

KitchenAid XAL95 T1U WOJH - Fridge/freezer combination - XAL95 T1U WOJH - Fridge/freezer combination EN (F088552) Istruzioni per l'Uso
KitchenAid XAL95 T1U WOJH - Fridge/freezer combination - XAL95 T1U WOJH - Fridge/freezer combination EN (F088552) Istruzioni per l'Uso
KitchenAid XAL95 T1U WOJH - Fridge/freezer combination - XAL95 T1U WOJH - Fridge/freezer combination EN (F088552) Istruzioni per l'Uso

Create successful ePaper yourself
Turn your PDF publications into a flip-book with our unique Google optimized e-Paper software.
Installation<br />
! Before placing your new appliance into o<strong>per</strong>ation please read<br />
these o<strong>per</strong>ating instructions carefully. They contain important<br />
information for safe use, for installation and for care of the<br />
appliance.<br />
! Please keep these o<strong>per</strong>ating instructions for future reference.<br />
Pass them on to possible new owners of the appliance.<br />
Positioning and connection<br />
Positioning<br />
1. Place the appliance in a well-ventilated humidity-free room.<br />
2. Do not obstruct the rear fan grills. The compressor and<br />
condenser give off heat and require good ventilation to o<strong>per</strong>ate<br />
correctly and save energy.<br />
3. Leave a space of at least 10 cm between the top part of the<br />
appliance and any furniture above it, and at least 5 cm between<br />
the sides and any furniture/side walls.<br />
4. Place the device far from heat sources (direct sun light, electric<br />
kitchen etc.)<br />
WARNING:<br />
THIS APPLIANCE MUST BE EARTHED.<br />
Replacing fuse covers:<br />
When replacing a faulty fuse, a 13amp ASTA approved fuse to BS<br />
1362 should always be used and the fuse cover re-fitted.<br />
If the fuse cover is lost, the plug must not be used until a<br />
replacement is obtained.<br />
Replacement fuse covers:<br />
If a replacement fuse cover is fitted, it must be of the correct<br />
colour as indicated by the coloured marking or the colour that is<br />
embossed in words on the base of the plug.<br />
Changing the plug:<br />
Removing the plug<br />
If your appliance has a non-rewireable moulded plug and you<br />
should wish to remove it to add a longer cable or to re-route the<br />
mains cable through partitions, units etc. please ensure that either:<br />
- The plug is replaced by a fused 13amp re-wireable plug<br />
bearing the BSI mark of approval.<br />
or<br />
- The mains cable is wired directly into a 13amp cable outlet,<br />
controlled by a switch (in compliance with BS 5733) which is<br />
accessible without moving the appliance.<br />
GB<br />
50mm<br />
Disposing of the plug<br />
Cut off and dispose of the supplied plug if it does not fit your socket.<br />
The cable should be cut as close as possible to the moulded plug.<br />
Remove the fuse.<br />
WARNING:<br />
To avoid a shock hazard do not insert the discarded plug<br />
into a socket anywhere else.<br />
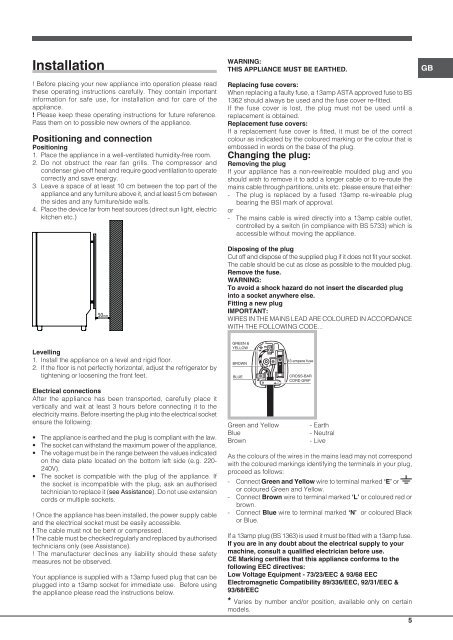
Fitting a new plug<br />
IMPORTANT:<br />
WIRES IN THE MAINS LEAD ARE COLOURED IN ACCORDANCE<br />
WITH THE FOLLOWING CODE...<br />
Levelling<br />
1. Install the appliance on a level and rigid floor.<br />
2. If the floor is not <strong>per</strong>fectly horizontal, adjust the refrigerator by<br />
tightening or loosening the front feet.<br />
Electrical connections<br />
After the appliance has been transported, carefully place it<br />
vertically and wait at least 3 hours before connecting it to the<br />
electricity mains. Before inserting the plug into the electrical socket<br />
ensure the following:<br />
• The appliance is earthed and the plug is compliant with the law.<br />
• The socket can withstand the maximum power of the appliance,<br />
• The voltage must be in the range between the values indicated<br />
on the data plate located on the bottom left side (e.g. 220-<br />
240V).<br />
• The socket is compatible with the plug of the appliance. If<br />
the socket is incompatible with the plug, ask an authorised<br />
technician to replace it (see Assistance). Do not use extension<br />
cords or multiple sockets.<br />
! Once the appliance has been installed, the power supply cable<br />
and the electrical socket must be easily accessible.<br />
! The cable must not be bent or compressed.<br />
! The cable must be checked regularly and replaced by authorised<br />
technicians only (see Assistance).<br />
! The manufacturer declines any liability should these safety<br />
measures not be observed.<br />
Your appliance is supplied with a 13amp fused plug that can be<br />
plugged into a 13amp socket for immediate use. Before using<br />
the appliance please read the instructions below.<br />
Green and Yellow<br />
Blue<br />
Brown<br />
- Earth<br />
- Neutral<br />
- Live<br />
As the colours of the wires in the mains lead may not correspond<br />
with the coloured markings identifying the terminals in your plug,<br />
proceed as follows:<br />
- Connect Green and Yellow wire to terminal marked ‘E’ or<br />
or coloured Green and Yellow.<br />
- Connect Brown wire to terminal marked ‘L’ or coloured red or<br />
brown.<br />
- Connect Blue wire to terminal marked ‘N’ or coloured Black<br />
or Blue.<br />
If a 13amp plug (BS 1363) is used it must be fitted with a 13amp fuse.<br />
If you are in any doubt about the electrical supply to your<br />
machine, consult a qualified electrician before use.<br />
CE Marking certifies that this appliance conforms to the<br />
following EEC directives:<br />
Low Voltage Equipment - 73/23/EEC & 93/68 EEC<br />
Electromagnetic Compatibility 89/336/EEC, 92/31/EEC &<br />
93/68/EEC<br />
* Varies by number and/or position, available only on certain<br />
models.<br />
5


