

KitchenAid 1 CH-3710 - Freezer - 1 CH-3710 - Freezer EN (850795618010) Istruzioni per l'Uso
KitchenAid 1 CH-3710 - Freezer - 1 CH-3710 - Freezer EN (850795618010) Istruzioni per l'Uso
KitchenAid 1 CH-3710 - Freezer - 1 CH-3710 - Freezer EN (850795618010) Istruzioni per l'Uso

Create successful ePaper yourself
Turn your PDF publications into a flip-book with our unique Google optimized e-Paper software.
10042000dGB.fm5 Page 16 Monday, February 14, 2005 9:14 AM<br />
INSTALLATION<br />
• Unpack the appliance and ensure that the<br />
various elements (plastic bags, polystyrene<br />
pieces, etc.) are well out of the reach of<br />
children.<br />
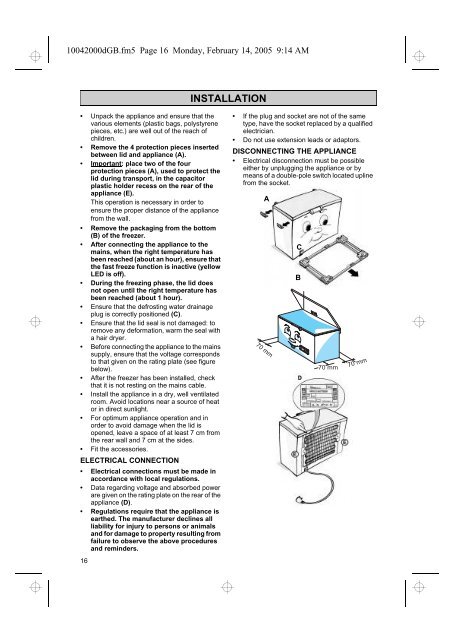
• Remove the 4 protection pieces inserted<br />
between lid and appliance (A).<br />
• Important: place two of the four<br />
protection pieces (A), used to protect the<br />
lid during transport, in the capacitor<br />
plastic holder recess on the rear of the<br />
appliance (E).<br />
This o<strong>per</strong>ation is necessary in order to<br />
ensure the pro<strong>per</strong> distance of the appliance<br />
from the wall.<br />
• Remove the packaging from the bottom<br />
(B) of the freezer.<br />
• After connecting the appliance to the<br />
mains, when the right tem<strong>per</strong>ature has<br />
been reached (about an hour), ensure that<br />
the fast freeze function is inactive (yellow<br />
LED is off).<br />
• During the freezing phase, the lid does<br />
not open until the right tem<strong>per</strong>ature has<br />
been reached (about 1 hour).<br />
• Ensure that the defrosting water drainage<br />
plug is correctly positioned (C).<br />
• Ensure that the lid seal is not damaged: to<br />
remove any deformation, warm the seal with<br />
a hair dryer.<br />
• Before connecting the appliance to the mains<br />
supply, ensure that the voltage corresponds<br />
to that given on the rating plate (see figure<br />
below).<br />
• After the freezer has been installed, check<br />
that it is not resting on the mains cable.<br />
• Install the appliance in a dry, well ventilated<br />
room. Avoid locations near a source of heat<br />
or in direct sunlight.<br />
• For optimum appliance o<strong>per</strong>ation and in<br />
order to avoid damage when the lid is<br />
opened, leave a space of at least 7 cm from<br />
the rear wall and 7 cm at the sides.<br />
• Fit the accessories.<br />
ELECTRICAL CONNECTION<br />
• Electrical connections must be made in<br />
accordance with local regulations.<br />
• Data regarding voltage and absorbed power<br />
are given on the rating plate on the rear of the<br />
appliance (D).<br />
• Regulations require that the appliance is<br />
earthed. The manufacturer declines all<br />
liability for injury to <strong>per</strong>sons or animals<br />
and for damage to pro<strong>per</strong>ty resulting from<br />
failure to observe the above procedures<br />
and reminders.<br />
16<br />
• If the plug and socket are not of the same<br />
type, have the socket replaced by a qualified<br />
electrician.<br />
• Do not use extension leads or adaptors.<br />
DISCONNECTING THE APPLIANCE<br />
• Electrical disconnection must be possible<br />
either by unplugging the appliance or by<br />
means of a double-pole switch located upline<br />
from the socket.<br />
A<br />
70 mm<br />
C<br />
B<br />
70 mm<br />
70 mm


