

KitchenAid KOBLENZ 2480 - KOBLENZ 2480 EN (858365720100) Istruzioni per l'Uso
KitchenAid KOBLENZ 2480 - KOBLENZ 2480 EN (858365720100) Istruzioni per l'Uso
KitchenAid KOBLENZ 2480 - KOBLENZ 2480 EN (858365720100) Istruzioni per l'Uso

Create successful ePaper yourself
Turn your PDF publications into a flip-book with our unique Google optimized e-Paper software.
DRAINING RESIDUAL WATER/<br />
CLEANING THE FILTER<br />
We recommend that you check and clean the filter<br />
regularly, at least two or three times a year, especially:<br />
• If the “Clean pump” indication lights up.<br />
• If the appliance is not draining pro<strong>per</strong>ly or if it fails to<br />
<strong>per</strong>form spin cycles.<br />
If the washing machine stands in a room prone to frost, you<br />
have to drain residual water after each wash to avoid damages.<br />
IMPORTANT: make sure the water has cooled before<br />
draining the appliance.<br />
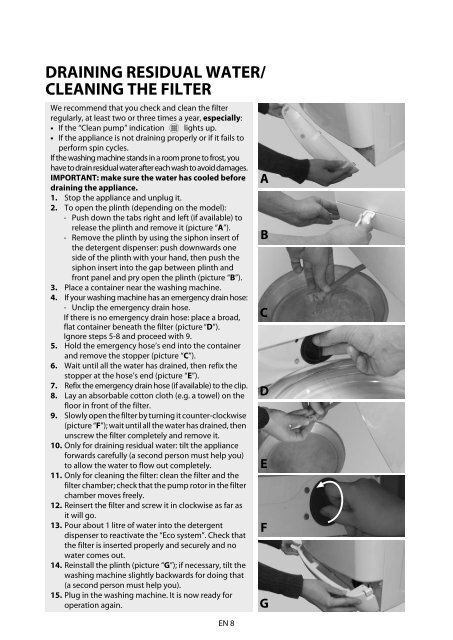
1. Stop the appliance and unplug it.<br />
2. To open the plinth (depending on the model):<br />
- Push down the tabs right and left (if available) to<br />
release the plinth and remove it (picture “A”).<br />
- Remove the plinth by using the siphon insert of<br />
the detergent dispenser: push downwards one<br />
side of the plinth with your hand, then push the<br />
siphon insert into the gap between plinth and<br />
front panel and pry open the plinth (picture “B”).<br />
3. Place a container near the washing machine.<br />
4. If your washing machine has an emergency drain hose:<br />
- Unclip the emergency drain hose.<br />
If there is no emergency drain hose: place a broad,<br />
flat container beneath the filter (picture “D”).<br />
Ignore steps 5-8 and proceed with 9.<br />
5. Hold the emergency hose’s end into the container<br />
and remove the stop<strong>per</strong> (picture “C”).<br />
6. Wait until all the water has drained, then refix the<br />
stop<strong>per</strong> at the hose’s end (picture “E”).<br />
7. Refix the emergency drain hose (if available) to the clip.<br />
8. Lay an absorbable cotton cloth (e.g. a towel) on the<br />
floor in front of the filter.<br />
9. Slowly open the filter by turning it counter-clockwise<br />
(picture “F”); wait until all the water has drained, then<br />
unscrew the filter completely and remove it.<br />
10. Only for draining residual water: tilt the appliance<br />
forwards carefully (a second <strong>per</strong>son must help you)<br />
to allow the water to flow out completely.<br />
11. Only for cleaning the filter: clean the filter and the<br />
filter chamber; check that the pump rotor in the filter<br />
chamber moves freely.<br />
12. Reinsert the filter and screw it in clockwise as far as<br />
it will go.<br />
13. Pour about 1 litre of water into the detergent<br />
dispenser to reactivate the “Eco system”. Check that<br />
the filter is inserted pro<strong>per</strong>ly and securely and no<br />
water comes out.<br />
14. Reinstall the plinth (picture “G”); if necessary, tilt the<br />
washing machine slightly backwards for doing that<br />
(a second <strong>per</strong>son must help you).<br />
15. Plug in the washing machine. It is now ready for<br />
o<strong>per</strong>ation again.<br />
<strong>EN</strong> 8<br />
A<br />
B<br />
C<br />
D<br />
E<br />
F<br />
G


