

KitchenAid OVN 908 W - OVN 908 W IT (857923201010) Istruzioni per l'Uso
KitchenAid OVN 908 W - OVN 908 W IT (857923201010) Istruzioni per l'Uso
KitchenAid OVN 908 W - OVN 908 W IT (857923201010) Istruzioni per l'Uso

Create successful ePaper yourself
Turn your PDF publications into a flip-book with our unique Google optimized e-Paper software.
ENGLISH 8<br />
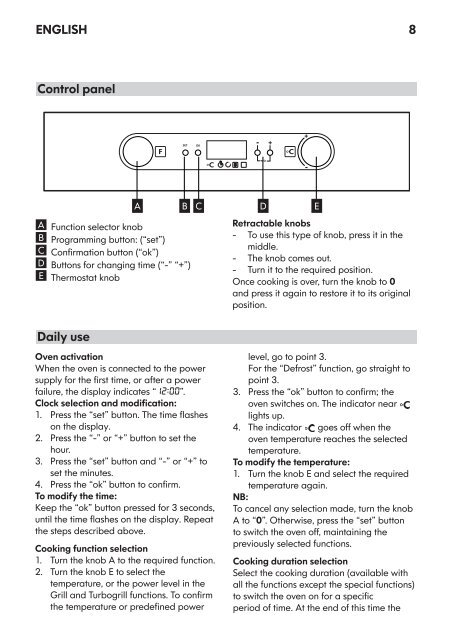
Control panel<br />
A Function selector knob<br />
B Programming button: (“set”)<br />
C Confirmation button (“ok”)<br />
D Buttons for changing time (“-” “+”)<br />
E Thermostat knob<br />
A B C D E<br />
Retractable knobs<br />
-- To use this type of knob, press it in the<br />
middle.<br />
-- The knob comes out.<br />
-- Turn it to the required position.<br />
Once cooking is over, turn the knob to 0<br />
and press it again to restore it to its original<br />
position.<br />
Daily use<br />
Oven activation<br />
When the oven is connected to the power<br />
supply for the first time, or after a power<br />
failure, the display indicates “12:00”.<br />
Clock selection and modification:<br />
1. Press the “set” button. The time flashes<br />
on the display.<br />
2. Press the “-” or “+” button to set the<br />
hour.<br />
3. Press the “set” button and “-” or “+” to<br />
set the minutes.<br />
4. Press the “ok” button to confirm.<br />
To modify the time:<br />
Keep the “ok” button pressed for 3 seconds,<br />
until the time flashes on the display. Repeat<br />
the steps described above.<br />
Cooking function selection<br />
1. Turn the knob A to the required function.<br />
2. Turn the knob E to select the<br />
tem<strong>per</strong>ature, or the power level in the<br />
Grill and Turbogrill functions. To confirm<br />
the tem<strong>per</strong>ature or predefined power<br />
level, go to point 3.<br />
For the “Defrost” function, go straight to<br />
point 3.<br />
3. Press the “ok” button to confirm; the<br />
oven switches on. The indicator near<br />
lights up.<br />
4. The indicator goes off when the<br />
oven tem<strong>per</strong>ature reaches the selected<br />
tem<strong>per</strong>ature.<br />
To modify the tem<strong>per</strong>ature:<br />
1. Turn the knob E and select the required<br />
tem<strong>per</strong>ature again.<br />
NB:<br />
To cancel any selection made, turn the knob<br />
A to “0”. Otherwise, press the “set” button<br />
to switch the oven off, maintaining the<br />
previously selected functions.<br />
Cooking duration selection<br />
Select the cooking duration (available with<br />
all the functions except the special functions)<br />
to switch the oven on for a specific<br />
<strong>per</strong>iod of time. At the end of this time the


