

KitchenAid OAKZ9 142 P IX - OAKZ9 142 P IX EN (859991544400) Use and care guide
KitchenAid OAKZ9 142 P IX - OAKZ9 142 P IX EN (859991544400) Use and care guide
KitchenAid OAKZ9 142 P IX - OAKZ9 142 P IX EN (859991544400) Use and care guide

You also want an ePaper? Increase the reach of your titles
YUMPU automatically turns print PDFs into web optimized ePapers that Google loves.
CLEANING AND MAINT<strong>EN</strong>ANCE<br />
Make sure that the oven has<br />
cooled down before carrying out<br />
any maintenance or cleaning.<br />
Do not use steam cleaners.<br />
Do not use wire wool, abrasive<br />
scourers or abrasive/corrosive<br />
cleaning agents, as these could<br />
damage the surfaces of the<br />
appliance.<br />
Wear protective gloves.<br />
The oven must be disconnected<br />
from the mains before carrying<br />
out any kind of maintenance work.<br />
EXTERIOR SURFACES<br />
• Clean the surfaces with a damp microfibre cloth.<br />
If they are very dirty, add a few drops of pH-neutral<br />
detergent. Finish off with a dry cloth.<br />
• Do not use corrosive or abrasive detergents. If<br />
any of these products inadvertently comes into<br />
contact with the surfaces of the appliance, clean<br />
immediately with a damp microfibre cloth.<br />
INTERIOR SURFACES<br />
• After every use, leave the oven to cool <strong>and</strong> then<br />
clean it, preferably while it is still warm, to remove<br />
any deposits or stains caused by food residues To<br />
dry any condensation that has formed as a result<br />
of cooking foods with a high water content, let the<br />
oven to cool completely <strong>and</strong> then wipe it with a<br />
cloth or sponge.<br />
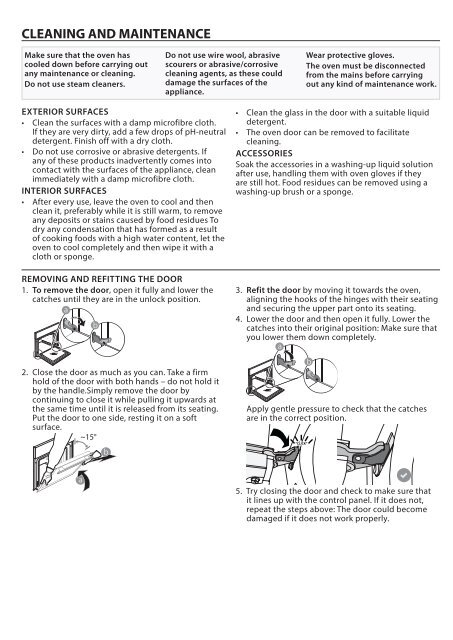
REMOVING AND REFITTING THE DOOR<br />
1. To remove the door, open it fully <strong>and</strong> lower the<br />
catches until they are in the unlock position.<br />
a<br />
2.<br />
b<br />
Close the door as much as you can. Take a firm<br />
hold of the door with both h<strong>and</strong>s – do not hold it<br />
by the h<strong>and</strong>le.Simply remove the door by<br />
continuing to close it while pulling it upwards at<br />
the same time until it is released from its seating.<br />
Put the door to one side, resting it on a soft<br />
surface.<br />
~15°<br />
b<br />
• Clean the glass in the door with a suitable liquid<br />
detergent.<br />
• The oven door can be removed to facilitate<br />
cleaning.<br />
ACCESSORIES<br />
Soak the accessories in a washing-up liquid solution<br />
after use, h<strong>and</strong>ling them with oven gloves if they<br />
are still hot. Food residues can be removed using a<br />
washing-up brush or a sponge.<br />
3. Refit the door by moving it towards the oven,<br />
aligning the hooks of the hinges with their seating<br />
<strong>and</strong> securing the upper part onto its seating.<br />
4. Lower the door <strong>and</strong> then open it fully. Lower the<br />
catches into their original position: Make sure that<br />
you lower them down completely.<br />
a<br />
b<br />
Apply gentle pressure to check that the catches<br />
are in the correct position.<br />
“CLICK”<br />
a<br />
5.<br />
Try closing the door <strong>and</strong> check to make sure that<br />
it lines up with the control panel. If it does not,<br />
repeat the steps above: The door could become<br />
damaged if it does not work properly.


