

KitchenAid 70156192 - 70156192 FR (858777316770) Istruzioni per l'Uso
KitchenAid 70156192 - 70156192 FR (858777316770) Istruzioni per l'Uso
KitchenAid 70156192 - 70156192 FR (858777316770) Istruzioni per l'Uso

You also want an ePaper? Increase the reach of your titles
YUMPU automatically turns print PDFs into web optimized ePapers that Google loves.
ENGLISH 9<br />
Daily use<br />
Start protection / key lock<br />
This automatic safety function is activated<br />
one minute after the oven has returned to<br />
“stand by mode“. (The oven is in “stand by”<br />
when the 24-hour clock is displayed or if the<br />
clock has not been set, when the display is<br />
blank).<br />
The door must be opened and closed e.g.<br />
putting food into it, before the safety lock is<br />
released. Else the display will show “DOOR”.<br />
Cooling down<br />
When a function is finished, the oven may<br />
carry out a cooling procedure. This is<br />
normal.<br />
After this procedure the oven switches off<br />
automatically.<br />
The cooling procedure can be interrupted<br />
without any harm to the oven by opening<br />
the door.<br />
Kitchen timer<br />
Use this function when you need a kitchen<br />
timer to measure exact time for various<br />
purposes such as cooking eggs or letting the<br />
dough rise before baking etc.<br />
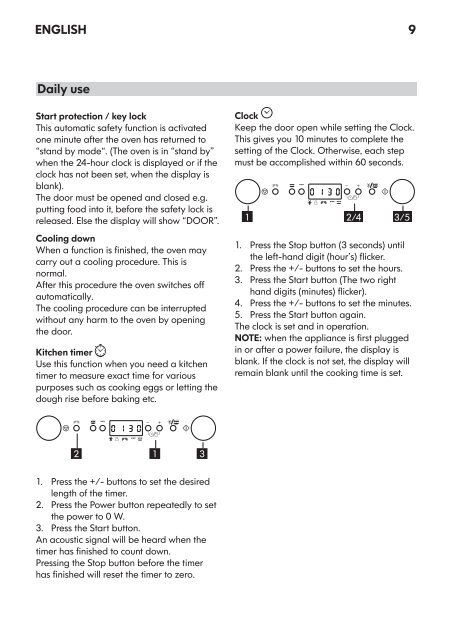
Clock<br />
Keep the door open while setting the Clock.<br />
This gives you 10 minutes to complete the<br />
setting of the Clock. Otherwise, each step<br />
must be accomplished within 60 seconds.<br />
1<br />
2/4<br />
3/5<br />
1. Press the Stop button (3 seconds) until<br />
the left-hand digit (hour’s) flicker.<br />
2. Press the +/- buttons to set the hours.<br />
3. Press the Start button (The two right<br />
hand digits (minutes) flicker).<br />
4. Press the +/- buttons to set the minutes.<br />
5. Press the Start button again.<br />
The clock is set and in o<strong>per</strong>ation.<br />
NOTE: when the appliance is first plugged<br />
in or after a power failure, the display is<br />
blank. If the clock is not set, the display will<br />
remain blank until the cooking time is set.<br />
2<br />
1<br />
3<br />
1. Press the +/- buttons to set the desired<br />
length of the timer.<br />
2. Press the Power button repeatedly to set<br />
the power to 0 W.<br />
3. Press the Start button.<br />
An acoustic signal will be heard when the<br />
timer has finished to count down.<br />
Pressing the Stop button before the timer<br />
has finished will reset the timer to zero.


