
Create successful ePaper yourself
Turn your PDF publications into a flip-book with our unique Google optimized e-Paper software.
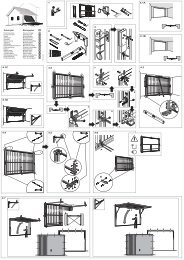
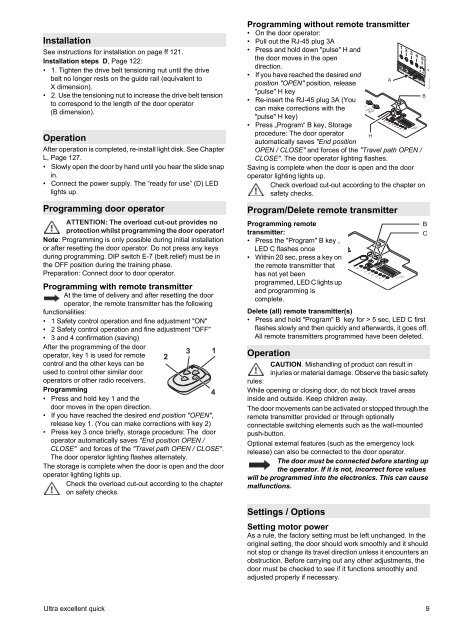
Installation<br />
See instructions for installation on page ff 121.<br />
Installation steps D, Page 122:<br />
• 1. Tighten the drive belt tensioning nut until the drive<br />
belt no longer rests on the guide rail (equivalent to<br />
X dimension).<br />
• 2. Use the tensioning nut to increase the drive belt tension<br />
to correspond to the length of the door operator<br />
(B dimension).<br />
Operation<br />
After operation is completed, re-install light disk. See Chapter<br />
L, Page 127.<br />
• Slowly open the door by hand until you hear the slide snap<br />
in.<br />
• Connect the power supply. The “ready for use” (D) LED<br />
lights up.<br />
ATTENTION: The overload cut-out provides no<br />
protection whilst programming the door operator!<br />
Note: Programming is only possible during initial installation<br />
or after resetting the door operator. Do not press any keys<br />
during programming. DIP switch E-7 (belt relief) must be in<br />
the OFF position during the training phase.<br />
Preparation: Connect door to door operator.<br />
Programming with remote transmitter<br />
At the time of delivery and after resetting the door<br />
operator, the remote transmitter has the following<br />
functionalities:<br />
• 1 Safety control operation and fine adjustment "ON"<br />
• 2 Safety control operation and fine adjustment "OFF"<br />
• 3 and 4 confirmation (saving)<br />
After the programming of the door<br />
operator, key 1 is used for remote<br />
control and the other keys can be<br />
used to control other similar door<br />
operators or other radio receivers.<br />
Programming<br />
• Press and hold key 1 and the<br />
door moves in the open direction.<br />
• If you have reached the desired end position "OPEN",<br />
release key 1. (You can make corrections with key 2)<br />
• Press key 3 once briefly, storage procedure: The door<br />
operator automatically saves "End position OPEN /<br />
CLOSE" and forces of the "Travel path OPEN / CLOSE".<br />
The door operator lighting flashes alternately.<br />
The storage is complete when the door is open and the door<br />
operator lighting lights up.<br />
Check the overload cut-out according to the chapter<br />
on safety checks.<br />
Programming without remote transmitter<br />
• On the door operator:<br />
• Pull out the RJ-45 plug 3A<br />
• Press and hold down "pulse" H and<br />
the door moves in the open<br />
direction.<br />
• If you have reached the desired end<br />
position "OPEN" position, release<br />
"pulse" H key<br />
A<br />
• Re-insert the RJ-45 plug 3A (You<br />
can make corrections with the<br />
"pulse" H key)<br />
• Press „Program“ B key, Storage<br />
procedure: The door operator<br />
H<br />
automatically saves "End position<br />
OPEN / CLOSE" and forces of the "Travel path OPEN /<br />
CLOSE". The door operator lighting flashes.<br />
Saving is complete when the door is open and the door<br />
operator lighting lights up.<br />
Check overload cut-out according to the chapter on<br />
safety checks.<br />
Programming door operator Program/Delete remote transmitter<br />
Programming remote<br />
transmitter:<br />
• Press the "Program" B key ,<br />
LED C flashes once<br />
• Within 20 sec, press a key on<br />
the remote transmitter that<br />
has not yet been<br />
programmed, LED C lights up<br />
and programming is<br />
complete.<br />
Delete (all) remote transmitter(s)<br />
• Press and hold "Program" B key for > 5 sec, LED C first<br />
flashes slowly and then quickly and afterwards, it goes off.<br />
All remote transmitters programmed have been deleted.<br />
Operation<br />
CAUTION. Mishandling of product can result in<br />
injuries or material damage. Observe the basic safety<br />
rules:<br />
While opening or closing door, do not block travel areas<br />
inside and outside. Keep children away.<br />
The door movements can be activated or stopped through the<br />
remote transmitter provided or through optionally<br />
connectable switching elements such as the wall-mounted<br />
push-button.<br />
Optional external features (such as the emergency lock<br />
release) can also be connected to the door operator.<br />
The door must be connected before starting up<br />
the operator. If it is not, incorrect force values<br />
will be programmed into the electronics. This can cause<br />
malfunctions.<br />
Settings / Options<br />
F1 F2 1<br />
F1 F2 1<br />
8 7 6 5 4 3 2<br />
8 7 6 5 4 3 2<br />
Setting motor power<br />
As a rule, the factory setting must be left unchanged. In the<br />
original setting, the door should work smoothly and it should<br />
not stop or change its travel direction unless it encounters an<br />
obstruction. Before carrying out any other adjustments, the<br />
door must be checked to see if it functions smoothly and<br />
adjusted properly if necessary.<br />
Ultra excellent quick 9<br />
P<br />
1 2 3<br />
P<br />
4 5<br />
AE<br />
B<br />
B<br />
C