

KitchenAid OVN 948 S - Oven - OVN 948 S - Oven EN (857923216000) Scheda programmi
KitchenAid OVN 948 S - Oven - OVN 948 S - Oven EN (857923216000) Scheda programmi
KitchenAid OVN 948 S - Oven - OVN 948 S - Oven EN (857923216000) Scheda programmi

You also want an ePaper? Increase the reach of your titles
YUMPU automatically turns print PDFs into web optimized ePapers that Google loves.
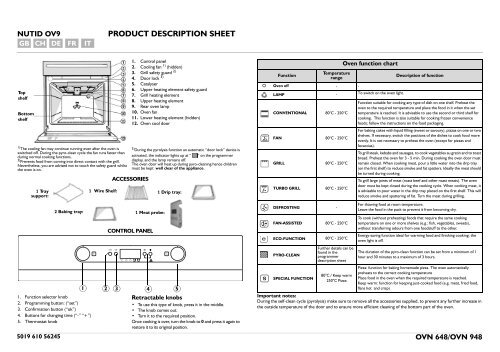
NUTID OV9<br />
GB CH DE FR<br />
IT<br />
PRODUCT DESCRIPTION SHEET<br />
Top<br />
shelf<br />
Bottom<br />
shelf<br />
1) The cooling fan may continue running even after the oven is<br />
switched off. During the pyro-clean cycle the fan runs faster than<br />
during normal cooking functions.<br />
2) Prevents food from coming into direct contact with the grill.<br />
Nevertheless, you are advised not to touch the safety guard whilst<br />
the oven is on.<br />
1 Tray<br />
support:<br />
1. Control panel<br />
2. Cooling fan 1) (hidden)<br />
3. Grill safety guard 2)<br />
4. Door lock 3)<br />
5. Catalyser<br />
6. Upper heating element safety guard<br />
7. Grill heating element<br />
8. Upper heating element<br />
9. Rear oven lamp<br />
10. <strong>Oven</strong> fan<br />
11. Lower heating element (hidden)<br />
12. <strong>Oven</strong> cool door<br />
3) During the pyrolysis function an automatic “door lock” device is<br />
activated, the indicator lights up at “ ” on the programmer<br />
display, and the lamp remains off.<br />
The oven door will heat up during pyro-cleaning hence children<br />
must be kept well clear of the appliance.<br />
ACCESSORIES<br />
1 Wire Shelf: 1 Drip tray:<br />
Function<br />
Temperature<br />
range<br />
O <strong>Oven</strong> off - -<br />
<strong>Oven</strong> function chart<br />
LAMP - To switch on the oven light.<br />
CONV<strong>EN</strong>TIONAL 80°C - 250°C<br />
FAN 80°C - 250°C<br />
GRILL 80°C - 250°C<br />
TURBO GRILL 80°C - 250°C<br />
Description of function<br />
Function suitable for cooking any type of dish on one shelf. Preheat the<br />
oven to the required temperature and place the food in it when the set<br />
temperature is reached. It is advisable to use the second or third shelf for<br />
cooking. This function is also suitable for cooking frozen convenience<br />
foods; follow the instructions on the food packaging.<br />
For baking cakes with liquid filling (sweet or savoury), pizzas on one or two<br />
shelves. If necessary, switch the positions of the dishes to cook food more<br />
evenly. It is not necessary to preheat the oven (except for pizzas and<br />
focaccias).<br />
To grill steak, kebabs and sausages, to cook vegetables au gratin and to toast<br />
bread. Preheat the oven for 3 - 5 min. During cooking the oven door must<br />
remain closed. When cooking meat, pour a little water into the drip tray<br />
(on the first shelf) to reduce smoke and fat spatters. Ideally the meat should<br />
be turned during cooking.<br />
To grill large joints of meat (roast beef and other roast meats). The oven<br />
door must be kept closed during the cooking cycle. When cooking meat, it<br />
is advisable to pour water in the drip tray placed on the first shelf. This will<br />
reduce smoke and spattering of fat. Turn the meat during grilling.<br />
2 Baking tray:<br />
1. Function selector knob<br />
2. Programming button: (“set”)<br />
3. Confirmation button (“ok”)<br />
4. Buttons for changing time (“-” “+”)<br />
5. Thermostat knob<br />
1 Meat probe:<br />
CONTROL PANEL<br />
1 2 3 4 5<br />
Retractable knobs<br />
• To use this type of knob, press it in the middle.<br />
• The knob comes out.<br />
• Turn it to the required position.<br />
Once cooking is over, turn the knob to 0 and press it again to<br />
restore it to its original position.<br />
DEFROSTING -<br />
FAN-ASSISTED 80°C - 250°C<br />
ECO-FUNCTION 80°C - 250°C<br />
PYRO-CLEAN<br />
SPECIAL FUNCTION<br />
Further details can be<br />
found in the<br />
programmer<br />
description sheet<br />
80°C / Keep warm<br />
250°C Pizza<br />
For thawing food at room temperature.<br />
Leave the food in the pack to prevent it from becoming dry.<br />
To cook (without preheating) foods that require the same cooking<br />
temperature on one or more shelves (e.g.: fish, vegetables, sweets),<br />
without transferring odours from one foodstuff to the other.<br />
Energy-saving function ideal for warming food and finishing cooking; the<br />
oven light is off.<br />
The duration of the pyro-clean function can be set from a minimum of 1<br />
hour and 30 minutes to a maximum of 3 hours.<br />
Pizza: function for baking homemade pizza. The oven automatically<br />
preheats to the correct cooking temperature<br />
Place food in the oven when the required temperature is reached.<br />
Keep warm: function for keeping just-cooked food (e.g. meat, fried food,<br />
flans hot and crisp)<br />
Important notes:<br />
During the self-clean cycle (pyrolysis) make sure to remove all the accessories supplied, to prevent any further increase in<br />
the outside temperature of the door and to ensure more efficient cleaning of the bottom part of the oven.<br />
5019 610 56245 <strong>OVN</strong> 648/<strong>OVN</strong> <strong>948</strong>
COOKING TABLES<br />
RECIPE FUNCTION PREHEATING SHELF TEMP TIME ACCESSORIES AND<br />
(from bottom) (°C) (min)<br />
NOTES<br />
Leavened cakes X 2 160-180 35 - 55 wire shelf + cake tin<br />
Biscuits/Tartlets X 3 170 - 180 15 - 40 baking tray<br />
Choux buns X 3 180 30 - 40 baking tray<br />
Vols-au-vent/Puff pastry<br />
X 3 180 - 200 20 - 30 baking tray<br />
crackers<br />
Meringues X 3 90 120 - 130 baking tray<br />
Lamb/Veal/Beef/Pork X 2 190 - 200 90 - 110 drip tray or wire shelf + pyrex<br />
dish<br />
Chicken/Rabbit/Duck X 2 190 - 200 65 - 85 drip tray or wire shelf + pyrex<br />
dish<br />
Turkey/Goose X 2 190 - 200 140 - 180 drip tray or wire shelf + pyrex<br />
dish<br />
Baked fish/en papillote (fillet,<br />
whole)<br />
X 2 180 - 200 50 - 60 drip tray or wire shelf + pyrex<br />
dish<br />
Lasagne/Baked pasta/<br />
X 2 190 - 200 45 - 55 wire shelf + pyrex dish<br />
Cannelloni/Flans<br />
Bread / Focaccia X 2 190 - 230 15 - 50 drip tray or baking tray<br />
Pizza X 2 auto 10-15 drip tray or baking tray<br />
Toast X 4 250 2-5 wire shelf<br />
Choux buns - 1 & 3 180 35 - 45 shelf 3 baking tray<br />
shelf 1 drip tray<br />
Vols-au-vent/Puff pastry<br />
crackers<br />
- 1 & 3 180 - 200 20 - 40 shelf 3 baking tray<br />
shelf 1 drip tray<br />
Lasagne & Meat - 1 & 3 200 50 - 100 shelf 3 wire tray + pyrex dish<br />
shelf 1 drip tray<br />
Meat & Potatoes - 1 & 3 200 45 - 100 shelf 3 wire tray + pyrex dish<br />
shelf 1 drip tray<br />
Fish & Vegetables - 1 & 3 180 30 - 50 shelf 3 wire tray + pyrex dish<br />
shelf 1 drip tray<br />
Meringues - 1 & 3 90 120 - 150 shelf 3 baking tray<br />
shelf 1 drip tray<br />
N.B: GRILL, turn meats halfway through cooking time.<br />
Vegetable gratin X 3 250 5 - 15 wire shelf + pyrex dish<br />
Grilled fish fillets and steaks X 3 200 - 225 20 - 30 wire shelf + pyrex dish<br />
Sausages/Kebabs/Spare ribs/<br />
Hamburgers<br />
Filled pies (cheesecake,<br />
strudel, apple pie)<br />
Meat & potato pies<br />
(vegetable pie, quiche<br />
lorraine)<br />
Stuffed vegetables<br />
(tomatoes, peppers,<br />
courgettes, aubergines)<br />
Meat & potato pies<br />
(vegetable pie, quiche<br />
lorraine)<br />
X 4 250 20 - 30 grill + drip tray with water on<br />
1st shelf, turn halfway through<br />
cooking<br />
X 2 180 - 200 50 -60 drip tray or wire shelf + pyrex<br />
dish<br />
X 2 180 - 200 35 - 55 wire shelf + cake tin<br />
X 2 180 - 200 40 - 60 wire shelf + pyrex dish<br />
X 1 & 3 180 - 190 45 - 55 wire shelf + pyrex dish<br />
Switch shelves halfway<br />
through cooking<br />
Pizzas/Focaccias X 1 & 3 230 - 250 12 - 30 baking tray + drip tray<br />
Switch shelves halfway<br />
through cooking<br />
Roast chicken - 2 200 55 - 65 grill + drip tray with water on<br />
1st shelf<br />
Roast potatoes - 3 200 35 - 55 drip tray<br />
Roast Beef - rare - 3 200 20 - 40 grill + drip tray with water on<br />
1st shelf<br />
Leg of lamb/Knuckle - 3 200 55 - 70 grill + drip tray<br />
Biscuits/Tartlets - 1 & 3 160 - 170 20 -40 shelf 3 baking tray<br />
shelf 1 drip tray
GB INSTRUCTIONS FOR USING THE ELECTRONIC TIMER NUTID<br />
Electronic timer<br />
1 2 3 4<br />
5<br />
Displays<br />
Function selector knob<br />
Setting button: (“set”)<br />
Confirmation button (“ok”)<br />
Buttons for changing time (“-” “+”)<br />
Thermostat knob<br />
Starting the oven<br />
When the oven is connected to the power supply for the first time, or reconnected after a power failure, the display indicates<br />
“12.00”.<br />
Selecting and changing the clock time:<br />
1. Press “set”. The time of day flashes on the display.<br />
2. Press button “-” or “+” to set the hour.<br />
3. Press “set” and “-” or “+” to set the minutes.<br />
4. Press “ok” to confirm.<br />
To change the time:<br />
Press and hold “ok” for 3 seconds. until the time flashes on the display. Repeat the steps described above.<br />
Select cooking function:<br />
1. Turn knob to the chosen function.<br />
2. Turn knob to select the temperature.<br />
(NB: during the “defrost” function, the temperature shown on the display is for guidance only and does not mean the oven<br />
is heating up: the oven temperature remains comparable to room temperature, as per the description of the function in the<br />
product description sheet).<br />
3. Press “ok” to confirm; the oven will switch on. The indicator next to switches on.<br />
4. The indicator switches off when the oven reaches the selected temperature.<br />
To change the temperature:<br />
1. Turn knob and select the desired temperature.<br />
Important notes:<br />
To cancel any selection, turn knob to “0”. Alternatively, press “set” to switch the oven off, maintaining the previously<br />
selected functions.<br />
Selecting the cooking time:<br />
Select the cooking time (available with any function, except for the special functions) to turn the oven on for a specified period<br />
of time. At the end of the specified time the oven will switch off automatically. The maximum programmed cooking time is 6<br />
hours.<br />
1. Set the function and the temperature (see chapter: “Selecting the cooking function”) up to point 2 without confirming by<br />
pressing “ok”.<br />
2. Press “set” (the indicator on the display lights up next to the cooking time symbol ) and, within 8 minutes, select the<br />
desired cooking time using buttons “-” o “+”.<br />
3. Confirm the selection by pressing “ok”; the oven switches on and the display shows the residual cooking time.<br />
4. To change the previous temperature setting, turn knob .<br />
To return to the residual cooking time, wait 5 seconds.<br />
Appearance of on the display:<br />
Once the set time has elapsed, an acoustic signal is heard and appears on the display.<br />
The oven will switch off automatically.<br />
To change the cooking time, use button “-” or “-” “+”. Return to point 3 chapter “Selecting the cooking time”.<br />
1. Turn knob to “0”<br />
The time of day appears again on the display.<br />
Selecting the end of cooking time<br />
Using this function it is possible to preset the end of cooking time. The maximum programmed cooking time is 23 hours and<br />
59 minutes.<br />
1. Proceed as described in points 1 and 2 chapter “Selecting the cooking time”<br />
2. Press “set” to set the end of cooking time: the indicator next to the symbol lights up .<br />
3. Set the end of cooking time using button “-” or “-” “+”.<br />
4. Press “ok” to confirm the end of cooking time.<br />
The oven will turn on automatically at the end of cooking time minus cooking time: the indicators on the display above the<br />
symbols will light up.<br />
Special functions<br />
Turn knob to function , lights up next to the symbol .<br />
Keep warm<br />
This maintains a constant temperature of 80°C in the oven.<br />
1. Turn knob to the symbol<br />
2. Press “ok” to confirm.<br />
3. The indicator next to on the control panel switches off when a temperature of 80°C is reached, a factory-set time of 5<br />
minutes flashes on the display and an acoustic signal sounds.<br />
4. Place the food in the oven.<br />
5. To change the preset time, use button “+” or “+” “-”.<br />
6. Press “ok” to confirm.<br />
7. Once the set time has elapsed, the oven switches off, an acoustic signal is heard and appears on the display.<br />
Pizza<br />
This operates at a fixed temperature of 250°C and is ideal for baking pizzas.<br />
1. Turn knob to the symbol .<br />
2. Press “ok” to confirm.<br />
3. The indicator next to on the control panel switches off when a temperature of 250°C is reached, a factory-set time of<br />
12 minutes flashes on the display and an acoustic signal is heard.<br />
4. Place the food in the oven.<br />
5. To change the preset time, use button “+” or “+” “-”.<br />
6. Press “ok” to confirm.<br />
7. Once the set time has elapsed, the oven switches off, an acoustic signal is heard and appears on the display.<br />
Pyrolysis function<br />
1. Turn knob to the self-cleaning Pyrolysis function, and for 2 seconds the display shows clean Cln, the selector<br />
automatically sets a minimum time of 1:30.<br />
2. Use buttons “+” “-”, to change duration of the self-clean cycle. The maximum programme time is 3 hours.<br />
The end of pyrolysis time can be set as follows:<br />
1. press “set” to set the end of pyrolysis time.<br />
The indicator next to the symbol lights up.<br />
2. Set the end of pyrolysis time using buttons “+” “-”.<br />
3. Press “ok” to confirm the end of pyrolysis time.<br />
The oven will automatically turn on at the end of pyrolysis time minus pyrolysis time (set previously).<br />
The indicators above the symbols light up.<br />
4. To increase pyrolysis time, press “set” and then set the new pyrolysis time using the button “+”.<br />
5. Confirm by pressing the “ok” button”.<br />
When the set time has elapsed, an acoustic signal is heard and the display shows .<br />
6. Press “ok” to stop the acoustic signal.<br />
7. Turn the knob to “0”, the time of day appears again on the display.
GB INSTRUCTIONS FOR USING THE ELECTRONIC TIMER NUTID<br />
Timer<br />
The timer can only be set when the oven is not in use and allows a maximum setting of 6 hours.<br />
To set the timer:<br />
1. Leave knob at “0”. The display shows the time of the day.<br />
2. Press “set”. The indicator next to the symbol lights up .<br />
Use buttons “-” or “+” to set the desired time.<br />
3. Press “ok” to confirm the selection.<br />
Once the set time has elapsed:<br />
An acoustic signal sounds and flashes on the display .<br />
Press “ok”: The acoustic signal stops. The time of day appears again on the display.<br />
Childproof lock :<br />
1. With knobs and set to “0”, press buttons “-” and “+” at the same time for 3 sec.<br />
NB:<br />
Activation of the LOCK function is signalled by an acoustic signal, whereas the symbol will appear on the display.<br />
When set, the display will continue to show the time.<br />
1. The oven functions will not operate while the childproof lock is activated.<br />
2. To deactivate the lock, repeat the sequence described in point 1.


