

lpg28257

You also want an ePaper? Increase the reach of your titles
YUMPU automatically turns print PDFs into web optimized ePapers that Google loves.
installation<br />
8<br />
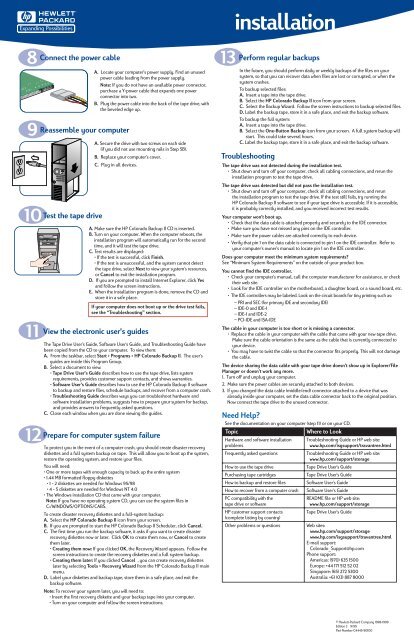
13 Connect the power cable<br />
A. Locate your computer’s power supply. Find an unused<br />
power cable leading from the power supply.<br />
Note: If you do not have an available power connector,<br />
purchase a Y-power cable that expands one power<br />
connector into two.<br />
B. Plug the power cable into the back of the tape drive, with<br />
the beveled edge up.<br />
9 Reassemble your computer<br />
A. Secure the drive with two screws on each side<br />
(if you did not use mounting rails in Step 5B).<br />
B. Replace your computer's cover.<br />
C. Plug in all devices.<br />
10 Test the tape drive<br />
A. Make sure the HP Colorado Backup II CD is inserted.<br />
B. Turn on your computer. When the computer reboots, the<br />
installation program will automatically run for the second<br />
time, and it will test the tape drive.<br />
C. Test results are displayed:<br />
• If the test is successful, click Finish.<br />
• If the test is unsuccessful, and the system cannot detect<br />
the tape drive, select Next to view your system's resources,<br />
or Cancel to exit the installation program.<br />
D. If you are prompted to install Internet Explorer, click Yes<br />
and follow the screen instructions.<br />
E. When the installation program is done, remove the CD and<br />
store it in a safe place.<br />
If your computer does not boot up or the drive test fails,<br />
see the “Troubleshooting” section.<br />
11 View the electronic user's guides<br />
The Tape Drive User's Guide, Software User's Guide, and Troubleshooting Guide have<br />
been copied from the CD to your computer. To view them:<br />
A. From the taskbar, select Start > Programs > HP Colorado Backup II. The user's<br />
guides are inside this Program Group.<br />
B. Select a document to view:<br />
• Tape Drive User's Guide describes how to use the tape drive, lists system<br />
requirements, provides customer support contacts, and shows warranties.<br />
• Software User's Guide describes how to use the HP Colorado Backup II software<br />
to backup and restore files, schedule backups, and recover from a computer crash.<br />
• Troubleshooting Guide describes ways you can troubleshoot hardware and<br />
software installation problems, suggests how to prepare your system for backup,<br />
and provides answers to frequently asked questions.<br />
C. Close each window when you are done viewing the guides.<br />
12 Prepare for computer system failure<br />
To protect you in the event of a computer crash, you should create disaster recovery<br />
diskettes and a full system backup on tape. This will allow you to boot up the system,<br />
restore the operating system, and restore your files.<br />
You will need:<br />
• One or more tapes with enough capacity to back up the entire system<br />
• 1.44 MB formatted floppy diskettes<br />
• 1 - 2 diskettes are needed for Windows 95/98<br />
• 4 - 5 diskettes are needed for Windows NT 4.0<br />
• The Windows installation CD that came with your computer.<br />
Note: If you have no operating system CD, you can use the system files in<br />
C:/WINDOWS/OPTIONS/CABS.<br />
To create disaster recovery diskettes and a full-system backup:<br />
A. Select the HP Colorado Backup II icon from your screen.<br />
B. If you are prompted to start the HP Colorado Backup II Scheduler, click Cancel.<br />
C. The first time you run the backup software, it asks if you want to create disaster<br />
recovery diskettes now or later. Click OK to create them now, or Cancel to create<br />
them later.<br />
• Creating them now: If you clicked OK, the Recovery Wizard appears. Follow the<br />
screen instructions to create the recovery diskettes and a full system backup.<br />
• Creating them later: If you clicked Cancel , you can create recovery diskettes<br />
later by selecting Tools > Recovery Wizard from the HP Colorado Backup II main<br />
menu.<br />
D. Label your diskettes and backup tape, store them in a safe place, and exit the<br />
backup software.<br />
Note: To recover your system later, you will need to:<br />
• Insert the first recovery diskette and your backup tape into your computer.<br />
• Turn on your computer and follow the screen instructions.<br />
Perform regular backups<br />
In the future, you should perform daily or weekly backups of the files on your<br />
system, so that you can recover data when files are lost or corrupted, or when the<br />
system crashes.<br />
To backup selected files:<br />
A. Insert a tape into the tape drive.<br />
B. Select the HP Colorado Backup II icon from your screen.<br />
C. Select the Backup Wizard. Follow the screen instructions to backup selected files.<br />
D. Label the backup tape, store it in a safe place, and exit the backup software.<br />
To backup the full system:<br />
A. Insert a tape into the tape drive.<br />
B. Select the One-Button Backup icon from your screen. A full system backup will<br />
start. This could take several hours.<br />
C. Label the backup tape, store it in a safe place, and exit the backup software.<br />
Troubleshooting<br />
The tape drive was not detected during the installation test.<br />
• Shut down and turn off your computer, check all cabling connections, and rerun the<br />
installation program to test the tape drive.<br />
The tape drive was detected but did not pass the installation test.<br />
• Shut down and turn off your computer, check all cabling connections, and rerun<br />
the installation program to test the tape drive. If the test still fails, try running the<br />
HP Colorado Backup II software to see if your tape drive is accessible. If it is accessible,<br />
it is probably correctly installed, and you received incorrect test results.<br />
Your computer won't boot up.<br />
• Check that the data cable is attached properly and securely to the IDE connector.<br />
• Make sure you have not missed any pins on the IDE controller.<br />
• Make sure the power cables are attached correctly to each device.<br />
• Verify that pin 1 on the data cable is connected to pin 1 on the IDE controller. Refer to<br />
your computer's owner's manual to locate pin 1 on the IDE controller.<br />
Does your computer meet the minimum system requirements?<br />
See “Minimum System Requirements” on the outside of your product box.<br />
You cannot find the IDE controller.<br />
• Check your computer's manual, call the computer manufacturer for assistance, or check<br />
their web site.<br />
• Look for the IDE controller on the motherboard, a daughter board, or a sound board, etc.<br />
• The IDE controllers may be labeled. Look on the circuit boards for tiny printing such as:<br />
– PRI and SEC (for primary IDE and secondary IDE)<br />
– IDE-0 and IDE-1<br />
– IDE-1 and IDE-2<br />
– PCI-IDE and ISA-IDE<br />
The cable in your computer is too short or is missing a connector.<br />
• Replace the cable in your computer with the cable that came with your new tape drive.<br />
Make sure the cable orientation is the same as the cable that is currently connected to<br />
your device.<br />
• You may have to twist the cable so that the connector fits properly. This will not damage<br />
the cable.<br />
The device sharing the data cable with your tape drive doesn't show up in Explorer/File<br />
Manager or doesn't work any more.<br />
1. Turn off and unplug your computer.<br />
2. Make sure the power cables are securely attached to both devices.<br />
3. If you changed the data cable (middle/end) connector attached to a device that was<br />
already inside your computer, set the data cable connector back to the original position.<br />
Now connect the tape drive to the unused connector.<br />
Need Help?<br />
See the documentation on your computer (step 11) or on your CD.<br />
Topic<br />
Where to Look<br />
Hardware and software installation<br />
problems<br />
Frequently asked questions<br />
How to use the tape drive<br />
Purchasing tape cartridges<br />
How to backup and restore files<br />
How to recover from a computer crash<br />
PC compatibility with the<br />
tape drive or software<br />
HP customer support contacts<br />
(complete listing by country)<br />
Other problems or questions<br />
Troubleshooting Guide or HP web site:<br />
www.hp.com/isgsupport/travantree.html<br />
Troubleshooting Guide or HP web site:<br />
www.hp.com/support/storage<br />
Tape Drive User's Guide<br />
Tape Drive User's Guide<br />
Software User's Guide<br />
Software User's Guide<br />
README file or HP web site:<br />
www.hp.com/support/storage<br />
Tape Drive User's Guide<br />
Web sites:<br />
www.hp.com/support/storage<br />
www.hp.com/isgsupport/travantree.html<br />
E-mail support:<br />
Colorado_Support@hp.com<br />
Phone support:<br />
Americas: (970) 635 1500<br />
Europe: +44 171 512 52 02<br />
Singapore: (65) 272 5300<br />
Australia: +61 (03) 887 8000<br />
© Hewlett-Packard Company 1998-1999<br />
Edition 3 9/99<br />
Part Number C4445-90100