TTM310 series ´¸âw - Kenwood
TTM310 series ´¸âw - Kenwood
TTM310 series ´¸âw - Kenwood

Create successful ePaper yourself
Turn your PDF publications into a flip-book with our unique Google optimized e-Paper software.
efore plugging in<br />
● Make sure your electricity supply is<br />
the same as the one shown on the<br />
underside of your toaster.<br />
● This appliance complies with<br />
European Economic Community<br />
Directive 89/336/EEC.<br />
before using for the first time<br />
1 Clip excess cord into the cord<br />
storage clips in the base .<br />
2 Set the browning control to setting 5<br />
and operate the toaster once on<br />
high power without bread. Repeat<br />
for low power.<br />
Note: this will take longer on low<br />
power.<br />
● As with all new heating elements,<br />
your toaster may emit a slight<br />
burning smell when it is first<br />
switched on. This is normal and not<br />
a cause for concern.<br />
3 Wash the sandwich cage and tongs<br />
with hot soapy water, then dry<br />
thoroughly.<br />
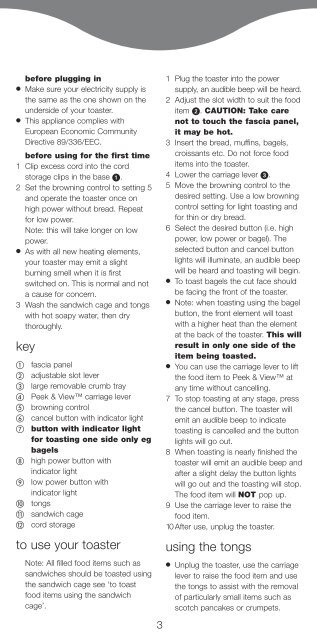
key<br />
fascia panel<br />
adjustable slot lever<br />
large removable crumb tray<br />
Peek & View carriage lever<br />
browning control<br />
cancel button with indicator light<br />
button with indicator light<br />
for toasting one side only eg<br />
bagels<br />
high power button with<br />
indicator light<br />
low power button with<br />
indicator light<br />
tongs<br />
sandwich cage<br />
cord storage<br />
to use your toaster<br />
Note: All filled food items such as<br />
sandwiches should be toasted using<br />
the sandwich cage see ‘to toast<br />
food items using the sandwich<br />
cage’.<br />
3<br />
1 Plug the toaster into the power<br />
supply, an audible beep will be heard.<br />
2 Adjust the slot width to suit the food<br />
item . CAUTION: Take care<br />
not to touch the fascia panel,<br />
it may be hot.<br />
3 Insert the bread, muffins, bagels,<br />
croissants etc. Do not force food<br />
items into the toaster.<br />
4 Lower the carriage lever .<br />
5 Move the browning control to the<br />
desired setting. Use a low browning<br />
control setting for light toasting and<br />
for thin or dry bread.<br />
6 Select the desired button (i.e. high<br />
power, low power or bagel). The<br />
selected button and cancel button<br />
lights will illuminate, an audible beep<br />
will be heard and toasting will begin.<br />
● To toast bagels the cut face should<br />
be facing the front of the toaster.<br />
● Note: when toasting using the bagel<br />
button, the front element will toast<br />
with a higher heat than the element<br />
at the back of the toaster. This will<br />
result in only one side of the<br />
item being toasted.<br />
● You can use the carriage lever to lift<br />
the food item to Peek & View at<br />
any time without cancelling.<br />
7 To stop toasting at any stage, press<br />
the cancel button. The toaster will<br />
emit an audible beep to indicate<br />
toasting is cancelled and the button<br />
lights will go out.<br />
8 When toasting is nearly finished the<br />
toaster will emit an audible beep and<br />
after a slight delay the button lights<br />
will go out and the toasting will stop.<br />
The food item will NOT pop up.<br />
9 Use the carriage lever to raise the<br />
food item.<br />
10 After use, unplug the toaster.<br />
using the tongs<br />
● Unplug the toaster, use the carriage<br />
lever to raise the food item and use<br />
the tongs to assist with the removal<br />
of particularly small items such as<br />
scotch pancakes or crumpets.