Istruzioni per l'uso - Hotpoint-Ariston
Istruzioni per l'uso - Hotpoint-Ariston
Istruzioni per l'uso - Hotpoint-Ariston

You also want an ePaper? Increase the reach of your titles
YUMPU automatically turns print PDFs into web optimized ePapers that Google loves.
GB<br />
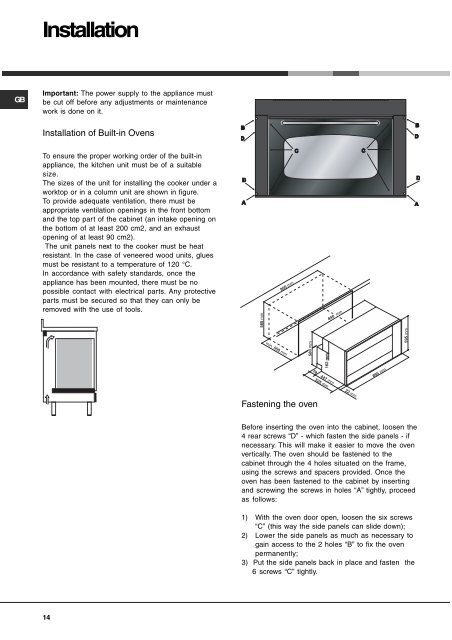
Installation<br />
Important: The power supply to the appliance must<br />
be cut off before any adjustments or maintenance<br />
work is done on it.<br />
Installation of Built-in Ovens<br />
To ensure the pro<strong>per</strong> working order of the built-in<br />
appliance, the kitchen unit must be of a suitable<br />
size.<br />
The sizes of the unit for installing the cooker under a<br />
worktop or in a column unit are shown in figure.<br />
To provide adequate ventilation, there must be<br />
appropriate ventilation openings in the front bottom<br />
and the top part of the cabinet (an intake opening on<br />
the bottom of at least 200 cm2, and an exhaust<br />
opening of at least 90 cm2).<br />
The unit panels next to the cooker must be heat<br />
resistant. In the case of veneered wood units, glues<br />
must be resistant to a tem<strong>per</strong>ature of 120 °C.<br />
In accordance with safety standards, once the<br />
appliance has been mounted, there must be no<br />
possible contact with electrical parts. Any protective<br />
parts must be secured so that they can only be<br />
removed with the use of tools.<br />
14<br />
585 mm<br />
min. 550 mm<br />
860 mm<br />
580 mm<br />
78<br />
Fastening the oven<br />
162 mm<br />
447 mm<br />
525 mm<br />
840 mm<br />
22 mm<br />
895 mm<br />
Before inserting the oven into the cabinet, loosen the<br />
4 rear screws “D” - which fasten the side panels - if<br />
necessary. This will make it easier to move the oven<br />
vertically. The oven should be fastened to the<br />
cabinet through the 4 holes situated on the frame,<br />
using the screws and spacers provided. Once the<br />
oven has been fastened to the cabinet by inserting<br />
and screwing the screws in holes “A” tightly, proceed<br />
as follows:<br />
1) With the oven door open, loosen the six screws<br />
“C” (this way the side panels can slide down);<br />
2) Lower the side panels as much as necessary to<br />
gain access to the 2 holes “B” to fix the oven<br />
<strong>per</strong>manently;<br />
3) Put the side panels back in place and fasten the<br />
6 screws “C” tightly.<br />
595 mm