SP6000 - Makita
SP6000 - Makita
SP6000 - Makita

Create successful ePaper yourself
Turn your PDF publications into a flip-book with our unique Google optimized e-Paper software.
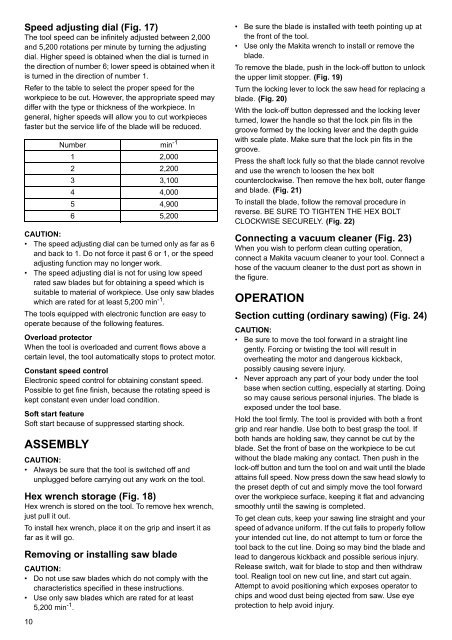
Speed adjusting dial (Fig. 17)<br />
The tool speed can be infinitely adjusted between 2,000<br />
and 5,200 rotations per minute by turning the adjusting<br />
dial. Higher speed is obtained when the dial is turned in<br />
the direction of number 6; lower speed is obtained when it<br />
is turned in the direction of number 1.<br />
Refer to the table to select the proper speed for the<br />
workpiece to be cut. However, the appropriate speed may<br />
differ with the type or thickness of the workpiece. In<br />
general, higher speeds will allow you to cut workpieces<br />
faster but the service life of the blade will be reduced.<br />
CAUTION:<br />
• The speed adjusting dial can be turned only as far as 6<br />
and back to 1. Do not force it past 6 or 1, or the speed<br />
adjusting function may no longer work.<br />
• The speed adjusting dial is not for using low speed<br />
rated saw blades but for obtaining a speed which is<br />
suitable to material of workpiece. Use only saw blades<br />
which are rated for at least 5,200 min-1 .<br />
The tools equipped with electronic function are easy to<br />
operate because of the following features.<br />
Overload protector<br />
When the tool is overloaded and current flows above a<br />
certain level, the tool automatically stops to protect motor.<br />
Constant speed control<br />
Electronic speed control for obtaining constant speed.<br />
Possible to get fine finish, because the rotating speed is<br />
kept constant even under load condition.<br />
Soft start feature<br />
Soft start because of suppressed starting shock.<br />
ASSEMBLY<br />
CAUTION:<br />
• Always be sure that the tool is switched off and<br />
unplugged before carrying out any work on the tool.<br />
Hex wrench storage (Fig. 18)<br />
Hex wrench is stored on the tool. To remove hex wrench,<br />
just pull it out.<br />
To install hex wrench, place it on the grip and insert it as<br />
far as it will go.<br />
Removing or installing saw blade<br />
CAUTION:<br />
• Do not use saw blades which do not comply with the<br />
characteristics specified in these instructions.<br />
• Use only saw blades which are rated for at least<br />
5,200 min -1 .<br />
10<br />
Number min -1<br />
1 2,000<br />
2 2,200<br />
3 3,100<br />
4 4,000<br />
5 4,900<br />
6 5,200<br />
• Be sure the blade is installed with teeth pointing up at<br />
the front of the tool.<br />
• Use only the <strong>Makita</strong> wrench to install or remove the<br />
blade.<br />
To remove the blade, push in the lock-off button to unlock<br />
the upper limit stopper. (Fig. 19)<br />
Turn the locking lever to lock the saw head for replacing a<br />
blade. (Fig. 20)<br />
With the lock-off button depressed and the locking lever<br />
turned, lower the handle so that the lock pin fits in the<br />
groove formed by the locking lever and the depth guide<br />
with scale plate. Make sure that the lock pin fits in the<br />
groove.<br />
Press the shaft lock fully so that the blade cannot revolve<br />
and use the wrench to loosen the hex bolt<br />
counterclockwise. Then remove the hex bolt, outer flange<br />
and blade. (Fig. 21)<br />
To install the blade, follow the removal procedure in<br />
reverse. BE SURE TO TIGHTEN THE HEX BOLT<br />
CLOCKWISE SECURELY. (Fig. 22)<br />
Connecting a vacuum cleaner (Fig. 23)<br />
When you wish to perform clean cutting operation,<br />
connect a <strong>Makita</strong> vacuum cleaner to your tool. Connect a<br />
hose of the vacuum cleaner to the dust port as shown in<br />
the figure.<br />
OPERATION<br />
Section cutting (ordinary sawing) (Fig. 24)<br />
CAUTION:<br />
• Be sure to move the tool forward in a straight line<br />
gently. Forcing or twisting the tool will result in<br />
overheating the motor and dangerous kickback,<br />
possibly causing severe injury.<br />
• Never approach any part of your body under the tool<br />
base when section cutting, especially at starting. Doing<br />
so may cause serious personal injuries. The blade is<br />
exposed under the tool base.<br />
Hold the tool firmly. The tool is provided with both a front<br />
grip and rear handle. Use both to best grasp the tool. If<br />
both hands are holding saw, they cannot be cut by the<br />
blade. Set the front of base on the workpiece to be cut<br />
without the blade making any contact. Then push in the<br />
lock-off button and turn the tool on and wait until the blade<br />
attains full speed. Now press down the saw head slowly to<br />
the preset depth of cut and simply move the tool forward<br />
over the workpiece surface, keeping it flat and advancing<br />
smoothly until the sawing is completed.<br />
To get clean cuts, keep your sawing line straight and your<br />
speed of advance uniform. If the cut fails to properly follow<br />
your intended cut line, do not attempt to turn or force the<br />
tool back to the cut line. Doing so may bind the blade and<br />
lead to dangerous kickback and possible serious injury.<br />
Release switch, wait for blade to stop and then withdraw<br />
tool. Realign tool on new cut line, and start cut again.<br />
Attempt to avoid positioning which exposes operator to<br />
chips and wood dust being ejected from saw. Use eye<br />
protection to help avoid injury.