
You also want an ePaper? Increase the reach of your titles
YUMPU automatically turns print PDFs into web optimized ePapers that Google loves.
ENGLISH<br />
EN<br />
A large proportion of garden waste contains a lot<br />
of water and therefore sticks easily. Such material<br />
should be allowed to dry for a few days before<br />
being processed.<br />
Store the grinder indoors in a dry place.<br />
COMPOSTING<br />
The processed material can be composted in<br />
various ways:<br />
- The material can be placed in a heap directly on<br />
the ground (cold composting).<br />
- The material can be placed in a plastic container,<br />
wooden crate, skeleton container or similar<br />
(cold composting).<br />
- The material can be placed in an insulated compost<br />
holder. The heat is then held for longer and<br />
the rotting process also continues during the<br />
winter. This method produces faster results<br />
(warm composting).<br />
- The material can be spread directly onto the<br />
garden (surface composting).<br />
MAINTENANCE<br />
Always disconnect the plug from the<br />
electric socket before any maintenance.<br />
Always wear protective gloves to avoid<br />
injury.<br />
Generally speaking, compost grinders require very<br />
little maintenance. In order to maintain the<br />
efficiency of the machine and to achieve a long<br />
service life, observe the following:<br />
• keep the air openings clean and free of obstructing<br />
material.<br />
• check the customer-installed nuts and screws<br />
(tighten if necessary).<br />
CLEANING<br />
Always clean the compost grinder after each use.<br />
Never use a high-pressure washer or<br />
running water when cleaning the<br />
grinder!<br />
Brush away dirt and plant residue, which could be<br />
caught in the blades. Wipe the outside of the<br />
grinder clean using a cloth which has been<br />
moistened with a mild detergent and water.<br />
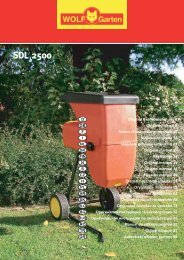
REPLACING/TURNING BLADES<br />
The grinder is equipped with two blades. Each<br />
blade has two edges, only one of which is used.<br />
The other edge is a spare. The blades can therefore<br />
be turned. When both edges have worn out, the<br />
blades must be replaced. Removal and installation<br />
of the blades is carried out as follows:<br />
1. Disconnect the connection cable so that the<br />
grinder is not powered.<br />
2. See fig. 1. Open the casing (E) by releasing the<br />
knob (E).<br />
3. Lock the rotor by inserting the wrench provided<br />
(N) in fig. 3.<br />
4. Unscrew the blade screws using the Allen key<br />
provided (O).<br />
5. Turn/replace the blade and tighten the screws.<br />
6. Remove the wrench (N).<br />
7. Carry out the same procedure with the other<br />
blade.<br />
SERVICE<br />
Authorised service stations carry out repairs and<br />
servicing. They use genuine spare parts.<br />
Under no circumstances may parts<br />
other than genuine spare parts be used.<br />
This is a requirement stipulated by the<br />
Testing Authority. The machine is<br />
approved and tested with these parts.<br />
If the machine requires servicing,<br />
repairs or maintenance which entail<br />
dismantling of the cover, this must be<br />
performed by an authorised service<br />
station.<br />
The manufacturer reserves the right to make<br />
alterations to the product without prior<br />
notification.<br />
31