Poly-Classic® Column Installation Instructions ... - Turncraft
Poly-Classic® Column Installation Instructions ... - Turncraft
Poly-Classic® Column Installation Instructions ... - Turncraft

You also want an ePaper? Increase the reach of your titles
YUMPU automatically turns print PDFs into web optimized ePapers that Google loves.
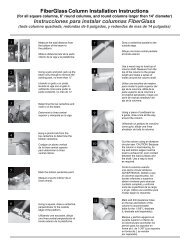
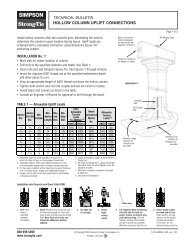
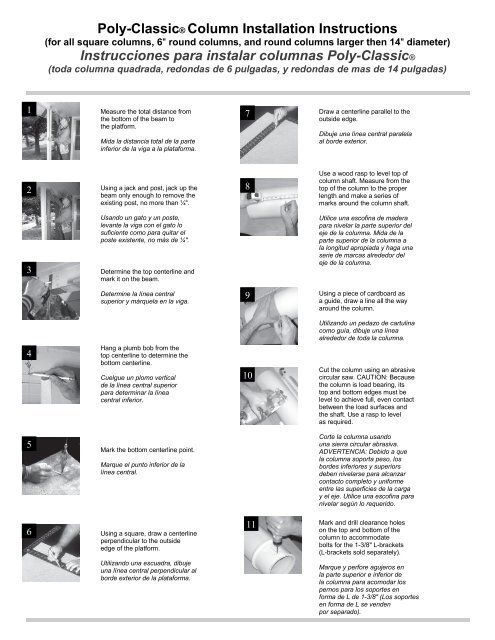
<strong>Poly</strong>-<strong>Classic®</strong> <strong>Column</strong> <strong>Installation</strong> <strong>Instructions</strong><br />
(for all square columns, 6" round columns, and round columns larger then 14" diameter)<br />
Instrucciones para instalar columnas <strong>Poly</strong>-<strong>Classic®</strong><br />
(toda columna quadrada, redondas de 6 pulgadas, y redondas de mas de 14 pulgadas)<br />
1<br />
Measure the total distance from<br />
the bottom of the beam to<br />
the platform.<br />
Mida la distancia total de la parte<br />
inferior de la viga a la plataforma.<br />
7<br />
Draw a centerline parallel to the<br />
outside edge.<br />
Dibuje una línea central paralela<br />
al borde exterior.<br />
2<br />
Using a jack and post, jack up the<br />
beam only enough to remove the<br />
existing post, no more than ¼".<br />
8<br />
Use a wood rasp to level top of<br />
column shaft. Measure from the<br />
top of the column to the proper<br />
length and make a series of<br />
marks around the column shaft.<br />
3<br />
Usando un gato y un poste,<br />
levante la viga con el gato lo<br />
suficiente como para quitar el<br />
poste existente, no más de ¼".<br />
Determine the top centerline and<br />
mark it on the beam.<br />
Utilice una escofina de madera<br />
para nivelar la parte superior del<br />
eje de la columna. Mida de la<br />
parte superior de la columna a<br />
la longitud apropiada y haga una<br />
serie de marcas alrededor del<br />
eje de la columna.<br />
Determine la línea central<br />
superior y márquela en la viga.<br />
9<br />
Using a piece of cardboard as<br />
a guide, draw a line all the way<br />
around the column.<br />
Utilizando un pedazo de cartulina<br />
como guía, dibuje una línea<br />
alrededor de toda la columna.<br />
4<br />
Hang a plumb bob from the<br />
top centerline to determine the<br />
bottom centerline.<br />
Cuelgue un plomo vertical<br />
de la línea central superior<br />
para determinar la línea<br />
central inferior.<br />
10<br />
Cut the column using an abrasive<br />
circular saw. CAUTION: Because<br />
the column is load bearing, its<br />
top and bottom edges must be<br />
level to achieve full, even contact<br />
between the load surfaces and<br />
the shaft. Use a rasp to level<br />
as required.<br />
5<br />
Mark the bottom centerline point.<br />
Marque el punto inferior de la<br />
línea central.<br />
Corte la columna usando<br />
una sierra circular abrasiva.<br />
ADVERTENCIA: Debido a que<br />
la columna soporta peso, los<br />
bordes inferiores y superiors<br />
deben nivelarse para alcanzar<br />
contacto completo y uniforme<br />
entre las superficies de la carga<br />
y el eje. Utilice una escofina para<br />
nivelar según lo requerido.<br />
6<br />
Using a square, draw a centerline<br />
perpendicular to the outside<br />
edge of the platform.<br />
11<br />
Mark and drill clearance holes<br />
on the top and bottom of the<br />
column to accommodate<br />
bolts for the 1-3/8" L-brackets<br />
(L-brackets sold separately).<br />
Utilizando una escuadra, dibuje<br />
una línea central perpendicular al<br />
borde exterior de la plataforma.<br />
Marque y perfore agujeros en<br />
la parte superior e inferior de<br />
la columna para acomodar los<br />
pernos para los soportes en<br />
forma de L de 1-3/8" (Los soportes<br />
en forma de L se venden<br />
por separado).
12<br />
13<br />
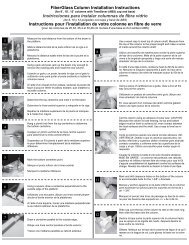
Slide cap over the top of the<br />
column to rest on the neck ring,<br />
then slide the base onto the<br />
column.<br />
Deslice la tapa sobre la parte<br />
superior de la columna hasta que<br />
se apoye en la argolla del cuello,<br />
después deslice la base sobre<br />
la columna.<br />
Secure two L-brackets on the<br />
top and bottom of the column<br />
using through-bolts. Do not use<br />
screws and do not over tighten.<br />
18<br />
* Slide the cap up to the beam<br />
and push up until secure. Screws<br />
may be used to secure the cap<br />
to the beam and the base to the<br />
platform. (When using screws,<br />
first drill pilot holes and fill with<br />
putty to cover screw heads.)<br />
* Deslice la tapa hasta la viga y<br />
empuje hacia arriba hasta que<br />
esté asegurada. Puede utilizar<br />
tornillos para asegurar la tapa en<br />
la viga y la base en la plataforma.<br />
(Cuando use tornillos, haga<br />
primero agujeros guía y, luego de<br />
atornillar, rellene para tapar las<br />
cabezas de los tornillos).<br />
14<br />
15<br />
Asegure dos soportes en forma<br />
de L sobre la parte superior y<br />
la parte inferior de la columna<br />
usando los pernos. No utilice<br />
tornillos y no apriete los pernos<br />
excesivamente.<br />
Apply construction adhesive<br />
to the top and bottom of<br />
the column.<br />
Aplique el pegamento de<br />
construcción a la parte superior y<br />
a la parte inferior de la columna.<br />
Put the assembly in place and<br />
plumb. Make sure that the load is<br />
centered over the column shaft<br />
and evenly distributed. Secure<br />
L-brackets to the platform and<br />
beam. The L-brackets will be<br />
hidden when the Cap & Base<br />
are secured into position.<br />
19<br />
20<br />
21<br />
Apply caulk to gaps between<br />
the cap and base and the<br />
column shaft.<br />
Aplique sello de calafetear a los<br />
espacios entre la tapa y la base<br />
y el eje de la columna.<br />
(Also flashing if used.)<br />
Prepare the column for painting<br />
by sanding lightly with 120-grit<br />
or finer wet/dry sandpaper.<br />
Prepare la columna para pintar<br />
lijando ligeramente con grava<br />
de 120 o un papel de lija más<br />
fino para superficies secas<br />
y mojadas.<br />
Remove dust by wiping the<br />
column, cap, and base with<br />
cleaner compatiable with<br />
your chosen paint.<br />
Asegúrese de que el peso esté<br />
centrado sobre el eje de la<br />
columna y que esté distribuido<br />
uniformemente. Asegure los<br />
soportes en forma de La la<br />
plataforma y a la viga. Los<br />
soportes en forma de L serán<br />
ocultados cuando la tapa y la<br />
base se aseguran en la posición.<br />
22<br />
Quite el polvo limpiando la<br />
columna, la tapa y la base<br />
con jabón y agua.<br />
Paint the column with a oil-base<br />
paint or acrylic-latex primer<br />
and paint.<br />
16<br />
17<br />
Apply construction adhesive<br />
to the cap and base.<br />
Aplique el pegamento de<br />
construcción a la tapa y<br />
a la base.<br />
Align the square part of the base<br />
with the platform below and<br />
push the base down until secure.<br />
Alinee la parte cuadrada de la<br />
base con la plataforma abajo y<br />
empuje la base hacia abajo hasta<br />
que esté asegurada.<br />
Pinte la columna con dos capas<br />
preparatorias y pintura de base<br />
de aceite o pintura acrílica<br />
y látex.<br />
* If this column is installed where it could collect water or debris, the top of the column<br />
and cap MUST be flashed (covered) to prevent such collection. Use lead, copper, aluminum,<br />
galvanized, etc. flashing cut slightly larger than the cap, and fold the edges<br />
down over the cap after step 18. It is not permissible at any time to fill the interior of the<br />
column shaft with sand, concrete or any other material.<br />
<strong>Column</strong>s are not to be used in a free standing application.<br />
An internal structural support will be required on free standing applications.<br />
* Si instala la columna en un lugar donde pueden acumularse agua o desperdicios,<br />
DEBE impermeabilizar (cubrir) la parte superior de la columna y la tapa para evitar que<br />
eso ocurra. Use un marco impermeabilizante de plomo, cobre, aluminio, galvanizado,<br />
etc., cortado apenas un poco más grande que la tapa y doble los bordes hacia abajo,<br />
encima de la tapa, luego del paso 18. No se permite, en ninguna circunstancia, rellenar<br />
el interior del eje de la columna con arena, concreto ni ningún otro material.<br />
No se debe usar columnas en una aplicación independiente.<br />
Se requiere un soporte estructural interior.