AUTOMATIC WASHER LAVADORA AUTOMÁTICA ... - Sears Canada
AUTOMATIC WASHER LAVADORA AUTOMÁTICA ... - Sears Canada
AUTOMATIC WASHER LAVADORA AUTOMÁTICA ... - Sears Canada
You also want an ePaper? Increase the reach of your titles
YUMPU automatically turns print PDFs into web optimized ePapers that Google loves.
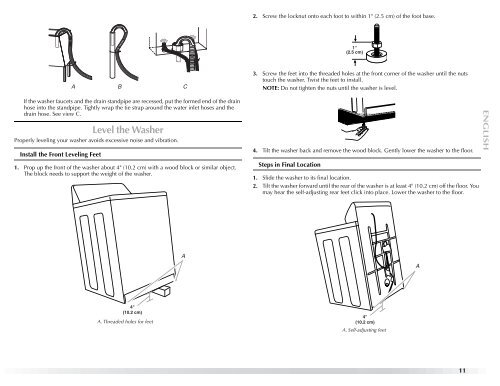
If the washer faucets and the drain standpipe are recessed, put the formed end of the drain<br />
hose into the standpipe. Tightly wrap the tie strap around the water inlet hoses and the<br />
drain hose. See view C.<br />
Level the Washer<br />
Properly leveling your washer avoids excessive noise and vibration.<br />
Install the Front Leveling Feet<br />
A<br />
B<br />
1. Prop up the front of the washer about 4" (10.2 cm) with a wood block or similar object.<br />
The block needs to support the weight of the washer.<br />
4"<br />
(10.2 cm)<br />
A. Threaded holes for feet<br />
C<br />
A<br />
2. Screw the locknut onto each foot to within 1" (2.5 cm) of the foot base.<br />
3. Screw the feet into the threaded holes at the front corner of the washer until the nuts<br />
touch the washer. Twist the feet to install.<br />
NOTE: Do not tighten the nuts until the washer is level.<br />
4. Tilt the washer back and remove the wood block. Gently lower the washer to the floor.<br />
Steps in Final Location<br />
1"<br />
(2.5 cm)<br />
1. Slide the washer to its final location.<br />
2. Tilt the washer forward until the rear of the washer is at least 4" (10.2 cm) off the floor. You<br />
may hear the self-adjusting rear feet click into place. Lower the washer to the floor.<br />
4"<br />
(10.2 cm)<br />
A. Self-adjusting feet<br />
A<br />
11


