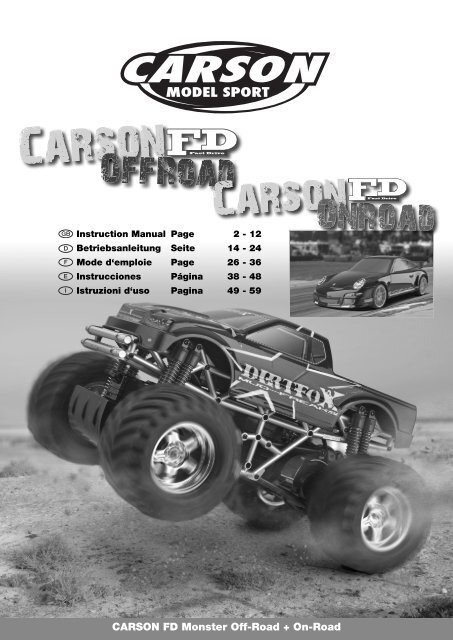
CARSON FD Monster Off-Road + On-Road
CARSON FD Monster Off-Road + On-Road
CARSON FD Monster Off-Road + On-Road

Create successful ePaper yourself
Turn your PDF publications into a flip-book with our unique Google optimized e-Paper software.
Instruction Manual Page 2 - 12<br />
Betriebsanleitung Seite 14 - 24<br />
Mode d‘emploie Page 26 - 36<br />
Instrucciones Página 38 - 48<br />
Istruzioni d‘uso Pagina 49 - 59<br />
<strong>CARSON</strong> <strong>FD</strong> <strong>Monster</strong> <strong>Off</strong>-<strong>Road</strong> + <strong>On</strong>-<strong>Road</strong>
GB<br />
Dear Customer<br />
We congratulate you for buying this <strong>CARSON</strong> RC model car,<br />
which is designed using state of the art technology.<br />
According to our policy of steady development and product<br />
improvement we reserve the right to make changes in<br />
specifications concerning equipment, material and design at<br />
any time without notice.<br />
Specifications or designs of the actual product may vary from<br />
those shown in this manual or on the box.<br />
Limited Warranty<br />
This product is warranted by <strong>CARSON</strong> against manufacturing<br />
defects in materials and workmanship under normal use for 24<br />
months from the date of purchase from authorised franchisees<br />
and dealers. In the event of a product defect during the warranty<br />
period, return the product along with your receipt as proof<br />
of purchase to any <strong>CARSON</strong> store. <strong>CARSON</strong> will, at its option,<br />
unless otherwise provided by law:<br />
(a) Correct the defect by repairing the product without charging<br />
for parts and labour<br />
(b) replace the product with one of the same or similar design;<br />
or<br />
(c) refund the purchase price.<br />
All replacement parts and products, and products on which<br />
a refund is made, become the property of <strong>CARSON</strong>. New<br />
or reconditioned parts and products may be used in the<br />
performance of warranty services. Repaired or replaced parts<br />
and products are warranted for the remainder of the original<br />
warranty period. You will be charged for repair or replacement<br />
of the product made after the expiration of the warranty period.<br />
Declaration of conformity<br />
Dickie-Tamiya GmbH&Co KG hereby declares that this model<br />
kit with radio, motor, battery and charger is in accordance with<br />
the basic requirements of the following European directives:<br />
98/37 EG and 89/336/EWG and other relevant regulations of<br />
guideline 1999/5/EG (R&TTE).<br />
The original declaration of conformity can be obtained from the<br />
following address:<br />
Dickie-Tamiya GmbH&Co. KG Werkstraße l D-90765 Fürth<br />
Germany<br />
2<br />
<strong>CARSON</strong> <strong>FD</strong> <strong>Monster</strong> <strong>Off</strong>-<strong>Road</strong> + <strong>On</strong>-<strong>Road</strong><br />
The manual forms part of this product. Should you ignore the<br />
operating and safety instructions, the warranty will be void.<br />
Keep this guide for future reference.<br />
The Warranty does not cover:<br />
Before driving your new model carefully read these instructions!<br />
damage or failure caused by or attributable to acts of God,<br />
abuse, accident, misuse, improper or abnormal usage,<br />
failure to follow instructions, improper installation or maintenance,<br />
alteration, lightning or other incidence of excess<br />
voltage or current;<br />
damage caused by losing control of your car;<br />
any repairs other than those provided by a <strong>CARSON</strong><br />
Authorised Service Facility;<br />
consumables such as fuses or batteries;<br />
cosmetic damage;<br />
transportation, shipping or insurance costs; or<br />
costs of product removal, installation, set-up service<br />
adjustment or reinstallation<br />
This warranty gives you specific legal rights, and you may also<br />
have other rights which may vary according to the country of<br />
purchase.<br />
The explanation of the symbol on the product,<br />
packaging or instructions:<br />
Electronic devices are valuable products and should<br />
not be disposed of with the household waste when<br />
they reach the end of their running time! Help us to<br />
protect the environment and respect our resources by handing<br />
this appliance over at the relevant recycling points.<br />
We wish you good luck and a lot of fun driving with your<br />
<strong>CARSON</strong> model car
Contents<br />
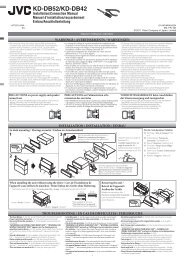
Included items<br />
Example:<br />
<strong>On</strong>-<strong>Road</strong><br />
Model<br />
Transmitter<br />
Preface .......................................................................................... 2<br />
Included items .............................................................................. 3<br />
Safety precautions ....................................................................... 4<br />
a. Charging the battery pack ....................................................... 5<br />
b. Installing transmitter battery ................................................... 5<br />
c. Inserting the battery into an off-road chassis ........................ 6<br />
d. Inserting the battery into an on-road chassis ......................... 7<br />
e. Transmitter ............................................................................... 8<br />
f. Steering trim ............................................................................. 8<br />
g. Throttle trim .............................................................................. 9<br />
h. Attaching antenna .................................................................... 9<br />
i. Replacing crystals ................................................................... 9<br />
j. Troubleshooting ..................................................................... 10<br />
k. Now you can set off on your travels with your<br />
<strong>CARSON</strong> <strong>FD</strong> vehicle!!! ........................................................... 10<br />
l. Cautions when operating RC model ..................................... 12<br />
Transmitter<br />
Example:<br />
<strong>Off</strong>-<strong>Road</strong><br />
Always included: ed:<br />
Model<br />
<strong>CARSON</strong> <strong>FD</strong> <strong>Monster</strong> <strong>Off</strong>-<strong>Road</strong> + <strong>On</strong>-<strong>Road</strong><br />
3<br />
GB
GB<br />
Safety Precautions<br />
Safety Precautions and Operating<br />
Guidelines<br />
A RC model car is a remote control operated model car with a<br />
special 7.2 V rechargeable battery. It is designed only for hobby<br />
use and may only be driven on tracks and areas intended for<br />
this use.<br />
No goods, people or animals may be transported using a RC<br />
model car.<br />
To avoid operating errors, it is essential that you read the<br />
instructions before use.<br />
Model cars may only be operated with a car body that is<br />
properly attached.<br />
This model is not a toy!<br />
This radio controlled model is not a toy. Learning how to<br />
control it correctly is a gradual process.<br />
Children under 10 years of age should be supervised by an<br />
adult.<br />
Driving a radio controlled car is a fascinating hobby. However, it<br />
has to be practised with the necessary caution and respect.<br />
A radio controlled model car can cause damage and injury and<br />
the user is liable for any such incident.<br />
Pay attention to the charge level indicator<br />
lamps of your transmitter.<br />
4<br />
Batteries for transmitter and receiver are well charged and of<br />
the correct voltage.<br />
Always check the range of radio operation before starting<br />
the car.<br />
Make sure that all servos respond correctly to the signals of<br />
the transmitter.<br />
All operable parts are in good condition and you have tested<br />
their operation.<br />
You have made sure that all screws are tightened.<br />
There is no other RC or similar transmitter nearby, which<br />
could cause interference. Any further radio signal on the<br />
same frequency can cause the loss of control for your<br />
model. Always switch on the transmitter first to avoid any<br />
uncontrolled reaction of the receiver to a foreign radio<br />
impulse.<br />
Fully extend the transmitter antenna and make sure that<br />
nobody in your environment controls a model with the same<br />
frequency (number on the crystal) and that there is no<br />
discernable interference. To end the operation switch off the<br />
receiver first, then the transmitter.<br />
Keep your car away from high voltage cables or radio masts.<br />
Never use the model during lightning.<br />
Atmospheric disturbances can affect the signals of your<br />
remote controlling transmitter.<br />
Do not use the model in wet areas. The electrical connection<br />
of the model is not waterproof. Therefore do not drive while<br />
it‘s raining, snowing, or in puddles or wet grass.<br />
<strong>CARSON</strong> <strong>FD</strong> <strong>Monster</strong> <strong>Off</strong>-<strong>Road</strong> + <strong>On</strong>-<strong>Road</strong><br />
To prevent the model being operated with faulty control<br />
equipment resulting in loss of control, the batteries in the<br />
transmitter and battery pack must be tested to ensure the<br />
correct state of charge.<br />
Before and after every use, checks must be carried out to<br />
ensure that the model car is correctly assembled. Nuts and<br />
bolts should be tightened as necessary.<br />
Make sure that you have sufficient insurance cover when<br />
practising your hobby.<br />
<strong>On</strong>ly a well maintained model will function in a correct manner.<br />
<strong>On</strong>ly use approved spare parts and never improvise with any<br />
unsuitable items.<br />
It is the user’s responsibility to ensure that the model is<br />
functioning correctly and that all nuts, bolts and screws are<br />
properly tightened.<br />
Always avoid running radio control models in restricted,<br />
confined or populated areas.<br />
Keep away from roads, highways, people and animals.<br />
Choose a sufficiently open and large area; it should be free<br />
of obstacles.<br />
Do not drive, if you are overtired or your reactions are<br />
impaired in any way.<br />
Watch your model constantly and do not become distracted.<br />
The body shell should be correctly attached to the vehicle<br />
before driving.<br />
Allow cooling time for the engine components before<br />
removing the body shell.<br />
Some parts (e.g. the motor and the muffler) become<br />
extremely hot during operation and could cause serious<br />
injury.<br />
Pay attention to the charge indications on<br />
your transmitter.<br />
Ensure that the batteries for the radio and receiver are fully<br />
charged and of the correct voltage. When the batteries are<br />
running low you might loose control of your model.<br />
Never use batteries which have already run low, or batteries<br />
of a different capacity at the same time.<br />
Never load batteries which are not rechargeable.<br />
If you do not use the model for a longer time you must remove<br />
the batteries.
a. Charging the battery pack<br />
First plug the charger into the socket and then connect the<br />
9.6 V battery pack to the charger’s power supply cable.<br />
Check that the charger is properly connected.<br />
The battery pack supplied has a capacity of 750 mAh.<br />
The charger has a charge current of 180 mAh.<br />
This means that the 750 mAh 9.6V battery pack is fully charged<br />
after approx. 4½ hours.<br />
If the optional 9.6 V battery pack with 1300 mAh is used, the<br />
charge time increases to approx. 7 hrs. 20 mins.<br />
Warning!!!!<br />
Do not exceed the charge time under any circumstances as<br />
overcharging damages the battery pack.<br />
Slide battery cover to indicated direction and open it. Install<br />
battery (Note polarity).<br />
Connect firmly.<br />
b. Installing transmitter battery<br />
<strong>CARSON</strong> <strong>FD</strong> <strong>Monster</strong> <strong>Off</strong>-<strong>Road</strong> + <strong>On</strong>-<strong>Road</strong><br />
5<br />
GB
GB<br />
b.1 Transmitter<br />
SNAP!<br />
antenna<br />
Make sure the battery was installed correctly and close battery<br />
cover. Screw in transmitter antenna firmly.<br />
c. Inserting the battery into an off-road chassis<br />
Turn knob at the bottom side of chassis toward the indicated<br />
direction and detach battery cover.<br />
c.1<br />
Connect charged chassis battery with RC car and put battery<br />
into RC car as shown.<br />
6<br />
<strong>CARSON</strong> <strong>FD</strong> <strong>Monster</strong> <strong>Off</strong>-<strong>Road</strong> + <strong>On</strong>-<strong>Road</strong>
c.2<br />
Secure cables and attach battery cover. Turn knob to the<br />
indicated direction and lock battery cover.<br />
d. Inserting the battery into an on-road chassis<br />
Turn knob at the bottom side of chassis toward the indicated<br />
direction and detach battery cover.<br />
d.1<br />
Connect charged chassis battery with RC car and put it into the<br />
car. Close battery cover and lock it while turning knob.<br />
<strong>CARSON</strong> <strong>FD</strong> <strong>Monster</strong> <strong>Off</strong>-<strong>Road</strong> + <strong>On</strong>-<strong>Road</strong><br />
SNAP!<br />
7<br />
GB
GB<br />
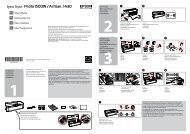
e. Transmitter<br />
The more you turn the steering wheel, the greater the head<br />
angle of the front wheels.<br />
8<br />
Pilot lamp<br />
Switch<br />
<strong>CARSON</strong> <strong>FD</strong> <strong>Monster</strong> <strong>Off</strong>-<strong>Road</strong> + <strong>On</strong>-<strong>Road</strong><br />
Streering trim<br />
Throttle trim<br />
Steering wheel Accelerator lever<br />
Neutral<br />
Left Right<br />
f. Steering trim<br />
When RC car does not run straight, adjust steering trim. Let car<br />
run without touching steering wheel to check direction and<br />
Forward travel /<br />
Accelerating<br />
Braking /<br />
Reverse travel<br />
The more you pull the accelerator lever, the faster the RC car<br />
will go.<br />
When car goes<br />
right.<br />
When car goes left.<br />
adjust by turning steering trim knob to opposite direction RC<br />
car naturally goes in.
g. Throttle trim<br />
If RC car moves on its own accord when throttle trigger is in<br />
neutral, adjust throttle trim. Turn knob into the position where<br />
tires of RC car stop rotation.<br />
h. Attaching antenna<br />
Antenna pipe<br />
Pass antenna cable through antenna pipe and attach antenna<br />
pipe on RC car.<br />
i. Replacing crystals<br />
Adjust knob to stop tire rotation.<br />
ON OFF<br />
Receiver crystal Transmitter crystal<br />
Choosing spare frequency band allows simultaneous running of<br />
6 cars. For purchasing replacement crystals, contact your local<br />
hobby shop. Make sure to use in pairs of same frequency.<br />
Switch<br />
<strong>CARSON</strong> <strong>FD</strong> <strong>Monster</strong> <strong>Off</strong>-<strong>Road</strong> + <strong>On</strong>-<strong>Road</strong><br />
9<br />
GB
GB<br />
j. Troubleshooting<br />
Problem Cause Remedy<br />
Model does not move. Transmitter switch and/or model switch is/are<br />
off.<br />
Switch on.<br />
Weak or no battery in model. Install charged battery.<br />
Heat protector has stopped car due to excess Turn off receiver switch. Let RC car cool down<br />
heat.<br />
for approximately 30 minutes.<br />
No control.<br />
Weak or no batteries in transmitter or model. Install charged or fresh batteries.<br />
Improper antenna on transmitter. Fully extend antenna.<br />
Another RC model using same frequency. Try a different location to operate your model.<br />
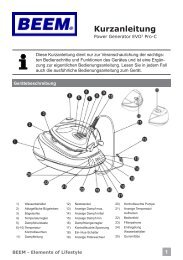
k. Now you can set off on your travels with your<br />
<strong>CARSON</strong> <strong>FD</strong> vehicle!!!<br />
10<br />
1 2<br />
Confirm that same frequency is not<br />
being used in your running area.<br />
3<br />
Switch on transmitter first, then switch<br />
on RC car. Make sure to follow this order<br />
when turning on your RC car. Performing<br />
Fully extend transmitter antenna.<br />
the wrong procedure may cause trouble<br />
with car.<br />
<strong>CARSON</strong> <strong>FD</strong> <strong>Monster</strong> <strong>Off</strong>-<strong>Road</strong> + <strong>On</strong>-<strong>Road</strong><br />
4<br />
Put RC car on a box or some type of stand<br />
and check if it works fine. If tire rotating<br />
does not stop, adjust throttle trim.
5<br />
6<br />
Let’s practice! Make a RC car circuit at a wide<br />
and safe location using corner pylons<br />
(separately available), empty cans or such<br />
objects. Run fast at straight sections and slow<br />
down at curved sections is a basic<br />
7<br />
Avoid continuous running. Allow the<br />
motor to cool down approximately<br />
30 minutes after running.<br />
Let the RC car run without controlling<br />
the steering wheel. If the RC car does not<br />
run straight, adjust steering trim.<br />
speed-control technique useful when driving<br />
RC cars. Choosing a different frequency band<br />
allows simultaneous running of 6 cars.<br />
8 9<br />
Reverse sequence to shut down after running. Make sure to disconnect/remove<br />
all batteries.<br />
10 11<br />
Clean your RC car after use. Never run the model on public roads or<br />
streets, as it could endanger traffic.<br />
<strong>CARSON</strong> <strong>FD</strong> <strong>Monster</strong> <strong>Off</strong>-<strong>Road</strong> + <strong>On</strong>-<strong>Road</strong><br />
Art.-No.<br />
7401522<br />
11<br />
GB
GB<br />
l. Cautions when operating RC model<br />
12<br />
12<br />
<strong>CARSON</strong> <strong>FD</strong> <strong>Monster</strong> <strong>Off</strong>-<strong>Road</strong> + <strong>On</strong>-<strong>Road</strong><br />
Never run the model in crowded areas, near or toward<br />
people or animals, to prevent property damage and/or<br />
personal injury.<br />
Never run the model on grassland. Twining grass may hinder<br />
axle rotation and may cause motor heat buildup.<br />
Never run the model near rivers, ponds or lakes as to prevent<br />
RC car from dropping into the water.<br />
Make sure that no one else is using the same frequency as<br />
yours in your running area. Using the same frequency at the<br />
same time, whether it is driving, flying or sailing, can cause<br />
loss of control with RC models, resulting in serious<br />
accidents.<br />
To avoid a runaway RC model or loss of control, always<br />
follow the procedure below.<br />
1. Fully extend transmitter antenna.<br />
2. Switch on transmitter.<br />
3. Switch on RC model.<br />
Follow reverse procedure to shut down.<br />
1. Turn off model<br />
2. Turn off transmitter<br />
3. Retract transmitter antenna.<br />
Never touch or hinder rotating tire.<br />
Never run RC model in the rain or let run over puddles, as<br />
water may cause trouble with RC model.<br />
Motor and battery get very hot after running. Take care when<br />
handle them.<br />
Retract transmitter antenna when not in use.<br />
Remove the batteries from model and transmitter when they<br />
are not in use.<br />
Do not dismantle transmitter or RC model.<br />
Cautions when handling batteries<br />
Use 9.6 V/ 600 mAh Ni-Cd battery for RC model and 6F22/ 006P<br />
(9 V) battery for transmitter.<br />
Do not dismantle the battery or charger and do not cut any<br />
battery cables. This may cause short-circuit and/or damage<br />
to the product.<br />
Charge battery with compatible charger following proper<br />
procedure that is called out in the instructions. Do not<br />
modify charger or charge battery in improper way.<br />
Do not recharge battery that is still warm from use as it may<br />
damage the battery. Allow the battery to cool off prior to<br />
recharging.<br />
Make sure to disconnect charger cables from RC model and<br />
electric outlet when not in use.<br />
Remove transmitter battery when not using it for a long term<br />
as it may leak and damage transmitter when left for a long<br />
period.<br />
Never incinerate used batteries, as they can explode causing<br />
serious accidents.
Notes<br />
<strong>CARSON</strong> <strong>FD</strong> <strong>Monster</strong> <strong>Off</strong>-<strong>Road</strong> + <strong>On</strong>-<strong>Road</strong><br />
13<br />
GB
D<br />
Sehr geehrter Kunde<br />
Wir beglückwünschen Sie zum Kauf Ihres <strong>CARSON</strong> RC-Modellautos,<br />
das nach dem heutigen Stand der Technik gefertigt<br />
wurde.<br />
Da wir stets um Weiterentwicklung und Verbesserung unserer<br />
Produkte bemüht sind, behalten wir uns eine Änderung in technischer<br />
Hinsicht und in Bezug auf Ausstattung, Materialien und<br />
Design jederzeit und ohne Ankündigung vor.<br />
Aus geringfügigen Abweichungen des Ihnen vorliegenden<br />
Produktes gegenüber Daten und Abbildungen dieser Anleitung<br />
können daher keinerlei Ansprüche abgeleitet werden.<br />
Garantiebedingungen<br />
Für dieses Produkt leistet <strong>CARSON</strong> eine Garantie von 24<br />
Monaten betreffend Fehler bei der Herstellung in Bezug auf<br />
Material und Fertigung bei normalem Gebrauch ab dem Kauf<br />
beim autorisierten Fachhändler. Im Falle eines Defekts während<br />
der Garantiezeit bringen Sie das Modell zusammen mit dem<br />
Kaufbeleg zu Ihrem Fachhändler.<br />
<strong>CARSON</strong> wird nach eigener Entscheidung, falls nicht anders im<br />
Gesetz vorgesehen:<br />
(a) den Defekt durch Reparatur kostenlos in Bezug auf Material<br />
und Arbeit beheben;<br />
(b) das Produkt durch ein gleichartiges oder im Aufbau<br />
ähnliches ersetzen; oder<br />
(c) den Kaufpreis erstatten.<br />
Alle ersetzten Teile und Produkte, für die Ersatz geleistet wird,<br />
werden zum Eigentum von <strong>CARSON</strong>. Im Rahmen der Garantieleistungen<br />
dürfen neue oder wiederaufbereitete Teile verwendet<br />
werden.<br />
Auf reparierte oder ersetzte Teile gilt eine Garantie für die<br />
Restlaufzeit der ursprünglichen Garantiefrist. Nach Ablauf<br />
der Garantiefrist vorgenommene Reparaturen oder gelieferte<br />
Ersatzteile werden in Rechnung gestellt.<br />
Konformitätserklärung<br />
Hiermit erklärt <strong>CARSON</strong> Modelsport, dass sich dieses Modell<br />
einschließlich Fernsteueranlage in Übereinstimmung mit den<br />
grund legenden Anforderungen folgender EG-Richtlinien:<br />
98/37EG für Maschinen und 89/336/EWG über die elektromagnetische<br />
Verträglichkeit und den anderen relevanten<br />
Vorschriften der Richtlinie 1999/5/EG (R&TTE) befindet.<br />
Die Original-Konformitätserklärung kann angefordert werden.<br />
14<br />
<strong>CARSON</strong> <strong>FD</strong> <strong>Monster</strong> <strong>Off</strong>-<strong>Road</strong> + <strong>On</strong>-<strong>Road</strong><br />
Diese Bedienungs- und Montageanleitung ist Bestandteil des<br />
Produkts. Bei Nichtbeachtung der Bedienungsanleitung und<br />
der enthaltenen Sicherheitsanweisungen erlischt der Garantieanspruch.<br />
Bewahren Sie diese Anleitung zum Nachlesen und<br />
für die even tuelle Weitergabe des Modells an Dritte auf.<br />
Von der Garantie ausgeschlossen sind:<br />
Beschädigung oder Ausfall durch Nichtbeachten der Sicherheitsanweisungen<br />
oder der Bedienungsanleitung, höhere<br />
Gewalt, Unfall, fehlerhafte oder außergewöhnliche<br />
Beanspruchung, fehlerhafte Handhabung, eigenmächtige<br />
Veränderungen, Blitzschlag oder anderer Einfluss von<br />
Hochspannung oder Strom.<br />
Schäden, die durch den Verlust der Kontrolle über Ihr Fahrzeug<br />
entstehen.<br />
Reparaturen, die nicht durch einen autorisierten <strong>CARSON</strong><br />
Service durchgeführt wurden<br />
Verschleißteile wie etwa Sicherungen und Batterien<br />
rein optische Beeinträchtigungen<br />
Transport-, Versand- oder Versicherungskosten<br />
Kosten für die Entsorgung des Produkts sowie Einrichten<br />
und vom Service vorgenommene Einstell- und Wiedereinrichtungsarbeiten.<br />
Durch diese Garantie erhalten Sie spezielle Rechte, darüber<br />
hinaus ist auch eine von Land zu Land verschiedene Geltendmachung<br />
anderer Ansprüche denkbar.<br />
Bedeutung des Symbols auf dem Produkt, der<br />
Verpackung oder Gebrauchsanleitung: Elektrogeräte<br />
sind Wertstoffe und gehören am Ende der Laufzeit<br />
nicht in den Hausmüll! Helfen Sie uns bei Umweltschutz<br />
und Recourcenschonung und geben Sie<br />
dieses Gerät bei den entsprechenden Rücknahmestellen ab.<br />
Fragen dazu beanwortet Ihnen die für Abfallbeseitigung zuständige<br />
Organisation oder Ihr Fachhändler.<br />
Wir wünschen Ihnen viel Spaß mit Ihrem <strong>CARSON</strong><br />
Modellauto und jederzeit gute Fahrt!<br />
Vor dem Gebrauch Ihres neuen Modells lesen Sie bitte dieses Handbuch<br />
sorgfältig durch!
Inhalt<br />
Lieferumfang<br />
Beispiel:<br />
<strong>On</strong>-<strong>Road</strong><br />
Modell<br />
Sender<br />
Vorwort ........................................................................................ 14<br />
Lieferumfang ............................................................................... 15<br />
Sicherheitsanweisungen ............................................................ 16<br />
a. Aufladen des Fahrakkus ........................................................ 17<br />
b. Einlegen der Senderbatterie .................................................. 17<br />
c. Einlegen des Akkus in ein <strong>Off</strong>-<strong>Road</strong> Chassis ....................... 18<br />
d. Einlegen des Akkus in ein <strong>On</strong>-<strong>Road</strong> Chassis ....................... 18<br />
e. Sender .................................................................................... 20<br />
f. Lenkungstrimmung ................................................................ 20<br />
g. Gastrimmung .......................................................................... 21<br />
h. Anbringung von Antenne ....................................................... 21<br />
i. Austausch der Quarze ........................................................... 21<br />
j. Fehlersuche ............................................................................ 22<br />
k. Jetzt soll die Fahrt mit deinem <strong>CARSON</strong> <strong>FD</strong> Fahrzeug<br />
losgehen!!! .............................................................................. 22<br />
l. Vorsichtsmaßnahmen beim Betrieb des RC-Modells .......... 24<br />
Sender<br />
Beispiel:<br />
<strong>Off</strong>-<strong>Road</strong><br />
Immer dabei:<br />
Modell<br />
<strong>CARSON</strong> <strong>FD</strong> <strong>Monster</strong> <strong>Off</strong>-<strong>Road</strong> + <strong>On</strong>-<strong>Road</strong><br />
15<br />
D
D<br />
Sicherheitsanweisungen<br />
Sicherheitsanweisung und<br />
bestimmungsgemäße Verwendung<br />
Ein RC-Modellauto ist ein ferngesteuertes, mit speziellem<br />
7,2 V Fahrakku betriebenes Modellauto. Es ist ausschließlich für<br />
Hobbyzwecke ausgelegt und darf nur auf dafür vorgesehenen<br />
Bahnen und Plätzen gefahren werden.<br />
Mit einem RC-Modellauto dürfen keine Güter, Personen oder<br />
Tiere transportiert werden.<br />
Um Bedienungsfehler zu vermeiden, muss vor der Benutzung<br />
unbedingt die Gebrauchsanweisung gelesen werden!<br />
Modellautos dürfen nur mit einer Karosserie, die ordnungsgemäß<br />
angebracht ist, betrieben werden.<br />
Dieses Modell ist kein Spielzeug!<br />
Funkferngesteuerte Modelle sind kein Spielzeug, Ihre<br />
Bedienung muss schrittweise erlernt werden.<br />
Kinder unter 10 Jahren sollten das Modell nur unter Aufsicht<br />
von Erwachsenen in Betrieb nehmen.<br />
Das Fahren von ferngesteuerten Autos ist ein faszinierendes<br />
Hobby, das jedoch mit der nötigen Vorsicht und Rücksichtnahme<br />
betrieben werden muss. Ein ferngesteuertes Modellauto,<br />
das ein beachtliches Gewicht aufweist und eine sehr<br />
hohe Ge schwindig keit erreicht, kann in einem unkontrollierten<br />
Fahr zu stand er heb liche Beschädigungen und Verletzungen<br />
verursachen, für die Sie als Betreiber haftbar sind.<br />
Fahren Sie niemals, ohne sich von den<br />
folgenden Punkten überzeugt zu haben:<br />
Empfängerakku und Senderakku müssen vollständig<br />
geladen sein.<br />
Überprüfen Sie vor dem Start die Funkreichweite.<br />
Überprüfen Sie das ordnungsgemäße Ansprechen der<br />
Servos auf die Steuersignale.<br />
Alle Funktionsteile des Fahrzeugs sind in einwandfreiem<br />
Zustand und überprüft.<br />
Sämtliche Schrauben sind auf festen Sitz überprüft.<br />
Es ist kein RC- oder anderer Sender in der Nähe in Betrieb,<br />
der Funkstörungen verursachen könnte. Störsignale auf<br />
gleicher Frequenz können bewirken, dass Sie die Kontrolle<br />
über Ihr Modell verlieren. Schalten Sie immer zuerst<br />
den Sender ein, um zu vermeiden, dass der Empfänger<br />
unkontrolliert auf ein fremdes Funksignal reagiert.<br />
Ziehen Sie die Senderantenne immer vollständig heraus. Bei<br />
gleichzeitigem Betrieb mehrerer Fahrzeuge darf das Modell<br />
nur auf einer freien Frequenz betrieben werden. Schalten Sie<br />
nach Beendigung des Fahrbetriebes zuerst den Empfänger,<br />
dann den Sender aus.<br />
Fahren Sie auch nicht unter Hochspannungsleitungen oder<br />
Funkmasten oder bei Gewitter!<br />
Atmosphärische Störungen können die Signale Ihres Fernsteuersenders<br />
beeinflussen.<br />
Die Elektrik des Modells ist nicht wasserdicht. Fahren Sie<br />
deshalb nicht bei Regen, Schnee, durch Pfützen oder nasses<br />
Gras.<br />
16<br />
<strong>CARSON</strong> <strong>FD</strong> <strong>Monster</strong> <strong>Off</strong>-<strong>Road</strong> + <strong>On</strong>-<strong>Road</strong><br />
Um zu vermeiden, dass das Modell mit Störungen im Steuerungssystem<br />
und dadurch unkontrolliert fährt, sind die Batterien<br />
des Senders und des Fahrakkus auf einwandfreien Ladezustand<br />
hin zu überprüfen.<br />
Die korrekte Montage der Modellautos muss stets vor und nach<br />
jeder Fahrt überprüft werden, gegebenenfalls Schrauben und<br />
Muttern nachziehen.<br />
Vergewissern Sie sich bei Ihrer Versicherung, ob Sie beim Ausüben<br />
Ihres Hobbys versichert sind. Nur ein einwandfrei zu sammen<br />
gebautes Modell wird erwartungsgemäß funktionieren und<br />
reagieren.<br />
Improvisieren Sie niemals mit untauglichen Hilfs mitteln, sondern<br />
verwenden Sie im Bedarfsfall nur Originalersatzteile. Auch<br />
bei einem vormontierten Modell soll ten Sie alle Verbindungen<br />
auf exakten und festen Sitz kontrollieren.<br />
Das ferngesteuerte Modell darf nur auf geeignetem Gelände<br />
und nicht auf öffentlichen Vekehrsflächen betrieben werden.<br />
Nicht in der Nähe von Personen und Tieren fahren!<br />
Fahren Sie nicht, wenn sie übermüdet oder anderweitig in<br />
Ihrer Reaktionsfähigkeit beeinträchtigt sind.<br />
Halten Sie immer direkten Sichtkontakt zum Modell.<br />
Fahren Sie das Modell nur mit ordnungsgemäß angebrachter<br />
Karosserie.<br />
Regelmäßige Wartung und Pflege ist für erstklassige Fahrleistung<br />
notwendig.<br />
Das Modell hat Teile, die sich im Betrieb erhitzen, z.B. die<br />
Ober seite des Motors, die Abgasanlage, das Metallgetriebe<br />
und vieles mehr. Die Berührung dieser Teile während des<br />
Betriebs kann zu Verletzungen führen.<br />
Achten Sie auf Ladezustandsanzeige Ihres<br />
Senders.<br />
Mit halbleeren Akkus können Sie die Kontrolle über das<br />
Modell verlieren.<br />
Mischen Sie im Sender niemals volle Akkus / Batterien mit<br />
halbleeren oder Akkus unterschiedlicher Kapazität.<br />
Versuchen Sie nie, Trockenbatterien zu laden (nur Akkus sind<br />
aufladbar).<br />
Bei längerem Nichtgebrauch ist der Empfängerakku unbedingt<br />
zu entfernen.
a. Aufladen des Fahrakkus<br />
Zuerst den Steckerlader in die Steckdose stecken und<br />
anschließend den 9,6 V Fahrakku mit dem Ladekabel des<br />
Steckladers verbinden.<br />
Auf richtigen Anschluss des Ladegeräts achten.<br />
Der mitgelieferte Akkupack hat eine Kapazität von 750 mAh.<br />
Der Steckerlader hat einen Ladestrom von 180 mAh.<br />
Der 750 mAh 9,6 V Fahr-Akku ist also nach ca. 4 1/2 Stunden<br />
voll geladen.<br />
Falls der optinal angebotene 9,6 V Akku mit 1300 mAh<br />
verwendet wird, ändert sich die Ladezeit auf ca. 7 1/2 Stunden.<br />
Achtung!!!!<br />
Auf keinen Fall die Ladezeit überschreiten, da bei Überladung<br />
der Fahr-Akku beschädigt wird.<br />
Batterieabdeckung in die angezeigte Richtung schieben und<br />
öffnen. Batterie einlegen (auf Polarität achten).<br />
fest einstecken<br />
b. Einlegen der Senderbatterie<br />
<strong>CARSON</strong> <strong>FD</strong> <strong>Monster</strong> <strong>Off</strong>-<strong>Road</strong> + <strong>On</strong>-<strong>Road</strong><br />
17<br />
D
D<br />
b.1 Senderantenne<br />
SNAP!<br />
Richtiges Einlegen der Batterie überprüfen und Batterieabdeckung<br />
schließen.<br />
Den Knopf an der Unterseite des Chassis in die angegebene<br />
Richtung drehen und Batterieabdeckung abnehmen.<br />
Den aufgeladenen Chassis-Akku mit dem RC-Auto verbinden<br />
und wie abgebildet in das Auto einlegen.<br />
18<br />
<strong>CARSON</strong> <strong>FD</strong> <strong>Monster</strong> <strong>Off</strong>-<strong>Road</strong> + <strong>On</strong>-<strong>Road</strong><br />
Senderantenne fest einschrauben.<br />
c. Einlegen des Akkus in ein <strong>Off</strong>-<strong>Road</strong> Chassis<br />
c.1
c.2<br />
Kabel verstauen und Batterieabdeckung anbringen. Den Knopf<br />
in die angegebenen Richtung drehen und Batterieabdeckung<br />
verriegeln.<br />
d. Einlegen des Akkus in ein <strong>On</strong>-<strong>Road</strong> Chassis<br />
Den Knopf an der Unterseite des Chassis in die angegebene<br />
Richtung drehen und Batterieabdeckung abnehmen.<br />
d.1<br />
Einen geladenen Akku an das RC-Auto anschließen und<br />
einlegen. Den Batteriefachdeckel schließen und durch Drehen<br />
des Knopfes verriegeln.<br />
<strong>CARSON</strong> <strong>FD</strong> <strong>Monster</strong> <strong>Off</strong>-<strong>Road</strong> + <strong>On</strong>-<strong>Road</strong><br />
SNAP!<br />
19<br />
D
D<br />
e. Sender<br />
Umso mehr Du am Steuerrad drehst, umso größer wird der<br />
Steuerwinkel der Vorderräder.<br />
20<br />
Steuerlampe<br />
Schalter<br />
<strong>CARSON</strong> <strong>FD</strong> <strong>Monster</strong> <strong>Off</strong>-<strong>Road</strong> + <strong>On</strong>-<strong>Road</strong><br />
Lenkungstrimmung<br />
Gastrimmung<br />
Lenkrad Gaszuggriff<br />
Neutral<br />
Links Rechts<br />
f. Lenkungstrimmung<br />
Fährt das RC-Auto nicht geradeaus, ist die Lenkungstrimmung<br />
nachzustellen. Lassen Sie das Auto ohne Betätigung des Lenkrades<br />
fahren, um die Richtung festzustellen und korrigieren Sie<br />
Vorwärtsfahrt/<br />
Gas geben<br />
Bremsen/<br />
Rückwärtsfahrt<br />
Umso mehr Du den Gashebel ziehst, desto schneller fährt dann<br />
RC-Auto.<br />
Falls das Auto nach<br />
rechts zieht.<br />
Falls das Auto nach<br />
links zieht.<br />
durch Drehen am Lenkungstrimmknopf in die entgegengesetzte<br />
Richtung, die das RC-Auto einschlägt.
g. Gastrimmung<br />
Falls das Auto von selbst losfährt, obwohl der Gaszuggriff auf<br />
neutral steht, ist die Gastrimmung nachzustellen. Den Knopf in<br />
die Stellung drehen, wo die Reifen aufhören, sich zu drehen.<br />
h. Anbringung von Antenne<br />
Antennendraht<br />
Antennenkabel durch das Antennenröhrchen führen und dieses<br />
am RC-Auto befestigen.<br />
i. Austausch der Quarze<br />
Knopf drehen, um Drehung der<br />
Räder anzuhalten.<br />
Schalter<br />
Empfängerquarz Senderquarz<br />
Die Wahlmöglichkeit der Frequenzbänder gestattet den gleichzeitigen<br />
Betrieb von 6 Autos. Fragen Sie bei Ihrem örtlichen<br />
ON OFF<br />
Modellbau-Fachgeschäft nach Ersatzquarzen. Stellen Sie<br />
sicher, dass Quarze jeweils nur paarweise verwendet werden.<br />
<strong>CARSON</strong> <strong>FD</strong> <strong>Monster</strong> <strong>Off</strong>-<strong>Road</strong> + <strong>On</strong>-<strong>Road</strong><br />
21<br />
D
D<br />
j. Fehlersuche<br />
Problem Ursache Lösung<br />
Modell fährt nicht. Schalter am Sender oder / und Modell steht /<br />
stehen auf „aus”.<br />
Einschalten<br />
Schwacher oder gar kein Akku im Modell. Geladenen Akku einlegen.<br />
Der Überhitzungschutz hat das Auto wegen zu Den Empfänger ausschalten. Das RC-Auto<br />
starker Erwärmung angehalten.<br />
etwa 30 Minuten abkühlen lassen.<br />
Schwacher Akku / Batterie im Sender oder Geladenen Akku oder neue Baterie einlegen.<br />
Keine Kontrolle<br />
Modell<br />
Senderantenne fehlerhaft Antenne ganz ausziehen.<br />
Ein anderes RC-Modell verwendet die gleiche Suchen Sie nach einem anderen Platz, um Ihr<br />
Frequenz.<br />
Modell fahren zu lassen.<br />
k. Jetzt soll die Fahrt mit deinem <strong>CARSON</strong><br />
<strong>FD</strong> Fahrzeug losgehen!!!<br />
1 2<br />
Stelle sicher, dass in deinem Fahr bereich<br />
niemand die gleiche Frequenz<br />
verwendet.<br />
3<br />
Zuerst den Sender, dann das RC-Auto<br />
einschalten. Achte beim Einschalten<br />
deines RC-Autos auf diese Reihenfolge.<br />
22<br />
Senderantenne ganz ausziehen.<br />
Bei fehlerhaftem Vorgehen kann es<br />
Probleme mit dem Auto geben.<br />
<strong>CARSON</strong> <strong>FD</strong> <strong>Monster</strong> <strong>Off</strong>-<strong>Road</strong> + <strong>On</strong>-<strong>Road</strong><br />
4<br />
Das RC-Auto zur Überprüfung der richtigen<br />
Funktion auf eine Schachtel oder eine Art<br />
Ständer stellen. Falls die Räder sich weiterdrehen,<br />
die Gastrimmung nachstellen.
5<br />
6<br />
Lass uns üben! Baue mit Eckbegrenzungen<br />
(getrennt erhältlich) oder leeren Büchsen usw.<br />
eine RC-Auto Renn strecke auf einer großen und<br />
freien Stelle. Auf Geraden schnell fahren und<br />
in den Kurven abbremsen ist die grundlegende<br />
7<br />
Permanenten Motoreinsatz vermeiden.<br />
Den Motor nach der Fahrt etwa<br />
30 Minuten abkühlen lassen.<br />
Lasse das Auto ohne Betätigung des<br />
Lenkrads fahren. Falls das RC-Auto nicht<br />
geradeaus fährt, die Lenkungstrimmung<br />
nachstellen.<br />
Steuer-Technik beim Fahren mit einem RC-Auto.<br />
Die Verwendung unterschiedlicher Frequenzbänder<br />
ermöglicht die gleichzeitige Fahrt von<br />
bis zu 6 Autos.<br />
8 9<br />
Zum Abschalten nach der Fahrt umgekehrte<br />
Reihenfolge einhalten.<br />
10 11<br />
Die Batterien herausnehmen bzw.<br />
abklemmen.<br />
Das RC-Auto nach der Fahrt säubern. Fahren Sie mit dem Modell niemals<br />
auf öffentlichen Wegen oder Straßen,<br />
da dies den Straßenverkehr gefährden<br />
könnte.<br />
<strong>CARSON</strong> <strong>FD</strong> <strong>Monster</strong> <strong>Off</strong>-<strong>Road</strong> + <strong>On</strong>-<strong>Road</strong><br />
Art.-Nr.<br />
7401522<br />
23<br />
D
D<br />
l. Vorsichtsmaßnahmen beim Betrieb des RC-Modells<br />
24<br />
12<br />
Fahren Sie mit dem Modell niemals in belebten Gegenden,<br />
in der Nähe von Menschen oder Tieren, um Schäden an<br />
Gegenständen oder Personen zu verhindern.<br />
Fahren Sie mit dem Modell niemals auf Grasflächen. Sich<br />
fest wickelndes Gras kann die Achsendrehung behindern<br />
und den Motor erhitzen.<br />
Fahren Sie mit dem Modell niemals in der Nähe von Flüssen,<br />
Teichen oder Seen, damit das RC-Auto nicht ins Wasser fällt.<br />
Stellen Sie sicher, dass in Ihrem Fahrbereich niemand<br />
dieselbe Frequenz verwendet wie Sie. Die gleichzeitige<br />
Verwendung derselben Frequenz von fahrenden, fliegenden<br />
oder segelnden RC-Modellen kann zum Verlust der Kontrolle<br />
über das Modell und damit zu schweren Unfällen führen.<br />
Halten Sie stets das unten stehende Verfahren ein, um zu<br />
verhindern, dass Sie die Kontrolle über das RC-Modell<br />
verlieren.<br />
1. Fahren Sie die Senderantenne voll aus.<br />
2. Schalten Sie den Sender ein.<br />
3. Schalten Sie das RC-Modell ein.<br />
<strong>CARSON</strong> <strong>FD</strong> <strong>Monster</strong> <strong>Off</strong>-<strong>Road</strong> + <strong>On</strong>-<strong>Road</strong><br />
Gehen Sie in umgekehrter Reihenfolge<br />
vor, um das Modell auszuschalten.<br />
1. Schalten Sie das Modell aus.<br />
2. Schalten Sie den Sender aus.<br />
3. Fahren Sie die Senderantenne wieder ein.<br />
Berühren Sie oder blockieren Sie niemals die Räder während<br />
der Fahrt.<br />
Fahren Sie mit dem RC-Modell niemals im Regen oder über<br />
Pfützen, da Wasser Schäden am RC-Modell verursachen<br />
kann.<br />
Der Motor und die Batterie werden beim Betrieb sehr heiß.<br />
Gehen Sie vorsichtig damit um.<br />
Fahren Sie die Senderantenne ein, wenn Sie sie nicht<br />
verwenden.<br />
Entfernen Sie die Batterien aus dem Modell und aus dem<br />
Sender, wenn sie diese nicht verwenden.<br />
Öffnen Sie den Sender oder das RC-Modell nicht.<br />
Vorsicht beim Umgang mit Batterien<br />
Verwenden Sie für das RC-Modell eine 9,6 V/ 600 mAh Ni-Cd-<br />
Batterie und für den Sender eine 6F22/006P-(9 V)-Batterie.<br />
Öffnen Sie die Batterie beziehungsweise das Aufladegerät<br />
nicht und schneiden Sie die Batteriekabel nicht durch. Dies<br />
kann zu Kurzschlüssen beziehungsweise Schäden am<br />
Produkt führen.<br />
Laden Sie die Batterie mit dem richtigen Ladegerät in<br />
Übereinstimmung mit dem in der Anleitung beschriebenen<br />
Verfahren. Nehmen Sie am Ladegerät keine Änderungen<br />
vor beziehungsweise laden Sie die Batterie niemals<br />
unsachgemäß auf.<br />
Laden Sie keine Batterien auf, die vom Betrieb noch warm<br />
sind, da dies zu Schäden an der Batterie führen kann.<br />
Lassen Sie die Batterie abkühlen, bevor Sie sie aufladen.<br />
Achten Sie darauf, dass das Kabel des Ladegeräts nicht<br />
mehr mit dem RC-Modell verbunden und der Stecker<br />
gezogen ist, wenn Sie diese nicht verwenden.<br />
Entfernen Sie die Batterie aus dem Sender, wenn sie ihn<br />
längere Zeit nicht verwenden, da die Batterie auslaufen und<br />
den Sender beschädigen könnte.<br />
Werfen Sie verbrauchte Batterien niemals ins Feuer, da sie<br />
explodieren und schwere Unfälle verursachen können.
Notizen<br />
<strong>CARSON</strong> <strong>FD</strong> <strong>Monster</strong> <strong>Off</strong>-<strong>Road</strong> + <strong>On</strong>-<strong>Road</strong><br />
25<br />
D
F<br />
Cher client<br />
Toutes nos félicitations pour l‘acquisition de votre voiture<br />
en modèle réduit <strong>CARSON</strong> RC, un modèle dernier cri. En<br />
vertu de notre engagement pour un développement et une<br />
amélioration continus de nos produits, nous nous réservons le<br />
droit d‘effectuer des modifications dans les spécifications de<br />
nos équipements, nos matériaux et de notre conception à tout<br />
moment et sans avertissement préalable. Les spécifications ou<br />
Conditions de garantie<br />
<strong>CARSON</strong> vous garantit pour 24 mois à partir de la date d‘achat<br />
(pièces justificatives à l‘appui) que la voiture est exempte de<br />
tout défaut. L‘utilisation inappropriée, l‘usure des éléments au<br />
cours de l‘utilisation, les transformations de votre propre chef,<br />
l‘application ou l‘utilisation incorrecte, l‘endommagement des<br />
batteries ou d‘autres équipements au cours de l‘utilisation ou<br />
l‘emploi abusif un l‘endommagement causé par le transport,<br />
n‘est pas couvert par la responsabilité civile. Notre garantie se<br />
limite à la réparation ou à l‘échange des appareils dans l‘état<br />
original et à la hauteur du prix d‘achat. L‘utilisateur de la voiture<br />
assume tous les risques en rapport avec l‘utilisation de la<br />
voiture. Nous nous réservons le droit de modifier ces<br />
conditions de garantie à tout moment et sans préavis. En cas<br />
de réclamation veuillez contacter votre revendeur spécialisé.<br />
Déclaration de conformité<br />
Dickie-Tamiya GmbH&Co KG déclare par la présente que ce<br />
kit de modélisme, avec émetteur, moteur, batterie et chargeur<br />
respecte les exigences de base des directives européennes<br />
suivantes : 98/37 EG et 89/336/EWG ainsi que les autres<br />
régulations de la directive 1999/5/EG (R&TTE).<br />
La déclaration de conformité originale peut être demandée à<br />
l‘adresse suivante : Dickie-Tamiya GmbH&Co. KG Werkstraße<br />
l D-90765 Fürth ALLEMAGNE<br />
Signification du symbole se trouvant sur le produit, l‘emballage<br />
et le mode d‘emploi :<br />
26<br />
<strong>CARSON</strong> <strong>FD</strong> <strong>Monster</strong> <strong>Off</strong>-<strong>Road</strong> + <strong>On</strong>-<strong>Road</strong><br />
les versions du produit acheté peuvent différer de celles<br />
affichées dans le manuel ou sur l‘emballage. Le présent<br />
manuel fait partie du produit. Tout non-respect des<br />
instructions et des consignes de sécurité qui y sont incluses<br />
dispense le fabricant de toute garantie. Conserver le présent<br />
manuel comme document de référence, et également pour<br />
pouvoir le transmettre par la suite à un tiers avec la voiture.<br />
La garantie ne couvre pas:<br />
tout dommage ou défaillance causé par force majeure,<br />
abus, accident, utilisation abusive, erronée ou anormale, non<br />
respect des instructions, mauvaise mise en route ou<br />
maintenance insuffisante, altération, éclair ou tout autre<br />
conséquence d‘une surtension ou d‘un courant excessif ;<br />
tout dommage provoqué par la perte de contrôle de la<br />
voiture ;<br />
toute réparation autre que celles réalisées par un organisme<br />
agrée par <strong>CARSON</strong> ;<br />
les consommables tels que les fusibles et les batteries ;<br />
des dommages esthétiques ;<br />
le transport, l‘expédition et les frais d‘assurance ; et<br />
les frais de retour, d‘installation, de mise au point et de<br />
remise en route du produit<br />
Cette garantie vous attribue des droits spécifiques, vous<br />
pouvez par ailleurs également prétendre à d‘autres droits en<br />
fonction du pays d‘achat.<br />
Les appareils électroniques sont des produits de<br />
valeur et ne doivent pas être éliminés avec les autres<br />
déchets ménagers une fois parvenus à la fin de leur<br />
cycle de vie. Aidez-nous à préserver l‘environnement<br />
et à respecter nos<br />
ressources en remettant cet appareil aux points de recyclage<br />
concernés.<br />
Nous vous souhaitons beaucoup de plaisir avec la conduite de<br />
votre modèle réduit <strong>CARSON</strong>.<br />
Lire attentivement ces instructions avant d‘utiliser ce nouveau modèle réduit.
Contenu<br />
Périmètre de<br />
livraison<br />
Exemple :<br />
<strong>On</strong>-<strong>Road</strong><br />
Modèle<br />
Emetteur<br />
Préface ........................................................................................ 26<br />
Périmètre de livraison ................................................................ 27<br />
Consignes de sécurité ............................................................... 28<br />
a. Recharge de l’accu moteur ................................................... 29<br />
b. Installation de la pile dans l’émetteur ................................... 29<br />
c. Mise en place de l’accu dans un châssis off-road ............... 30<br />
d. Mise en place de l’accu dans un châssis <strong>On</strong>-<strong>Road</strong> ............. 31<br />
e. Emetteur ................................................................................. 32<br />
f. Trim de direction .................................................................... 32<br />
g. Trim de gaz ............................................................................. 33<br />
h. Fixation de l‘antenne ............................................................. 33<br />
i. Remplacement des quartz .................................................... 33<br />
j. Detection de pannes .............................................................. 34<br />
k. Et maintenant, c’est parti avec ta <strong>CARSON</strong> <strong>FD</strong> !!! ............... 34<br />
l. Précautions lors de l’utilisation de la voiture<br />
radiocommandée ................................................................... 36<br />
Emetteur<br />
Exemple :<br />
<strong>Off</strong>-<strong>Road</strong><br />
Toujours là :<br />
Modèle<br />
<strong>CARSON</strong> <strong>FD</strong> <strong>Monster</strong> <strong>Off</strong>-<strong>Road</strong> + <strong>On</strong>-<strong>Road</strong><br />
27<br />
F
F<br />
Consignes de sécurité<br />
Guide des précautions d’utilisation<br />
Une maquette de voiture RC est une voiture télécommandée<br />
actionnée par un accu moteur spécial 7,2 V. Elle est<br />
uniquement destinée à une utilisation dans le cadre des loisirs<br />
et ne doit être utilisée que sur des pistes et des emplacements<br />
prévus à cet effet.<br />
Une maquette de voiture RC ne doit pas servir à transporter<br />
des marchandises, des personnes ou des animaux.<br />
Pour éviter les erreurs de manipulation, lire obligatoirement la<br />
notice avant utilisation !<br />
Ce modèle n‘est pas un jouet<br />
Un modèle télécommandé n‘est pas un jouet, sa<br />
manipulation doit être apprise progressivement.<br />
Les enfants de moins de 10 ans ne doivent pas conduire la<br />
voiture sans être accompagnés d‘un adulte.<br />
La conduite d‘une voiture radiocommandée est une activité<br />
passionnante. Elle doit toutefois être exercée avec la prudence<br />
et l‘attention nécessaires.<br />
Une voiture radiocommandée peut provoquer des dommages<br />
et des blessures si elle n‘est pas conduite de manière<br />
contrôlée, l‘utilisateur est responsable de sa conduite.<br />
Ne jamais démarrer sans avoir vérifié les<br />
points suivants :<br />
28<br />
Les batteries de l‘émetteur et du récepteur sont<br />
correctement chargées et sont à la bonne tension.<br />
Toujours vérifier la portée de la radiocommande avant de<br />
démarrer la voiture.<br />
Vérifier que les servos répondent correctement aux signaux<br />
de l‘émetteur.<br />
Toutes les pièces mobiles doivent être en bon état et<br />
fonctionner correctement.<br />
Vérifier que toutes les vis sont serrées.<br />
Vérifier qu‘il n‘y a pas d‘émetteur RC ou similaire à proximité<br />
qui pourrait provoquer des interférences. Tout signal radio<br />
de la même fréquence peut entraîner une perte du contrôle<br />
de la voiture. Toujours allumer l‘émetteur en premier pour<br />
éviter toute réaction incontrôlée du récepteur par rapport à<br />
un signal radio extérieur.<br />
Sortir complètement l‘antenne et s‘assurer qu‘aux alentours,<br />
personne ne commande un modèle réduit avec la même<br />
fréquence (valeur sur le quartz) et qu‘il n‘y a pas<br />
d‘interférence visible. A la fin de l‘utilisation, couper tout<br />
d‘abord le récepteur, puis l‘émetteur.<br />
Maintenir la voiture éloignée des câbles haute tension ou<br />
des antennes radio.<br />
Ne jamais utiliser la voiture par temps d‘orage.<br />
Les perturbations atmosphériques peuvent affecter les<br />
signaux de l‘émetteur.<br />
Ne pas utiliser la voiture dans les zones humides. Les<br />
raccords électriques de la voiture ne sont pas étanches.<br />
Pour cette raison, ne pas conduire sous la pluie, la neige ou<br />
à travers des flaques d‘eau ou de l‘herbe mouillée.<br />
<strong>CARSON</strong> <strong>FD</strong> <strong>Monster</strong> <strong>Off</strong>-<strong>Road</strong> + <strong>On</strong>-<strong>Road</strong><br />
Les maquettes de voitures ne doivent être utilisées qu’avec une<br />
carrosserie correctement montée.<br />
Pour éviter les perturbations du système de commande, ce<br />
qui se traduit par une marche incontrôlée de la maquette, il<br />
convient de vérifier que les batteries de l’émetteur et de l’accu<br />
moteur sont parfaitement chargées.<br />
Toujours vérifier avant et après chaque utilisation le bon<br />
montage de la maquette et revisser au besoin les vis et les<br />
écrous.<br />
Assurez-vous de disposer d‘une couverture d‘assurance<br />
suffisante pour pratiquer cette activité.<br />
Seul un modèle bien entretenu fonctionnera de manière<br />
correcte. N‘utiliser que des pièces détachées homologuées<br />
et ne jamais improviser de réparations avec des éléments<br />
inadaptés.<br />
L‘utilisateur est responsable du bon fonctionnement de la<br />
voiture et du bon serrage de tous les écrous, boulons et vis.<br />
Toujours éviter de conduire les modèles radiocommandés<br />
dans des lieux fermés, confines ou densément peuplés.<br />
Maintenir éloigné des routes, autoroutes, des gens et des<br />
animaux.<br />
Choisir une zone ouverte de grande taille, de préférence<br />
exempte d‘obstacles.<br />
Ne pas conduire en cas de fatigue importante ou dans le cas<br />
d‘une réactivité altérée de quelque autre manière.<br />
Toujours conserver la voiture dans le champ visuel, ne pas<br />
se laisser distraire.<br />
La carrosserie doit être correctement attachée au véhicule<br />
avant le démarrage.<br />
Laisser les composants moteur refroidir avant de retirer la<br />
carrosserie.<br />
Certaines pièces (p.ex. le moteur et le silencieux) peuvent<br />
devenir extrêmement chaudes lors d‘une utilisation<br />
prolongée et peuvent entraîner des blessures graves.<br />
Bien tenir compte des indications de<br />
charge de l‘émetteur.<br />
S‘assurer que les batteries de l‘émetteur et du récepteur<br />
sont correctement chargées et à la bonne tension. Des<br />
batteries déchargées peuvent entraîner une perte de<br />
contrôle de la voiture.<br />
Ne jamais utiliser simultanément des piles pleines et des<br />
piles partiellement déchargées, ou des batteries de<br />
capacités différentes.<br />
Ne jamais tenter de recharger des piles.<br />
En cas d‘immobilisation prolongée de la voiture, retirer les<br />
batteries.
a. Recharge de l’accu moteur<br />
Raccorder tout d’abord le chargeur à fiche à la prise de<br />
courant, puis relier l’accu moteur 9,6 V avec le câble de<br />
recharge du chargeur à fiche.<br />
Faire attention au branchement correct du chargeur.<br />
Le pack d’accus fourni a une capacité de 750 mAh.<br />
Le chargeur à fiche a un courant de charge de 180 mAh.<br />
L’accu moteur 9,6 V 750 mAh est donc totalement rechargé au<br />
bout de 4 heures ½ environ.<br />
En cas d’utilisation de l’accu 9,6 V 1 300 mAh fourni en option,<br />
la durée de charge passe à 7 heures 20 minutes.<br />
Attention !!!!<br />
Ne dépasser en aucun cas la durée de recharge, car une<br />
charge trop importante détériore l’accu moteur.<br />
Glisser le couvercle du logement de pile dans la direction<br />
indiquée et ouvrir. Installer la pile en respectant les polarités.<br />
Connecter<br />
fermement<br />
b. Installation de la pile dans l’émetteur<br />
<strong>CARSON</strong> <strong>FD</strong> <strong>Monster</strong> <strong>Off</strong>-<strong>Road</strong> + <strong>On</strong>-<strong>Road</strong><br />
29<br />
F
F<br />
b.1 Antenne de<br />
SNAP!<br />
l’émetteur<br />
S’assurer que la pile est correctement installée et refermer le<br />
couvercle. Visser fermement l’antenne de l’émetteur.<br />
c. Mise en place de l’accu dans un châssis<br />
off-road<br />
Tourner dans la direction indiquée le bouton sur la face<br />
inférieure du châssis et détacher la trappe.<br />
c.1<br />
Connecter le pack rechargé à la voiture et le glisser dans le<br />
compartiment comme montré.<br />
30<br />
<strong>CARSON</strong> <strong>FD</strong> <strong>Monster</strong> <strong>Off</strong>-<strong>Road</strong> + <strong>On</strong>-<strong>Road</strong>
c.2<br />
Arranger les cables et remettre en place le couvercle. Tourner<br />
le bouton dans la direction indiquée pour bloquer la trappe.<br />
d. Mise en place de l’accu dans un châssis <strong>On</strong>-<strong>Road</strong><br />
Tourner dans la direction indiquée le bouton sur la face<br />
inférieure du châssis et détacher la trappe.<br />
d.1<br />
Connecter le pack rechargé à la voiture et le glisser dans le<br />
compartiment comme montré. Fermer le couvercle et le fixer en<br />
tournant le loquet.<br />
<strong>CARSON</strong> <strong>FD</strong> <strong>Monster</strong> <strong>Off</strong>-<strong>Road</strong> + <strong>On</strong>-<strong>Road</strong><br />
SNAP!<br />
31<br />
F
F<br />
e. Emetteur<br />
Plus tu tournes le volant de commande, plus l’angle des roues<br />
avant augmente.<br />
32<br />
Lampe témoin<br />
Interrupteur<br />
<strong>CARSON</strong> <strong>FD</strong> <strong>Monster</strong> <strong>Off</strong>-<strong>Road</strong> + <strong>On</strong>-<strong>Road</strong><br />
Trim de direction<br />
Trim de gaz<br />
Volant Gâchette de gaz<br />
Au centre<br />
Gauche Droite<br />
f. Trim de direction<br />
Lorsque la voiture RC ne roule pas droit, agir sur le trim de<br />
direction. Laisser rouler la voiture sans toucher au volant et<br />
régler en tournant le bouton du trim de direction dans le sens<br />
opposé.<br />
Marche avant/<br />
accélération<br />
Freinage/<br />
marche arrière<br />
Plus tu tires sur le levier des gaz, plus la voiture RC roule vite.<br />
Lorsque la voiture<br />
tire à droite.<br />
Lorsque la voiture<br />
tire à gauche.
g. Trim de gaz<br />
Si la voiture avance lorque la gâchette de gaz est au neutre,<br />
agir sur le trim de gaz. Tourner le bouton de trim jusqu’au<br />
moment où les roues arrêtent de tourner.<br />
h. Fixation de l‘antenne<br />
Passer le câble d’antenne dans le tube et fixer ce dernier sur la<br />
voiture RC.<br />
Régler le bouton pour stopper la<br />
rotation des roues.<br />
Gaine<br />
d’antenne Interrupteur<br />
i. Remplacement des quartz<br />
ON OFF<br />
Quartz du récepteur Quartz de l’émetteur<br />
L’utilisation d’autres bandes de fréquence permet l’évolution<br />
simultanée de 6 voitures. Pour se procurer des paires de quartz<br />
de remplacement, contacter un revendeur de modélisme.<br />
S’assurer d’utiliser une paire de quartz de même fréquence.<br />
<strong>CARSON</strong> <strong>FD</strong> <strong>Monster</strong> <strong>Off</strong>-<strong>Road</strong> + <strong>On</strong>-<strong>Road</strong><br />
33<br />
F
F<br />
j. Detection de pannes<br />
Problème Cause Solution<br />
Le modèle ne demarre L’interrupeur de l’émetteur et/ou de la voiture Mettre en marche.<br />
pas.<br />
sont en position arrêt (OFF).<br />
Pas de pack d‘accus ou pack déchargé dans le<br />
modèle.<br />
Installer un pack rechargé.<br />
La protection contre les surchauffes a arrêté Eteindre le récepteur. Laisser la voiture RC<br />
la voiture en raison d’une température trop<br />
élevée.<br />
refroidir pendant 30 minutes environ.<br />
Pas de contrôle.<br />
Pas de pile ou pile faible dans l’émetteur. Installer une pile neuve.<br />
Antenne d’émetteur non compatible. Déployer complétement l’antenne.<br />
Un autre modèle RC utilise la même fréquence. Essayer de faire évoluer le modèle à un autre<br />
endroit.<br />
k. Et maintenant, c’est parti avec ta<br />
<strong>CARSON</strong> <strong>FD</strong> !!!<br />
34<br />
1 2<br />
S’assurer que la fréquence n’est pas<br />
déjà utilisée sur l’aire d’évolution.<br />
3<br />
Mettre en marche l’émetteur en premier,<br />
puis la voiture RC. Toujours procéder<br />
dans cet ordre : dans l’ordre inverse,<br />
Déployer complétement l’antenne de<br />
l’émetteur.<br />
il y a risque de perte de contrôle du<br />
modèle.<br />
<strong>CARSON</strong> <strong>FD</strong> <strong>Monster</strong> <strong>Off</strong>-<strong>Road</strong> + <strong>On</strong>-<strong>Road</strong><br />
4<br />
Poser la voiture RC sur un support<br />
permettant la libre rotation des roues. Si<br />
les roues tournent avec la gâchette au<br />
neutre, régler le trim de gaz.
5<br />
6<br />
Entraînons-nous! Tracez un circuit sur un vaste<br />
espace dégagé au moyen de cônes de balisage<br />
Tamiya (disponibles séparément), de boîtes de<br />
conserve vides ou de cannettes de boissons.<br />
Rouler aussi vite que possible dans les lignes<br />
7<br />
Eviter de rouler continuellement. Laisser<br />
le moteur refroidir 30 minutes après<br />
utilisation.<br />
Faire rouler la voiture sans agir sur le<br />
volant. Si la voiture tire à gauche ou à<br />
droite, agir sur le trim de direction.<br />
droites et ralentir avant de prendre les virages<br />
est la technique de base pour piloter une voiture<br />
RC. L’utilisation d’autres bandes de fréquence<br />
permet l’évolution simultanée de 6 voitures.<br />
8 9<br />
Eteindre dans l’ordre inverse. Impérativement déconnecter et<br />
sortir le pack d’accus.<br />
10 11<br />
Nettoyer la voiture RC après utilisation. Ne faites jamais fonctionner la voiture<br />
sur les routes ou les voies publiques, la<br />
circulation risquant dans ce cas d’être<br />
mise en danger.<br />
<strong>CARSON</strong> <strong>FD</strong> <strong>Monster</strong> <strong>Off</strong>-<strong>Road</strong> + <strong>On</strong>-<strong>Road</strong><br />
Art.-Nr.<br />
7401522<br />
35<br />
F
F<br />
l. Précautions lors de l’utilisation de la voiture<br />
radiocommandée<br />
36<br />
12<br />
Ne faites jamais fonctionner la voiture dans des zones très<br />
fréquentées ou à proximité de personnes ou d’animaux,<br />
afin de prévenir les dommages matériels et/ou les blessures<br />
corporelles.<br />
Ne faites jamais fonctionner la voiture dans les herbages.<br />
Les herbes hautes peuvent empêcher la rotation de l’essieu,<br />
risquant ainsi d’entraîner une accumulation de chaleur dans<br />
le moteur.<br />
Ne faites jamais fonctionner la voiture à proximité d’une<br />
rivière, d’un étang ou d’un lac, afin d’éviter toute chute de la<br />
voiture radiocommandée dans l’eau.<br />
Veillez à ce que personne n’utilise la même fréquence<br />
que vous dans la zone dans laquelle vous vous trouvez.<br />
L’utilisation d’une même fréquence simultanément, sur<br />
route, dans les airs ou sur l’eau, risque d’entraîner la perte<br />
de contrôle des voitures radiocommandées et d’occasionner<br />
de graves accidents.<br />
Afin d’éviter tout emballement ou toute perte de contrôle de<br />
la voiture radiocommandée, veuillez toujours respecter la<br />
procédure indiquée ci-dessous.<br />
1. Déployez entièrement l’antenne du transmetteur.<br />
2. Allumez le transmetteur.<br />
3. Allumez l’appareil radiocommandé.<br />
<strong>CARSON</strong> <strong>FD</strong> <strong>Monster</strong> <strong>Off</strong>-<strong>Road</strong> + <strong>On</strong>-<strong>Road</strong><br />
Procédez dans l’ordre inverse pour<br />
éteindre la voiture.<br />
1. Mettez la voiture à l’arrêt.<br />
2. Mettez le transmetteur à l’arrêt.<br />
3. Rétractez l’antenne du transmetteur.<br />
Ne touchez jamais les pneus et n’empêchez jamais leur<br />
rotation.<br />
Ne faites jamais fonctionner une voiture radiocommandée<br />
sous la pluie ou dans des flaques d’eau, l’eau risquant<br />
de l’endommager<br />
Le moteur et l’accumulateur sont très chauds après le<br />
fonctionnement. Manipulez-les avec précaution.<br />
Rétractez l’antenne du transmetteur en dehors des périodes<br />
d’utilisation.<br />
Retirez les accumulateurs de la voiture et du transmetteur en<br />
dehors des périodes d’utilisation.<br />
Ne démontez pas le transmetteur ni la voiture<br />
radiocommandée.<br />
Attention lors du maniement des<br />
accumulateurs.<br />
Utilisez un accumulateur ni-cad 9.6 V / 600 mAh pour la voiture<br />
radiocommandée et un accumulateur 6F22 / 006P (9 V) pour le<br />
transmetteur.<br />
Ne démontez pas l’accumulateur ou le chargeur et ne<br />
coupez pas les câbles des accumulateurs. Un court-circuit<br />
ou des dommages sur le produit risqueraient d’être<br />
occasionnés.<br />
Chargez l’accumulateur avec un chargeur compatible<br />
en suivant la procédure indiquée dans les instructions<br />
d’utilisation. Ne changez pas le chargeur et ne chargez pas<br />
l’accumulateur de façon inappropriée.<br />
Ne rechargez pas l’accumulateur lorsqu’il est encore<br />
chaud après utilisation. Des dommages pourraient être<br />
occasionnés sur ce dernier. Laissez l’accumulateur refroidir<br />
avant de le recharger.<br />
Veillez à bien déconnecter les câbles des accumulateurs<br />
de la voiture radiocommandée et de la prise de courant en<br />
dehors des périodes d’utilisation.<br />
Retirez l’accumulateur du transmetteur en cas d’inutilisation<br />
prolongée, des fuites risquant dans le cas contraire de se<br />
produire et d’endommager le transmetteur.<br />
N’incinérez jamais des accumulateurs usagés. Une<br />
explosion et de graves accidents risqueraient alors de se<br />
produire.
Note<br />
<strong>CARSON</strong> <strong>FD</strong> <strong>Monster</strong> <strong>Off</strong>-<strong>Road</strong> + <strong>On</strong>-<strong>Road</strong><br />
37<br />
F
E<br />
Estimado cliente<br />
Le felicitamos por la adquisición de su coche radio controlado<br />
<strong>CARSON</strong>, que ha sido fabricado con tecnología de actualidad.<br />
De acuerdo con nuestra política de constante desarrollo y<br />
mejora de nuestros productos, nos reservamos el derecho de<br />
efectuar cambios en las especificaciones relativas a equipo,<br />
material y diseño de este producto en cualquier momento sin<br />
noticia previa.<br />
Las especificaciones o diseños del producto real podrían variar<br />
de los mostrados en el manual o envase.<br />
Condiciones de la garantía<br />
Este producto está garantizado por <strong>CARSON</strong> contra defectos<br />
de fabricación en materiales o mano de obra bajo utilización<br />
normal por un período de 24 meses desde la fecha de adquisición<br />
en comercios autorizados.<br />
En caso de defecto del producto durante el período de<br />
garantía, lleve el producto y el ticket o recibo de venta como<br />
prueba de adquisición a cualquier tienda autorizada <strong>CARSON</strong>.<br />
<strong>CARSON</strong> podrá a su elección y salvo que las leyes dispongan<br />
otra cosa:<br />
(a) Corregir el defecto mediante la reparación del producto sin<br />
cargo de piezas o mano de obra;<br />
(b) Reemplazar el producto por otro del mismo o similar diseño;<br />
o<br />
(c) Devolver el importe de adquisición del producto.<br />
Todas las piezas y productos reemplazados, así como los<br />
productos cuyo importe haya sido devuelto, pasan a ser<br />
propiedad de <strong>CARSON</strong>. Se podrán utilizar piezas nuevas o<br />
reacondicionadas para la prestación del servicio de garantía.<br />
Las piezas y productos reparados o reemplazados estarán<br />
garantizados por el período restante al vencimiento de la<br />
garantía. Cualquier reparación o sustitución del producto tras<br />
vencer el período de garantía será abonada por usted.<br />
Declaración de conformidad<br />
Dickie-Tamiya GmbH&Co KG por la presente declara que<br />
este kit de modelo con radio, motor, batería y cargador está<br />
en concordancia con los requerimientos básicos 98/37EG y<br />
89/336/EWG y otras normas pertinentes de la directiva 1999/5/<br />
EG (R&TTE).<br />
El producto que ha adquirido está propulsado por una batería<br />
recargable Ni-MH. La batería es reciclable. Al final de su vida<br />
útil, bajo varias leyes nacionales / estatales y locales, puede<br />
ser ilegal tirar esta batería en los contenedores de basura normal.<br />
Pregunte a las autoridades locales responsables sobre las<br />
opciones adecuadas de reciclado o deshecho.<br />
38 <strong>CARSON</strong> <strong>FD</strong> <strong>Monster</strong> <strong>Off</strong>-<strong>Road</strong> + <strong>On</strong>-<strong>Road</strong><br />
Este manual es componente del producto. No cumplir las<br />
instrucciones operativas y de seguridad incluidas invalidará la<br />
garantía. Conserve esta guía como recordatorio o para caso de<br />
pasar el modelo a una tercera persona.<br />
Esta garantía no cubre:<br />
Antes de utilizar su nuevo modelo lea estas instrucciones<br />
cuidadosamente!<br />
Daños o fallos causados o atribuibles a fuerzas de la<br />
naturaleza, abuso, accidente, uso incorrecto, impropio o<br />
anormal, falta de seguimiento de las instrucciones,<br />
mantenimiento o instalaciones inadecuadas, alteraciones,<br />
tormentas eléctricas u otros incidentes causados por exceso<br />
de voltaje o corriente;<br />
Cualquier reparación no efectuada por un servicio de<br />
reparaciones autorizado <strong>CARSON</strong>;<br />
Consumibles como fusibles o baterías;<br />
Daños estéticos;<br />
Transportes, embarques y / o costos de seguros; o<br />
Costos de retirada del producto, instalaciones, servicio de ajuste<br />
o reinstalación. Esta garantía le da a usted derechos legales<br />
específicos, y usted también podría tener otros derechos que<br />
variarían de estado en estado.<br />
Significado del símbolo en el producto, el embalaje o<br />
las instrucciones de uso. ¡Los electrodomésticos son<br />
objetos de valor y, al final de su vida útil, no deben<br />
tirarse a la basura doméstica! Contribuya a proteger<br />
el medioambiente y los recursos entregando este<br />
aparato en los puntos de reciclaje correspondientes.<br />
La organización responsable de la recogida de<br />
basura o su establecimiento especializado podrán<br />
responder a sus preguntas.<br />
Le deseamos buena suerte y mucha diversión conduciendo su<br />
coche radio controlado <strong>CARSON</strong>!
Indice de<br />
contenidos<br />
Contenido<br />
del kit<br />
Ejemplo:<br />
<strong>On</strong>-<strong>Road</strong><br />
Modelo<br />
Emisora<br />
Prólogo ....................................................................................... 38<br />
Contenido del kit ........................................................................ 39<br />
Precauciones de seguridad ....................................................... 40<br />
a. Carga del acumulador ........................................................... 41<br />
b. Colocación de la batería del mando ..................................... 41<br />
c. Inserción del acumulador en un chasis <strong>Off</strong>-<strong>Road</strong> ...................42<br />
d. Inserción del acumulador en un chasis <strong>On</strong>-<strong>Road</strong> ...................43<br />
e. Emisora .................................................................................. 44<br />
f. Trim de direccion ................................................................... 44<br />
g. Trim de acelerador ................................................................. 45<br />
h. Montaje de la antena ............................................................. 45<br />
i. Cambio de los cristales de cuarzo ........................................ 45<br />
j. Localización de fallos ............................................................ 46<br />
k. ¡Ahora ya puedes conducir tu <strong>CARSON</strong> <strong>FD</strong>! ........................ 46<br />
l. Precauciones a la hora de usar modelos RC ....................... 48<br />
Emisora<br />
Ejemplo:<br />
<strong>Off</strong>-<strong>Road</strong><br />
Siempre adjunto: to:<br />
Modelo<br />
<strong>CARSON</strong> <strong>FD</strong> <strong>Monster</strong> <strong>Off</strong>-<strong>Road</strong> + <strong>On</strong>-<strong>Road</strong><br />
39<br />
E
E<br />
Precauciones de seguridad<br />
Precauciones de seguridad y normas de<br />
operativa<br />
Un automóvil a escala radiocontrolado es un vehículo<br />
teledirigido accionado mediante un acumulador especial de<br />
7,2 V. Está diseñado exclusivamente para utilizarlo como hobby<br />
y sólo debe conducirse por pistas y espacios previstos para<br />
ello.<br />
Con un automóvil a escala por radiocontrol no se deben transportar<br />
mercancías, personas ni animales.<br />
Para evitar errores de manejo, se deben leer sin falta las<br />
instrucciones de uso antes de utilizarlo.<br />
Los automóviles a escala sólo deben utilizarse con una<br />
carrocería colocada de forma correcta.<br />
¡Este modelo no es un juguete!<br />
Los modelos radio controlados no son juguetes, su manejo<br />
debe ser aprendido paso a paso<br />
Los niños menores de 10 años sólo deberían manejar este<br />
modelo bajo supervisión adulta.<br />
La conducción de coches radio controlados es un fascinante<br />
hobby que debe ser practicado con la necesaria precaución y<br />
respeto. Un coche radio-controlado que tiene un peso considerable<br />
y capaz de desarrollar velocidades muy altas puede<br />
causar daños y lesiones en caso de conducción incontrolada,<br />
siendo el usuario legalmente responsable de ello.<br />
Nunca comience a conducir sin haberse<br />
asegurado de los siguientes puntos:<br />
Las baterías de la emisora y del receptor dan buen voltaje y<br />
no están deterioradas o desgastadas.<br />
Todos los componentes operativos están en buenas condiciones<br />
y se ha comprobado su correcto funcionamiento.<br />
Verificado que todos los tornillos estén correctamente<br />
apretados.<br />
Compruebe siempre el funcionamiento del sistema de radio<br />
antes de utilizar el coche<br />
No hay ninguna otra emisora RC o similar cercana que<br />
pueda causar interferencias.<br />
La emisora y el receptor están conectados, y se ha<br />
comprobado el buen funcionamiento de todas sus<br />
funciones.<br />
Primero conecte la emisora, luego el receptor. Invierta el procedimiento<br />
para la desconexión.<br />
Asegúrese que nadie más está operando en la misma frecuencia<br />
que su radio y que no se aprecian interferencias.<br />
Cualquier otra señal de radio en la misma frecuencia puede<br />
causar la pérdida de control de su modelo.<br />
Siempre apague el motor y desconecte el coche antes de<br />
desconectar la emisora.<br />
¡No conduzca bajo líneas de alta tensión, antenas o durante<br />
tormentas eléctricas!<br />
40 <strong>CARSON</strong> <strong>FD</strong> <strong>Monster</strong> <strong>Off</strong>-<strong>Road</strong> + <strong>On</strong>-<strong>Road</strong><br />
Para evitar que el modelo tenga interferencias en el sistema<br />
de control y, debido a ello, se mueva descontroladamente, se<br />
deben comprobar que las baterías del emisor y del acumulador<br />
estén perfectamente cargadas.<br />
Antes y después de cada recorrido se debe comprobar siempre<br />
que el automóvil a escala esté correctamente montado y<br />
reapretar los tornillos y tuercas si es necesario.<br />
Compruebe que dispone de un seguro con la suficiente cobertura<br />
contra los daños que pueda causar cuando practique su<br />
hobby.<br />
Sólo un vehículo montado correctamente funcionará y reaccionará<br />
de la manera esperada.<br />
Nunca improvise en las reparaciones y utilice únicamente los<br />
recambios originales si fuese necesario. Igualmente y ante un<br />
modelo premontado, deberá repasar todas las conexiones y<br />
tortillería para asegurarse que están correctamente apretados<br />
ajustados.<br />
Las perturbaciones atmosféricas pueden afectar las señales<br />
de su emisora de radio<br />
Las conexiones eléctricas de su modelo no son estancas.<br />
En consecuencia, no lo maneje en lluvia, nieve, charcos o<br />
hierba húmeda.<br />
El terreno en el que se pretende operar el modelo no está<br />
abierto al tráfico y no es usado por personas o animales.<br />
No conduzca si está muy cansado o su poder de reacción<br />
está limitado de algún modo.<br />
Mantenga siempre contacto visual con el modelo.<br />
La carrocería debería estar correctamente fijada al chasis<br />
antes de conducirlo.<br />
Permita cierto tiempo para que el escape y el motor se<br />
enfríen antes de quitar la carrocería. Estas piezas están<br />
extremadamente calientes durante el uso y podrían causar<br />
heridas serias.<br />
Preste atención a las instrucciones de<br />
carga de su emisora.<br />
Asegúrese que las baterías de la emisora y el receptor están<br />
completamente cargadas y tienen el voltaje correcto<br />
Con baterías medio gastadas podría perder el control de su<br />
modelo.<br />
Nunca utilice baterías recargables o de diferente capacidad.<br />
Nunca intente recargar las baterías.<br />
Si no utiliza el modelo por algún tiempo, la batería recargable<br />
debe ser retirada.
a. Carga del acumulador<br />
En primer lugar, insertar el cargador insertable en la caja de<br />
enchufe y unir a continuación el acumulador de 9,6 V con el<br />
cable de carga del cargador insertable.<br />
Observar que la conexión del cargador sea correcta.<br />
El pack de acumulador suministrado tiene una capacidad de<br />
750 mAh.<br />
El cargador insertable tiene una corriente de carga de<br />
180 mAh. El acumulador de 750 mAh 9,6 V se carga por<br />
completo en aprox. 4 horas y media.<br />
En caso de que se utilice el acumulador de 9,6 V con 1300 mAh<br />
ofrecido opcionalmente, el tiempo de carga pasa a aprox. 7 h y<br />
20 min.<br />
¡Atención!<br />
No sobrepasar en ningún caso el tiempo de carga, ya que en<br />
caso de sobrecarga el acumulador puede dañarse.<br />
Empujar la tapa de la batería en la dirección indicada por la<br />
flecha y abrir. Colocar la batería (sin invertir la polaridad).<br />
Conectar bien.<br />
b. Colocación de la batería del mando<br />
<strong>CARSON</strong> <strong>FD</strong> <strong>Monster</strong> <strong>Off</strong>-<strong>Road</strong> + <strong>On</strong>-<strong>Road</strong><br />
41<br />
E
E<br />
b.1 Antena del mando<br />
SNAP!<br />
Comprobar que la batería esté colocada correctamente y<br />
proceder a cerrar la tapa.<br />
Girar en la dirección indicada por la flecha el botón que se<br />
encuentra en la cara inferior del cárter y quitar la tapa de la<br />
batería.<br />
Conectar el acumulador cargado de cárter al vehículo<br />
teledirigido y alojarlo en el vehículo como aparece en la figura.<br />
42 <strong>CARSON</strong> <strong>FD</strong> <strong>Monster</strong> <strong>Off</strong>-<strong>Road</strong> + <strong>On</strong>-<strong>Road</strong><br />
Enroscar bien la antena del mando.<br />
c. Inserción del acumulador en un chasis <strong>Off</strong>-<strong>Road</strong><br />
c.1
c.2<br />
Disponer los cables en el espacio a disposición y volver a<br />
colocar la tapa. Girar el botón en la dirección indicada para<br />
bloquear la tapa de la batería.<br />
d. Inserción del acumulador en un chasis <strong>On</strong>-<strong>Road</strong><br />
Girar el botón en la parte inferior del chasis en la dirección<br />
indicada y retirar la cubierta de la batería.<br />
d.1<br />
Conexión y colocación de un acumulador cargado en el<br />
vehículo teledirigido. Cerrar la tapa de la batería y bloquearla<br />
girando el botón.<br />
<strong>CARSON</strong> <strong>FD</strong> <strong>Monster</strong> <strong>Off</strong>-<strong>Road</strong> + <strong>On</strong>-<strong>Road</strong><br />
SNAP!<br />
43<br />
E
E<br />
e. Emisora<br />
Luz piloto<br />
Interruptor<br />
Cuanto más gires el volante, mayor será el ángulo de las<br />
ruedas delanteras.<br />
44 <strong>CARSON</strong> <strong>FD</strong> <strong>Monster</strong> <strong>Off</strong>-<strong>Road</strong> + <strong>On</strong>-<strong>Road</strong><br />
Trim de direccion<br />
Trim de acelerador<br />
Volante Acelerador<br />
Neutro<br />
Izquierda Derecha<br />
f. Trim de direccion<br />
Si el auto radiocontrolado no avanza en línea recta, se tendrá<br />
que reajustar el equilibrado de la dirección. Deje que el auto<br />
avance sin accionar el volante para determinar la dirección y<br />
Marcha<br />
adelante/dar gas<br />
Frenar/<br />
marcha atrás<br />
Cuanto más tires de la palanca del gas, más rápido irá el<br />
automóvil radiocontrolado.<br />
Si el vehículo tiende<br />
a ir a la derecha.<br />
Si el vehículo tiende<br />
a ir a la izquierda.<br />
corregirla girando el botón de equilibrado de la dirección en<br />
sentido opuesto al que vira el auto radiocontrolado.
g. Trim de acelerador<br />
Si el vehículo arranca aun sin accionar el acelerador, ajustar<br />
la modulación de la velocidad. Girar el botón hasta llegar a la<br />
posición en la cual las ruedas dejan de rodar.<br />
h. Montaje de la antena<br />
Antena<br />
Hacer pasar el cable de la antena a través del tubo de la<br />
antena; fijar el tubo al vehículo RC.<br />
i. Cambio de los cristales de cuarzo<br />
Cristal de cuarzo<br />
receptor<br />
La posibilidad de elegir entre diferentes bandas de frecuencia<br />
permite el uso contemporáneo de 6 vehículos distintos.<br />
Dirigirse a una tienda de modelismo y preguntar por cristales<br />
Girar el botón para parar la<br />
rotación de las ruedas.<br />
Interruptor<br />
ON OFF<br />
Cristal de cuarzo emisor<br />
de cuarzo de repuesto. No olvidar que los cristales de cuarzo<br />
se usan siempre de dos en dos.<br />
<strong>CARSON</strong> <strong>FD</strong> <strong>Monster</strong> <strong>Off</strong>-<strong>Road</strong> + <strong>On</strong>-<strong>Road</strong><br />
45<br />
E
E<br />
j. Localización de fallos<br />
Problema Causa Solución<br />
El modelo no marcha. El interruptor del mando y/o del modelo está(n)<br />
en “OFF”.<br />
En el acumulador queda poca carga o no hay<br />
acumulador en el modelo.<br />
La protección contra sobrecalentamiento<br />
ha detenido el auto debido a un fuerte<br />
calentamiento.<br />
Ningún control<br />
k. ¡Ahora ya puedes conducir tu <strong>CARSON</strong> <strong>FD</strong>!<br />
1 2<br />
Asegurarse de que nadie esté utilizando<br />
la misma frecuencia en la zona donde<br />
se va a usar el vehículo teledirigido.<br />
3<br />
Encender primero el mando y luego el<br />
vehículo RC. Atenerse a este orden a la<br />
hora de encender el vehículo RC.<br />
46 <strong>CARSON</strong> <strong>FD</strong> <strong>Monster</strong> <strong>Off</strong>-<strong>Road</strong> + <strong>On</strong>-<strong>Road</strong><br />
Encender<br />
Colocar un acumulador cargado.<br />
Apagar el receptor. Dejar que se enfríe el vehículo<br />
RC una media hora.<br />
Poca carga en el acumulador / batería Colocar un acumulador cargado o una batería<br />
nueva.<br />
Antena del mando defectuosa Sacar la antena completamente.<br />
Otro modelo teledirigido utiliza la misma<br />
frecuencia.<br />
Sacar completamente la antena del<br />
mando.<br />
Si se procede incorrectamente pueden<br />
presentarse problemas.<br />
Buscar otro lugar donde no interfiera con<br />
ningún otro vehículo.<br />
4<br />
Para examinar que el auto<br />
radiocontrolado funciona correctamente,<br />
colocarlo sobre una caja o un soporte. En<br />
caso de que las ruedas siguieran girando,<br />
reajustar el equilibrado del gas.
5<br />
6<br />
Ahora vamos a practicar un poco. Construir<br />
en un área libre y suficientemente extensa un<br />
circuito automovilístico usando miniconos de<br />
carretera (se pueden comprar aparte) o latas<br />
vacías o lo que pueda servir. La técnica básica<br />
7<br />
Evitar un uso continuado del motor.<br />
Después del uso, dejar que el motor se<br />
enfríe unos treinta minutos.<br />
Hacer marchar el vehículo sin accionar<br />
el volante. Si el vehículo RC no marcha<br />
en línea recta, ajustar la modulación del<br />
volante.<br />
cuando se maneja un vehículo RC es acelerar<br />
en los tramos rectilíneos y frenar en las curvas.<br />
La posibilidad de elegir entre diferentes bandas<br />
de frecuencia permite el uso contemporáneo de<br />
hasta 6 vehículos distintos.<br />
8 9<br />
Después del uso, apagar ateniéndose a la<br />
secuencia de encendido pero al contrario.<br />
10 11<br />
Sacar (soltar) las baterías.<br />
Después, limpiar el vehículo teledirigido. No hacer marchar nunca el modelo en<br />
las vías públicas ni en carreteras ya que<br />
podría representar una fuente de peligro<br />
para el tráfico.<br />
<strong>CARSON</strong> <strong>FD</strong> <strong>Monster</strong> <strong>Off</strong>-<strong>Road</strong> + <strong>On</strong>-<strong>Road</strong><br />
Art.-Nr.<br />
7401522<br />
47<br />
E
E<br />
l. Precauciones a la hora de usar modelos RC<br />
12<br />
No usar nunca el modelo en sitios donde haya muchas personas,<br />
ni en las cercanías de personas o animales, ya que<br />
existiría peligro de causar lesiones y/o daños materiales.<br />
No usar nunca el modelo sobre hierba. Se puede enrollar<br />
hierba en el eje rotante y bloquearlo causando un calentamiento<br />
excesivo del motor.<br />
Usar el modelo manteniéndolo lejos de ríos, estanques o<br />
lagos para evitar que pueda terminar en el agua.<br />
Asegurarse de que nadie esté utilizando la misma frecuencia<br />
en la zona donde se va a usar el vehículo. Si dos modelos<br />
(se trate de aeromodelos, vehículos o barquitos teledirigidos)<br />
usan la misma frecuencia contemporáneamente, se puede<br />
perder el control y, por consiguiente, causar accidentes<br />
incluso graves.<br />
Para evitar que un modelo RC se escape o, de algún modo,<br />
se pierda el control de uno de ellos, proceder siempre en el<br />
siguiente orden:<br />
1. Extender completamente la antena.<br />
2. Encender el mando.<br />
3. Encender el modelo RC.<br />
48 <strong>CARSON</strong> <strong>FD</strong> <strong>Monster</strong> <strong>Off</strong>-<strong>Road</strong> + <strong>On</strong>-<strong>Road</strong><br />
Proceder en orden contrario al apagar.<br />
1. Apagar el modelo.<br />
2. Apagar el mando.<br />
3.Meter la antena del mando.<br />
No tocar nunca las ruedas ni obstaculizar su rotación.<br />
No usar nunca el modelo RC cuando llueva ni dejarlo que<br />
atraviese charcos, ya que el agua puede causar problemas<br />
técnicos.<br />
El motor y la batería se calientan mucho después del uso.<br />
Manejarlos con mucho cuidado.<br />
Meter la antena del mando si no se está utilizando.<br />
Quitar la batería del modelo y del mando cuando no se están<br />
utilizando.<br />
No desmontar ni el mando ni el modelo RC.<br />
Precauciones a la hora de manejar las<br />
baterías<br />
Usar una batería de 9,6 V/ 600 mAh de Ni-Cd para el modelo<br />
RC y una 6F22/ 006P (9 V) para el mando.<br />
No desmontar la batería ni el cargador y no cortar ningún<br />
cable. Esto podría provocar cortocircuitos y/o daños al<br />
producto.<br />
Cargar la batería con un cargador compatible ateniéndose<br />
al procedimiento correcto descrito en las instrucciones. No<br />
modificar el cargador ni intentar cargar la batería de manera<br />
inadecuada.<br />
No recargar la batería mientras esté todavía caliente por el<br />
uso, de lo contrario, se podría dañar. Dejar que se enfríe la<br />
batería antes de recargarla.<br />
Desconectar siempre el cable de carga del modelo RC y el<br />
enchufe eléctrico cuando no se estén usando.<br />
Quitar la batería del mando si no se va a usar durante un<br />
tiempo prolongado, ya que podría haber pérdidas y dañar el<br />
mando.<br />
No exponer al fuego las baterías desechadas, ya que<br />
podrían explotar y causar accidentes incluso graves.
Caro Cliente<br />
Ci congratuliamo con lei per l’acquisto di questo modello<br />
radio comandato <strong>CARSON</strong>,che è stato progettato secondo gli<br />
ultimi ritrovati della tecnica. Per mantenere sempre aggiornati<br />
i nostri prodotti ci riserviamo il diritto di effettuare qualsiasi<br />
aggiornamento tecnico atto a migliorarne le qualità senza alcun<br />
preavviso. Alcune caratteristiche tecniche di questo prodotto<br />
possono perciò essere diverse da quelle illustrate in questo<br />
manuale o sulla scatola.<br />
Condizioni di Garanzia<br />
Questo prodotto è garantito da <strong>CARSON</strong>, da difetti di<br />
fabbricazione nei materiali e lavorazioni, riscontrati nel normale<br />
utilizzo del modello, per 24 mesi dalla data di acquisto presso<br />
un rivenditore autorizzato.<br />
In caso di prodotto difettoso durante il periodo di garanzia,<br />
recarsi con il prodotto e lo scontrino o ricevuta presso qualsiasi<br />
rivenditore <strong>CARSON</strong>. <strong>CARSON</strong> a sua discrezione, provvederà<br />
in accordo alle normative vigenti:<br />
(a) riparare il prodotto senza addebitare nulla;<br />
(b) sostituire il prodotto con un altro uguale o di simili<br />
caratteristiche, o<br />
(c) rimborsare il prezzo di acquisto.<br />
Tutte le parti sostituite o rimborsate diventano di proprietà della<br />
<strong>CARSON</strong>. Le parti nuove sostituite o riparate possono essere<br />
utilizzate per il servizio di garanzia. Le parti riparate o sostituite<br />
in garanzia sono a loro volta coperti da garanzia.<br />
Dichiarazione di conformità<br />
Dickie-Tamiya GmbH & Co. KG dichiara che questo modello<br />
in tutte le sue parti, radio, motore, batteria, caricabatteria, è<br />
in regola con le SEGUENTI DIRETTIVE EUROPEE: 98/37EG<br />
e 89/336/EWG Inoltre è conforme alle direttive 1999/5/EG<br />
(R&TTE).<br />
La dichiarazione originale di conformità può essere richiesta<br />
al seguente indirizzo: Dickie-Tamiya GmbH & Co. KG<br />
Werkstraße 1 D-90765 Fürth<br />
Il prodotto che avete acquistato è alimentato da batteria<br />
ricaricabile al Ni-MH.La batteria è riciclabile.<br />
Alla fine del suo ciclo, in diverse nazioni e/o leggi locali,<br />
potrebbe essere illegale introdurla nei cassonetti della<br />
immondizia. Assicuratevi come procedure per lo smaltimento,<br />
con il vostro locale ufficio smaltimento rifiuti.<br />
Dalla garanzia sono esclusi:<br />
Danni o guasti causati da eventi naturali, normale usura, abusi,<br />
incidenti, utilizzo non corretto, inosservanza delle istruzioni,<br />
montaggio non corretto, imperizia dell’utilizzatore, mancanza<br />
di manutenzione, fulmini o altri incidenti causati da eccesso di<br />
voltaggio;<br />
Tutte le riparazioni non effettuate da personale autorizzato<br />
<strong>CARSON</strong>.<br />
Le parti di consumo e le batterie danni estetici non funzionali<br />
trasporto, spedizione o costi assicurativi costi di ritiro del<br />
prodotto, installazioni, regolazioni e reinstallazioni. La garanzia<br />
in ogni caso è applicata in conformità alle vigenti norme nello<br />
stato dove il prodotto è stato acquistato.<br />
Significato del simbolo sul prodotto, sulla confezione<br />
o nelle istruzioni per l‘uso. Gli apparecchi elettrici<br />
sono prodotti riciclabili e quindi, al termine del loro<br />
ciclo di vita, non devono essere gettati tra i rifiuti<br />
domestici! Aiutateci a tutelare l‘ambiente e a<br />
preservare le risorse, conferendo questo apparecchio<br />
presso i relativi centri di raccolta. Se avete domande<br />
a questo proposito, vi consigliamo di rivolgervi<br />
all‘ente<br />
responsabile dello smaltimento dei rifiuti o al vostro rivenditore<br />
specializzato.<br />
Vi auguriamo buona fortuna e buon divertimento alla guida del<br />
vostro modello Carson.<br />
Prima di utilizzare il vostro nuovo modello leggete attentamente queste istruzioni!<br />
<strong>CARSON</strong> <strong>FD</strong> <strong>Monster</strong> <strong>Off</strong>-<strong>Road</strong> + <strong>On</strong>-<strong>Road</strong><br />
49<br />
E<br />
I
I<br />
Contenuto<br />
Contenuti<br />
del kit<br />
Esempio:<br />
<strong>On</strong>-<strong>Road</strong><br />
Modello<br />
Trasmettitore<br />
Prefazione ................................................................................... 49<br />
Contenuti del kit ......................................................................... 50<br />
Misure di Sicurezza .................................................................... 51<br />
a. Carica della batteria motore .................................................. 52<br />
b. Inserimento della batteria del trasmettitore ......................... 52<br />
c. Inserimento della batteria ricaricabile in un telaio<br />
<strong>Off</strong>-<strong>Road</strong> ................................................................................. 52<br />
d. Inserimento della batteria ricaricabile in un telaio<br />
<strong>On</strong>-<strong>Road</strong> ................................................................................. 54<br />
e. Trasmettitore .......................................................................... 55<br />
f. Trim regolazione sterzo ......................................................... 55<br />
g. Trim regolazione acceleratore ............................................... 56<br />
h. Montaggio dell‘antenna ......................................................... 56<br />
i. Sostituzione dei quarzi .......................................................... 56<br />
j. Ricerca dei guasti .................................................................. 57<br />
k. Adesso puoi partire con la tua vettura <strong>CARSON</strong> <strong>FD</strong>!!! ......... 57<br />
l. Precauzioni per il funzionamento del modello RC ............... 58<br />
Trasmettitore<br />
Esempio:<br />
<strong>Off</strong>-<strong>Road</strong><br />
50 <strong>CARSON</strong> <strong>FD</strong> <strong>Monster</strong> <strong>Off</strong>-<strong>Road</strong> + <strong>On</strong>-<strong>Road</strong><br />
Standard di<br />
fornitura:<br />
Modello
Misure di Sicurezza<br />
Precauzioni di sicurezza e guida operativa<br />
Un‘auto RC è un modellino radiocomandato azionato con<br />
una speciale batteria ricaricabile da 7,2 V. È progettata<br />
esclusivamente per uso dilettantistico e può essere utilizzata<br />
solamente su apposite piste e aree.<br />
Con il modellino di auto RC non è consentito trasportare merci,<br />
persone o animali.<br />
Per evitare errori, leggere assolutamente le istruzioni per l‘uso<br />
prima dell‘utilizzo!<br />
I modellini possono essere utilizzati solamente con carrozzerie<br />
montate a regola d‘arte.<br />
Questo modello non è un giocattolo!<br />
I modelli radiocomandati non sono giocattoli, l’utilizzo di essi<br />
deve essere imparato passo passo.<br />
I bambini sotto i 10 anni possono guidare il modello solo<br />
sotto la supervisione di un adulto.<br />
Guidare un modello radiocomandato è un affascinante hobby<br />
che deve essere praticato con la necessaria cautela e rispetto.<br />
Un modello radiocomandato può causare danni e ferite in caso<br />
di perdita di controllo di cui l’utilizzatore è responsabile.<br />
Non iniziare a guidare prima di avere<br />
osservato I seguenti punti:<br />
Le batterie del trasmettitore e della ricevente siano ben<br />
cariche e del corretto voltaggio.<br />
Controllare sempre le operazioni radio prima di far partire il<br />
modello.<br />
Assicuratevi che tutti servocomandi rispondano<br />
correttamente al segnale del trasmettitore.<br />
Tutte le parti del modello siano in buone condizioni ed<br />
assicuratevi della loro funzionalità .<br />
Dovete essere sicuri che tutte le viti siano ben strette.<br />
Che non ci siano altri modelli o trasmettitori nelle vicinanze<br />
che possano causare interferenze. Accendere sempre<br />
prima il trasmettitore per evitare reazioni incontrollate della<br />
ricevente o percezione di segnali estranei.<br />
Estraete completamente l’antenna ed assicuratevi che<br />
nessuno intorno a voi utilizzi la stessa frequenza (numero<br />
marcato sul quarzo) e che non ci siano interferenze.<br />
Spegnere sempre prima la ricevente e quindi il trasmettitore.<br />
Tenete il vostro modello lontano da cavi di alta tensione o<br />
antenne radio.<br />
Non usare mai il modello durante temporali con fulmini.<br />
Potrebbero causare malfunzionamenti elettrici – Non usare il<br />
modello in zone umide.<br />
Non guidare in presenza di forte vento, pioggia o temporali<br />
Per evitare guasti del sistema di controllo e la conseguente<br />
marcia incontrollata del modellino, controllare che le<br />
batterie del trasmettitore e le batterie motore siano<br />
perfettamente cariche.<br />
Controllare prima e dopo ogni utilizzato il corretto<br />
assemblaggio dei modellini ed eventualmente serrare viti e<br />
dadi.<br />
Cautelatevi con una sufficiente copertura assicurativa, che vi<br />
consenta di praticare il vostro hobby in assoluta sicurezza.<br />
Il vostro modello funzionerà bene solo se sarà tenuto in<br />
perfetta efficienza. Utilizzare solo ricambi originali e non<br />
montare mai parti non adatte.<br />
La responsabilità del modello è direttamente di chi lo guida,<br />
per cui assicurarsi prima dell’utilizzo che tutto funzioni<br />
correttamente e che tutta la viteria sia ben stretta.<br />
Evitate sempre di guidare il modello in zone ristrette e<br />
limitate o in aree popolate.<br />
State lontani da strade, autostrade,persone e animali.<br />
Scegliete un’area sufficientemente aperta e libera di ostacoli.<br />
Guardare continuamente il modello e non distrasi.<br />
La carrozzeria deve essere fissata correttamente al modello<br />
prima dell’utilizzo.<br />
Fare raffreddare tutte le componenti del motore prima di<br />
rimuovere la carrozzeria.<br />
Queste parti durante l’uso diventano estremamente calde e<br />
possono causare gravi ustioni.<br />
Assicurarsi che le batterie siano ben<br />
cariche e del corretto voltaggio.<br />
Quando le batterie si stanno scaricando potreste perdere il<br />
controllo del modello.<br />
Non unite mai nel trasmettitore batterie accu cariche con<br />
batterie per metà scariche o con batterie accu di capacità<br />
diversa.<br />
Non cercate di caricare batterie a secco (solo le batterie<br />
accu sono ricaricabili).<br />
Dopo l’utilizzo rimuovere le batterie dal modello.<br />
<strong>CARSON</strong> <strong>FD</strong> <strong>Monster</strong> <strong>Off</strong>-<strong>Road</strong> + <strong>On</strong>-<strong>Road</strong><br />
51<br />
I
I<br />
a. Carica della batteria motore<br />
Inserire il caricabatterie a spina nella presa di corrente e<br />
successivamente collegare la batteria motore da 9,6 V con il<br />
cavo di carica del caricabatterie.<br />
Accertarsi che il caricabatterie sia collegato correttamente.<br />
La batteria ricaricabile fornita ha una capacità di 750 mAh.<br />
Il caricabatterie a spina ha una corrente di carica di 180 mAh.<br />
La batteria motore 9,6 V da 750 mAh sarà pertanto<br />
completamente carica dopo circa 4 ore e ½.<br />
Nel caso in cui venga utilizzata la batteria ricaricabile di 9,6 V<br />
da 1300 mAh, disponibile come optional, il tempo di carica sarà<br />
di circa 7 ore e 20 minuti.<br />
Attenzione!!!<br />
Non superare in alcun caso il tempo di carica, poiché la batteria<br />
motore potrebbe subire dei danni se sovraccaricata.<br />
b. Inserimento della batteria del trasmettitore<br />
Spingere la copertura della batteria nella direzione indicata e<br />
aprirla. Inserire la batteria (prestare attenzione alla polarità).<br />
52 <strong>CARSON</strong> <strong>FD</strong> <strong>Monster</strong> <strong>Off</strong>-<strong>Road</strong> + <strong>On</strong>-<strong>Road</strong><br />
Innestare<br />
saldamente.
.1 Antenna trasmettitore<br />
SNAP!<br />
Controllare di aver inserito correttamente la batteria e chiudere<br />
la copertura della batteria.<br />
Ruotare la manopola sul lato inferiore del telaio nella direzione<br />
indicata e rimuovere la copertura della batteria.<br />
Collegare la batteria del telaio carica con l‘auto RC e come<br />
illustrato in figura inserire nel veicolo.<br />
Avvitare saldamente l‘antenna del trasmettitore.<br />
c. Inserimento della batteria ricaricabile in un<br />
telaio <strong>Off</strong>-<strong>Road</strong><br />
c.1<br />
<strong>CARSON</strong> <strong>FD</strong> <strong>Monster</strong> <strong>Off</strong>-<strong>Road</strong> + <strong>On</strong>-<strong>Road</strong><br />
53<br />
I
I<br />
c.2<br />
Riporre il cavo e applicare la copertura della batteria.<br />
d. Inserimento della batteria ricaricabile in un<br />
telaio <strong>On</strong>-<strong>Road</strong><br />
Ruotare la manopola nella direzione indicata e bloccare la<br />
copertura della batteria.<br />
d.1<br />
Collegare una batteria carica all‘auto RC e inserirla. Chiudere il<br />
coperchio del vano batteria e bloccarlo ruotando la manopola.<br />
54 <strong>CARSON</strong> <strong>FD</strong> <strong>Monster</strong> <strong>Off</strong>-<strong>Road</strong> + <strong>On</strong>-<strong>Road</strong><br />
SNAP!
e. Trasmettitore<br />
Volante<br />
Spia di controllo<br />
Interruttore<br />
Posizione neutra<br />
Sinistra Destra<br />
Più viene ruotato il volante, maggiore è l‘angolo di sterzata<br />
delle ruote anteriori.<br />
f. Trim regolazione sterzo<br />
Se l‘auto RC non avanza in linea retta, regolare l‘assetto<br />
dello sterzo. Far avanzare l‘auto senza azionare il volante per<br />
individuare la direzione e correggere ruotando la manopola<br />
Trim regolazione sterzo<br />
Trim regolazione acceleratore<br />
Impugnatura cavo<br />
dell‘acceleratore<br />
Marcia avanti/<br />
accelerazione<br />
Più viene tirata la leva del gas, maggiore è la velocità dell‘auto<br />
RC.<br />
Se l‘auto tira verso<br />
destra.<br />
Frenata/<br />
marcia indietro<br />
Se l‘auto tira verso<br />
sinistra.<br />
dell‘assetto dello sterzo nella direzione opposta a quella presa<br />
dall‘auto RC.<br />
<strong>CARSON</strong> <strong>FD</strong> <strong>Monster</strong> <strong>Off</strong>-<strong>Road</strong> + <strong>On</strong>-<strong>Road</strong><br />
55<br />
I
I<br />
g. Trim regolazione acceleratore<br />
Se l‘auto parte da sola, anche se l‘impugnatura del cavo<br />
dell‘acceleratore è in posizione neutra, è necessario regolare<br />
h. Montaggio dell‘antenna<br />
Infilare il cavo dell‘antenna attraverso l‘apposito tubicino e<br />
fissarlo all‘auto RC.<br />
56 <strong>CARSON</strong> <strong>FD</strong> <strong>Monster</strong> <strong>Off</strong>-<strong>Road</strong> + <strong>On</strong>-<strong>Road</strong><br />
Ruotare la manopola per<br />
arrestare la sterzatura delle ruote.<br />
l‘assetto dell‘acceleratore. Ruotare la manopola finche le ruote<br />
non sterzano più.<br />
Cavo<br />
dell‘antenna Interruttore<br />
i. Sostituzione dei quarzi<br />
La possibilità di selezione delle bande di frequenza consente<br />
di azionare contemporaneamente 6 auto. Contattare il proprio<br />
rivenditore di modellismo per richiedere i quarzi di ricambio.<br />
ON OFF<br />
Quarzo ricevitore Quarzo trasmettitore<br />
Accertarsi che i quarzi vengano utilizzati sempre solamente a<br />
coppie.
j. Ricerca dei guasti<br />
Problema Causa Soluzione<br />
Il modellino non parte. L‘interruttore del trasmettitore e/o il modellino<br />
sono impostati su „OFF“ (aus).<br />
Accendere<br />
La batteria nel modellino è scarica o assente. Inserire la batteria carica.<br />
La protezione contro il surriscaldamento Spegnere il ricevitore. Far raffreddare l‘auto RC<br />
ha arrestato il veicolo per riscaldamento<br />
eccessivo.<br />
per circa 30 minuti.<br />
La batteria nel trasmettitore o nel modellino è Inserire una batteria nuova o ricaricata.<br />
Assenza di controllo<br />
scarica.<br />
Antenna del trasmettitore difettosa Estrarre completamente l‘antenna.<br />
Un‘altro modello RC utilizza la stessa<br />
Cercare un altro posto dove utilizzare il<br />
frequenza.<br />
modellino.<br />
k. Adesso puoi partire con la tua vettura<br />
<strong>CARSON</strong> <strong>FD</strong>!!!<br />
1 2<br />
Accertarsi che nel proprio raggio di<br />
azione nessun altro utilizzi la stessa<br />
frequenza.<br />
3<br />
Accendere prima il trasmettitore poi l‘auto<br />
RC. Rispettare la sequenza all‘accensione<br />
dell‘auto RC.<br />
Estrarre completamente l‘antenna del<br />
trasmettitore.<br />
Se non si procede correttamente<br />
potrebbero verificarsi malfunzionamenti<br />
dell‘auto.<br />
<strong>CARSON</strong> <strong>FD</strong> <strong>Monster</strong> <strong>Off</strong>-<strong>Road</strong> + <strong>On</strong>-<strong>Road</strong><br />
4<br />
Posizionare l‘auto RC su una scatola o<br />
su un supporto per controllarne il corretto<br />
funzionamento. Nel caso in cui le ruote<br />
continuino a girare, regolare l‘assetto<br />
dell‘acceleratore.<br />
57<br />
I
I<br />
5<br />
6<br />
Passiamo alle esercitazioni! In un‘area ampia e<br />
libera predisporre un circuito da corsa per l‘auto<br />
RC posizionando sugli angoli gli appositi coni<br />
(disponibili su richiesta), lattine vuote o simili .<br />
La tecnica fondamentale per guidare un‘auto<br />
7<br />
Evitare l‘utilizzo continuo del motore.<br />
Far raffreddare il motore dopo la corsa<br />
per circa 30 minuti.<br />
Far avanzare l‘auto senza azionare il<br />
volante. Se l‘auto RC non avanza in linea<br />
retta, regolare l‘assetto dello sterzo.<br />
radiocomandata consiste nell‘andare veloce sui<br />
rettilinei e nel frenare sulle curve. L‘utilizzo di<br />
bande di frequenza differenti consente di<br />
azionare contemporaneamente fino a 6 auto.<br />
8 9<br />
Rispettare la sequenza inversa per lo spegnimento<br />
dopo la corsa.<br />
10 11<br />
58 <strong>CARSON</strong> <strong>FD</strong> <strong>Monster</strong> <strong>Off</strong>-<strong>Road</strong> + <strong>On</strong>-<strong>Road</strong><br />
Art.-Nr.<br />
7401522<br />
Rimuovere o scollegare le batterie.<br />
Pulire l‘auto RC dopo la corsa. Non azionare mai il modello su strade<br />
pubbliche o vie poiché potrebbe<br />
compromettere il traffico.
l. Precauzioni per il funzionamento del modello RC<br />
12<br />
Non azionare mai il modello in zone affollate, vicino o in<br />
direzione di persone o animali per evitare danni a cose,<br />
animali e/o persone.<br />
Non azionare mai il modello su prati. L’erba può attorcigliarsi<br />
intorno agli assi e impedirne la rotazione causando il<br />
surriscaldamento del motore.<br />
Non azionare mai il modello nei pressi di fiumi, stagni o laghi<br />
per evitare che l’auto R/C cada in acqua.<br />
Accertarsi che nessun altro stia usando la stessa frequenza<br />
nell’area di azionamento. L’uso della stessa frequenza allo<br />
stesso tempo, che sia su strada, in aria o in acqua, può<br />
causare la perdita di controllo dei modelli R/C con<br />
conseguenti incidenti gravi.<br />
Per evitare una perdita di controllo del modello R/C,<br />
procedere sempre come di seguito riportato.<br />
1. Allungare completamente l’antenna trasmittente.<br />
2. Accendere il radiotrasmettitore.<br />
3. Accendere il modello R/C.<br />
Per lo spegnimento seguire il<br />
procedimento inverso.<br />
1. Spegnere il modello<br />
2. Spegnere il radiotrasmettitore<br />
3. Ritrarre l’antenna trasmittente.<br />
Non toccare né ostacolare mai le ruote mentre girano.<br />
Non azionare mai il modello R/C nella pioggia né farlo<br />
mai passare sopra pozzanghere poiché l’acqua può causare<br />
anomalie di funzionamento.<br />
Dopo il funzionamento, il motore e la batteria diventano<br />
molto caldi. Fare attenzione nel maneggiarli.<br />
Ritrarre l’antenna trasmittente se non usata.<br />
Rimuovere le batterie dal modello e dal radiotrasmettitore se<br />
non usati.<br />
Non smontare il radiotrasmettitore né il modello RC.<br />
Precauzioni per l’uso delle batterie<br />
Usare una batteria Ni-Cd da 9,6 V/ 600 mAh per il modello RC e<br />
una batteria 6F22/006P (9 V) per il radiotrasmettitore.<br />
Non smontare la batteria né il caricabatteria e non tagliare<br />
i cavi delle batterie. Ciò può causare un cortocircuito e/o<br />
danneggiare il prodotto.<br />
Ricaricare la batteria con il rispettivo caricabatteria<br />
seguendo il corretto procedimento come riportato nelle<br />
istruzioni. Non apportare modifiche al caricabatteria e non<br />
ricaricare le batterie in modo improprio.<br />
Non ricaricare la batteria se ancora calda dall’uso poiché<br />
può essere danneggiata. Prima della ricarica aspettare che<br />
la batteria si sia raffreddata.<br />
Accertarsi che i cavi del caricabatteria, se non usato, siano<br />
staccati dal modello RC e dalla presa di corrente.<br />
Rimuovere la batteria dal radiotrasmettitore se non lo si usa<br />
per un periodo prolungato poiché, se lasciata all’interno a<br />
lungo, dalla batteria può fuoriuscire del liquido a danno del<br />
radiotrasmettitore.<br />
Non gettare le batterie usate nel fuoco poiché possono<br />
esplodere causando gravi incidenti.<br />
<strong>CARSON</strong> <strong>FD</strong> <strong>Monster</strong> <strong>Off</strong>-<strong>Road</strong> + <strong>On</strong>-<strong>Road</strong><br />
59<br />
I
For Germany:<br />
Service-Hotline:<br />
Mo - Do 8.00 – 17.00 Uhr<br />
Fr 8.00 – 14.30 Uhr<br />
01805–73 33 00<br />
12 ct/min<br />
<strong>CARSON</strong>-Model Sport<br />
Abt. Service<br />
Mittlere Motsch 9<br />
96515 Sonneberg<br />
<strong>CARSON</strong>-Model Sport<br />
Werkstraße 1 D-90765 Fürth / Germany<br />
www.carson-modelsport.de