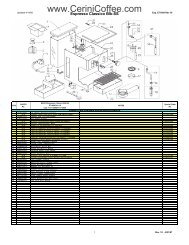
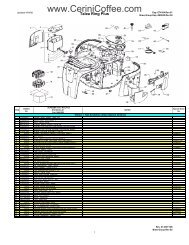
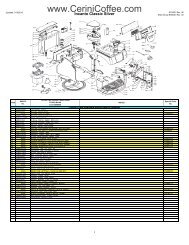
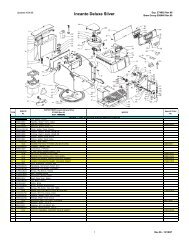
15000996 Starbucks Sirena Rev00.indb - Cerini Coffee & Gifts ...
15000996 Starbucks Sirena Rev00.indb - Cerini Coffee & Gifts ...
15000996 Starbucks Sirena Rev00.indb - Cerini Coffee & Gifts ...

Create successful ePaper yourself
Turn your PDF publications into a flip-book with our unique Google optimized e-Paper software.
4 INSTALLATION<br />
For your own safety and that of other people, please strictly follow the “Safety Regulations” in section 3.<br />
4.1 Packaging<br />
The original packaging has been designed to protect the machine during transport.<br />
It is recommended to keep the packaging for future transport.<br />
4.2 Installation instructions<br />
Before installing the machine, observe the following safety precautions:<br />
• Place the machine in a safe area: on a flat, stable surface, away from water and moisture;<br />
• Make sure the machine is out of the reach of children;<br />
• Avoid placing the machine on very hot surfaces or near open flames.<br />
The espresso machine is now ready to be connected to the power supply.<br />
4.3 Connecting to the power supply<br />
Before turning on the machine, make sure that the hot water / steam knob is closed.<br />
• Electric current can be dangerous! Therefore, it is essential to follow the safety regulations carefully.<br />
• Never use faulty electrical cords! Faulty electrical cords and plugs must be replaced immediately by<br />
authorized customer service centers.<br />
• The voltage of the appliance has been set by the manufacturer.<br />
• Check that the voltage supplied matches the indications on the label on the bottom of the appliance.<br />
• Connect the power cord to the machine as shown in Figure F.<br />
• Connect the plug end of the power cord to a socket with suitable voltage.<br />
• You can preheat your cups by placing them on the cup warming tray. (Warm cups will help retain the<br />
espresso’s crema and aroma.)<br />
NOTE: The machine is equipped with an energy saving system. The machine will<br />
automatically shut off 90 minutes after its last operation. To turn the machine on, press the<br />
power button (15).<br />
4.4 Filling the water tank<br />
• Lift and remove the water tank lid (7).<br />
• Remove the water tank (8) using the handle provided on the inside.<br />
• Rinse and fill it with filtered water, taking care not to overfill.<br />
• Replace the tank; press down firmly. Replace the lid (7).<br />
For best results, only use cold, filtered water to fill the tank. Never use sparkling water. The quality<br />
and filtration of the water to fill the tank will affect the final flavor of the espresso.<br />
Hot water or any other liquid may damage the tank. Do not turn on the machine without water in the<br />
tank; always make sure there is enough water in the tank.<br />
4.5 Priming the water circuit<br />
The machine’s water circuit must be primed in the following cases: before using the machine, for the first<br />
time out of the box, or after long periods of inactivity, and when the water tank becomes empty.<br />
The machine indicates the need to prime the water circuit when the water light is blinking (24).<br />
• Press the main power button (15). The button lights will start blinking slowly. This means the machine is<br />
warming up. The blinking will stop when the machine is warmed up and ready to use.<br />
• Place a container below the steam wand. Open the hot water/steam wand by turning the knob (6)<br />
clockwise all the way.<br />
• Wait until the water light (24) stops blinking.<br />
• Close the hot water/steam wand, by rotating the knob (6) counter-clockwise all the way.<br />
• The machine has been primed when the water light (24) shuts off.<br />
• Remove and empty the container.<br />
The machine will give best performance if the unit is allowed to fully heat up prior to pulling a shot of<br />
espresso. For best results when making espresso, you will need to preheat the portafilter. A preheated<br />
portafilter will result in warmer coffee and will help retain the espresso’s flavourful taste.<br />
• Insert the portafilter into the machine without coffee, and place a cup beneath the portafilter. (Fig. H)<br />
• Press the coffee button (17). Allow the machine to dispense water through the portafilter.<br />
• We suggest you dispense a couple of shots of water through the portafilter to heat it up to the optimal<br />
temperature.<br />
• When not brewing a cup of espresso, leave the cleaned portafilter attached to the machine. This will<br />
ensure the portafilter remains preheated.<br />
The machine is now ready to dispense espresso and steam; please see related sections for operating<br />
details.<br />
NOTE: The temperature gauge is a general indicator of the machine temperature. When the<br />
machine is warming up, the coffee lights (18 and 20) will blink. The machine is warmed up<br />
and ready to use when the coffee lights remain fixed. Even if the temperature gauge is in the green<br />
area, the machine is ready to use only when the coffee lights remain fixed.<br />
4.6 Drip tray adjustment<br />
The drip tray can be adjusted according to the size of the cup(s) used.<br />
When using small espresso cups or shot glasses used to prepare espresso, we recommend raising the drip<br />
tray to the higher position, for optimal crema (Fig. G). If larger cappuccino or latte cups are used, lower the<br />
drip tray. (Fig. H)<br />
To lift the drip tray height, proceed as follows:<br />
• Remove the drip tray grill and the drip tray. (Fig. I)<br />
• Turn the “X” support upside down so that the hinges match up with the reference marks inside the base<br />
of the machine as shown in the figure. (Fig. J and Fig. K)<br />
• Place the drip tray and the grill back into place. (Fig. L)<br />
• 12 • • 13 •<br />
ENGLISH