HITCHBIKER 400 MANUAL-TRI - The Bell Garage
HITCHBIKER 400 MANUAL-TRI - The Bell Garage
HITCHBIKER 400 MANUAL-TRI - The Bell Garage

You also want an ePaper? Increase the reach of your titles
YUMPU automatically turns print PDFs into web optimized ePapers that Google loves.
1x<br />
1x<br />
1/2”-13x3.75”<br />
x1<br />
x1<br />
x1<br />
x1<br />
1.25”<br />
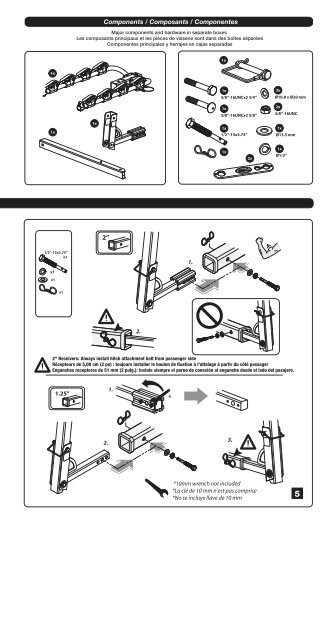
Components / Composants / Componentes<br />
Major components and hardware in separate boxes<br />
Les composants principaux et les pièces de visserie sont dans des boîtes séparées<br />
Componentes principales y herrajes en cajas separadas<br />
1x<br />
2”<br />
2.<br />
1.<br />
2.<br />
*<br />
1.<br />
1x<br />
3/8”-16UNCx2 3/4”<br />
1x<br />
3/8”-16UNCx2 5/8”<br />
1x<br />
1/2”-13x3.75”<br />
1x<br />
3.<br />
2x<br />
3x<br />
Ø10.8 x Ø20 mm<br />
2x<br />
3/8”-16UNC<br />
1x<br />
Ø13.5 mm<br />
2" Receivers: Always install hitch attachment bolt from passenger side<br />
Récepteurs de 5,08 cm (2 po) : toujours installer le boulon de xation à l’attelage à partir du côté passager<br />
Enganches receptores de 51 mm (2 pulg.): instale siempre el perno de conexión al enganche desde el lado del pasajero.<br />
1x<br />
*10mm wrench not included<br />
*La clé de 10 mm n’est pas comprise<br />
*No se incluye llave de 10 mm<br />
1x<br />
Ø1/2”<br />
5