

Hot and Cold Water Dispenser Chaude ou Froide ... - Air & Water
Hot and Cold Water Dispenser Chaude ou Froide ... - Air & Water
Hot and Cold Water Dispenser Chaude ou Froide ... - Air & Water

Create successful ePaper yourself
Turn your PDF publications into a flip-book with our unique Google optimized e-Paper software.
COLD HOT<br />
WARNING!<br />
Always unplug the unit before cleaning to avoid electric shock.<br />
Failure to do so may result in death or injury.<br />
• Wipe with clean warm water <strong>and</strong> dry with a soft cloth.<br />
• Do not use harsh chemicals, abrasives, ammonia, chlorine bleach, concentrated<br />
detergents, solvents or metal sc<strong>ou</strong>ring pads. Some of these chemicals may<br />
dissolve, damage <strong>and</strong>/or discolor the unit.<br />
• The spilled water in the drip tray must be removed regularly <strong>and</strong> cleaned<br />
properly to avoid any bacteria <strong>and</strong> residue build-up.<br />
• We recommend that y<strong>ou</strong> clean the water dispenser at least twice a year. When<br />
cleaning, y<strong>ou</strong> do not need to take anything apart. Simply p<strong>ou</strong>r the baking<br />
soda/water solution thr<strong>ou</strong>gh the water guard. Then rinse with plenty of water<br />
<strong>and</strong> allow the water to drain.<br />
• Remove the accumulated water from the drip tray, <strong>and</strong> wipe the compartment<br />
clean.<br />
CLEANING THE CONDENSER COILS<br />
We recommend that y<strong>ou</strong> move the dispenser away from the wall <strong>and</strong> vacuum<br />
or brush the coils on the rear of the unit at least 4 times a year. Some operating<br />
environments may require more frequent cleaning.<br />
FOR LONG VACATIONS OR ABSENCES / mOVING<br />
• Turn OFF water dispenser.<br />
• Unplug the unit.<br />
• If bottle still contains water, remove it quickly <strong>and</strong><br />
carefully to avoid spillage.<br />
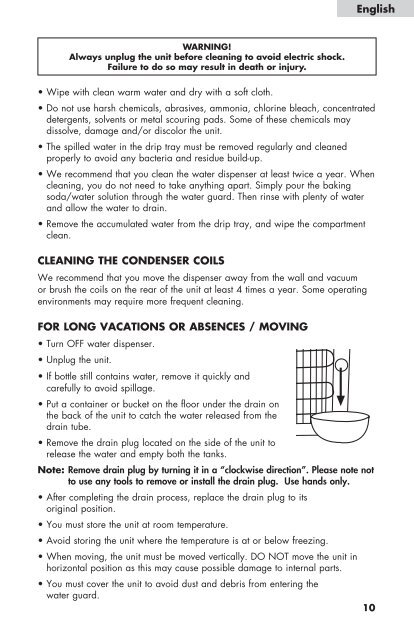
• Put a container or bucket on the floor under the drain on<br />
the back of the unit to catch the water released from the<br />
drain tube.<br />
• Remove the drain plug located on the side of the unit to<br />
release the water <strong>and</strong> empty both the tanks.<br />
Note: Remove drain plug by turning it in a “clockwise direction”. Please note not<br />
to use any tools to remove or install the drain plug. Use h<strong>and</strong>s only.<br />
• After completing the drain process, replace the drain plug to its<br />
original position.<br />
• Y<strong>ou</strong> must store the unit at room temperature.<br />
• Avoid storing the unit where the temperature is at or below freezing.<br />
• When moving, the unit must be moved vertically. DO NOT move the unit in<br />
horizontal position as this may cause possible damage to internal parts.<br />
• Y<strong>ou</strong> must cover the unit to avoid dust <strong>and</strong> debris from entering the<br />
water guard.<br />
English<br />
10


