installation manual multi-split air conditioner - Haier.com
installation manual multi-split air conditioner - Haier.com
installation manual multi-split air conditioner - Haier.com

You also want an ePaper? Increase the reach of your titles
YUMPU automatically turns print PDFs into web optimized ePapers that Google loves.
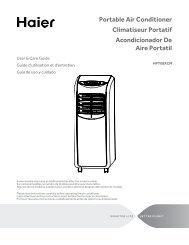
Pump Down Operation<br />
In order to protect the environment, be sure to pump down when relocating or disposing of the unit.<br />
1) Remove the valve caps from liquid stop valve and gas stop valve.<br />
2) Carry out forced cooling operation.<br />
3) After five to ten minutes, close the liquid stop valve with a hexagonal wrench.<br />
4) After two to three minutes, close the gas stop vaile and stop forced cooling<br />
operation.<br />
Wiring work<br />
1. Electric wiring<br />
The <strong>air</strong> <strong>conditioner</strong> must use special circuit , and wiring by the qualified electrician according to the wiring rules specified in national<br />
standard.<br />
The grounding wire and the neutral wire shall be strictly separated. Connect the neutral wire with grounding wire is incorrect.<br />
The electric leakage breaker must be installed.<br />
All the electric wire must be copper wire.Power supply:<br />
The wiring method of power line is Y connection. If the power line is damaged, in order to avoid risk of electric shock, it must be replaced<br />
by the manufacturer or its rep<strong>air</strong> center or other similar qualified person.The connecting cable must be shielded.<br />
Fuse: T3.15A 250VAC T16A 250VAC (Please check with the outdoor unit wiring diagram.)<br />
Please check the circuit diagram about the fuse replaced.<br />
2. Wiring method<br />
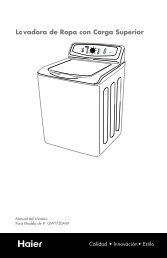
Wiring method of orbicular terminals<br />
For the connection wire with orbicular terminals, its wiring method is as shown in<br />
the right figure: remove the connecting screw, put the screw through the ring on<br />
the end of the wire, then connect to the terminal block and fasten screw.<br />
Wiring method of straight terminals.<br />
For the connection wire without orbicular terminals, its wiring method is: loosen<br />
the connection screw, and insert the end of the connection wire <strong>com</strong>pletely into<br />
the Terminal block, then fasten the screw.<br />
Slightly pull the wire outwards to confirm it is firmly held.<br />
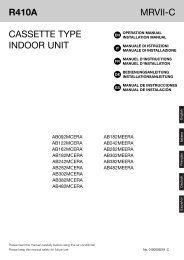
Crimp connection method for wires without terminals<br />
Connect the wire with<br />
same diameter to the<br />
two sides of the terminal<br />
Do not connect the<br />
wire with same diameter<br />
to the same side<br />
Do not connect the<br />
wire with different<br />
diameters<br />
Note: Power line and <strong>com</strong>munication wire are provided by consumers themselves.<br />
12<br />
liquid<br />
stop valve<br />
Gas<br />
stop valve<br />
Crimp connection method for connection wire<br />
After connection,the wire must be fastened by wire cover. The wire cover shall press on the protection<br />
coat of the connection wire,as shown in right top figure.<br />
Note:When connecting the wiring,confirm the terminal number of indoor and outdoor units carefully.<br />
Incorrect wiring will damage the controller of <strong>air</strong> <strong>conditioner</strong> or the unit can not operate.<br />
Close<br />
Hexagonal<br />
wernch<br />
Valve cap<br />
Wiring Method for<br />
Ring Terminal Block<br />
Correct Pressing Wrong Pressing<br />
Terminal<br />
block<br />
Pressing<br />
Clamps<br />
3. Wiring method of outdoor unit:<br />
Power line<br />
Remove the rep<strong>air</strong> board of the outdoor unit and loosen the wire cover A,then put the live wire, neutral wire and grounding wire through<br />
the wire cover ,and connect them to terminal block correspon dingly. After connection, fasten wire cover to its previous state.<br />
Communication wire of indoor unit.<br />
Loosen wire cover , put the <strong>com</strong>munication wire through the wire cover B, and connect them to terminal block correspondingly. After<br />
connection, fasten wire cover B to its previous state.