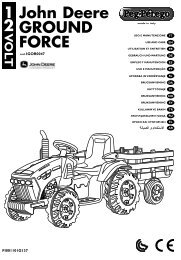
Navicella - Peg Perego
Navicella - Peg Perego
Navicella - Peg Perego

You also want an ePaper? Increase the reach of your titles
YUMPU automatically turns print PDFs into web optimized ePapers that Google loves.
with 3 safety belts. The central one can be 3-point or a lap<br />
belt.<br />
We recommend positioning the bassinet unit on the<br />
vehicle’s rear seats with the end for the child’s head above<br />
the central seat.<br />
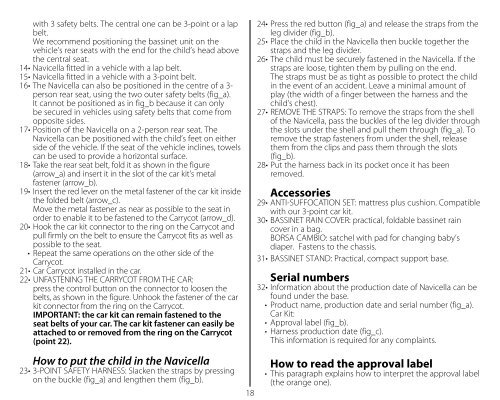
14• <strong>Navicella</strong> fitted in a vehicle with a lap belt.<br />
15• <strong>Navicella</strong> fitted in a vehicle with a 3-point belt.<br />
16• The <strong>Navicella</strong> can also be positioned in the centre of a 3-<br />
person rear seat, using the two outer safety belts (fig_a).<br />
It cannot be positioned as in fig_b because it can only<br />
be secured in vehicles using safety belts that come from<br />
opposite sides.<br />
17• Position of the <strong>Navicella</strong> on a 2-person rear seat. The<br />
<strong>Navicella</strong> can be positioned with the child’s feet on either<br />
side of the vehicle. If the seat of the vehicle inclines, towels<br />
can be used to provide a horizontal surface.<br />
18• Take the rear seat belt, fold it as shown in the figure<br />
(arrow_a) and insert it in the slot of the car kit's metal<br />
fastener (arrow_b).<br />
19• Insert the red lever on the metal fastener of the car kit inside<br />
the folded belt (arrow_c).<br />
Move the metal fastener as near as possible to the seat in<br />
order to enable it to be fastened to the Carrycot (arrow_d).<br />
20• Hook the car kit connector to the ring on the Carrycot and<br />
pull firmly on the belt to ensure the Carrycot fits as well as<br />
possible to the seat.<br />
• Repeat the same operations on the other side of the<br />
Carrycot.<br />
21• Car Carrycot installed in the car.<br />
22• UNFASTENING THE CARRYCOT FROM THE CAR:<br />
press the control button on the connector to loosen the<br />
belts, as shown in the figure. Unhook the fastener of the car<br />
kit connector from the ring on the Carrycot.<br />
IMPORTANT: the car kit can remain fastened to the<br />
seat belts of your car. The car kit fastener can easily be<br />
attached to or removed from the ring on the Carrycot<br />
(point 22).<br />
How to put the child in the <strong>Navicella</strong><br />
23• 3-POINT SAFETY HARNESS: Slacken the straps by pressing<br />
on the buckle (fig_a) and lengthen them (fig_b).<br />
18<br />
24• Press the red button (fig_a) and release the straps from the<br />
leg divider (fig_b).<br />
25• Place the child in the <strong>Navicella</strong> then buckle together the<br />
straps and the leg divider.<br />
26• The child must be securely fastened in the <strong>Navicella</strong>. If the<br />
straps are loose, tighten them by pulling on the end.<br />
The straps must be as tight as possible to protect the child<br />
in the event of an accident. Leave a minimal amount of<br />
play (the width of a finger between the harness and the<br />
child’s chest).<br />
27• REMOVE THE STRAPS: To remove the straps from the shell<br />
of the <strong>Navicella</strong>, pass the buckles of the leg divider through<br />
the slots under the shell and pull them through (fig_a). To<br />
remove the strap fasteners from under the shell, release<br />
them from the clips and pass them through the slots<br />
(fig_b).<br />
28• Put the harness back in its pocket once it has been<br />
removed.<br />
Accessories<br />
29• ANTI-SUFFOCATION SET: mattress plus cushion. Compatible<br />
with our 3-point car kit.<br />
30• BASSINET RAIN COVER: practical, foldable bassinet rain<br />
cover in a bag.<br />
BORSA CAMBIO: satchel with pad for changing baby’s<br />
diaper. Fastens to the chassis.<br />
31• BASSINET STAND: Practical, compact support base.<br />
Serial numbers<br />
32• Information about the production date of <strong>Navicella</strong> can be<br />
found under the base.<br />
• Product name, production date and serial number (fig_a).<br />
Car Kit:<br />
• Approval label (fig_b).<br />
• Harness production date (fig_c).<br />
This information is required for any complaints.<br />
How to read the approval label<br />
• This paragraph explains how to interpret the approval label<br />
(the orange one).