Bedienungsanleitung Elektrische Markisenkurbel - 1DayFly.com
Bedienungsanleitung Elektrische Markisenkurbel - 1DayFly.com
Bedienungsanleitung Elektrische Markisenkurbel - 1DayFly.com

Create successful ePaper yourself
Turn your PDF publications into a flip-book with our unique Google optimized e-Paper software.
i<br />
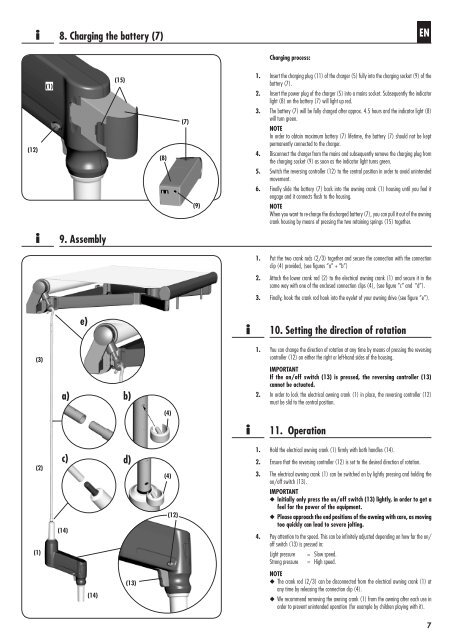
8. Charging the battery (7)<br />
EN<br />
Charging process:<br />
(12)<br />
(1)<br />
(15)<br />
(8)<br />
(7)<br />
(9)<br />
1. Insert the charging plug (11) of the charger (5) fully into the charging socket (9) of the<br />
battery (7).<br />
2. Insert the power plug of the charger (5) into a mains socket. Subsequently the indicator<br />
light (8) on the battery (7) will light up red.<br />
3. The battery (7) will be fully charged after approx. 4.5 hours and the indicator light (8)<br />
will turn green.<br />
NOTE<br />
In order to obtain maximum battery (7) lifetime, the battery (7) should not be kept<br />
permanently connected to the charger.<br />
4. Disconnect the charger from the mains and subsequently remove the charging plug from<br />
the charging socket (9) as soon as the indicator light turns green.<br />
5. Switch the reversing controller (12) to the central position in order to avoid unintended<br />
movement.<br />
6. Finally slide the battery (7) back into the awning crank (1) housing until you feel it<br />
engage and it connects flush to the housing.<br />
NOTE<br />
When you want to re-charge the discharged battery (7), you can pull it out of the awning<br />
crank housing by means of pressing the two retaining springs (15) together.<br />
i<br />
9. Assembly<br />
1. Put the two crank rods (2/3) together and secure the connection with the connection<br />
clip (4) provided, (see figures “a” + “b”)<br />
2. Attach the lower crank rod (2) to the electrical awning crank (1) and secure it in the<br />
same way with one of the enclosed connection clips (4), (see figure “c” and “d”).<br />
3. Finally, hook the crank rod hook into the eyelet of your awning drive (see figure “e”).<br />
e)<br />
i<br />
10. Setting the direction of rotation<br />
(3)<br />
a) b)<br />
1. You can change the direction of rotation at any time by means of pressing the reversing<br />
controller (12) on either the right or left-hand sides of the housing.<br />
Important<br />
If the on/off switch (13) is pressed, the reversing controller (13)<br />
cannot be actuated.<br />
2. In order to lock the electrical awning crank (1) in place, the reversing controller (12)<br />
must be slid to the central position.<br />
(4)<br />
i<br />
11. Operation<br />
(2)<br />
(1)<br />
c)<br />
(14)<br />
d)<br />
(4)<br />
(12)<br />
1. Hold the electrical awning crank (1) firmly with both handles (14).<br />
2. Ensure that the reversing controller (12) is set to the desired direction of rotation.<br />
3. The electrical awning crank (1) can be switched on by lightly pressing and holding the<br />
on/off switch (13).<br />
Important<br />
◆◆<br />
Initially only press the on/off switch (13) lightly, in order to get a<br />
feel for the power of the equipment.<br />
◆◆<br />
Please approach the end positions of the awning with care, as moving<br />
too quickly can lead to severe jolting.<br />
4. Pay attention to the speed. This can be infinitely adjusted depending on how far the on/<br />
off switch (13) is pressed in:<br />
Light pressure = Slow speed.<br />
Strong pressure = High speed.<br />
(14)<br />
(13)<br />
Note<br />
◆◆<br />
The crank rod (2/3) can be disconnected from the electrical awning crank (1) at<br />
any time by releasing the connection clip (4).<br />
◆◆<br />
We re<strong>com</strong>mend removing the awning crank (1) from the awning after each use in<br />
order to prevent unintended operation (for example by children playing with it).<br />
7