
Create successful ePaper yourself
Turn your PDF publications into a flip-book with our unique Google optimized e-Paper software.
My modules will not respond to my controller.<br />
Make sure that the House Code on all Modules and Controllers are set to the same House<br />
Code (A .. P).<br />
My modules will not react to my remote / sensor.<br />
When you use a remote or sensor, you should have at least one TM13 Transceiver or<br />
Marmitek Security Console installed in your house. These components will translate the radio<br />
signals to the Marmitek X-10 signal on the power line. Only one Transceiver should be<br />
installed for all remotes and sensors set to the same House Code.<br />
ENGLISH<br />
Am I able to increase the range of my remotes by using more Transceivers?<br />
Yes, you can use more than one TM13 Transceiver in your home when the range of your<br />
remotes is not sufficient. The TM13 is using so called collision detection to prevent signals to<br />
be disturbed when more than one TM13 is transmitting. TM13’s will wait for a quite power<br />
line before transmitting their data. To prevent your Marmitek X-10 System to become slow or<br />
to prevent dimming from becoming less smooth, make sure that the TM13 units are placed as<br />
far away from each other as possible.<br />
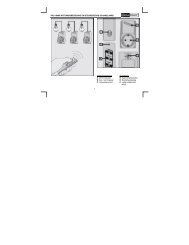
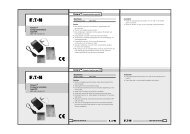
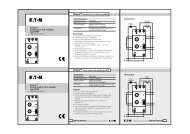
USER INSTRUCTIONS <strong>SW10</strong> <strong>SHUTTER</strong> <strong>SWITCH</strong><br />
<strong>SWITCH</strong> OFF APPROPRIATE MAINS FUSE BEFORE INSTALLING!<br />
(INSTALLATION BY A CERTIFIED INSTALLER)<br />
1. Take of the switch cover, remove both screws and take off the mounting plate.<br />
2. Mount the mounting plate onto the flush mounting box with countersunk screws.<br />
Position the plastic décor frame.<br />
3. Connect cables:<br />
Phase to L (_)<br />
Neutral to N<br />
UP to UP<br />
Down to DN<br />
4. When connected, position Shutter Switch on the mounting plate and reinsert both screws.<br />
5. Now program the switch using the following procedure:<br />
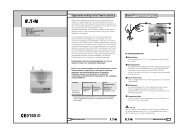
PROGRAMMING THE <strong>SW10</strong><br />
Now the control electronics has to be calibrated in order to adjust to the time the shutter<br />
motor need from fully closed to fully open:<br />
1. Switch on mains fuse.<br />
2. Use the switch to drive the shutter all the way up.<br />
3. With the aid of a screwdriver, adjust the House Code dial to the * position.<br />
4. Now press the lower push button until the shutter is closed completely.<br />
5. Release the button as soon as the shutter is closed. The electronics measure the elapsed<br />
time and stores it internally so that the switch always knows the position of the shutter.<br />
6. Set the rotary code switches on the front side to the desired address<br />
7. Put the switch cover back on.<br />
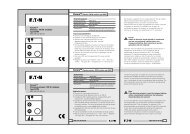
The calibration is now completed. The internal electronics have measured and stored the time<br />
for raising and lowering the shutter. These values will not be lost even in case of mains failure.<br />
You are now able to control the switch both by hand and with a Marmitek X-10<br />
Controller (the switch will not respond to Marmitek X-10 signals when the programming has<br />
not been executed).<br />
The switch will respond to the following commands: ON: fully open, OFF: fully closed,<br />
DIM : 4 % up, BRIGHT: 4 % down.<br />
<strong>SW10</strong> TM<br />
5