Europa B evo Europa B evo 24 - Tecno-Gaz
Europa B evo Europa B evo 24 - Tecno-Gaz
Europa B evo Europa B evo 24 - Tecno-Gaz

Create successful ePaper yourself
Turn your PDF publications into a flip-book with our unique Google optimized e-Paper software.
Istruzioni per l’uso<br />
Instructions for use<br />
Mode d’emploi<br />
Bedienungsanleitung<br />
Instrucciones de uso<br />
<strong>Europa</strong> B <strong>evo</strong><br />
<strong>Europa</strong> B <strong>evo</strong> <strong>24</strong><br />
ITALIANO<br />
ENGLISH<br />
FRANCAIS<br />
ESPANOL<br />
DEUTCH<br />
DXBT100 Rev_4
0434<br />
Costruito da / The Manufacturer / Fabriqué<br />
par / Fabricado por / Hersteller:<br />
MEDILINE ITALIA s.r.l.<br />
Via 8 marzo, 4<br />
43025 Corte Tegge – Cavriago (RE)<br />
ITALY
ITALIANO<br />
Gentile Cliente,<br />
La ringraziamo per aver scelto la nostra autoclave, sapremo ricambiare la Sua fiducia con<br />
la massima attenzione e un servizio sicuramente adeguato alle Sue aspettative.<br />
L’autoclave da Lei scelta è la massima espressione in fatto di tecnologia applicata. Le<br />
garantisce la sicura sterilizzazione di tutti i tipi di strumenti e materiali: solidi, cavi, porosi,<br />
liberi ed imbustati.<br />
Prima di utilizzare questa autoclave, La invitiamo a leggere con massima attenzione il<br />
manuale d’uso e successivamente alloggiarlo in un luogo accessibile a tutti gli operatori<br />
addetti alla sterilizzazione.<br />
L’autoclave deve essere utilizzata solo ed esclusivamente per gli usi previsti dal<br />
costruttore.<br />
Per l’installazione, manutenzione ed assistenza si rivolga esclusivamente a tecnici<br />
autorizzati. La invitiamo ad usare e richiedere esclusivamente ricambi originali.<br />
1
ITALIANO<br />
INDICE<br />
1. CONSULTAZIONE MANUALE<br />
1.1 GLOSSARIO<br />
1.2 SIMBOLOGIA<br />
1.3 IMMAGINI CON DESCRIZIONE POSIZIONE<br />
2. SICUREZZE<br />
2.1 MARCATURA DI SICUREZZA<br />
2.2 DISPOSITIVI DI SICUREZZA<br />
2.3 NOTE DI SICUREZZA<br />
2.4 SMALTIMENTO<br />
3. DESTINAZIONE D’USO DELL’AUTOCLAVE<br />
4. DATI TECNICI<br />
4.1 MECCANICI<br />
4.2 ELETTRICHE<br />
4.3 CAMERA<br />
4.4 SERBATOIO ACQUA DEMINERALIZZATA<br />
4.5 SERBATOIO ACQUA UTILIZZATA<br />
4.6 FILTRO BATTERIOLOGICO<br />
5. ACCESSORI<br />
6. DISINBALLAGGIO<br />
7. INSTALLAZIONE<br />
8. ISTRUZIONI DI UTILIZZO<br />
8.1 ACCENSIONE AUTOCLAVE<br />
8.2 CARICO SERBATOIO ACQUA DEMINERALIZZATA<br />
8.3 CARICO MANUALE SERBATOIO ACQUA DEMINERALIZZATA<br />
8.4 CARATTERISTICHE ACQUA DA UTILIZZARE<br />
8.5 CARICO MATERIALI IN AUTOCLAVE<br />
8.6 INIZIO CICLO DI STERILIZZAZIONE<br />
8.7 FINE CICLO<br />
8.8 SCARICO MATERIALI STERILIZZATI<br />
8.9 SCARICO ACQUA UTILIZZATA<br />
8.10 INTERROMPERE UN CICLO DI STERILIZZAZIONE<br />
9. CICLI DI STERILIZZAZIONE<br />
9.1 DESCRIZIONE CICLI<br />
9.2 CICLI OPERATIVI<br />
9.3 CICLI NOTTE<br />
2
ITALIANO<br />
9.4 CICLI TEST<br />
9.5 DIAGRAMMA DI CICLO<br />
10. MESSAGGI DI ERRORE O ALLARME<br />
10.1 ELENCO DEI MESSAGGI DI ERRORE-ALLARME<br />
11. MANUTENZIONE E PREVENZIONE<br />
11.1 SOSTITUZIONE DEL FILTRO BATTERIOLOGICO<br />
11.2 PULIZIA DELLA CAMERA<br />
11.3 PULIZIA GUARNIZIONE PORTELLO<br />
11.4 REGOLAZIONE PORTELLO<br />
11.5 SOSTITUZIONE DELLA CARTA DELLA STAMPANTE<br />
11.6 INDICAZIONI STATO STAMAPANTE<br />
12. PROGRAMMAZIONE E PARAMETRI DISPLAY<br />
12.1 SELEZIONE LINGUA<br />
12.2 SELEZIONE ORA<br />
12.3 SELEZIONE MINUTI<br />
12.4 SELEZIONE SECONDI<br />
12.5 SELEZIONE DATA<br />
12.6 SELEZIONE MESE<br />
12.7 SELEZIONE ANNO<br />
12.8 VISUALIZZAZIONE PRESSIONE ATMOSFERICA<br />
12.9 SELEZIONE CARICO ACQUA<br />
13. SOLUZIONE A PROBLEMI OPERATIVI<br />
13.1 L’AUTOCLAVE NON ASCIUGA CORRETTAMENTE<br />
13.2 LA CAMERA DELL’AUTOCLAVE DIVENTA BIANCA<br />
13.3 LA CAMERA DELL’AUTOCLAVE PRESENTA MACCHIE VERDI<br />
13.4 IL CICLO DI STERILIZZAZIONE SI INTERROMPE<br />
13.5 L’AUTOCLAVE NON RICEVE I COMANDI<br />
13.6 LA STAMPANTE DELL’AUTOCLAVE NON STAMPA<br />
13.7 MACCHIE SUGLI STRUMENTI<br />
14. DEMINERALIZZATORE<br />
14.1 IMPOSTAZIONE SISTEMI DI DEMINERALIZZAZIONE<br />
14.2 COLLEGAMENTO SISTEMI DI DEMINERALIZZAZIONE<br />
14.3 CAMBIO CARTUCCIA RESINA E FILTRO<br />
15. PROCEDURE STANDARD STERILIZZAZIONE<br />
16. ISTRUZIONE PER LA SPEDIZIONE DELL’AUTOCLAVE<br />
17. PROCEDURE PER SERVIZIO ED ASSISTENZA<br />
18. GARANZIA<br />
3
ITALIANO<br />
01 CONSULTAZIONE MANUALE<br />
1.1 Glossario<br />
VUOTO<br />
CAMERA<br />
FILTRO<br />
TRAY<br />
PORTATRAY<br />
DEMINERALIZZATORE<br />
Pressione inferiore alla pressione atmosferica<br />
Corpo cilindrico in acciaio che alloggia i dispositivi da sterilizzare<br />
Dispositivo atto a trattenere particelle<br />
Cassetto di supporto del carico da sterilizzare<br />
Struttura di supporto dei tray in camera di sterilizzazione<br />
Dispositivo atto ad eliminare i sali minerali dell'acqua<br />
proveniente dalla rete idrica<br />
HELIX TEST Test di verifica della penetrazione del vapore in un corpo cavo<br />
BOWIE - DICK TEST Test di verifica della penetrazione del vapore in un corpo poroso<br />
VACUUM TEST Test di verifica del mantenimento del grado di vuoto in camera<br />
FILTRO<br />
BATTERIOLOGICO<br />
Dispositivo atto a trattenere le particelle in sospensione nell'aria<br />
superiori a 0,3 µm.<br />
SOVRAPRESSIONE Pressione superiore a quella standard per il ciclo considerato<br />
SOVRATEMPERATURA Temperatura superiore a quella standard per il ciclo considerato<br />
RESINE<br />
Componente sostituibile (cartuccia) del demineralizzatore che<br />
elimina tutti i sali di tipo inorganico<br />
1.2 Simbologia<br />
ATTENZIONE: Indicazione da seguire per evitare danni a cose o<br />
compromettere la buona riuscita del ciclo<br />
PERICOLO: Indicazione di sicurezza per evitare lesioni<br />
TENSIONE PERICOLOSA<br />
TOGLIERE TENSIONE PRIMA DI RIMUOVERE IL<br />
COPERCHIO<br />
ALTA TEMPERATURA<br />
4
ITALIANO<br />
CONNESSIONE DI TERRA<br />
Ai sensi della DIRETTIVA 2002/96/CE questo simbolo indica che<br />
il prodotto, alla fine della sua vita utile, non deve essere smaltito<br />
come rifiuto urbano.<br />
Corrente Alternata<br />
Attenzione alta tensione pericolo di folgorazione<br />
Fusibile<br />
Leggere attentamente il manuale<br />
Fabbricato il -- / -- / --<br />
Materiale Non Imbustato<br />
Materiale Imbustato<br />
Massimo livello acqua demineralizzata<br />
Minimo livello acqua demineralizzata<br />
Massimo livello acqua utilizzata<br />
pos. Posizione (numero a cui corrisponde il componente nelle figure)<br />
FIG. Figura<br />
Ω Ohm (unità di misura della Resistenza Elettrica)<br />
s Secondi (unità di misura del tempo)<br />
kW KiloWatt (unità di misura della Potenza)<br />
Hz Hertz (unità di misura della frequenza)<br />
mm Millimetri (unità di misura della Lunghezza)<br />
A Amperé (unita di misura della corrente elettrica)<br />
V Volt (unità di misura della tensione elettrica)<br />
°C Gradi Centigradi (unità di misura della Temperatura)<br />
kg Chilogrammi (unità di misura della Massa)<br />
5
ITALIANO<br />
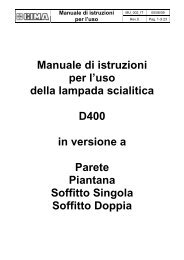
1.3 Immagini con descrizione posizione<br />
Piedino distanziale<br />
FIG.1<br />
Troppo pieno acqua demineralizzata<br />
Rubinetto di scarico acqua demineralizzata –collegamento<br />
demineralizzatore<br />
Valvola di sicurezza<br />
Troppo pieno acqua utilizzata – scarico condensa<br />
Rubinetto di scarico acqua utilizzata<br />
Alimentazione elettrica principale<br />
Collegamento presa elettrica demineralizzatore - SOLO ED<br />
ESCUSIVAMENTE DEMINERALIZZATORE<br />
Fusibile 12A<br />
Fusibile 12A<br />
Fusibile 500mA<br />
6
ITALIANO<br />
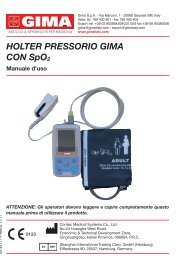
FIG.2<br />
7
ITALIANO<br />
Filtro Batteriologico<br />
Carico Manuale Acqua demineralizzata con Tappo<br />
Carico Acqua demineralizzata<br />
Scarico Acqua Usata utilizzata<br />
Display<br />
Stampante<br />
Connessione RS232<br />
Connettore B-TEST (incubatore) (paragrafo 2.3)<br />
Interruttore Generale (MAINS)<br />
Ciclo 121°C Non imbustati<br />
Ciclo 121°C Imbustati<br />
Ciclo 134°C Non imbustati<br />
Ciclo 134°C Imbustati<br />
Ciclo Prion<br />
Ciclo 134°C Flash<br />
Vacuum Test<br />
Led Helix – B&D Test<br />
Minimo livello acqua demineralizzata<br />
Massimo livello acqua demineralizzata<br />
Massimo livello acqua utilizzata<br />
Pulsante START-STOP<br />
Pulsante Caricamento Acqua demineralizzata<br />
Pulsante Selezione Ciclo<br />
Pulsante Apertura porta<br />
8
ITALIANO<br />
02 SICUREZZA<br />
2.1 Marcatura di sicurezza<br />
TENSIONE PERICOLOSA<br />
TOGLIERE TENSIONE PRIMA DI RIMUOVERE IL<br />
COPERCHIO<br />
ALTA TEMPERATURA<br />
CONNESSIONE A TERRA<br />
2.2 Dispositivi di sicurezza<br />
I Dispositivi di sicurezza sono i seguenti:<br />
-Valvola di sicurezza tarata 2.4 bar 0/+10%<br />
-Blocco elettromagnetico per evitare l’apertura del portello durante l’esecuzione<br />
del ciclo.<br />
-Termostato di sicurezza<br />
2.3 Note di Sicurezza<br />
-Il produttore è responsabile del prodotto immesso sul mercato ai sensi della normativa<br />
vigente. La responsabilità decade nel momento in cui vengono eseguite operazioni sul<br />
dispositivo, o su parte di esso, da personale non qualificato o con l’utilizzo di parti di<br />
ricambio non originali.<br />
-Il locale dove si installa l’autoclave non deve essere a rischio potenziale di esplosione e/o<br />
incendio.<br />
-L’autoclave deve essere installata in un ambiente conforme ai requisiti legislativi vigenti.<br />
-Il connettore dell’incubatore (FIG.1 pos..18.), deve essere utilizzato solo ed<br />
esclusivamente per il collegamento del B-TEST. Connessione a 230 V a.c. indipendente<br />
dall’interruttore generale (MAINS), non toccare il connettore con mani bagnate o umide e<br />
proteggerlo da eventuali schizzi d’acqua.<br />
9
ITALIANO<br />
2.4 Smaltimento<br />
Questo prodotto è soggetto alla direttiva 2002/96/EC del Parlamento europeo e del<br />
Consiglio dell’Unione europea sui rifiuti di apparecchiature elettriche (RAEE). Nelle<br />
giurisdizioni che adottano tale direttiva, il prodotto è stato lanciato sul mercato in data<br />
successiva al 13 agosto 2005 e non deve essere smaltito come rifiuto domestico non<br />
riciclabile. Utilizzare le apposite strutture RAEE di raccolta locali per lo smaltimento di<br />
questo prodotto oppure attenersi alle disposizioni vigenti.<br />
03 IMPIEGO E DESTINAZIONE D’USO DELL’AUTOCLAVE<br />
L’autoclave è in grado di sterilizzare le tre tipologie di carico previste dalla norma<br />
EN13060, specificatamente :<br />
MATERIALI FERROSI O<br />
SOLIDI<br />
CORPI POROSI<br />
CORPI CAVI<br />
Strumenti senza cavità e senza ostacoli per la penetrazione<br />
del vapore<br />
Materiali semplici o composti che possono assorbire i fluidi<br />
(tessuti, camici, garze, medicazioni ecc…)<br />
Materiali o dispositivi con cavità, ostruzioni ecc…<br />
Questi si suddividono in due tipologie, classificate secondo<br />
lunghezza e diametro. Indicativamente<br />
TIPO B: cannule, tubi o dispositivi con passaggi<br />
consider<strong>evo</strong>li<br />
TIPO A: turbine, manipoli e dispositivi con fori ciechi o di<br />
piccole dimensioni.<br />
L’autoclave deve essere utilizzata, solo ed esclusivamente, per la sterilizzazione di<br />
strumenti e materiali compatibili con il sistema di sterilizzazione a vapore.<br />
L’autoclave può essere utilizzata nel campo dentale, medicale, estetico ed in generale in<br />
tutti i settori in cui si procede alla sterilizzazione degli strumenti e dei materiali.<br />
Questo dispositivo è stato certificato per la sterilizzazione dei seguenti materiali* :<br />
EUROPA B EVO EUROPA B EVO <strong>24</strong><br />
Materiali solidi liberi ed imbustati kg. 5,00 kg. 7,00<br />
Materiali cavi di tipo A e B per un<br />
massimo<br />
kg. 5,00 kg. 7,00<br />
Materiali porosi per un massimo kg. 1,50 kg. 2,0<br />
*Valido solo per i paesi europei<br />
Accertarsi sempre che i carichi sottoposti a sterilizzazione<br />
possano sopportare le temperature del ciclo prescelto.<br />
10
ITALIANO<br />
04 DATI TECNICI<br />
4.1 Meccanici<br />
EUROPA B EVO EUROPA B EVO <strong>24</strong><br />
Temperatura di lavoro<br />
+5°C ÷ +40°C<br />
Altitudine MAX<br />
2.000 m<br />
Umidità relativa MAX a 30°C 80%<br />
Umidità relativa MAX a 40°C 50%<br />
Dimensioni ingombro (L x H x P) 510 X 390 X 590 mm 510 X 390 X 730 mm<br />
Ingombro portello aperto<br />
300 mm<br />
Peso (serbatoi vuoti) 54 kg 58 kg<br />
Peso (serbatoi pieni) 63 kg 67 kg<br />
Peso per area di supporto 2058 N/m 2 2058 N/m 2<br />
Volume 0.12 m 3 0.15 m 3<br />
Livello potenza sonora<br />
< 70 db A<br />
4.2 Elettrici<br />
EUROPA B EVO EUROPA B EVO <strong>24</strong><br />
Tensione alimentazione<br />
230 V a.c. +/-10 % single phase<br />
Potenza 1,7 kW 2.0 kW<br />
Frequenza<br />
50 / 60 Hz<br />
Cavo alimentazione 2 + 1 x 1mm 2<br />
Fusibili<br />
6.3 x 32 - 12 A<br />
Calore trasmesso<br />
3.6 E +6 J / ora<br />
4.3 Camera<br />
EUROPA B EVO EUROPA B EVO <strong>24</strong><br />
Pressione lavoro MAX<br />
2.4 bar (relativi)<br />
Vuoto MAX<br />
- 0.9 bar (relativi)<br />
Temperatura MAX 138 °C<br />
Materiale Inox AISI 304<br />
Dimensioni Ø <strong>24</strong>5 x 318 mm Ø <strong>24</strong>5 x 500 mm<br />
4.4 Serbatoio Acqua Pulita<br />
EUROPA B EVO EUROPA B EVO <strong>24</strong><br />
Con<br />
demineralizz.<br />
Senza<br />
demineralizz.<br />
Volume<br />
4,5 l<br />
Cicli eseguibili 4<br />
Vedere istruzioni<br />
demineralizzatore<br />
2<br />
Materiale<br />
polietilene<br />
11
ITALIANO<br />
4.5 Serbatoio Acqua Usata<br />
EUROPA B EVO EUROPA B EVO <strong>24</strong><br />
Volume<br />
4,5 l<br />
Cicli eseguibili 4 2<br />
Materiale<br />
polietilene<br />
Temperatura max. acqua di<br />
scarico<br />
50°C<br />
4.6 Filtro Batteriologico<br />
EUROPA B EVO EUROPA B EVO <strong>24</strong><br />
Diametro<br />
56 mm<br />
Capacità filtrante 0.3 µm<br />
12
ITALIANO<br />
05 ACCESSORI<br />
L’autoclave viene venduta e consegnata completa di tutti gli accessori, gli stessi sono<br />
contenuti nell’ imballo originale.<br />
Accessori in dotazione e opzionali:<br />
- Portatray<br />
EUROPA B EVO EUROPA B EVO <strong>24</strong><br />
Materiale<br />
Alluminio anodizzato<br />
Dimensioni (L x H x P) 192 x 165 x 280 mm 192 x 200 x 470 mm<br />
Immagine<br />
FIG.3<br />
Dotazione prevista 1<br />
FIG.4<br />
-- Portatray opzionali<br />
EUROPA B EVO<br />
EUROPA B EVO<br />
<strong>24</strong><br />
Materiale Alluminio anodizzato /<br />
Dimensioni (L x H x P)<br />
193 x 200 x 280 mm<br />
(200 x 193 x 280) mm<br />
/<br />
Immagine<br />
/<br />
FIG.5<br />
Dotazione prevista 1 /<br />
- Trays<br />
EUROPA B EVO EUROPA B EVO <strong>24</strong><br />
Materiale<br />
Alluminio anodizzato<br />
Dimensioni (L x H x P) 184 x 17 x 286 mm 184 x 17 x 286 mm + 184 x 17 x 140 mm<br />
Immagine<br />
FIG.6<br />
FIG.7<br />
Dotazione prevista 4 4 + 4<br />
+<br />
FIG.8<br />
13
ITALIANO<br />
-- Trays opzionali<br />
EUROPA B EVO EUROPA B EVO <strong>24</strong><br />
Materiale /<br />
Alluminio anodizzato o<br />
acciaio inox<br />
Dimensioni (L x H x P) / 184 x 17 x 460 mm<br />
Immagine /<br />
FIG.9<br />
Dotazione prevista / 4<br />
- Chiave estrazione tray e regolazione portello<br />
Utilizzare per estrarre e manovrare i trays (FIG.11) e per poter regolare il portello (paragrafo<br />
11.4)<br />
Immagine<br />
FIG.10<br />
Dotazione prevista 1<br />
FIG.11<br />
- Imbuto in plastica con tubo<br />
Utilizzare per caricamento acqua manuale (paragrafo 8.3)<br />
Immagine<br />
FIG.12<br />
Dotazione prevista 1<br />
- Spugna pulizia camera e guarnizione portello<br />
Utilizzarla per pulire la camera di sterilizzazione e la guarnizione portello (paragrafo 11.2-<br />
11.3)<br />
Immagine<br />
FIG.13<br />
Dotazione prevista 1<br />
14
ITALIANO<br />
- Raccordo carico acqua<br />
Utilizzarlo con l’imbuto in plastica con tubo per caricamento manuale acqua e con tubo<br />
carico acqua completo di filtro<br />
Immagine<br />
FIG.14<br />
Dotazione prevista 1<br />
- Tubo carico acqua completo di filtro<br />
Utilizzare per caricamento acqua manuale (paragrafo 8.3)<br />
Immagine<br />
FIG.15<br />
Dotazione prevista 1<br />
- Tubo scarico acqua<br />
Utilizzare per scaricare l’acqua utilizzata (paragrafo 8.9)<br />
Immagine<br />
FIG.16<br />
Dotazione prevista 1<br />
- Tubo rilsan<br />
Collegare una estremità del tubo al Troppo pieno acqua utilizzata – scarico condensa<br />
(FIG.1 pos..4.), l’altra ad un contenitore per recupero acqua e condensa.<br />
Immagine<br />
FIG.17<br />
Dotazione prevista 1<br />
15
ITALIANO<br />
- Piedini distanziale posteriore in plastica<br />
Applicare il piedino distanziale posteriore in plastica nella parte posteriore dell’autoclave<br />
(FIG.1 pos..0.) per garantire un’adeguata ventilazione nel caso in cui l’autoclave venga<br />
posizionata vicino ad una parete<br />
Immagine<br />
FIG.18<br />
Dotazione prevista 1<br />
- Tubi per scarico posteriore utenze<br />
1- Tubo per troppo pieno acqua pulita<br />
2- Tubo per rubinetto scarico acqua utilizzata<br />
1- Collegare una estremità del tubo al troppo pieno posteriore acqua pulita (FIG.1 pos..1.),<br />
l’altra ad un contenitore per recupero acqua demineralizzata o in scarico (versione col<br />
demineralizzatore).<br />
2- Collegare una estremità del tubo al raccordo FIG.20 ed avvitarlo al rubinetto di scarico<br />
acqua utilizzata (FIG.1 pos..5.), l’altra ad un contenitore per recupero acqua utilizzata .<br />
Immagine<br />
FIG.19<br />
Dotazione prevista 2<br />
- Raccordo per scarico posteriore acqua utilizzata<br />
Collegare una estremità del tubo per scarico acqua utilizzata al raccordo FIG.20 ed<br />
avvitarlo al rubinetto di scarico acqua utilizzata (FIG.1 pos..5.).<br />
Immagine<br />
FIG.20<br />
Dotazione prevista 1<br />
16
ITALIANO<br />
- Cavo alimentazione<br />
Collegare l’estremità del connettore (FIG.21 pos..B.) al pannello posteriore (FIG.1 pos..6.)<br />
successivamente la spina (FIG.21 pos..A.) direttamente alla presa di alimentazione<br />
dell’impianto elettrico<br />
Immagine<br />
FIG.21<br />
Dotazione prevista 1<br />
IMPORTANTE<br />
Richiedete ed utilizzate solo ed esclusivamente accessori originali.<br />
17
ITALIANO<br />
06 DISIMBALLAGGIO<br />
L’autoclave viene spedita in un imballo idoneo al trasporto, alla movimentazione e alla<br />
protezione dell’autoclave stessa.<br />
L’imballo non deve subire urti, deve essere maneggiato con cura evitando di farlo rotolare<br />
o farlo cadere da altezze superiori a 16 cm.<br />
Nel caso non siano disponibili attrezzature per la movimentazione maneggiare l’autoclave<br />
imballata sempre in due persone.<br />
L’autoclave è supportata con un pallet in legno e racchiusa in un cartone ondulato e<br />
rinforzato internamente da composti di cartone.<br />
Per disimballare l’autoclave, aprire il cartone ondulato, rimuovere le parti di rinforzo ed<br />
estrarla utilizzando le cinghie in dotazione.<br />
E’ consigliata la movimentazione dell’autoclave mediante l’impiego minimo di due persone.<br />
La movimentazione deve avvenire solo con l’utilizzo delle cinghie<br />
IMPORTANTE<br />
Non sollevare mai l’autoclave prendendola dalla parte inferiore del portello o del quadro<br />
comandi, in quanto questa operazione errata, potrebbe danneggiare l’apparecchiatura.<br />
All’interno dell’imballo troverete:<br />
MANUALE D’USO che dovrete leggere attentamente e riporlo in luogo accessibile a tutti<br />
gli operatori, addetti alla sterilizzazione.<br />
CERTIFICAZIONI E DICHIARAZIONI DI CONFORMITA’ che dovrete conservare<br />
TAGLIANDO DI GARANZIA che dovrete compilare e spedire<br />
ATTENZIONE<br />
Conservate sempre l’imballo originale.<br />
18
ITALIANO<br />
07 INSTALLAZIONE<br />
A<br />
FIG.22<br />
EUROPA B EVO EUROPA B EVO <strong>24</strong><br />
610 mm<br />
B 590 mm 730 mm<br />
C<br />
D<br />
50 mm<br />
410 mm<br />
426 mm (anteriore) 403 mm (anteriore)<br />
E<br />
455 mm (posteriore) 444 mm (posteriore)<br />
F 400 mm 431 mm<br />
1 - Installare l’autoclave in ambienti idonei alla sterilizzazione.<br />
2 - Il locale deve essere adeguatamente illuminato ed areato, come previsto dalle direttive<br />
in vigore.<br />
3 - Installare l’autoclave lontano da fonti di calore e schizzi d’acqua.<br />
4 - Posizionare l’autoclave su un piano idoneo a supportarne il peso (min.80 kg) e di<br />
adeguate dimensioni.<br />
5 - Il piano di appoggio dell’autoclave deve essere perfettamente orizzontale.<br />
6 - Posizionare l’autoclave ad una altezza tale che l’utilizzatore possa ispezionare la<br />
totalità della camera di sterilizzazione e riesca a pulirla con facilità.<br />
7 - Aprire il portello dell’autoclave e togliere tutte le buste, che imballano i singoli<br />
accessori, contenuti all’interno della camera di sterilizzazione.<br />
19
ITALIANO<br />
8 - Lasciare all’interno della camera di sterilizzazione solo il portatray con i trays,<br />
posizionare tutti gli altri accessori in un vano esterno a disposizione degli operatori.<br />
9 - Non appoggiare mai sull’autoclave giornali, vassoi, contenitori con liquidi ecc…<br />
10 - Non appoggiarsi mai al portello quando è aperto.<br />
11 – Lasciare uno spazio di almeno 5 cm nella parte posteriore utilizzando il piedino<br />
distanziale posteriore in plastica (FIG.1 pos..0. – FIG.18) e nei fianchi dell’ apparecchio in<br />
modo da garantire la ventilazione necessaria.<br />
12 - Effettuare i collegamenti dei tubi nella parte posteriore (capitolo 5)<br />
13 - Accertarsi sempre che l’impianto elettrico a cui si allaccia l’autoclave sia conforme alle<br />
norme vigenti e dimensionato in maniera adeguata alle caratteristiche dell’apparecchio.<br />
14 - Prendere il cavo di alimentazione elettrica in dotazione e innestare la presa femmina<br />
sulla spina del pannello posteriore dell’autoclave (FIG.1 pos..6.)<br />
15 - Collegare la spina elettrica all’impianto assicurandosi che l’alimentazione sia 230 Vac-<br />
2000Va<br />
IMPORTANTE<br />
Evitare di connettersi con prolunghe, riduzioni od adattatori; in caso contrario<br />
potrebbero crearsi microinterruzioni con conseguente segnalazione di allarme.<br />
16 - Accendere l’autoclave premendo l’interruttore generale (FIG.2 pos..19.) e aprire il<br />
portello della autoclave stessa. Attendere alcuni secondi, vi saranno due segnalazioni<br />
sonore che informano sull’acquisizione dei parametri relativi all’allineamento barometrico<br />
automatico, contestualmente sul display comparirà la scritta “porta aperta”.<br />
IMPORTANTE<br />
Non selezionare mai un comando prima delle due segnalazioni sonore, l’autoclave<br />
non accetterà la programmazione prescelta.<br />
17 - Caricare il serbatoio di acqua pulita seguendo le indicazioni del (capitolo 8).<br />
Successivamente eseguire un ciclo di prova seguendo sempre le indicazioni espresse nel<br />
(capitolo 8).<br />
18 - Se l’autoclave viene installata con il sistema di demineralizzazione, attenersi alle<br />
istruzioni contenute nell’imballo di questo dispositivo e nel (capitolo 14).<br />
20
ITALIANO<br />
08 ISTRUZIONI DI UTILIZZO<br />
Dopo aver installato l’autoclave, procedere alla preparazione e all’utilizzo.<br />
8.1 Accendere l’autoclave<br />
Premere l’interruttore generale (FIG.2 pos..19.).<br />
8.2 Carico serbatoio acqua pulita<br />
Collegare al “tubo carico acqua completo di filtro” (in dotazione) il “raccordo carico acqua “<br />
FIG.14, dopodichè inserirlo nell’orifizio del raccordo frontale dell’autoclave (FIG.2<br />
pos..13.).<br />
Inserire l’altro capo del tubo col filtro all’interno del contenitore dell’acqua demineralizzata<br />
o distillata.<br />
A questo punto premere il pulsante B-PUMP per azionare la pompa di carico acqua e<br />
mantenerlo premuto finché non apparirà il conto alla rovescia.<br />
La pompa carica il serbatoio interno all’autoclave. Se il livello massimo non viene<br />
raggiunto entro 180 secondi, la pompa si ferma automaticamente, sarà quindi necessario<br />
premere nuovamente il pulsante.<br />
La pompa si ferma automaticamente quando il livello massimo è stato raggiunto.<br />
Con connessione a mezzo demineralizzatore, se il livello massimo di acqua non è stato<br />
raggiunto, il funzionamento dell’autoclave sarà inibito.<br />
8.3 Carico manuale serbatoio di acqua pulita<br />
Nel caso in cui la pompa di carico acqua non funzioni, il riempimento del serbatoio può<br />
essere effettuato manualmente dall’operatore nel seguente modo:<br />
-Accendere l’autoclave.<br />
-Togliere il tappo posto frontalmente sull’autoclave (FIG.2 pos..12.).<br />
-Inserire in questo orifizio il raccordo carico acqua col tubo connesso all’imbuto (FIG.14)<br />
-Versare l’acqua distillata nell’imbuto tenendolo più alto del raccordo di carico<br />
-Versare fino a quando il led di livello massimo non si sarà acceso (FIG.2 pos..29.).<br />
-A carico completato, estrarre il raccordo e riposizionare il tappo.<br />
21
ITALIANO<br />
8.4 Caratteristiche acqua da utilizzare<br />
TABELLA LIVELLI QUALITATIVI STABILITI DALLA NORMATIVA UNI EN 13060: 2005<br />
CEN STANDARD UNI EN 13060 : 2005<br />
Residuo evaporazione ≤ 10 mg/l<br />
Ossido di silicio ≤ 1 mg/l<br />
Ferro ≤ 0.2 mg/l<br />
Cadmio ≤ 0.005 mg/l<br />
Piombo ≤ 0.05 mg/l<br />
Resti di metalli pesanti tranne ferro,<br />
cadmio, piombo<br />
≤ 0.1 mg/l<br />
Cloruro (Cl’) ≤ 2 mg/l<br />
Fosfato (P20s) ≤ 0.5 mg/l<br />
Conduttività (a 20°C) ≤ 15 µs/cm<br />
Valore Ph (grado di acidità) 5 ÷ 7,5<br />
Aspetto<br />
Incolore, limpido, senza depositi<br />
Durezza (E Ioni di terra alcalina) ≤ 0.02 mmol/l<br />
8.5 Carico materiali in autoclave<br />
Disporre i materiali da sterilizzare sui trays in dotazione.<br />
- non sovrapporre mai i materiali<br />
- disporre gli strumenti imbustati, sempre con la parte carta verso l’alto<br />
- mai mettere a contatto i materiali con la camera di sterilizzazione e al portello di chiusura<br />
- disporre pinze e forbici con le lame aperte<br />
FIG.23<br />
Terminato il carico, chiudere il portello dell’autoclave. Sul display comparirà la scritta<br />
PORTA CHIUSA.<br />
8.6 Inizio del ciclo di sterilizzazione<br />
Scegliere il programma di sterilizzazione più idoneo al carico predisposto, premendo il<br />
pulsante B-SELECT.<br />
Ogni singola pressione, cambia la selezione del programma a quello successivo.<br />
Dopo aver scelto il programma avviare il ciclo premendo il pulsante B-START. La porta<br />
verrà bloccata automaticamente ed il ciclo avrà inizio.<br />
Durante il ciclo il display visualizzerà tutti i parametri ed informazioni relative.<br />
22
ITALIANO<br />
8.7 Fine ciclo<br />
Un segnale acustico avviserà gli operatori dell’avvenuto ciclo di sterilizzazione.<br />
Se i parametri di sterilizzazione sono stati rispettati, sul display comparirà il messaggio<br />
FINE CICLO, in caso di problemi, comparirà un codice di errore o allarme.<br />
Al termine del segnale acustico, sbloccare la porta premendo il pulsante B-DOOR. Nel<br />
caso vi sia presenza di pressione, all’interno della camera, il pulsante non azionerà lo<br />
sblocco. Attendere la completa depressurizzazione della camera e ripetere l’operazione<br />
oppure, solo in caso di emergenza, premere contemporaneamente B-DOOR + B-PUMP.<br />
A portello sbloccato, tirare la maniglia della porta ed aprire.<br />
8.8 Scarico materiali sterilizzati<br />
Indossare idonei dispositivi di protezione individuale in accordo con le normative vigenti in<br />
materia di sicurezza e igiene sul lavoro. Estrarre i trays utilizzando l’apposita chiave in<br />
dotazione (FIG.10), lasciare condizionare gli strumenti e riporli in ambienti dove non<br />
possano subire contaminazioni.<br />
8.9 Scarico acqua utilizzata<br />
Quando il led di livello acqua utilizzata (FIG.2 pos..30.) si accende bisogna procedere allo<br />
svuotamento del serbatoio di raccolta dell’acqua esausta. Se non si provvede, il<br />
funzionamento dell’autoclave è inibito.<br />
Prendere il tubo in dotazione (FIG.16), ed inserirlo nella raccordo di scarico acqua usata<br />
posto frontalmente all’autoclave (FIG.2 pos.14), svitare la ghiera agendo in senso<br />
antiorario (compiere 2 giri completi), contestualmente mettere l’altro capo del tubo in un<br />
contenitore; l’acqua per caduta andrà nel contenitore stesso.<br />
IMPORTANTE<br />
A - Il tubo alloggiato nel contenitore di raccolta, non deve mai, lambire o essere immerso<br />
nell’acqua scaricata, diversamente si avrà una situazione di risucchio.<br />
B - Attendere sempre che l’acqua di scarico sia fuoriuscita totalmente. Il led di livello<br />
massimo acqua utilizzata, si spegne quando ancora vi è acqua nel serbatoio, pertanto non<br />
utilizzarlo come riferimento per questa operazione.<br />
Al termine dello scarico avvitare la ghiera e togliere il tubo.<br />
23
ITALIANO<br />
8.10 Interrompere un ciclo di sterilizzazione<br />
Un ciclo di sterilizzazione può essere volontariamente interrotto, premendo il<br />
pulsante B-START per almeno 2 secondi.<br />
L’autoclave emetterà un suono, andrà in decompressione e sul display comparirà il<br />
messaggio di Allarme A001 (CICLO INTERROTTO).<br />
Per resettare l’allarme, mantenere premuti contemporaneamente i pulsanti sotto<br />
evidenziati, sino all’intervento del segnale acustico:<br />
B-DOOR + B-PUMP + B-SELECT<br />
ATTENZIONE:<br />
Se la stampante è in funzione il reset dell’allarme è inibito<br />
In caso di visualizzazione di un messaggio d'allarme (suffisso "A") il ciclo<br />
è da ritenersi NON andato a buon fine: occorrerà ripetere tutte le<br />
operazioni di preparazione e sterilizzazione.<br />
<strong>24</strong>
ITALIANO<br />
09 CICLI DI STERILIZZAZIONE<br />
9.1 Descrizione cicli<br />
L’autoclave è corredata di tre serie di cicli:<br />
A - cicli operativi<br />
B - cicli notte<br />
C - cicli test<br />
9.2 Cicli operativi<br />
Tutti i cicli operativi, hanno il sistema di vuoto frazionato, pertanto possono sterilizzare<br />
materiali cavi, porosi, solidi, sia liberi che imbustati.<br />
Le temperature selezionabili sono 121°C – 134°C.<br />
Normalmente i cicli 121°C, si utilizzano per termoplasti ci o materiali sensibili, mentre i cicli<br />
134°C, si utilizzano per tutti gli altri materiali.<br />
In tutti i casi, seguire sempre le indicazioni, date dai produttori degli strumenti o dispositivi,<br />
da sterilizzare.<br />
Esistono anche 2 cicli speciali:<br />
- ciclo Prion, studiato per il morbo di Creutzfeldt-Jakob (sindrome della mucca pazza)<br />
- ciclo Flash creato per la sterilizzazione rapida di strumenti o dispositivi non imbustati.<br />
9.3 Cicli notte<br />
L’autoclave, è dotata di uno speciale dispositivo economizzatore.<br />
Tale dispositivo permette di eseguire cicli di sterilizzazione in assenza dell’operatore.<br />
Al termine del ciclo, se la porta non viene aperta, l’autoclave si stabilizza, poi si spegne<br />
automaticamente, resterà acceso soltanto l’interruttore generale (FIG.2 pos..19.).<br />
All’arrivo degli operatori, sarà sufficiente premere qualsiasi pulsante per riaccendere<br />
l’autoclave e leggere l’esito del ciclo sul display.<br />
Oltre a ciò la stampante avrà redatto regolarmente il rapporto scritto relativo al ciclo<br />
stesso.<br />
25
ITALIANO<br />
TABELLA STERILIZZAZIONE<br />
CICLI<br />
121°C non<br />
imbustato<br />
121°C<br />
imbustato<br />
134°C<br />
Flash<br />
134°C non<br />
imbustato<br />
134°C<br />
imbustato<br />
TEMPO TEMPO<br />
ESPOSIZ ASCIUGATURA<br />
T4 T5 (Minuti)<br />
(Minuti) 18L <strong>24</strong>L<br />
18 6 12<br />
18 17 13<br />
4 2 4<br />
5 6 12<br />
5 17 13<br />
134°C Prion 20 17 13<br />
BANDA DI<br />
PRESSIONE<br />
DI LAVORO<br />
( bar relativi )<br />
BANDA DI<br />
TEMPERATURA<br />
DI LAVORO<br />
( °C )<br />
1.04 ÷ 1.30 121 ÷ 125<br />
2.02 ÷ 2.38 134 ÷ 138<br />
I tempi di preriscaldo e di frazionamento del vuoto possono variare a seconda delle<br />
condizioni dell’autoclave da 25 – 35 minuti che andranno a sommarsi con i tempi dei cicli<br />
riportati in tabella. Tutti i cicli di sterilizzazione hanno 3 fasi di vuoto.<br />
9.4 Cicli test<br />
- Helix test questo test serve per verificare la capacità di penetrazione del vapore in un<br />
corpo cavo. Inserire nella camera di sterilizzazione nel tray centrale il sistema Helix test<br />
completo di indicatore, senza la presenza di carico. Fare riferimento alle istruzioni del<br />
produttore per il corretto caricamento dell'indicatore. Eseguire l’apposito ciclo test, al<br />
termine estrarre l’intero sistema e controllare l’indicatore. In caso di responso negativo<br />
contattare ed informare un tecnico autorizzato.<br />
- Bowie e Dick test questo serve per verificare la capacità di penetrazione del vapore in un<br />
carico poroso. Inserire nella camera di sterilizzazione nel tray centrare il test Bowie-Dick,<br />
senza la presenza di carico. Eseguire l’apposito ciclo test, al termine estrarre il pacchetto<br />
aprirlo e controllare il risultato valutando il foglio “test” posizionato in centro, in caso di<br />
responso negativo informare e contattare un tecnico autorizzato<br />
- Vacuum test serve per verificare la capacità di mantenimento di vuoto dell’autoclave, il<br />
rapporto del test viene rilasciato dalla stampante dell’autoclave. Il test deve essere<br />
eseguito a macchina fredda. Non inserire alcun tipo di carico in autoclave. Al termine<br />
controllare il risultato valutando il tagliando emesso dalla stampante collegata<br />
all’autoclave. In caso di responso negativo informare e contattare un tecnico autorizzato.<br />
Utilizzare preferibilmente test distribuiti dalla casa produttrice.<br />
26
ITALIANO<br />
134°C Helix/<br />
Bowie&Dick<br />
TEMPO<br />
STERILIZZ.<br />
T4<br />
( Minuti)<br />
TABELLA CICLI TEST<br />
TEMPO<br />
ASCIUGATURA<br />
T5<br />
(Minuti)<br />
BANDA DI<br />
PRESSIONE<br />
DI LAVORO<br />
MINIMA<br />
( bar relativi )<br />
BANDA DI<br />
PRESSIONE<br />
DI LAVORO MINIMA<br />
( °C )<br />
3.5 4 2.02 ÷ 2.38 134 ÷ 138<br />
Vacuum -0.9<br />
FIG.<strong>24</strong><br />
T1,T2,T3= fasi di preriscaldo e di frazionamento del vuoto<br />
T4= sterilizzazione<br />
T5= asciugatura<br />
27
ITALIANO<br />
10 MESSAGGI DI ERRORE E ALLARMI<br />
I messaggi di errore e di allarmi sono evidenziati tramite un codice alfanumerico,<br />
composto da una lettera e da 3 cifre.<br />
Il prefisso “E” è relativo ad errori dell’operatore, ripristinabili dall’operatore stesso.<br />
Il prefisso “A” è relativo ad allarmi, anomalie dell’autoclave, dopo aver attuato il rimedio, se<br />
il problema persiste bisogna richiedere assistenza telefonica.<br />
In caso di visualizzazione di un messaggio d'allarme (prefisso "A") il ciclo<br />
è da ritenersi NON andato a buon fine: occorrerà ripetere tutte le<br />
operazioni di preparazione e sterilizzazione.<br />
Per resettare allarmi ed errori, mantenere premuti contemporaneamente i pulsanti sotto<br />
evidenziati, sino all’intervento del segnale acustico:<br />
B-DOOR + B-PUMP + B-SELECT<br />
10.1 Elenco dei messaggi di errore - allarme<br />
ERRORE CAUSA RIMEDIO<br />
E 200<br />
Basso livello acqua nel serbatoio acqua<br />
demineralizzata<br />
Riempire il serbatoio<br />
E 250<br />
Basso livello acqua pulita con caricamento da<br />
demineralizz.<br />
Riempire il serbatoio<br />
E 300 Livello massimo acqua utilizzata Svuotare serbatoio<br />
E 401 Porta aperta<br />
Chiudere con attenzione la<br />
porta<br />
E 451 Porta non bloccata Aprire la porta e richiudere<br />
E 461<br />
Alta temperatura in camera per Vacuum test Spegnere ed attendere 10<br />
(oltre 40°C)<br />
min.<br />
A 250 Inizio ciclo senza acqua<br />
Controllare i sistemi di<br />
demineralizz.<br />
A 001 Ciclo interrotto Resettare e riavviare il ciclo<br />
A 011 Anomalia pc display<br />
Spegnere e riaccendere<br />
l’autoclave<br />
A 101 Vuoto non raggiunto in 10 min. Resettare e ripetere il ciclo<br />
A 111<br />
Vuoto non mantenuto su prima fase VACUUM<br />
TEST<br />
Resettare e ripetere il ciclo<br />
A 121<br />
Vuoto non mantenuto su seconda fase<br />
VACUUM TEST<br />
Resettare e ripetere il ciclo<br />
A 401<br />
Portello aperto durante ciclo o problema Controllare il sistema di<br />
chiusura<br />
chiusura<br />
A 501 Pressione non mantenuta Resettare e ripetere il ciclo<br />
A 551 Anomalia 1° sensore temperatura Resettare e ripetere i l ciclo<br />
A 552 Anomalia 2° sensore temperatura Resettare e ripetere i l ciclo<br />
A 641 Sovrapressione Resettare e ripetere il ciclo<br />
A 651 Sovratemperatura Resettare e ripetere il ciclo<br />
28
ITALIANO<br />
A 661 Anomalie raffronto temperature Resettare e ripetere il ciclo<br />
A 701 Pressione di lavoro non raggiunta Resettare e ripetere il ciclo<br />
A 751 Bassa temperatura Resettare e ripetere il ciclo<br />
A 761 Anomalia nel sensore di pressione Resettare e ripetere il ciclo<br />
A 801 Anomalia scarico pressione Resettare e ripetere il ciclo<br />
A 901<br />
Tensione principale troppo bassa –<br />
Temporanea mancanza di alimentazione<br />
elettrica<br />
Resettare e ripetere il ciclo,<br />
In caso di ripetizione<br />
verificare erogazione energia<br />
elettrica.<br />
SOSTITUIRE LE RESINE Resine IONIC<br />
SYSTEM esaurite<br />
SOSTITUIRE IL FILTRO Resine<br />
OSMOSI SYSTEM esaurite<br />
Seguire le indicazione del del<br />
manuale paragrafo 14.3<br />
Seguire le indicazione del del<br />
manuale paragrafo 14.3<br />
D<br />
P<br />
Lo<br />
Portello stampante non<br />
chiuso<br />
Manca la carta della<br />
stampante<br />
Bassa tensione sulla linea<br />
di alimentazione<br />
Aprire e richiudere il portello della stampante<br />
Inserire la carta<br />
Provare a collegare la macchina alla rete elettrica in un<br />
altro punto; se il problema persiste contattare un<br />
elettricista<br />
IMPORTANTE<br />
Se dopo aver eseguito i rimedi, il problema si ripresenta, interpellare l’assistenza<br />
telefonica, presso MEDILINE ITALIA srl +39 0522 - 94 29 97.<br />
29
ITALIANO<br />
11 MANUTENZIONE E PREVENZIONE<br />
Una corretta manutenzione dell’autoclave, assicura un buon funzionamento della stessa e<br />
un sicuro risparmio in termini di tempo e costi dovuti ad assistenza e manutenzione.<br />
11.1 Sostituzione del filtro batteriologico<br />
Sostituire il filtro batteriologico (FIG.2 pos..11.) al massimo ogni 200 cicli, oppure appena il<br />
filtro assume un colore scuro.<br />
Ruotare il filtro in senso antiorario per svitarlo (FIG.25) e in senso orario per avvitarlo<br />
(FIG.26)<br />
Utilizzare solo ed esclusivamente filtri originali.<br />
FIG.25<br />
FIG.26<br />
11.2 Pulizia della camera<br />
Pulire periodicamente la camera e il filtro, asportando eventuali depositi o detriti, eviterete<br />
così di immettere nel circuito di scarico, materiali che possono creare ostruzioni.<br />
Per una buona pulizia usare esclusivamente acqua demineralizzata e la spugna abrasiva<br />
in dotazione (FIG.13).<br />
Il filtro è collocato nella sua sede per interferenza, pertanto in fase di estrazione per la<br />
pulizia prestare attenzione a non danneggiarlo (FIG.27).<br />
Una volta pulito deve essere ricollocato nella sua sede (FIG.28) e, per una buona<br />
operazione filtrante, deve sporgere di circa 15mm (FIG.29).<br />
FIG.27 FIG.28 FIG.29<br />
Non utilizzare mai solventi, detergenti, soluzioni chimiche, disincrostanti o altri prodotti<br />
similari.<br />
30
ITALIANO<br />
11.3 Pulizia guarnizione portello<br />
Periodicamente asportare eventuali residui che si depositano sulla circonferenza della<br />
guarnizione, utilizzando acqua e la spugna in dotazione (parte non abrasiva)(FIG.13),<br />
oppure un panno umido.<br />
11.4 Regolazione portello<br />
Per regolare la pressione di chiusura del portello, occorre agire sul regolatore del portello<br />
stesso, utilizzando la chiave a doppia funzione (FIG.10) in dotazione.<br />
Ruotare in senso antiorario (FIG.30 pos..A.) per aumentare la pressione di chiusura.<br />
Ruotare in senso orario (FIG.30 pos..B.) per diminuire la pressione di chiusura.<br />
.A.<br />
.B.<br />
FIG.30<br />
31
ITALIANO<br />
11.5 Sostituzione della carta della stampante<br />
Rotolo di carta termografica di larghezza 57 mm. La carta termografica deve essere usata<br />
solo da un lato.<br />
Aprire il portello della stampante premendo il pulsante (FIG.31 pos..A.) inserire il rotolo di<br />
carta prestando attenzione al verso di rotazione tirare la carta fino a farla uscire e chiudere<br />
lo sportello (FIG.31 pos..B.); la stampante è ora pronta per la stampa.<br />
.A.<br />
.B.<br />
FIG.31<br />
11.6 Stato stampante<br />
Se il portello della stampante non è perfettamente chiuso, sul display compare la lettera<br />
“D”.<br />
Aprire e richiudere il portello della stampante.<br />
Se manca la carta, sul display compare la lettera “P”.<br />
Aprire il portello, inserire la carta e richiudere il portello.<br />
32
ITALIANO<br />
12 PROGRAMMAZIONE DISPLAY<br />
Fare riferimento alla FIG.2.<br />
12.1 Selezione Lingua<br />
Premere B-START e contemporaneamente l’interruttore generale (MAINS).<br />
Tenere premuto B-START fino a quando sul display compare il nome della lingua<br />
impostata.<br />
Premendo B-SELECT si modifica la lingua [avanti].<br />
Premendo B-PUMP si modifica la lingua [indietro].<br />
12.2 Selezione Ora<br />
Premendo B-START compare l’ora.<br />
Premendo B-SELECT si modifica l’ora [avanti].<br />
Premendo B-PUMP si modifica l’ora [indietro].<br />
12.3 Selezione Minuti<br />
Premendo B-DOOR compare minuti.<br />
Premendo B-SELECT si modifica minuti [avanti].<br />
Premendo B-PUMP si modifica minuti [indietro].<br />
12.4 Selezione Secondi<br />
Premendo B-DOOR compare secondi. Non modificare.<br />
12.5 Selezione Data<br />
Premendo B-START compare giorno (lampeggia).<br />
Premendo B-SELECT si modifica giorno [avanti].<br />
Premendo B-PUMP si modifica giorno [indietro].<br />
12.6 Selezione Mese<br />
Premendo B-DOOR compare mese (lampeggia).<br />
Premendo B-SELECT si modifica mese [avanti].<br />
Premendo B-PUMP si modifica mese [indietro].<br />
33
ITALIANO<br />
12.7 Selezione Anno<br />
Premendo B-DOOR compare anno.<br />
Premendo B-SELECT si modifica anno [avanti].<br />
Premendo B-PUMP si modifica anno [indietro].<br />
12.8 Visualizzazione Pressione Atmosferica<br />
Premendo B-START compare la pressione atmosferica memorizzata.<br />
NON MODIFICARE !<br />
12.9 Selezione Carico Acqua<br />
Premendo B-START compare l’impostazione carico acqua :<br />
-CARICAMENTO CON POMPA<br />
-IONIC SYSTEM<br />
-OSMOSI SYSTEM<br />
Premendo B-SELECT si modifica l’impostazione.<br />
Per salvare l’impostazione premere B-DOOR e tenerlo premuto fino al segnale acustico<br />
“BEEP”<br />
Per uscire premere B-START e tenerlo premuto fino a quando non si sente il segnale<br />
acustico “BEEP”.<br />
I dati impostati sono memorizzati. Spegnere l’autoclave tramite l’interruttore MAINS.<br />
34
13 SOLUZIONE A PROBLEMI OPERATIVI<br />
ITALIANO<br />
In molti casi, alcuni allarmi o errori sono determinati da non attenzione o non conoscenza<br />
di alcuni aspetti tecnici ed operativi.<br />
Qui di seguito Vi elenchiamo alcuni casi di anomalie con relative soluzioni.<br />
13.1 L’autoclave non asciuga correttamente<br />
a - SOSTITUIRE IL FILTRO BATTERIOLOGICO, con uno nuovo originale<br />
b - NON SONO STATI UTILIZZATI TRAY ORIGINALI, ma tray diversi, senza fori o<br />
con foratura diversa.<br />
Utilizzare solo tray originali. Richiedete tray suppletivi originali.<br />
c - GLI STRUMENTI NON SONO STATI DISPOSTI CORRETTAMENTE, disporre gli<br />
strumenti o i materiali imbustati con la carta verso l’alto.<br />
Non sovrapporre mai, gli strumenti o i materiali, disporli parallelamente.<br />
Non mettere mai gli strumenti o i materiali a contatto con la camera, possono<br />
bruciare o deformarsi<br />
13.2 La camera dell’ autoclave è diventata bianca<br />
a - CAMBIARE IMMEDIATAMENTE IL TIPO DI ACQUA UTILIZZATA, utilizzare acqua<br />
demineralizzata o distillata, come specificatamente indicato nei capitoli precedenti e<br />
procedere poi alla pulizia della camera.<br />
b - IL COLORE BIANCASTRO PUO’ essere conseguenza dell’evaporazione di<br />
materiali organici,presenti sugli strumenti.<br />
Provvedere a sottoporre gli strumenti ad una azione di detersione più idonea ed<br />
approfondita<br />
c - verificare l’eventuale impianto di demineralizzazione installato (IONIC SYSTEM<br />
OSMOSI SYSTEM)<br />
13.3 La camera dell’ autoclave presenta macchie verdi-bluastre<br />
a - NON VI E’ STATO UN CORRETTO RISCIACQUO DEGLI STRUMENTI dopo la<br />
fase di detersione, sciacquare con maggior attenzione e scrupolo gli strumenti.<br />
Se le macchie sono evidenti richiedere assistenza tecnica telefonica.<br />
13.4 Il ciclo di sterilizzazione si interrompe, senza apparente motivo<br />
a - CONTROLLARE SE L’AUTOCLAVE E’ COLLEGATA alla rete elettrica con<br />
prolunghe, riduzioni, adattatori, nel caso togliere questi accessori e collegare<br />
l’autoclave direttamente alla presa elettrica.<br />
35
ITALIANO<br />
13.5 L’autoclave non riceve i comandi<br />
a - L’AUTOCLAVE STA EFFETTUANDO L’ALLINEAMENTO BAROMETRICO<br />
AUTOMATICO, attendere il doppio segnale sonoro dopo l’apertura del portello, poi<br />
impostare le funzioni.<br />
b - IL SERBATOIO DI ACQUA DEMINERALIZZATA è VUOTO, il led di livello minimo è<br />
acceso, provvedere al riempimento di acqua pura.<br />
c - IL SERBATOIO DI ACQUA UTILIZZATA E’ PIENO,il led di livello massimo è<br />
acceso, provvedere allo scarico dell’acqua esausta.<br />
13.6 La stampante dell’autoclave non stampa<br />
a - IL PORTELLINO PORTAROTOLO NON E’ CHIUSO CORRETTAMENTE, sul<br />
display compare la lettera “D”. Aprire e richiudere il portellino della stampante<br />
accertandosi che sia chiuso correttamente.<br />
b - MANCA LA CARTA, sul display compare la lettera “P”.Aprire il portello e inserire il<br />
rotolo di carta termografica.<br />
c - IL ROTOLO DELLA CARTA E’ MONTATO CON LA PARTE TERMICA VERSO<br />
L’INTERNO, aprire il portellino e girare il rotolo della carta in posizione corretta.<br />
13.7 Macchie sugli strumenti<br />
a - GLI STRUMENTI DIVENTANO GIALLI, residuo di liquido chimico che con il caldo si<br />
è fissato sugli strumenti. Non si è eseguito un risciacquo adeguato<br />
b - LA CAMERA DI STERILIZZAZIONE PRESENTA MACCHIE GIALLE, è stato<br />
immesso nella camera strumentario con presenza di liquido chimico che cadendo<br />
si è fissato grazie al calore. Non si è eseguito un risciacquo adeguato.<br />
c - GLI STRUMENTI PRESENTANO MACCHIE BIANCASTRE, lo sciacquo è stato<br />
effettuato con acqua molto calcarea e gli strumenti non sono stati asciugati. Come<br />
ultimo sciacquo si consiglia di utilizzare acqua demineralizzata e asciugare<br />
accuratamente gli strumenti.<br />
d - GLI STRUMENTI SI SONO ANNERITI, ciò è dovuto al fatto che gli strumenti hanno<br />
all’interno forte componentistica di carbonio.<br />
36
ITALIANO<br />
14 DEMINERALIZZATORE<br />
14.1 Impostazione sistemi di demineralizzazione<br />
L’autoclave è predisposta anche per il caricamento dell’acqua demineralizzata attraverso il<br />
SISTEMA IONICO o SISTEMA OSMOSI<br />
Questi sistemi sono accessori delle autoclavi. Tali prodotti sono utilizzati per eliminare i<br />
sali minerali dell’acqua proveniente dalla rete idrica per alimentare l’autoclave.<br />
L’operatore prima di installare il sistema IONICO o a OSMOSI deve programmare<br />
l’Autoclave seguendo le istruzioni sotto indicate:<br />
Accendere l’autoclave premendo l’interruttore generale (FIG.2 pos..19.) e tenere premuto<br />
B-START finché non appare la scritta che riporta la lingua selezionata.<br />
Premere e rilasciare B-START<br />
appare:<br />
per selezionare la schermata successiva finchè non<br />
- CARICAMENTO CON POMPA oppure<br />
- IONIC SYSTEM oppure<br />
- OSMOSI SYSTEM<br />
Per cambiare l’impostazione usare B-SELECT.<br />
Per salvare l’impostazione premere B-DOOR e tenerlo premuto fino al segnale acustico<br />
“BEEP”<br />
Per uscire premere B-START e tenerlo premuto fino a quando non si sente il segnale<br />
acustico “BEEP”<br />
ATTENZIONE<br />
Il numero riportato sotto al tipo di caricamento indica approssimativamente quanti cicli di<br />
sterilizzazione si possono ancora fare col filtro (nel caso del sistema ad osmosi) o con le<br />
resine (nel caso del sistema a scambio ionico) attualmente in uso.<br />
E’ buona norma ricordarsi di resettare questo numero al valore massimo quando si cambia<br />
il filtro o le resine sul sistema attualmente in uso.<br />
Dopo aver salvato il tipo di caricamento in uso, per resettare al valore massimo questa<br />
informazione bisogna tenere premuto il tasto B-PUMP fino al segnale acustico (circa 10<br />
secondi) nella schermata di attesa inizio ciclo.<br />
37
ITALIANO<br />
FIG.32<br />
38
ITALIANO<br />
14.2 Collegamento dei sistemi di demineralizzazione<br />
Spegnere l’autoclave premendo l’interruttore Generale (MAINS) (FIG.2 pos..19.) posto sul<br />
fianco destro dell’autoclave.<br />
L’operatore dopo aver settato l’autoclave installerà il sistema di demineralizzazione<br />
seguendo le indicazioni riportate anche nel manuale allegato al demineralizzatore stesso.<br />
Qui riportiamo il particolare del collegamento specifico all’autoclave del tubo di<br />
alimentazione dell’acqua e della connessione della spina elettrica:<br />
1. Spegnere l’autoclave se è accesa;<br />
2. Chiudere il rubinetto posto a monte dell’impianto di demineralizzazione<br />
3. Installare il demineralizzazione come indicato nel manuale del demineralizzatore<br />
stesso;<br />
4. Avvolgere il filetto maschio del raccordo - portatubo con teflon o atro componente<br />
che garantisca la tenuta all’acqua;<br />
5. Avvitare il raccordo - portatubo sul filetto femmina dello scarico dell’acqua Pulita<br />
FIG.1 pos. .2.;<br />
6. Inserire il tubo in uscita dal demineralizzatore nel raccordo - portatubo ora avvitato<br />
all’autoclave;<br />
7. Inserire la spina del demineralizzatore nella presa FIG.1 pos. .7. nel retro<br />
dell’autoclave;<br />
8. Aprire il rubinetto posto a monte dell’impianto di demineralizzazione;<br />
9. Controllare che non vi siano delle perdite d’acqua;<br />
10. Accendere l’autoclave;<br />
11. Eseguire uno o più cicli di sterilizzazione per controllare il funzionamento della<br />
connessione eseguita e controllare soprattutto le perdite.<br />
A FINE GIORNATA CHIUDERE SEMPRE IL RUBINETTO POSTO A MONTE<br />
DELL’IMPIANTO DI DEMINERALIZZAZIONE .<br />
COLLEGARE I SISTEMI DI DEMINERALIZZAZIONE SOLTANTO AD AUTOCLAVI<br />
PREDISPOSTE.<br />
SE ALL’ INIZIO DEL CICLO L’AUTOCLAVE SEGNALA E250 SIGNIFICA CHE È<br />
STATO AVVIATO IL CICLO CON UN BASSO LIVELLO D’ACQUA PULITA.<br />
E’ PERTANTO NECESSARIO RIEMPIRE IL SERBATOIO ACQUA PULITA<br />
NOTA: PER IL COLLEGAMENTO DEI SISTEMI DI DEMINERALIZZAZIONE ALLE<br />
AUTOCLAVI, FARE RIFERIMENTO ANCHE A QUANTO INDICATO SUL MANUALE DEI<br />
SISTEMI DI DEMINERALIZZAZIONE.<br />
14.3 Cambio cartuccia resina - filtro<br />
L’autoclave segnala sul display lo stato di esaurimento delle resine o del filtro in<br />
messaggio “SOSTITUIRE RESINE” o “SOSTITUIRE FILTRO”.<br />
Sostituire la cartuccia come indicato nel manuale del demineralizzatore ;<br />
Dopo sostituzione, premere il pulsante B-PUMP fino all’intervento del segnale acustico,<br />
per resettare l’autoclave.<br />
39
ITALIANO<br />
15 PROCEDURE STANDARD STERILIZZAZIONE<br />
Sterilizzare vuol dire adottare precisi protocolli operativi ed applicare una metodologia<br />
di sterilizzazione.<br />
L’autoclave è il punto chiave di questa metodologia.<br />
Chi non segue tutte le varie fasi del processo di sterilizzazione, può inficiare il risultato<br />
finale.<br />
TECNO-GAZ SpA produce tutti i dispositivi per ogni fase del ciclo di sterilizzazione.<br />
Bisogna pertanto :<br />
1 - Predisporre un preciso protocollo operativo scritto,da distribuire a tutti gli operatori<br />
ed addetti alla sterilizzazione.<br />
TECNO-GAZ SpA può fornire questi protocolli personalizzati.<br />
2 - Seguire con scrupolo ed attenzione,tutte le fasi del ciclo di sterilizzazione:<br />
DISINFEZIONE fase obbligatoria, per salvaguardare la sicurezza degli operatori<br />
preposti.,da attuarsi con immersione in liquidi chimici o termo disinfezione;<br />
DETERSIONE la fase più importante che assicura la rimozione di tutti i tipi di<br />
residui, chimici ed organici. Lo strumento più idoneo sono le vasche ad ultrasuoni;<br />
ASCIUGATURA fase indispensabile, che evita corrosioni degli strumenti e<br />
interferenze al ciclo di sterilizzazione;<br />
IMBUSTAMENTO fase indispensabile per il mantenimento della sterilità nel<br />
tempo<br />
STERILIZZAZIONE fase finale sterilizzazione a vapore.<br />
40
ITALIANO<br />
16 ISTRUZIONE PER LA SPEDIZIONE DELL’AUTOCLAVE<br />
Nel caso si debba spedire l’autoclave per riparazione, controllo, ripristino, revisione,<br />
validazione, seguire le seguenti indicazioni obbligatorie:<br />
1- Utilizzare l’imballo originale, se questo non è più in Vostro possesso, utilizzare un<br />
imballo adeguato.<br />
La merce viaggia con rischio a carico del mittente.<br />
2- Spedire solo l’autoclave, trattenetevi sempre tray e portatray<br />
3- Pulire accuratamente la camera di sterilizzazione e l’autoclave nel suo complessivo,<br />
prima di spedirla.<br />
Nel caso giunga sporca e con residui, l’autoclave verrà rispedita non riparata,<br />
oppure verrà sottoposta ad azione di pulizia e disinfezione.<br />
4- Scaricare sempre il serbatoio di acqua demineralizzata, tramite il raccordo posto<br />
posteriormente all’autoclave (FIG.2 pos..2.)<br />
5- Scaricare sempre il serbatoio di acqua utilizzata, tramite l’apposito raccordo posto<br />
posteriormente all’autoclave (FIG.2 pos..5.)<br />
6- Indicare per iscritto, ed inserire nell’imballo un documento ove si indichi con<br />
precisione l’anomalia riscontrata o il servizio di cui si intende beneficiare.<br />
7- Spedire sempre in porto franco, diversamente saranno addebitate le spese di<br />
trasporto sostenute.<br />
ATTENZIONE<br />
Tutti gli imballi non originali che ci perverranno, verranno smaltiti.<br />
Le autoclavi Vi saranno ritornate con imballi nuovi ed originali, questo per<br />
assicurare massima tutela alla vostra autoclave durante il trasporto.<br />
Il costo dell’imballo vi sarà addebitato.<br />
41
ITALIANO<br />
17 PROCEDURE PER SERVIZIO ED ASSISTENZA<br />
Riparazioni – Revisioni – Assistenze – Validazioni<br />
Riteniamo molto importante, informarVi quali sono le procedure adottate dal nostro reparto<br />
riparazioni.<br />
Il reparto riparazioni è una entità autonoma di MEDILINE ITALIA SRL (TECNO-GAZ<br />
GROUP), costituito da una struttura articolata e professionale.<br />
Vengono applicate procedure espresse nel nostro manuale qualità.<br />
1- In caso di guasto l’autoclave, viene presa in consegna direttamente dal reparto<br />
riparazioni che la codifica e crea la scheda di assistenza tecnica.<br />
2- Entro un massimo di 48 ore viene visionata dai tecnici e viene stilata la diagnosi<br />
tecnica con preventivo di spesa per il servizio richiesto.<br />
Se l’autoclave non viene resa come richiesto nel capitolo ISTRUZIONI PER LA<br />
SPEDIZIONE, i tempi espressi si possono dilatare sensibilmente.<br />
3- Il preventivo di spesa verrà inoltrato al cliente distributore che lo trasmetterà al<br />
cliente finale, per presa d’atto e sottoscrizione.<br />
4- Dopo aver ricevuto il preventivo sottoscritto per accettazione, l’autoclave verrà<br />
messa in lavorazione e verrà spedita nei tempi, indicati sul modulo del preventivo.<br />
5- La merce verrà rispedita con imballo originale mediante spedizioniere del cliente.<br />
42
ITALIANO<br />
18 GARANZIA<br />
1) DURATA: il prodotto è coperto da un periodo di garanzia di 12 (dodici) mesi.<br />
2) ESCLUSIONE: sono da escludersi dalla garanzia:<br />
a) le avarie causate da mancata manutenzione ordinaria dovute a trascuratezza<br />
dell’Utilizzatore o ad un uso improprio del prodotto;<br />
b) controlli periodici e manutenzione;<br />
c) riparazioni o sostituzioni di parti soggette ad usura, fragili o di durata non<br />
prevedibile, a meno che non sia provata la loro difettosità al momento della<br />
consegna;<br />
d) guasti relativi a mano d'opera, trasferta del personale tecnico e trasporto;<br />
e) guasti o danni derivanti da un uso improprio e da errori di utilizzo;<br />
f) guasti o danni derivanti da impurità nei sistemi di alimentazione di acqua e aria,<br />
eventi chimici o elettrici straordinari;<br />
g) guasti o danni derivanti da uso di detergenti, disinfettanti, sostanze o processi<br />
sterilizzanti, non espressamente indicati nel manuale d'uso e manutenzione;<br />
h) naturale viraggio delle parti in plastica.<br />
3) VERBALE DI INSTALLAZIONE E COLLAUDO: condizione essenziale per accedere alla<br />
garanzia é la restituzione dell’apposito verbale di installazione e collaudo, debitamente<br />
compilato in tutte le sue parti e controfirmato dall’Utilizzatore stesso e dal Tecnico<br />
Installatore. La restituzione del verbale dovrà avvenire entro 15 giorni dall'installazione,<br />
pena il decadimento della garanzia.<br />
4) LIMITI: la garanzia dà diritto alla sostituzione o riparazione gratuita dei componenti<br />
difettosi. È comunque escluso il diritto alla sostituzione dell’intero apparecchio. Per quanto<br />
riguarda i componenti applicati o integrati prodotti con marchio TECNO-GAZ S.P.A. o da<br />
terzi e dotati di proprio certificato di garanzia, valgono le condizioni, i limiti e le esclusioni<br />
riportati sui certificati stessi.<br />
L’effettuazione di una o più riparazioni nel periodo di garanzia non comporta alcuna<br />
modifica della data di scadenza della garanzia stessa.<br />
5) CONTESTAZIONI: nel caso di contestazione da parte dell’Acquirente sull’applicazione<br />
della garanzia, sulla qualità o sulle condizioni della apparecchiatura consegnata,<br />
l’Acquirente non potrà in alcun caso sospendere e/o ritardare i pagamenti.<br />
6) CONTROVERSIE: in caso di controversia sull’applicazione ed interpretazione del<br />
presente Certificato di Garanzia, sarà competente il Tribunale di PARMA (Italia), ovunque<br />
sia stato stipulato il contratto di acquisto dell’apparecchiatura.<br />
7) DEROGHE: particolari deroghe, concesse in merito alle presenti norme di garanzia, non<br />
implicano il riconoscimento di alcun diritto nei confronti dell’Acquirente e saranno da<br />
considerarsi limitatamente concesse in relazione al caso specifico.<br />
8) ALTRO: per quanto non espressamente previsto dal presente Certificato di Garanzia<br />
valgono le norme contenute nel Codice Civile e nelle Leggi in materia della Repubblica<br />
Italiana.<br />
43
ITALIANO<br />
La garanzia decade se:<br />
a) l’apparecchiatura presenta danneggiamenti dovuti a caduta, esposizione a fiamme,<br />
rovesciamenti di liquidi, fulmini, calamità naturali, eventi atmosferici, o comunque da cause<br />
non imputabili a difetti di fabbricazione;<br />
b) l’installazione non é conforme alle istruzioni di TECNO-GAZ S.p.A. ed é stata eseguita<br />
da personale non autorizzato;<br />
c) l’apparecchiatura venga riparata, modificata o comunque manomessa dall’Acquirente o<br />
da terzi non autorizzati;<br />
d) all’atto della richiesta di intervento in garanzia il numero di matricola del prodotto risulti<br />
asportato, cancellato, contraffatto, ecc.;<br />
e) non venga restituito il verbale di installazione e collaudo compilato e firmato entro 15<br />
giorni dall'installazione;<br />
f) l’Acquirente sospenda e/o ritardi per qualunque motivo il pagamento di qualunque<br />
somma dovuta in relazione all’acquisto e/o alla manutenzione dell’attrezzatura;<br />
g) non venga rispettata la manutenzione periodica programmata o altra prescrizione<br />
prevista nel manuale d'uso e manutenzione.<br />
44
ENGLISH<br />
Dear Client,<br />
Thank you for having chosen our autoclave, we know how to exchange your fidelity, with<br />
maximum attention and service definitely corresponding to your expectations.<br />
The autoclave you have chosen is the maximum expression of applied technology. It<br />
guarantees safe sterilization of all types of instruments and materials: solids, hollows,<br />
porous, free and packaged.<br />
Before using this autoclave, we invite you to read with maximum attention the user’s<br />
manual and then keep it in a place accessible to all operators in charge of sterilization.<br />
The autoclave must be used only and exclusively for the uses foreseen by the constructor.<br />
For installation, maintenance and assistance ask exclusively for a technician authorized.<br />
We invite you to use and ask for exclusively original spare parts.<br />
1
ENGLISH<br />
1. COMMANDS AND CONTROLS<br />
1.1 FRONTAL VIEW CLOSED DOOR<br />
1.2 SYMBOLS<br />
1.3 IMAGES WITH DESCRIPTION<br />
2. SAFETY<br />
2.1 SAFETY MARKING<br />
2.2 SAFETY DEVICES<br />
2.3 SAFETY NOTICES<br />
2.4 DISPOSAL<br />
TABLE OF CONTENTS<br />
3. USE AND FUNCTION FORESEEN FOR AUTOCLAVE<br />
4. TECHNICAL DATA<br />
4.1 MECHANICAL DATA<br />
4.2 ELECTRICAL DATA<br />
4.3 CHAMBER<br />
4.4 CLEAN WATER TANK<br />
4.5 USED WATER TANK<br />
4.6 BACTERIOLOGICAL FILTER<br />
5. ACCESSORIES<br />
6. UNPACKING<br />
7. INSTALLATION<br />
8. USAGE INSTRUCTION<br />
8.1 TURNING ON AUTOCLAVE<br />
8.2 LOADING PURE WATER TANK<br />
8.3 MANUAL LOADING DEMINERALIZED WATER TANK<br />
8.4 CHARACTERISTICS OF WATER TO USE<br />
8.5 LOADING MATERIALS IN AUTOCLAVE<br />
8.6 BEGINNING STERILIZATION CYCLE<br />
8.7 END OF CYCLE<br />
8.8 UNLOADING STERILIZED MATERIAL<br />
8.9 DISCHARGING USED WATER<br />
8.10 INTERRUPTION OF STERILIZATION CYCLE<br />
9. STERILIZATION CYCLES<br />
9.1 CYCLES DESCRIPTION<br />
9.2 OPERATION CYCLES<br />
9.3 NIGHT CYCLES<br />
2
ENGLISH<br />
9.4 TEST CYCLES<br />
9.5 CYCLE DIAGRAM<br />
10. MESSAGE OF ERROR OR ALARM<br />
10.1 LIST OF ERRORS OR ALARM<br />
11. MAINTENANCE AND PREVENTION<br />
11.1 BACTERIOLOGICAL FILTER SUBSTITUTION<br />
11.2 CHAMBER CLEANING<br />
11.3 DOOR SEAL CLEANING<br />
11.4 REGULATION DOOR<br />
11.5 SUBSTITUTION OF PRINTER PAPER<br />
11.6 PRINTER STATUS<br />
12. PROGRAMMING AND PARAMETERS DISPLAY<br />
12.1 LANGUAGE SELECTION<br />
12.2 HOURS SELECTION<br />
12.3 MINUTES SELECTION<br />
12.4 SECONDS SELECTION<br />
12.5 DATE SELECTION<br />
12.6 MONTH SELECTION<br />
12.7 YEAR SELECTION<br />
12.8 VISUALIZE ATMOSPHERIC PRESSURE<br />
12.9 WATER LOADING SELECTION<br />
13. SOLUTION TO OPERATION PROBLEMS<br />
13.1 AUTOCLAVE DOES NOT DRY CORRECTLY<br />
13.2 AUTOCLAVE CHAMBER BECOMES WHITE<br />
13.3 AUTOCLAVE CHAMBER PRESENTS GREEN STAINS<br />
13.4 INTERRUPTION OF THE STERILIZATION CYCLE<br />
13.5 AUTOCLAVE DOES NOT RECEIVE COMMANDS<br />
13.6 AUTOCLAVE PRINTER DOES NOT PRINT<br />
13.7 STAINS ON INSTRUMENTS<br />
14. DEMINERALIZER<br />
14.1 SET OF DEMINERALIZER SYSTEM<br />
14.2 CONNECTION AND PLUG OF DEMINERALIZER SYSTEM<br />
14.3 CHANGE RESINS OF FILTER<br />
15. STANDARD STERILIZATION PROCEDURE<br />
16. INSTRUCTIONS FOR AUTOCLAVE SHIPPING<br />
17. PROCEDURES FOR SERVICE AND ASSISTANCE<br />
18. GUARANTEE<br />
3
ENGLISH<br />
01 CONSULTING THE MANUAL<br />
1.1 Glossary<br />
VACUUM<br />
CHAMBER<br />
FILTER<br />
TRAY<br />
TRAY HOLDER<br />
DEMINERALIZER<br />
HELIX TEST<br />
BOWIE - DICK TEST<br />
VACUUM TEST<br />
Pressure below atmospheric pressure<br />
Cylindrical steel body that, during the cycle, is filled with<br />
Device for retaining particles<br />
Drawer for holding the load to be sterilized<br />
Structure for holding the trays in the sterilization chamber<br />
Device for eliminating mineral salts in mains water<br />
Test for checking the penetration of steam in a hollow object<br />
Test for checking the penetration of steam in a porous object<br />
Test for checking that the degree of vacuum in the chamber is<br />
maintained<br />
BACTERIOLOGICAL Device for retaining particles in suspension in the air larger than<br />
FILTER 0.3 µm.<br />
OVER PRESSURE Pressure higher than the standard one for the cycle considered<br />
OVER TEMPERATURE Temperature higher than the standard one for the cycle<br />
RESINES Replaceable component (cartridge) of the demineralizer that<br />
1.2 Symbols<br />
WARNING: Instruction to follow to avoid damaging property or<br />
compromising the successful result of the cycle<br />
DANGER: Safety instruction to avoid injury<br />
HAZARDOUS VOLTAGE<br />
DISCONNECT THE POWER BEFORE REMOVING THE LID<br />
HIGH TEMPERATURE<br />
EARTHING<br />
4
ENGLISH<br />
Pursuant to DIRECTIVE 2002/96/EC, this symbol shows that the<br />
product must not be disposed of as urban waste at the end of its<br />
operating life.<br />
Alternate current<br />
Warning: high voltage. Risk of electrocution!<br />
Fuse<br />
Read with attention the manual use<br />
Manufactured the -- / -- / --<br />
Unwrapped Material<br />
Wrapped Material<br />
Clean water maximum level<br />
Clean water minimum level<br />
Used water maximum level<br />
pos.<br />
Pict.<br />
Ω<br />
s<br />
kW<br />
Hz<br />
mm<br />
A<br />
V<br />
°C<br />
kg<br />
Position (number identifying a component in the figures or<br />
diagrams).<br />
Picture<br />
Ohm (Electric Resistance unit)<br />
Seconds (time unit)<br />
kilowatt (power unit)<br />
Hertz (Frequency unit)<br />
Millimeters (Length unit)<br />
Ampere (Electric Current unit)<br />
Volt (Electric Voltage unit)<br />
Degrees Centigrade (Temperature unit)<br />
Kilograms (Weight unit)<br />
5
ENGLISH<br />
1.2 Symbols<br />
PICT.1<br />
Spacer<br />
Clean water overflow<br />
Clean water drain tap-Demineralizer tap<br />
Safety Valve<br />
Used water overflow - condensate drain<br />
Used water drain tap<br />
Main power supply<br />
ONLY DEMINERALIZER electrical socket<br />
Fuse 12A<br />
Fuse 12A<br />
Fuse 500mA<br />
6
ENGLISH<br />
PICT.2<br />
7
ENGLISH<br />
Bacteriological filter<br />
Manual water filling with funnel<br />
Water filling with pump<br />
Used water draining<br />
Display<br />
Printer<br />
Connector RS232<br />
Connector B-test (incubator) (paragraph 2.3)<br />
General switch (MAINS)<br />
121°C cycle unwrapped indicator<br />
121°C cycle wrapped indicator<br />
134°C cycle unwrapped indicator<br />
134°C cycle wrapped indicator<br />
Cycle Prion<br />
Cycle 134°C Flash<br />
Vacuum Test<br />
Led Helix – B&D Test<br />
Clean Water Minimum Level<br />
Clean Water Maximum Level<br />
Used Water Maximum Level<br />
Start of cycle selection button<br />
Button for water filling with pump<br />
Cycle selection button<br />
Door opening button<br />
8
ENGLISH<br />
02 SAFETY<br />
2.1 Safety Marking<br />
HAZARDOUS VOLTAGE<br />
DISCONNECT THE POWER BEFORE REMOVING THE<br />
LID<br />
HIGH TEMPERATURE<br />
EARTH CONNECTION<br />
2.2 Safety Devices<br />
The following Safety Devices are installed:<br />
- Safety valve set at 2.4 bar 0/+10%<br />
- Electromagnetic lock to prevent the door from opening while the cycle is running<br />
- Resistance over temperature thermostats<br />
2.3 Safety Notes<br />
- The manufacturer is liable for the marketed product in accordance with current<br />
regulations.<br />
The manufacturer's liability will expire when operations are carried out on the device, or a<br />
part of it, by unskilled personnel or using non-original spare parts.<br />
- There should be no potential risk of explosion and/or fire in the room where the<br />
autoclave is installed.<br />
- The autoclave should be installed in a special well-ventilated room.<br />
The incubator’s connector (PICT.1 pos.18.), should be used only for the B-TEST.<br />
The 230 V a.c. connection is indipendent by the MAINS, don’t touch the connector with<br />
wet hands and protect by the water.<br />
9
ENGLISH<br />
2.4 Disposal<br />
This product is subject to Directive 2002/96/EC of the European Parliament and the<br />
Council of the European Union on Waste of Electrical and Electronic Equipment (WEEE)<br />
and, in jurisdictions adopting that Directive, is marked as being put on the market after<br />
August 13, 2005, and should not be disposed of as unsorted public waste. Please utilise<br />
your local WEEE collection facilities in the disposition and otherwise observe all applicable<br />
requirements.<br />
03 INTENDED USE OF AND USING<br />
The autoclave is able to sterilize the three types of load provided for by the standard EN13060,<br />
especially:<br />
METAL OR SOLID<br />
MATERIALS<br />
POROUS OBJECTS<br />
HOLLOW OBJECTS<br />
Instruments with no cavities and no obstacles to the<br />
penetration of steam<br />
Simple or composite materials that can absorb fluids (fabrics,<br />
gowns, surgical gauzes, dressings, etc)<br />
Materials or devices with cavities, obstructions, etc.<br />
These are subdivided into two types, classified according to<br />
the length and diameter of the cavity. Approximately:<br />
TYPE B: cannulas, tubes or devices with large passages.<br />
TYPE A: turbines, hand pieces and devices with blind or<br />
small holes.<br />
The autoclave must be used, solely and exclusively, for the sterilization of<br />
instruments and materials compatible with the steam sterilization system.<br />
This equipment can be used in the dental, medical, aesthetic fields and, generally, in all<br />
the fields where the sterilization of the instruments and materials is made<br />
This device has been certified for the sterilization of the following materials *:<br />
Wrapped and unwrapped solid<br />
materials for a maximum load of<br />
Type A/B hollow materials for a<br />
maximum load of<br />
Porous materials for a maximum<br />
load of<br />
EUROPA B EVO EUROPA B EVO <strong>24</strong><br />
kg. 5,00 kg. 7,00<br />
kg. 5,00 kg. 7,00<br />
kg. 1,50 kg. 2,0<br />
* Only for european countries<br />
Always make sure the loads undergoing sterilization can<br />
withstand the temperatures of the selected cycle<br />
10
ENGLISH<br />
04 TECHNICAL DATA<br />
4.1 Mechanical Data<br />
EUROPA B EVO EUROPA B EVO <strong>24</strong><br />
Working temperature<br />
+5°C ÷ +40°C<br />
Maximum altitude<br />
2.000 m<br />
MAX relative humidity at 30°C 80%<br />
MAX relative humidity at 40°C 50%<br />
Dimensions of space occupied<br />
(L x H x P)<br />
510 X 390 X 590 mm 510 X 390 X 730 mm<br />
Space occupied with open<br />
door<br />
300 mm<br />
Weight (tank empty) 54 kg 58 kg<br />
Weight (tank full) 63 kg 67 kg<br />
Weight of area of support 2058 N/m 2 2058 N/m 2<br />
Volume 0.12 m 3 0.15 m 3<br />
Potential sound level<br />
< 70 db A<br />
4.2 Electrical Data<br />
EUROPA B EVO EUROPA B EVO <strong>24</strong><br />
Power voltage<br />
230 V a.c. +/-10 % single phase<br />
Power 1,7 kW 2.0 kW<br />
Frequency<br />
50 / 60 Hz<br />
Power cord 2 + 1 x 1mm 2<br />
Fuses<br />
6.3 x 32 - 12 A<br />
Heat transmitted<br />
3.6 E +6 J / hour<br />
4.3 Chamber<br />
EUROPA B EVO EUROPA B EVO <strong>24</strong><br />
MAX working pressure<br />
2.4 bar (relative)<br />
MAX empty<br />
- 0.9 bar (relative)<br />
MAX Temperature 138 °C<br />
Material Inox AISI 304<br />
Size Ø <strong>24</strong>5 x 318 mm Ø <strong>24</strong>5 x 500 mm<br />
4.4 Clean Water tank<br />
EUROPA B EVO EUROPA B EVO <strong>24</strong><br />
With<br />
Demineralizer<br />
Without<br />
Demineralizer<br />
Volume<br />
4,5 l<br />
Usable cycles 4<br />
Read<br />
demineralizer<br />
2<br />
instruction<br />
Material<br />
polyethylene<br />
11
ENGLISH<br />
4.5 Used Water tank<br />
EUROPA B EVO EUROPA B EVO <strong>24</strong><br />
Volume<br />
4,5 l<br />
Usable cycles 4 2<br />
Material<br />
polyethylene<br />
Max temperature used water 50°C<br />
4.6 Bacteriological filter<br />
EUROPA B EVO EUROPA B EVO <strong>24</strong><br />
Diameter<br />
56 mm<br />
Filtering capacity 0.3 µm<br />
12
ENGLISH<br />
05 ACCESSORIES<br />
Autoclave is sold and delivered complete of all accessories, which are included in the<br />
original packaging.<br />
Accessories provided and optional accessories:<br />
- Tray holder<br />
EUROPA B EVO EUROPA B EVO <strong>24</strong><br />
Material<br />
Aluminium anodized<br />
Size (L x H x P) 192 x 165 x 280 mm 192 x 200 x 470 mm<br />
Picture<br />
PICT.3<br />
Envelope standard 1<br />
PICT.4<br />
-- Optional Tray holder<br />
EUROPA B EVO<br />
EUROPA B EVO<br />
<strong>24</strong><br />
Material Aluminium anodized /<br />
Size (L x H x P)<br />
193 x 200 x 280 mm<br />
(200 x 193 x 280) mm<br />
/<br />
Picture<br />
/<br />
PICT.5<br />
Envelope standard 1 /<br />
- Tray<br />
EUROPA B EVO EUROPA B EVO <strong>24</strong><br />
Material<br />
Aluminium anodized<br />
Size (L x H x P) 184 x 17 x 286 mm 184 x 17 x 286 mm + 184 x 17 x 140 mm<br />
Picture<br />
PICT.6<br />
PICT.7<br />
Envelope standard 4 4 + 4<br />
+<br />
PICT.8<br />
13
ENGLISH<br />
-- Optional trays<br />
EUROPA B EVO EUROPA B EVO <strong>24</strong><br />
Material /<br />
Aluminium anodized or<br />
stainless steel<br />
Size (L x H x P) / 184 x 17 x 460 mm<br />
Picture /<br />
PICT.9<br />
Envelope standard / 4<br />
- Tray extraction and door adjustment wrench<br />
Use for extract the trays (PICT.11) and for door adjustement (paragraph 11.4)<br />
Picture<br />
PICT.10<br />
Envelope standard 1<br />
PICT.11<br />
- Plastic funnel with pipe<br />
Use to charge water in manual metod (paragraph 8.3)<br />
Picture<br />
PICT.12<br />
Envelope standard 1<br />
- Chamber and door gasket clearing sponge<br />
Use to clean sterilization chamber and door gasket (paragraph 11.2-11.3)<br />
Picture<br />
PICT.13<br />
Envelope standard 1<br />
14
ENGLISH<br />
- Connection for water filling pipe and plastic funnel<br />
Use with plastic funnel and water filling pipe with filter<br />
Picture<br />
PICT.14<br />
Envelope standard 1<br />
- Water filling pipe with filter<br />
Use to charge water with pump (paragraph 8.3)<br />
Picture<br />
PICT.15<br />
Envelope standard 1<br />
- Water discharghe pipe<br />
Use to empty used water tank (paragraph 8.9)<br />
Picture<br />
PICT.16<br />
Envelope standard 1<br />
- Rilsan pipe<br />
Connect one pipe end into the used water overflow - condensate drain pipe fitting (PICT.1<br />
pos..4.) and put the other end in a tank.<br />
Picture<br />
PICT.17<br />
Envelope standard 1<br />
15
ENGLISH<br />
- Rear spacer<br />
Put the spacer in the autoclave’s back panel (PICT.1 pos. 0.) It’s necessary for guarantee<br />
a good ventilation if you place the autoclave near a wall.<br />
Picture<br />
PICT.18<br />
Envelope standard 1<br />
- Pipes for discharge utilities<br />
1- Pipe for clean water overflow<br />
2- Pipe for discharging used water<br />
1- Connect one pipe end into the water overflow pipe fitting (PICT.1 pos. 1.) and put the<br />
other end in a tank or in the discharge (demineralizer version).<br />
2- Connect one pipe end at the pipe fitting PICT.20 and screw it into the used water tap<br />
(PICT.1 pos. 5.) then put the other end in a tank or in the discharge.<br />
Picture<br />
PICT.19<br />
Envelope standard 2<br />
- Pipe fitting for back discharge used water<br />
Connect the pipe for discharging used water into the pipe fitting for back discharge used<br />
water PICT.20 and screw into the used water tap (PICT.1 pos. 5.).<br />
Picture<br />
PICT.20<br />
Envelope standard 1<br />
16
ENGLISH<br />
- Power supply cord<br />
Take the power supply cord provided and insert the female plug (PICT.21 pos..B.) in the<br />
socket of the back panel of the autoclave (PICT.1 pos. 6.). Then insert the male plug<br />
(PICT.21 pos. A.) in the electric plug of the system.<br />
Picture<br />
PICT.21<br />
Envelope standard 1<br />
IMPORTANT<br />
Ask for and use only and exclusively original accessories.<br />
17
ENGLISH<br />
06 UNPACKING<br />
The autoclave is shipped in a suitable package to be transported and moved easily and to<br />
protect its contents.<br />
The package must not be jostled, it must be moved with care avoiding letting it turn over or<br />
fall from a height superior to 16 cm.<br />
In case autonomous handling means are not available handle the packaged autoclave<br />
always in two persons.<br />
Autoclave is placed on wooden pallet and packed with corrugated cardboard internal and<br />
external application.<br />
For remove the autoclave to its pack please remove first the corrugated cardboard.<br />
For lift the autoclave please use the belts.<br />
For your safety pay attention to weight of the autoclave, for lift or move the autoclave it is<br />
necessary at least 2 people.<br />
Use the belts also for move the autoclave<br />
IMPORTANT<br />
Do not lift the autoclave from the inferior part of the door or command panel, this incorrect<br />
operation can create problems of a mechanical nature.<br />
Inside the package you will find:<br />
USER’S MANUAL to be read with attention and kept in a place available to all operators<br />
assigned to sterilization.<br />
CERTIFICATION which must be conserved<br />
GUARANTEE LABEL which must be completed and send.<br />
ATTENTION<br />
Always conserve original packaging.<br />
18
ENGLISH<br />
07 INSTALLATION<br />
A<br />
PICT.22<br />
EUROPA B EVO EUROPA B EVO <strong>24</strong><br />
610 mm<br />
B 590 mm 730 mm<br />
C<br />
D<br />
50 mm<br />
410 mm<br />
426 mm (front)<br />
403 mm (front)<br />
E<br />
455 mm (rear)<br />
444 mm (rear)<br />
F 400 mm 431 mm<br />
1 - Install the autoclave in an environment suitable for carrying out sterilization procedures.<br />
2 - The room must be adequately lit and ventilated, as provided for in the directives in<br />
force<br />
3 - Install the autoclave away from heat sources and water splashes.<br />
4 - Position the autoclave on a surface that is able to bear its weight. The minimum<br />
recommended load bearing capacity of the surface is 80 kg.<br />
5 - The supporting surface must be perfectly horizontal and must not have inclinations.<br />
6 - Place the autoclave at a height that allows the user to inspect and easily clean all parts<br />
of the sterilization chamber.<br />
7 - Open the door of the autoclave and remove from inside the sterilization chamber all<br />
packages which contain the single accessories.<br />
19
ENGLISH<br />
8 - Leave inside the sterilization chamber only the tray carrier with the trays. All other<br />
accessories should be positioned in a separate space available to operators.<br />
9 - Never place on the autoclave newspapers, trays, liquid containers, etc.<br />
10 - Do not lean on the door when it is open<br />
11 - Comply with the minimum overall dimensions shown in PICT.22. Use the spacer<br />
(PICT.1 pos..0. – FIG.18) for ensure the minum distance to wall.<br />
12 - Connect the overflow connectors to the special drains with the pipes provided.<br />
(chapter 5)<br />
13 - Always make sure the electrical system to which the autoclave is to be connected is in<br />
conformity with the legislation in force and sized to suit the specifications of the said<br />
appliance.<br />
14 - Take the power supply cable supplied and plug the plug on the rear panel of the<br />
autoclave into the female socket (PICT.1 pos..6.)<br />
15 - Connect the electric plug to the system and make sure the power supply is 230 Vac -<br />
2000 Va minimum<br />
IMPORTANT<br />
Do not make the connections using extensions, reducers or adapters as this could<br />
create micro outages with consequent generation of alarm signals.<br />
16 - Turn on the autoclave by pushing the general switch (PICT.2 pos. 19.) and open the<br />
door to the autoclave. Wait a few seconds, there will be two beeps which indicate the<br />
reaching of relative parameters for automatic atmospheric alignment, at the same time the<br />
display will indicate “door open”.<br />
IMPORTANT<br />
Never select a control before hearing the two acoustic signals: the autoclave will<br />
not accept the selected program<br />
17 - Load the pure water tank following the indications in the section entitled USAGE<br />
INSTRUCTIONS (chapter 8).<br />
Successively run the test cycle, always following the indications expressed in the section<br />
USAGE INSTRUCTIONS (chapter 8).<br />
18 - If the autoclave is installed with the demineralizer system, follow the instructions<br />
contained in the packaging of this device and the DEMINERALIZER section (chapter 14).<br />
20
ENGLISH<br />
08 USAGE INSTRUCTION<br />
After having installed the autoclave, proceed with preparations and use.<br />
8.1 Turn on the autoclave<br />
Press the general switch (PICT.2 pos..19.).<br />
8.2 Loading pure water tank<br />
Connect the water filling pipe (provided) with the connection for water filling pipe and<br />
plastic funnel PICT.14. Then engage the connection in the charging hole (PICT.2 pos.<br />
.13.).<br />
Insert the other end of the pipe with filter in the demineralized or distilled water container.<br />
Press the button B-PUMP to start the water loading pump and press it until the countdown<br />
start.<br />
The pump loads the tank inside the autoclave. If maximum level is not reached within 180<br />
seconds the pump automatically stops, therefore it is necessary to press the button again.<br />
The pump stops automatically when maximum level is reached.<br />
With connection to a deionizer, if the maximum water level has not been reached, the<br />
functioning of the autoclave will be obstructed.<br />
8.3 Manual filling<br />
If you wish to use this method of filling or in the event of malfunctioning of the pump, the<br />
filling of the tank can be carried out manually by the operator in the following way:<br />
-Turn on autoclave<br />
-Remove the connection cover of (PICT.2 pos..12.)<br />
-Insert in this opening the hose connected to the funnel (PICT. 14.)<br />
-Pour distilled water in the funnel, keeping it higher than the loading top<br />
-Add until the led of maximum level turns on (PICT.2 pos. 29.).<br />
-Loading completed, twist on the top<br />
21
ENGLISH<br />
8.4 Characteristics of the water to be used<br />
TABLE SHOWING THE QUALITY LEVELS LAID BY THE UNI EN 13060: 2005<br />
CEN STANDARD UNI EN 13060 : 2005<br />
Evaporation residue ≤ 10 mg/l<br />
Silicon oxide ≤ 1 mg/l<br />
Iron ≤ 0.2 mg/l<br />
Cadmium ≤ 0.005 mg/l<br />
Lead ≤ 0.05 mg/l<br />
mg/l Remains of heavy metals apart<br />
from iron, cardium, lead<br />
≤ 0.1 mg/l<br />
Chloride (Cl’) ≤ 2 mg/l<br />
Phosphate (P20s) ≤ 0.5 mg/l<br />
Conductivity (at 20°C) ≤ 15 µs/cm<br />
Ph value (acidity level) 5 ÷ 7,5<br />
Appearance<br />
Transparent, clear, without<br />
deposits<br />
Hardness (and alkaline earth ions) ≤ 0.02 mmol/l<br />
8.5 Loading the material into the autoclave<br />
Place the materials to be sterilized on the trays provided.<br />
- never superpose the materials<br />
- arrange the wrapped instruments, with the paper part facing upwards<br />
- never bring the materials into contact with the sterilization chamber or the closing door<br />
- put the scissors and dental forceps with the blade open<br />
PICT.23<br />
When you have place all the instruments close the door and you can read<br />
CLOSED on the display.<br />
DOOR<br />
8.6 Starting the sterilization cycle<br />
Choose sterilization program most adaptable of load prepared and press the button<br />
B-SELECT.<br />
Each individual pressure changes program selection to the next.<br />
After having chosen the program start the cycle by pressing the button B-START, the door<br />
will lock automatically and the cycle will begin.<br />
During the cycle, the display will show all parameters and relative information.<br />
22
ENGLISH<br />
8.7 End of cycle<br />
An acoustic signal will warn the operators that the sterilization cycle has been completed.<br />
If the cycle is concluded with a positive outcome, the message END OF CYCLE will<br />
appear on the display; if, on the other hand, problems arise, an error or alarm code will be<br />
displayed.<br />
When the acoustic signal stops, release the door by pressing the B-DOOR button. If there<br />
is pressure inside the chamber, the button will not activate the release device. Wait until<br />
the chamber is completely depressurized, then repeat the operation or, in emergency<br />
situations only, simultaneously press B-DOOR + B-PUMP. When the door is released, pull<br />
the door handle to open it.<br />
8.8 Unloading, preserving and storing the sterilizied materials<br />
Wear personal protection equipment in accordance with the existing laws.<br />
Extract the trays using the special spanner provided (PICT.10), and place the autoclave<br />
load on a clean, dry surface.<br />
Then store the treated instruments in the special, prepared compartments.<br />
8.9 Discharging used water<br />
When the led of used water level (PICT.2 pos. 30.) goes on, proceed with emptying. If not<br />
emptied, the autoclave function is inhibited.<br />
Take the pipe provided (PICT.16), and insert it in the used water discharge plug, on the<br />
front of the autoclave (PICT.2 pos. 14.), unscrew the metal ring anticlockwise (to execute 2<br />
complete turns), simultaneously place the other end of the pipe in a container, the water<br />
will descend into the same container.<br />
IMPORTANT<br />
A – The hose located in the receiving container, must not ever, touch or be immersed in<br />
the discharged water, otherwise there will be a situation of sucking up.<br />
B – Always wait until the unloading water is totally emptied. The led of maximum used<br />
water level will turn off when there is still water in the tank, therefore do not use as a<br />
reference for this operation.<br />
To the term of the drainage to screw the metal ring and remove the tube.<br />
23
ENGLISH<br />
8.10 Interruption of sterilization cycle<br />
A sterilization cycle can be voluntarily interrupted by pressing the button B-START<br />
for at least 2 seconds.<br />
The autoclave will emit a beep, go into decompression and on the display will<br />
appear the message ALLARM 001 (INTERRUPTED CYCLE).<br />
To reset error, maintain pressed simultaneously the buttons below indicated, until the<br />
intervention of an acoustic signal:<br />
B-DOOR + B-PUMP + B-SELECT<br />
ATTENTION:<br />
You can’t reset the allarm if the printer works<br />
If an alarm message is displayed (CODE “A”) the cycle is to be considered<br />
aborted: it will be necessary to repeat all the preparation and sterilization<br />
operations.<br />
<strong>24</strong>
ENGLISH<br />
09 STERILIZATION CYCLES<br />
9.1 Descriptions cycles<br />
The autoclave has three series of cycles:<br />
A - operation cycles<br />
B - night cycles<br />
C - test cycles<br />
9.2 Operation cycles<br />
All operation cycles have a system of fractioned vacuum, which therefore permits<br />
sterilization of materials that are hollow, porous, solid, both free and packaged.<br />
Temperatures can be selected from 121°C – 134°C.<br />
Normally the cycles of 121°C are used for thermoplasti cs or sensitive materials, while the<br />
134°C cycles are used for all other materials.<br />
In all cases always follow the indications given by the manufacturer of the instruments or<br />
devices to be sterilized.<br />
There are also two special cycles:<br />
- Prion cycle, studied for the Crutzfeldt-Jacobs disease (mad cow disease)<br />
- Flash cycle created for rapid sterilization of unpackaged instruments and devices.<br />
9.3 Night cycles<br />
The autoclave is provided with a special economizer device.<br />
This device allows the execution of sterilization cycles without the presence of an operator.<br />
At cycle end, if the door is not opened, the autoclave stabilizes and then shuts off<br />
automatically.<br />
Only the general switch remains on (PICT.2 pos. 19.).<br />
Upon the operator’s arrival it is sufficient to press any button to re-start the autoclave and<br />
read the cycle result on the display.<br />
Besides that the printer will have regularly prepared the written report relative to the same<br />
cycle.<br />
25
ENGLISH<br />
STERILIZATION TABLE<br />
CICLI<br />
121°C<br />
Unpackaged<br />
121°C<br />
Packaged<br />
134°C<br />
Flash<br />
134°C<br />
Unpackaged<br />
134°C<br />
Packaged<br />
134°C<br />
Prion<br />
EXPOSED DRYING<br />
TIME<br />
TIME<br />
T4 T5 (Minuts)<br />
(Minuts) 18L <strong>24</strong>L<br />
18 6 12<br />
18 17 13<br />
4 2 4<br />
5 6 12<br />
5 17 13<br />
20 17 13<br />
PRESSURE<br />
WORK<br />
MIN AND MAX<br />
(relative bar)<br />
TEMPERATURE<br />
WORK MIN AND<br />
MAX<br />
( °C )<br />
1.04 ÷ 1.30 121 ÷ 125<br />
2.02 ÷ 2.38 134 ÷ 138<br />
Warmig up time and vacuum fractionation can vary, because of autoclave’s conditions,<br />
between 25 and 30 minutes. You have to an this time to sterilization’s times showed in<br />
table. Hall the cycles have three vacuum fases<br />
9.4 Test cycles<br />
- Helix test this test is used to check the capacity of the steam to penetrate a hollow object<br />
Place the Helix test system complete with indicator on the central tray in the sterilization<br />
chamber, without the presence of a load. Refer to the manufacturer's instructions for<br />
correct loading of the indicator.<br />
Carry out the special test cycle. At the end, take out the whole system and check the<br />
indicator.<br />
In the event of a negative response, contact and inform an authorized technician.<br />
- Bowie e Dick test this test is used to check the capacity of the steam to penetrate a<br />
porous load.<br />
Place the Bowie-Dick test on the central tray in the sterilization chamber, without the<br />
presence of a load. Carry out the special test cycle. At the end, take out the packet, open it<br />
and check the result by assessing the test sheet in the centre. In the event of a negative<br />
response, contact and inform an authorized technician.<br />
- Vacuum test this test is used to check the capacity of the autoclave to maintain the<br />
vacuum. The results of this test are printed by the autoclave printer.This test must be<br />
carried out with the machine cold. Do not put any type of load into the autoclave. Close the<br />
door, select the cycle and start it. At the end, check the result by assessing the ticket<br />
issued by the printer connected to the autoclave. In the event of a negative response,<br />
contact and inform an authorized technician.<br />
It is preferable to use tests distributed of the manufacturer.<br />
26
ENGLISH<br />
CICLI<br />
134°C Helix/<br />
Bowie&Dick<br />
STERILIZZATION<br />
TIME<br />
T4<br />
( Minuts)<br />
TEST CYCLES TABLE<br />
DRY<br />
TIME<br />
T5<br />
(Minuts)<br />
PRESSURE<br />
WORK<br />
MIN AND MAX<br />
( relative bar )<br />
TEMPERATURE<br />
WORK MIN AND<br />
MAX<br />
( °C )<br />
3.5 4 2.02 ÷ 2.38 134 ÷ 138<br />
Vacuum -0.9<br />
PICT.<strong>24</strong><br />
T1,T2,T3= pre heater fase and vacuum fases<br />
T4= sterilization<br />
T5= drying<br />
27
ENGLISH<br />
10 MESSAGES OF ERROR OR ALARMS<br />
Messages of error are emphasized through an Alfa-numerical code, consisting in a letter<br />
and three numbers.<br />
The “E” CODE is relative to errors of the operator, which can be corrected by same<br />
operator.<br />
The “A” CODE is relative to alarms, irregularities of the autoclave, after having carried out<br />
the remedy, if the problem persists it is necessary to request telephonic assistance.<br />
If an alarm message is displayed (CODE “A”) the cycle is to be considered<br />
aborted: it will be necessary to repeat all the preparation and sterilization<br />
operations.<br />
To reset alarms and errors, maintain pressed the buttons here indicated until the<br />
intervention of a “BEEP”<br />
B-DOOR + B-PUMP + B-SELECT<br />
10.1 List of error alarm messages<br />
ERROR CAUSE REMEDY<br />
E 200 Low water level Fill tank<br />
E 250<br />
Low level water cleaned up with loadingfrom<br />
demineralizer<br />
Fill tank<br />
E 300 Maximum level used water Empty tank<br />
E 401 Door open Colse door with attention<br />
E 451 Door unlocked Open door and close again<br />
E 461<br />
High temperature in chamber for vacuum test<br />
(above 40° C)<br />
Shut off and wait 10 minutes<br />
A 250 Cycle begins without water Control demineralizer device<br />
A 001 Interrupted cycle Reset and restart cycle<br />
A 011 Irregular pc display<br />
Shut off and restart<br />
autoclave<br />
A 101 Vacuum not reached in 10’ (minutes) Reset and restart cycle<br />
A 111 Vacuum not maintened for first phase VT Reset and restart cycle<br />
A 121 Vaccum not maintened for second phase VT Reset and restart cycle<br />
A 401<br />
Hatch opende during the cycle or problem<br />
closing<br />
Check the closing system<br />
A 501 Pressure not maintened Reset and restart cycle<br />
A 551 Irregular 1° temperature sensor Reset and restart cycle<br />
A 552 Irregular 2° temperature sensor Reset and restart cycle<br />
A 641 Overly high pressure Reset and restart cycle<br />
A 651 Overlay high temperature Reset and restart cycle<br />
A 661 Irregular temperature comparison Reset and restart cycle<br />
A 701 Working pressure not reached Reset and restart cycle<br />
A 751 Low temperature Reset and restart cycle<br />
A 761 Irregular pressor sensor Reset and restart cycle<br />
28
ENGLISH<br />
A 801 Irregular unloading pressure Reset and restart cycle<br />
Reset and restart cycle,<br />
Main voltage too low - Temporary lack of<br />
A 901<br />
Inform eletric Energy<br />
electric energy<br />
provider<br />
REPLACE RESINS Resins IONIC<br />
SYSTEM exhaust<br />
REPLACE FILTER Resins OSMOSI<br />
SYSTEM exhaust<br />
Replacement of resins; refer to paragraph<br />
14.3<br />
Replacement of filter; refer to paragraph<br />
14.3<br />
D<br />
The printer’s door is not<br />
closed<br />
Try to close the printer’s door<br />
P Paper is missing Insert paper<br />
Lo<br />
There is low voltage on<br />
the line<br />
Try to connect the machine to the net electrical worker in<br />
an other point; if the problem persists to contact a<br />
electrician<br />
IMPORTANT<br />
If after following the remedies, the problem persists, call telephone assistance at<br />
MEDLINE ITALIA srl +39 0522 – 94 29 97.<br />
29
ENGLISH<br />
11 MAINTENANCE AND PREVENTION<br />
Correct maintenance of the autoclave assures correct functioning of it and a secure saving<br />
in terms of time and costs for assistance and maintenance.<br />
11.1 Replacing the bacteriological filter<br />
Substitute the bacteriological filter (PICT.2 pos. 11.) maximum every 200 cycles, or as<br />
soon as the filter becomes a dark color.<br />
Unscrew it in an anticlockwise direction (PICT.25). Screw on the new filter in a clockwise<br />
direction (PICT.26) until it is seated.<br />
Use only and exclusively original filters from the manufacturer of the autoclave.<br />
PICT.25<br />
PICT.26<br />
11.2 Cleaning the chamber<br />
Clean periodically the chamber, remove eventual deposits or debris, thus avoiding the<br />
introduction in the discharging circuit of material which can cause obstructions.<br />
For correct cleaning use only demineralized water and the abrasive sponge provided.<br />
(PICT.13)<br />
The filter in chamber is fixed about interference. When you estract the filter for the<br />
cleaning please you don’t damage it (PICT.27). Then, you reposition the filter (PICT.28)<br />
and control that protrude about 15mm from the chamber surface (PICT.29).<br />
PICT.27 PICT.28 PICT.29<br />
Never use solvents, detergents, chemical solutions, descaling agents or other similar<br />
products.<br />
30
ENGLISH<br />
11.3 Door seal cleaning<br />
Periodically remove eventual residuals which are deposited on the circumference of the<br />
seal using water and the sponge provided (non abrasive side), or else a moistened cloth.<br />
11.4 Door regulation<br />
To regulate the door lock pressure, it is necessary to adjust the regulator of the same door<br />
using the double function wrench (extraction tray + wrench) (PICT.10) provided.<br />
Turn anti clockwise (PICT.30 pos..A.) to increase lock pressure.<br />
Turn clockwise (PICT.30 pos. A.) to decrease the lock pressure.<br />
.A.<br />
.B.<br />
PICT.30<br />
31
ENGLISH<br />
11.5 Substitution printer paper<br />
Thermographic paper roll 57 mm wide. Thermographic paper can be printed on one side<br />
only. Open the printer cover by pushing the button (PICT.31 pos..A.), place the paper roll<br />
by paying attention to the rotation direction, pull the paper until it comes out and close the<br />
cover (PICT.31 pos..B.); the printer is ready for printing.<br />
.A.<br />
.B.<br />
PICT. 31<br />
11.6 Printer status<br />
If the cover of the printer is not perfectly closed, on the display the letter “D” appears.<br />
Open and close the printer’s cover.<br />
If paper is missing, on the display the letter “P” will appear.<br />
Open the cover, insert paper and re-close the cover.<br />
32
ENGLISH<br />
12 PROGRAMMING DISPLAY<br />
Please, see the PICT.2<br />
12.1 Language selection<br />
Press simultaneously B-START and MAINS switch. Hold down B-START until on the<br />
display appears the name of the language programmed.<br />
Press B-SELECT to modify the language [forward].<br />
Press to B-PUMP modify the language [backwards].<br />
12.2 Hours selection<br />
Press B-START the hours appears.<br />
Press B-SELECT to modify hour [forward].<br />
Press B-PUMP to modify hour [backwards].<br />
12.3 Minuts selection<br />
Press B-DOOR minutes appear.<br />
Press B-SELECT to modify minutes [forward].<br />
Press B-PUMP to modify minutes [backwards].<br />
12.4 Seconds selection<br />
Press B-DOOR seconds appear. Do not modify.<br />
12.5 Date selection<br />
Press B-START day appears (flashing).<br />
Press B-SELECT to modify day [forward].<br />
Press B-PUMP to modify day [backwards].<br />
12.6 Month selection<br />
Press B-DOOR month appears (flashing).<br />
Press B-SELECT to modify month [forward].<br />
Press B-PUMP to modify day [backwards].<br />
33
ENGLISH<br />
12.7 Year selection<br />
Press B-DOOR year appears.<br />
Press B-SELECT to modify year [forward].<br />
Press B-PUMP to modify year [backwards].<br />
12.8 Visualize atmospheric pressure<br />
Press B-START and compare memorized atmospheric pressure appears.<br />
DO NOT MODIFY!<br />
12.9 Water loading selection<br />
Press and release B-START to select next screen until you see setting the water load:<br />
-CHARGING BY PUMP<br />
-IONIC SYSTEM<br />
-OSMOSI SYSTEM<br />
Press B-SELECT to modify water supply loading.<br />
Press B-DOOR to save the modify and maintain pressed until the sound of the “beep”.<br />
Press B-START to exit menu and maintain pressed until the sound of the “beep”.<br />
The data inserted are memorized. Turn off the autoclave using the MAINS switch.<br />
34
ENGLISH<br />
13 SOLUTIONS TO OPERATIONAL PROBLEMS<br />
In many cases some alarms or errors are determined by lack of attention or lack of<br />
familiarity with some technical and operational aspects.<br />
Following are listed some cases of irregularity with relative solutions.<br />
13.1 Autoclave does not dry correctly<br />
a - SUBSTITUTE THE BACTERIOLOGICAL FILTER, with a new original.<br />
b - ORIGINAL TRAYS HAVE NOT BEEN USED, but other trays without perforations or<br />
diverse perforations. Use only original trays, possibly in aluminum. Request<br />
additional original trays.<br />
c - INSTRUMENTS HAVE NOT BEEN ARRANGED CORRECTLY, arrange<br />
instruments or packaged materials with the paper turned upwards.<br />
Never pile up instruments or materials, arrange them parallel to one another.<br />
Never place the instruments or materials in contact with the chamber, they can burn<br />
or become deformed.<br />
13.2 Autoclave chamber becomes white<br />
a - CHANGE IMMEDIATELY THE TYPE OF WATER USED, use demineralized or<br />
distilled water, as is specifically indicated in the previous chapter and then proceed<br />
with cleaning the chamber.<br />
b - THE WHITISH COLOR CAN be a consequence of the evaporation of organic<br />
materials present on the instruments.<br />
Instruments should be cleaned with a detergent action more suitable and<br />
thoroughly.<br />
c - check the demineralizer (IONIC SYSTEM or OSMOSI SYSTEM)<br />
13.3 Autoclave chamber presents blueish green stains<br />
a - INSTRUMENTS HAVE NOT BEEN CORRECTLY RINSED cleanse and rinse with<br />
major attention the instruments.<br />
If the stains are evident request telephonic assistance.<br />
13.4 Sterilization cycle interrupts without apparent motive<br />
a - CONTROL IF AUTOCLAVE IS CONNECTED to the electrical net with extensions,<br />
reductions, adapters, if so remove this accessories and connect the autoclave<br />
directly to the electric socket.<br />
35
ENGLISH<br />
13.5 Autoclave does not receive commands<br />
a - AUTOCLAVE PRE-ARRANGES BAR AUTOMATIC ALIGNMENT wait for the<br />
double beep after opening the door, then program the functions.<br />
b - PURE WATER TANK is empty, minimum led level is on, fill with pure water<br />
c - USED WATER TANK IS FULL. Maximum level led is on, discharge used water.<br />
13.6 Autoclave printer does not print<br />
a - PAPER CARRIER COVER IS NOT CLOSED CORRECTLY, on the display appears<br />
the letter “D”. Open and close the printer cover checking that is correctly closed.<br />
b - PAPER MISSING, on the display appears the letter “P”. Open the cover and insert<br />
the roll of thermo-graphic paper.<br />
c - ROLL OF PAPER IS MOUNTED WITH THERMO SIDE TOWARDS INSIDE, open<br />
the cover and turn the roll of paper to the correct position.<br />
13.7 Stains on instruments<br />
a - INSTRUMENTS BECOME YELLOW, chemical liquid residual has with heat been<br />
fixed on the instruments. They were not sufficiently rinsed.<br />
b - STERILIZATION CHAMBER PRESENTS YELLOW SPOTS, instruments were<br />
introduced in the chamber with chemical liquid which dripped and is fixed due to<br />
heat. Rinsing was not sufficient.<br />
c - INSTRUMENTS PRESENT WHITE SPOTS, rinsing was done with water with high<br />
level of calcium and the instruments were not dried. For last rinse it is advisable to<br />
used demineralized water and dry carefully the instruments.<br />
d - INSTRUMENTS ARE DARKENED, this is caused by the fact that the instruments<br />
have internally a strong component of carbon.<br />
36
ENGLISH<br />
14 DEMINERALIZER<br />
14.1 Set of demineralizer system<br />
Autoclave is already prepared also for plug IONIC SYSTEM or OSMOSI SYSTEM for<br />
charging water into the autoclave.<br />
These applications are accessories of autoclave.<br />
These applications have been designed for remove minerals in the water before to charge<br />
the autoclave.<br />
First to plug the hydraulic connections it is necessary set the software of autoclave<br />
following this instructions:<br />
Switch-on the autoclave with the MAINS (PICT.2 pos. 19.) switch and keep pressed<br />
B-START ((during the switch on) until you see a string reporting the selected language<br />
Press and release B-START to select next screnn until you setting the water load:<br />
-CHARGING BY PUMP<br />
-IONIC SYSTEM<br />
-OSMOSI SYSTEM<br />
To change this setting use B-SELECT.<br />
To save keep pressed B-DOOR until you hear a “BEEP”.<br />
To exit keep pressed B-START until you hear a “BEEP”.<br />
WARNING<br />
The number you can see on display, under the kind of water system used, it’s a counter. It<br />
gives you an indication about the number of cycles possible to make until the end of filter<br />
(in case of osmosi system) or until the end of resins (in case of ionic system).<br />
When you change the filter or the resins, it’s necessary reset the number of the counter<br />
after saving of the kind of system used.<br />
For reset the counter it’s necessary keep push the button B-PUMP until the acoustic signal<br />
of the buzzer (it takes about 10 second) in the main page of the menu where you can start<br />
the sterilization cycle.<br />
37
ENGLISH<br />
PICT.32<br />
38
ENGLISH<br />
14.2 Connection of demineralizer system<br />
Turn off the autoclave by pressing the General switch (MAINS) located on the right side of<br />
the autoclave. (PICT.2 pos..19.)<br />
The operator after having set the autoclave can install the demineralizations system<br />
following the indications in the manual attached to the demineralizer apparatus.<br />
Here are indicated the specific connection to the autoclave of the water supply hose and<br />
the connection of the electric plug.<br />
1. Turn off the autoclave if it is on;<br />
2. Close the faucet located above the demineralization system;<br />
3. Install the demineralizer as indicated in its manual;<br />
4. Twist the male screw of the connection-hose carrier with Teflon or other component<br />
which guarantees the sealing of water;<br />
5. Screw the connection on the Demineralizer tap PICT. 32 pos. .2.;<br />
6. Insert the hose exit of demineralizer to the connection-hose carrier already screwed<br />
to the autoclave;<br />
7. Insert the plug of demineralizer to the socket PICT.32 pos. .7. on the back of the<br />
autoclave<br />
8. Open the faucet located above the demineralization system;<br />
9. Control that there is no water loss;<br />
10. Turn on the autoclave;<br />
11. Run one or more sterilization cycles to control the functioning of the connection and<br />
check above all for leaking.<br />
AT THE END OF EACH DAY ALWAYS CLOSE THE FAUCET LOCATED ABOVE<br />
THE DEMINERALIZATION SYSTEM TO PREVENT FLOODING<br />
CONNECT OF DEMINERALIZER ONLY TO PREPROGRAMMED AUTOCLAVE .<br />
IF THE UNIT AT THE BEGINNING OF THE CYCLE SHOWS E250 THEN YOU<br />
HAVE TO FILL THE CLEAN WATER TANKUNTIL THE MAXIMUN IS REACHED.<br />
NOTE: FOR THE CONNECTION OF DEMINERALIZATION SYSTEM TO THE<br />
AUTOCLAVE TECNO-GAZ REFER TO INDICATIONS IN THE MANUAL.<br />
14.3 Change resins - filter<br />
Autoclave display indicates the state of finishing of the resin with the message “REPLACE<br />
THE RESINS” or “REPLACE THE FILTER”.<br />
Substitute the resin cartridge as indicated in the deminaralizer manual.<br />
After substitution, press button B-PUMP until the “beep”, to reset the autoclave.<br />
39
ENGLISH<br />
15 STANDARD STERILIZATION PROCEDURE<br />
Sterilization means adopting precise operational protocol and applying a system.<br />
Autoclave is the final link of this system.<br />
Those who do not follow all of the various phases of the sterilization system will be<br />
unsatisfied with the final result.<br />
TECNO-GAZ SpA produces all the devices for each phase of the sterilization cycle.<br />
Therefore it is necessary to:<br />
1 - Prepare a precise written operational protocol to distribute to all operators assigned<br />
to sterilization.<br />
TECNO-GAZ SpA can provide these personalized protocols.<br />
2 - Follow carefully and with attention all of the sterilization cycle phases:<br />
DISINFECTION obligatory phase, in base of that is obligatory for the operator<br />
security, to be done with immersion in chemical liquids or thermo-disinfection.<br />
CLEANING the most important phase which insures the removal of all types of<br />
residual, chemical and organic. The most suitable instruments are ultrasound<br />
baths.<br />
DRYING essential phase to avoid corrosion of instruments and interference of the<br />
sterilization cycle.<br />
PACKAGING essential phase for maintaining sterile the treated instruments.<br />
STERILIZATION final phase of steam sterilization<br />
40
16 INSTRUCTION FOR AUTOCLAVE SHIPPING<br />
ENGLISH<br />
In case the autoclave must be shipped for repairs, controls, reactivation, revisions,<br />
validations follow the obligatory indications below:<br />
1- Use the original packaging; if this is no longer in your possession, use adequate<br />
packaging. The merchandise travels at risk to the sender.<br />
2- Ship only the autoclave, always removing trays and tray carrier.<br />
3- Carefully clean the sterilization chamber and autoclave in general before shipping.<br />
In case it arrives dirty or with residual the autoclave with be returned without being<br />
repaired, or it will be put through a cleansing action and disinfection.<br />
4- Always empty the clean water tank through the attachment located on the back of<br />
the autoclave (PICT.2 pos..2.)<br />
5- Always empty the used water tank through the attachment located on the back of<br />
the autoclave (PICT.2 pos..5.)<br />
6- Indicate by letter and insert in the package a document which indicates precisely<br />
the irregularity or service desired.<br />
7- Ship at your expense, otherwise you will be billed for shipping.<br />
ATTENTION<br />
All non original packaging which arrives will be disposed of.<br />
Autoclave will be returned with new and original packing to insure maximum<br />
protection for your autoclave during shipping.<br />
Cost of packaging will be charged to client.<br />
41
ENGLISH<br />
17 PROCEDURE FOR SERVICE AND ASSISTANCE<br />
17 - PROCEDURE FOR SERVICE AND<br />
ASSISTANCE<br />
Repairs – Revisions – Assistance – Validation<br />
We consider it important to inform you of the procedures used by or service department.<br />
The service department is the autonomous entity MEDILINE ITALIA SRL (TECNO-GAZ<br />
GROUP), which has an articulated and professional structure.<br />
Procedures applied have been explained in our quality manual.<br />
1- When the autoclave arrives at MEDILINE ITALIA SRL it is consigned directly to the<br />
service center, which codes and creates the technical assistance document.<br />
2- Within 48 hours, it is examined by technicians and technical analysis along with cost<br />
estimate is prepared for the service requested.<br />
If the autoclave is not delivered as requested in the chapter INSTRUCTIONS FOR<br />
SHIPPING, above times can sensibly differ<br />
3- Cost estimate will be sent to the distributor client, who will transmit it to the final<br />
client for vision and approval.<br />
4- After MEDILINE ITALIA SRL receives written acceptance of the cost estimate, the<br />
autoclave will be serviced and reshipped according to times indicated on the cost<br />
estimate.<br />
5- The merchandise will be reshipped in original packaging by the client’s shipper.<br />
42
ENGLISH<br />
18 WARRANTY<br />
1) DURATION: the product is covered by a 12-month (twelve) guarantee.<br />
2) EXCLUSION: the guarantee excludes:<br />
a) faults originating from non-performance of scheduled maintenance and due to<br />
negligence or improper use of the product by the User;<br />
b) periodic checks and maintenance;<br />
c) repair or replacement of parts subject to wear that are fragile or have an<br />
unpredictable life, unless they prove faulty at the time of their delivery;<br />
d) faults caused by personnel or originating from technical personnel transfer and<br />
transportation;<br />
e) faults or damage originating from improper use or operating errors;<br />
f) faults or damage originating from contamination in the water and air infeed systems,<br />
extraordinary chemical agents or electrical events;<br />
g) faults or damage originating from the use of detergents, disinfecting agents,<br />
sterilizing fluids or processes that are not described explicitly in the instruction<br />
manual for operation and maintenance;<br />
h) natural color change of plastic components.<br />
3) INSTALLATION AND TESTING REPORT: an essential prerequisite for guarantee<br />
validity is the return of the installation and testing report after all its sections have been<br />
filled in by the User and the Fitter. The report must be returned within 15 days after<br />
installation, otherwise the guarantee becomes null and void.<br />
4) LIMITS: the guarantee entitles its holder to repairs or replacement of faulty components<br />
free of charge. The right to replace the entire machine is excluded. As for components<br />
either applied or added to TECNO-GAZ products or by third parties, having their own<br />
guarantee certificate, the conditions, limits and exclusions indicated in the relevant<br />
certificates apply.<br />
Under no circumstances shall carrying out of one or more than one repair during the<br />
guarantee term change the guarantee expiry date.<br />
5) CLAIMS: in the event of the Purchaser making a claim relating to the application of the<br />
guarantee and the quality or conditions of the delivered equipment, the said Purchaser<br />
shall in no way suspend and/or delay payments.<br />
6) DISPUTES: if a dispute arises on the application and interpretation of this Certificate of<br />
guarantee, the Court of PARMA (Italy) shall be the court of jurisdiction, regardless of the<br />
location in which the purchase agreement was stipulated.<br />
7) DEROGATIONS: any special derogations from the guarantee terms described in this<br />
section shall not imply the granting to the Purchaser of any right and shall be considered<br />
as granted for a specific case only.<br />
8) MISCELLANEOUS: for any other issue, which is not covered by this Certificate of<br />
Guarantee, the rules described in the Civil Code and existing relevant Laws in the<br />
Republic of Italy apply.<br />
43
ENGLISH<br />
The guarantee becomes null and void in the event that:<br />
a) the equipment presents damage caused by a fall, exposure to flames, liquid spillage,<br />
natural events, bad weather conditions or by any other cause that is not due to<br />
manufacturing defects;<br />
b) installation has not been performed in line with TECNO-GAZ instructions and by<br />
authorized personnel;<br />
c) the equipment is repaired, modified or tampered with by the Purchaser or by nonauthorized<br />
third parties;<br />
d) when asking for an intervention under guarantee, the product serial number has been<br />
removed, deleted, counterfeited, etc.;<br />
e) the installation and testing report is not returned suitably filled in and signed within 15<br />
days from installation;<br />
f) the Purchaser suspends and/or delays payment of amounts due, for any reason<br />
whatsoever, relating to the purchase and/or maintenance of the equipment;<br />
g) scheduled periodic maintenance or any other instruction envisaged in the manual for<br />
operation and maintenance is not carried out<br />
44
FRANÇAIS<br />
Cher client,<br />
Nous vous remercions d'avoir choisi notre autoclave et saurons mériter votre confiance<br />
avec la plus grande attention et un service en mesure de répondre à votre attente.<br />
L’autoclave que vous avez choisi est la meilleure expression en fait de technologie<br />
appliquée. Vous garantit la stérilisation en toute sûreté de tous les types d'instruments et<br />
de matériels : solides, creux, poreux, en vrac ou ensachés.<br />
Avant d'utiliser cet autoclave, nous vous invitons à lire attentivement le contenu de ce<br />
mode d'emploi puis de le ranger dans un lieu accessible à tout le personnel préposé à la<br />
stérilisation.<br />
L’autoclave doit exclusivement être utilisé pour l'usage prévu par le fabricant.<br />
Pour l'installation, l'entretien et le SAV adressez-vous exclusivement à un personnel<br />
agréé. Nous vous invitons aussi à utiliser et à demander exclusivement des pièces de<br />
rechange d'origine.<br />
1
FRANÇAIS<br />
INDEX<br />
1. CONSULTATION MANUEL<br />
1.1 GLOSSAIRE<br />
1.2 SYMBOLOGIE<br />
1.3 IMAGES AVEC DESCRIPTION POSITION<br />
2. SÉCURITÉ<br />
2.1 MARQUAGE DE SÉCURITÉ<br />
2.2 DISPOSITIF DE SÉCURITÉ<br />
2.3 NOTES DE SÉCURITÉ<br />
2.4 MISE AU REBUT<br />
3. USAGE PRÉVU<br />
4. DONNÉES TECHNIQUES<br />
4.1 MÉCANIQUES<br />
4.2 ÉLECTRIQUES<br />
4.3 CHAMBRE<br />
4.4 RÉSERVOIR EAU PROPRE<br />
4.5 RÉSERVOIR EAU USÉE<br />
4.6 FILTRE BACTÉRIOLOGIQUE<br />
5. ACCESSOIRES<br />
6. DÉBALLAGE<br />
7. INSTALLATION<br />
8. MODE D'EMPLOI<br />
8.1 ALLUMAGE AUTOCLAVE<br />
8.2 REMPLISSAGE RÉSERVOIR EAU PURE<br />
8.3 REMPLISSAGE MANUEL RÉSERVOIR EAU PURE<br />
8.4 CARACTÉRISTIQUES EAU A UTILISER<br />
8.5 REMPLISSAGE MATÉRIEL DANS AUTOCLAVE<br />
8.6 DÉBUT CYCLE DE STÉRILISATION<br />
8.7 FIN DU CYCLE<br />
8.8 ENLÈVEMENT DU MATÉRIEL STÉRILISE<br />
8.9 ÉVACUATION EAU USÉE<br />
8.10 INTERRUPTION DU CYCLE DE STÉRILISATION<br />
9. CYCLES DE STÉRILISATION<br />
9.1 DESCRIPTION CYCLES<br />
9.2 CYCLES OPÉRATIONNELS<br />
9.3 CYCLES OPÉRATIONNELS – CYCLES NUIT<br />
2
FRANÇAIS<br />
9.4 CYCLES TEST<br />
9.5 DIAGRAMME DE CYCLE<br />
10. MESSAGES D'ERREUR OU D'ALARME<br />
10.1 LISTE DES MESSAGES D'ERREUR-ALARME<br />
11. ENTRETIEN ET PRÉVENTION<br />
11.1 CHANGEMENT DU FILTRE BACTÉRIOLOGIQUE<br />
11.2 NETTOYAGE DE LA CHAMBRE<br />
11.3 PULIZIA GUARNIZIONE PORTELLO<br />
11.4 RÉGLAGE DU PANNEAU<br />
11.5 CHANGEMENT DU PAPIER DE L'IMPRIMANTE<br />
11.6 INDICATIONS ETAT IMPRIMANTE<br />
12. PROGRAMMATION DE L’ECRAN<br />
12.1 SÉLECTION LANGUE<br />
12.2 SÉLECTION HEURE<br />
12.3 SÉLECTION MINUTES<br />
12.4 SÉLECTION SECONDES<br />
12.5 SÉLECTION DATE<br />
12.6 SÉLECTION MOIS<br />
12.7 SÉLECTION ANNÉE<br />
12.8 AFFICHAGE PRESSION ATMOSPHÉRIQUE<br />
12.9 SÉLECTION REMPLISSAGE EAU<br />
13. PETIT GUIDE DE DÉPANNAGE<br />
13.1 L’AUTOCLAVE NE SÈCHE PAS CORRECTEMENT<br />
13.2 LA CHAMBRE DE L'AUTOCLAVE DEVIENT BLANCHE<br />
13.3 LA CHAMBRE DE L'AUTOCLAVE PRÉSENTE DES TACHES VERTES<br />
13.4 LE CYCLE DE STÉRILISATION A ÉTÉ INTERROMPU<br />
13.5 L’AUTOCLAVE NE REÇOIT PAS LES COMMANDES<br />
13.6 L'IMPRIMANTE DE L'AUTOCLAVE N'IMPRIME PAS<br />
13.7 TACHES SUR LES INSTRUMENTS<br />
14. DÉMINÉRALISATEUR<br />
14.1 BRANCHEMENT AU DEMINERALISATEUR<br />
14.2 BRANCHEMENT DU DEMINERALISATEUR<br />
14.3 CHANGEMENT CARTOUCHE RESINES DU DEMINERALISATEUR<br />
15. PROCÉDURES STANDARD STÉRILISATION<br />
16. INSTRUCTIONS POUR LE RETOUR DE L'AUTOCLAVE<br />
17. PROCÉDURES A SUIVRE POUR BÉNÉFICIER DU SAV<br />
18. GARANTIE<br />
3
FRANÇAIS<br />
01 CONSULTATION MANUEL<br />
1.1 Glossarie<br />
VIDE<br />
CHAMBRE<br />
FILTRE<br />
PLATEAU<br />
PORTE-PLATEAUX<br />
DEMINERALISATEUR<br />
Pression inférieure à la pression atmosphérique<br />
Corps cylindrique en acier qui loge les appareils à stériliser<br />
Dispositif pour retenir les particules<br />
Tiroir de support de la charge à stériliser<br />
Structure de support des plateaux dans la chambre de<br />
Dispositif pour éliminer les sels minéraux de l’eau qui vient du<br />
réseau hydrique<br />
TEST HELIX Test de vérification de la pénétration de la vapeur dans un corps<br />
TEST DE BOWIE DICK Test de vérification de la pénétration de la vapeur dans un corps<br />
TEST DE VIDE<br />
Test de vérification du maintien du degré de vide dans la<br />
chambre<br />
FILTRE<br />
BACTERIOLOGIQUE<br />
Dispositif pour retenir les particules supérieures à 0,3 µm en<br />
suspension dans l’air.<br />
SURPRESSION Pression supérieure à la pression standard pour le cycle<br />
SURTEMPERATURE Température supérieure à la standard pour le cycle considéré<br />
RESINES<br />
Composant remplaçable (cartouche) du déminéralisateur qui<br />
élimine tous les sels<br />
1.2 Symbologie<br />
FAIRE ATTENTION: Indication à suivre pour éviter tout<br />
dommage aux choses ou l’échec du cycle de stérilisation<br />
DANGER: Indication de sécurité pour éviter des lésions<br />
TENSION DANGEREUSE<br />
COUPER LE COURANT AVANT D’ENLEVER LE COUVERCLE<br />
TEMPERATURE ELEVEE<br />
4
FRANÇAIS<br />
MISE A LA TERRE<br />
Suivant la DIRECTIVE 2002/96/CE ce symbole indique que le<br />
produit, à la fin de sa vie utile, ne doit pas être éliminé comme<br />
déchet urbain.<br />
Courant Alternatif<br />
Faire attention : tension élevée risque d’électrocution<br />
Fusible<br />
Lire attentivement le manuel<br />
Fabriqué le -- / -- / --<br />
Appareil sans sachet<br />
Appareil sous sachet<br />
Niveau maximum eau déminéralisée<br />
Niveau minimum eau déminéralisée<br />
Niveau maximum eau usée<br />
pos. Position (numéro correspondant au composant dans les images)<br />
FIG. Image<br />
Ω Ohm (unité de mesure de la Résistance Electrique)<br />
s Secondes (unité de mesure du temps)<br />
kW kiloWatt (unité de mesure de la Puissance)<br />
Hz Hertz (unité de mesure de la fréquence)<br />
mm Millimètres (unité de mesure de la Longueur)<br />
A Ampère (unité de mesure du courant électrique)<br />
V Volt (unité de mesure de la tension électrique)<br />
°C Degrés Celsius (unité de mesure de la Température)<br />
kg Kilogrammes (unité de mesure de la Masse)<br />
5
FRANÇAIS<br />
1.3 Images avec décription position<br />
Pied d’écartement<br />
Excedent eau pure<br />
FIG.1<br />
Vidange eau pure – connexion deioniseur<br />
Soupape de sécurité<br />
Excedent eau utiliés – decharge condensation<br />
Vidange eau utilisée<br />
Alimentation électrique principale<br />
Prise pour alimentation électrique - EXCLUSIVEMENT RÉSERVÉE AU<br />
DEIONISEUR<br />
Fusible 12A<br />
Fusible 12A<br />
Fusible 500mA<br />
6
FRANÇAIS<br />
FIG.2<br />
7
FRANÇAIS<br />
Filtre bactériologique<br />
Remplissage manuel eau<br />
Remplissage eau<br />
Évacuation eau usée<br />
Écran<br />
Imprimeur<br />
Connexion RS232<br />
Le connecteur de l’incubateur (paragraphe2.3)<br />
Interrupteur général (MAINS)<br />
Cycle 121°C En vrac<br />
Cycle 121°C Ensachés<br />
Cycle 134°C En vrac<br />
Cycle 134°C Ensachés<br />
Cycle Prion<br />
Cycle 134°C Flash<br />
Test de vide<br />
Helix – B&D Test<br />
Niveau minimum eau<br />
Niveau maximum eau<br />
Niveau maximum eau usée<br />
Bouton START-STOP<br />
Bouton Remplissage eau<br />
Bouton Sélection Cycle<br />
Bouton Déverrouillage panneau<br />
8
FRANÇAIS<br />
02 SÉCURITÉ<br />
2.1 Pictogrammes de sécurité<br />
TENSION DANGEREUSE<br />
COUPER LE COURANT AVANT D'ENLEVER LE<br />
COUVERCLE<br />
TEMPÉRATURE ÉLEVÉE<br />
MISE A LA TERRE<br />
2.2 Dispositifs de sécurité<br />
Les dispositifs de sécurité sont les suivants :<br />
- Soupape de sécurité étalonnée à 2,4 bar ± 10%<br />
- Verrouillage électromagnétique pour prévenir l'ouverture du panneau pendant le<br />
cycle<br />
- Thermostat de sécurité<br />
2.3 Notes sur Notes sur la sécurité la sécurité<br />
-Le constructeur est responsable du produit introduit sur le marché aux sens de la<br />
réglementation en vigeur.<br />
La responsabilité déchoit dans l'instant où elles sont exécutées des opérations sur le<br />
dispositif, o sur une partie d'elle, de personnel non qualifié ou avec l'utilise des parties de<br />
rechange pas originaux.<br />
-L'autoclave ne doit pas fonctionner dans un environnement comportant un risque de<br />
déflagration et/ou d'incendie.<br />
-Les autoclaves doivent être installés dans une atmosphère conformément à la condition<br />
législative en vigueur sur l'utilisation de pays<br />
-Le connecteur de l’incubateur (FIG.1 pos..18.), doit être employé uniquement pour la<br />
connexion du B-TEST. Connexion à 230 V c.a. indépendante de l’interrupteur général<br />
(MAINS), ne pas toucher le connecteur les mains mouillées ou humides et le protéger<br />
d’éventuelles éclaboussures d’eau.<br />
9
FRANÇAIS<br />
2.4 Mise au rebut<br />
Ce produit est soumis a la directive 2002/96/CEE du Parlement européen et du Conseil de<br />
l'Union européenne relative aux déchets d'équipements électriques et électroniques<br />
(DEEE). Par ailleurs, dans les juridictions adoptant cette directive, il est marqué comme<br />
mis sur le marché après le 13 août 2005. Il ne doit donc pas être jeté avec vos ordures<br />
ménagères courantes (déchets municipaux non triés). Pour vous dé débarrasser de ce<br />
produit, veuillez faire appel à vos services de collecte des DEEE et observer toutes les<br />
obligations en vigueur.<br />
03 USAGE PRÉVU<br />
L’ autoclave est en mesure pour stériliser les trois typologies de chargement prévues en la<br />
règle EN 13060, spécifiéeme :<br />
MATÉRIELS FERREUX<br />
OU SOLIDES<br />
PARTIES POREUX<br />
PARTIES AVEC CAVITE’<br />
Strumenti senza cavità e senza ostacoli per la penetrazione<br />
del vapore<br />
Matériels simples ou composés qui peuvent absorber les<br />
fluides(tissés, blouses, gazes, pansements etc...)<br />
Matériels ou dispositifs avec cavité, obstructions etc...<br />
Ceux-ci se subdivisent en deux typologies, classifiées selon<br />
longueur et diamètre:<br />
TYPE B : canules, tubes ou dispositifs avec des passages<br />
larges<br />
TYPE A : turbines, tubes, manipules et dispositifs avec des<br />
trous des petites dimensions<br />
L’usage de l'autoclave est exclusivement la stérilisation d'instruments et de<br />
matériels compatibles avec la stérilisation à la vapeur.<br />
Cet appareil peut être utilisé dans le secteur dental, médical, esthétique et, en général,<br />
dans tous les secteur où on pratique la stérilisation d'instruments et de matériels.<br />
Ce dispositif a été certifié pour la stérilisation des suivants instruments*:<br />
EUROPA B EVO EUROPA B EVO <strong>24</strong><br />
Matériels ferreux ou solides<br />
ensaches<br />
kg. 5,00 kg. 7,00<br />
Matériels cavità de type A et B kg. 5,00 kg. 7,00<br />
Matériels poreax kg. 1,50 kg. 2,0<br />
*Cette indication est valable seulement pour les pays européens.<br />
Vérifiez toujours si le matériel soumis à la stérilisation peut<br />
supporter les températures du cycle sélectionné.<br />
10
FRANÇAIS<br />
04 DONNEES TECHNIQUES<br />
4.1 Mécaniques<br />
EUROPA B EVO EUROPA B EVO <strong>24</strong><br />
Température d'exercice<br />
+5°C ÷ +40°C<br />
Altitude max.<br />
2.000 m<br />
Humidité relative max. à 30°C 80%<br />
Humidité relative max. à 40°C 50%<br />
Dimensions hors tout (L x H x P) 510 X 390 X 590 mm 510 X 390 X 730 mm<br />
Encombrement panneau ouvert<br />
300 mm<br />
Poids (réservoirs vides) 54 kg 58 kg<br />
Poids (réservoirs pleins) 63 kg 67 kg<br />
Poids par aire de support 2058 N/m 2 2058 N/m 2<br />
Volume 0.12 m 3 0.15 m 3<br />
Emission sonore<br />
< 70 db A<br />
4.2 Elettrici<br />
EUROPA B EVO EUROPA B EVO <strong>24</strong><br />
Tension alimentation<br />
230 V a.c. +/-10 % single phase<br />
Puissance 1,7 kW 2.0 kW<br />
Fréquence<br />
50 / 60 Hz<br />
Cordon alimentation 2 + 1 x 1mm 2<br />
Fusibles<br />
6.3 x 32 - 12 A<br />
Chaleur transmise<br />
3.6 E +6 J / ora<br />
4.3 Chambre<br />
EUROPA B EVO EUROPA B EVO <strong>24</strong><br />
Pression d'exercice max.<br />
2.4 bar (relatifs)<br />
Vide max.<br />
- 0.9 bar (relatifs)<br />
Température max. 138 °C<br />
Composition Inox AISI 304<br />
Dimensions Ø <strong>24</strong>5 x 318 mm Ø <strong>24</strong>5 x 500 mm<br />
4.4 Réservoir eau propre<br />
Volume<br />
Nombre de cycles<br />
réalisables<br />
Composition<br />
EUROPA B EVO EUROPA B EVO <strong>24</strong><br />
Avec<br />
demineralizz.<br />
Sans<br />
demineralizz.<br />
4,5 l<br />
Vour les<br />
4<br />
instructions<br />
2<br />
demineralizers<br />
Polyéthylène<br />
11
FRANÇAIS<br />
4.5 Réservoir eau usée<br />
EUROPA B EVO EUROPA B EVO <strong>24</strong><br />
Volume<br />
4,5 l<br />
Nombre de cycles réalisables 4 2<br />
Composition<br />
Polyéthylène<br />
Température max. eau usée 50°C<br />
4.6 Filtre bactériologique<br />
EUROPA B EVO EUROPA B EVO <strong>24</strong><br />
Diamètre<br />
56 mm<br />
Capacité filtrante 0.3 µm<br />
12
FRANÇAIS<br />
05 ACCESSOIRES<br />
Les accessoires suivants font partie de l'équipement de série de l'autoclave. Ils sont tous<br />
contenus dans l'emballage d'origine<br />
Accessoires standard et en option:<br />
- Porte-plateaux<br />
EUROPA B EVO EUROPA B EVO <strong>24</strong><br />
Composition<br />
Aluminium Anodisé<br />
Dimensions (L x H x P) 192 x 165 x 280 mm 192 x 200 x 470 mm<br />
Image<br />
FIG.3<br />
Dotation prévue 1<br />
FIG.4<br />
- Porte-Plateaux Facultatif<br />
EUROPA B EVO<br />
EUROPA B EVO<br />
<strong>24</strong><br />
Composition Aluminium Anodisé /<br />
Dimensions (L x H x P)<br />
193 x 200 x 280 mm<br />
(200 x 193 x 280) mm<br />
/<br />
Image<br />
/<br />
FIG.5<br />
Dotation prévue 1 /<br />
- Plateaux<br />
EUROPA B EVO EUROPA B EVO <strong>24</strong><br />
Composition<br />
Aluminium Anodisé<br />
Dimensions (L x H x P) 184 x 17 x 286 mm 184 x 17 x 286 mm + 184 x 17 x 140 mm<br />
Image<br />
FIG.6<br />
FIG.7<br />
Dotation prévue 4 4 + 4<br />
+<br />
FIG.8<br />
13
FRANÇAIS<br />
- Plateaux facultatif<br />
EUROPA B EVO EUROPA B EVO <strong>24</strong><br />
Composition /<br />
Aluminium Anodisé \ Acier<br />
Inoxydable<br />
Dimensions (L x H x P) / 184 x 17 x 460 mm<br />
Image /<br />
FIG.9<br />
Dotation prévue / 4<br />
- Pince d’extraction plateau et réglage porte<br />
A employer pour extraire et manutentionner les plateaux (FIG.11) et pour pouvoir régler la<br />
porte (paragraphe 11.4)<br />
Image<br />
FIG.10<br />
Dotation prévue 1<br />
FIG.11<br />
- Entonnoir en plastique avec tuyau<br />
A employer pour charge manuelle de l’eau (paragraphe 8.3)<br />
Image<br />
FIG.12<br />
Dotation prévue 1<br />
- Eponge pour nettoyage chambre et garniture porte<br />
A employer pour nettoyer la chambre de stérilisation et la garniture de la porte (paragraphe<br />
11.2-11.3)<br />
Image<br />
FIG.13<br />
Dotation prévue 1<br />
14
FRANÇAIS<br />
- Raccord charge eau<br />
A employer avec l’entonnoir en plastique avec tuyau pour charge manuelle de l’eau et<br />
avec tuyau charge eau avec filtre<br />
Image<br />
FIG.14<br />
Dotation prévue 1<br />
- Entonnoir en plastique avec tuyau<br />
A employer pour charge manuelle de l’eau (paragraphe 8.3)<br />
Image<br />
FIG.15<br />
Dotation prévue 1<br />
- Tuyau vidange eau<br />
A employer pour vider l’eau usée (paragraphe 8.9)<br />
Image<br />
FIG.16<br />
Dotation prévue 1<br />
- Tubo rilsan<br />
Connecter une extrémité du tuyau au Trop-plein eau usée – purge vapeur (FIG.1 pos..4.),<br />
l’autre à un bac pour la récupération de l’eau et de la vapeur.<br />
Image<br />
FIG.17<br />
Dotation prévue 1<br />
15
FRANÇAIS<br />
- Pied d’écartement arrière en plastique<br />
Mettre le pied d’écartement dans la partie arrière de l’autoclave (FIG.1 pos..0.) pour<br />
assurer un aérage adéquat en cas de positionnement de l’autoclave près d’une paroi<br />
Image<br />
FIG.18<br />
Dotation prévue 1<br />
- Tuyaux pour vidange arrière des eaux<br />
1- Tuyau pour trop-plein eau propre<br />
2- Tuyau pour robinet vidange eau usée<br />
1- Connecter une extrémité du tuyau au trop-plein arrière eau propre (FIG.1 pos..1.),<br />
l’autre à un bac pour la récupération de l’eau déminéralisée ou en cours de vidange<br />
(version avec déminéralisateur).<br />
2- Connecter une extrémité du tuyau au raccord FIG.20 et le visser au robinet de vidange<br />
de l’eau usée (FIG.1 pos..5.), l’autre à un bac de récupération de l’eau usée.<br />
Image<br />
FIG.19<br />
Dotation prévue 2<br />
- Raccord pour vidange arrière eau usée<br />
Connecter une extrémité du tuyau pour vidange eau usée au raccord FIG.20 et le visser<br />
au robinet de vidange de l’eau usée (FIG.1 pos..5.).<br />
Image<br />
FIG.20<br />
Dotation prévue 1<br />
16
FRANÇAIS<br />
- Cordon d'alimentation<br />
Connecter l’extrémité du connecteur (FIG.21 pos..B.) au panneau arrière (FIG.1 pos..6.)<br />
ensuite brancher la fiche (FIG.21 pos..A.) directement à la prise de secteur<br />
Image<br />
FIG.21<br />
Dotation prévue 1<br />
IMPORTANT<br />
Demandez et utilisez seulement et exclusivement les accessoires d'origine.<br />
17
FRANÇAIS<br />
06 DEBALLAGE<br />
L’autoclave est expédié dans un emballage protecteur idoine lui permettant d'être<br />
manutentionné facilement.<br />
L’emballage ne doit pas subir de heurts, il doit être manipulé avec attention en évitant de<br />
le faire rouler ou tomber d'une hauteur supérieure à 16 cm.<br />
En cas d'absence d'engins de levage, l'autoclave emballé doit toujours être manutentionné<br />
par 2 personnes.<br />
L’autoclave est soutenue avec une palette en bois et elle est contenue dans un carton<br />
ondulé et renforcé intérieurement par des composés de carton.<br />
Pour déballer l’autoclave, il faut ouvrir le carton ondulé, lever les renforcements et la<br />
déballer en utilisant les courroies en dotation.<br />
On conseille la manutention de l’autoclave par deux ou plusieurs personnes.<br />
Le déplacement doit arriver seulement avec l’utilisation des courroies.<br />
IMPORTANT<br />
Ne soulevez jamais l’autoclave en la saisissant par la partie inférieure du panneau ou du<br />
tableau de commandes au risque de provoquer des cassures mécaniques.<br />
A l’intérieur de l'emballage, vous trouverez :<br />
MANUEL DE MODE D'EMPLOI à lire attentivement et à ranger dans un endroit accessible<br />
à tout le personnel préposé à la stérilisation.<br />
DES CERTIFICATIONS à conserver<br />
BON DE GARANTIE à remplir et à expédier partiellement<br />
ATTENTION<br />
L'emballage d'origine doit être conservé.<br />
18
FRANÇAIS<br />
07 INSTALLAZION<br />
A<br />
FIG.22<br />
EUROPA B EVO EUROPA B EVO <strong>24</strong><br />
610 mm<br />
B 590 mm 730 mm<br />
C<br />
D<br />
50 mm<br />
410 mm<br />
426 mm (avant)<br />
403 mm (avant)<br />
E<br />
455 mm (arriere)<br />
444 mm (arriere)<br />
F 400 mm 431 mm<br />
1 - Installez l’autoclave dans un environnement idoine à la stérilisation.<br />
2 - La pièce doit être bien éclairée et ventilée, comme prévu par la législation en vigueur.<br />
3 - Installez l’autoclave loin des sources de chaleur et des projections d'eau.<br />
4 - Placez l’autoclave sur un plan idoine à en supporter le poids et de dimensions<br />
adéquates.<br />
5 - Le plan d'appui de l’autoclave doit être parfaitement horizontal.<br />
6 - Placez l’autoclave à une hauteur telle que l'utilisateur puisse contrôler toute la chambre<br />
de stérilisation et la nettoyer aisément<br />
7 - Ouvrez le panneau de l’autoclave et enlevez tous les sachets contenant les<br />
accessoires et qui ont été rangés dans la chambre de stérilisation.<br />
19
FRANÇAIS<br />
8 - Ne laissez dans la chambre de stérilisation que le porte-plateaux et les plateaux.<br />
Rangez tous les autres accessoires dans un logement externe à la disposition du<br />
personnel.<br />
9 - Ne posez jamais sur l’autoclave des journaux, des plateaux, des conteneurs de<br />
liquide, etc.<br />
10 - Ne jamais s'appuyer au panneau lorsqu'il est ouvert.<br />
11 – Laisser un espace de 5cm minimum dans la partie arrière par le biais du pied<br />
d’écartement arrière en plastique (FIG.1 pos..0. – FIG.18) et dans les côtés de l’appareil<br />
pour assurer l’aérage nécessaire.<br />
12 - Effectuer les connexions des tuyaux dans la partie arrière (chapitre 5)<br />
13 - Avant de brancher l'autoclave, vérifiez si l'installation électrique est conforme à la<br />
législatin en vigueur en la matière et si elle est adaptée aux caractéristiques de l'appareil.<br />
14 - Branchez la prise femelle du cordon d'alimentation en dotation sur la fiche du tableau<br />
situé au dos de l’autoclave (FIG. 1 pos..6.)<br />
15 - Branchez la prise électrique à l'installation en vérifiant que l'alimentation corresponde<br />
bien à 230 Vac- 2000Va.<br />
IMPORTANT<br />
Evitez l'utilisation de rallonges, réductions ou adaptateurs au risque de produire<br />
des micro-interruptions de courant et par conséquent des déclenchements<br />
d'alarme.<br />
16 – Mettez l’autoclave en route en appuyant sur l'interrupteur général (FIG.2 pos.19) et<br />
ouvrez le panneau de l'autoclave. Attendez quelques secondes les deux signalisations<br />
sonores indiquant l'acquisition des paramètres relatifs à l'alignement atmosphérique<br />
automatique. En même temps, le message “porte ouverte” s'affichera sur le visuel.<br />
IMPORTANT<br />
Ne sélectionnez jamais une commande avant d'avoir entendu les deux<br />
signalisations sonores car l'autoclave ne l'accepterait pas.<br />
17 - Remplissez le réservoir d'eau pure en suivant les indications du (chapitre 8).<br />
Effectuez ensuite un cycle d'essai en suivant toujours les indications reportées dans le<br />
(chapitre 8).<br />
18 - Si l’autoclave est installé avec le dispositif de Déminéralisation, suivez les instructions<br />
reportées sur l'emballage de ce dispositif et (chapitre 14).<br />
20
FRANÇAIS<br />
08 MODE D'EMPLOI<br />
Après avoir installé l’autoclave, procédez à la préparation et à l'utilisation.<br />
8.1 Mettez l’autoclave en route<br />
En appuyant sur l'interrupteur général (FIG.2 pos..19.).<br />
8.2 Remplissage du réservoir d'eau pure<br />
Connecter le “raccord charge eau” FIG.14 au “tuyau charge eau avec filtre” (standard), et<br />
l’insérer dans l’orifice du raccord frontal de l’autoclave (FIG.2 pos.13).<br />
Introduire l’autre extrémité du tuyau avec filtre dans le bac de l’eau déminéralisée ou<br />
distillée.<br />
A ce moment-là appuyer sur le bouton B-PUMP pour actionner la pompe de charge eau et<br />
le maintenir abaissé jusqu’à l’affichage du compte à rebours .<br />
La pompe remplit le réservoir interne de l'autoclave. Si le niveau maximum n'est pas<br />
atteint dans les 180 secondes, la pompe s'arrête automatiquement et il faudra à nouveau<br />
appuyer sur le bouton.<br />
La pompe s'arrête automatiquement lorsque le niveau maximum a été atteint.<br />
Si le niveau maximum d'eau n'est pas atteint avec un déionisateur branché, le<br />
fonctionnement de l'autoclave sera invalidé.<br />
8.3 Remplissage manuel du réservoir d'eau pure<br />
Si la pompe de remplissage de l'eau ne devait pas fonctionner, le réservoir pourrait être<br />
rempli manuellement par l'opérateur en procédant de la façon suivante :<br />
-Allumer l’autoclave.<br />
-Enlever le bouchon placé frontalement sur l’autoclave (FIG.2 pos.12).<br />
-Introduire le raccord charge eau dans cet orifice avec le tuyau connecté à l’entonnoir<br />
(FIG. 14)<br />
-Verser l’eau distillée dans l’entonnoir en positionnant ce dernier plus en haut par rapport<br />
au raccord de charge<br />
-Verser jusqu’à l’éclairage du LED de niveau maximum (FIG.2 pos.29).<br />
-La charge terminée, extraire le raccord et repositionner le bouchon.<br />
21
FRANÇAIS<br />
8.4 Caractéristiques de l'eau a utiliser<br />
TABLEAU NIVEAUX QUALITATIFS ÉTABLIS PAR LA NORME UNI EN 13060: 2005<br />
CEN STANDARD UNI EN 13060 : 2005<br />
Résidu d'évaporation ≤ 10 mg/l<br />
Oxyde de silicium ≤ 1 mg/l<br />
Fer ≤ 0.2 mg/l<br />
Cadmium ≤ 0.005 mg/l<br />
Plomb ≤ 0.05 mg/l<br />
Résidus de métaux lourds sauf fer,<br />
cadmium, plomb<br />
≤ 0.1 mg/l<br />
Chlorure (Cl') ≤ 2 mg/l<br />
Phosphate (P20s) ≤ 0.5 mg/l<br />
Conductivité (à 20°C) ≤ 15 µs/cm<br />
Valeur pH (degré d'acidité) 5 ÷ 7,5<br />
Aspect<br />
incolore, limpide, sans dépôts<br />
Dureté (et ions de terre alcaline) ≤ 0.02 mmol/l<br />
8.5 Chargement du matériel dans l'autoclave<br />
Disposez le matériel à stériliser sur les plateaux en dotation.<br />
- ne superposez jamais le matériel,<br />
- les instruments ensachés doivent toujours être disposés avec la partie papier vers le<br />
haut,<br />
- le matériel ne doit jamais entrer en contact avec la chambre de stérilisation ou le<br />
panneau de fermeture.<br />
- ranger pinces et ciseaux les lames ouvertes<br />
FIG.23<br />
Après le chargement, fermez le panneau de l'autoclave. Le message “PORTE FERMÉE”<br />
s'affichera sur le visuel<br />
8.6 Début cycle de stérilisation<br />
Sélectionnez le programme de stérilisation plus idoine au matériel à stériliser en appuyant<br />
sur le bouton B-SELECT.<br />
Chaque pression commute la sélection du programme au suivant.<br />
Après avoir sélectionné le programme, démarrez le cycle en appuyant sur le bouton<br />
B-START, la porte se verrouillera automatiquement et le cycle aura lieu.<br />
Pendant le cycle, le visuel affiche tous les paramètres et les informations<br />
correspondantes.<br />
22
FRANÇAIS<br />
8.7 Fin du cycle<br />
Un signal acoustique avertit de la fin du cycle de stérilisation.<br />
Si le cycle a abouti, le message FIN DU CYCLE s'affichera sur le visuel, en cas de<br />
problèmes c'est un code d'erreur ou d'alarme qui s'affiche.<br />
A la fin du signal acoustique, déverrouillez la porte en appuyant sur le bouton B-DOOR. Si<br />
la chambre n'est pas complètement dépressurisée, l'actionnement du bouton n'aura aucun<br />
effet. Attendez la dépressurisation complète de la chambre et répétez l'opération. En cas<br />
d'urgence appuyez simultanément sur B-DOOR + B-PUMP<br />
Une fois le panneau déverrouillé, tirez la poignée de la porte et ouvrez.<br />
8.8 Enlèvement du matériel stérilise<br />
Mettre les équipements de protection individuelle conformément aux normes en vigueur<br />
en matière d’hygiène et sécurité du travail. Extraire les plateaux en employant la pince<br />
livrée (FIG.10), laisser conditionner les instruments et les stocker dans un milieu stérile.<br />
8.9 Vidage de l'eau usée<br />
Lorsque le témoin de niveau eau usée (FIG.2 pos..30.) s'allume, il faut la vider. Si on ne<br />
vide pas l'eau usée, le fonctionnement de l'autoclave est invalidé.<br />
Prenez le tuyau avec le raccord en dotation (FIG.16), et introduisez le dans la prise de<br />
vidage de l'eau usée située sur la façade de l’autoclave (FIG.2 pos.14), Dévisser sur la<br />
bague dans le sense inverse aux aiguilles d'une montre<br />
(faire 2 tours complets). placez l'autre extrémité du tuyau dans un conteneur. L'eau usée<br />
tombera par gravité dans ledit conteneur.<br />
IMPORTANT<br />
A - le tuyau logé dans le conteneur de réception ne doit jamais effleurer ou être plongé<br />
dans l'eau usée car cela créerait un vortex,<br />
B - attendez toujours que l'eau usée soit complètement vidangée, étant donné que le<br />
témoin de niveau maximum de l'eau usée s'éteint lorsqu'il y a encore de l'eau dans le<br />
réservoir, ne l'utilisez pas comme indicateur dans cette opération.<br />
A la fin du vidage visser le métal sonnent et enlever le tube<br />
23
FRANÇAIS<br />
8.10 Interruption du cycle de stérilisation<br />
Un cycle de stérilisation peut être volontairement interrompu en appuyant sur le<br />
bouton B-START pendant 2 secondes au moins.<br />
L’autoclave produira un son, ira en décompression et le message d'erreur A001<br />
s'affichera sur le visuel (CYCLE INTERROMPU).<br />
Pour restaurer l'erreur, appuyez simultanément sur les boutons illustrés ci-dessous<br />
jusqu'au déclenchement du signal acoustique :<br />
B-DOOR + B-PUMP + B-SELECT<br />
ATTENTION:<br />
Si l’imprimante est en fonction la remise à zéro de l’alarme est inhibée.<br />
En cas d’affichage d’un message d’alarme (suffixe "A") le cycle doit être<br />
considéré NON réussi: il faudra répéter toutes les opérations de<br />
préparation et de stérilisation.<br />
<strong>24</strong>
FRANÇAIS<br />
09 CYCLES DE STÉRILISATION<br />
9.1 Description des cycles<br />
L’autoclave est doté de trois séries de cycles :<br />
A - cycles opérationnels<br />
B - cycles opérationnels-cycles nuit<br />
C - cycles tests<br />
9.2 Cycles opérationnels<br />
Tous les cycles opérationnels ont le système de vide fractionné, ils peuvent donc stériliser<br />
des matériels creux, poreux, solides, aussi bien en vrac qu'ensachés.<br />
Les températures peuvent être sélectionnées de 121°C à 1 34°C.<br />
Normalement les cycles à 121°C s'utilisent pour thermopla stiques ou matériel sensible<br />
tandis que les cycles à 134°C s'utilisent pour tous les aut res matériels.<br />
Dans tous les cas suivez toujours les indications des fabricants des instruments ou des<br />
dispositifs à stériliser.<br />
Il existe aussi 2 cycles spéciaux :<br />
- cycle Prion, étudié pour le variant de la maladie de Creutzfeld-Jacob (vache folle)<br />
- cycle Flash conçu pour stériliser rapidement des instruments ou des dispositifs en vrac.<br />
9.3 Cycles nuit<br />
L’autoclave est équipé d'un dispositif économiseur d'énergie.<br />
Ce dispositif permet d'effectuer des cycles de stérilisation en l'absence du personnel.<br />
A la fin du cycle, si la porte n'est pas ouverte, l’autoclave se stabilise, puis s'éteint<br />
automatiquement, seul l'interrupteur général restera allumé (FIG.2 pos..19.).<br />
Au retour du personnel, il suffira d'appuyer sur n'importe quel bouton pour rallumer<br />
l'autoclave et lire le résultat du cycle sur le visuel.<br />
En plus, l'imprimante aura imprimé le rapport concernant ledit cycle.<br />
25
FRANÇAIS<br />
TABLEAU STÉRILISATION<br />
CICLI<br />
121°C non<br />
ensaché<br />
121°C<br />
ensaché<br />
134°C<br />
Flash<br />
134°C non<br />
ensaché<br />
134°C<br />
ensaché<br />
DURÉE<br />
DURÉE<br />
EXPOSITION<br />
SÉCHAGE<br />
T4<br />
T5 (Minutes)<br />
(Minutes) 18L <strong>24</strong>L<br />
18 6 12<br />
18 17 13<br />
4 2 4<br />
5 6 12<br />
5 17 13<br />
134°C Prion 20 17 13<br />
PLAGE DE<br />
PRESSION<br />
DE TRAVAIL<br />
( bars relatifs )<br />
PLAGE DE<br />
TEMPERATURE<br />
DE TRAVAIL<br />
( °C )<br />
1.04 ÷ 1.30 121 ÷ 125<br />
2.02 ÷ 2.38 134 ÷ 138<br />
Les temps de préchauffage et de fractionnement du vide peurent changer, par rapport aux<br />
conditiones de l’autoclave, des 25 - 30 min. Ces temps vont se sommer aux temps des<br />
cycles indiqués dans la table. Tout les cycles de stérilisation ont 3 phases de vide<br />
9.4 Cycles test<br />
- Helix test ce test sert à vérifier la capacité de pénétration de la vapeur dans un corps<br />
creux. Introduire le système Helix test équipé d’indicateur dans le plateau centrale de la<br />
chambre de stérilisation, sans charge. Faire référence aux instructions du producteur pour<br />
le chargement correct de l’indicateur. Effectuer le cycle de test indiqué, à la fin extraire<br />
tout le système et contrôler l’indicateur.<br />
En cas de réponse négative contacter et informer un technicien autorisé.<br />
- Bowie & dick test ce test sert à vérifier la capacité de pénétration de la vapeur dans du<br />
matériel poreux. Introduire le test Bowie-Dick dans le plateau central de la chambre de<br />
stérilisation, sans charge.<br />
Effectuer le cycle de test indiqué, à la fin extraire le paquet, l’ouvrir et contrôler le résultat<br />
en évaluant la feuille “test” positionnée au centre. En cas de réponse négative informer et<br />
contacter un technicien autorisé.<br />
- Vacuum test ce test sert à vérifier la capacité de maintien du vide de l'autoclave, le<br />
rapport du test est imprimé par l'imprimante de l'autoclave. Le test doit être effectué la<br />
machine froide. Ne pas introduire de charge dans l’autoclave. A la fin contrôler le résultat<br />
en évaluant le ticket d’impression de l’imprimante connectée à l’autoclave. En cas de<br />
réponse négative informer et contacter un technicien autorisé.<br />
Employer de préférence des tests distribués par le producteur.<br />
26
FRANÇAIS<br />
134°C Helix/<br />
Bowie&Dick<br />
DURÉE<br />
EXPOSITION<br />
T4<br />
(Minutes)<br />
TABLEAU CYCLES TEST<br />
DURÉE<br />
SÉCHAGE<br />
T5<br />
(Minutes)<br />
PLAGE DE<br />
PRESSION<br />
DE TRAVAIL<br />
( bars relatifs )<br />
PLAGE DE<br />
TEMPERATURE<br />
DE TRAVAIL<br />
( °C )<br />
3.5 4 2.02 ÷ 2.38 134 ÷ 138<br />
Vacuum -0.9<br />
FIG.<strong>24</strong><br />
T1,T2,T3 = séchage / vide<br />
T4 = stérilisation<br />
T5 = séchage<br />
27
FRANÇAIS<br />
10 MESSAGES D'ERREUR OU D'ALARME<br />
Les messages d'erreur sont signalés par un code alphanumérique composé d'une lettre et<br />
de 3 chiffres.<br />
Le préfixe “E” concerne les erreurs de l'opérateur et peut être rétablie par l'opérateur luimême.<br />
La lettre “A” concerne des alarmes relatives à l'autoclave. Si le problème persiste après<br />
avoir effectué la solution décrite, contactez le SAV par téléphone du fabricant.<br />
En cas d’affichage d’un message d’alarme (suffixe "A") le cycle doit être<br />
considéré NON réussi: il faudra répéter toutes les opérations de<br />
préparation et de stérilisation.<br />
Pour effacer les alarmes et les erreurs, appuyez simultanément sur les boutons indiqués<br />
ci-dessous jusqu'au déclenchement du signal acoustique :<br />
B-DOOR + B-PUMP + B-SELECT<br />
10.1 Liste des messages d'erreur-alarme<br />
ERREUR CAUSE SOLUTION<br />
E 200 Niveau eau insuffisant Remplir le reservoir<br />
E 250<br />
Niveau d'eau pure bas, avec remplissage par<br />
déminéralisateur<br />
Remplir le reservoir<br />
E 300 Niveau maximum eau usée Vider le réservoir<br />
E 401 Porte ouverte<br />
Fermer la porte avec<br />
attention<br />
E 451 Mauvais blocage de la porte Ouvrir et refermer la porte<br />
E 461<br />
Température chambre trop élevée pour le Éteindre et attendre 10<br />
Vacuum test (plus de 40°C)<br />
minutes<br />
A 250 Début cycle sans eau Contrôler le déminéralisateur<br />
A 001 Cycle interrompu<br />
Effacer et redémarrer le<br />
cycle<br />
A 011 Anomalie pc visuel<br />
Éteindre et rallumer<br />
l’autoclave<br />
A 101 Vide pas atteint en 10 minutes Effacer et répéter le cycle<br />
A 111 Vide pas maintenu sur première phase VT Effacer et répéter le cycle<br />
A 121 Vide pas maintenu sur deuxième phase VT Effacer et répéter le cycle<br />
A 401<br />
Porte ouverte pendant le cycle ou problème de Contrôler le système de<br />
fermeture<br />
fermeture<br />
A 501 Pression non maintenue Effacer et répéter le cycle<br />
A 551 Anomalie 1° capteur température Effacer et répéter le cycle<br />
A 552 Anomalie 2° capteur température Effacer et répéter le cycle<br />
A 641 Surpression Effacer et répéter le cycle<br />
A 651 Surchauffe Effacer et répéter le cycle<br />
28
FRANÇAIS<br />
A 661 Anomalies comparaison températures Effacer et répéter le cycle<br />
A 701 Pression d'exercice pas atteinte Effacer et répéter le cycle<br />
A 751 Température trop basse Effacer et répéter le cycle<br />
A 761 Anomalie sur le capteur de pression Effacer et répéter le cycle<br />
A 801 Anomalie dépressurisation Effacer et répéter le cycle<br />
A 901<br />
Absence temporaire d’alimentation électrique<br />
Tension principale trop basse<br />
Effacer et répéter le cycle<br />
Contacter la compagnie de<br />
distribution de l'électricité<br />
REMPLACER LES RESINE Résines<br />
IONIC SYSTEM épuisé<br />
REMPLACER LE FILTRE Résines<br />
OSMOSI SYSTEM épuisé<br />
Suivre les indications du paragraphe 14.3<br />
de ce manuel<br />
Suivre les indications du paragraphe 14.3<br />
de ce manuel<br />
D<br />
La porte de l'imprimeur<br />
n'est pas fermée<br />
Essayez de fermer la porte de l'imprimeur<br />
P Le papier est absent Insérez le papier<br />
Lo<br />
Pour essayer de relier la machine à l'ouvrier électrique<br />
Il y a bas voltege sur la<br />
net dans un autre point; si le problème persiste pour<br />
ligne<br />
entrer en contact avec un électricien<br />
IMPORTANT<br />
Si le problème persiste après avoir effectué la solution décrite, contactez le SAV du<br />
fabricant par téléphone au numéro suivant: MEDILINE ITALIA srl +39 0522 – 94 29 97<br />
29
FRANÇAIS<br />
11 ENTRETIEN ET PRÉVENTION<br />
Un entretien correct de l'autoclave garantit son bon fonctionnement et un gain assuré en<br />
termes de pertes de temps et de coûts dus à l'intervention du SAV et de l'entretien.<br />
11.1 Changement du filtre bactériologique<br />
Changez le filtre bactériologique (FIG.2 pos..11.) tous les 200 cycles maximum ou lorsque<br />
le filtre prend une couleur foncée.<br />
Tourner le filtre dans le sens inverse des aiguilles d’une montre pour le dévisser (FIG.25)<br />
et dans le sens des aiguilles d’une montre pour le visser (FIG.26)<br />
Utilisez seulement et exclusivement des filtres d'origine<br />
FIG.25<br />
FIG.26<br />
11.2 Nettoyage de la chambre<br />
Nettoyer périodiquement la chambre et le filtre, et enlever tout éventuel dépôt ou débris,<br />
vous éviterez ainsi d’introduire dans le circuit de vidange des matériaux qui peuvent<br />
causer des obstructions.<br />
Pour une bon nettoyage employer exclusivement de l’eau et l’éponge abrasive livrée<br />
(FIG.13).<br />
Le filtre est monté dans son logement avec interférence, donc en phase d’extraction pour<br />
le nettoyage faire attention à ne pas l’endommager (FIG.27).<br />
Après le nettoyage, il doit être remis dans son logement (FIG.28) et, pour une bonne<br />
filtration, il doit saillir d’environ 15 mm (FIG.29).<br />
FIG.27 FIG.28 FIG.29<br />
N'utilisez jamais de solvants, détergents, solutions chimiques, détartrants ou autres<br />
produits similaires.<br />
30
FRANÇAIS<br />
11.3 Nettoyage garniture panneau<br />
Éliminez régulièrement les résidus qui pourraient se déposer sur le pourtour de la<br />
garniture avec de l'eau et l'éponge en dotation (partie non abrasive) (FIG.13) ou avec un<br />
chiffon humide<br />
11.4 Ajustement du panneau<br />
Pour régler la pression de fermeture du panneau, agissez sur le régulateur dudit panneau<br />
avec la clé à double fonction (FIG.10) fournie en dotation.<br />
Tournez dans le sens opposé des aiguilles d'une montre (FIG.30 pos..A.) pour augmenter<br />
la pression de fermeture.<br />
Tournez dans le sens des aiguilles d'une montre (FIG.30 pos..B.) pour diminuer la<br />
pression de fermeture.<br />
.A.<br />
.B.<br />
FIG.30<br />
31
FRANÇAIS<br />
11.5 Changement du papier de l'imprimante<br />
Rouleau de papier thermographique de 57 mm de large. Le papier thermographique doit<br />
être imprimé sur un côté seulement.<br />
Ouvrir le capot de l’imprimante en poussant le bouton (FIG.31 pos..A.), insérer le rouleau<br />
de papier en faisant attention à la direction de rotation , tirer le papier jusqu’à le faire<br />
ressortir et refermer le capot (FIG.31 pos..B.); l’imprimante est prête pour l’impression.<br />
.A.<br />
.B.<br />
FIG.31<br />
11.6 Etat imprimante<br />
Si le volet de l'imprimante n'est pas parfaitement fermé la lettre “D” s'affiche sur le visuel.<br />
Ouvrez et refermez le volet de l'imprimante.<br />
S'il n'y a plus de papier, la lettre “P” s'affiche sur le visuel.<br />
Ouvrez le volet, introduisez le papier et refermez le volet.<br />
32
FRANÇAIS<br />
12 PROGRAMMATION DE L’ECRAN<br />
Faire référence à la FIG.2.<br />
12.1 Sélection de la langue<br />
Appuyez sur B-START et simultanément sur l'interrupteur MAINS.<br />
Appuyez B-STARTjusqu'à ce que la langue souhaitée s'affiche.<br />
La langue est modifiée [en avant] en appuyant sur B-SELECT.<br />
La langue est modifiée [en arrière] en appuyant sur B-PUMP<br />
12.2 Sélection de l’heure<br />
L'heure s'affiche en appuyant sur B-START.<br />
L'heure est modifiée [en avant] en appuyant sur B-SELECT.<br />
L'heure est modifiée [en arrière] en appuyant sur B-PUMP .<br />
12.3 Sélection des minutes<br />
Les minutes s'affichent en appuyant sur B-DOOR.<br />
Les minutes sont modifiées [en avant] en appuyant sur B-SELECT.<br />
Les minutes sont modifiées [en arrière] en appuyant sur B-PUMP.<br />
12.4 Sélection des secondes<br />
Les secondes s'affichent en appuyant sur B-DOOR. Ne pas modifier.<br />
12.5 Sélection de la date<br />
Le jour s'affiche (clignotant) en appuyant sur B-START.<br />
Le jour est modifié [en avant] en appuyant sur B-SELECT<br />
Le jour est modifié [en arrière] en appuyant sur B-PUMP.<br />
12.6 Sélection mois<br />
Le mois s'affiche (clignotant) en appuyant sur B-DOOR .<br />
Le mois est modifié [en avant] en appuyant sur B-SELECT.<br />
Le mois est modifié [en arrière] en appuyant sur B-PUMP.<br />
33
FRANÇAIS<br />
12.7 Sélection de l'année<br />
L'année s'affiche en appuyant sur B-DOOR.<br />
L'année est modifiée [en avant] en appuyant sur B-SELECT.<br />
L'année est modifiée [en arrière] en appuyant sur B-PUMP.<br />
12.8 Affichage de la pression atmosphérique<br />
La pression atmosphérique enregistrée s'affiche en appuyant sur B-START.<br />
NE PAS MODIFIER !<br />
12.9 Sélection du mode de remplissage de l'eau<br />
Appuyer sur le poussoir B-START pour l’établissement chargement d’eau :<br />
- CHARGEMENT PAR POMPE<br />
- IONIC SYSTEM<br />
- OSMOSI SYSTEM<br />
Appuyer sur le poussoir B-SELECT pour modifier l’établissement.<br />
Appuyer sur le poussoir B-DOOR jusqu’à l’intervention du «beep».<br />
Appuyez sans lâcher sur B-START jusqu'à ce que vous entendiez le bip.<br />
Les paramètres sont à présent enregistrés. Éteignez l’autoclave avec l'interrupteur MAINS.<br />
34
FRANÇAIS<br />
13 PETIT GUIDE DE DÉPANNAGE<br />
Dans la plupart des cas, certaines alarmes ou erreurs sont provoquées par une inattention<br />
ou une ignorance de certains aspects techniques et opérationnels.<br />
Ce paragraphe décrit les problèmes plus fréquents pouvant surgir et les solutions pour y<br />
remédier.<br />
13.1 L’autoclave ne sèche pas correctement<br />
a - REMPLACEZ LE FILTRE BACTÉRIOLOGIQUE par un neuf d'origine<br />
b - LES PLATEAUX UTILISES NE SONT PAS D'ORIGINE, sans trous ou avec une<br />
perforation différente. Utilisez seulement des plateaux d'origine, en aluminium si<br />
possible. Demandez des plateaux d'origine.<br />
c - LE MATÉRIEL À STÉRILISER N'EST PAS DISPOSÉ CORRECTEMENT, disposez<br />
le matériel en vrac ou ensaché avec le papier orienté vers le haut.Non sovrapporre<br />
mai, gli strumenti o i materiali, disporli parallelamente. Le matériel à stériliser ne<br />
doit jamais entrer en contact avec les parois de la chambre car il pourrait brûler ou<br />
se déformer.<br />
13.2 La chambre de l'autoclave est devenue blanche<br />
a - CHANGEZ IMMÉDIATEMENT LE TYPE D'EAU UTILISÉE, utilisez de l'eau<br />
déminéralisée ou distillée comme indiqué spécifiquement dans les chapitres<br />
précédents puis nettoyez ensuite la chambre.<br />
b - LA COULEUR BLANCHÂTRE PEUT être une conséquence de l'évaporation de<br />
matériaux organiques présents sur le matériel à stériliser. Recommencez le<br />
nettoyage du matériel à stériliser d'une façon plus idoine et approfondie.<br />
c - vérifier le système de déminéralisation installé, si présent (IONIC SYSTEM -<br />
OSMOSI SYSTEM)<br />
13.3 La chambre de l'autoclave a des taches vertes-bleuatres<br />
a - LE MATÉRIEL À STÉRILISER N'A PAS ÉTÉ RINCE CORRECTEMENT après le<br />
lavage. Refaites le rinçage du matériel à stériliser d'une façon plus idoine et<br />
approfondie. Si les tâches sont évidentes, contactez le SAV du fabricant par<br />
téléphone.<br />
13.4 Le cycle de stérilisation s'est interrompu sans motif apparent<br />
a - SI L’AUTOCLAVE EST BRANCHÉ avec des rallonges, réductions ou adaptateurs,<br />
enlevez ces accessoires et branchez directement l’autoclave à la prise électrique.<br />
35
FRANÇAIS<br />
13.5 L’autoclave ne reçoit pas les commandes<br />
a - L’AUTOCLAVE EST EN TRAIN D'EFFECTUER L'ALIGNEMENT BARIQUE<br />
AUTOMATIQUE, attendez le double signal sonore après l'ouverture du panneau<br />
programmez les fonctions.<br />
b - LE RÉSERVOIR D'EAU PURE est vide, le témoin de niveau minimum est allumé,<br />
remplissez-le avec de l'eau pure.<br />
c - LE RÉSERVOIR D'EAU EST PLEIN, le témoin de niveau maximum est allumé,<br />
videz l'eau usée<br />
13.6 L'imprimante de l'autoclave n'imprime pas<br />
a - LE VOLET DU PORTE-ROULEAU N'EST PAS BIEN FERME, la lettre “D” s'affiche.<br />
Ouvrez et refermez le volet de l'imprimante en vérifiant sa fermeture.<br />
b - PLUS DE PAPIER, la lettre “P” s'affiche. Ouvrez le volet et introduisez le rouleau de<br />
papier thermosensible.<br />
c - LE ROULEAU DE PAPIER EST MONTÉ AVEC LA FACE THERMOSENSIBLE<br />
VERS L'INTÉRIEUR. Ouvrez le volet et tourner le rouleau de papier dans l'autre<br />
sens.<br />
13.7 Tâches sur le matériel à stériliser<br />
a - LE MATÉRIEL À STÉRILISER A JAUNI en raison d'un résidu de liquide chimique<br />
qui, avec la chaleur, s'est fixé sur le matériel. Ceci est dû à un mauvais rinçage.<br />
b - LA CHAMBRE DE STÉRILISATION PRÉSENTE DES TACHES JAUNES car du<br />
matériel contenant du liquide chimique y a été introduit. En tombant, le liquide s'est<br />
fixé par effet de la chaleur. Ceci est dû à un mauvais rinçage.<br />
c - LE MATÉRIEL À STÉRILISER PRÉSENTE DES TACHES BLANCHÂTRES car le<br />
rinçage a été effectué avec de l'eau très calcaire et que le matériel n'a pas été bien<br />
séché. En dernier rinçage, il est conseillé d'utiliser de l'eau déminéralisée et de<br />
sécher soigneusement le matériel à stériliser.<br />
d - LE MATÉRIEL À STÉRILISER A NOIRCI ceci est dû au fait qu'il contient un grand<br />
pourcentage de carbone<br />
36
FRANÇAIS<br />
14 DÉMINÉRALISATEUR<br />
14.1 Etablissement des systemes de demineralisation<br />
L’autoclave est prédisposé aussi pour le chargement de l’eau déminéralisé par le système<br />
ionique ou système d’osmose.<br />
Ces systèmes sont accessoires des autoclaves TECNO-GAZ S.p.A. (pas en dotation).<br />
Ces produits sont utilises pour éliminer les sels minéraux de l’eau qui vient du réseau<br />
hydrique pour alimenter l’autoclave.<br />
Avant d’installer le système IONIQUE ou d’OSMOSE, l’opérateur doit programmer<br />
l’autoclave en suivant les instructions sous indiquées :<br />
Appuyez sur l’interrupteur géneral (vert) et tenir appuyé B-START jusqu’à quand la<br />
langue sélectionnée ne parait sur le visual<br />
Appuyer et relacher B-START pour sélectionner la page-écran suivant, jusqu’à quand ne<br />
parait :<br />
- CHARGEMENT PAR POMPE<br />
- IONIC SYSTEM<br />
- OSMOSI SYSTEM<br />
Pour changer l’affichage, appuyer sur le poussoir B-SELECT<br />
Pour confirmer le l’affichage, appuyer sur le poussoir B-DOOR , sans lacher, jusqu’à<br />
quand on n’écout l’indication acoustique ‘BEEP’<br />
Pour sortir de la programmation, appuyer sur le poussoir B-START, sans lacher, jusqu’à<br />
quand on n’écout l’indication acoustique ‘BEEP’<br />
ATTENZION<br />
Le numéro indiqué sous le type de chargement indique approximativement les cycles de<br />
stérilisation que on peut encore démarrer avec le filtre (en cas du système d’osmose) ou<br />
avec les résines (dans le cas du système ionique) actuellement en usage.<br />
Il est de règle de se souvenir de réinitialiser cet numéro au valeur maximum quand on<br />
change le filtre ou les résines sur le système actuellement en usage.<br />
Après avoir sauvé le type de chargement en usage, pour réinitialiser au valeur maximum<br />
cette information on doit appuyer sur le poussoir B-PUMP jusqu’à l’intervention du signal<br />
acoustique (à peut près 10 seconds) dans l’écran d’attente de début cycle.<br />
37
FRANÇAIS<br />
FIG.32<br />
38
FRANÇAIS<br />
14.2 Enclenchement des systemes de demineralisation<br />
Éteignez l’autoclave en appuyant sur l'interrupteur général (MAINS) (FIG.2 pos..19.) situé<br />
sur le côté droit de l'autoclave.<br />
Après avoir initialisé l’autoclave, l’opérateur doit installer le système de déminéralisation<br />
en suivant les instructions reportées aussi dans le manuel inclus dans le déminéralisateur.<br />
Ici on reporte le détail de l’enclenchement spécifique à l’autoclave du tuyau d’alimentation<br />
de l’eaux et de la connexion de la fiche électrique :<br />
1. Éteignez l’autoclave si elle est allumée.<br />
2. Fermez le robinet situé en amont du déminéralisateur.<br />
3. Installez le déminéralisateur en suivant les indications reportées dans son manuel.<br />
4. Appliquez du Téflon ou un autre matériau garantissant l'étanchéité à l'eau sur le filet<br />
mâle du raccord porte-tuyau.<br />
5. Vissez le raccord porte-tuyau sur le filet femelle du tuyau d'évacuation de l'eau<br />
propre FIG.1 pos. .2..<br />
6. Introduisez le tuyau du déminéralisateur dans le raccord porte-tuyau vissé à<br />
présent à l’autoclave.<br />
7. Introduisez la fiche du déminéralisateur dans la prise FIG.1 pos..7. au dos de<br />
l'autoclave.<br />
8. Ouvrez le robinet situé en amont du déminéralisateur.<br />
9. Vérifiez s'il n'y a pas de fuites d'eau Accendere l’autoclave;<br />
10. Effectuez un ou plusieurs cycles de stérilisation pour vérifier le fonctionnement du<br />
branchement à peine effectué en vérifiant surtout l'absence de fuites.<br />
EN FIN DE JOURNÉE, FERMEZ TOUJOURS LE ROBINET SITUE EN<br />
AMONT DU DEMINERALISATEUR AFIN DE PRÉVENIR LES<br />
INONDATIONS<br />
BRANCHEZ LES SYSTEMES DE DÉMINÉRALISATION SEULEMENT A DES<br />
AUTOCLAVES TECNO-GAZ PRÉDISPOSÉES.<br />
AU DEBUT DU CYCLE DE STERILISATION, L'AUTOCLAVE SIGNALE E250, IL<br />
SIGNIFIE QUE ON A DEMARRE LE CYCLE AVEC LE NIVEAU D'EAU PURE<br />
BAS; DONC, IL EST NECESSAIRE REMPLIR LE RESERVOIR D'EAU PURE.<br />
NOTE : POUR LE BRANCHEMENT DU DÉMINÉRALISATEUR AU AUTOCLAVES<br />
TECNO-GAZ, VEUILLEZ-VOUS REPORTER AUX INDICATIONS DU MANUEL<br />
D'INSTRUCTIONS CORRESPONDANT<br />
14.3 Echange cartouche resine et filtre<br />
L’autoclave signale sur le display l ‘état de déplétion, des résines ou du filtre, avec le<br />
message “ECHANGER RESINES“ ou “ECHANGER FILTRE“.<br />
Changez la cartouche de résine comme illustré dans le manuel du déminéralisateur.<br />
Après avoir remplacé la cartouche, appuyez sur le bouton B-PUMP jusqu'au<br />
déclenchement du signal acoustique, pour effacer l’autoclave.<br />
39
FRANÇAIS<br />
15 PROCÉDURES STANDARD DE STÉRILISATION<br />
Stériliser veut dire adopter des protocoles opérationnels précis et appliquer un système.<br />
L’autoclave est le maillon final de ce système.<br />
Le non respect d'une des phases du cycle de stérilisation peut nuire au résultat final.<br />
TECNO-GAZ SpA fabrique tous les dispositifs pour chaque phase du cycle de stérilisation.<br />
Il faut :<br />
1 – Prévoir un protocole opérationnel écrit précis à diffuser auprès de tout le personnel<br />
préposé à la stérilisation.<br />
TECNO GAZ SPA peut fournir ces protocoles personnalisés.<br />
2 – Suivre scrupuleusement et avec attention, toutes les phases du cycle de stérilisation :<br />
DÉSINFECTION phase obligatoire selon la législation en vigueur, qui doit être<br />
effectuée par immersion dans des liquides chimiques ou par désinfection<br />
thermique.<br />
DÉTERSION la phase plus importante qui assure l'élimination de tous les résidus<br />
chimiques et organiques. L'instrument plus idoine est le bac à ultrasons.<br />
SÉCHAGE phase indispensable pour prévenir la corrosion du matériel à stériliser et<br />
les interférences avec le cycle de stérilisation<br />
ENSACHAGE phase indispensable pour assurer la stérilisation du matériel.<br />
STÉRILISATION phase finale stérilisation à vapeur<br />
40
FRANÇAIS<br />
16 INSTRUCTION POUR RETOURNER L'AUTOCLAVE<br />
En cas de retour au fabricant de l’autoclave pour réparation, révision ou validation, suivez<br />
les indications suivantes pour son expédition :<br />
1- Utilisez l'emballage d'origine, s'il n'est plus en votre possession, utilisez un emballage<br />
adéquat. La marchandise voyage aux risques et périls de l'expéditeur.<br />
2- N'expédiez que l’autoclave, pas les plateaux ni les porte-plateaux.<br />
3- Nettoyez soigneusement la chambre de stérilisation et l’autoclave dans son ensemble<br />
avant de l'expédier. Si elle arrive sale et avec des résidus, elle sera réexpédiée non<br />
réparée ou sera soumise à un nettoyage et désinfection.<br />
4-Videz toujours le réservoir d'eau propre à travers le raccord placé au dos de l’autoclave<br />
(FIG.2 pos..2.).<br />
5- Videz toujours le réservoir d'eau usée à travers le raccord placé au dos de<br />
l’autoclave(FIG.2 pos..5.).<br />
6- Joignez une lettre d'explication précisant l'anomalie constatée ou le service dont vous<br />
entendez bénéficier.<br />
7- Expédiez toujours en port franc, sinon les frais de transport vous seront facturés.<br />
ATTENTION<br />
Tous les emballages non d'origine seront éliminés.<br />
L'autoclave vous sera retourné dans un emballage neuf et d'origine afin d'assurer la<br />
plus grande protection pendant le transport.<br />
L'emballage vous sera facturé à prix coûtant.<br />
41
FRANÇAIS<br />
17 PROCÉDURES A SUIVRE POUR BÉNÉFICIER DU SAV<br />
Réparations – Révisions – Assistance – Validations<br />
Cette page vous indique les procédures adoptées par notre atelier réparations.<br />
L'atelier réparations est un service autonome de MEDILINE ITALIA SRL (TECNO-GAZ<br />
GROUP) qui a une structure articulée et professionnelle.<br />
Les procédures déjà exprimées dans notre manuel de qualité y sont appliquées.<br />
1- Lorsque l’autoclave arrive chez MEDILINE ITALIA SRL elle est réceptionnée<br />
directement par l'atelier de réparation qui le codifie et crée une fiche d'assistance<br />
technique.<br />
2- Dans un délai maximum de 48 heures, l'autoclave est vu par les techniciens et un<br />
diagnostic technique est posé ainsi qu'un devis. Si l’autoclave n'a pas été retourné<br />
comme indiqué dans le paragraphe 16 INSTRUCTION POUR RETOURNER<br />
L'AUTOCLAVE, les délais indiqués ci-dessus peuvent sensiblement se rallonger.<br />
3- Le devis sera fait parvenir au distributeur qui le transmettra au client final pour<br />
acceptation.<br />
4- Après que MEDILINE ITALIA SRL aura reçu le devis signé pour acceptation,<br />
l'autoclave sera mis en réparation et sera expédié dans le délai indiqué sur le devis.<br />
5- L'autoclave sera réexpédié dans son emballage d'origine à travers le transporteur<br />
du client.<br />
42
FRANÇAIS<br />
18 GARANTIE<br />
1) DUREE: le produit est couvert par une garantie de 12 (douze) mois<br />
2) EXCLUSION: sont exclus de la garantie:<br />
a) les problèmes liés au manque d’entretien ordinaire, à une négligence de l’utilisateur<br />
ou à une utilisation impropre du produit ;<br />
b) les contrôles périodiques et l’entretien ;<br />
c) les réparations ou les remplacements de pièces soumises à usure, fragiles ou dont<br />
la durée de vie est imprévisible, à moins que leur défaut n’ait été prouvé au moment<br />
de la livraison ;<br />
d) les problèmes relatifs à la main d’œuvre, au déplacement du personnel technique<br />
et au transport ;<br />
e) les problèmes ou les dommages liés à une utilisation impropre et à une utilisation<br />
erronée ;<br />
f) les problèmes ou les dommages liés à des impuretés dans les systèmes<br />
d'alimentation en eau et en air, les opérations chimiques ou électriques<br />
extraordinaires ;<br />
g) les problèmes ou les dommages liés à l’utilisation de détergents, désinfectants,<br />
substances ou processus de stérilisation, non expressément indiqués dans le<br />
manuel d’utilisation et d’entretien ;<br />
h) le virage normal des pièces en plastique.<br />
3) PROCÈS-VERBAL D’INSTALLATION ET D’ESSAI: ce procès-verbal d’installation et<br />
d’essai dûment rempli, dans sa totalité, signé par l’utilisateur et le technicien installateur<br />
doit être renvoyé à l’entreprise. Cette condition est essentielle pour pouvoir bénéficier de<br />
la garantie. Ce procès-verbal devra être renvoyé dans un délai de 15 jours à compter de<br />
l’installation, sous peine d’expiration de la garantie.<br />
4) LIMITES : la garantie donne droit au remplacement ou à la réparation gratuits des<br />
composants défectueux. Le remplacement de l’appareil tout entier reste toutefois exclu.<br />
Pour les composants installés ou intégrés fabriqués sous la marque TECNO-GAZ ou par<br />
des tiers fournissant leur propre certificat de garantie, ce sont les conditions, les limites et<br />
les exclusions indiquées sur ces certificats qui sont valables.<br />
La réalisation d’une ou de plusieurs réparations durant la période de garantie ne comporte<br />
aucune modification de la date d’expiration de la garantie.<br />
5) CONTESTATIONS : en cas de contestation de l’Acheteur sur l’application de la<br />
garantie, sur la qualité ou sur les conditions de l’équipement livré, l’Acheteur ne pourra en<br />
aucun cas suspendre et/ou retarder les paiements.<br />
6) LITIGES : tout litige sur l’application et l’interprétation de ce Certificat de garantie sera<br />
du ressort du Tribunal de PARME (Italie) indépendamment du lieu où le contrat d’achat de<br />
l’équipement a été stipulé.<br />
7) DÉROGATIONS : les dérogations spéciales, accordées dans le cadre des présentes<br />
normes de garantie, ne comportent la reconnaissance d'aucun droit pour l’Acheteur et<br />
devront être considérées comme étant accordées dans la limite de chaque cas spécifique.<br />
8) AUTRE : pour tout ce qui n’est pas expressément prévu par ce Certificat de garantie, ce<br />
sont les normes contenues dans le Code Civil et dans les Lois en matière de la<br />
République Italienne qui sont valables.<br />
43
FRANÇAIS<br />
La garantie expire si :<br />
a) l’équipement est endommagé suite à une chute, l’exposition aux flammes, les<br />
renversements de liquides, la foudre, les calamités naturelles, les intempéries ou toutefois<br />
suite à des causes non imputables à des défauts de fabrication ;<br />
b) l’installation n’est pas conforme aux instructions de TECNO-GAZ et a été effectuée par<br />
du personnel non autorisé ;<br />
c) l’équipement est réparé, modifié ou toutefois altéré par l’Acheteur ou par des tiers non<br />
autorisés ;<br />
d) au moment de la demande d’intervention sous garantie, le numéro de série du produit a<br />
été enlevé, effacé, falsifié, etc. ;<br />
e) le procès-verbal d’installation et d’essai rempli et signé n’est pas renvoyé dans les 15<br />
jours suivants l’installation ;<br />
f) l’Acheteur suspend et/ou retarde, pour quelle que raison que ce soit, le paiement de<br />
toute somme due pour l’achat et/ou l’entretien de l’équipement ;<br />
g) l’entretien périodique programmé ou toute autre prescription prévue dans le manuel<br />
d’utilisation et d’entretien n’est pas respecté.<br />
44
ESPANOL<br />
Estimado Cliente,<br />
Les agradecemos por elegir nuestro autoclave y sepan que sabremos corresponder a su<br />
confianza, con la máxima atención y un servicio adecuado a sus expectativas.<br />
El autoclave que eligieron es la máxima expresión de tecnología aplicada. El autoclave<br />
les garantiza la esterilización de todos los instrumentos y materiales: sólidos, huecos,<br />
porosos, libres y empaquetados.<br />
Antes de utilizar el autoclave les rogamos leer con la máxima atención el manual de uso y<br />
que lo guarden en un lugar accesible a todos los operadores encargados de la<br />
esterilización.<br />
El autoclave deberá ser utilizada exclusivamente para las operaciones previstas por el<br />
fabricante.<br />
La instalación, el mantenimiento y asistencia requeriá exclusivamente la intervención de<br />
técnicos autorizador. Les rogamos que utilicen y pidan exclusivamente repuestos<br />
originales.<br />
1
ESPANOL<br />
ÍNDICE<br />
1. CONSULTA DEL MANUAL<br />
1.1 GLOSARIO<br />
1.2 SIMBOLOGÍA<br />
1.3 DIBUJOS CON DESCRIPCIÓN DE LAS POSICIONES<br />
2. SEGURIDAD<br />
2.1 MARCACIÓN DE SEGURIDAD<br />
2.2 DISPOSITIVO DE SEGURIDAD<br />
2.3 NOTAS SOBRE LA SEGURIDAD<br />
2.4 ELIMINACIÓN<br />
3. FINALIDAD DE EMPLEO DEL AUTOCLAVE<br />
4. DATOS TÉCNICOS<br />
4.1 MECÁNICOS<br />
4.2 ELÉCTRICOS<br />
4.3 CÁMARA<br />
4.4 DEPÓSITO AGUA LIMPIA<br />
4.5 DEPÓSITO AGUA USADA<br />
4.6 FILTRO BACTERIOLÓGICO<br />
5. ACCESORIOS DE DOTACIÓN<br />
6. DESEMBALADO<br />
7. INSTALACIÓN<br />
8. INSTRUCCIONES PARA EL USO<br />
8.1 ACCIONAMIENTO DEL AUTOCLAVE<br />
8.2 LLENADO DEPÓSITO AGUA PURA<br />
8.3 LLENADO EN MANUAL DEPÓSITO AGUA PURA<br />
8.4 CARACTERISTICAS DEL AGUA UTILIZADA<br />
8.5 CARGA DE MATERIALES EN AUTOCLAVE<br />
8.6 INICIO CICLO DE ESTERILIZACIÓN<br />
8.7 FINAL CICLO<br />
8.8 EXTRACCIÓN MATERIALES ESTERILIZADOS<br />
8.9 DRENAJE DEL AGUA UTILIZADA<br />
8.10 INTERRUPCIÓN DE UN CICLO DE ESTERILIZACIÓN<br />
9. CICLOS DE ESTERILIZACIÓN<br />
9.1 DESCRIPCIÓN DE LOS CICLOS<br />
9.2 CICLOS OPERATIVOS<br />
9.3 CICLOS OPERATIVOS – CICLOS NOCTURNOS<br />
2
9.4 CICLOS DE TESTE<br />
9.5 DIAGRAMA DE CICLO<br />
ESPANOL<br />
10. MENSAJES DE ERROR O DE ALARMA<br />
10.1 LISTADO DE MENSAJES DE ERROR-ALARMAS<br />
11. MANTENIMIENTO Y PREVENCIÓN<br />
11.1 SUSTITUCIÓN DEL FILTRO BACTERIOLÓGICO<br />
11.2 LIMPIEZA DE LA CÁMARA<br />
11.3 LIMPIEZA DE LA JUNTA TAPA<br />
11.4 REGULACIÓN DE LA TAPA<br />
11.5 SUSTITUCIÓN DEL PAPEL DE LA IMPRESORA<br />
11.6 INDICACIÓN CONDICIÓN DE LA IMPRESORA<br />
12. PROGRAMACIÓN Y PARÁMETROS DISPALY<br />
12.1 SELECCIÓN IDIOMA<br />
12.2 SELECCIÓN HORA<br />
12.3 SELECCIÓN MINUTOS<br />
12.4 SELECCIÓN SEGUNDOS<br />
12.5 SELECCIÓN FECHA<br />
12.6 SELECCIÓN MES<br />
12.7 SELECCIÓN AÑO<br />
12.8 VISUALIZACIÓN PRESIÓN ATMOSFÉRICA<br />
12.9 SELECCIÓN CARGA AGUA<br />
13. SOLUCIÓN DE PROBLEMAS OPERATIVOS<br />
13.1 AUTOCLAVE NO EFECTUA SECADO CORRECTO<br />
13.2 LA CÁMARA DEL AUTOCLAVE CAMBIA A COLOR BLANCO<br />
13.3 LA CÁMARA DEL AUTOCLAVE PRESENTA ,MANCHAS VERDES<br />
13.4 EL CICLO DE ESTERILIZACIÓN SE INTERRRUMPE<br />
13.5 EL AUTOCLAVE NO RECIBE LOS MANDOS<br />
13.6 LA IMPRESORA DEL AUTOCLAVE NO IMPRIME<br />
13.7 MANCAHS EN LOS INSTRUMENTOS<br />
14. DESMINERALIZADOR<br />
14.1 IMPOSTACIÒN DEL SISTEMA DE DEMINERALIZACIÒN<br />
14.2 CONEXION SISTEMA DE DESMINERALIZACIÒN<br />
14.3 CAMBIO CARTUCHO RESINA FILTRE<br />
15. PROCEDIMIENTOS ESTÁNDAR DE ESTERILIZACIÓN<br />
16. INSTRUCCIÓN PARA EXPEDICIÓN DEL AUTOCLAVE<br />
17. PROCEDIMIENTOS PARA EL SERVICIO Y ASISTENCIA<br />
18. GARANTÍA<br />
3
ESPANOL<br />
01 CONSULTA DEL MANUAL<br />
1.1 Glosario<br />
VACÍO<br />
CELDA<br />
FILTRO<br />
TRAY<br />
PORTATRAY<br />
DESMINERALIZADOR<br />
Presión inferior a la presión atmosférica<br />
Cuerpo cilíndrico de acero que aloja los dispositivos a esterilizar<br />
Dispositivo apto a retener las partículas<br />
Cajón de soporte de la carga a esterilizar<br />
Estructura de soporte de las bandejas en la celda de<br />
Dispositivo apto para eliminar los sales minerales del agua<br />
proveniente de la red hídrica<br />
HELIX TEST Teste para comprobación de la penetración del vapor en un<br />
BOWIE - DICK TEST Teste para comprobación de la penetración del vapor en un<br />
VACUUM TEST<br />
Teste para comprobación del mantenimiento del grado de vacío<br />
en la celda<br />
FILTRO<br />
BACTERIOLÓGICO<br />
Dispositivo apto para retener las partículas en suspensión en el<br />
aire superiores a 0,3 µm.<br />
SOBREPRESIÓN Presión superior a la estándar para el ciclo considerado<br />
SOBRETEMPERATURA Temperatura superior a la estándar para el ciclo considerado<br />
RESINAS<br />
Componente reemplazable (cartucha) del desmineralizador que<br />
elimina todos los sales de tipo inorgánico<br />
1.2 Simbologia<br />
ATENCIÓN: Indicación a respetar para evitar daños materiales o<br />
afectar el éxito del ciclo<br />
PELIGRO: Indicación de seguridad para evitar lesiones<br />
TENSIÓN PELIGROSA<br />
CORTAR TENSIÓN ANTES DE EXTRAER LA TAPA<br />
ALTA TEMPERATURA<br />
4
ESPANOL<br />
CONEXIÓN DE TIERRA<br />
Este símbolo indica, con arreglo a la DIRECTIVA 2002/96/CE,<br />
que terminada su vida útil, el producto no debe eliminarse como<br />
desperdicio urbano.<br />
Corriente Alternada<br />
Atención alta tensión peligro de fulguración<br />
Fusible<br />
Lean atentamente el manual<br />
Fabricado en -- / -- / --<br />
Material No Envasado<br />
Material Envasado<br />
Máximo nivel de agua desmineralizada<br />
Mínimo nivel de agua desmineralizada<br />
Máximo nivel de agua utilizada<br />
pos. Posición (número correspondiente al componente en las figuras)<br />
FIG. Figura<br />
Ω Ohm (unidad de medida de la Resistencia Eléctrica)<br />
s Segundos (unidad de medida del tiempo)<br />
kW kiloWatt (unidad de medida de la Potencia)<br />
Hz Hertz (unidad de medida de la frecuencia)<br />
mm Milímetros (unidad de medida de la Longitud)<br />
A Amperé (unidad de medida de la corriente eléctrica)<br />
V Volt (unidad de medida de la tensión eléctrica)<br />
°C Grados Centígrados (unidad de medida de la Temperatura)<br />
kg Kilogramos (unidad de medida de la Masa)<br />
5
ESPANOL<br />
1.3 Dibujos con descripción de las posiciones<br />
Patilla separadora<br />
Válvula de rebose de agua limpia<br />
FIG.1<br />
Grifo de drenaje de agua limpia – conexión desmineralizador<br />
Válvula de Seguridad<br />
Válvula de rebose del agua usada - descarga condensación<br />
Grifo de drenaje de agua usada<br />
Alimentación Eléctrica Principal<br />
Toma para Alimentación Eléctrica SOLO Y EXCLUSIVAMENTE<br />
DESMINERALIZADOR<br />
Fusible 12A<br />
Fusible 12A<br />
Fusible 500mA<br />
6
ESPANOL<br />
FIG.2<br />
7
ESPANOL<br />
Filtro Bacteriológico<br />
Carga manual de Agua<br />
Llenado con agua<br />
Drenaje agua Usada<br />
Display<br />
Impresora<br />
Conexión RS232<br />
Conector de la incubadora (apartado 2.3)<br />
Interruptor general (MAINS)<br />
Ciclo 121° no envasado<br />
Ciclo 121°C envasado<br />
Ciclo 134°C no envasado<br />
Ciclo 134°C envasado<br />
Ciclo Prion<br />
Ciclo 134°C Flash<br />
Vacuum Test<br />
Led Helix – B&D Test<br />
Mínimo nivel de agua<br />
Máximo nivel de agua<br />
Máximo nivel de agua usada<br />
Botòn START-STOP<br />
Botòn llenado Agua<br />
Botòn Selección Ciclo<br />
Botòn Tapa abierta<br />
8
ESPANOL<br />
02 SEGURIDAD<br />
2.1 Marcación de Seguridad<br />
TENSIÓN PELIGROSA<br />
QUITAR TENSIÓN ANTES DE RETIRAR LA TAPA<br />
ALTA TEMPERATURA<br />
CONEXIÓN DE TIERRA<br />
2.2 Dispositivos de Seguridad<br />
Los Dispositivos de Seguridad son los siguientes:<br />
- Válvula de Seguridad calibrada a 2.4 bar ± 10%<br />
- Bloqueo electromagnético para impedir la apertura de la tapa durante la<br />
ejecución del ciclo<br />
- Termostato de seguridad<br />
2.3 Notas sobre la Seguridad<br />
-El fabricante es responsable del producto puesto en comercio cumpliendo la normativa<br />
en vigor. La responsabilidad caducará cuando personas no capacitadas realicen<br />
operaciones con el dispositivo o partes del mismo o cuando se utilicen piezas de repuesto<br />
no originales.<br />
-Los locales donde se instale el autoclave no deben estar expuestos a riesgos potenciales<br />
de explosiones y/o incendios.<br />
-El autoclave debe estar instalado en un ambiente conforme a los requisitos legislativos<br />
en vigor.<br />
El conector de la incubadora (FIG.1 pos..18.), debe utilizarse únicamente para la<br />
conexión de B-TEST. Conexión de 230 V a.c. independiente del interruptor general<br />
(MAINS). Prescinda de acercarse al conector con las manos mojadas o húmedas y<br />
protéjalo contra posibles proyecciones de agua.<br />
9
ESPANOL<br />
2.4 Eliminación<br />
Este producto cumple todos los requisitos establecidos por la Directiva 2002/96/CE del<br />
Parlamento Euoropeo y del Consejo de la Unión Europea sobre Residuos de Aparatos<br />
Eléctricos y Electrónicos (RAEE). En los estados miembros que adoptaron la citada<br />
Directiva, deberá inicarse en el producto que fue puesto en el mercado después del 13 de<br />
agosto de 2005 y que no debe eliminarse como residuo urbano no reciclable. Utilice las<br />
instalaciones locales de recogida de RAEE que correspondan para deshacerse de este<br />
producto de acuerdo con todos los requisitos estipulados<br />
03 FINALIDAD DE EMPLEO DEL AUTOCLAVE<br />
El autoclave es capaz de esterilizar las tres tipologías de carga previstas por la norma EN13060, y<br />
específicamente:<br />
MATERIALES FERROSOS<br />
O SÓLIDOS<br />
CUERPOS POROSOS<br />
CUERPOS HUECOS<br />
Instrumentos sin cavidades y sin obstáculos para la<br />
penetración del vapor<br />
Materiales sencillos o compuestos que puedan absorber los<br />
fluidos (tejidos, batas, gasas, vendas, etc.)<br />
Materiales o dispositivos con cavidades, obstrucciones, etc.<br />
Estos están subdivididos en dos tipos, clasificados en<br />
función de la longitud y del diámetro. Indicativamente:<br />
TIPO B cánulas, tubos o dispositivos con pasadas<br />
considerables<br />
TIPO A turbinas, empuñaduras y dispositivos con orificios<br />
ciegos o de pequeñas dimensiones<br />
El autoclave debe ser utilizada, sólo y exclusivamente, para la esterilización de<br />
instrumentos y de materiales compatibles con el sistema de esterilizado por vapor.<br />
El autoclave puede ser utilizado en el sector dental, medico, estetico y en general en<br />
todos los sectores donde se procede a la esterilización de instrumentos y materiales.<br />
El autoclave ha sido certificado para la esterilizaciòn de los siguientes materiales*:<br />
Materiales solidos ensobrados y no<br />
ensobrados para un cargo maximo de<br />
Materiales concavos de tipologia a y b<br />
para un cargo maximo<br />
Materiales porosos para un cargo<br />
maximo de<br />
*Válido solamente para los países europeos<br />
EUROPA B EVO EUROPA B EVO <strong>24</strong><br />
kg. 5,00 kg. 7,00<br />
kg. 5,00 kg. 7,00<br />
kg. 1,50 kg. 2,0<br />
Debe comprobarse siempre la capacidad de los materiales de<br />
someterse a las temperaturas del ciclo de esterilización<br />
determinado.<br />
10
ESPANOL<br />
04 DATOS TECNICOS<br />
4.1 Mecánicos<br />
EUROPA B EVO EUROPA B EVO <strong>24</strong><br />
Temperatura de trabajo<br />
+5°C ÷ +40°C<br />
Altitud MAX<br />
2.000 m<br />
Humedad relativa MAX a 30°C 80%<br />
Humedad relativa MAX a 40°C 50%<br />
Dimensiones totales (L x H x P) 510 X 390 X 590 mm 510 X 390 X 730 mm<br />
Dimensiones con tapa abierta<br />
300 mm<br />
Peso (depósitos vacíos) 54 kg 58 kg<br />
Peso (depósitos llenos) 63 kg 67 kg<br />
Peso por área de soporte 2058 N/m 2 2058 N/m 2<br />
Volumen 0.12 m 3 0.15 m 3<br />
Nivel de potencia sonora<br />
< 70 db A<br />
4.2 Eléctricos<br />
EUROPA B EVO EUROPA B EVO <strong>24</strong><br />
Tensión alimentación<br />
230 V a.c. +/-10 % single phase<br />
Potencia 1,7 kW 2.0 kW<br />
Frecuencia<br />
50 / 60 Hz<br />
Cable alimentación 2 + 1 x 1mm 2<br />
Fusibles<br />
6.3 x 32 - 12 A<br />
Calor transmitido<br />
3.6 E +6 J / ora<br />
4.3 Cámara<br />
EUROPA B EVO EUROPA B EVO <strong>24</strong><br />
Presión trabajo MAX<br />
2.4 bar (relativi)<br />
Vacío MAX<br />
- 0.9 bar (relativi)<br />
Temperatura MAX 138 °C<br />
Material Inox AISI 304<br />
Dimensiones Ø <strong>24</strong>5 x 318 mm Ø <strong>24</strong>5 x 500 mm<br />
4.4 Depósito Agua Limpia<br />
EUROPA B EVO EUROPA B EVO <strong>24</strong><br />
Con<br />
demineralizz.<br />
Senza<br />
demineralizz.<br />
Volumen<br />
4,5 l<br />
Ciclos efectuables 4<br />
Leer impostaciòn<br />
del sistema de<br />
2<br />
demineralizaciòn<br />
Material<br />
polietileno<br />
11
ESPANOL<br />
4.5 Depósito Agua Usada<br />
EUROPA B EVO EUROPA B EVO <strong>24</strong><br />
Volumen<br />
4,5 l<br />
Ciclos efectuables 4 2<br />
Material<br />
polietileno<br />
Temperatura max. agua de<br />
drenaje<br />
50°C<br />
4.6 Filtro Bacteriológico<br />
EUROPA B EVO EUROPA B EVO <strong>24</strong><br />
Diàmetro<br />
56 mm<br />
Capacidad de filtrado 0.3 µm<br />
12
ESPANOL<br />
05 ACCESORIOS EN DOTACIÓN<br />
El autoclave será suministrado y entregado completo con todos los accesorios que<br />
estarán en sus embalajes originales.<br />
Accesorios en dotación y opcionales:<br />
- Portabandejas<br />
EUROPA B EVO EUROPA B EVO <strong>24</strong><br />
Material<br />
Aluminio Anodizado<br />
Dimensiones (L x H x P) 192 x 165 x 280 mm 192 x 200 x 470 mm<br />
Cuadro<br />
FIG.3<br />
Dotación prevista 1<br />
FIG.4<br />
-- Portabandeja opcional<br />
EUROPA B EVO EUROPA B EVO <strong>24</strong><br />
Material Aluminio Anodizado /<br />
Dimensiones (L x H x P)<br />
193 x 200 x 280 mm<br />
(200 x 193 x 280) mm<br />
/<br />
Cuadro<br />
/<br />
FIG.5<br />
Dotación prevista 1 /<br />
- Bandejas<br />
EUROPA B EVO EUROPA B EVO <strong>24</strong><br />
Material<br />
Aluminio Anodizado<br />
Dimensiones (L x H xP) 184 x 17 x 286 mm 184 x 17 x 286 mm + 184 x 17 x 140 mm<br />
Cuadro<br />
FIG.6 FIG.7 FIG.8<br />
Dotazione prevista 4 4 + 4<br />
13
ESPANOL<br />
-- Bandejas opcional<br />
EUROPA B EVO EUROPA B EVO <strong>24</strong><br />
Material /<br />
Aluminio Anodizado / de<br />
acero inoxidable<br />
Dimensiones (L x H x P) / 184 x 17 x 460 mm<br />
Cuadro /<br />
FIG.9<br />
Dotación prevista / 4<br />
- Llave para extracción del tray y regulación de la portezuela<br />
Utilízala para extraer y manejar los trays (FIG.11) y también para regular la portezuela (apartado<br />
11.4)<br />
Cuadro<br />
Dotación prevista<br />
FIG.10<br />
1<br />
FIG.11<br />
- Embudo de plástico con tubo<br />
Utilízalo para la carga manual del agua (apartado 8.3)<br />
Cuadro<br />
FIG.12<br />
Dotación prevista 1<br />
- Paño para la limpieza de la celda y del burlete de la portezuela<br />
Utilízalo para limpiar la celda de esterilización y el burlete de la portezuela (apartado 11.2-<br />
11.3)<br />
Cuadro<br />
FIG.13<br />
Dotación prevista 1<br />
14
ESPANOL<br />
- Racor para carga de agua<br />
Utilízalo con el embudo de plástico con tubo para cargar el agua en manual y con el tubo<br />
para carga de agua completo con filtro<br />
Immagine<br />
FIG.14<br />
Dotazione prevista 1<br />
- Tubo para carga de agua completo con filtro<br />
Utilízalo para cargar el agua en manual (apartado 8.3)<br />
Cuadro<br />
FIG.15<br />
Dotación prevista 1<br />
- Tubo de desagüe<br />
Utilízalo para descargar el agua usada (apartado 8.9)<br />
Cuadro<br />
FIG.16<br />
Dotación prevista 1<br />
- Tubo rilsan<br />
Une un extremo del tubo al Rebosadero del agua usada – descarga de condensación<br />
(FIG.1 pos..4.), el otro extremo debe acoplarse a un contenedor para recolección del agua<br />
y del vapor condensado.<br />
Cuadro<br />
FIG.17<br />
Dotación prevista 1<br />
15
ESPANOL<br />
- Patilla separadora de plástico posterior<br />
Aplica la patilla separadora de plástico en la parte posterior del autoclave (FIG.1 pos..0.)<br />
para asegurar la ventilación adecuada en caso de que se posicione la autoclave<br />
demasiado cerca de una pared<br />
Cuadro<br />
FIG.18<br />
Dotación prevista 1<br />
- Tubos de descarga posterior de dependencias<br />
1- Tubo para rebosadero agua limpia<br />
2- Tubo para grifo de descarga del agua usada<br />
1- Une un extremo del tubo al rebosadero posterior del agua limpia (FIG.1 pos..1.), y el<br />
otro extremo a un contenedor para recuperación del agua desmineralizada o a un punto<br />
de desagüe (versión con desmineralizador).<br />
2- Une un extremo del tubo al racor FIG.20 y ensambla en él el grifo para el desagüe del<br />
agua usada (FIG.1 pos..5.), y el otro extremo del tubo a un contenedor para recoger el<br />
agua.<br />
Immagine<br />
FIG.19<br />
Dotación prevista 2<br />
- Racor para desagüe del agua usada posterior<br />
Conecta un extremo del tubo de desagüe del agua usada al racor FIG.20 y fija en él el grifo de<br />
desagüe del agua usada (FIG.1 pos..5.).<br />
Cuadro<br />
FIG.20<br />
Dotación prevista 1<br />
16
ESPANOL<br />
- Cable de alimentación eléctrica<br />
Une el extremo del conector (FIG.21 pos..B.) al panel trasero (FIG.1 pos..6.) y seguidamente<br />
enchufa la clavija (FIG.21 pos..A.) directamente en la toma de alimentación del sistema eléctrico.<br />
Cuadro<br />
FIG.21<br />
Dotación prevista 1<br />
IMPORTANTE<br />
Solicitar y utilizar exclusivamente accesorios originales<br />
17
ESPANOL<br />
06 DESEMBALADO<br />
El autoclave será expedido en embalaje idóneo que protegerá el contenido y permitirá su<br />
fácil transporte y manejo.<br />
El embalaje no deberá sufrir choques, requeriendo manejo atento que evite vuelcos y<br />
caídas de alturas superiores a los 16 cm.<br />
En caso de imposibilidad de utilizar medios de desplazamiento autónomos, el instrumento<br />
debe ser manejado dentro de su embalaje y siempre con 2 personas para las<br />
operaciones.<br />
El autoclave està puesta arriba de un pallet de madera y cerrada en un cartòn ondulado y<br />
reforzado para dentro con compuestos de cartòn.<br />
Para desembalar el autoclave, abrir el cartòn ondulado, remover las partes de refuerzo y<br />
extraerlo utilizzando las correas en dotaciòn.<br />
El consejo es de mover el autoclave en 2 o mas personas.<br />
La movimentaciòn tin eque ser hecha solo atraves del utilizzo de las correas<br />
IMPORTANTE<br />
Nunca deberá levantarse el autoclave asiéndolo por la parte inferior de la tapa o del panel<br />
de mandos pues esa operación además de errónea puede originar problemas de<br />
naturaleza mecánica<br />
Dentro del embalaje se encuentran :<br />
MANUAL DE USO que deberán leer atentamente guardandolo en lugar accesible a todos<br />
los operadores responsables de la esterilización.<br />
CERTIFICADOS que deberán guardar<br />
BOLETÍN DE GARANTÍA que deberán completar enviando una parte<br />
ATENCIÓN<br />
Consérvese siempre el embalaje original<br />
18
ESPANOL<br />
07 INSTALACIÓN<br />
A<br />
FIG.22<br />
EUROPA B EVO EUROPA B EVO <strong>24</strong><br />
610 mm<br />
B 590 mm 730 mm<br />
C<br />
D<br />
50 mm<br />
410 mm<br />
426 mm (trasero) 403 mm (trasero)<br />
E<br />
455 mm (delatero) 444 mm (delatero)<br />
F 400 mm 431 mm<br />
1 - Instalar el autoclave en ambientes idóneos para la esterilización.<br />
2 - El local debe estar adecuadamente iluminado y aireado, conforme lo previsto por las<br />
directivas en vigor.<br />
3 - Instalar el autoclave lejos de fuentes de calor y salpicaduras de agua.<br />
4 - Colocar el autoclave sobre una superficie idónea que pueda soportar el peso (min.80<br />
kg) y que tenga las dimensiones apropiadas.<br />
5 – La superficie de apoyo de la autoclave debe estar perfectamente horizontal.<br />
6 - Colocar el autoclave a una altura que permita al utilizador la inspección total de la<br />
cámara de esterilización y que posibilite la realización de la limpieza.<br />
7 - Abrir la tapa del autoclave y retirar todos los sobres que envolucran los accesorios<br />
que se encuentran en el interior de la cámara de esterilización.<br />
19
ESPANOL<br />
8 - Dejar en el interior de la cámara de esterilización solo el portabandeja con las<br />
bandejas, todos los demás accesorios deben ser guardados en el compartimiento externo<br />
a disposición de los utilizadores.<br />
9 - Nunca deben dejarse sobre la máquina periódicos, bandejas, contenedores con<br />
líquidos, etc …<br />
10 - Nunca apoyarse a la tapa cuando esté abierta.<br />
11 - Crea un espacio de por lo menos 5 cm detrás y por los lados del aparato<br />
utilizando la patilla espaciadora de plástico (FIG.1 pos..0. – FIG.18) garantizando la<br />
ventilación necesaria.<br />
12 - Efectúa la conexión de los tubos en la parte trasera (capítulo 5)<br />
13 - Comprobar siempre si el sistema eléctrico al que se enlaza el autoclave cumple<br />
las normas vigentes y que tenga las dimensiones adecuadas a las características del<br />
aparato.<br />
14 - ufar la toma hembra del cable de alimentación eléctrica en la toma del panel trasero<br />
del autoclave (FIG.1 pos..6.)<br />
15 - Conectar el enchufe eléctrico al sistema comprobando una alimentación de 230 Vac-<br />
2000Va<br />
IMPORTANTE<br />
Evitar el enlace de extensiones, reductores o adaptadores pues pueden originar<br />
microinterrupciones con consecuente señalización de alarma.<br />
1 6- Activar el autoclave pulsando el interruptor general (FIG.2 pos..19.) y abrir la tapa del<br />
autoclave. Aguardar algunos segundos, habrá dos señales acústicas que informarán de la<br />
adquisición de los parámetros relativos a alineación atmosférica automática y<br />
simultáneamente aparecerá en el display el mensaje “puerta abierta”.<br />
IMPORTANTE<br />
Nunca debe seleccionarse un mando antes de las dos señales acústicas pues el<br />
autoclave no aceptará el programa elegido.<br />
17 - Llenar el depósito con agua pura siguiendo las instrucciones del (capítulo 8).<br />
Realizar entonces un ciclo de prueba siguiendo las instrucciones proporcionadas por el<br />
capítulo (capítulo 8).<br />
18 - Si se instala el autoclave con el sistema de desionización, deben respetarse las<br />
instrucciones proporcionadas en el embalaje del dispositivo (capítulo 14).<br />
20
ESPANOL<br />
08 INSTRUCCIONES PARA EL USO<br />
Después de instalada, el autoclave deberá ser preparada para la utilización.<br />
8.1 Accionar el autoclave<br />
Pulsando el interruptor general (FIG.2 pos..19.)<br />
8.2 Llenado del depósito agua limpia<br />
Conecta el “racor para carga de agua “ FIG.14 al “tubo para carga de agua completo con<br />
filtro” (en dotación) introduciéndolo en la abertura del racor frontal del autoclave (FIG.2<br />
pos..13.).<br />
Coloca el otro extremo del tubo con filtro dentro del contenedor del agua desmineralizada<br />
o destilada.<br />
Presiona ahora el pulsador B-PUMP para accionar la bomba para carga de agua y<br />
manténgalo pulsado hasta visualizarse la cuenta atrás.<br />
La bomba llenará el depósito interno del autoclave. No alcanzándose el nivel máximo en<br />
el plazo de 180 segundos la bomba se parará automáticamente siendo necesario pulsar<br />
nuevamente el botón de accionamiento.<br />
La bomba parará automáticamente al alcanzarse el nivel máximo.<br />
Con enlace a desionizador el funcionamiento del autoclave estará inhibido en caso de<br />
nivel máximo no alcanzado.<br />
8.3 Llenado manual del depósito de agua pura<br />
En caso de fallo en el funcionamiento de la bomba de entrega de agua el llenado del<br />
depósito podrá efectuarse en manual y el operador deberá:<br />
-Acciona el autoclave.<br />
-Extrae la tapa frontal del autoclave (FIG.2 pos..12.).<br />
-Coloca en esa abertura el racor para carga de agua con tubo acoplado al embudo (FIG. .<br />
14)<br />
-Vierte el agua destilada en el embudo manteniéndolo en posición más alta respecto del<br />
racor de carga<br />
-Sigue incorporando líquido hasta encenderse el led de nivel máximo (FIG.2 pos..29.).<br />
-Completada la introducción del líquido, extrae el racor y repón la tapa.<br />
21
ESPANOL<br />
8.4 Caracteristicas del agua utilizada<br />
TABLA NIVELES CUALITATIVOS ESTABLECIDOS POR LA NORMATIVA UNI EN 13060 :2005<br />
CEN STANDARD UNI EN 13060 : 2005<br />
Residuo evaporazione ≤ 10 mg/l<br />
Ossido di silicio ≤ 1 mg/l<br />
Ferro ≤ 0.2 mg/l<br />
Cadmio ≤ 0.005 mg/l<br />
Piombo ≤ 0.05 mg/l<br />
Resti di metalli pesanti tranne ferro,<br />
cadmio, piombo<br />
≤ 0.1 mg/l<br />
Cloruro (Cl’) ≤ 2 mg/l<br />
Fosfato (P20s) ≤ 0.5 mg/l<br />
Conduttività (a 20°C) ≤ 15 µs/cm<br />
Valore Ph (grado di acidità) 5 ÷ 7,5<br />
Aspetto<br />
Incolore, limpido, senza depositi<br />
Durezza (E Ioni di terra alcalina) ≤ 0.02 mmol/l<br />
8.5 Carga de materiales en el autoclave<br />
Disponer los materiales por esterilizar en las bandejas.<br />
-nunca sobreponer los materiales<br />
-disponer los instrumentos envasados siempre con la cara de papel hacia arriba<br />
-nunca permitir el contacto entre los materiales y la cámara de esterilización o la tapa<br />
cerrada<br />
-colocar las pinzas y las tijeras con las hojas abiertas<br />
FIG.23<br />
Al completar la carga, cerrar la tapa del autoclave. En el display aparecerá el mensaje<br />
PUERTA CERRADA.<br />
8.6 Inicio del ciclo de esterilización<br />
Elegir el programa de esterilización más idóneo para la carga introducidapulsando el<br />
botón B-SELECT<br />
Cada opresión del botón alterará la selección del programa pasando a la opción sucesiva.<br />
Después de elegir el programa será posible accionar el ciclo pulsando el botón B-START,<br />
la tapa se bloqueará automáticamente y el ciclo empezará.<br />
Durante el ciclo, el display visualizará todos los parámetros y las informaciones<br />
correspondientes.<br />
22
ESPANOL<br />
8.7 Final del ciclo<br />
Una señal acústica advierte el operador del final del ciclo de esterilización.<br />
Si el ciclo tuvo éxito, aparecerá en el display el mensaje FINAL DE CICLO de lo contrario<br />
el display mostrará un código de error o una alarma.<br />
Al terminar la señal acústica, desbloquear la tapa oprimiendo el botón B-DOOR.<br />
Habiendo presión en el interior de la cámara, el botón no accionará el desbloqueo.<br />
Aguardar la completa despresurización de la cámara y repetir la operación ó, sólo en<br />
casos de emergencia, pulsar simultáneamente B-DOOR + B-PUMP .<br />
Desbloqueada la tapa, tirar de la empuñadura y abrirla.<br />
8.8 Extracción de los materiales esterilizados<br />
Utiliza equipos de protección individual idóneos cumpliendo las normativas vigentes en<br />
materia de seguridad e higiene laboral. Extrae los trays con el auxilio de la llave específica<br />
suministrada con el aparato (FIG.10). Deja que los utensilios se acondicionen antes de<br />
guardarlos en ambiente al amparo de contaminaciones.<br />
8.9 Drenaje del agua usada<br />
Al encenderse el led de nivel de agua usada (FIG.2 pos..30.) deberá accionarse el<br />
vaciado. Sin el vaciado, el funcionamiento del autoclave estará inhibido.<br />
Introducir el tubo en la toma de desagüe del agua usada situada en la parte frontal del<br />
autoclave (fig.2 pos.14),<br />
Desenroscar la anilla girando a izquierdas (dos vueltas completas), introducir la otra<br />
extremidad del tubo en un recipiente; el agua verterá en el contenedor por gravedad.<br />
IMPORTANTE<br />
A - El tubo alojado en el contenedor de captación nunca deberá rozar ni sumergirse en el<br />
agua drenada pues son posibles situaciones de reflujo.<br />
B - Aguardar siempre hasta que el agua haya salido totalmente. El led de nivel máximo de<br />
agua usada se apagará antes que el agua termine en el depósito y por ello no debe ser<br />
considerado como referencia en esa operación.<br />
Al terminar el drenaje al tornillo la anilla y quitar el tubo.<br />
23
ESPANOL<br />
8.10 Interrupción de un ciclo de esterilización<br />
Un ciclo de esterilización podrá ser interrumpido voluntariamente pulsándose el<br />
botón B-START por aproximadamente 2 segundos.<br />
El autoclave emitirá un sonido y pasará a la descompresión mostrando en el display<br />
el mensaje de error A001 (CICLO INTERRUMPIDO).<br />
Para reponer a cero el error deben mantenerse oprimidos simultáneamente los botones<br />
que destacamos a continuación hasta que intervenga la señal acústica:<br />
B-DOOR + B-PUMP + B-SELECT<br />
ATENCIÓN:<br />
Con impresora en funcionamiento, el reset de la alarma estará inhibido.<br />
Al visualizarse un mensaje de alarma (sufijo "A") el ciclo debe<br />
considerarse SIN éxito: deben repetirse todas las operaciones de<br />
preparación y de esterilización.<br />
<strong>24</strong>
ESPANOL<br />
09 CICLOS DE ESTERILIZACIÓN<br />
9.1 Descripción de los ciclos<br />
El autoclave dispone de tres series de ciclos:<br />
A - ciclos operativos<br />
B - ciclos operativos – ciclos nocturnos<br />
C - ciclos de testes<br />
9.2 Ciclos operativos<br />
Todos los ciclos operativos disponen de un sistema de vacío fraccionado y por lo tanto<br />
pueden esterilizar materiales huecos, porosos, sólidos, libres o envasados.<br />
Las temperaturas seleccionables son 121°C – 134°C.<br />
Normalmente los ciclos de 121°C, son utilizados para term oplásticos o materiales<br />
sensibles mientras que los ciclos de 134°C, se utilizan par a todos los demás materiales.<br />
Seguir siempre las instrucciones proporcionadas por los productores de los instrumentos<br />
o de los dispositivos esterilizados.<br />
Habrá además 2 ciclos especiales:<br />
- Ciclo Prión, estudiado para la enfermedad de Creutzfeldt-Jacobs (vaca loca)<br />
- Ciclo Flash creado para el esterilizado rápido de instrumentos o dispositivos no<br />
empaquetados.<br />
9.3 Ciclos nocturnos<br />
El autoclave, posee un dispositivo especial para el ahorro.<br />
Ese dispositivo permitirá realizar ciclos de esterilizado durante la ausencia de los<br />
operadores.<br />
Al completarse el ciclo, no abriéndose la tapa, el autoclave se estabilizará para entonces<br />
apagarse automáticamente dejando encendido sólo el interruptor general (FIG.2 pos..19.).<br />
Con la llegada de los operarios, será suficiente oprimir uno de los botones para accionar<br />
nuevamente el autoclave y leer el resultado del ciclo en el display.<br />
Además de lo anterior la impresora habrá imprimido regularmente el informe<br />
correspondiente al ciclo realizado.<br />
25
ESPANOL<br />
TABLA ESTERILIZACIÓN<br />
CICLI<br />
121°C no<br />
envasado<br />
121°C<br />
envasado<br />
134°C<br />
Flash<br />
134°C no<br />
envasado<br />
134°C<br />
envasado<br />
TIEMPO<br />
TIEMPO<br />
SECADO<br />
EXP<br />
T5 (Minuti)<br />
T4<br />
(Minuti) 18L <strong>24</strong>L<br />
18 6 12<br />
18 17 13<br />
4 2 4<br />
5 6 12<br />
5 17 13<br />
134°C Prion 20 17 13<br />
RANGO DE<br />
PRESIÓN<br />
DE TRABAJO<br />
( bar relativos )<br />
RANGO DE<br />
TEMPERATURA<br />
DE TRABAJO<br />
( °C )<br />
1.04 ÷ 1.30 121 ÷ 125<br />
2.02 ÷ 2.38 134 ÷ 138<br />
Los intervalos de precalentamiento y de fracción de vacío pueden variar en función de las<br />
condiciones del autoclave de 25 – 30 minutos a los que se añdirán los intervalos de los<br />
ciclos proporcionados en la tabla.<br />
Los ciclos de esterilización se desarrollan en tres fases de vacío.<br />
9.4 Cicli test<br />
- Helix test este teste sirve para verificar la capacidad de penetración del vapor en un<br />
cuerpo hueco.<br />
Coloca en la celda de esterilización, sobre el tray central, el sistema Helix test completo<br />
con indicador, en ausencia de carga. Consulta las instrucciones del fabricante inherentes<br />
la carga del indicador.<br />
Realiza el ciclo de prueba específico y al completarse el test, extrae el sistema y controla<br />
el indicador.<br />
En caso de resultado negativo contacta con un técnico autorizado.<br />
- Bowie y dick test éste sirve para verificar la capacidad de penetración del vapor en una<br />
carga porosa. Coloca el test Bowie-Dick sin carga en la celda de esterilización, en el tray<br />
central.<br />
Realiza el ciclo de prueba específico y al completarse el teste, extrae el paquete y ábrelo<br />
para controlar el resultado evaluando la ficha “test” aplicada en el centro. En caso de<br />
resultado negativo contacta con un técnico autorizado.<br />
- Vacuum test sirve para verificar la capacidad de mantenimiento del vacío del autoclave,<br />
el informe del teste será impreso por la impresora del autoclave. La prueba debe<br />
realizarse con máquina fría. No debe introducirse ningún tipo de carga en la autoclave.<br />
Terminado el teste, controla el resultado evaluando el cupón emitido por la impresora<br />
conectada a la autoclave. En caso de resultado negativo contacta con un técnico<br />
autorizado.<br />
Utiliza preferentemente los testes distribuidos por el fabricante.<br />
26
ESPANOL<br />
134°C Helix/<br />
Bowie&Dick<br />
TIEMPO<br />
ESTERILIZ.<br />
T4<br />
( Minutos)<br />
TABLA CICLOS TEST<br />
TIEMPO<br />
SECADO<br />
T5<br />
(Minutos)<br />
PRESIÓN DE<br />
TRABAJO<br />
( bares relativos)<br />
RANGO DE<br />
TEMPERATURA<br />
DE TRABAJO<br />
( °C )<br />
3.5 4 2.02 ÷ 2.38 134 ÷ 138<br />
Vacuum -0.9<br />
FIG.<strong>24</strong><br />
T1,T2,T3 = precalentamiento / fracción de vacío<br />
T4= esterilización<br />
T5= secado<br />
27
ESPANOL<br />
10 MENSAJES DE ERROR O ALARMAS<br />
Los mensajes de error estarán destacados por un código alfanumérico compuesto de una<br />
letra y de 3 cifras.<br />
El sufijo “E” está realcionado con errores del operador que el mismo operador puede<br />
restablecer.<br />
El sufijo “A” está relacionado con alarmas, anomalías del autoclave; si el problema<br />
persiste tras la reparación debe contactarse con la asistencia telefónica.<br />
Al visualizarse un mensaje de alarma (sufijo "A") el ciclo debe<br />
considerarse SIN éxito: deben repetirse todas las operaciones de<br />
preparación y de esterilización.<br />
Para restablecer alarmas y errores deben mantenerse pulsados simultáneamente los<br />
botones que a continuación destacamos hasta la intervención de la señal acústica:<br />
B-DOOR + B-PUMP + B-SELECT<br />
10.1 Listado de mensajes de error-alarmas<br />
ERRORE CAUSA RIMEDIO<br />
E 200 Nivel Bajo de agua Llenar el depósito<br />
E 250<br />
Nivel bajo de agua limpia con llenado por<br />
desmineralizador<br />
Llenar el depósito<br />
E 300 Nivel máximo de agua usada Vaciar el depósito<br />
E 401 Tapa abierta Cerrar con atención la tapa<br />
E 451 Tapa no bloqueada Abrir la tapa y cerrarla<br />
E 461<br />
Alta temperatura en cámara para Vacuum test<br />
(mas que 40°C)<br />
Apagar y aguardar 10 min.<br />
A 250 Inicio ciclo sin agua<br />
Controlar el dispositivo<br />
desmineraliz.<br />
A 001 Ciclo interrumpido Reiniciar y accionar el ciclo<br />
A 011 Anomalía pc display<br />
Apagar y volver a accionar el<br />
autoclave<br />
A 101 Vacío no alcanzado en 10 min. Reiniciar y repetir el ciclo<br />
A 111 Vacío no mantenido en primera fase VT Reiniciar y repetir el ciclo<br />
A 121 Vacío no mantenido en segunda fase VT Reiniciar y repetir el ciclo<br />
A 401<br />
Tapa abierta durante el ciclo o problema de<br />
cierre<br />
Controlar sistema de cierre<br />
A 501 Presión no mantenida Reiniciar y repetir el ciclo<br />
A 551 Anomalía 1° sensor temperatura Reiniciar y repetir el ciclo<br />
A 552 Anomalía 2° sensor temperatura Reiniciar y repetir el ciclo<br />
A 641 Superpresión Reiniciar y repetir el ciclo<br />
A 651 Sobretemperatura Reiniciar y repetir el ciclo<br />
A 661 Anomalías comparación temperaturas Reiniciar y repetir el ciclo<br />
A 701 Presión de trabajo no alcanzada Reiniciar y repetir el ciclo<br />
A 751 Baja temperatura Reiniciar y repetir el ciclo<br />
28
ESPANOL<br />
A 761 Anomalía en sensor de presió Reiniciar y repetir el ciclo<br />
A 801 Anomalía descarga presión Reiniciar y repetir el ciclo<br />
A 901<br />
Consultar la empresa de<br />
Tensión principal muy baja<br />
suministro de Energía<br />
Pérdida momentánea de alimentación eléctrica<br />
eléctrica<br />
REEMPLAZAR LAS RESINAS Resinas<br />
de IONIC SYSTEM agotado<br />
REEMPLAZAR EL FILTRO Filtro de<br />
OSMOSI SYSTEM agotado<br />
Seguir las instrucciones en elapartado 14.3<br />
Seguir las instrucciones en elapartado 14.3<br />
del manual<br />
D Tapa impresora no cerrada Abrir y cerrar la tapa de la impresora<br />
P Falta papel en impresora Introducir el papel<br />
Baja tensión en la línea de Intentar conectar la máquina a la red eléctrica en otro<br />
Lo<br />
alimentación<br />
punto; si el problema persiste contactar con electricista<br />
IMPORTANTE<br />
Si el problema persiste aunque se haya aplicado la solución correspondiente diríjanse a la<br />
asistencia telefónica de: MEDILINE ITALIA srl +39 0522 – 94 29 97<br />
29
ESPANOL<br />
11 MANTENIMIENTO Y PREVENCIÓN<br />
El correcto mantenimiento del autoclave garantizará su buen funcionamiento y el ahorro<br />
seguro de tiempo y costes debidos a asistencia y mantenimiento.<br />
11.1 Sustitución del filtro bacteriológico<br />
Sustituir el filtro bacteriológico (FIG.2 pos. .11.), máximo a cada 200 ciclos ó cuando éste<br />
muestre un color oscuro.<br />
Gira el filtro a izquierdas para desenroscarlo (FIG.25) y a derechas para enroscarlo<br />
(FIG.26)<br />
Utilizar exclusivamente filtros originales<br />
FIG.25<br />
FIG.26<br />
11.2 Limpieza de la cámara<br />
Limpia periódicamente la celda y el filtro eliminando posibles depósitos o detritos para<br />
evitar así, introducir en el circuito de desagüe, materiales que puedan crear obstrucciones.<br />
Para realizar correctamente la limpieza utiliza únicamente agua y la esponja suministrada<br />
(FIG.13).<br />
El filtro encaja en su alojamiento por fricción y, para preservar su, integridad es necesaria<br />
cautela al extraerlo durante las fases de limpieza (FIG.27).<br />
Completada la limpieza, repón el filtro en su asiento (FIG.28) dejándolo sobresalir de<br />
aproximadamente 15 mm para que pueda realizar una acción de filtrado ideal (FIG.29).<br />
FIG.27 FIG.28 FIG.29<br />
Nunca utilizar solventes, detergentes, soluciones químicas desincrustantes u otros<br />
productos similares.<br />
30
ESPANOL<br />
11.3 Limpieza de la junta de la tapa<br />
Deberán eliminarse periódicamente los resíduos que se acumulan en la circunferencia de<br />
la junta usando para ello agua y la esponja en dotación (cara no abrasiva) (FIG.13), ó un<br />
paño húmedo.<br />
11.4 Regulación de la tapa<br />
Para regular la presión de cierre de la puerta debe actuarse con el regulador de la puerta<br />
utilizando la llave de doble función (extracción de la bandeja + llave) en dotación.<br />
Girar a izquierdas (FIG.30 pos. .A. ), para aumentar la presión de cierre.<br />
Girar a derechas (FIG.30 pos. .B. ) para reducir la presión de cierre.<br />
.A.<br />
.B.<br />
FIG.30<br />
31
ESPANOL<br />
11.5 Sustitución del Papel de la Impresora<br />
Rodillo de papel termográfico con 57 mm de ancho. El papel termográfico debe ser<br />
utilizado solo por un lado.<br />
Levantar la tapa de la impresora empujando el botón (FIG.31 pos..A.) introducir el rodillo<br />
de papel atentos al sentido de rotación, tirar del papel hasta que salga y cerrar la tapa<br />
(FIG.31pos..B.); la impresora estará así lista para imprimir .<br />
.A.<br />
.B.<br />
FIG.31<br />
11.6 Condiciòn de la impresora<br />
Si la tapa de la impresora no está perfectamente cerrada aparecerá en el display la letra<br />
“D”.<br />
Abrir y cerrar la tapa de la impresora.<br />
Se manca la carta, sul display compare la lettera “P”.<br />
Aprire il portello, inserire la carta e richiudere il portello.<br />
32
ESPANOL<br />
12 PROGRAMACIÓN DE PARÁMETROS DISPLAY<br />
Consulta la FIG.2.<br />
12.1 Selección Idioma<br />
Pulsar B-START y simultáneamente el interruptor MAINS. Mantener pulsado B-START<br />
hasta que aparezca en el display el nombre del idioma requerido.<br />
Pulsando B-SELECT se modificará el idiomai [avance].<br />
Pulsando B-PUMP se modificará el idoma [atrás].<br />
12.2 Selección Hora<br />
Pulsando B-START aparece la hora.<br />
Pulsando B-SELECT modificase la hora [hacia adelante].<br />
Pulsando B-PUMP modificase la hora [hacia atrás].<br />
12.3 Selección Minutos<br />
Pulsando B-DOOR aparecen los minutos.<br />
Pulsando B-SELECT modificanse los minutos [hacia adelante].<br />
Pulsando B-PUMP modificanse los minutos [hacia atrás].<br />
12.4 Selección Segundos<br />
Pulsando B-DOOR aparecen los segundos. No modificables.<br />
12.5 Selección Fecha<br />
Pulsando B-START aparecen los días (destello).<br />
Pulsando B-SELECT<br />
Pulsando B-PUMP<br />
modificanse los días [hacia adelante].<br />
modificanse los días [hacia atrás].<br />
12.6 Selección Mes<br />
Pulsando B-DOOR aparecen los meses (destello).<br />
Pulsando B-SELECT<br />
modificanse los meses [hacia adelante].<br />
Pulsando B-PUMP<br />
modificanse los meses [hacia atrás].<br />
33
ESPANOL<br />
12.7 Selección Año<br />
Pulsando B-DOOR aparece el año.<br />
Pulsando B-SELECT modificase el año [hacia adelante].<br />
Pulsando B-PUMP modificase el año [hacia atrás].<br />
12.8 Visualización Presión Atmosférica<br />
Pulsando B-START aparece la presión atmosférica almacenada.<br />
NO MODIFICABLE !<br />
12.9 Selección Carga Agua<br />
Pulsando B-START aparece la programación del llenado del agua:<br />
-CARGA CON BOMBA<br />
-IONIC SYSTEM<br />
-OSMOSI SYSTEM<br />
Pulsando B-SELECT se modificase la impostaciòn.<br />
Pulsar B-SELECT mantenerlo oprimido hasta oirse un “beep”.<br />
Pulsar B-START y mantenerlo oprimido hasta oirse el “beep”.<br />
Los datos programados será almacenados. Apagar el autoclave por el interruptor MAINS.<br />
34
13 SOLUCIÓN DE PROBLEMAS OPERATIVOS<br />
ESPANOL<br />
En muchos casos, algunas de las alarmas o de los errores estarán originados por la<br />
desatención o el desconocimiento de algunos apsectos técnicos y operativos. A<br />
continuación relataremos algunos de los casos de anomalías con respectivas soluciones.<br />
13.1 El autoclave no efectua correctamente el secado<br />
a - SUSTITUIR EL FILTRO BACTERIOLÓGICO con uno original de TECNO GAZ<br />
b - NO FUERON UTILIZADAS BANDEJAS ORIGINALES sino bandejas distintas sin<br />
perforaciones o con perforación distinta. Utilizar exclusivamente bandejas<br />
originales posiblemente en aluminio. Solicitar bandejas adicionales originales.<br />
c - LOS INSTRUMENTOS NO FUERON ACOMODADOS CORRECTAMENTE,<br />
distribuir los instrumentos o los materiales envasados con la cara de papel hacia<br />
arriba. Nunca sobreponer los instrumentos y materiales sino repartirlos<br />
paralelamente. Nunca colocar instrumentos o materiales a contacto con la cámara<br />
pues pueden quemarse o deformarse<br />
13.2 La cámara del autoclave cambia a color blanco<br />
a - CAMBIAR INMEDIATAMENTE EL TIPO DE AGUA UTILIZADA, utilizar agua<br />
desmineralizada o destilada conforme especificado en los capítulos anteriores y<br />
limpiar la cámara.<br />
b - EL COLOR BLANCO PUEDE ser consecuencia de la evaporación de materiales orgánicos<br />
presentes en los instrumentos. Someter los instrumentos a una acción de detersión más<br />
idónea y profunda.<br />
c - Comprobar al grupo de demineralización del agua instalado (IONIC SYSTEM<br />
OSMOSI SYSTEM)<br />
13.3 La cámara del autoclave presenta manchas verdes-azuladas<br />
a - NO HUBO UN LAVADO CORRECTO DE LOS INSTRUMENTOS tras la fase de<br />
detersión, aclarar con más cuidado y escrupulosamente los instrumentos. Si las<br />
manchas son evidentes buscar asistencia técnica telefónica.<br />
13.4 El ciclo de esterilización se interrumpe sin motivo aparente<br />
a - CONTROLAR SI EL AUTOCLAVE ESTÁ CONECTADA a la red eléctrica con<br />
extensiones, reducciones, adaptadores y de ser así eliminar tales accesorios y<br />
conectar el autoclave directamente a la toma de la red eléctrica.<br />
35
ESPANOL<br />
13.5 El autoclave no recibe los mandos<br />
a - EL AUTOCLAVE ESTÁ RESPONDIENDO A LA ALINEACIÓN BÁRICA<br />
AUTOMÁTICA, aguardar la doble señal acústica tras la apertura de la tapa para<br />
entonces parametrizar las funciones.<br />
b - EL DEPÓSITO DE AGUA PURA está vacío, el led de nivel minimo está encendido<br />
abastecer con agua pura.<br />
c - EL DEPÓSITO DE AGUA USADA ESTÁ LLENO, el led de nivel máximo está<br />
encendido, drenar el agua usada.<br />
13.6 La impresora del autoclave no imprime<br />
a - LA TAPA DEL PORTACILINDRO NO ESTÁ CERRADA CORRECTAMENTE, en el<br />
display aparece la letra “D”. Abrir y cerrar la tapa de la impresora comprobando su<br />
correcto cierre.<br />
b - FALTA EL PAPEL, aparece en el display la letra “P”. Abrir la tapa e introducir el<br />
rollo de papel termográfico.<br />
c - EL CILINDRO DE PAPEL ESTÁ MONTADO CON LA CARA TÉRMICA HACIA DENTRO,<br />
abrir la tapa y colocar el cilindro en la posición correcta<br />
13.7 Manchas en los instrumentos<br />
a - LOS INSTRUMENTOS PASAN AL COLOR AMARILLO, resíduos de líquido<br />
químico que con el calor se fijan en los instrumentos. No fueron adecuadamente<br />
aclarados.<br />
b - LA CÁMARA DE ESTERILIZACIÓN PRESENTA MANCHAS AMARILLAS, ha sido<br />
puesto en la cámara un instrumental con líquido químico que cayendo pudo fijarse<br />
gracias al calor. No fue efectuado el aclarado adecuado.<br />
c - LOS INSTRUMENTOS MUESTRAN MANCHAS BLANCAS, el aclarado fue<br />
realizado con agua demasiadamente calcárea y los instrumentos no se secaron. Para<br />
el último aclarado es aconsejable utilizar agua desmineralizada además de secar<br />
perfectamente los instrumentos.<br />
d - LOS INSTRUMENTOS SE OSCURECIERON, y ello se debe a la fuerte presencia<br />
de carbono en su interior.<br />
36
ESPANOL<br />
14 DESMINERALIZADOR<br />
14.1 Impostaciòn del sistema de demineralizaciòn<br />
El autoclave está apta también para el abastecimiento de agua desmineralizada atraves<br />
de los sistemas de cargo automatico SISTEMA IONICO o SISTEMA OSMOSIS.<br />
Estos sistemas son accesorios de los autoclaves TECNO-GAZ S.p.A. (no en dotación).<br />
Ese producto se utiliza para eliminar las sales minerales del agua procedente de la red<br />
hídrica para alimentar el autoclave.<br />
Es necesario programar el autoclave para cargar el agua con los sistemas IONICO o<br />
OSMOSIS, segun las indicaciones puestas a bajo:<br />
Accionar el autoclave pulsando el interruptor general (verde) y mantener pulsado B-<br />
START hasta que aparezca el mensaje que indique el idioma elegido.<br />
Pulsar y dejar B-START para seleccionar la pantalla sucesiva hasta que aparezca:<br />
-CARGA CON BOMBA<br />
-IONIC SYSTEM<br />
-OSMOSI SYSTEM<br />
Para cambiar la programación usar B-SELECT<br />
Para almacenar el programa debe pulsarse B-DOOR y mantenerlo oprimido hasta oirse<br />
la señal acústica “BEEP”<br />
Para salir debe pulsarse B-START y mantenerlo oprimido hasta oirse la señal acústica<br />
“BEEP”<br />
ATENCIÒN<br />
Il numero puesto a bajo de la tipologia de cargamiento esplica cuantos ciclos se pueden<br />
mas o menos hacer con el filtre o con las resinas.<br />
Se conseja de hacer el reset de este numero cuando se cambia el filtro o las resinas<br />
despues de haber guardado la tipologia de cargamiento en uso.<br />
Para hacer el reset al maximo valor de esta informaciòn es necesario mantener pulsada<br />
B-PUMP hasta el señal acústica en la panoramica de espera empi<strong>evo</strong> ciclo<br />
37
ESPANOL<br />
FIG.32<br />
38
ESPANOL<br />
14.2 Conexion de los sistema de desmineralization<br />
Desconectar el autoclave oprimiendo el interrptor General (MAINS) (FIG.2 pos.19) que se<br />
encuentra a la derecha del autoclave. El operador despues de las impostaciones del<br />
autoclave tiene que instalar el sistema de desmineralizaciòn segun las indicaciònes<br />
escriptas en el manual de usuario del desmineralizador.<br />
Aqui ponemos el particolar de la conexion del autoclave con el conduco de alimentaciòn<br />
del agua y de la conexion al enchufe:<br />
1. Apagar el autoclave si está encendida;<br />
2. Cerrar el grifo aguas arriba del sistema de desmineralización<br />
3. Instalar el desmineralizador conforme indicado en el manual del desmineralizador;<br />
4. Envolver el roscado macho del racorportatubo con teflon u otro componente que<br />
garantice la estanqueidad contra el agua;<br />
5. Enroscar el racor-portatubo en el filete hembra del desagüe del agua Limpia FIG.1<br />
pos. .2. ;<br />
6. Introducir el tubo que sale de desmineralizador en el racor-portatubo recién<br />
acoplado al autoclave;<br />
7. Introducir el enchufe del desmineralizador en la toma FIG.1 pos. .7. por detrás del<br />
autoclave;<br />
8. Abrir el grifo aguas arriba del sistema de desmineralización;<br />
9. Controlar si hay fugas de agua;<br />
10. Accionar el autoclave;<br />
11. Efectuar uno o más ciclos de esterilización para controlar el funcionamiento de la<br />
conexión realizada y controlar principalmente las fugas<br />
AL FINAL DEL DÍA CERRAR SIEMPRE EL GRIFO AGUAS ARRIBA DEL<br />
SISTEMA DE DESMINERALIZACIÓN PARA EVITAR INUNDACIONES<br />
CONECTAR LOS SISTEMAS DE DESMINERALIZACIÒN SOLO CON<br />
AUTOCLAVES TECNO-GAZ PREDISPUESTAS.<br />
SI AL INICIAR EL CICLO EL AUTOCLAVE ENTRA EN E250 SIGNIFCA QUE FUE<br />
ACCIONADO EL CICLO CON UN NIVEL DE AGUA LIMPIA BAJO Y POR LO<br />
TANTO DEBERÁ EFECTUARSE EL LLENADO DEL DEPÓSITO CON AGUA<br />
LIMPIA<br />
NOTA: PARA LA CONEXIÓN LOS SISTEMAS DE DESMINERALIZACIÒN A<br />
AUTOCLAVES TECNO-GAZ, CONSULTE LO INDICADO EN EL MANUAL DE<br />
DESMINERALIZADOR.<br />
14.3 Cambio cartucho resina – filtre<br />
El autoclave pone en el display el esaurimento de las resinas o del filtre con el mesate<br />
“substituciòn resinas” o “substituciòn filtres”.<br />
Sustituir el cartucho de resina conforme lo indicado en el manual de desmineralizador;<br />
Terminada la sustitución debe pulsarse el botón B-PUMP hasta la intervención de la<br />
señal acústica para entoces reiniciar el autoclave.<br />
39
ESPANOL<br />
15 PROCEDIMIENTOS ESTANDAR DE ESTERILIZACIÓN<br />
Esterilizar significa adoptar protocolos operativos específicos y aplicar un sistema.<br />
El autoclave es el eslabón final de ese sistema.<br />
El que no efectúe todas las fases del sistema de esterilización perjudicará el resultado<br />
final.<br />
TECNO-GAZ SpA, produce todos los dispositivos para todas las fases del ciclo de<br />
esterilización.<br />
Se requiere por lo tanto:<br />
1 - Predisponer un protocolo operativo por escrito preciso y distribuirlo entre todos los<br />
operadores y encargados de la esterilización.<br />
TECNO GAZ SPA puede suministrar tales protocolos personalizados.<br />
2 - Seguir escrupulosa y atentamente todas las fases del ciclo de esterilización:<br />
DESINFECCIÓN fase compulsoria que es obligatorio para salvaguardar<br />
la seguridad de los operadores que debe actuarse por sumersión en líquidos<br />
químicos o por termodesinfección;<br />
DETERSIÓN la fase más que garantiza la eliminación de todos los tipos de<br />
resíduos químicos y orgánicos. El instrumento más idóneo son las cubetas de<br />
ultrasonidos;<br />
SECADO fase indispensable, que evita corrosión de los instrumentos e<br />
interferencias en el ciclo de esterilización;<br />
ENVASADO fase indispensable para mantener estériles los instrumentos<br />
tratados.<br />
ESTERILIZACIÓN fase final esterilización por vapor.<br />
40
ESPANOL<br />
16<br />
INSTRUCCIONES PARA LA EXPEDICIÓN DEL<br />
AUTOCLAVE<br />
Cuando haya la necesidad de expedirse el autoclave para reparaciones, control, rearme,<br />
revisión, validación, sigan obligatoriamente las instrucciones a continuación:<br />
1- Utilizar el embalaje original, si ese embalaje ya no se encuentra en las manos<br />
del cliente, deberá utilizarse un embalaje adecuado. La mercancía viaja por riesgo<br />
y cargo del remitente.<br />
2- Expedir sólo el autoclave, reteniendo bandejas y portabandejas.<br />
3-Limpiar esmeradamente la cámara de esterilización y el autoclave completa<br />
antes de expedirlas La llegada de un autoclave sucio o con resíduos determinará<br />
su rechazo sin reparaciones ó una acción de limpieza y desinfección.<br />
4- Siempre drenar el depósito de agua limpia por el racor que se encuentra por de<br />
trás del autoclave (FIG.2 pos.2)<br />
5- Siempre debe drenarse el depósito de agua usada por el racor que se encuentra<br />
por detrás del autoclave (FIG.2 pos.5)<br />
6- Indicar por escrito e incluir en el embalaje, un documento en que se indique<br />
precisamente la anomalía detectada o el servicio que se requiere.<br />
7- Expedir siempre puerto franco de lo contrario serán adeudados los gastos de<br />
transporte.<br />
ATENCIÓN<br />
Todos los embalajes no originales que nos envíen serán eliminados.<br />
Los autoclaves les serán devueltos con embalajes nu<strong>evo</strong>s y originales ello para garantizar<br />
la máxima protección del autoclave durante el transporte.<br />
El embalaje les será adeudado.<br />
41
ESPANOL<br />
17 PROCEDIMIENTOS PARA EL SERVICIO Y ASISTENCIA<br />
Reparaciones – Revisiones – Asistencias - Validaciones<br />
Creemos muy importante informarles de cuales son los procedimientos adoptados por<br />
nuestra oficina de reparaciones.<br />
La oficina de reparaciones es una entidad autónoma de MEDILINE ITALIA SRL (TECNO-<br />
GAZ GROUP), que posee una estructura articulada y profisional. Serán aplicados los<br />
procedimientos ya relatados en nuestro manual de calidad.<br />
1 - Llegando a la MEDILINE ITALIA SRL, el autoclave pasa directamente a la oficina de<br />
reparaciones que aplicará un código al aparato creando una ficha de asistencia técnica.<br />
2 - Dentro de un plazo máximo de 48 horas, el aparato será sometido a inspección por los<br />
técnicos y se redactará el diagnóstico técnico con presupuesto de gastos por el servicio<br />
requerido. En caso de no d<strong>evo</strong>lución del autoclave conforme lo requerido en el capítulo<br />
INSTRUCCIONES PARA LA EXPEDICIÓN, los plazos indicados pueden aumentar<br />
considerablemente.<br />
3 - El presupuesto de gastos será enviado al cliente distribuidor que lo transmitirá al<br />
cliente final para información y suscripción.<br />
4 - Después que MEDILINE ITALIA SRL habrá recibido el presupuesto suscrito por<br />
aceptación el autoclave será sometido a reparación y devuelto en los plazos conforme lo<br />
indicado en el módulo del presumpuesto.<br />
5- La mercancía será enviada con embalaje original por medio del transportador del<br />
clinete.<br />
42
ESPANOL<br />
18 GARANTÍA<br />
1) DURACIÓN: el producto está amparado por un período de garantía de 12 (doce)<br />
meses.<br />
2) EXCLUSIÓN: no están incluidos en la garantía:<br />
a) las averías causadas por la carencia de mantenimiento ordinario debido a la<br />
negligencia del usuario o a un uso inadecuado del producto;<br />
b) controles periódicos y mantenimiento;<br />
c) reparaciones o sustitución de las piezas sujetas a desgaste, frágiles o de<br />
duración imprevisible, salvo que se haya probado, en el momento de su<br />
entrega, que presentan defectos;<br />
d) averías relativas a mano de obra; viaje del personal técnico y transporte;<br />
e) averías o daños producidos por un uso inadecuado o por errores en la<br />
utilización;<br />
f) averías o daños producidos por impurezas en los sistemas de alimentación del<br />
agua y del aire, accidentes químicos o eléctricos extraordinarios;<br />
g) averías o daños causados por la utilización de detergentes, substancias o<br />
procesos de esterilización que no estén indicados expresamente en el manual<br />
de uso y mantenimiento;<br />
h) cambio de color natural de las piezas de plástico.<br />
3) INFORME DE INSTALACIÓN Y ENSAYO: una condición esencial para acceder a la<br />
garantía es la d<strong>evo</strong>lución del informe de instalación y ensayo, correctamente<br />
cumplimentado y firmado por el Usuario y por el Técnico Instalador. El informe deberá<br />
d<strong>evo</strong>lverse antes de transcurridos 15 días a partir de la instalación, pudiéndose incurrir en<br />
la caducidad de la garantía.<br />
4) LÍMITES: la garantía da derecho a la sustitución o reparación gratis de los<br />
componentes defectuosos. Queda excluido el derecho a la sustitución de todo el aparato.<br />
En lo referente a los componentes aplicados o integrados con productos con marca<br />
TECNO-GAZ, o de terceros, y acompañados por su certificado de garantía, son válidas<br />
las condiciones, límites y exclusiones indicadas en tales certificados.<br />
Las reparaciones llevadas a cabo durante el período de garantía no modifican la fecha de<br />
vencimiento de la garantía.<br />
5) RECLAMACIONES: en el caso de reclamación del Comprador sobre la aplicación de la<br />
Garantía, sobre la calidad o sobre las condiciones del equipo entregado, el Comprador no<br />
tendrá la facultad de suspender ni retrasar los pagos, por ningún motivo.<br />
6) CONTROVERSIAS: en caso de controversia sobre la aplicación e interpretación del<br />
presente Certificado de Garantía, será competente el Tribunal de PARMA (Italia),<br />
dondequiera que haya sido estipulado el contrato de compra del aparato.<br />
7) EXCEPCIONES: cualquiera excepción especial, concedida con relación a las presentes<br />
normas de garantía, no implica el reconocimiento de ningún derecho al Comprador, y se<br />
considerará concedida exclusivamente con relación al caso específico.<br />
8) OTROS: Todo aquello que no esté expresamente previsto en este Certificado de<br />
Garantía estarán regido por las normas contenidas en el Código Civil y en las leyes en<br />
materia de la República Italiana.<br />
43
ESPANOL<br />
La garantía caduca si:<br />
a) el equipo presenta averías provocadas por caídas, exposición al fuego, vertido de<br />
líquidos, rayos, calamidades naturales, eventos atmosféricos, u otras causas no<br />
imputables a defectos de fabricación;<br />
b) la instalación no es conforme a las instrucciones de TECNO-GAZ y si fue llevada a<br />
cabo por personal no autorizado;<br />
c) el equipo es reparado, modificado o, en algún modo, alterado por el Comprador o por<br />
terceros no autorizados;<br />
d) al pedir el servicio bajo garantía faltara el número de matrícula del aparato, o si<br />
estuviera cancelado, falsificado, etc.;<br />
e) no se devuelve el informe de instalación y ensayo cumplimentado y firmado antes de<br />
transcurridos 15 días a partir de la instalación;<br />
f) el Comprador suspende o retrasa, por cualquier motivo, el pago de cualquier suma<br />
debida con relación a la compra o al mantenimiento del equipo;<br />
g) no se respeta el mantenimiento periódico programado u otra disposición prevista en el<br />
manual de uso y mantenimiento<br />
44
DEUTCH<br />
Lieber Kunde,<br />
Vielen Dank für die Wahl unseres Autoklaven. Wir werden uns mit großer Aufmerksamkeit<br />
und einem sicherlich Ihren Ansprüchen entsprechenden Kundendienst dieses Vertrauens<br />
würdig erweisen.<br />
Der von Ihnen gewählte Autoklav ist der maximale Ausdruck in Sachen angewandter<br />
Technologie. Autoklaven garantiert Ihnen die sichere Sterilisierung aller Arten Instrumente<br />
und Materialien: Festkörper, Hohlkörper, poröses Material, loses Material und verpackte<br />
Körper.<br />
Wir bitten Sie die Bedienungsanleitung vor Gebrauch des Autoklaven aufmerksam zu<br />
lesen und diese an einem für alle - mit der Sterilisierung beauftragten - Bediener<br />
zugänglichen Ort aufzubewahren.<br />
Der Autoklav darf nur für den vom Hersteller vorgesehenen Einsatz verwendet werden.<br />
Für Installationsarbeiten, die Instandhaltung und den Service wenden Sie sich<br />
ausschließlich an von der Firma TECNO-GAZ/MEDILINE ITALIA autorisierte Techniker.<br />
Bitte verwenden und bestellen Sie nur Original-Ersatzteile der TECNO-GAZ<br />
1
DEUTCH<br />
1. DAS HANDBUCH KONSULTIEREN<br />
INHALT<br />
1.1 GLOSSAR<br />
1.2 SYMBOLE<br />
1.3 ABBILDUNGEN MIT POSITIONSBESCHREIBUNG<br />
2. SICHERHEIT<br />
2.1 SICHERHEITSKENNZEICHNUNG<br />
2.2 SCHUTZEINRICHTUNGEN<br />
2.3 ANMERKUNGEN ZUR SICHERHEIT<br />
2.4 ENTSORGUNG<br />
3. ZWECKBESTIMMUNG DES AUTOKLAVEN<br />
4. TECHNISCHE DATEN<br />
4.1 MECHANISCHE DATEN<br />
4.2 ELEKTRISCHE DATEN<br />
4.3 KAMMER<br />
4.4 REINWASSERTANK<br />
4.5 SCHMUTZWASSERTANK<br />
4.6 BAKTERIOLOGISCHER FILTER<br />
5. MITGELIEFERTES ZUBEHÖR<br />
6. DEN AUTOKLAV AUSPACKEN<br />
7. INSTALLATION<br />
8. GEBRAUCHSANWEISUNGEN<br />
8.1 DEN AUTOKLAV EINSCHALTEN<br />
8.2 DEN REINWASSERTANK FÜLLEN<br />
8.3 DEN REINWASSERTANK MANUELL FÜLLEN<br />
8.4 EIGENSCHAFTEN DES ZU VERWENDENDEN WASSER<br />
8.5 DAS MATERIAL IN DEN AUTOKLAVEN GEBEN<br />
8.6 DEN STERILISIERZYKLUS STARTEN<br />
8.7 ZYKLUSENDE<br />
8.8 DAS STERILISIERTE MATERIAL HERAUSNEHMEN<br />
8.9 DAS SCHMUTZWASSER ABLASSEN<br />
8.10 EINEN STERILISIERZYKLUS UNTERBRECHEN<br />
9. STERILISIERZYKLUS<br />
9.1 BESCHREIBUNG DER ZYKLEN<br />
9.2 ARBEITSZYKLEN<br />
9.3 ARBEITSZYKLEN - NACHTZYKLEN<br />
2
DEUTCH<br />
9.4 TESTZYKLEN<br />
9.5 ZYKLUSDIAGRAMM<br />
10. FEHLER- UND STÖRUNGSMELDUNGEN<br />
10.1 LISTE DER FEHLER- UND STÖRUNGSMELDUNGEN<br />
11. INSTANDHALTUNG UND PRÄVENTION<br />
11.1 DEN BAKTERIOLOGISCHEN FILTER WECHSELN<br />
11.2 DIE KAMMER REINIGEN<br />
11.3 DIE TÜRDICHTUNG REINIGEN<br />
11.4 DIE TÜR EINSTELLEN<br />
11.5 DAS DRUCKERPAPIER WECHSELN<br />
11.6 DRUCKERSTATUS<br />
12. PROGRAMMIERUNG UND DISPLAY-PARAMETER<br />
12.1 DIE SPRACHE EINSTELLEN<br />
12.2 DIE UHRZEIT EINSTELLEN - STUNDE<br />
12.3 DIE UHRZEIT EINSTELLEN - MINUTEN<br />
12.4 DIE UHRZEIT EINSTELLEN - SEKUNDEN<br />
12.5 DAS DATUM EINSTELLEN - TAG<br />
12.6 DAS DATUM EINSTELEN - MONAT<br />
12.7 DAS DATUM EINSTELLEN - JAHR<br />
12.8 LUFTDRUCKANZEIGE<br />
12.9 ANWAHL WASSERZULAUF<br />
13. BEHEBUNG AUFTRETENDER PROBLEME<br />
13.1 DER AUTOKLAV TROCKNET NICHT ORDNUNGSGEMÄSS<br />
13.2 DIE KAMMER DES AUTOKLAVEN WIRD WEISS<br />
13.3 DIE KAMMER DES AUTOKLAVEN HAT GRÜNE FLECKEN<br />
13.4 DER STERILISIERZYKLUS WIRD ABGEBROCHEN<br />
13.5 DER AUTOKLAV EMPFÄNGT KEINE ARBEITSANWEISUNGEN<br />
13.6 DER DRUCKER DES AUTOKLAVEN DRUCKT NICHT<br />
13.7 FLECKEN AUF DEN INSTRUMENTEN<br />
14. WASSERAUFBEREITUNG<br />
14.1 EINSTELLUNG VON WASSERAUFBEREITUNG SYSTEME<br />
14.2 VERBINDUNG VON WASSERAUFBEREITUNGSYSTEME<br />
14.3 WECHSELN VON PATRONE UND FILTER<br />
15. STANDARDVORGÄNGE STERILISIERUNG<br />
16. ANWEISUNGEN FÜR DEN VERSAND DES AUTOKLAVEN<br />
17. SERVICE UND KUNDENDIENST<br />
18. GARANTIE<br />
3
DEUTCH<br />
01 DAS HANDUBUCH KONSULTIEREN<br />
1.1 Glossar<br />
VAKUUM<br />
KAMMER<br />
FILTER<br />
TABLETT<br />
TABLETTHALTER<br />
ENTSALZER<br />
HELIX TEST<br />
BOWIE - DICK TEST<br />
VAKUUMTEST<br />
BAKTERIOLOGISCHER<br />
FILTER<br />
ÜBERDRUCK<br />
ÜBERTEMPERATUR<br />
HARZE<br />
Druck, dessen Wert unter dem Luftdruck liegt<br />
Zylindrischer Körper aus Stahl in den die zu sterilisierenden<br />
Vorrichtung, die Partikel zurückhält<br />
Gestell, auf das das zu sterilisierende Material gelegt wird<br />
Halterung für die Tabletts in der Sterilisationskammer<br />
Vorrichtung für die Eliminierung der Mineralsalze im Netzwasser<br />
Test zur Überprüfung der Penetrationskapazität von Dampf in<br />
Test zur Überprüfung der Penetrationskapazität von Dampf in<br />
Test zur Überprüfung des Vakuumbeständigkeitsgrades in der<br />
Vorrichtung, Kammer die in der Luft schwebende Partikel mit einer Größe<br />
über 0,3 µm zurückhält.<br />
Druck, dessen Wert über dem Standarddruck des gewünschten<br />
Temperatur, deren Wert über dem Standardwert des<br />
austauschbarer Bestandteil (Kartusche) des Entsalzers, der alle<br />
anorganischen Salze eliminiert<br />
1.2 Symbole<br />
ACHTUNG: Hinweise, der zu befolgen ist, damit<br />
Sachbeschädigung ausgeschlossen und die ordnungsgemäße<br />
Ausführung des Zyklus gewährleistet ist.<br />
GEFAHR: Sicherheitshinweis, um Verletzungen zu verhindern<br />
GEFÄHRLICHE SPANNUNG<br />
VOR ABNAHME DES DECKELS STROMZUFUHR<br />
UNTERBRECHEN<br />
HOHE TEMPERATUR<br />
4
DEUTCH<br />
ERDUNG<br />
Im Sinne der RICHTLINIE 2002/96/EG zeigt dieses Symbol an,<br />
dass das Produkt am Ende seines Betriebslebens nicht mit dem<br />
Hausmüll entsorgt werden darf.<br />
Wechselstrom<br />
Achtung Hochspannung Stromschlaggefahr<br />
Sicherung<br />
Das Handbuch aufmerksam lesen<br />
Hergestellt am --.--.--<br />
Unverpacktes Material<br />
Verpacktes Material<br />
Höchststand entsalzenes Wasser<br />
Mindeststand entsalzenes Wasser<br />
pos.<br />
FIG.<br />
Ω<br />
s<br />
kW<br />
Hz<br />
mm<br />
A<br />
V<br />
Höchststand Brauchwasser<br />
Position (Nummer die dem Bauteil in den Abbildungen<br />
entspricht)<br />
Abbildung<br />
Ohm (Maßeinheit für den elektrischen Widerstand)<br />
Sekunden (Maßeinheit für die Zeit)<br />
kiloWatt (Maßeinheit für die Leistung)<br />
Hertz (Maßeinheit für die Frequenz)<br />
Millimeter (Maßeinheit für die Länge)<br />
Amperé (Maßeinheit für den elektrischen Strom)<br />
Volt (Maßeinheit für die elektrische Spannung)<br />
°C Grad Celsius (Maßeinheit für die Temperatur)<br />
kg<br />
Kilogramm (Maßeinheit für das Gewicht)<br />
5
DEUTCH<br />
1.3 Abbildungen mit positionsbeschreibung<br />
FIG.1<br />
Abstandsfuß<br />
Überlaufschutz Reinwasser<br />
Hahn für Reinwasserablauf – Anschluss Entsalzer<br />
Schutzventil<br />
Überlaufschutz Schmutzwasser– Kondenswasserablauf<br />
Hahn für Schmutzwasserablauf<br />
Hauptstromversorgung<br />
Buchse für Stromversorgung NUR ENTSALZER<br />
12A-Sicherung<br />
12A-Sicherung<br />
500mA-Sicherung<br />
6
DEUTCH<br />
FIG.2<br />
7
DEUTCH<br />
Bakteriologischer Filter<br />
Manueller Wassereinlauf<br />
Wassereinlauf<br />
Schmutzwasserablauf<br />
Display<br />
Drucker<br />
Anschluss RS232<br />
Stecker B-test (Inkubator) ( Absatz 2.3)<br />
Hauptschalter (MAINS)<br />
121°C Zyklus unverpackte Körper<br />
121°C Zyklus verpackte Körper<br />
134°C Zyklus unverpackte Körper<br />
134°-Zyklus verpackte Körper<br />
Prion-Zyklus<br />
134°-Zyklus Flash<br />
Vacuum Test<br />
Led Helix – B&D Test<br />
Wassermindeststand<br />
Wasserhöchststand<br />
Höchststand Brauchwasser<br />
EIN - AUS<br />
Wasser auffüllen<br />
Zyklusanwahl<br />
Türverriegelung öffnen<br />
8
DEUTCH<br />
02 SICHERHEIT<br />
2.1 Sicherheitskennzeichnung<br />
GEFÄHRLICHE SPANNUNG<br />
VOR ABNAHME DES DECKELS STROMZUFUHR<br />
UNTERBRECHEN<br />
HOHE TEMPERATUR<br />
ERDUNG<br />
2.2 Schutzeinrichtungen<br />
Folgenden Schutzeinrichtungen sind am Gerät installiert:<br />
-Schutzventil, geeicht auf 2.4 bar 0 + 10%<br />
-Elektromagnetische Sperre, verhindert das Öffnen der Tür während dem Zyklus<br />
-Sicherheitsthermostat<br />
2.3 Anmerkungen zur Sicherheit<br />
- Als Hersteller haftet die Firma Mediline Italia Srl gemäß der geltenden Richtlinie für das<br />
auf den Markt gebrachte Produkt.<br />
Die Verantwortbarkeit verfällt unverzüglich wenn nicht qualifiziertes Personal an der<br />
Maschine oder ihren Teilen Eingriffe vornimmt oder nicht originale Ersatzteile verwendet<br />
werden.<br />
- Der Raum in dem der Autoklav installiert wird darf keine potentielle Explosions- und/oder<br />
Brandgefahr aufweisen.<br />
- Der Autoklav darf nur in einem Raum installiert werden der den gesetzlichen Vorschriften<br />
entspricht.<br />
- Der Stecker des Inkubator (ABB.1 Pos..18.) darf nur für den Anschluss des B-TEST<br />
verwendet werden. Anschluss an 230 V AC unabhängig vom Hauptschalter (MAINS), den<br />
Stecker nicht mit nassen oder feuchten Händen anfassen und vor eventuellen<br />
Wasserspritzern schützen.<br />
.<br />
9
DEUTCH<br />
2.4 Entsorgung<br />
Dieses Produkt unterliegt der Richtlinie 2002/96/EG über Elektro- und Elektronik-Altgeräte<br />
(WEEE) des Europäischen Parlaments bzw. des EU-Ministerrats. Dieses Gerät ist in<br />
Ländern, die diese Richtlinie bereits als Gesetz verabschiedet haben, nicht vor dem 13.<br />
August 2005 im Handel erhältlich und sollte nicht im Rahmen des normalen Hausmülls<br />
entsorgt werden. Nutzen Sie bitte zur Entsorgung dieses Geräts die entsprechenden<br />
Rücknamesysteme in Ihrer Gemeinde und beachten Sie auch alle weiteren Vorschriften in<br />
diesem Kontext.<br />
03 ZWECKBESTIMMUNG DES AUTOKLAVEN<br />
Der Autoklav sterilisiert entsprechend der Norm EN13060 drei Materialtypen, im<br />
Einzelnen:<br />
EISENMATERIAL ODER<br />
FESTKÖRPER<br />
Instrumente ohne Hohlkörper und ohne Behinderungen für<br />
das Dampfeindringen<br />
PORÖSE KÖRPER Einfache Materialien oder Komposite, welche die<br />
Flüssigkeiten aufnehmen können (Stoffe, Kittel,<br />
Verbandstoffe, usw…)<br />
KÖRPER MIT<br />
HOHLKÖRPER<br />
Materialien oder Geräte mit Hohlkörpern, Behinderungen,<br />
usw…<br />
Diese werden in zwei Kategorien unterteilt und indikativ nach<br />
Länge und Durchmesser klassifiziert<br />
KATEGORIE B Kanülen, Leitungen oder Geräte mit großen<br />
Durchgängen<br />
KATEGORIE A Turbinen, Gerätegriffe und Geräte mit<br />
Blindöffnungen oder kleinen Öffnungen<br />
Der Autoklav darf nur für das Sterilisieren von Instrumenten und Materialien, die mit<br />
dem System der Dampfsterilisierung vereinbar sind, verwendet werden.<br />
Der Autoklav kann im Zahn- Arzt- und Kosmetiksbereich und im Allgemeinem in allen<br />
Instruments- und Materialsterilizationsbereichen eingesetzt werden:<br />
EUROPA B EVO EUROPA B EVO <strong>24</strong><br />
Eisenmaterial oder festkörper kg. 5,00 kg. 7,00<br />
Körper mit hohlkörper kg. 5,00 kg. 7,00<br />
Poröse Körper kg. 1,50 kg. 2,0<br />
* Gültig nur für Europäische Ländern<br />
Vergewissern Sie sich stets, dass die zu sterilisierende Ladung<br />
die Temperaturen des angewählten Zyklus verträgt.<br />
10
DEUTCH<br />
04 TECHNISCHE DATEN<br />
4.1 Mechanische Daten<br />
EUROPA B EVO EUROPA B EVO <strong>24</strong><br />
Betriebstemperatur<br />
+5°C ÷ +40°C<br />
Maximale Meereshöhe<br />
2.000 m<br />
Maximale relative Feuchte bei 30°C 80%<br />
Maximale relative Feuchte bei 40°C 50%<br />
Raumbedarf (L x H x P) 510 X 390 X 590 mm 510 X 390 X 730 mm<br />
Raumbedarf bei offener Tür<br />
300 mm<br />
Gewicht (serbatoi vuoti) 54 kg 58 kg<br />
Gewicht (serbatoi pieni) 63 kg 67 kg<br />
Gewicht für Auflagefläche 2058 N/m 2 2058 N/m 2<br />
Volumen 0.12 m 3 0.15 m 3<br />
Geräuschpegel<br />
< 70 db A<br />
4.2 Elektrische Daten<br />
EUROPA B EVO EUROPA B EVO <strong>24</strong><br />
Versorgungsspannung<br />
230 V a.c. +/-10 % single phase<br />
Leistung 1,7 kW 2.0 kW<br />
Frequenz<br />
50 / 60 Hz<br />
Speisekabel 2 + 1 x 1mm 2<br />
Sicherungen<br />
6.3 x 32 - 12 A<br />
übertragene Wärme<br />
3.6 E +6 J / ora<br />
4.3 Kammer<br />
EUROPA B EVO EUROPA B EVO <strong>24</strong><br />
Maximaler Arbeitsdruck<br />
2.4 bar (relativi)<br />
Maximales Vakuum<br />
- 0.9 bar (relativi)<br />
Höchsttemperatur 138 °C<br />
Material Inox AISI 304<br />
Abmessungen Ø <strong>24</strong>5 x 318 mm Ø <strong>24</strong>5 x 500 mm<br />
4.4 Reinwassertank<br />
Volumen<br />
Ausführbare Zyklen 4<br />
Material<br />
EUROPA B EVO EUROPA B EVO <strong>24</strong><br />
Mit<br />
Wasseraufbereitung<br />
4,5 l<br />
Bitte s. die<br />
Gebrauchsanleitung von<br />
Wasseraufbereitung<br />
Polyäthylen<br />
Ohne<br />
Wasseraufbereitung<br />
2<br />
11
DEUTCH<br />
4.5 Schmutzwassertank<br />
EUROPA B EVO EUROPA B EVO <strong>24</strong><br />
Volumen<br />
4,5 l<br />
Ausführbare Zyklen 4 2<br />
Material<br />
Polyäthylen<br />
Maximale<br />
Ablasswassertemperatur<br />
50°C<br />
4.6 Bakteriologischer Filter<br />
EUROPA B EVO EUROPA B EVO <strong>24</strong><br />
Durchmesser<br />
56 mm<br />
Filterkapazität 0.3 µm<br />
12
DEUTCH<br />
05 MITGELIEFERTES ZUBEHÖR<br />
Der Autoklav wird inklusive Zubehör verkauft und geliefert. Das Zubehör befindet sich in<br />
der Originalverpackung.<br />
Mitgeliefertes und Sonder-Zubehör:<br />
- Tablettaufnahmegestell<br />
EUROPA B EVO EUROPA B EVO <strong>24</strong><br />
Material<br />
Eloxiertem aluminium<br />
Abmessungen (L x H x P) 192 x 165 x 280 mm 192 x 200 x 470 mm<br />
Abbildung<br />
ABB.3<br />
Standardausstattung 1<br />
ABB.4<br />
-- Zusätzliches Tablettaufnahmegestell<br />
EUROPA B EVO<br />
EUROPA B EVO<br />
<strong>24</strong><br />
Material Eloxiertem aluminium /<br />
Abmessungen (L x H x P)<br />
193 x 200 x 280 mm<br />
(200 x 193 x 280) mm<br />
/<br />
Abbildung<br />
/<br />
ABB.5<br />
Standardausstattung 1 /<br />
- Tabletts<br />
EUROPA B EVO EUROPA B EVO <strong>24</strong><br />
Material<br />
Eloxiertem aluminium<br />
Abmessungen(L x H x P) 184 x 17 x 286 mm 184 x 17 x 286 mm + 184 x 17 x 140 mm<br />
Abbildung<br />
ABB.6<br />
ABB.7<br />
+<br />
ABB.8<br />
13
DEUTCH<br />
Standardausstattung 4 4 + 4<br />
-- Zusätzliches Tablettaufnahmegestell<br />
EUROPA B EVO EUROPA B EVO <strong>24</strong><br />
Material /<br />
Eloxiertem aluminium<br />
oder rostfreies stal<br />
Abmessungen (L x H x P) / 184 x 17 x 460 mm<br />
Abbildung /<br />
ABB.9<br />
Standardausstattung / 4<br />
- Schlüssel für das Herausnehmen des Tabletts und zur Türeinstellung<br />
Für das Herausnehmen und die Handhabung der Tabletts (ABB.11) und um die Tür<br />
einzustellen (Absatz 11.4).<br />
Abbildung<br />
ABB.10<br />
Standardausstattung 1<br />
ABB.11<br />
- Trichter aus Plastik mit Schlauch<br />
Für das Einfüllen des Wassers von Hand (Absatz 8.3)<br />
Abbildung<br />
ABB.12<br />
Standardausstattung 1<br />
- Schwamm für die Reinigung der Kammer und der Türdichtung<br />
Für das Reinigen der Sterilisationskammer und der Türdichtung (Absätze 11.2-11.3)<br />
Abbildung<br />
ABB.13<br />
Standardausstattung 1<br />
14
DEUTCH<br />
- Anschlussstück Wasserzulauf<br />
Zusammen mit dem Plastikschlauch für die manuelle Wasserbefüllung und mit dem mit<br />
dem Filter bestückten Wasserzulaufschlauch zu verwenden<br />
Abbildung<br />
ABB.14<br />
Standardausstattung 1<br />
- Wasserauffüllschlauch mit Filter<br />
Für das Einfüllen des Wassers von Hand (Absatz 8.3)<br />
Abbildung<br />
ABB.15<br />
Standardausstattung 1<br />
- Wasserablassschlauch<br />
Für das Ablassen des Brauchwassers (Absatz 8.9)<br />
Abbildung<br />
ABB.16<br />
Standardausstattung 1<br />
- Rilsan-schlauch<br />
Ein Ende des Schlauchs an den Überlaufschutz Brauchwasser - Kondensatablass (ABB.1<br />
Pos..4.) anschließen, das andere Ende an einen Wasser- und Kondensatauffangbehälter<br />
anschließen.<br />
Abbildung<br />
ABB.17<br />
Standardausstattung 1<br />
15
DEUTCH<br />
- Abstandsfuß für die Geräterückseite aus Plastik<br />
Den Abstandsfuß aus Plastik auf der Rückseite des Autoklaven anbringen (ABB.1<br />
Pos..0.), damit eine angemessene Belüftung gewährleistet ist, auch wenn der Autoklav<br />
nahe einer Wand aufgestellt wird.<br />
Abbildung<br />
ABB.18<br />
Standardausstattung 1<br />
- Schläuche für den rückseitigen Ablass der Verbraucher<br />
1- Überlaufschutz Reinwasser<br />
2- Schlauch für den Hahn des Brauchwasserablaufs<br />
1- Ein Ende des Schlauchs an den hinteren Überlaufschutz Reinwasser (ABB.1 Pos.1)<br />
anschließen, das andere Ende an einen Auffangbehälter für entsalzenes Wasser oder<br />
Abwasser (Ausführung mit Entsalzer) anschließen.<br />
2- Ein Ende des Schlauchs an das Anschlussstück ABB.20 anschließen und diese am<br />
Brauchwasserablaufhahn (ABB.1 Pos..5.) aufdrehen, das andere Ende an einen<br />
Auffangbehälter für das Brauchwasser anschließen.<br />
Abbildung<br />
ABB.19<br />
Standardausstattung 2<br />
- Anschlussstück für rückseitigen Brauchwasserablauf<br />
Ein Ende des Schlauchs für Brauchwasserablauf an das Anschlussstück ABB.20<br />
anschließen und dieses am Brauchwasserablaufhahn (ABB.1 Pos..5.) aufdrehen.<br />
Abbildung<br />
ABB.20<br />
Standardausstattung 1<br />
16
DEUTCH<br />
- Speisekabel<br />
Das Ende der Steckers (ABB.21 Poan die hintere Tafel (ABB.1 Pos..6.) anschließen und<br />
anschließend den Stecker (ABB.21 Pos..A.) direkt an die Versorgungsbuchse der elektrischen<br />
Anlagen anschließen.<br />
Abbildung<br />
ABB.21<br />
Standardausstattung 1<br />
WICHTIG<br />
Fordern Sie ausschließlich originale Ersatzteile<br />
17
DEUTCH<br />
06 DEN AUTOKLAV AUSPACKEN<br />
Der Autoklav wird angemessen verpackt, sodass er bequem transportiert und verlagert<br />
werden kann und der Packungsinhalt geschützt ist.<br />
Der Karton muss gegen Stöße geschützt werden, ist vorsichtig zu behandeln, sollte nicht<br />
auf die Seite gekippt werden und darf nicht tiefer als 16 cm fallen.<br />
Wenn keine selbsttätigen Verlagerungssysteme zur Verfügung stehen, ist der verpackte<br />
Autoklav von 2 Personen zu verlagern.<br />
Der Autoklav liegt auf eine Holzpalette. Er wurde in einem abgestützten Wellenkarton<br />
eingepackt. Um den Autoklav auszupacken, öffnen Sie den Karton, entfernen Sie die<br />
Abstützungsteilen, und nehmen Sie den Autoklav mit den in der Verpackung enthaltenen<br />
Griffen aus.<br />
Wir empfehlen, dass der Autoklav von zwei Personen ausgenommen wird.<br />
Der Autoklav soll nur mit den Griffen verstellt werden!<br />
WICHTIG<br />
Der Autoklav darf auf keinen Fall unter seiner Tür oder dem Bedienungsfeld angepackt<br />
werden, denn dabei könnten mechanische Bauteile beschädigt werden.<br />
In der Verpackung befinden sich:<br />
BEDIENUNGSANLEITUNG. Diese muss aufmerksam gelesen und dann an einem für alle<br />
- mit der Sterilisierung beauftragten - Bediener zugänglichen Ort aufbewahrt werden.<br />
ZERTIFIZIERUNGEN. Diese müssen sorgfältig aufbewahrt werden.<br />
GARANTIESCHEIN. Dieser muss ausgefüllt und Teile davon zurückgesandt werden.<br />
ACHTUNG<br />
Die Original-Verpackung ist über die gesamte Betriebsdauer des Geräts aufzubewahren.<br />
18
DEUTCH<br />
07 INSTALLATION<br />
A<br />
ABB.22<br />
EUROPA B EVO EUROPA B EVO <strong>24</strong><br />
610 mm<br />
B 590 mm 730 mm<br />
C<br />
D<br />
50 mm<br />
410 mm<br />
426 mm (rückseitig) 403 mm (rückseitig)<br />
E<br />
455 mm (vorderseitig) 444 mm (vorderseitig)<br />
F 400 mm 431 mm<br />
1 - Den Autoklav an einem für die Sterilisierung angemessenen Ort installieren.<br />
2 - Der Raum muss angemessen, und gemäß den geltenden Richtlinien, beleuchtet und<br />
belüftet sein.<br />
3 - Den Autoklav nicht in der Nähe von Wärmequellen und Wasserspritzern installieren.<br />
4 - Den Autoklav auf einer Fläche mit entsprechender Tragfähigkeit (geringste 80kg) und<br />
angemessener Größe aufstellen.<br />
5 - Die Aufstellfläche des Autoklaven muss absolut eben sein.<br />
6 - Den Autoklaven auf einer Höhe aufstellen, die dem Bediener die volle Einsicht in die<br />
Sterilisierkammer gestattet und die Reinigung ermöglicht.<br />
7 - Die Tür des Autoklaven öffnen und alle Beutel, für das Verpacken einzelner<br />
Instrumente, welche in der Kammer aufbewahrt sind, herausnehmen.<br />
19
DEUTCH<br />
8 - In der Sterilisierkammer nur das Tablettaufnahmegestell mit den Tabletts lassen. Das<br />
gesamte Zubehör ist in einem dazu bestimmten und den Bediener zugänglichem Fach<br />
unterzubringen.<br />
9 - Auf dem Autoklaven dürfen keine Zeitungen, Schalen, Behälter mit Flüssigkeiten, usw.<br />
abgestellt werden.<br />
10 - Sich niemals auf der Tür abstützen, wenn diese offen steht.<br />
11 - Um eine ordnungsgemäße Belüftung zu garantieren, muss stets einen<br />
Mindestabstand von 5 cm auf der Geräterückseite gegeben sein. Nutzen Sie dazu den<br />
Abstandsfuß für die Geräterückseite (FIG.1 pos..0. – FIG.18) und die Geräteseiten.<br />
12 -Die Schläuche auf der Rückseite anschließen (Kapitel 5)<br />
13 - Vergewissern Sie sich stets, dass das Stromnetz an das der Autoklav angeschlossen<br />
wird, den geltenden Richtlinien und den für das Gerät erforderlichen Daten entspricht.<br />
14 - Das mitgelieferte Stromkabel an der Steckverbindung auf der Autoklav-Rückseite<br />
anschließen (Abb.1 Pos. 6).<br />
15 - Das andere Kabelende an einer Steckdose 230 Vac - 2000 Va des Stromnetzes<br />
anschließen.<br />
WICHTIG<br />
Vermeiden Sie Verlängerungskabel und Adapterstecker, denn es könnten<br />
Mikrounterbrechungen der Stromzufuhr entstehen, die zu einer Störmeldung führen<br />
würden.<br />
16 - Den Autoklaven am Hauptschalter (ABB.2 Pos. 19) einschalten und seine Tür öffnen.<br />
Einige Sekunden warten. Zwei Signaltöne geben an, dass die Parameter für die<br />
automatische Anpassung an den Luftdruck erfasst werden. Auf dem Display erscheint die<br />
Schrift "Tür offen".<br />
WICHTIG<br />
Niemals ein Programm anwählen b<strong>evo</strong>r die beiden Signaltöne abgegeben wurden,<br />
da der Autoklav sonst die angewählten Programme nicht annimmt.<br />
17 - Den Reinwassertank füllen, beachten Sie dabei die Anweisungen im (kapitel 8).<br />
Dann einen Testzyklus ausführen, beachten Sie dazu die Anweisungen im (kapitel 8).<br />
18 - Wenn der Autoklav mit einem Entsalzungssystem installiert wird, beachten Sie die<br />
Anweisungen in der mit dem Entionisierer mitgelieferten Anleitung (kapitel 14).<br />
20
DEUTCH<br />
08 GEBRAUCHSANWEISUNGEN<br />
Nachdem der Autoklav installiert wurde, kann er angewendet werden.<br />
8.1 Den autoclav einschalten<br />
Drücken den Hauptschalter (ABB.2 Pos. 19)<br />
8.2 Den reinwassertank fullen<br />
An den “Wasserzulaufschlauch mit Filter” (mitgeliefert) das “Wasserzulaufanschlussstück“<br />
ABB.14 anschließen und dann in die Öffnung des frontalen Anschlusses am Autoklaven<br />
(ABB.2 Pos.13) stecken.<br />
Das andere Ende des Schlauchs mit Filter in den Behälter für das entsalzene oder<br />
destillierte Wasser stecken.<br />
An dieser Stelle die Taste B-PUMP drücken und so die Wasserzulaufpumpe einschalten;<br />
die Taste so lange drücken bis die Rückwärtszählung beginnt.<br />
Die Tankfüllpumpe befüllt den Innentank des Autoklaven. Sollte der Höchststand binnen<br />
180 Sekunden nicht erreicht werden, schaltet die Pumpe automatisch ab. Sie kann nur<br />
durch erneutes Betätigen der Taste neugestartet werden.<br />
Die Pumpe stoppt automatisch wenn der Höchststand erreicht ist.<br />
Ist ein Entionisierer vorgeschaltet und der Wasserhöchststand wird nicht erreicht, ist der<br />
Betrieb der Autoklaven unterbunden.<br />
8.3 Den reinwassertank manuell fullen<br />
Wenn die Wasserfüllpumpe nicht funktioniert, kann der Tank vom Bediener händisch<br />
gefüllt werden, dazu wie folgt vorgehen:<br />
-Den Autoklav einschalten.<br />
-Den Verschluss auf der Front des Autoklaven (Abb.2 Pos.12) abnehmen.<br />
-Den an den Trichter angeschlossenen Wasserzulaufschlauch in diese Öffnung stecken<br />
(ABB. 14).<br />
-Destilliertes Wasser in den Trichter geben, diesen dabei höher als das<br />
Einlaufverbindungsstück halten<br />
-Einfüllen bis die Led für den Höchststand aufleuchtet (ABB.2 Pos.29).<br />
-Nach dem Auffüllvorgang das Anschlussstück herausnehmen und den Verschluss wieder<br />
aufsetzen.<br />
21
DEUTCH<br />
8.4 Eigenschaften des zu verwendeten wassers<br />
TABELLE DER VON DER RICHTLINIE UNI EN 13060: 2005 FESTGELEGTEN<br />
QUALITÄTSSTANDARDS<br />
CEN STANDARD UNI EN 13060 : 2005<br />
Evaporationsrückstände ≤ 10 mg/l<br />
Siliziumoxyd ≤ 1 mg/l<br />
Eisen ≤ 0.2 mg/l<br />
Kadmium ≤ 0.005 mg/l<br />
Blei ≤ 0.05 mg/l<br />
Schwermetallrückstände,<br />
ausgenommen Eisen, Kadmium, Blei<br />
≤ 0.1 mg/l<br />
Chlorid (Cl') ≤ 2 mg/l<br />
Phosphat (P20s) ≤ 0.5 mg/l<br />
Leitfähigkeit (bei 20°C) ≤ 15 µs/cm<br />
PH-Wert (Säurewert) 5 ÷ 7,5<br />
Aussehen<br />
farblos, klar, ohne Ablagerungen<br />
Härte (E-Ionen Alkalierde) ≤ 0.02 mmol/l<br />
8.5 Das material in den autoklav geben<br />
Das zu sterilisierende Material auf die mitgelieferten Tabletts legen.<br />
- das Material niemals übereinander legen<br />
- die verpackten Instrumente stets mit der Papierseite nach oben gerichtet anordnen<br />
- das Material darf die Sterilisierkammer oder das Tür niemals berühren<br />
- Greifer und Scheren mit geöffneten Klingen einlegen<br />
ABB.23<br />
Nach dem Laden des Autoklaven, dessen Türe schließen. Auf dem Display erscheint die<br />
Schrift TÜR GESCHLOSSEN.<br />
8.6 Den sterilisierzyklus starten<br />
Das der Ladung entsprechende Sterilisierprogramm anwählen, dazu die Taste B-SELECT<br />
drücken.<br />
Bei jedem Drücken der Taste schaltet die Anwahl auf das folgende Programm.<br />
Nach der Programmanwahl mit der Taste B-START den Zyklus starten; die Tür wird<br />
automatisch blockiert und der Zyklus startet.<br />
Während dem Zyklus zeigt das Display alle diesbezüglichen Parameter und Informationen.<br />
22
DEUTCH<br />
8.7 Zyklusende<br />
Ein Signalton weist den Bediener auf den erfolgten Sterilisierzyklus hin.<br />
Sollte der Zyklus erfolgreich abgeschlossen sein, erscheint auf dem Display die Meldung<br />
ZYKLUSENDE, bei Problemen erscheint eine Fehlercode oder eine Störungsmeldung.<br />
Nach dem Signalton, die Sperre de Tür durch Drücken der Taste B-DOOR.<br />
Sollte Druck in der Kammer anliegen, lässt sich die Tür durch diese Taste nicht<br />
entsperren. Die Vervollständigung des Druckabbaus abwarten und die Vorgang<br />
wiederholen oder im Notfall die Tasten B-DOOR + B-PUMP zugleich drücken.<br />
Nachdem die Türsperre gelöst wurde, am Türgriff ziehen und diese somit öffnen.<br />
8.8 Das sterilisierte material herausnehmen<br />
In Übereinstimmung mit den geltenden Vorschriften hinsichtlich der Sicherheit und<br />
Hygiene am Arbeitsplatz die passende Persönliche Schutzausrüstung tragen. Die Tabletts<br />
mit dem mitgelieferten Schlüssel (ABB.10) herausnehmen, die Instrumente auskühlen<br />
lassen und an einem Ort aufbewahren an dem sie nicht kontaminiert werden können.<br />
8.9 Das schmutzwasser ablassen<br />
Wenn die Led für den Brauchwasserstand (Abb.2 Pos.30) aufleuchtet, diesen leeren.<br />
Wenn der Tank nicht geleert wird, ist der Betrieb des Autoklaven unterbunden.<br />
Den mitgelieferten (Abb.16) Schlauch mit der Steckverbindung an den<br />
Schmutzwasserauslass auf der Front des Autoklaven (Abb.2 Pos.14) anschließen, Den<br />
Ringen linksrum aufschrauben (2 vollständige Umdrehungen). Das andere Ende des<br />
Schlauchs in einen Auffangbehälter halten; das Wasser strömt durch die Schwerkraft in<br />
den Auffangbehälter.<br />
WICHTIG<br />
A - Das in den Auffangbehälter gehaltene Schlauchende muss stets über dem<br />
Schmutzwasserpegel sein, andernfalls würde das Brauchwasser aufgesogen werden.<br />
B - Der Inhalt im Schmutzwassertank des Autoklaven muss immer ganz abgelassen<br />
werden. Die Led für den Höchststand im Schmutzwassertank geht aus, obwohl sich noch<br />
Wasser im Tank befindet, daher gilt diese Led nicht als Hinweis für diesen Vorgang.<br />
Am Ende des Abfluss die Nutmutter schrauben und das Rohr abnehmen.<br />
23
DEUTCH<br />
8.10 Einen sterilisierzyklus unterbrechen<br />
Ein Sterilisierzyklus kann unterbrochen werden, dazu die Taste B-START<br />
mindestens 2 Sekunden lang drücken. Der Autoklav gibt einen Signalton ab,<br />
schaltet aus Unterdruck und es erscheint die Fehlermeldung 001 (ZYKLUS<br />
UNTERBROCHEN).<br />
Um den Fehler rückzusetzen, die unten angezeigten Tasten zugleich drücken bis der<br />
Signalton ertönt:<br />
B-DOOR + B-PUMP + B-SELECT<br />
ACHTUNG:<br />
Wenn der Drucker in Betrieb ist, ist die Quittierung der Störung nicht möglich.<br />
Wenn eine Störungsmeldung erscheint (Nachsilbe "A") gilt der Zyklus als<br />
nicht korrekt ausgeführt: alle Vorbereitungen und die Sterilisation müssen<br />
wiederholt werden.<br />
<strong>24</strong>
DEUTCH<br />
09 STERILISIERZYKLUS<br />
9.1 Beschreiburg der zyklen<br />
Der Autoklav besitzt drei Zyklusserien:<br />
A - Arbeitszyklen<br />
B - Arbeitszyklen - Nachtzyklen<br />
C - Testzyklen<br />
9.2 Arbeitszyklen<br />
Alle Arbeitszyklen arbeiten mit dem System des fraktionierten Vakuums, daher können mit<br />
diesen Zyklen Hohlkörper, poröse Körper, Feststoffe, verpacktes und unverpacktes<br />
Material sterilisiert werden.<br />
Die anwählbaren Temperaturen liegen zwischen 121°C u nd 134°C.<br />
Normalerweise nutzt man die 121°C-Zyklen für thermopl astisches und empfindliches<br />
Material, während die 134°C-Zyklen bei allen anderen Materialien angewendet werden.<br />
In allen Fällen sind die Anweisungen des Instrumenten- und Geräteherstellers zu<br />
beachten.<br />
Außerdem stehen 2 Sonderzyklen zur Verfügung:<br />
- Prion-Zyklus, dieser Zyklus wurde für die Kreuzfeld-Jacobs-Krankheit (BSE) entwickelt<br />
wurde.<br />
- Flash-Zyklus, dieser Zyklus wurde für das schnelle Sterilisieren der unverpackten<br />
Instrumente und Geräte entwickelt.<br />
9.3 Arbeitszyclen - nachtzyklen<br />
Der Autoklav ist mit einem speziellem Economy-Gerät ausgestattet.<br />
Dank dieser Einrichtung kann ein Sterilisierzyklus in der Abwesenheit des Bedieners<br />
durchgeführt werden.<br />
Wenn nach Abschluss der Sterilisierung die Tür nicht geöffnet wird, stabilisiert sich der<br />
Autoklav und schaltet dann automatisch ab. Dabei bleibt nur der Hauptschalter<br />
eingeschaltet (ABB.2 pos..19.).<br />
Der Bediener muss bei seinem Zurückkommen eine beliebige Taste drücken, um den<br />
Autoklaven wieder einzuschalten und kann dann am Display die Ergebnis Zykluses<br />
ablesen.<br />
Bei dieser Vorgehensweise druckt der Drucker wie gewohnt den Zyklus-Bericht aus.<br />
25
DEUTCH<br />
CICLI<br />
STERILISIERTABELLE<br />
TROCKNUNGS-<br />
PROZESS-<br />
ZEIT<br />
ZEIT<br />
T5 (Minuten)<br />
T4<br />
(Minuten) 18L <strong>24</strong>L<br />
BETRIEBSDRUC<br />
KBEREICH<br />
( relative Bar )<br />
BETRIEBSTEMP<br />
ERATURBEREIC<br />
H<br />
( °C )<br />
121°<br />
unverpackt<br />
121°C<br />
verpackt<br />
134°C<br />
Flash<br />
134°C<br />
unverpackt<br />
134°C<br />
verpackt<br />
134°C<br />
Prion<br />
18 6 12<br />
18 17 13<br />
4 2 4<br />
5 6 12<br />
5 17 13<br />
20 17 13<br />
1.04 ÷ 1.30 121 ÷ 125<br />
2.02 ÷ 2.38 134 ÷ 138<br />
Die Zeiten für das Vorerwärmen und Fraktionieren des Vakuums können je nach<br />
Vorraussetzungen des Autoklaven zwischen 25-35 Minuten variieren.<br />
Alle Sterilisierungszyklen durchlaufen 3 Vakuumphasen.<br />
9.4 Testzyklus<br />
- Helix-Test dieser Test dient der Überprüfung der Penetrationskapazität von Dampf in<br />
einem Hohlkörper. Zu diesem Zweck ist das Helix Indicator System anzuwenden.<br />
Ohne Ladung das System Helix Test mit Indikator in die Sterilisationskammer auf das<br />
mittige Tablett legen. Beachten Sie für die korrekte Beladung des Indikators die<br />
Herstelleranweisungen.<br />
Den entsprechenden Testzyklus ausführen, dann das gesamte System herausnehmen<br />
und den Indikator überprüfen.<br />
Bei negativem Ergebnis ist der autorisierte Servicedienst zu informieren.<br />
- Bowie- und Dick-Test dieser Test dient der Überprüfung der Penetrationskapazität von<br />
Dampf in einem porösen Körper. zu diesem Zweck ist der Bowie und Dick Test Pack<br />
(Toptable) anzuwenden.<br />
Ohne Ladung den Bowie-Dick-Test in die Sterilisationskammer auf das mittige Tablett<br />
legen.<br />
Den entsprechenden Testzyklus ausführen, dann das Paket herausnehmen, öffnen und<br />
anhand des mittig positionierten „Test“-Blattes das Ergebnis überprüfen. Bei negativem<br />
Ergebnis ist der autorisierte Servicedienst zu informieren.<br />
- Vakuumtest dieser Test dienst der Überprüfung der Vakuumhaltekapazität des<br />
Autoklaven, der Testbericht wird vom Autoklaven-Drucker ausgedruckt.<br />
Der Test muss bei kaltem Gerät durchgeführt werden. Es darf keinerlei Ladung in den<br />
Autoklaven gegeben werden. Abschließend das Ergebnis, anhand des vom<br />
Autoklavendrucker ausgedruckten Belegs, überprüfen. Bei negativem Ergebnis ist der<br />
autorisierte Servicedienst zu informieren.<br />
26
DEUTCH<br />
134°C Helix/<br />
Bowie&Dick<br />
STERILISIER-<br />
ZEIT<br />
T4<br />
( Minuten)<br />
TABELLE TEST-ZYKLEN<br />
TROCKNUNGS<br />
-ZEIT<br />
T5<br />
(Minuten)<br />
BETRIEBSDRUC<br />
KBEREICH<br />
( relative Bar)<br />
BETRIEBSTEMPE<br />
RATURBEREICH<br />
( °C )<br />
3.5 4 2.02 ÷ 2.38 134 ÷ 138<br />
Vacuum -0.9<br />
ABB.<strong>24</strong><br />
T1,T2,T3= Die Zeiten für das Vorerwärmen und Fraktionieren des Vakuums<br />
T4= Sterilisier-zeit<br />
T5= Trocknungs-zeit<br />
27
DEUTCH<br />
10 FEHLER- UND STÖRUNGSMELDUNGEN<br />
Die Fehlermeldungen werden mit einem alphanumerischen Code dargestellt, dieser<br />
besteht aus einem Buchstaben und 3 Ziffern.<br />
Der Buchstabe "E" bezieht sich auf Fehler durch den Bediener, die von diesem<br />
rückgesetzt werden können.<br />
Der Buchstabe "A" bezieht sich auf Störungen am Autoklaven. Sollte nach der<br />
Fehlerbehebung das Problem weiterhin auftreten, ist der Kundendienst anzurufen.<br />
Wenn eine Störungsmeldung erscheint (Nachsilbe „A“) gilt der Zyklus als<br />
nicht korrekt ausgeführt: alle Vorbereitungen und die Sterilisation müssen<br />
wiederholt werden.<br />
Um die Störungen und die Fehler rückzusetzen, die unten dargestellten Tasten zugleich<br />
drücken bis der Signalton ertönt:<br />
B-DOOR + B-PUMP + B-SELECT<br />
10.1 Liste der fehler- und störungsmeldungen<br />
FEHLER URSACHE ABHILFE<br />
E 200 Niedriger Wasserstand Den Tank füllen<br />
E 250<br />
Niedriger Reinwasserstand mit Zulauf von<br />
Entsalzer<br />
Den Tank füllen<br />
E 300 Schmutzwassertank voll Den Tank leeren<br />
E 401 Tür offen Die Tür vorsichtig schließen<br />
E 451 Tür nicht blockiert<br />
Die Tür öffnen und erneut<br />
schließen<br />
E 461<br />
Zu hohe Temperatur in der Kammer für Ausschalten und 10 Minuten<br />
Vakuumtest (über 40°C)<br />
warten<br />
A 250 Zyklusstart ohne Wasser<br />
Das Gerät<br />
wasseraufbereitung systeme<br />
überprüfen<br />
A 001 Zyklus unterbrochen<br />
Den Zyklus rücksetzen und<br />
neustarten<br />
A 011 Störung PC Display<br />
Den Autoklaven aus-und<br />
wieder einschalten<br />
A 101 Nach 10 min wurde kein Vakuum aufgebaut<br />
Rücksetzen und den Zyklus<br />
wiederholen<br />
A 111<br />
Vakuum nicht aufrechterhalten in der ersten Rücksetzen und den Zyklus<br />
Phase VT<br />
wiederholen<br />
A 121<br />
Vakuum nicht aufrechterhalten in der zweiten Rücksetzen und den Zyklus<br />
Phase VT<br />
wiederholen<br />
A 401<br />
Tür offen während dem Zyklus oder problem Das Schließsystem<br />
Tür- Schließsystem<br />
überprüfen<br />
A 501 Druck nicht aufrechterhalten<br />
Rücksetzen und den Zyklus<br />
wiederholen<br />
A 551 Störung 1. Temperaturfühler Rücksetzen und den Zyklus<br />
28
A 552<br />
A 641<br />
A 651<br />
A 661<br />
A 701<br />
A 751<br />
A 761<br />
A 801<br />
A 901<br />
Störung 2. Temperaturfühler<br />
Überdruck<br />
Übertemperatur<br />
Störung Temperaturvergleich<br />
Arbeitsdruck nicht erreicht<br />
Zu geringe Temperatur<br />
Störung an Druckfühler<br />
Störung Druckablass<br />
Hauptdruck zu gering<br />
Vorübergehend unterbrochene<br />
Stromversorgung<br />
DEUTCH<br />
wiederholen<br />
Rücksetzen und den Zyklus<br />
wiederholen<br />
Rücksetzen und den Zyklus<br />
wiederholen<br />
Rücksetzen und den Zyklus<br />
wiederholen<br />
Rücksetzen und den Zyklus<br />
wiederholen<br />
Rücksetzen und den Zyklus<br />
wiederholen<br />
Rücksetzen und den Zyklus<br />
wiederholen<br />
Rücksetzen und den Zyklus<br />
wiederholen<br />
Rücksetzen und den Zyklus<br />
wiederholen<br />
Wenden Sie sich an den<br />
Stromversorger<br />
DIE HARZE WECHSELN die Patrone<br />
IONIC SYSTEM sind erschöpft<br />
DIE HARZE FILTER die Patrone<br />
OSMOSIS SYSTEM sind erschöpft<br />
im Absatz 14.3 der Anleitung<br />
im Absatz 14.3 der Anleitung<br />
D<br />
Druckerklappe nicht<br />
geschlossen<br />
Die Klappe des Druckers öffnen und wieder schließen<br />
P Kein Papier im Drucker Papier einlegen<br />
Lo<br />
Schließen Sie die Maschine an einer anderen Stelle des<br />
Zu geringe Spannung in<br />
Stromnetzes an; bleibt das Problem bestehen wenden<br />
der Versorgungsleitung<br />
Sie sich an einen Elektriker<br />
WICHTIG<br />
Sollte auch nach der Durchführung der Abhilfemaßnahme das Problem weiterhin<br />
auftreten, rufen Sie den Service-Telefondienst der MEDILINE ITALIA srl unter folgender<br />
Nummer an: +39 0522 94 29 97.<br />
29
DEUTCH<br />
11 INSTANDHALTUNG UND PRÄVENTION<br />
Eine ordnungsgemäße Instandhaltung des Autoklaven sichert einen einwandfreien Betrieb<br />
und eine Zeit- und Kostenersparnis in Folge auf Service- und Wartungseingriffe.<br />
11.1 Den bakteriologischen filter ersetzen<br />
Der bakteriologische Filter muss (Abb.2 Pos.11) muss mindestens alle 200 Zyklus oder<br />
immer dann wenn der Filter eine dunklere Farbe annimmt ersetzt werden.<br />
Den Filter linksrum drehen, um ihn abzudrehen (ABB.25) und rechtsrum drehen, um ihn<br />
aufzudrehen (ABB.26).<br />
Bauen Sie nur Original-Filter ein!<br />
ABB.25<br />
ABB.26<br />
11.2 Die kammer reinigen<br />
Die Kammer und der Filter sind regelmäßig zu reinigen. Dabei sind eventuelle<br />
Ablagerungen und Schmutz zu entfernen. Auf diese Weise wird verhindert, dass Schmutz<br />
in den Auslass gelangt und diesen verstopft.<br />
Für eine ordnungsgemäße Reinigung nur Wasser und den mitgelieferten<br />
Scheuerschwamm verwenden (ABB.13).<br />
Der Filter liegt mit Übermaß in seinem Sitz, daher muss beim Herausnehmen für die<br />
Reinigung darauf geachtet werden, dass er nicht beschädigt wird (ABB.27).<br />
Den gereinigten Filter wieder in sein Lager einsetzen (ABB.28), wobei er etwa 15 mm<br />
überstehen soll (ABB.29), damit eine gute Filterleistung gewährleistet ist.<br />
FIG.27 FIG.28 FIG.29<br />
Niemals Lösungsmittel, Reinigungsmittel, chemische Lösungen, Verkrustungen lösende<br />
Säuren oder andere ähnliche Produkte verwenden.<br />
30
DEUTCH<br />
11.3 Die turdichtung reinigen<br />
Die regelmäßig die eventuellen Rückstände die sich an der Dichtung absetzen mit Wasser<br />
und dem mitgelieferten Schwamm (nicht abrasive Seite) oder mit einem feuchten Tuch<br />
entfernen.<br />
11.4 Die tur einstellen<br />
Um den Schließdruck der Tür einzustellen, mit dem mitgelieferten Schlüssel mit<br />
Doppelfunktion (Tablettentnahme + Schlüssel) die entsprechende Regelschraube der Tür<br />
verstellen.<br />
Linksrumdrehen (FIG.30 pos..A.) um den Schließdruck zu erhöhen.<br />
Rechtsrumdrehen (FIG.30 pos..B.) um den Schließdruck zu senken.<br />
.A.<br />
.B.<br />
FIG.30<br />
31
DEUTCH<br />
11.5 Das drunckerpapier wechseln<br />
Rolle thermografisches Papier mit einer Breite von 57 mm. Das thermografische Papier<br />
darf nur einseitig verwendet werden.<br />
Die Klappe am Drucker öffnen, indem Sie die Taste betätigen (ABB.31 POS.A), die<br />
Papierrolle einschieben , beachten Sie dabei die Drehrichtung, das Papier herausziehen<br />
und die Klappe schließen (ABB.31 POS.B); der Drucker ist jetzt betriebsbereit .<br />
.A.<br />
.B.<br />
ABB.31<br />
11.6 Druckerstatus<br />
Wenn die Druckerklappe nicht perfekt geschlossen ist, erscheint auf dem Display der<br />
Buchstabe (D).<br />
Die Klappe öffnen und wieder schließen.<br />
Wenn kein Papier mehr vorhanden ist, erscheint der Buchstabe (P).<br />
Die Klappe öffnen, eine neue Papierrolle einlegen und die Klappe wieder schließen.<br />
32
DEUTCH<br />
12 PROGRAMMIERUNG DER DISPLAY-PARAMETER<br />
Siehe ABB.2.<br />
12.1 Die Sprache einstellen<br />
Die Taste B-START und den Schalter MAINS zugleich drücken.<br />
Die Taste B-START gedrückt halten bis auf dem Display die eingestellte Sprache<br />
erscheint.<br />
Mit der Taste B-SELECT wird auf die folgende Sprache geschalten.<br />
Mit der Taste B-PUMP wird auf die letzte Sprache zurückgeschaltet.<br />
12.2 Die Uhrzeit einstellen - Stunde<br />
Die Taste B-START drücken, es erscheint die Stunde.<br />
Mit der Taste wird di B-SELECT e Stunde verstellt [vorwärts].<br />
Mit der Taste B-PUMP wird die Stunde verstellt [rückwärts].<br />
12.3 Die Uhrzeit einstellen - Minuten<br />
Die Taste B-DOOR drücken, es erscheinen die Minuten.<br />
Mit der Taste B-SELECT werden die Minuten verstellt [vorwärts].<br />
Mit der Taste B-PUMP werden die Minuten verstellt [rückwärts].<br />
12.4 Die Uhrzeit einstellen - Sekunden<br />
Die Taste B-DOOR drücken, es erscheinen die Sekunden. Nicht verändern.<br />
12.5 Das Datum einstellen - Tag<br />
Die Taste B-START drücken, es erscheint der Tag (blinkt).<br />
Mit der Taste B-SELECT wir der Tag verändert [vorwärts].<br />
Mit der Taste B-PUMP wird der Tag verändert [rückwärts].<br />
12.6 Das Datum einstellen – Monat<br />
Die Taste B-DOOR drücken, es erscheint der Monat (blinkt).<br />
Mit der Taste B-SELECT wird der Monat verändert [vorwärts].<br />
Mit der Taste B-PUMP wird der Monat verändert [rückwärts].<br />
33
DEUTCH<br />
12.7 Das Datum einstellen - Jahr<br />
Die Taste B-DOOR drücken, es erscheint das Jahr.<br />
Mit der Taste B-SELECT wird das Jahr verändert [vorwärts].<br />
Mit der Taste B-PUMP wird das Jahr verändert [rückwärts].<br />
12.8 Luftdruckanzeige<br />
Die Taste B-START. Es erscheint der gespeicherte Luftdruck.<br />
NICHT VERÄNDERN!<br />
12.9 Anwahl Wasserzulauf<br />
Wenn Sie B-START drücken, können Sie den Wassereinlauf wählen:<br />
- EINLAUF DURCH PUMPE<br />
- IONIC SYSTEM<br />
- OSMOSIS SYSTEM<br />
Wenn Sie B-SELECT drücken, können Sie die Einstellung wechseln.<br />
Zum Speichern, drücken Sie B-DOOR, bis wann den „Pieptone“ hören können<br />
Die Taste B-START gedrückt halten bis der Signalton zu hören ist.<br />
Die eingestellten Daten sind nun gespeichert. Den Autoklaven am Schalter MAINS<br />
ausschalten.<br />
34
13 BEHEBUNG AUFTRETENDER PROBLEME<br />
DEUTCH<br />
In vielen Fällen werden Störungen oder Fehler durch die Nichtbeachtung oder die<br />
Unkenntnis hinsichtlich einiger technischer Aspekte und der Funktionsweise des Geräts<br />
verursacht.<br />
Im Folgenden sind einige Störungen und deren Behebungsmaßnahmen aufgeführt.<br />
13.1 Der autoklav trocknet nicht ordnungsgemass<br />
a - DEN BAKTERIOLOGISCHEN FILTER gegen einen neuen originalen der TECNO-GAZ<br />
ERSETZEN.<br />
b - ES WURDEN KEINE ORIGINALEN TABLETTS, sondern andersartige ohne oder mit einer<br />
andersartigen Lochung VERWENDET Verwenden Sie nur Original-Tabletts, möglichst aus<br />
Aluminium. Fordern Sie zusätzliche Original-Tabletts an.<br />
c - DIE INSTRUMENTE WURDEN NICHT ORDNUNGSGEMÄSS IN DEN AUTOKLAV<br />
GELEGT, die Instrumente oder die verpackten Körper mit der Papierseite nach<br />
oben gerichtet anordnen. Die Instrumente oder das Material darf niemals die<br />
Kammer berühren, dabei könnten die verbrennen und sich verformen.<br />
13.2 Die kammer des autoklaven wird weiss<br />
a - SOFORT DAS VERWENDETE WASSER WECHSELN , verwenden Sie entsalzenes oder<br />
destilliertes Wasser gemäß den Angaben in den vorigen Kapiteln und reinigen Sie die<br />
Kammer.<br />
b - DIE WEISSLICHE FARBE KANN eine Folge der Verdunstung von auf den Instrumenten<br />
abgelagertem organischem Material sein. Reinigen Sie die Instrumente sorgfältiger.<br />
c - gegebenenfalls die Entsalzungsanlage überprüfen (IONIC SYSTEM OSMOSI<br />
SYSTEM)<br />
13.3 Die kammer des autoklaven hat grun-blauliche flecken<br />
a - DIE INSTRUMENTE WURDEN nach dem Reinigungsvorgang NICHT<br />
ORDNUNGSGEMÄSS NACHGESPÜLT, die Instrumente nach dem Reinigen sorgfältiger<br />
mit Wasser abspülen. Sollten die Flecken sehr auffällig sein, wenden Sie sich an den<br />
Service-Telefondienst.<br />
13.4 Der sterilisierzyklus wird, ohne ersichtlichen grund, abgebrochen<br />
a - ÜBERPRÜFEN SIE OB DER AUTOKLAV mit Verlängerungskabel oder Adaptersteckern an<br />
das Stromnetz angeschlossen ist; gegebenenfalls diese Zwischenteile entfernen und den<br />
Autoklaven direkt an das Stromnetz anschließen.<br />
35
DEUTCH<br />
13.5 Der autoklav empfangt keine arbeitsanweisungen<br />
a - DER AUTOKLAV FÜHRT GERADE DIE AUTOMATISCHE ANPASSUNG AN DEN<br />
LUFTDRUCK DURCH, warten Sie nach dem Öffnen der Tür auf den zweifachen<br />
Signalton und geben Sie erst dann die gewünschten Funktionen ein.<br />
b - DER REINWASSERTANK IST LEER, die Led für den Mindestpegel leuchtet, füllen<br />
Sie den Tank mit sauberem Wasser auf.<br />
c - DER BRAUCHWASSERTANK IST VOLL, die Led für den Höchststand leuchtet<br />
lassen Sie das Brauchwasser ab<br />
13.6 Der drucker des autoklaven drunkt nicht<br />
a - DIE KLAPPE DER PAPIERROLLE IST NICHT GESCHLOSSEN, auf dem Display<br />
erscheint der Buchstabe "D". Öffnen Sie die Klappe. Schließen Sie nun die Klappe<br />
wieder und achten Sie darauf, dass diese richtig zu ist.<br />
b - KEIN PAPIER, auf dem Display erscheint der Buchstabe "P". Öffnen Sie die Klappe<br />
und legen Sie eine Rolle Thermopapier ein.<br />
c - DIE HITZEEMPFINDLICHE SEITE DES PAPIERS ZEIGT NACH INNEN, öffnen<br />
Sie die Klappe und legen Sie die Papierrolle richtig ein.<br />
13.7 Flecken auf den instrumenten<br />
a - DIE INSTRUMENTE WERDEN GELB, Rückstände chemischer Flüssigkeit die sich<br />
durch die Hitze an den Instrumenten festgesetzt haben. Um dies zu verhindern, die<br />
Instrumente besser abwaschen.<br />
b - DIE STERILISIERKAMMER HAT GELBE FLECKEN, es wurden Instrumente mit<br />
Rückständen chemischer Flüssigkeit in die Kammer gelegt, diese Flüssigkeit tropfte<br />
durch die Hitzeeinwirkung auf den Boden. Um dies zu verhindern, die Instrumente<br />
besser abgewaschen.<br />
c - DIE INSTRUMENTE HABEN WEISSLICHE FLECKEN, die Instrumente wurden mit sehr<br />
kalkhaltigem Wasser abgespült und nicht abgetrocknet. Für den letzten Abspülvorgang<br />
sollte entsalzenes Wasser verwendet und darauf hin die Instrumente sorgfältig<br />
abgetrocknet werden.<br />
d - DIE INSTRUMENTE HABEN EINE SCHWARZE FARBE ANGENOMMEN, dies ist auf<br />
einen hohen Kohlegehalt im Inneren der Instrumente zurückzuführen.<br />
36
DEUTCH<br />
14 WASSERAUFBEREITUNG<br />
14.1 Einstellung von wasseraufbereitung systeme<br />
Der Autoklav ist so entworfen worden, dass das demineralisierte Wasser durch das IONIC<br />
SYSTEM oder das OSMOSIS SYSTEM einlaufen kann.<br />
Die o. g. Systeme sind Zubehör von den Autoklaven von TECNO-GAZ. Sie gehören nicht<br />
dazu. Diese Systeme sind notwendig, um die Mineralsalzen zu entfernen, die im<br />
Stadtwasser enthalten sind. Der Bediener soll die folgenden Normen respektieren, um<br />
den Autoklav so einzustellen, dass entweder IONIC oder OSMOSIS System ergänzt<br />
werden kann.<br />
Den Autoklaven am Hauptschalter (grün) einschalten und die Taste B-START gedrückt<br />
halten bis der Schriftzug mit der angewählten Sprache erscheint.<br />
Die Taste B-START drücken und loslassen, um die folgende Seite anzuwählen bis<br />
folgendes erscheint:<br />
- EINLAUF DURCH PUMPE<br />
- IONIC SYSTEM<br />
- OSMOSIS SYSTEM<br />
Mit der Taste B-SELECT die Einstellung ändern.<br />
Um die Einstellung zu speichern, die Taste B-SELECT solange gedrückt halten bis der<br />
Signalton ertönt.<br />
Um diese Einstellungen zu beenden, die Taste B-START solange gedrückt halten bis der<br />
Signalton ertönt.<br />
ACHTUNG<br />
Das lesbare Nummer, das unter dem Wassereinlauftyp gezeigt wird, bedeutet, wie viele<br />
Sterilisierungszyklen entweder mit dem Filter oder mit der Patrone noch möglich sind.<br />
Es ist wichtig, sich zu erinnern, das o. g. Nummer auf Null zu stellen, wenn Sie den Filter<br />
oder die Patrone wechseln.<br />
Nachdem Sie das Wassereinlauftyp gewählt haben, sollen Sie den Druckknopf B-PUMP<br />
auf der Seite für den Zyklusanfang drücken, bis wann Sie den Piepton hören, um das<br />
Nummer auf Null zu stellen.<br />
37
DEUTCH<br />
ABB.32<br />
38
DEUTCH<br />
14.2 Verbindung von wasseraufbereitungsysteme<br />
Den Autoklav am Hauptschalter auf der Seite des Gerätes abschalten (ABB.2 POS.19).<br />
Nachdem der Bediener den Autoklav eingestellt hat, kann das Wasseraufbereitungsystem<br />
eingebaut werden. Um das System einzubauen, folgen Sie die im entsprechenden<br />
Handbuch enthaltene Beschreibung.<br />
Hier wird zusammengefasst, wie den Einlaufrohr für Wasser dem Autoklav verbindet wird,<br />
und wie den Stecker verbindet wird.<br />
1. Gegebenenfalls den Autoklav ausschalten;<br />
2. Den Hahn vor der Entsalzungsanlage schließen;<br />
3. Den Einlaufrohr gemäß den Anweisungen im entsprechenden Handbuch montieren;<br />
4. Das Außengewinde des Schlauch-Anschlussstücks mit Teflon oder ähnlichem<br />
umwickeln, um seine Dichtigkeit zu garantieren;<br />
5. Das Schlauch-Anschlussstück am Innengewinde des Reinwasserauslauf (ABB.1<br />
POS.2) anschrauben;<br />
6. Den Gummischlauch an den Auslauf des Einlaufrohr am Schlauch-Anschlussstück,<br />
das nun am Autoklav angeschraubt ist, anschließen;<br />
7. Den Stecker des Einlaufrohr in die Buchse ABB.1 POS.7 auf der Rückseite des<br />
Autoklaven stecken;<br />
8. Den Hahn vor der Entsalzungsanlage öffnen;<br />
9. Die Anlage auf Lecks überprüfen;<br />
10. Den Autoklav einschalten;<br />
11. Einen oder mehrere Sterilisierumläufe durchführen und die Funktionstüchtigkeit der<br />
Anschlüsse überprüfen. Vergewissern Sie sich, dass keine Wasserlecks anliegen.<br />
AM ENDE DES ARBEITSTAGES STETS ÜBERPRÜFEN, DASS DER HAHN VOR<br />
DER ENTSALZUNGSANLAGE ZU IST, SODASS<br />
ÜBERSCHWEMMUNGSGEFAHR AUSGESCHLOSSEN IST<br />
VERBINDEN SIE DIE WASSERAUFBEREITUNGSYSTEME NUR MIT TECNO-GAZ<br />
AUTOKLAVEN, DIE DAS ERLAUBEN.<br />
WENN DER AUTOKLAV AM ZYKLUSBEGINN AUF E250 SCHALTET, BEDEUTET DAS,<br />
DASS EIN ZYKLUS MIT EINEM ZU GERINGEN REINWASSERSTAND GESTARTET<br />
WURDE. DAHER MUSS DER REINWASSERTANK GEFÜLLT WERDEN<br />
MERKE: ZUM ANSCHLIESSEN DIE WASSERAUFBEREITUNGSYSTEME AN TECNO-GAZ -<br />
AUTOKLAVEN SIEHE ANGABEN IN DER GEBRAUCHSANLEITUNG DES AUTOKLAVEN.<br />
14.3 Wechseln von patrone und filter<br />
Der Autoklav zeigt im Display mit dem Nachricht „PATRONE WECHSELN“ oder „FILTER<br />
WECHSELN“, wenn die Patrone oder den Filter erschöpft sind .<br />
Nach dem Auswechseln, zum Rücksetzen des Autoklaven, die Taste B-PUMP drücken bis<br />
der Signalton ertönt.<br />
39
DEUTCH<br />
15 STANDARDVORGÄNGE STERILISIERUNG<br />
Sterilisieren bedeutet, präzise Betriebsprotokolle und ein System anwenden.<br />
Der Autoklav ist das Schlussglied dieses Systems.<br />
Wer die verschiedenen Phasen des Sterilisierungssystems nicht einhält, könnte das<br />
Endergebnis beeinträchtigen.<br />
TECNO-GAZ SpA stellt alle Geräte für jede Phase des Sterilisierprozesses her.<br />
Dementsprechend ist Folgendes zu beachten:<br />
1 - Ein präzises schriftliches Betriebsprotokoll anfertigen das allen Bedienern und mit der<br />
Sterilisierung beauftragten Personen ausgehändigt wird. TECNO-GAZ SPA kann Ihnen<br />
Ihren Anforderungen angepasste Protokolle liefern.<br />
2 - Alle Phase des Sterilisierumlauf strengstens befolgen:<br />
DESINFIZIERUNG das ist verbindlich um die Sicherheit der Arbeiter zu schutzen,<br />
anzuwenden bei Eintauchen in chemische Flüssigkeiten oder<br />
Thermodesinfizierung.<br />
REINIGUNG die wichtigste Phase in der alle chemischen und organischen<br />
Rückstände entfernt werden. Das beste Instrument für diesen Vorgang sind die<br />
Ultraschallbecken.<br />
TROCKNEN unbedingt erforderliche Phase, dank der Korrosion der Instrumente<br />
und Interferenzen im Sterilisierzyklus vermieden wird.<br />
VERPACKEN unbedingt erforderliche Phase für die Erhaltung der Keimfreiheit der<br />
behandelten Instrumente.<br />
STERILISIERUNG Endphase Dampfsterilisierung<br />
40
DEUTCH<br />
16 ANWEISUNGEN FÜR DEN VERSAND DES AUTOKLAVEN<br />
Wenn der Autoklav für Reparaturen, Revisionen, Wiederherstellung der<br />
Funktionstüchtigkeit oder Gültigkeit verschickt werden muss, sind folgende Anweisungen<br />
unbedingt zu beachten:<br />
1 - Die Original-Verpackung verwenden. Sollte Ihnen diese nicht mehr zur<br />
Verfügung stehen, eine angemessene Verpackung verwenden. Der Absender trägt<br />
die Verantwortung für die Versendung der Ware.<br />
2 - Versenden Sie nur den Autoklav, behalten Sie die Tabletts und den<br />
Tabletthalter.<br />
3 - Reinigen Sie, vor dem Versenden, den gesamten Autoklav und insbesondere<br />
die Sterilisierkammer. Sollte der Autoklav verschmutzt oder mit Rückstände zur<br />
Reparatur geschickt werden, wird er unrepariert zurückgeschickt oder gereinigt und<br />
desinfiziert.<br />
4 - Der Reinwassertank muss leer sein. Der Tank wird über das Anschlussstück auf<br />
der Rückseite des Autoklaven (Abb.2 Pos.2) geleert.<br />
5 - Stets den Brauchwassertank leeren. Der Tank wird über das Anschlussstück auf<br />
der Rückseite des Autoklaven (Abb.2 Pos.5) geleert<br />
6 - Schriftlich und der Verpackung beigelegt die aufgetretene Störung oder die<br />
gewünschte Dienstleistung genau angeben.<br />
7 - Das Gerät frei Haus senden, andernfalls werden die Transport in Rechnung<br />
gestellt.<br />
ACHTUNG<br />
Nicht-Original-Verpackung die bei uns eintrifft, wird entsorgt.<br />
Der Autoklav wird Ihnen in einer neuen Original-Verpackung zugesandt, damit die<br />
Unversehrtheit Ihres Geräts während dem Transport gewahrt wird. Diese neue<br />
Verpackung wird Ihnen in Rechnung gestellt.<br />
41
DEUTCH<br />
17 SERVICE UND KUNDENDIENST<br />
Reparaturen - Revisionen - Kundendienst - Erteilung der Gültigkeit<br />
Wir halten es für sehr wichtig, Ihnen die Vorgehensweise unsere Reparaturabteilung zu<br />
schildern.<br />
Die Reparaturabteilung ist eine eigenständige Einheit der MEDILINE ITALIA SRL<br />
(GRUPPE TECNO-GAZ), die über ein verzweigtes und professionelles Gefüge verfügt.Es<br />
werden Vorgehensweisen angewendet, die in unserem Qualitätshandbuch beschrieben<br />
sind.<br />
1 - Wenn der Autoklav bei der MEDILINE ITALIA SRL eintrifft, wird er direkt von der<br />
Reparaturabteilung angenommen. Dort erhält er eine Bearbeitungsnummer und es<br />
wird eine Service-Karteikarte angelegt.<br />
2 - Binnen maximal 48 Stunden wird der Autoklav von Technikern begutachtet und<br />
die technische Diagnose mit Kostenvoranschlag für die erforderliche Leistung<br />
erstellt. Wenn der Autoklav nicht gemäß den Anweisungen im Kapitel<br />
ANWEISUNGEN FÜR DEN VERSAND DES AUTOKLAVEN versendet wird, kann<br />
die Auftragsbearbeitung länger dauern.<br />
3 - Der Kostenvoranschlag wird an die zuständige Vertriebsfirma geschickt. Diese<br />
senden ihn dann zur Kenntnisnahme und Annahme durch Unterschrift an den<br />
Endkunden.<br />
4 - Nachdem bei MEDILINE ITALIA SRL der unterzeichnete Kostenvoranschlag<br />
eingegangen ist, wird der Autoklav repariert und gemäß den im Kostenanschlag<br />
angegebenen Zeiten an den Kunden zurückgeschickt.<br />
5 - Die Ware wird von der Kundenspedition in der Original-Verpackung<br />
zurückgeschickt.<br />
42
DEUTCH<br />
18 GARANTIE<br />
1) DAUER: Auf das Produkt wird eine Garantie von 12 Monaten (zwölf) gewährt.<br />
2) AUSSCHLIESSUNGEN: Von der Garantie ausgeschlossen sind:<br />
a) Auf fehlende Wartung oder Nachlässigkeit des Anwenders oder auf einen<br />
unsachgemäßen Gebrauch des Produkts zurückführbare Störungen und Anomalien;<br />
b) Regelmäßige Kontrollen und Wartung;<br />
c) Reparatur und Austausch von Verschleißteilen, empfindlichen Teilen und Teilen<br />
mit einer nicht schätzbaren Lebensdauer, ausgenommen, die Mängel wurden bei<br />
Empfang des Produkts festgestellt und mitgeteilt;<br />
d) Arbeitskräfte, Entsendung des technischen Personals und Transport;<br />
e) Störungen oder Schäden, die auf einen unsachgemäßen Gebrauch und<br />
Anwendungsfehler zurückzuführen sind;<br />
f) Störungen oder Schäden, die auf Verunreinigungen in den Wasser- und<br />
Luftversorgungssystemen, chemische oder elektrische Ereignisse zurückzuführen<br />
sind;<br />
g) Störungen oder Schäden, die auf nicht ausdrücklich in den Bedienungs- und<br />
Wartungsanleitungen angegebene Reinigungsmittel, Desinfektionsmittel,<br />
Sterilisierstoffe oder –verfahren zurückzuführen sind.<br />
h) Natürliche Verfärbung der Kunststoffteile.<br />
3) INSTALLATIONS- UND ABNAHMEPROTOKOLL: Wesentliche Voraussetzung für die<br />
Inanspruchnahme der Garantieleistungen ist die Rücksendung des vollständig<br />
ausgefüllten und vom Anwender unterzeichneten speziellen Installations- und<br />
Abnahmeprotokolls. Dieses Protokoll muss innerhalb von 15 Tagen nach der Installation<br />
zurückgesandt werden, da andernfalls die Garantie verfällt.<br />
4) GARANTIEGRENZEN: Die Garantie verleiht Anspruch auf den kostenlosen Austausch<br />
oder die kostenlose Reparatur der defekten Bauteile. Es besteht kein Anspruch auf den<br />
Austausch des kompletten Geräts. Bezüglich der mit dem Markenzeichen TECNO-GAZ<br />
oder durch Dritte gefertigten Bauteile, die mit einem eigenen Garantieschein ausgestattet<br />
sind, gelten die in diesen Garantiescheinen angegebenen Bedingungen, Grenzen und<br />
Ausschließungen.<br />
Die Durchführung von einer oder mehreren Reparaturen während der Garantiefrist führt zu<br />
keiner Verlängerung des Garantieanspruchs.<br />
5) BEANSTANDUNGEN: Bei Beanstandungen seitens des Käufers bezüglich der<br />
Ausübung der Garantieleistungspflicht und der Qualität oder des Zustands des gelieferten<br />
Geräts ist der Käufer auf keinen Fall berechtigt, die Bezahlung zu verzögern und/oder zu<br />
unterbrechen.<br />
6) STREITIGKEITEN: Für Streitigkeiten bezüglich der Anwendung und Auslegung dieses<br />
Garantiescheins ist unabhängig von dem Ort, an dem der Kaufvertrag für das Gerät<br />
abgeschlossen wurde, das Gericht PARMA (Italien) zuständig.<br />
7) AUSNAHMEN: Bezüglich dieser Garantiebedingungen gewährte Ausnahmen führen zu<br />
keiner Anerkennung von weiteren Rechten des Käufers und beziehen sich einzig und<br />
allein auf den spezifischen Fall.<br />
8) WEITERES: Für alle nicht ausdrücklich in diesem Garantieschein erwähnten Umstände<br />
gelten die anwendbaren Gesetze des Bürgerlichen Gesetzbuchs der Italienischen<br />
Republik.<br />
43
DEUTCH<br />
Der Garantieanspruch verfällt in folgenden Fällen:<br />
a) wenn das Gerät Beschädigungen aufweist, die auf Sturz, Feueraussetzung,<br />
ausgegossene Flüssigkeiten, Blitzschlag, Naturereignisse oder Witterungseinflüsse oder<br />
auf andere nicht auf Fabrikationsmängel zurückführbare Schäden zurückzuführen sind;<br />
b) wenn die Installation nicht gemäß den Anleitungen von TECNO-GAZ erfolgt und durch<br />
nicht autorisiertes Personal durchgeführt wird;<br />
c) wenn das Gerät durch den Käufer oder nicht autorisierte Dritte repariert, abgeändert<br />
oder umgebaut wird;<br />
d) wenn bei Inanspruchnahme der Garantieleistungen festgestellt wird, dass die<br />
Gerätnummer entfernt, getilgt, gefälscht, usw. wurde;<br />
e) wenn das Installations- und Abnahmeprotokoll nicht innerhalb von 15 Tagen nach der<br />
Installation ausgefüllt und unterzeichnet zurückgesandt wird;<br />
f) wenn der Käufer die Bezahlung jedwelcher für den Kauf des Geräts und/oder dessen<br />
Wartung geschuldeter Betrags aus jedwelchen Gründen verzögert oder unterbricht;<br />
g) wenn die in den Bedienungs- und Wartungsanleitungen vorgeschriebene<br />
programmierte Wartung nicht in den angegebenen Zeitabständen durchgeführt wird.<br />
44
d e n t a l a n d m e d i c a l e q u i p m e n t<br />
TECNO-GAZ S.p.A.<br />
Strada Cavalli N°4 • 43038 • Sala Baganza • Parma • ITALIA<br />
Tel. +39 0521 83.80 Fax. +39 0521 83.33.91<br />
www.tecnogaz.com<br />
Il presente manuale deve<br />
sempre accompagnare il<br />
prodotto,<br />
in<br />
adempimento alle<br />
Direttive Comunitarie<br />
Europee.<br />
TECNO-GAZ, si riserva il<br />
diritto di apporre<br />
modifiche al presente<br />
documento senza dare<br />
alcun pre-avviso.<br />
La ditta TECNO-GAZ si<br />
riserva la proprietà del<br />
presente documento e<br />
ne vieta l’utilizzo o la<br />
divulgazione a terzi<br />
senza il proprio<br />
benestare<br />
This manual must always<br />
be kept with the product,<br />
in complying with the<br />
Directives of European<br />
Community.<br />
TECNO-GAZ reserves<br />
the right to modify the<br />
enclosed document<br />
without notice.<br />
TECNO-GAZ reserves<br />
the property of the<br />
document and forbids<br />
others to use it or spread<br />
it without its approval.<br />
Ce manuel doit toujours<br />
accompagner l'appareil<br />
conformément aux<br />
Directives de la<br />
Communauté<br />
européenne.<br />
TECNO-GAZ se réserve<br />
le droit d'y apporter des<br />
modifications sans aucun<br />
préavis.<br />
TECNO-GAZ se réserve<br />
la propriété de ce<br />
manuel.<br />
Toute utilisation ou<br />
divulgation à des tiers<br />
est interdite sans son<br />
autorisation.<br />
El presente manual<br />
siempre deberá<br />
acompañar el producto<br />
al cual pertenece,<br />
cumpliendo las<br />
Directivas Comunitarias<br />
Europeas.<br />
TECNO-GAZ, reserva el<br />
derecho de aportar<br />
alteraciones al presente<br />
documento sin avisos<br />
previos.<br />
La empresa TECNO-<br />
GAZ reserva a si los<br />
derechos de propiedad<br />
del presente documento<br />
prohiebiendo su<br />
utilización o divulgación<br />
a terceros sin que haya<br />
expresado su<br />
consentimiento.<br />
Diese Anleitung muss<br />
dem Gerät in<br />
Übereinstimmung mit<br />
den Richtlinien der<br />
Europäischen<br />
Gemeinschaft beigelegt<br />
werden.<br />
TECNO-GAZ behält sich<br />
dar Recht vor ohne<br />
Vorankündigung<br />
Änderungen in dieser<br />
Dokumentation<br />
vorzunehmen.<br />
Die Firma TECNO-GAZ<br />
ist Eigentümer der<br />
vorliegenden<br />
Dokumentation und<br />
verbietet die Nutzung<br />
von Dritten oder die<br />
Weitergabe an Dritte<br />
ohne entsprechende<br />
Genehmigung .