RT3000p Manual - Polk Audio
RT3000p Manual - Polk Audio
RT3000p Manual - Polk Audio

You also want an ePaper? Increase the reach of your titles
YUMPU automatically turns print PDFs into web optimized ePapers that Google loves.
ENGLISH<br />
ESPAÑOL<br />
FRANÇAIS<br />
DEUTSCH<br />
CONNECTING THE SPEAKERS TO THE<br />
SYSTEM - GENERAL<br />
Use two-conductor 16 gauge or thicker<br />
speaker wires. Measure enough wire to<br />
reach from your receiver or amp to each<br />
speaker. Keep in mind the extra length needed<br />
for running the wire around doors and<br />
windows. Leave yourself about 12" of extra<br />
slack to allow moving the speakers or receiver<br />
without having to disconnect the wires.<br />
Note that one of the terminals on the rear of<br />
the speaker is marked red (+) and the other<br />
black (-). Make certain that you connect the<br />
wire from the red (+) terminal of your amplifier<br />
to the red (+) terminal on your speaker,<br />
and the wire from the black (-) terminal of<br />
the amplifier to the black (-) terminal on<br />
your speaker. Most wire has some indication<br />
(such as color-coding, ribbing, or writing) on<br />
one of the two conductors to help maintain<br />
consistency. If your speakers sound “thin”<br />
with little bass and little to no center image,<br />
odds are that one of the speaker wires is<br />
connected backwards. Double-check all connections.<br />
nos descubiertos proporcionarán la mejor estabilidad<br />
y la mejor calidad de sonido.<br />
Ya que estén instaladas las cuatro patas,<br />
coloque la bocina en el lugar seleccionado. Si<br />
usted está utilizando los pernos para alfombra,<br />
presione la parte superior del gabinete hasta<br />
que los pernos penetren la alfombra y estén en<br />
contacto con la superficie dura por debajo de<br />
la alfombra.<br />
Trate de mecer la bocina de un lado para otro y<br />
de atrás hacia adelante. Cuando la bocina esté<br />
estable in cualquier dirección, la instalación ya<br />
se hizo. En cambio, si la bocina no está perfectamente<br />
estable, use los tornillos de mariposa<br />
que se encuentran en las esquinas de la base, a<br />
fin de ajustar el nivel de las patas, hasta que la<br />
bocina esté nivelada y estable.<br />
PUNTOS GENERALES PARA CONECTAR<br />
LAS BOCINAS AL SISTEMA<br />
Use cables para bocinas de dos conductores<br />
de calibre 16 o más grueso. Mida la longitud<br />
necesaria de cable para cubrir la distancia<br />
entre su receptor o amplificador y cada uno<br />
de las bocinas. No se olvide incluir el largo<br />
que se requiera para instalar el cable en<br />
torno de las puertas y ventanas. Deje por lo<br />
menos 12 pulgadas (30 cm) adicionales para<br />
que pueda mover las bocinas o el receptor<br />
sin tener que desconectar los cables.<br />
BRANCHEMENT DES ENCEINTES AU<br />
SYSTÈME – GÉNÉRALITÉS<br />
Employez un câble à deux conducteurs de<br />
calibre #16 ou supérieur. Prévoyez suffisamment<br />
de câble pour joindre votre récepteur<br />
ou amplificateur à chaque enceinte, sans<br />
oublier de calculer la longeur nécessaire<br />
pour contourner les portes et les fenêtres.<br />
Prévoyez environ 12" (30cm) de plus pour<br />
vous permettre de déplacer les haut-parleurs<br />
ou le récepteur sans débrancher les câbles.<br />
Notez qu’un des borniers à l’arrière de l’enceinte<br />
est rouge (+) et l’autre noir (-).<br />
Assurez-vous de relier le câble du bornier<br />
rouge (+) de votre amplificateur au bornier<br />
rouge (+) de votre enceinte et le câble du<br />
bornier noir (-) de l’amplificateur au bornier<br />
noir (-) de votre enceinte. L’un des deux conducteurs<br />
de la plupart des câbles est codé<br />
(couleur, nervure ou lettres) pour en déterminer<br />
la polarité. Si le son est déphasé avec<br />
peu de graves et peu ou pas d’image centrale,<br />
un des câbles est probablement<br />
branché à l’envers. Vérifiez toutes les connexions<br />
une deuxième fois.<br />
sanftem Druck in Position, bis die Spikes<br />
die feste Schicht unter dem Teppichboden<br />
erreicht haben.<br />
Bewegen Sie nun das Gehäuse vorsichtig in<br />
alle Richtungen, um sicherzustellen, daß es<br />
die notwendige Stabilität hat. Sollte dies<br />
nicht der Fall sein, drehen Sie die<br />
Einstellräder am Gehäuseboden, bis der<br />
Lautsprecher stabil im Lot steht.<br />
BEFESTIGUNG DER LAUTSPRECHER<br />
MIT DEM SYSTEM – ALLGEMEIN<br />
Benutzen Sie zwei Lautsprecher Drähte 16-er<br />
Leitungsdraht oder dicker. Messen Sie genug<br />
Draht, damit er von Ihrem Empfänger oder<br />
Verstärker bis zu jedem Lautsprecher reicht.<br />
Denken Sie daran, daß Sie extra Länge<br />
brauchen, um die Türrahmen herum zu<br />
kommen. Geben Sie noch etwa 30 cm extra<br />
Draht dazu, damit Sie die Lautsprecher oder<br />
Ihren Empfänger hin- und herschieben können,<br />
ohne die Drähte entfernen zu müssen.<br />
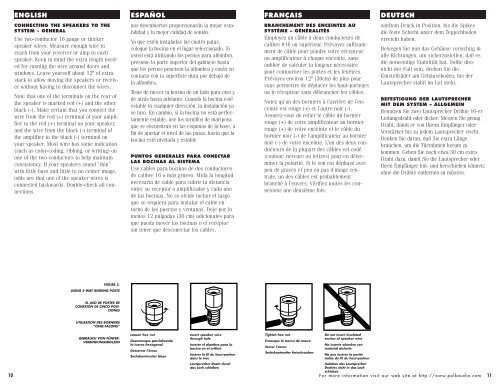
FIGURE 3.<br />
USING 5-WAY BINDING POSTS<br />
EL USO DE POSTES DE<br />
CONEXIÓN DE CINCO POSI-<br />
CIONES<br />
UTILISATION DES BORNIERS<br />
“CINQ FAÇONS”<br />
10<br />
GEBRAUCH VON FÜNFER-<br />
VERBINDUNGSBOLZEN<br />
Loosen hex nut<br />
Desenrosque parcialmente<br />
la tuerca hexagonal<br />
Desserrer l’écrou<br />
Sechskantmutter lösen<br />
Insert speaker wire<br />
through hole<br />
Inserte el alambre para la<br />
bocina en el orificio<br />
Insérer le fil du haut-parleur<br />
dans le trou<br />
Lautsprecher-Draht durch<br />
das Loch schieben<br />
Tighten hex nut<br />
Enrosque la tuerca de nuevo<br />
Serrer l’écrou<br />
Sechskantmutter festschrauben<br />
Do not insert insulated<br />
section of speaker wire<br />
No inserte alambre con<br />
material aislante<br />
Ne pas insérer la partie<br />
isolée du fil du haut-parleur<br />
Isolation des Lautsprecher-<br />
Drahtes nicht in das Loch<br />
schieben<br />
For more information visit our web site at http://www.polkaudio.com<br />
11