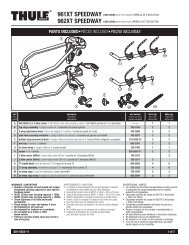
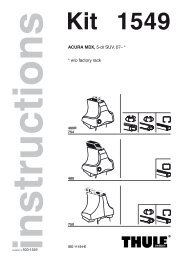
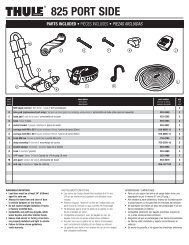
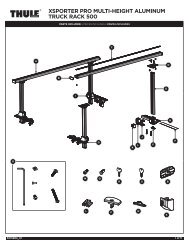
thule 668tt Frontier / 669tt Mountaineer / 667tt ... - Rack Attack
thule 668tt Frontier / 669tt Mountaineer / 667tt ... - Rack Attack
thule 668tt Frontier / 669tt Mountaineer / 667tt ... - Rack Attack

You also want an ePaper? Increase the reach of your titles
YUMPU automatically turns print PDFs into web optimized ePapers that Google loves.
7<br />
• To remove box from roof rack, loosen knobs, slide saddles until they separate from carriage bolts. Lift off of vehicle. Leave all the parts attached<br />
to your carrier to simplify your next installation.<br />
• Pour retirer le coffre du toit, desserrez les écrous borgnes, faites coulisser les berceaux jusqu’à ce qu’ils se séparent des vis de carrosserie. Soulevez-le du véhicule.<br />
Laissez toutes les pièces attachées au coffre afin de faciliter la prochaine installation.<br />
• Para sacar la caja del portacargas, afloje las perillas, deslice las cunas hasta que se separen de los pernos de montaje. Sáquela del vehículo levantándola. Deje<br />
todas las piezas sujetas al portacargas para facilitar la próxima instalación del mismo.<br />
8<br />
• Make sure that loads are evenly distributed inside the roof box. Do not exceed the maximum permitted load of 110 lbs./50kg. for the box or the<br />
maximum permitted load for the roof as recommended by the vehicle manufacturer, as well of the maximum load of the load carrier.<br />
• Assurez-vous que le poids est bien réparti dans le coffre de toit. Ne dépassez pas la charge maximale du coffre qui est de 50 kg (110 lb) ni celle du toit spécifiée par<br />
le fabricant de votre véhicule. Ne dépassez pas non plus le poids maximum de la galerie.<br />
• Asegúrese de que los cargamentos estén bien distribuidos dentro de la caja. No sobrepase la carga máxima permitida de 110 las./50 Kg. para la caja o la<br />
carga máxima permitida para el techo según lo recomienda el fabricante del vehículo. Tampoco no sobrepase el peso máximo del portacargas.<br />
9<br />
UNLOCKING/LOCKING THE BOX / DÉVERROUILLAGE/VERROUILLAGE DU COFFRE / APERTURA Y CIERRE CON LLAVE DE LA CAJA<br />
Unlocking:<br />
Locking:<br />
Insert the key and turn clockwise to the unlocked position. The key<br />
can only be removed when the box lid is closed and locked.<br />
To close, press down on the lid at the front and rear of the box. Turn<br />
the key counter-clockwise to lock. Remove key.<br />
Déverrouillage: Insérez la clé et tournez-la dans le sens horaire, en position ouverte. La clé ne peut être<br />
retirée que lorsque le coffre est fermé et verrouillé.<br />
Verrouillage: Pour fermer, appuyez sur le couvercle à l’avant et à l’arrière du coffre. Tournez la clé<br />
dans le sens anti-horaire pour verrouiller et retirez-la.<br />
OPEN /OUVERT/ABIERTO<br />
CLOSED /FERMÉ/CERRADO<br />
Apertura:<br />
Cierre:<br />
Introduzca la llave y gire hacia la derecha hasta abrir. La llave sale solamente cuando<br />
la tapa de la caja está cerrada con llave.<br />
Para cerrar, oprima la tapa en la parte delantera y trasera de la caja. Gire la llave<br />
hacia la izquierda para cerrar con llave. Saque la llave.<br />
10<br />
EXCHANGING LOCK CORES / CHANGEMENT DE SERRURE / CAMBIO DE CERRADURA<br />
• In order to change the existing lock core to a different lock core number, follow steps 1–9 below.<br />
• Pour changer de serrurre les étapes 1 à 9 ci-dessous.<br />
• Para poder cambiar los cilindros existentes por otros con número de cilindro diferentes, siga los pasos del 1 al 9 que se muestran a continuación.