RMB-1048 - Rotel
RMB-1048 - Rotel
RMB-1048 - Rotel

Create successful ePaper yourself
Turn your PDF publications into a flip-book with our unique Google optimized e-Paper software.
7 English<br />
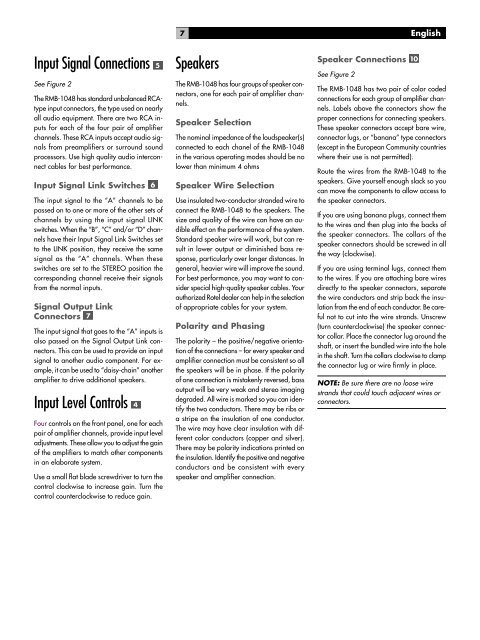
Input Signal Connections<br />
See Figure 2<br />
The <strong>RMB</strong>-<strong>1048</strong> has standard unbalanced RCAtype<br />
input connectors, the type used on nearly<br />
all audio equipment. There are two RCA inputs<br />
for each of the four pair of amplifier<br />
channels. These RCA inputs accept audio signals<br />
from preamplifiers or surround sound<br />
processors. Use high quality audio interconnect<br />
cables for best performance.<br />
Input Signal Link Switches<br />
The input signal to the “A” channels to be<br />
passed on to one or more of the other sets of<br />
channels by using the input signal LINK<br />
switches. When the “B”, “C” and/or “D” channels<br />
have their Input Signal Link Switches set<br />
to the LINK position, they receive the same<br />
signal as the “A” channels. When these<br />
switches are set to the STEREO position the<br />
corresponding channel receive their signals<br />
from the normal inputs.<br />
Signal Output Link<br />
Connectors<br />
The input signal that goes to the “A” inputs is<br />
also passed on the Signal Output Link connectors.<br />
This can be used to provide an input<br />
signal to another audio component. For example,<br />
it can be used to “daisy-chain” another<br />
amplifier to drive additional speakers.<br />
Input Level Controls<br />
Four controls on the front panel, one for each<br />
pair of amplifier channels, provide input level<br />
adjustments. These allow you to adjust the gain<br />
of the amplifiers to match other components<br />
in an elaborate system.<br />
Use a small flat blade screwdriver to turn the<br />
control clockwise to increase gain. Turn the<br />
control counterclockwise to reduce gain.<br />
Speakers<br />
The <strong>RMB</strong>-<strong>1048</strong> has four groups of speaker connectors,<br />
one for each pair of amplifier channels.<br />
Speaker Selection<br />
The nominal impedance of the loudspeaker(s)<br />
connected to each chanel of the <strong>RMB</strong>-<strong>1048</strong><br />
in the various operating modes should be no<br />
lower than minimum 4 ohms<br />
Speaker Wire Selection<br />
Use insulated two-conductor stranded wire to<br />
connect the <strong>RMB</strong>-<strong>1048</strong> to the speakers. The<br />
size and quality of the wire can have an audible<br />
effect on the performance of the system.<br />
Standard speaker wire will work, but can result<br />
in lower output or diminished bass response,<br />
particularly over longer distances. In<br />
general, heavier wire will improve the sound.<br />
For best performance, you may want to consider<br />
special high-quality speaker cables. Your<br />
authorized <strong>Rotel</strong> dealer can help in the selection<br />
of appropriate cables for your system.<br />
Polarity and Phasing<br />
The polarity – the positive/negative orientation<br />
of the connections – for every speaker and<br />
amplifier connection must be consistent so all<br />
the speakers will be in phase. If the polarity<br />
of one connection is mistakenly reversed, bass<br />
output will be very weak and stereo imaging<br />
degraded. All wire is marked so you can identify<br />
the two conductors. There may be ribs or<br />
a stripe on the insulation of one conductor.<br />
The wire may have clear insulation with different<br />
color conductors (copper and silver).<br />
There may be polarity indications printed on<br />
the insulation. Identify the positive and negative<br />
conductors and be consistent with every<br />
speaker and amplifier connection.<br />
Speaker Connections<br />
See Figure 2<br />
The <strong>RMB</strong>-<strong>1048</strong> has two pair of color coded<br />
connections for each group of amplifier channels.<br />
Labels above the connectors show the<br />
proper connections for connecting speakers.<br />
These speaker connectors accept bare wire,<br />
connector lugs, or “banana” type connectors<br />
(except in the European Community countries<br />
where their use is not permitted).<br />
Route the wires from the <strong>RMB</strong>-<strong>1048</strong> to the<br />
speakers. Give yourself enough slack so you<br />
can move the components to allow access to<br />
the speaker connectors.<br />
If you are using banana plugs, connect them<br />
to the wires and then plug into the backs of<br />
the speaker connectors. The collars of the<br />
speaker connectors should be screwed in all<br />
the way (clockwise).<br />
If you are using terminal lugs, connect them<br />
to the wires. If you are attaching bare wires<br />
directly to the speaker connectors, separate<br />
the wire conductors and strip back the insulation<br />
from the end of each conductor. Be careful<br />
not to cut into the wire strands. Unscrew<br />
(turn counterclockwise) the speaker connector<br />
collar. Place the connector lug around the<br />
shaft, or insert the bundled wire into the hole<br />
in the shaft. Turn the collars clockwise to clamp<br />
the connector lug or wire firmly in place.<br />
NOTE: Be sure there are no loose wire<br />
strands that could touch adjacent wires or<br />
connectors.