OWNERS MANUAL Fire-Safe® Safes MANUEL DU ... - Home Depot
OWNERS MANUAL Fire-Safe® Safes MANUEL DU ... - Home Depot
OWNERS MANUAL Fire-Safe® Safes MANUEL DU ... - Home Depot

You also want an ePaper? Increase the reach of your titles
YUMPU automatically turns print PDFs into web optimized ePapers that Google loves.
2<br />
Gain entry with basic electronic lock cont.<br />
3<br />
Gain entry with advanced electronic lock cont.<br />
3<br />
Signals<br />
Your electronic-lock safe communicates by means<br />
of several audio/visual signals.<br />
Red (Error) LED + three beeps indicates<br />
one of the following:<br />
1. You have pressed Program key out of sequence.<br />
2. You have entered an invalid code or user pin.<br />
3. You have let 5 seconds or more elapse between<br />
key presses.<br />
4. Lights after three consecutive invalid codes are<br />
input (2-minute delay mode).<br />
Gain entry with advanced electronic lock<br />
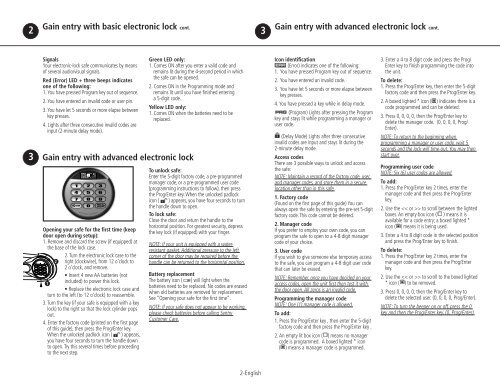
Opening your safe for the first time (keep<br />
door open during setup):<br />
1. Remove and discard the screw (if equipped) at<br />
the base of the lock case.<br />
2. Turn the electronic lock case to the<br />
2 right (clockwise), from 12 o’clock to<br />
2 o’clock, and remove.<br />
• Insert 4 new AA batteries (not<br />
1 included) to power this lock.<br />
• Replace the electronic lock case and<br />
turn to the left (to 12 o’clock) to reassemble.<br />
3. Turn the key (if your safe is equipped with a key<br />
lock) to the right so that the lock cylinder pops<br />
out.<br />
4. Enter the factory code (printed on the fi rst page<br />
of this guide), then press the Prog/Enter key.<br />
When the unlocked padlock icon ( ) appears,<br />
you have four seconds to turn the handle down<br />
to open. Try this several times before proceeding<br />
to the next step.<br />
Green LED only:<br />
1. Comes ON after you enter a valid code and<br />
remains lit during the 4-second period in which<br />
the safe can be opened.<br />
2. Comes ON in the Programming mode and<br />
remains lit until you have fi nished entering<br />
a 5-digit code.<br />
Yellow LED only:<br />
1. Comes ON when the batteries need to be<br />
replaced.<br />
To unlock safe:<br />
Enter the 5-digit factory code, a pre-programmed<br />
manager code, or a pre-programmed user code<br />
(programming instructions to follow), then press<br />
the Prog/Enter key. When the unlocked padlock<br />
icon ( ) appears, you have four seconds to turn<br />
the handle down to open.<br />
To lock safe:<br />
Close the door and return the handle to the<br />
horizontal position. For greatest security, depress<br />
the key lock (if equipped) with your fi nger.<br />
NOTE: If your unit is equipped with a waterresistant<br />
gasket. Additional pressure to the left<br />
corner of the door may be required before the<br />
handle can be returned to the horizontal position.<br />
Battery replacement<br />
The battery icon ( ) will light when the<br />
batteries need to be replaced. No codes are erased<br />
when old batteries are removed for replacement.<br />
See “Opening your safe for the fi rst time”.<br />
NOTE: If your safe does not appear to be working,<br />
please check batteries before calling Sentry<br />
Customer Care.<br />
Icon identification<br />
(Error) indicates one of the following:<br />
1. You have pressed Program key out of sequence.<br />
2. You have entered an invalid code.<br />
3. You have let 5 seconds or more elapse between<br />
key presses.<br />
4. You have pressed a key while in delay mode.<br />
(Program) Lights after pressing the Program<br />
key and stays lit while programming a manager or<br />
user code.<br />
(Delay Mode) Lights after three consecutive<br />
invalid codes are input and stays lit during the<br />
2-minute delay mode.<br />
Access codes<br />
There are 3 possible ways to unlock and access<br />
the safe:<br />
NOTE: Maintain a record of the factory code, user,<br />
and manager codes, and store them in a secure<br />
location other than in this safe.<br />
1. Factory code<br />
(Found on the fi rst page of this guide) You can<br />
always open the safe by entering the pre-set 5-digit<br />
factory code. This code cannot be deleted.<br />
2. Manager code<br />
If you prefer to employ your own code, you can<br />
program the safe to open to a 4-8 digit manager<br />
code of your choice.<br />
3. User code<br />
If you wish to give someone else temporary access<br />
to the safe, you can program a 4-8 digit user code<br />
that can later be erased.<br />
NOTE: Remember, once you have decided on your<br />
access codes, open the unit fi rst then test it with<br />
the door open. All zeros is an invalid code.<br />
Programming the manager code<br />
NOTE: One (1) manager code is allowed.<br />
To add:<br />
1. Press the Prog/Enter key , then enter the 5-digit<br />
factory code and then press the Prog/Enter key .<br />
2. An empty lit box icon ( ) means no manager<br />
code is programmed. A boxed lighted * icon<br />
( ) means a manager code is programmed.<br />
3. Enter a 4 to 8 digit code and press the Prog/<br />
Enter key to fi nish programming the code into<br />
the unit.<br />
To delete:<br />
1. Press the Prog/Enter key, then enter the 5-digit<br />
factory code and then press the Prog/Enter key.<br />
2. A boxed lighted * icon ( ) indicates there is a<br />
code programmed and can be deleted.<br />
3. Press 0, 0, 0, 0, then the Prog/Enter key to<br />
delete the manager code. (0, 0, 0, 0, Prog/<br />
Enter).<br />
NOTE: To return to the beginning when<br />
programming a manager or user code, wait 5<br />
seconds and the lock will time-out. You may then<br />
start over.<br />
Programming user code<br />
NOTE: Six (6) user codes are allowed.<br />
To add:<br />
1. Press the Prog/Enter key 2 times, enter the<br />
manager code and then press the Prog/Enter<br />
key.<br />
2. Use the > to scroll between the lighted<br />
boxes. An empty box icon ( ) means it is<br />
available for a code entry; a boxed lighted *<br />
icon ( ) means it is being used.<br />
3. Enter a 4 to 8 digit code in the selected position<br />
and press the Prog/Enter key to fi nish.<br />
To delete:<br />
1. Press the Prog/Enter key 2 times, enter the<br />
manager code and then press the Prog/Enter<br />
key.<br />
2. Use the > to scroll to the boxed lighted<br />
* icon ( ) to be removed.<br />
3. Press 0, 0, 0, 0, then the Prog/Enter key to<br />
delete the selected user. (0, 0, 0, 0, Prog/Enter).<br />
NOTE: To turn the beeper on or off, press the 0<br />
key and then the Prog/Enter key. (0, Prog/Enter).<br />
2-English