Aygo Audio_LHD - Toyota-tech.eu
Aygo Audio_LHD - Toyota-tech.eu
Aygo Audio_LHD - Toyota-tech.eu

You also want an ePaper? Increase the reach of your titles
YUMPU automatically turns print PDFs into web optimized ePapers that Google loves.
<strong>Aygo</strong><br />
AUDIO<br />
9.<br />
Loosen the carpet clip 111 and the hook 105 as<br />
shown.<br />
111 : Carpet clip (1x)<br />
105 : Hook (1x)<br />
21 : Carpet<br />
9.<br />
Desserrez le clip de la moquette 111 et le<br />
crochet 105 de la manière illustrée.<br />
111 : Clip de la moquette (1x)<br />
105 : Crochet (1x)<br />
21 : Moquette<br />
104<br />
12<br />
104<br />
12<br />
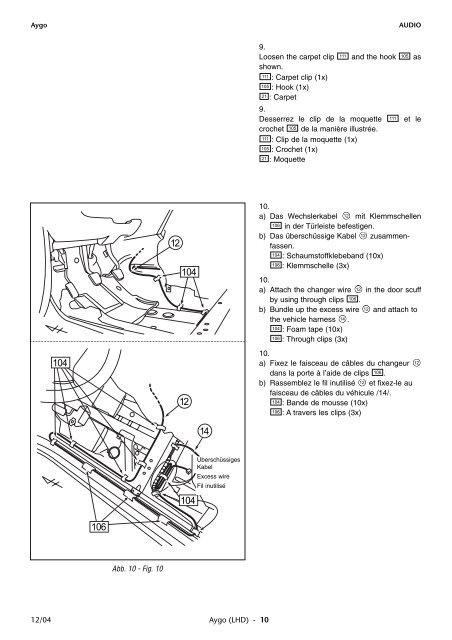
10.<br />
a) Das Wechslerkabel 12 mit Klemmschellen<br />
106 in der Türleiste befestigen.<br />
b) Das überschüssige Kabel 12 zusammenfassen.<br />
104 : Schaumstoffklebeband (10x)<br />
106 : Klemmschelle (3x)<br />
10.<br />
a) Attach the changer wire 12 in the door scuff<br />
by using through clips 106 .<br />
b) Bundle up the excess wire 12 and attach to<br />
the vehicle harness 14 .<br />
104 : Foam tape (10x)<br />
106 : Through clips (3x)<br />
10.<br />
a) Fixez le faisceau de câbles du chang<strong>eu</strong>r<br />
dans la porte à l’aide de clips 106 .<br />
b) Rassemblez le fil inutilisé 12 et fixez-le au<br />
faisceau de câbles du véhicule /14/.<br />
104 : Bande de mousse (10x)<br />
106 : A travers les clips (3x)<br />
12<br />
14<br />
104<br />
Überschüssiges<br />
Kabel<br />
Excess wire<br />
Fil inutilisé<br />
106<br />
Abb. 10 - Fig. 10<br />
12/04<br />
<strong>Aygo</strong> (<strong>LHD</strong>) - 10