SFH 3326 ELEKTR‹KL‹ YA⁄LI RADYATÖR KULLANMA ... - Sinbo
SFH 3326 ELEKTR‹KL‹ YA⁄LI RADYATÖR KULLANMA ... - Sinbo
SFH 3326 ELEKTR‹KL‹ YA⁄LI RADYATÖR KULLANMA ... - Sinbo

Create successful ePaper yourself
Turn your PDF publications into a flip-book with our unique Google optimized e-Paper software.
IMPORTANT SAFEGUARDS<br />
agent who should be contacted if there is an oil leakage.<br />
21. Regulations concerning the disposal of oil when scrapping the appliance have to be followed.<br />
22. The heater should not be used in a room, of which the floor area is less than 5 M2.<br />
23. The cord shouldn’t be placed nearby the hot surface of the appliance.<br />
24. This appliance is not intended for use by persons (including children) with reduced physical, sensory<br />
or mental capabilities, or lack of experience and knowledge, unless they have been given supervision<br />
or instruction concerning use of the appliance by a person responsible for their safety.<br />
FOR HOUSEHOLD USE ONLY<br />
SAVE THESE INSTRUCTIONS<br />
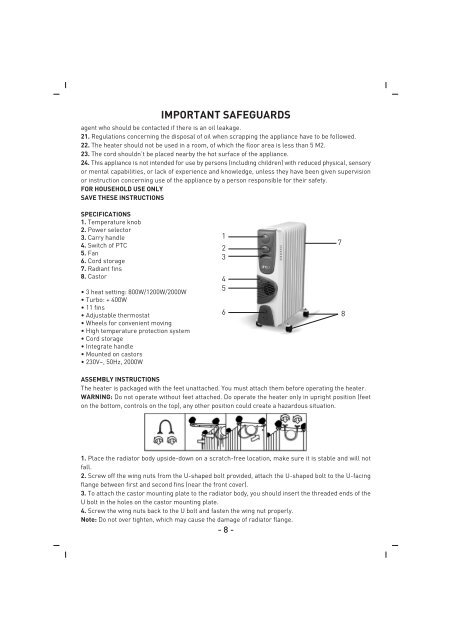
SPECIFICATIONS<br />
1. Temperature knob<br />
2. Power selector<br />
3. Carry handle<br />
4. Switch of PTC<br />
5. Fan<br />
6. Cord storage<br />
7. Radiant fins<br />
8. Castor<br />
• 3 heat setting: 800W/1200W/2000W<br />
• Turbo: + 400W<br />
• 11 fins<br />
• Adjustable thermostat<br />
• Wheels for convenient moving<br />
• High temperature protection system<br />
• Cord storage<br />
• Integrate handle<br />
• Mounted on castors<br />
• 230V~, 50Hz, 2000W<br />
1<br />
2<br />
3<br />
4<br />
5<br />
6<br />
7<br />
8<br />
ASSEMBLY INSTRUCTIONS<br />
The heater is packaged with the feet unattached. You must attach them before operating the heater.<br />
WARNING: Do not operate without feet attached. Do operate the heater only in upright position (feet<br />
on the bottom, controls on the top), any other position could create a hazardous situation.<br />
1. Place the radiator body upside-down on a scratch-free location, make sure it is stable and will not<br />
fall.<br />
2. Screw off the wing nuts from the U-shaped bolt provided, attach the U-shaped bolt to the U-facing<br />
flange between first and second fins (near the front cover).<br />
3. To attach the castor mounting plate to the radiator body, you should insert the threaded ends of the<br />
U bolt in the holes on the castor mounting plate.<br />
4. Screw the wing nuts back to the U bolt and fasten the wing nut properly.<br />
Note: Do not over tighten, which may cause the damage of radiator flange.<br />
- 8 -