(ld46 instructions) - Olivers Baby Care
(ld46 instructions) - Olivers Baby Care
(ld46 instructions) - Olivers Baby Care
Create successful ePaper yourself
Turn your PDF publications into a flip-book with our unique Google optimized e-Paper software.
GB<br />
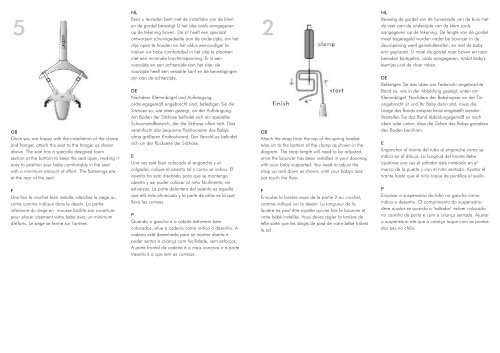
Once you are happy with the installation of the clamp<br />
and hanger, attach the seat to the hanger as shown<br />
above. The seat has a specially designed foam<br />
section at the bottom to keep the seat open, making it<br />
easy to position your baby comfortably in the seat<br />
with a minimum amount of effort. The fastenings are<br />
at the rear of the seat.<br />
F<br />
Une fois le crochet bien installe, attachez le siege au<br />
cintre comme indique dans le dessin. La partie<br />
inferieure du siege en mousse facilite son ouverture<br />
pour placer aisement votre bebe avec un minimum<br />
d'efforts. Le siege se ferme sur l'arriere.<br />
NL<br />
Eens u tevreden bent met de installatie van de klem<br />
en de gordel bevestigt U het zitje zoals aangegeven<br />
op de tekening boven. De zit heeft een speciaal<br />
ontworpen schuimgedeelte aan de onderzijde, om het<br />
zitje open te houden en het aldus eenvoudiger te<br />
maken uw baby comfortabel in het zitje te plaatsen<br />
met een minimale krachtinspanning. Er is een<br />
voorzijde en een achterzijde aan het zitje: de<br />
voorzijde heeft een verzakte kant en de bevestigingen<br />
zijn aan de achterzijde.<br />
DE<br />
Nachdem Klemmbügel und Aufhängung<br />
ordnungsgemäß angebracht sind, befestigen Sie die<br />
Sitzhose so, wie oben gezeigt, an der Aufhängung.<br />
Am Boden der Sitzhose befindet sich ein spezieller<br />
Schaumstoffbereich, der die Sitzhose offen hält. Dies<br />
vereinfacht das bequeme Positionieren des <strong>Baby</strong>s<br />
ohne größeren Kraftaufwand. Der Verschluss befindet<br />
sich an der Rückseite der Sitzhose.<br />
E<br />
Una vez esté bien colocado el enganche y el<br />
colgador, colque el asiento tal y como se indica. El<br />
asiento ha sido diseñado para que se mantenga<br />
abierto y asi poder colocar al niño fácilmente, sin<br />
esfuerzos. La parte delantera del asiento es aquella<br />
que etá más ahuecada y la parte de atrás es la que<br />
lleva las correas.<br />
P<br />
Quando o gancho e o cabide estiverem bem<br />
colocados, situe a cadeira como indica o desenho. A<br />
cadeira está desenhada para se manter aberta e<br />
poder sentar a criança com facilidade, sem esforços.<br />
A parte frontal da cadeira é a mais concava e a parte<br />
traseira é a que tem as correias.<br />
GB<br />
Attach the strap from the top of the spring loaded<br />
tube on to the bottom of the clamp as shown in the<br />
diagram. The strap length will need to be adjusted<br />
once the bouncer has been installed in your doorway,<br />
with your baby supported. You need to adjust the<br />
strap up and down as shown, until your baby's toes<br />
just touch the floor.<br />
F<br />
Enroulez la lanière issue de la partie 2 au crochet,<br />
comme indiqué sur le dessin. La longueur de la<br />
lanière ne peut être ajustée qu'une fois le bouncer et<br />
votre bébé installés. Vous devez régler la lanière de<br />
telle sorte que les doigts de pied de votre bébé frôlent<br />
le sol.<br />
NL<br />
Bevestig de gordel van de bovenzijde van de buis met<br />
de veer aan de onderzijde van de klem zoals<br />
aangegeven op de tekening. De lengte van de gordel<br />
moet bijgeregeld worden nadat be bouncer in de<br />
deuropening werd geinstalleerden, en met de baby<br />
erin geplaatst. U moet de gordel naar boven en naar<br />
beneden bijregelen, zoals aangegeven, totdat baby's<br />
teentjes juist de vloer raken.<br />
DE<br />
Befestigen Sie das oben am Federrohr angebrachte<br />
Band so, wie in der Abbildung gezeigt, unten am<br />
Klemmbügel. Nachdem der <strong>Baby</strong>hopser an der Tür<br />
angebracht ist und Ihr <strong>Baby</strong> darin sitzt, muss die<br />
Länge des Bands entsprechend eingestellt werden.<br />
Verstellen Sie das Band abbildungsgemäß so nach<br />
oben oder unten, dass die Zehen des <strong>Baby</strong>s geradeso<br />
den Boden berühren.<br />
E<br />
Enganchar el tirante del tubo al enganche como se<br />
indica en el dibujo. La longitud del tirante debe<br />
ajustarse una vez el saltador esté instalado en el<br />
marco de la puerta y con el niño sentado. Ajustar el<br />
tirante hasta que el niño toque de puntillas el suelo.<br />
P<br />
Encaixor o suspensório do tubo no gancho como<br />
indica o desenho. O comprimento do suspensório<br />
deve ajustar-se quando o "saltador" estiver colocado<br />
no caixilho da porta e com a criança sentada. Ajustar<br />
o suspensório até que a criança toque com as pontas<br />
dos pés no chão.


