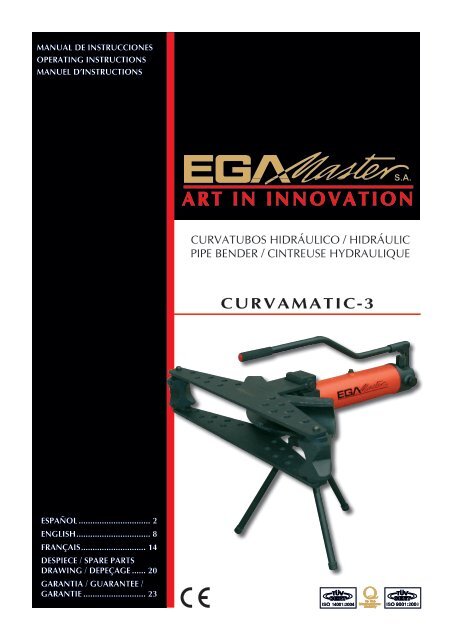
CURVAMATIC-3 - Ega Master
CURVAMATIC-3 - Ega Master
CURVAMATIC-3 - Ega Master

Create successful ePaper yourself
Turn your PDF publications into a flip-book with our unique Google optimized e-Paper software.
MANUAL DE INSTRUCCIONES<br />
OPERATING INSTRUCTIONS<br />
MANUEL D’INSTRUCTIONS<br />
CURVATUBOS HIDRÁULICO / HIDRÁULIC<br />
PIPE BENDER / CINTREUSE HYDRAULIQUE<br />
<strong>CURVAMATIC</strong>-3<br />
ESPAÑOL................................ 2<br />
ENGLISH................................. 8<br />
FRANÇAIS............................. 14<br />
DESPIECE / SPARE PARTS<br />
DRAWING / DEPEÇAGE....... 20<br />
GARANTIA / GUARANTEE /<br />
GARANTIE............................ 23
ESPAÑOL<br />
INSTRUCCIONES DE SEGURIDAD<br />
¡Atención! Cuide su seguridad.<br />
1. No utilice prendas colgantes que se puedan enganchar en los elementos en movimiento .<br />
2. Utilice siempre guantes.<br />
3. Emplee siempre los accesorios destinados a la máquina ya que sin su utilización puede resultar<br />
lesionado.<br />
4. No manipular ni utilizar la máquina desde la zona delantera (zona de curvado de tubo). El usuario<br />
siempre se debe situar en la zona trasera (zona del pistón hidráulico).<br />
5. Colocar siempre la pata delantera perfectamente alineada con el pistón hidráulico para garantizar<br />
la seguridad durante el uso.<br />
CURVATUBOS HIDRÁULICO – 3<br />
Máquina curvadora adecuadamente equipada para curvar tubería de acero para conducción de<br />
agua, gas, etc. de ¼"÷3". Su sistema de dos velocidades permite de forma automática una rápida<br />
aproximación, así como un suave doblado sin necesidad de cambiar de pistón. Dispuesta con doble<br />
placa, lo que le da la máxima consistencia durante el curvado. Asentamiento sobre 3 patas de<br />
apoyo para obtener una mayor estabilidad.<br />
Sistema de giro del cilindro y placas para poder curvar en zonas de dificil acceso.<br />
Este curvatubos está diseñado para curvar tubos conformes a la norma DIN-2440, y que hayan<br />
sido conformados en caliente. Se muestra una tabla con los diametros y espesores que dicta la norma<br />
DIN-2440.<br />
Presión de trabajo: 13 Tm.<br />
ATENCIÓN<br />
Antes de comenzar a trabajar, aflojar ligeramente (una vuelta) el tornillo de llenado de aceite nº36.<br />
2
TABLA DE DIAMETROS DE TUBOS DIN-2440<br />
TAMAÑO DIAMETRO EXTERIOR ESPESOR<br />
1/4 13,5 2,35<br />
3/8 17,2 2,35<br />
1/2 21,3 2,65<br />
3/4 26,9 2,65<br />
1 33,7 3,25<br />
1.1/4 42,4 3,25<br />
1.1/2 48,3 3,65<br />
2 60,3 3,65<br />
2.1/2 76,1 3,65<br />
3 88,9 4,03<br />
MANTENIMIENTO<br />
Es importante utilizar aceite hidráulico. No utilizar ningún otro tipo de fluído.<br />
Filtrar el aceite antes de introducirlo en el depósito. Cualquier elemento extraño podría dañarlo.<br />
En posición de reposo la válvula (nº50) debe estar abierta y el pistón debe estar retirado para<br />
evitar que el muelle de retorno del pistón se encuentre presionado.<br />
Después de varios dias sin uso deben engrasar la extremidad que asoma del pistón para evitar<br />
oxidaciones y agarrotamientos al utilizarlo de nuevo.<br />
RECOMENDACIONES<br />
No ponerse nunca delante de la máquina, evitaremos accidentes.<br />
IMPORTANTE<br />
Para el pedido de repuestos indique el código de éstos y el número de serie de la máquina.<br />
INSTRUCCIONES DE FUNCIONAMIENTO<br />
A) LLENADO DEL DEPÓSITO<br />
Introducir aceite a través del tapón (nº36). Introducir aceite a través del tapón (nº36). Para ello, se<br />
aconseja retroceder completamente el pistón (mediante la ruleta de retroceso), estabilizar en horizontal<br />
el pistón para nivelar completamente el aceite, meter una varilla hasta encontrar un obstáculo y medir<br />
1,5cm de aceite. Ese será el nivel ideal de llenado.<br />
A<br />
3
B) CURVADO DE TUBOS<br />
B1- El tornillo superior de llenado de aceite debe estar parcialmente abierto para el uso. Sólo debe<br />
cerrarse para el transporte.<br />
B2- Cierre la válvula (nº50).<br />
B3- Con la placa superior abatida, coloque ambos diábolos en sus correspondientes alojamientos<br />
de la placa inferior según la medida del tubo a curvar.<br />
B4- Seleccione la huella correspondiente del diábolo y orientelo hacia la máquina.<br />
B5- Seleccione la galleta necesaria en función de la medida del tubo a curvar.<br />
B6- Introduzca el tubo a curvar alojándolo entre la galleta y los diábolos.<br />
B7- Introducir y accionar la palanca en el alojamiento del pistón e iniciaremos el movimiento rápido<br />
de salida del pistón hasta que la galleta haga contacto con el tubo. En ese instante se accionará<br />
la velocidad de curvado suave, que nos permitirá curvar con mínimo esfuerzo.<br />
B8- Una vez realizado el curvado, se abrirá la válvula (nº50). El pistón retrocederá automáticamente.<br />
B9- Eleve la placa superior y retire la galleta junto con el tubo curvado.<br />
B1<br />
B2<br />
B3<br />
nº50<br />
B4 B5 B6<br />
B7<br />
B8<br />
B9<br />
nº50<br />
4
SOLUCIÓN A POSIBLES ERRORES<br />
a) El pistón no avanza: compruebe que el tornillo superior (Fig. B1) está parcialmente abierto y que<br />
la válvula de retorno (nº50) está cerrada.<br />
b) El pistón no retrocede o no retrocede completamente: compruebe que el tubo no está atascado<br />
en los émbolos laterales. Dando un suave golpe debería soltarse. Comprobar también que el<br />
tornillo superior (Fig. B1) no esté cerrado.<br />
c) Existe fuga de aceite por la parte frontal: esto es normalmente debido a la continua fricción<br />
sobre la junta que sufre mayor rozamiento. Esta junta ha de ser cambiada periodicamente del<br />
modo que a continuación se detalla:<br />
1. Vaciar el déposito de aceite a través del tornillo superior.<br />
2. Soltar la pieza Nº27 con ayuda de una llave hexagonal.<br />
3. Soltar la pieza hexagonal Nº 33 con ayuda de una llave.<br />
4. Soltar la pieza Nº28 con ayuda de una llave hexagonal.<br />
5. Extraer el pistón pieza Nº30 con la mano.<br />
6. Sustituir la junta del pistón Nº39 asegurándose de su correcta posición.<br />
7. Introducir el pistón con suavidad para evitar dañar la junta.<br />
8. Introducir la pieza Nº28 y apretar con ayuda de una llave hexagonal.<br />
9. Introducir la pieza Nº33 y apretar con ayuda de una llave.<br />
10. Introducir la pieza Nº27 y apretar con ayuda de una llave hexagonal.<br />
1 2 3<br />
4 5 6<br />
7 8 9 10<br />
5
MEDIDAS DE GALLETAS Y DIÁBOLO<br />
GALLETA<br />
DIÁBOLO<br />
(consta de 3 caras<br />
diferentes)<br />
1.1/2 - 2<br />
1/2 - 3/4 - 1 -<br />
1.1/4 - 1.1/2 -<br />
2 - 2.1/2 - 3<br />
2.1/2 - 3<br />
1/4 - 3/8<br />
1/2 - 3/4 - 1<br />
NOTAS<br />
¡IMPORTANTE!<br />
El fabricante no se responsabiliza de los daños o mal funcionamiento de la máquina en caso de<br />
que no se use correctamente o se haya utilizado para trabajos para los que no está diseñada.<br />
Para pedir cualquier repuesto, mirar en el dibujo de despiece el número de la pieza deseada.<br />
Según la directiva sobre residuos eléctricos de aparatos eléctricos y electrónicos (RAEE),<br />
éstos deberán recogerse y tratarse por separado. Si en el futuro tiene que deshacerse de este producto,<br />
no se deshaga de él junto con la basura doméstica. Póngase en contacto con su distribuidor<br />
para proceder a su reciclaje de manera gratuita cuando sea posible.<br />
6
GARANTÍA<br />
El fabricante garantiza al comprador de ésta máquina la garantía total durante 12 meses de las<br />
piezas con defectos de fabricación.<br />
Esta garantía no cubre aquellas piezas que por su uso normal tienen un desgaste.<br />
Nota: para obtener la validez de la garantía, es absolutamente imprescindible que complete y<br />
remita al fabricante el documento de “CERTIFICADO DE GARANTIA”, dentro de los siete dias a<br />
partir de la fecha de compra.
ENGLISH<br />
SAFETY INSTRUCTIONS<br />
Attention! Be careful.<br />
1. Do not wear loose clothing. They could be caught by moving parts of the machine.<br />
2. Always wear gloves.<br />
3. Always use the machine´s indicicated accesories because if you don´t, it could lead to risk of<br />
personal injury.<br />
4. Don’t use or manipulate the machine standing in front of it (pipe welding area). User should<br />
always stand at the back of the machine (hydraulic piston area).<br />
5. Place always the forward supporting leg perfectly lined with the hydraulic piston to guarantee the<br />
use safety.<br />
HIDRÁULIC PIPE BENDER – 3<br />
Pipe bender machine properly equipped to bend steel pipe for conduction of water, gas, etc.<br />
from ¼"÷3". The system of two speeds enables an automatic switch from “fast pre-loading” to<br />
“soft bending” position without any need to change pistons. Fitted with double plate, wich gives<br />
it the maximum consistency during the bending. Seated upon 3 legs of support to obtain a greater<br />
stability. Has a turn system for the cylinder and plates to be able to bend in difficult access areas.<br />
This pipe bender has been designed for bending pipes according to DIN-2440. Included a table<br />
with the diameter and thickness specified by norm DIN-2440.<br />
Working pressure : 13 Tm.<br />
ATTENTION<br />
Before beginning to work, loose slightly (a turn) the plug nº36.<br />
8
TUBING DIAMETER & THICKNESS DIN-2440<br />
SIZE EXTERIOR DIAMETER THICKNESS<br />
1/4 13,5 2,35<br />
3/8 17,2 2,35<br />
1/2 21,3 2,65<br />
3/4 26,9 2,65<br />
1 33,7 3,25<br />
1.1/4 42,4 3,25<br />
1.1/2 48,3 3,65<br />
2 60,3 3,65<br />
2.1/2 76,1 3,65<br />
3 88,9 4,03<br />
MAINTENANCE<br />
It is very important to use hidraulic oil and not any other type of fluid.<br />
Filter the oil before putting it into the deposit as any foreign substance can damage the O rings<br />
or any of the valves.<br />
The valve (nº50), in position of rest, must be opened and the piston withdraw, to avoid having<br />
pressed the spring of the pistons return.<br />
Before several days without being used, lubricate the end of the piston to avoid corrosions and<br />
seizure while starting again its usage.<br />
ADVICE<br />
Take care while working, don’t place your body in front of the machine, that will avoid accidents.<br />
IMPORTANT<br />
When ordering spare parts please indicate its code number and the serial number of the machine.<br />
GUIDE OF USAGE<br />
A) FILLING THE DEPOSIT<br />
Introduce through the plug (nº36) the oil. Introduce through the plug (nº36) the oil. For that, it<br />
is strongly recommended to move back the piston (with the runback roulette), stabilize the piston<br />
horizontally to level the oil fully, insert a rod until a stop is found and measure 1,5cm of oil. This<br />
will be the ideal level of filling.<br />
A<br />
9
B) BENDING OF PIPES<br />
B1- The upper screw for oil filling must be half-opened for use. It only must be completely closed<br />
for transport.<br />
B2- Close the valve (nº50).<br />
B3- With the superior plate withdrawn, place both resting forms in their corresponding housings of<br />
the interior plate according to the size of the pipe bent.<br />
B4- Select the form corresponding to the resting form in the end of the piston.<br />
B5- Place the corresponding form in the end of the piston.<br />
B6- Insert the pipe to be bent, housing it between the form and the resting forms.<br />
B7- Insert and actuate the bar, inside the housing of the big piston (left) and we will actuate it fast<br />
untill the pipe contacts with the bending form. At this moment smooth-bending speed will<br />
start, which enables bending with minimal effort.<br />
B8- Once the bend is gotten, the (nº50) will be oppened and by making this action, the piston will<br />
go back automatically.<br />
B9- Raise the superior plate and withdraw the form together with the bent pipe, removing it from the same.<br />
B1<br />
B2<br />
B3<br />
nº50<br />
B4 B5 B6<br />
B7<br />
B8<br />
B9<br />
nº50<br />
10
SOLUTION TO POSSIBLE ERRORS<br />
a) The piston does not move forward: check the upper screw (Fig. B1) is half-opened and the returning<br />
valve (nº50) is closed.<br />
b) The piston does not fully move back: check the pipe is not blocked by lateral resting forms. It<br />
can be solved with some smooth knocks. Check too the upper screw (Fig. B1) is half-opened.<br />
c) Oil is leaking from front zone: the reason for this is the continous friction of the internal o-ring.<br />
This o-ring must be from time to time changed according to following way:<br />
1. Drain the oil tank through the upper screw.<br />
2. Loosen the piece Nº 27 with a hexagonal key.<br />
3. Loosen the hexagonal piece Nº 27 with a wrench.<br />
4. Loosen the piece Nº 28 with a hexagonal key.<br />
5. Extract the piston Nº30 piece with the hand.<br />
6. Replace o-ring of the piston (piece Nº39) , making sure it is correctly positioned.<br />
7. Introduce the piston with smoothness to avoid to damage the o-ring.<br />
8. Introduce and tighten the piece Nº28 with a hexagonal key.<br />
9. Introduce and tighten the piece Nº33 witha key.<br />
10. Introduce and tighten the piece Nº27 with a hexagonal key.<br />
1 2 3<br />
4 5 6<br />
7 8 9 10<br />
11
MEASURES OF FORMS AND RESTING FORMS<br />
FORMS<br />
RESTING<br />
FORMS<br />
(it has three sides)<br />
1.1/2 - 2<br />
1/2 - 3/4 - 1 -<br />
1.1/4 - 1.1/2 -<br />
2 - 2.1/2 - 3<br />
2.1/2 - 3<br />
1/4 - 3/8<br />
1/2 - 3/4 - 1<br />
NOTES<br />
IMPORTANT!<br />
The maker will not take responsibility for damage or malfunction as a result of the machine<br />
being incorrectly used or, applied for a purpose for which it was not intended.<br />
For ordering spare parts, please refer to the Spare Parts Drawing and note the needed number.<br />
According to Waste Electrical and Electronic Equipment directive (WEEE), these ones must<br />
be collected and arranged separately. If you have to throw them out, please, do not use the usual<br />
rubbish. Please, contact your distributor for free recycling.<br />
12
GUARANTEE<br />
The maker guarantees to the machine owner 12 months against any manifacture defect.<br />
This guaranteee do not cover the parts wich are consumables.<br />
Note: to apply the guarantee its necesary to send the “GUARANTEE CERTIFICATE” duly filled<br />
within one week after purchased the machine to the maker.
FRANÇAIS<br />
INSTRUCTIONS DE SECURITE<br />
Attention! Soyez prudent.<br />
1. N´utilisez pas des vêtements amples Ils pourraient être entrainés dans les parties mobiles de la<br />
machine.<br />
2. Utilisez toujours des gants.<br />
3. N´utilisez que des accesoires destinés exactement á la machine, afin d´eviter tout risque de<br />
blessure corporelle.<br />
4. Ne pas manipuler ni utiliser de puis la zone avant (zone du courbé du tube). L’utilisateur doit<br />
toujours de situer dans la zone arrière (zone du piston hydraulique).<br />
5. Toujours placer la patte avant parfaitement alignée avec le piston hydraulique pour garantir la<br />
sécurité pendant l’utilisation.<br />
CINTREUSE HYDRAULIQUE – 3<br />
Machine à cintrer toute tuyauterie en acier pour la circulation d’eau, de gaz, etc de ¼" à 3".<br />
Son système à deux vitesses permet de façon automatique une approximation rapide, ainsi qu’un<br />
léger doublage sans avoir besoin de changer le piston. Dispose de 2 plaques qui permettent une<br />
résistance maximum pendant le cintrage. 3 pieds d’appui pour une plus grande stabilité.<br />
Système de rotation du cylindre et des plaques pour cintrer des tubes dans des zones d’accès<br />
difficile.<br />
Cette cintreuse est conçue pour cintrer des tubes conformes à la norme DIN-2440, qui ont été<br />
façonnés à chaud.<br />
Présenté tableau des diamètres et épaisseurs de tubes selon la norme DIN 2440.<br />
Pression de travail : 13 Tm.<br />
ATTENTION<br />
Avant de commencer à travailler, desserrer légèrement (un tour) la vis de remplissage d’huile N°36.<br />
14
TABLEAU DES DIAMETRES DE TUBES DIN-2440<br />
DIMENSION DIAMETRE EXTERIEUR EPAIS SEUR<br />
1/4 13,5 2,35<br />
3/8 17,2 2,35<br />
1/2 21,3 2,65<br />
3/4 26,9 2,65<br />
1 33,7 3,25<br />
1.1/4 42,4 3,25<br />
1.1/2 48,3 3,65<br />
2 60,3 3,65<br />
2.1/2 76,1 3,65<br />
3 88,9 4,03<br />
ENTRETIEN<br />
Important: utiliser de l’huile hydraulique. N’utiliser aucun autre fluide.<br />
Filtre l’huile avant de l’introduire dans le réservoir. Un élément extérieur pourrait endommager<br />
la machine.<br />
Dans la position de repos, la vanne (N°32) doit être ouverte et le piston doit être à son minimum<br />
pour éviter que le ressort de retour du piston soit sous pression.<br />
Après plusieurs sans utilisation, il faut graisser l’extrémité du piston pour éviter les oxydations et<br />
bouchages éventuels.<br />
RECOMMENDATIONS<br />
Ne jamais se mettre devant la machine afin d’éviter les accidents.<br />
IMPORTANT<br />
Pour la commande de piéces détachées, indiquer la référence et le numéro de série de la machine.<br />
GUIDE D’UTILISATION<br />
A) REMPLISSAGE DU RESERVOIR<br />
Remplir d’huile par le bouchon (nº36). Pour cela, il est conseillé de reculer complètement le piston (au<br />
moyen de la roulette de recul), stabiliser à l’horizontal le piston pour niveler complètement l’huile, mettre<br />
une tige jusqu’à rencontrer un obstacle et mesurer 1,5cm d’huile. Ce sera le niveau idéal de remplissage.<br />
A<br />
15
B) CINTRAGE DES TUBES<br />
B1- La vis supérieure de remplissage d’huile doit être partiellement ouverte pour son utilisation.<br />
Elle doit juste se fermer pour le transport.<br />
B2- Fermeture de la vanne (nº50).<br />
B3- Soulever la plaque supérieure, positionner les butées dans leurs emplacements respectifs sur la<br />
plaque inférieure suivant le diamètre du tube à cintrer.<br />
B4- Sélectionner l’empreinte correspondante sur la butée et l’orienter vers la machine.<br />
B5- Positionner le galet correspondant au tube à cintrer à l’extrémité du piston.<br />
B6- Introduire le tube entre le galet et les butées.<br />
B7- Introduire et actionner le manche dans le grand piston (piston gauche) et vous obtiendrez une<br />
avancée très rapide du galet jusqu’à son entrée en contact avec le tube. A cet instant, la vitesse<br />
de courbage douce sera actionnée, ce qui nous permettra de courber avec un minimum d’effort.<br />
B8- Après avoir réalisé le cintrage, ouvrir la vanne (N°32) et le piston reviendra à sa position initiale<br />
automatiquement.<br />
B9- Soulever la plaque supérieure et retirer le galet et le tube cintré.<br />
B1<br />
B2<br />
B3<br />
nº50<br />
B4 B5 B6<br />
B7<br />
B8<br />
B9<br />
nº50<br />
16
SOLUTION AUX POSSIBLES ERREURS<br />
a) Le piston n’avance pas : vérifier que la vis supérieure (Fig. B1) est partiellement ouverte et que la<br />
valve de retour (nº50) est bien fermée.<br />
b) Le piston ne recule pas ou pas complètement : vérifier que le tube n’est pas bouché dans les<br />
pistons latéraux. En donnant un petit coup, ça devrait sauter. Vérifier également que la vis supérieure<br />
(Fig. B1) n’est pas fermée.<br />
c) Il y a des fuites d’huile par la partie frontale : cela est normalement du à la friction continue sur<br />
le joint qui subit le plus de friction. Ce joint doit être changé périodiquement selon les détails<br />
comme suit:<br />
1. Vider le dépôt d’huile à travers la vis supérieure.<br />
2. Desserrer la pièce Nº27 avec l’aide d’une clé hexagonale.<br />
3. Desserrer la pièce hexagonale Nº33 avec l’aide d’une clé.<br />
4. Desserrer la pièce Nº28 avec l’aide d’une clé hexagonale.<br />
5. Extraire le piston pièce Nº30 avec la main.<br />
6. Remplacer le joint du piston Nº39 en s’assurant de sa position correcte.<br />
7. Introduire le piston doucement pour éviter d’abîmer le joint.<br />
8. Introduire la pièce Nº28 et la serrer avec l’aide d’une clé hexagonale.<br />
9. Introduire la pièce Nº33 et la serrer avec l’aide d’une clé.<br />
10. Introduire la pièce Nº27 et la serrer avec l’aide d’une clé.<br />
1 2 3<br />
4 5 6<br />
7 8 9 10<br />
17
MESURES DES GALETS ET BUTÉES<br />
GALETS<br />
BUTÉES<br />
(composé de trois<br />
faces différentes)<br />
1.1/2 - 2<br />
1/2 - 3/4 - 1 -<br />
1.1/4 - 1.1/2 -<br />
2 - 2.1/2 - 3<br />
2.1/2 - 3<br />
1/4 - 3/8<br />
1/2 - 3/4 - 1<br />
NOTES<br />
IMPORTANT!<br />
Le fabricant ne se responsabilise pas des détériorations ou du mauvais fonctionnement de la<br />
machine dans le cas d’une mauvaise utilisation ou suite à des usages pour lesquels elle n’est pas<br />
concue.<br />
Pour commander les pièces de rechange, regarder le descriptif et le numéro de pièce désiré.<br />
Selon la directive des déchets d’appareils électriques et électroniques (DEEE), ces derniers<br />
devront se ramasser et suivre un traitement séparé. Si dans l’l’avenir vous devez vous débarrasser<br />
de ce produit, ne le faites pas avec le reste d’ordures ménagères. Merci de vous adresser à votre<br />
distributeur pour procéder à son recyclage gratuit si possible.<br />
18
GARANTIE<br />
Le fabricant donne une garantie de 12 mois à l’acquéreur de cette machine, pour les pièces avec<br />
un défaut de fabrication.<br />
La garantie ne s’applique pas aux pièces d’usure normale.<br />
Note : pour obtenir la validité de la garantie, il est obligatoire de compléter et de retourner au<br />
fabricant, le document ‘’CERTIFICAT DE GARANTIE’’ dans les 7 jours d’acquisition de la machine.<br />
“Este documento ha sido creado por EGA <strong>Master</strong> S.A. y a ella le corresponden todos sus derechos. Queda prohibida por tanto toda<br />
copia o redifusion de la totalidad o parte de este documento, tanto en soporte físico, electrónico o salvo expresa autorización de EGA<br />
<strong>Master</strong> S.A. Cualquier vulneración de estos derechos podrá ser reclamada vía judicial.”<br />
“This document has been created by EGA <strong>Master</strong> S.A., and thus, owns its intellectual rights. Any total or partial copy or difusion, in any<br />
phisical, electronical or any other way of this document strictly forbidden, unless EGA <strong>Master</strong> S.A. provides a written authorization. Any<br />
infringment of these rights can be claimed judicially.”<br />
“ Ce document a été créé par EGA <strong>Master</strong> S.A et tous ses droits lui correspondent. Par conséquent, sauf autorisation préalable d’EGA<br />
<strong>Master</strong> S.A, toute copie ou diffusion intégrale ou partielle de ce document, soit en support physique ou électronique est interdite. Toute<br />
violation de ces droits pourra être réclamée par voie judiciaire. »
20<br />
DESPIECE / SPARE PARTS DRAWING / DEPEÇAGE
21<br />
Nº COD CANT / QTY / QTÉ<br />
1<br />
2<br />
2<br />
2<br />
2<br />
2<br />
2<br />
2<br />
2<br />
3<br />
4<br />
5<br />
6<br />
7<br />
8<br />
9<br />
10<br />
11<br />
12<br />
13<br />
14<br />
15<br />
16<br />
17<br />
18<br />
19<br />
20<br />
21<br />
22<br />
23<br />
24<br />
25<br />
27<br />
28<br />
29<br />
30<br />
31<br />
32<br />
83864<br />
64190-<br />
1/4,3/8,1/2"<br />
64191-3/4"<br />
64192-1"<br />
64193-1.1/4"<br />
64194-1.1/2"<br />
64195-2"<br />
64231-2.1/2"<br />
64232-3"<br />
83865<br />
83866<br />
83867<br />
83868<br />
83869<br />
83870<br />
83871<br />
83872<br />
83873<br />
83874<br />
83875<br />
83876<br />
83877<br />
83878<br />
83879<br />
83880<br />
83881<br />
83882<br />
83883<br />
83884<br />
83885<br />
83886<br />
83887<br />
83889<br />
83890<br />
83891<br />
83892<br />
83893<br />
83894<br />
1<br />
1<br />
1<br />
1<br />
1<br />
1<br />
1<br />
1<br />
1<br />
4<br />
2<br />
2<br />
1<br />
3<br />
1<br />
3<br />
1<br />
1<br />
1<br />
1<br />
1<br />
1<br />
1<br />
1<br />
1<br />
2<br />
1<br />
6<br />
1<br />
4<br />
4<br />
4<br />
1<br />
1<br />
1<br />
1<br />
1<br />
1<br />
Nº COD CANT / QTY / QTÉ<br />
33<br />
34<br />
35<br />
36<br />
37<br />
38<br />
39<br />
40<br />
41<br />
42<br />
43<br />
44<br />
45<br />
46<br />
47<br />
48<br />
49<br />
50<br />
51<br />
52<br />
53<br />
54<br />
55<br />
56<br />
57<br />
58<br />
59<br />
60<br />
61<br />
62<br />
63<br />
64<br />
CONJUNTO<br />
DE JUNTAS /<br />
O-RING SET /<br />
ENSEMBLE<br />
DE JOINTS<br />
83895<br />
83896<br />
83897<br />
83898<br />
83899<br />
83900<br />
83901<br />
83902<br />
83903<br />
83904<br />
83905<br />
83906<br />
83907<br />
83908<br />
83909<br />
83910<br />
83911<br />
83912<br />
83913<br />
83914<br />
83915<br />
83916<br />
83917<br />
83918<br />
83919<br />
83920<br />
83921<br />
83922<br />
83923<br />
83924<br />
83925<br />
83926<br />
83927<br />
1<br />
1<br />
1<br />
1<br />
1<br />
1<br />
1<br />
1<br />
2<br />
2<br />
3<br />
1<br />
2<br />
1<br />
1<br />
1<br />
1<br />
1<br />
1<br />
1<br />
1<br />
1<br />
1<br />
2<br />
2<br />
1<br />
1<br />
1<br />
1<br />
1<br />
1<br />
1<br />
1
CERTIFICADO DE GARANTIA<br />
GUARANTEE CERTIFICATE<br />
CERTIFICAT DE GARANTIE<br />
ARTICULO / ITEM / ARTICLE:.....................................................................................................................<br />
Nº DE SERIE / SERIE Nº / Nº SERIE:............................................................................................................<br />
DISTRIBUIDOR / DISTRIBUTOR / DISTRIBUTEUR:....................................................................................<br />
PAIS / COUNTRY / PAYS:..............................................................................TEL.:....................................<br />
FECHA DE VENTA / SALE DATE / DATE VENTE:.........................................................................................<br />
NOMBRE DEL COMPRADOR / BUYER NAME / NOM DE L’ACHETEUR:...................................................<br />
TEL. COMPRADOR / BUYER TEL. / TEL. DE L’ACHETEUR:.........................................................................<br />
EGA MASTER GARANTIZA AL COMPRADOR DE ESTA MAQUINA LA GARANTIA TOTAL (DURANTE 12 MESES), DE LAS PIEZAS CON DEFECTOS DE FABRICACION. ESTA<br />
GARANTIA NO CUBRE AQUELLAS PIEZAS QUE POR SU USO NORMAL TIENEN UN DESGASTE. PARA OBTENER LA VALIDEZ DE LA GARANTIA , ES ABSOLUTAMENTE<br />
IMPRESCINDIBLE QUE COMPLETE Y REMITA ESTE DOCUMENTO A EGA MASTER , DENTRO DE LOS SIETE DIAS A PARTIR DE LA FECHA DE COMPRA.<br />
EGA MASTER GUARANTEES TO THE BUYER OF THIS MACHINE THE TOTAL WARRANTY (DURING 12 MONTHS), OF THE PIECES WITH MANUFACTURING FAULTS.<br />
THIS GUARANTEE DOES NOT COVER THOSE PIECES WORN OUT DUE TO A NORMAL USE. IN ORDER TO OBTAIN THE VALIDITY OF THIS WARRANTY , IT IS ABSOLUTE-<br />
LY NECESSARY TO FULFILL THIS DOCUMENT AND RESEND IT TO EGA MASTER WITHIN 7 DAYS FROM SALE DATE.<br />
EGA MASTER GARANTIE A L’ACHETEUR DE CETTE MACHINE LA GARANTIE TOTALE (PENDANT 12 MOIS) DES PIECES AVEC DEFAUTS DE FABRICATION. CETTE GARANTIE<br />
NE COUVRE PAS LES PIECES QUE PAR UN USAGE NORMAL, SOIENT DETERIOREES. POUR OBTENIR LA VALIDITE DE LA GARANTIE, IL EST ABSOLUMENT IMPERATIF<br />
COMPLETER ET ENVOYER CE DOCUMENT EGA MASTER, DANS UN DELAI DE 7 JOURS A PARTIR DE LA DATE D’ACHAT.<br />
SELLO / STAMP / CACHET<br />
EJEMPLAR PARA EGA MASTER / COPY FOR EGA MASTER / EXEMPLAIRE POUR EGA MASTER<br />
CERTIFICADO DE GARANTIA<br />
GUARANTEE CERTIFICATE<br />
CERTIFICAT DE GARANTIE<br />
ARTICULO / ITEM / ARTICLE:.....................................................................................................................<br />
Nº DE SERIE / SERIE Nº / Nº SERIE:............................................................................................................<br />
DISTRIBUIDOR / DISTRIBUTOR / DISTRIBUTEUR:....................................................................................<br />
PAIS / COUNTRY / PAYS:..............................................................................TEL.:....................................<br />
FECHA DE VENTA / SALE DATE / DATE VENTE:.........................................................................................<br />
NOMBRE DEL COMPRADOR / BUYER NAME / NOM DE L’ACHETEUR:...................................................<br />
TEL. COMPRADOR / BUYER TEL. / TEL. DE L’ACHETEUR:.........................................................................<br />
EGA MASTER GARANTIZA AL COMPRADOR DE ESTA MAQUINA LA GARANTIA TOTAL (DURANTE 12 MESES), DE LAS PIEZAS CON DEFECTOS DE FABRICACION. ESTA<br />
GARANTIA NO CUBRE AQUELLAS PIEZAS QUE POR SU USO NORMAL TIENEN UN DESGASTE. PARA OBTENER LA VALIDEZ DE LA GARANTIA , ES ABSOLUTAMENTE<br />
IMPRESCINDIBLE QUE COMPLETE Y REMITA ESTE DOCUMENTO A EGA MASTER , DENTRO DE LOS SIETE DIAS A PARTIR DE LA FECHA DE COMPRA.<br />
EGA MASTER GUARANTEES TO THE BUYER OF THIS MACHINE THE TOTAL WARRANTY (DURING 12 MONTHS), OF THE PIECES WITH MANUFACTURING FAULTS.<br />
THIS GUARANTEE DOES NOT COVER THOSE PIECES WORN OUT DUE TO A NORMAL USE. IN ORDER TO OBTAIN THE VALIDITY OF THIS WARRANTY , IT IS ABSOLUTE-<br />
LY NECESSARY TO FULFILL THIS DOCUMENT AND RESEND IT TO EGA MASTER WITHIN 7 DAYS FROM SALE DATE.<br />
EGA MASTER GARANTIE A L’ACHETEUR DE CETTE MACHINE LA GARANTIE TOTALE (PENDANT 12 MOIS) DES PIECES AVEC DEFAUTS DE FABRICATION. CETTE GARANTIE<br />
NE COUVRE PAS LES PIECES QUE PAR UN USAGE NORMAL, SOIENT DETERIOREES. POUR OBTENIR LA VALIDITE DE LA GARANTIE, IL EST ABSOLUMENT IMPERATIF<br />
COMPLETER ET ENVOYER CE DOCUMENT EGA MASTER, DANS UN DELAI DE 7 JOURS A PARTIR DE LA DATE D’ACHAT.<br />
SELLO / STAMP / CACHET<br />
EJEMPLAR PARA EL CLIENTE / COPY FOR THE CUSTOMER / EXEMPLAIRE POUR LE CLIENT
C/ ZORROLLETA 11, POL. IND. JUNDIZ<br />
01015 VITORIA, SPAIN P.O.B. APTDO. 5005<br />
TEL. 34 - 945 290 001 FAX. 34 - 945 290 141<br />
master@egamaster.com<br />
www.egamaster.com