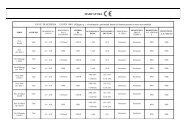
Angolo 16,5x41 Angolo Jolly 16,5x41 - Sichenia
Angolo 16,5x41 Angolo Jolly 16,5x41 - Sichenia
Angolo 16,5x41 Angolo Jolly 16,5x41 - Sichenia

Create successful ePaper yourself
Turn your PDF publications into a flip-book with our unique Google optimized e-Paper software.
<strong>Angolo</strong> <strong>Jolly</strong> <strong>16</strong>,<strong>5x41</strong><br />
Riproduzione fedele in gres porcellanato di pietra naturale a spacco.<br />
A faithful porcelain stoneware reproduction of natural split stone slabs.<br />
Reproduction fidèle en grès cérame de pierres naturelles fendues.<br />
Getreue Nachbildung von Spaltnaturstein aus Feinsteinzeug.<br />
<strong>Angolo</strong> <strong>16</strong>,<strong>5x41</strong><br />
6 1 /2”x<strong>16</strong> 7 /<strong>16</strong>” 6 1 /2”x<strong>16</strong> 7 /<strong>16</strong>”<br />
Riproduzione fedele in gres porcellanato di pietra naturale a spacco.<br />
A faithful porcelain stoneware reproduction of natural split stone slabs.<br />
Reproduction fidèle en grès cérame de pierres naturelles fendues.<br />
Getreue Nachbildung von Spaltnaturstein aus Feinsteinzeug.<br />
1<br />
Per una corretta posa si consiglia di partire dall’angolo del muro.<br />
1<br />
Nell’opera di posa partire sempre dallo spigolo del muro ruotando<br />
Iniziare la posa alternando il pezzo jollato A (lung. 41,5 mm) con il pezzo jollato B<br />
alternativamente i pezzi di 180°. (vedi fig. 1)<br />
(lung. 20 cm circa) ricavato dal “pezzo A” When laying, always start from the edge of the wall and rotate the tiles alternately by 180° (see Figure 1).<br />
To guarantee proper laying, we recommend you start from the corner of the wall.<br />
Pour la pose, partir de l’arête du mur en tournant tour à tour les pièces de 180°(voir fig. 1).<br />
Start by alternating the jolly tiles A (length: 41.5 mm) and the jolly tiles B (length: approx. 20 cm) obtained<br />
Beginnen Sie bei der Verlegung immer an der Wandecke durch abwechselndes Drehen<br />
from “Piece A”.<br />
der Elemente um 180° (siehe Abb. 1).<br />
Pour une pose correcte, il est conseillé de partir du coin du mur.<br />
Commencer la pose en alternant la pièce jolly A (long. 41,5 mm) avec la pièce jolly B (long. 20 cm<br />
environ) obtenu à partir de la “pièce A”<br />
Für eine richtige Verlegung wird geraten, in der Ecke der Wand zu beginnen.<br />
Beginnen Sie mit der Verlegung durch abwechselnde Verwendung des <strong>Jolly</strong>-Teils A (Länge 41,5 mm)<br />
und des <strong>Jolly</strong>-Teils B (Länge etwa 20 cm), das aus dem “Teil A” gewonnen wird.<br />
B<br />
A<br />
B<br />
20 mm<br />
41,5 mm<br />
A<br />
12 mm Riempire di colla. Fill with glue. Remplir avec de la colle. Mit Kleber füllen.<br />
2<br />
Prima della posa si consiglia di riempire completamente<br />
la parte interna dell’angolo Wall con la colla senza<br />
lasciare tra parete e piastrella spazi vuoti. (fig. 2)<br />
Before laying, it is advisable to completely fill the inside of the Wall corner tile<br />
with glue, without leaving any gaps between the wall and tile (fig. 2)<br />
Avant la pose, remplir complètement la partie interne de l’angle Wall avec de la<br />
colle sans laisser d’espaces vides entre le mur et le carreau. (fig. 2)<br />
Vor der Verlegung wird geraten, den inneren Teil des Eckelements Wall<br />
vollständig mit Kleber zu füllen, ohne dass zwischen Wand und Fliese<br />
Freiräume bleiben (Abb. 2).<br />
È necessario rasare lo spigolo di circa 10-12 mm per<br />
permettere ad entrambe le superfici della piastrella di aderire<br />
perfettamente alla parete evitando in tal modo sprechi di<br />
colla. (fig. 2-3-4)<br />
B<br />
N.B.: per i tagli necessari si consiglia di tagliare i pezzi<br />
lato marca e se possibile con attrezzo munito di disco<br />
diamantato a secco o ad acqua.<br />
N.B.: When cutting the tiles, we advise you to cut on the branded side,<br />
using (if possible) a wet or dry cutter with diamond disk blade.<br />
A<br />
The edge needs to be trimmed by approx. 10-12 mm to allow both<br />
surfaces of the tile to adhere perfectly to the wall, thereby avoiding<br />
glue wastage(fig. 2-3-4).<br />
Lisser l’arête d’environ 10-12 mm pour permettre aux deux surfaces du<br />
carreau d’adhérer parfaitement au mur évitant ainsi les gaspillages de<br />
colle. (fig. 2-3-4)<br />
Es ist notwendig, die Kante von etwa 10-12 mm zu glätten, damit beide<br />
Oberflächen der Fliese vollkommen an der Wand anhaften und somit<br />
eine Vergeudung von Kleber vermieden wird (Abb. 2-3-4).<br />
3 4<br />
N.B. : pour les coupes nécessaires, on conseille de couper les pièces du<br />
côté de la marque et si possible avec un outil muni d’un disque diamanté<br />
à sec et à eau.<br />
Anm.: Für die notwendigen Schnitte wird geraten, die Teile auf der<br />
Markenseite zu schneiden sowie nach Möglichkeit mit einem über<br />
Diamantscheibe versehenen Werkzeug im trockenen Betrieb oder mit<br />
Wasser.