
You also want an ePaper? Increase the reach of your titles
YUMPU automatically turns print PDFs into web optimized ePapers that Google loves.
ENGLISH<br />
ENGLISH<br />
This product conforms to Directive 99/05/EEC<br />
Exclusive use: gate opener<br />
Product notified in all EU countries.<br />
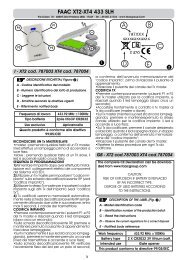
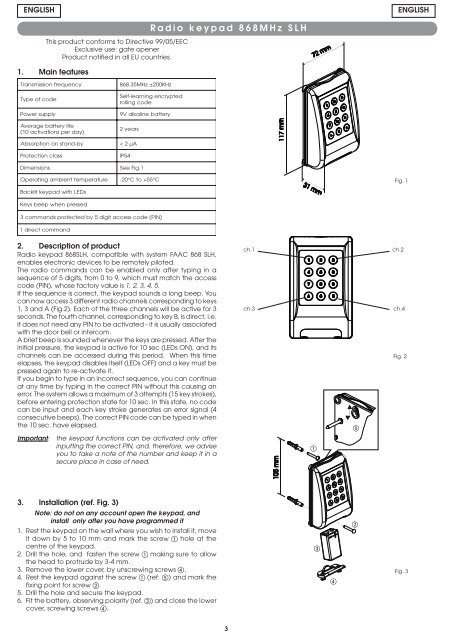
1. Main features<br />
Radio keypad <strong>868MHz</strong> <strong>SLH</strong><br />
Transmission frequency<br />
Type of<br />
Power<br />
code<br />
supply<br />
Average battery life<br />
(10 activations per day)<br />
Absorption on stand-by<br />
868.35MHz<br />
±200KHz<br />
Self-learning encrypted<br />
rolling code<br />
9V alkaline battery<br />
2<br />
< 2<br />
years<br />
µ A<br />
Protection class<br />
IP54<br />
Dimensions<br />
See Fig. 1<br />
Operating ambient<br />
Backlit<br />
Keys<br />
keypad with LEDs<br />
beep when pressed<br />
temperature<br />
-20°C to +55° C<br />
Fig. 1<br />
3 commands protected by 5 digit access code (PIN)<br />
1 direct command<br />
2. Description of product<br />
Radio keypad 868<strong>SLH</strong>, compatible with system FAAC 868 <strong>SLH</strong>,<br />
enables electronic devices to be remotely piloted.<br />
The <strong>radio</strong> commands can be enabled only after typing in a<br />
sequence of 5 digits, from 0 to 9, which must match the access<br />
code (PIN), whose factory value is 1, 2, 3, 4, 5.<br />
If the sequence is correct, the keypad sounds a long beep. You<br />
can now access 3 different <strong>radio</strong> channels corresponding to keys<br />
1, 3 and A (Fig.2). Each of the three channels will be active for 3<br />
seconds. The fourth channel, corresponding to key B, is direct, i.e.<br />
it does not need any PIN to be activated - it is usually associated<br />
with the door bell or intercom.<br />
A brief beep is sounded whenever the keys are pressed. After the<br />
initial pressure, the keypad is active for 10 sec (LEDs ON), and its<br />
channels can be accessed during this period. When this time<br />
elapses, the keypad disables itself (LEDs OFF) and a key must be<br />
pressed again to re-activate it.<br />
If you begin to type in an incorrect sequence, you can continue<br />
at any time by typing in the correct PIN without this causing an<br />
error. The system allows a maximum of 3 attempts (15 key strokes),<br />
before entering protection state for 10 sec. In this state, no code<br />
can be input and each key stroke generates an error signal (4<br />
consecutive beeps). The correct PIN code can be typed in when<br />
the 10 sec. have elapsed.<br />
Important:<br />
the keypad functions can be activated only after<br />
inputting the correct PIN, and, therefore, we advise<br />
you to take a note of the number and keep it in a<br />
secure place in case of need.<br />
ch.1<br />
ch.3<br />
<br />
<br />
ch.2<br />
ch.4<br />
Fig. 2<br />
3. Installation (ref. Fig. 3)<br />
Note: do not on any account open the keypad, and<br />
install only after you have programmed it<br />
1. Rest the keypad on the wall where you wish to install it, move<br />
it down by 5 to 10 mm and mark the screw hole at the<br />
centre of the keypad.<br />
2. Drill the hole, and fasten the screw making sure to allow<br />
the head to protrude by 3-4 mm.<br />
3. Remove the lower cover, by unscrewing screws .<br />
4. Rest the keypad against the screw (ref. ) and mark the<br />
fixing point for screw .<br />
5. Drill the hole and secure the keypad.<br />
6. Fit the battery, observing polarity (ref. ) and close the lower<br />
cover, screwing screws .<br />
<br />
<br />
<br />
Fig. 3<br />
3