BA ROPULS Umschlag 1110.cdr - Rothenberger
BA ROPULS Umschlag 1110.cdr - Rothenberger
BA ROPULS Umschlag 1110.cdr - Rothenberger

You also want an ePaper? Increase the reach of your titles
YUMPU automatically turns print PDFs into web optimized ePapers that Google loves.
5.1 Operation and maintenance<br />
Before you start working, let the compressor run for 10 minutes with the air tap completely<br />
open so that its moving parts can get used to operating.<br />
General information<br />
Important!<br />
Please read!<br />
This compressor is not designed or built for long-term use. It is recommended that it not be<br />
operated at more than 50% and not for more than 15 minutes continuously.<br />
Set-up<br />
Always set up the compressor at least 50 cm from any obstruction that could hinder the<br />
airflow and thereby the cooling.<br />
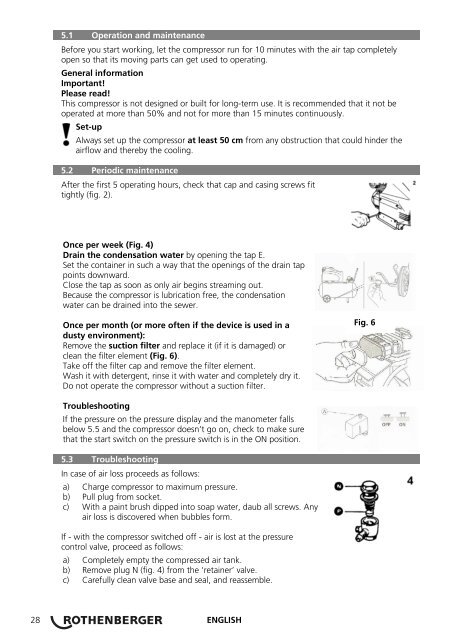
5.2 Periodic maintenance<br />
After the first 5 operating hours, check that cap and casing screws fit<br />
tightly (fig. 2).<br />
Once per week (Fig. 4)<br />
Drain the condensation water by opening the tap E.<br />
Set the container in such a way that the openings of the drain tap<br />
points downward.<br />
Close the tap as soon as only air begins streaming out.<br />
Because the compressor is lubrication free, the condensation<br />
water can be drained into the sewer.<br />
Once per month (or more often if the device is used in a<br />
dusty environment):<br />
Remove the suction filter and replace it (if it is damaged) or<br />
clean the filter element (Fig. 6).<br />
Take off the filter cap and remove the filter element.<br />
Wash it with detergent, rinse it with water and completely dry it.<br />
Do not operate the compressor without a suction filter.<br />
Troubleshooting<br />
If the pressure on the pressure display and the manometer falls<br />
below 5.5 and the compressor doesn’t go on, check to make sure<br />
that the start switch on the pressure switch is in the ON position.<br />
5.3 Troubleshooting<br />
In case of air loss proceeds as follows:<br />
a) Charge compressor to maximum pressure.<br />
b) Pull plug from socket.<br />
c) With a paint brush dipped into soap water, daub all screws. Any<br />
air loss is discovered when bubbles form.<br />
If - with the compressor switched off - air is lost at the pressure<br />
control valve, proceed as follows:<br />
a) Completely empty the compressed air tank.<br />
b) Remove plug N (fig. 4) from the ‘retainer’ valve.<br />
c) Carefully clean valve base and seal, and reassemble.<br />
28 ENGLISH<br />
Fig. 6