

BlackandDecker Tournevis- As36ln - Type H1 - Instruction Manual (l'Indonésie)
BlackandDecker Tournevis- As36ln - Type H1 - Instruction Manual (l'Indonésie)
BlackandDecker Tournevis- As36ln - Type H1 - Instruction Manual (l'Indonésie)

Create successful ePaper yourself
Turn your PDF publications into a flip-book with our unique Google optimized e-Paper software.
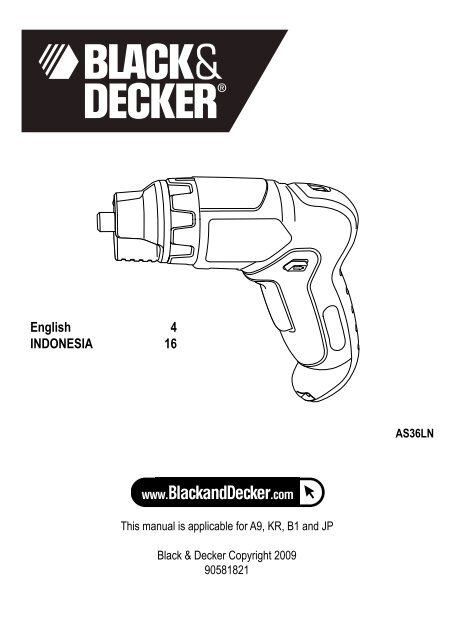
English 4<br />
INDONESIA 16<br />
AS36LN<br />
This manual is applicable for A9, KR, B1 and JP<br />
Black & Decker Copyright 2009<br />
90581821
➂<br />
13<br />
➅<br />
➄<br />
➃<br />
➆<br />
➁<br />
➀<br />
➇<br />
➈<br />
B<br />
➃<br />
11<br />
➈<br />
➉<br />
A<br />
C<br />
➁<br />
➅<br />
D<br />
2<br />
➂<br />
E
➆<br />
F1<br />
➆<br />
F2<br />
F3<br />
➆<br />
12<br />
G1<br />
12<br />
G2<br />
G3<br />
3
ENGLISH<br />
3.6V Li-ion Screwdriver<br />
AS36LN<br />
Technical Data<br />
Cordless Screwdriver<br />
Voltage VDC 3.6<br />
No Load Speed RPM 180<br />
Max. Torque Nm 4.8<br />
AS36LN<br />
Bit Holder mm (Hex) 6.35<br />
Weight kg 0.5<br />
Battery<br />
Voltage V 3.6<br />
<strong>Type</strong><br />
Capacity Ah 1.1<br />
Charger<br />
Li-ion<br />
Approx. Charging Time Hour 6 (fully charged)<br />
Weight kg 0.4<br />
Intended Use<br />
Your Black & Decker compact screwdriver has been designed for screwdriving applications.<br />
The tool is intended for consumer use only.<br />
Your Black & Decker charger has been designed for charging Black & Decker batteries of<br />
the type supplied with this tool.<br />
Safety <strong>Instruction</strong>s<br />
When using power tools, always observe the safety regulations applicable in your<br />
country to reduce the risk of fire, electric shock, personal injury and material damage.<br />
Read the following safety instructions before attempting to operate this product. Keep<br />
these instructions in a safe place!<br />
The following symbols are used throughout this manual:<br />
Denotes risk of personal injury, loss of life or damage to the tool in case of nonobservance<br />
of the instructions in this manual.
ENGLISH<br />
Denotes risk of electric shock.<br />
Fire hazard.<br />
1. Keep work area clean. Cluttered areas and benches can cause accidents.<br />
2. Consider work area environment. Do not expose power tool to humidity. Keep work<br />
area well lit (250-300 Lux). Do not use power tools in the presence of inflammable liquids<br />
or gases.<br />
3. Keep children away. Do not let children come into contact with the tool or extension<br />
cord. Keep all people away from the work area.<br />
4. Dress properly. Do not wear loose clothing or jewelry. They can be caught in moving<br />
parts. Preferably wear rubber gloves and non-slip footwear when working outdoors.<br />
Wear protective hair covering to keep long hair out of the way. When working outdoors,<br />
preferably wear suitable gloves and non-slip footwear.<br />
5. Personal protection. Always use safety glasses. Everyday eyeglasses only have impact<br />
resistant lenses, they are not safety glasses. Use a face or dust mask whenever the<br />
operations may produce dust or flying particles. If these particles might be considerably<br />
hot, also wear a heat-resistant apron. Wear ear protection whenever the sound level<br />
seems uncomfortable, i.e. if the sound pressure stated in this manual exceeds 85 dB(A).<br />
6. Do not overreach. Keep proper footing and balance at all times.<br />
7. Stay alert. Watch what you are doing. Use common sense. Do not operate the tool<br />
when you are tired.<br />
8. Secure workpiece. Use clamps or a vice to hold the workpiece. It is safer and it frees<br />
both hands to operate the tool.<br />
9. Remove adjusting keys and wrenches. Always check that adjusting keys and<br />
wrenches are removed from the tool before switching on.<br />
10. Use appropriate tool. The intended use is laid down in this instruction manual. Do not<br />
force small tools or attachments to do the job of a heavy-duty tool. The tool will do the<br />
job better and safer at the rate for which it was intended. Do not force the tool.<br />
Warning! The use of any accessory or attachment or performance of any operation<br />
with this tool, other than those recommended in this instruction manual may present a<br />
risk of personal injury.<br />
11. Check for damaged parts. Before using the tool, carefully check it for damage<br />
to ensure that it will operate properly and perform its intended function. Check for<br />
misalignment and seizure of moving parts, breakage of parts and any other conditions<br />
that may affect its operation. Have damaged guards or other defective parts repaired or<br />
replaced as instructed. Do not use the tool if the switch is defective. Have any damaged<br />
or defective parts replaced by an authorized repair agent. Never attempt any repairs<br />
yourself.
ENGLISH<br />
12. Avoid unintentional starting. Do not carry the plugged-in tool with a finger on the<br />
switch. Be sure that the switch is released when plugging in.<br />
13. Do not abuse cord. Never carry the tool by its cord or yank it to disconnect from the<br />
socket. Keep the cord away from heat, oil and sharp edges.<br />
14. Store idle tools. When not in use, power tools must be stored in a dry place and locked<br />
up securely, out of reach of children.<br />
15. Maintain tools with care. Keep the tools in good condition and clean for better and<br />
safer performance. Follow the instructions for maintenance and changing accessories.<br />
Inspect the tool cords at regular intervals and, if damaged, have them repaired by an<br />
authorized repair agent. Inspect the extension cords periodically and replace them if<br />
damaged. Keep all controls dry, clean and free from oil and grease.<br />
16. Have your tool repaired by an authorized repair agent. This power tool is in<br />
accordance with the relevant safety regulations. To avoid danger, electric appliances<br />
must only be repaired by qualified technicians using original spare parts.<br />
Additional Safety <strong>Instruction</strong>s for Batteries and Chargers<br />
Batteries<br />
17. Never attempt to open for any reason.<br />
18. Do not store in locations where the temperature may exceed 40ºC.<br />
19. Charge only at ambient temperatures between 4ºC and 40ºC.<br />
20. Charge only using the charger provided with the tool (see technical data).<br />
21. When disposing of batteries, follow the instructions given in the section<br />
“Protecting the environment”.<br />
22. Leaks from battery cells can occur under extreme conditions. The battery fluid,<br />
a 25-30% solution of potassium hydroxide, can be harmful. In case of skin contact:: (a)<br />
wash quickly with soap and water; or (b) neutralize with a mild acid such as lemon juice<br />
or vinegar. If the liquid gets into the eyes, flush them immediately with clean water for a<br />
minimum of 10 minutes. Seek medical attention.<br />
23. Fire hazard! Avoid short-circulating the contacts of a detached battery.<br />
24. Do not incinerate the battery.<br />
Chargers<br />
25. Use your Black & Decker charger only to charge the battery in the tool with which it was<br />
supplied. Other batteries could burst, causing personal injury and damage.<br />
26. Never attempt to charge non-rechargeable batteries.
ENGLISH<br />
27. Have defective cords replaced immediately.<br />
28. Do not expose to water.<br />
29. Do not open the charger.<br />
30. Do not probe the charger.<br />
31. The charger is intended for indoor use only.<br />
Specific Safety Rules<br />
32. When fitting and changing accessories, always use the instructions supplied with the<br />
accessory.<br />
33. Should your screwdriver develop a fault, do not try to fix it yourself, but take it to one of<br />
our authorized repair agents.<br />
34. Warning: Some dust created by power sanding, sawing, grinding, drilling, and other<br />
construction activities contains chemicals known to cause cancer, birth defects or other<br />
reproductive harm. Some examples of these chemicals are:<br />
• Lead from lead-based paints,<br />
• Crystalline silica from bricks and cement and other masonry products, and<br />
• Arsenic and chromium from chemically-treated lumber (CCA).<br />
Your risk from these exposures varies, depending on how often you do this type of work.<br />
To reduce your exposure to these chemicals: work in a well ventilated area, and work<br />
with approved safety equipment, such as those dust masks that are specially designed<br />
to filter out microscopic particles.<br />
Avoid prolonged contact with dust from power sanding, sawing, grinding, drilling,<br />
and other construction activities. Wear protective clothing and wash exposed<br />
areas with soap and water. Allowing dust to get into your mouth, eyes, or lay on the<br />
skin may promote absorption of harmful chemicals.
ENGLISH<br />
Labels on your tool<br />
They may include the following symbols.<br />
V ............. volts<br />
A ............. Amperes<br />
Hz ............. Hertz<br />
W ............. Watts<br />
Min. ............. Minutes<br />
............. Alternating current<br />
............. Direct current<br />
no ............. No load speed<br />
............. Class II Construction<br />
............. Earthing terminal<br />
............. Safety alert symbol<br />
.../min ............. Revolutions or reciprocation per minute<br />
.../bpm ............. Beats per minute<br />
Save these instructions!<br />
Electrical safety<br />
Your charger is double insulated; therefore no earth wire is required. Always check<br />
that the mains voltage corresponds to the voltage on the rating plate. Never attempt to<br />
replace the charger unit with a regular mains plug.<br />
Using an Extension Cable<br />
An extension cable should not be used unless absolutely necessary. Use of an improper<br />
extension cable could result in a risk of fire and electric shock. If an extension cable must be<br />
used, use only those that are approved by the country’s Electrical Authority. Make sure that<br />
extension cord is in good condition before using. Always use the cord that is suitable for the<br />
power input of your charger (see technical data on name plate).<br />
When using a cable reel, always unwind the cable completely.
ENGLISH<br />
Fig. A<br />
1. On/off switch<br />
2. Forward/reverse slider<br />
3. Forward/reverse window<br />
4. Bit holder<br />
5. LED light<br />
6. Mode selector / torque adjustment collar<br />
7. Screw holder<br />
8. Charger<br />
9. Charging base<br />
10. Charging indicator<br />
11. Bit storage<br />
Assembly<br />
Fitting the charging base to the wall (fig. A & B)<br />
The charging base (9) can be placed on a worktop or fitted to the wall to provide a<br />
convenient storage and charging point for the tool. Screws and wall anchors are not<br />
included.<br />
◆ Drive screws in the wall with the same distance apart as the slots (13) on the back of the<br />
charging base (9).<br />
The distance between the slots must be 75 mm.<br />
◆ Slide the charging base over the screws to fit the base to the wall.<br />
◆ Plug in the charger (8).<br />
◆ Place the tool on the charging base making sure the charging indicator (10) lights up.<br />
Warning! Avoid damaging the power cord when mounting the charging base to the wall.<br />
Fitting and removing a drill bit or a screwdriver bit (fig. C)<br />
This tool uses screwdriver bits and drill bits with a 6.35 mm (1/4”) hexagonal shank.<br />
◆ To fit a bit, insert the bit shaft into the bit holder (4).<br />
◆ To remove a bit, pull the bit shaft out of the bit holder (4).
ENGLISH<br />
Use<br />
Warning! Let the tool work at its own pace. Do not overload.<br />
◆ Before first use, the battery must be charged for at least 9 hours.<br />
Charging the battery (fig. A)<br />
◆ Place the tool on the charging base (9).<br />
◆ Plug in the charger (8).<br />
◆ Leave the tool connected to the charger for 6 hours.<br />
The red light illuminates when the unit is on charge and will stay red as long as there is<br />
power to the charger. The red light will not go off to indicate a full charge.<br />
The charger may hum and become warm while charging; this is normal and does not<br />
indicate a problem.<br />
Warning! Do not charge the battery at ambient temperatures below 4 °C or above 40 °C.<br />
Selecting the direction of rotation (fig. D)<br />
For drilling and for tightening screws, use forward (clockwise) rotation. For loosening screws<br />
or removing a jammed drill bit, use reverse (counterclockwise) rotation.<br />
The forward/reverse window (3) displays the rotation direction with an arrow.<br />
◆ To select forward rotation, push the forward/reverse slider (2) to the forward position.<br />
◆ To select reverse rotation, push the forward/reverse slider (2) to the rearward position.<br />
◆ To lock the tool, set the forward/reverse slider into the centre position.<br />
Selecting the torque (fig. E)<br />
This tool is fitted with a collar to set the torque for various screwdriving and drilling<br />
applications. Large screws and hard workpiece materials require a higher torque setting than<br />
small screws and soft workpiece materials. The collar has a range of 6 settings to suit your<br />
application.<br />
◆<br />
◆<br />
To set the torque, rotate the torque adjustment collar (6) clockwise or counterclockwise.<br />
For screwdriving, set the collar to the desired setting.<br />
If you do not yet know the appropriate setting, proceed as follows:<br />
- Set the collar (6) to the lowest torque setting.<br />
- Tighten the first screw.<br />
10
ENGLISH<br />
- If the clutch ratchets before the desired result is achieved, increase the collar setting<br />
and continue tightening the screw. Repeat until you reach the correct setting. Use this<br />
setting for the remaining screws.<br />
Screwdriving applications<br />
Torque range: low torque for small screws and high torque for large screws<br />
Drilling/screwdriving<br />
◆ Select forward or reverse rotation using the forward/reverse slider (2).<br />
◆ To switch the tool on, press the on/off switch (1).<br />
◆ To switch the tool off, release the on/off switch (1).<br />
Screwdriving using the screw holder (fig. F1-F3)<br />
The screw holder (7) can be used with 1” and 2” screwdriver bits. The screw holder cannot<br />
be used with bit tip holder extensions.<br />
◆ Pull the screw holder (7) out the tool (fig. F1).<br />
◆ Place the screw onto the screw holder (fig. F2).<br />
◆ Push the screw holder towards the screw making sure the bit tip and the screw are fully<br />
engaged (fig. F3).<br />
The screw is securely held to the screw holder with a magnet. The magnet does not work on<br />
non-ferrous screws.<br />
◆ Drive the screw into the wall.<br />
When screwdriving, the screw holder retracts in order to allow the screw to be driven to its<br />
required depth.<br />
LED light<br />
The LED light (5) is activated automatically when the trigger is depressed. The LED will also<br />
illuminate when the trigger is depressed and the forward/reverse slider (2) is in the locked off<br />
position (central position).<br />
Hints for optimum use<br />
11
ENGLISH<br />
Screwdriving<br />
◆ Always use the correct type and size of screwdriver bit.<br />
◆ If screws are difficult to tighten, try applying a small amount of washing liquid or soap as<br />
a lubricant.<br />
◆ Use the spindle lock to loosen very tight screws or to firmly tighten screws.<br />
◆ Always hold the tool and screwdriver bit in a straight line with the screw.<br />
◆ When screwing in wood, it is recommended to drill a pilot hole with a depth equal to the<br />
length of the screw. A pilot hole guides the screw and prevents splintering or distortion of<br />
the wood. For the optimum size of the pilot hole, refer to the table below.<br />
◆ When screwing in hardwood, also drill a clearance hole with a depth equal to half the<br />
length of the screw. For the optimum size of the clearance hole, refer to the table below.<br />
Screw size<br />
Pilot hole ø<br />
(softwood)<br />
Pilot hole ø<br />
(hardwood)<br />
Clearance hole<br />
No. 6 (3.5 mm) 2.0 mm 2.5 mm 3.6 mm<br />
No. 8 (4 mm) 2.5 mm 3.0 mm 4.5 mm<br />
No. 10 (5 mm) 3.0 mm 3.5 mm 5.0 mm<br />
Drilling<br />
◆<br />
◆<br />
◆<br />
◆<br />
Always apply a light pressure in a straight line with the drill bit.<br />
Just before the drill tip breaks through the other side of the workpiece, decrease<br />
pressure on the tool.<br />
Use a block of wood to back up workpieces that may splinter.<br />
Make an indentation using a centre punch at the centre of the hole to be drilled in order<br />
to improve accuracy.<br />
Drilling using a countersink drill bit (fig. G1-G3)<br />
The countersink drill bit (12) is used to remove material to seat the screw head flush to the<br />
surface.<br />
Warning! Always gear the diameter of the drill bit to the diameter of the screw.<br />
◆ Place the drill bit into the tool.<br />
◆ Drive the drill into the material (fig. G1).<br />
◆ Drive the cutter on the drill bit as far into the material as necessary. Cut away sufficient<br />
material to sink the screw head into the material (fig. G2).<br />
◆ Drive the screw into the material with a screwdriver bit (fig. G3).<br />
12
ENGLISH<br />
Maintenance<br />
Your Black & Decker power tool has been designed to operate over a long period of time<br />
with a minimum of maintenance. Continuous satisfactory operation depends upon proper<br />
tool care and regular cleaning.<br />
This tool is not user-serviceable. Take it to an authorized Black & Decker repair agent for<br />
service.<br />
Your charger does not require any maintenance apart from regular cleaning.<br />
Unplug the charger before cleaning it.<br />
• Regularly clean the motor housing using a damp cloth. Do not use any abrasive or<br />
solvent-based cleaner.<br />
Important<br />
To ensure product SAFETY and RELIABILITY, repairs, maintenance and adjustment (other<br />
than those listed in this manual) should be performed by authorized service centers or other<br />
qualified organizations, always using identical replacement parts. Unit contains no user<br />
serviceable parts inside.<br />
Accessories<br />
The performance of any power tool is dependent upon the accessory used. Black & Decker<br />
accessories are engineered to high quality standards and are designed to enhance the<br />
performance of your power tool. By using Black & Decker accessories you will get the very<br />
best from your tool.<br />
Black & Decker offers a large selection of accessories available at our local dealer or<br />
authorized service center at extra cost.<br />
CAUTION: The use of any non-recommended accessories may be hazardous.<br />
Protecting The Environment<br />
Separate collection. This product must not be disposed of with normal household<br />
waste.<br />
Should you find one day that your Black & Decker product needs replacement, or if it is of no<br />
further use to you, do not dispose of it with household waste. Make this product available for<br />
separate collection.<br />
Separate collection of used products and packaging allows materials to be recycled<br />
and used again.<br />
13
ENGLISH<br />
Re-use of recycled materials helps prevent environmental pollution and reduces the demand<br />
for raw materials.<br />
If necessary, contact your local municipality for proper disposal instructions in your city/town.<br />
Batteries<br />
Black & Decker batteries can be recharged many times. At the end of their useful life, discard<br />
batteries with due care for our environment:<br />
• Run the battery down completely, and then remove it from the tool.<br />
• NiCd, NiMH, and Li-ion batteries are recyclable. Take them to a local recycling station.<br />
Service Information<br />
Black & Decker offers a full network of company-owned and authorized service locations<br />
throughout Asia. All Black & Decker Service Centers are staffed with trained personnel to<br />
provide customers with efficient and reliable power tool service.<br />
Whether you need technical advice, repair, or genuine factory replacement parts, contact the<br />
Black & Decker location nearest to you.<br />
Notes<br />
• Black & Decker’s policy is one of continuous improvement to our products and, as such,<br />
we reserve the right to change product specifications without prior notice.<br />
• Standard equipment and accessories may vary by country.<br />
• Product specifications may differ by country.<br />
• Complete product range may not be available in all countries. Contact your local Black &<br />
Decker dealers for range availability.<br />
14
ENGLISH<br />
EC declaration of conformity<br />
AS36LN<br />
Black & Decker declares that these products conform to:<br />
98/37/EC, EN 60745<br />
LpA (sound pressure) 58.9 dB(A), LWA (acoustic power) 69.9 dB(A),<br />
Vibration Total value (triax vector sum) according to EN60745<br />
KpA (sound pressure uncertainty): 3 dB(A),<br />
KWA (acoustic power uncertainty): 3 dB(A)<br />
Kevin Hewitt<br />
Director of Consumer Engineering<br />
Spennymoor, County Durham DL16 6JG,<br />
United Kingdom<br />
1-5-2008<br />
15
16<br />
INDONESIA<br />
Obeng 3,6V Li-ion<br />
AS36LN<br />
Data Teknis<br />
Obeng Tanpa Kabel<br />
Tegangan VDC 3,6<br />
Kecepatan tanpa beban RPM 180<br />
Torsi Maks. Nm 4,8<br />
AS36LN<br />
Pemegang Bit mm (Hex) 6,35<br />
Berat kg 0,5<br />
Baterai<br />
Tegangan V 3,6<br />
Tipe<br />
Kapasitas Ah 1,1<br />
Alat Pengisi Daya<br />
Li-ion<br />
Perk. Waktu Pengisian Jam 6 (terisi penuh)<br />
Berat kg 0,4<br />
Tujuan Penggunaan<br />
Obeng Black & Decker kompak Anda telah dirancang untuk aplikasi memasang sekrup.<br />
Perkakas ini ditujukan hanya untuk digunakan oleh konsumen.<br />
Alat penambah daya Black & Decker Anda telah dirancang untuk mengisi daya baterai<br />
Black & Decker dari tipe yang disertakan dengan perkakas ini.<br />
Petunjuk Keselamatan<br />
Sewaktu menggunakan perkakas listrik ini, patuhilah selalu peraturan keselamatan<br />
yang berlaku di negara Anda untuk mengurangi risiko kebakaran, sengatan listrik,<br />
cedera diri, dan kerusakan materi. Bacalah petunjuk keselamatan berikut ini sebelum<br />
mencoba mengoperasikan produk ini. Simpanlah petunjuk ini di tempat yang aman!<br />
Simbol-simbol berikut ini digunakan dalam buku petunjuk ini:<br />
Menandakan risiko cedera diri, kematian atau kerusakan pada perkakas jika petunjuk<br />
dalam manual ini tidak dipatuhi.<br />
Menandakan risiko sengatan listrik.<br />
Bahaya kebakaran.<br />
1. Jaga kebersihan area kerja. Area dan bangku kerja yang berantakan dapat<br />
menyebabkan kecelakaan.
INDONESIA<br />
2. Pertimbangkan lingkungan area kerja. Jangan sampai perkakas daya terpapar<br />
kelembaban. Jaga agar area kerja mendapat penerangan yang memadai (250-300 Lux).<br />
Jangan menggunakan perkakas daya saat ada cairan atau gas yang mudah terbakar.<br />
3. Jauhkan dari anak-anak. Jangan membiarkan anak-anak kontak dengan perkakas atau<br />
kabel sambungan ini. Jauhkan orang-orang dari area kerja ini.<br />
4. Kenakan pakaian yang sesuai. Jangan mengenakan pakaian longgar atau perhiasan.<br />
Pakaian itu bisa tersangkut di bagian yang bergerak. Sebaiknya mengenakan sarung<br />
tangan karet dan alas kaki anti-slip saat bekerja di luar ruangan. Pakai alat pelindung<br />
rambut untuk mencegah rambut panjang keluar. Saat bekerja di luar ruangan, sebaiknya<br />
pakai sarung tangan yang sesuai dan juga alas kaki anti-slip.<br />
5. Perlindungan Pribadi Selalu gunakan kacamata untuk keselamatan. Kacamata<br />
sehari-hari hanya memiliki lensa tahan benturan, tetapi bukan merupakan kacamata<br />
untuk keselamatan. Gunakan masker wajah atau debu saat bekerja di lingkungan<br />
berdebu atau partikel yang beterbangan. Jika partikel ini kemungkinan dianggap panas,<br />
juga kenakan celemek tahan panas. Kenakan pelindung telinga saat tingkat suara<br />
tampak tidak membuat nyaman, yaitu jika tekanan suara yang dicantumkan dalam buku<br />
panduan ini melebihi 85 dB(A).<br />
6. Jangan melampaui batas. Selalu jaga pijakan dan keseimbangan yang baik.<br />
7. Tetap waspada. Perhatikan apa yang sedang Anda kerjakan. Gunakan logika. Jangan<br />
mengoperasikan perkakas saat Anda lelah.<br />
8. Peralatan kerja yang aman. Gunakan penjepit atau catok untuk menahan peralatan<br />
kerja. Ini lebih aman dan kedua tangan Anda bebas untuk mengoperasikan perkakas.<br />
9. Cabut kunci dan kunci inggris pengatur. Selalu periksa bahwa kunci dan kunci inggris<br />
pengatur dicabut dari perkakas tersebut sebelum menyalakannya.<br />
10. Gunakan perkakas yang sesuai. Tujuan penggunaan ini dijelaskan dalam buku panduan<br />
instruksi ini. Jangan memaksakan perkakas kecil atau alat lainnya untuk melakukan<br />
pekerjaan alat beban-berat. Perkakas tersebut akan bekerja lebih baik dan lebih aman pada<br />
tingkat yang dimaksudkan baginya. Jangan menggunakan perkakas tersebut dengan paksa.<br />
Peringatan! Penggunaan aksesoris atau alat lain atau pelaksanaan operasi apapun<br />
dengan peralatan ini, selain dari yang direkomendasikan dalam buku petunjuk<br />
instruksi ini bisa mengakibatkan cedera pribadi.<br />
11. Periksa komponen yang rusak. Sebelum menggunakan perkakas, periksa seksama<br />
akan adanya kerusakan untuk memastikan bahwa alat tersebut akan beroperasi dengan<br />
benar dan dapat melakukan fungsi yang dimaksudkan baginya. Lakukan pemeriksaan<br />
untuk mengetahui apakah ada komponen bergerak yang salah dalam pengaturannya<br />
atau macet, komponen yang patah dan kondisi lainnya yang dapat mempengaruhi<br />
pengoperasian perkakas tersebut. Lakukan perbaikan atau penggantian terhadap<br />
pelindung kerusakan atau komponen lain yang cacat sesuai yang diperintahkan. Jangan<br />
menggunakan perkakas tersebut jika sakelarnya cacat. Ganti komponen yang rusak atau<br />
cacat tersebut oleh agen perbaikan resmi. Jangan pernah berusaha memperbaikinya<br />
sendiri.<br />
17
INDONESIA<br />
12. Hindari menjalankan perkakas tanpa maksud. Jangan pegang perkakas yang masih<br />
disambungkan dengan jari yang masih ada pada sakelar. Pastikan bahwa sakelar sudah<br />
dilepaskan saat dicolokkan.<br />
13. Kabel jangan sampai salah pakai. Jangan pernah saat membawa perkakas tersebut<br />
pada bagian kabel dengan menyentaknya untuk melepaskannya dari stop kontak.<br />
Jauhkan kabel dari panas, minyak dan ujung yang tajam.<br />
14. Simpan perkakas yang tidak terpakai. Saat sedang tidak digunakan, perkakas<br />
daya harus disimpan di tempat kering dan terkunci dengan aman, jauh dari jangkauan<br />
anak-anak.<br />
15. Pelihara perkakas dengan baik. Jaga perkakas dalam kondisi baik dan bersih untuk<br />
dapat diperoleh kinerja yang lebih baik dan lebih aman. Ikuti instruksi untuk perawatan<br />
dan penggantian aksesori. Periksa kabel perkakas dalam jangka waktu tertentu dan, jika<br />
rusak, perbaiki di agen perbaikan yang ditetapkan. Periksa kabel sambungan secara<br />
periodik dan ganti jika rusak. Jaga semua alat kontrol agar tetap kering, bersih dan<br />
bebas dari oli dan gemuk.<br />
16. Perbaiki perkakas Anda oleh agen perbaikan yang ditunjuk. Perkakas daya ini<br />
sesuai dengan peraturan keamanan yang relevan. Untuk menghindari bahaya, peralatan<br />
listrik hanya diperbaiki oleh teknisi yang berkualifikasi di bidangnya menggunakan suku<br />
cadang asli.<br />
Instruksi Keamanan Tambahan Baterai dan Alat Penambah Daya<br />
Baterai<br />
17. Jangan mencoba membuka atas alasan apa pun.<br />
18. Jangan simpan di lokasi dimana suhu bisa melebihi 40ºC.<br />
19. Isi ulang hanya pada suhu ruangan antara 4°C dan 40°C.<br />
20. Isi ulang hanya menggunakan alat penambah daya yang disediakan dengan<br />
perkakas tersebut (lihat data teknis).<br />
21. Saat membuang baterai, ikuti instruksi yang diberikan dalam bagian “Melindungi<br />
lingkungan”.<br />
22. Kebocoran sel baterai bisa terjadi pada kondisi ekstrim. Cairan baterai, lautan<br />
25-30% kalium hidroksida, bisa berbahaya. Jika kena kulit: (a) cepat cuci dengan sabun<br />
dan air; atau (b) netralkan dengan asam lemah seperti jus lemon atau asam cuka.<br />
Jika cairan tersebut masuk ke mata, langsung bilas dengan air bersih selama minimal<br />
10 menit. Mintalah bantuan medis.<br />
23. Bahaya kebakaran! Hindarkan hubungan pendek bila kontak dengan baterai yang<br />
dapat dilepas.<br />
24. Jangan membakar baterai.<br />
18
INDONESIA<br />
Alat pengisi daya<br />
25. Gunakan alat pengisi daya Black & Decker Anda hanya untuk mengisi ulang baterai yang<br />
ada di dalam perkakas yang disertakan bersamanya. Baterai lainnya bisa jadi meledak,<br />
mengakibatkan cedera pribadi dan kerusakan.<br />
26. Jangan pernah mencoba mengisi ulang baterai yang tidak dapat diisi ulang.<br />
27. Gantilah kawat kabel yang cacat dengan segera.<br />
28. Jangan dipaparkan ke air.<br />
29. Jangan membuka alat pengisi daya.<br />
30. Jangan memeriksa alat pengisi daya.<br />
31. Alat pengisi daya ini ditujukan hanya untuk penggunaan di dalam ruangan.<br />
Aturan Keselamatan Spesifik<br />
32. Saat memasang dan mengganti aksesori, selalu gunakan instruksi yang disediakan<br />
dengan aksesoris.<br />
33. Bila perkakas obeng Anda ini rusak, jangan mencoba untuk memperbaikinya sendiri,<br />
tetapi bawalah kepada salah satu agen perbaikan yang kami sarankan.<br />
34. Peringatan: Terkadang debu yang dihasilkan oleh kegiatan mengampelas,<br />
menggergaji, mengasah, mengebor, dan aktifitas konstruksi lainnya mengandung bahan<br />
kimia yang diketahui bisa menyebabkan kanker, cacat pada bayi atau bahaya reproduksi<br />
lainnya. Beberapa contoh dari bahan kimia ini adalah:<br />
• Timah dari cat berbahan dasar timah,<br />
• Silika kristalin dari batu bata dan semen dan dari produk pertukangan lainnya, dan<br />
• Arsenik dan kromium berasal dari barang-barang yang sudah tidak digunakan lagi<br />
yang diberi perlakuan tambahan dengan bahan kimia.<br />
Risiko Anda dari berbagai pemaparan ini, tergantung pada seberapa sering Anda<br />
melakukan untuk tipe pekerjaan ini. Untuk mengurangi pemaparan Anda terhadap bahan<br />
kimia ini: bekerjalah di dalam ruangan yang berventilasi baik dengan perlengkapan<br />
keamanan yang disetujui, seperti masker debu yang secara khusus dirancang untuk<br />
menyaring partikel miksoskopik.<br />
Hindari kontak lama dengan debu yang berasal dari aktifitas mengampelas,<br />
menggergaji, mengasah, mengebor dan aktifitas konstruksi lainnya. Kenakan<br />
pakaian pelindung dan cuci area yang kotor dengan sabun dan air. Debu yang<br />
masuk ke dalam mulut, mata, atau terkena pada kulit bisa meningkatkan absorbsi bahan<br />
kimia berbahaya.<br />
19
INDONESIA<br />
Label pada perkakas Anda<br />
Perkakas tersebut dilengkapi dengan simbol berikut ini.<br />
V ............. volt<br />
A ............. Ampere<br />
Hz ............. Hertz<br />
W ............. Watts<br />
Men. ............. Menit<br />
............. Arus bolak-balik<br />
............. Arus searah<br />
n ° ............. Kecepatan tanpa beban<br />
............. Konstruksi Kelas II<br />
............. Terminal arde<br />
............. Simbol tanda keselamatan<br />
.../men ............. Putaran per menit<br />
.../bpm ............. Bit per menit<br />
Simpan instruksi ini!<br />
Keselamatan Kerja Kelistrikan<br />
Alat pengisi daya Anda berisolasi ganda; oleh sebab itu tidak perlu kabel arde (ground).<br />
Selalu periksa apakah voltase utama sesuai dengan yang tertera di papan nama.<br />
Jangan mencoba untuk mengganti alat pengisi daya dengan steker utama biasa.<br />
Menggunakan Kabel Sambungan<br />
Kabel sambungan sebaiknya tidak digunakan kecuali benar-benar perlu. Penggunaan kabel<br />
sambungan yang tidak sesuai dapat mengakibatkan risiko kebakaran dan sengatan listrik.<br />
Jika kabel sambungan harus digunakan, gunakan hanya kabel yang disetujui oleh Badan<br />
Kelistrikan negara setempat. Pastikan bahwa kabel sambungan dalam kondisi baik sebelum<br />
menggunakannya. Selalu gunakan inti kabel yang sesuai dengan input daya alat pengisi<br />
daya Anda (lihat data teknis pada papan nama).<br />
Saat menggunakan gulungan kabel, selalu ulur kabel seluruhnya.<br />
20
INDONESIA<br />
Gbr. A<br />
1. Tombol on/off<br />
2. Penggeser maju/mundur<br />
3. Jendela maju/mundur<br />
4. Pemegang Bit<br />
5. Lampu LED<br />
6. Pemilih mode / sabuk pengatur torsi<br />
7. Pemegang sekrup<br />
8. Alat Pengisi Daya<br />
9. Alas pengisi daya<br />
10. Indikator pengisian ulang<br />
11. Penyimpanan bit<br />
Perakitan<br />
Memasang alas pengisian daya ke dinding (gbr. A & B)<br />
Alas pengisian daya (9) dapat ditempatkan pada bagian atas atau ditempelkan ke dinding<br />
untuk dapat menyimpan dan titik pengisian daya yang baik bagi perkakas tersebut. Sekrup<br />
dan sauh dinding tidak disertakan.<br />
Masukkan sekrup ke dalam dinding dengan jarak yang sama dengan slot (13)<br />
di belakang alas pengisian ulang (9).<br />
Jarak antar slot harus 75 mm.<br />
Geser alas pengisian daya di atas sekrup untuk menyesuaikan alas tersebut dengan<br />
dinding.<br />
Colokkan alat pengisi daya (8).<br />
Letakkan perkakas tersebut pada alas pengisian daya memastikan indikator pengisian<br />
ulang (10) menyala.<br />
Peringatan! Hindari merusak inti kabel daya saat memasangkan alas pengisian daya<br />
ke dinding.<br />
Memasang dan melepaskan bit bor atau bit obeng (gbr. C)<br />
Perkakas ini menggunakan bit obeng dan bit bor dengan tangkai heksagonal 6,35 mm (1/4").<br />
Untuk memasang bit, masukkan bit shaft ke dalam pemegang bit (4).<br />
Untuk melepaskan bit, tarik bit shaft ke luar dari pemegang bit (4).<br />
21
INDONESIA<br />
Penggunaan<br />
Peringatan! Biarkan perkakas bekerja sesuai kecepatannya. Jangan dibebani berlebihan.<br />
Sebelum penggunaan pertama, baterai harus diisi ulang selama sedikitnya 9 jam.<br />
Mengisi baterai (gbr. A)<br />
Letakkan perkakas di atas alas pengisian (9).<br />
Colokkan alat pengisi daya (8).<br />
Biarkan perkakas tersebut tersambung dengan alat pengisi daya selama 6 jam.<br />
Lampu merah bercahaya saat unit sedang diisi ulang dan akan tetap berwarna merah<br />
selama ada daya yang digunakan untuk mengisi ulang. Lampu warna merah tersebut tidak<br />
akan mati untuk menandakan bahwa pengisian sudah selesai.<br />
Alat pengisi daya bisa jadi berdengung dan menjadi hangat saat diisi ulang; hal ini adalah<br />
normal dan tidak mengindikasikan adanya masalah.<br />
Peringatan! Jangan mengisi ulang baterai pada suhu ruangan di bawah 4°C atau<br />
di atas 40°C.<br />
Memilih arah rotasi (gbr.D)<br />
Untuk mengebor atau mengencangkan sekrup, gunakan rotasi maju (searah jarum jam).<br />
Untuk mengendurkan sekrup atau melepaskan bit bor yang macet, gunakan rotasi mundur<br />
(berlawanan arah jarum jam).<br />
Jendela maju/mundur (3) menampilkan arah rotasi dengan sebuah anak panah.<br />
Untuk memilih rotasi maju, dorong penggeser maju/mudur (2) ke posisi depan.<br />
Untuk memilih rotasi mundur, dorong penggeser maju/mudur (2) ke posisi belakang.<br />
Untuk mengunci perkakas tersebut, atur penggeser maju/mundur ke posisi tengah.<br />
Memilih torsi (gbr.E)<br />
Perkakas ini dilengkapi dengan sebuah alat berkuping untuk menyetel torsi (putaran)<br />
berbagai pemakaian obeng dan aplikasi pengeboran. Sekrup besar dan bahan peralatan<br />
kerja yang keras membutuhkan setelan torsi yang lebih tinggi daripada sekrup kecil dan<br />
bahan peralatan kerja yang lunak. Alat berkuping tersebut memiliki hingga 6 setelan untuk<br />
menyesuaikan dengan aplikasi Anda.<br />
Untuk menyetel torsi, putar alat berkuping pengatur torsi (6) searah jarum jam atau<br />
berlawanan arah jarum jam.<br />
Untuk memasang sekrup, setel alat berkuping ke setelan yang diinginkan.<br />
Jika Anda belum tahu setelan yang sesuai, lakukan hal berikut ini:<br />
- Setel alat berkuping (6) ke setelan torsi terendah.<br />
- Kencangkan sekrup pertama.<br />
22
INDONESIA<br />
- Jika sekrup terjepit sebelum hasil yang diinginkan tercapai, tingkatkan setelan alat<br />
berkuping dan lanjutkan mengencangkan sekrup. Ulangi hingga Anda mencapai<br />
setelan yang benar. Gunakan setelan ini untuk sekrup yang lainnya.<br />
Aplikasi memasang sekrup<br />
<br />
Rentang torsi: torsi rendah untuk sekrup kecil dan torsi tinggi untuk sekrup<br />
besar<br />
Mengebor/memasang sekrup<br />
Pilih rotasi maju atau mundur menggunakan penggeser maju/mundur (2).<br />
Untuk menyalakan perkakas tersebut, tekan sakelar on/off (1).<br />
Untuk mematikan perkakas tersebut, lepaskan sakelar on/off (1).<br />
Memasang sekrup menggunakan pemegang sekrup (gbr. F1-F3)<br />
Pemegang sekrup (7) bisa digunakan dengan bit obeng 1" dan 2". Pemegang sekrup tidak<br />
dapat digunakan dengan sambungan pemegang ujung bit.<br />
Tarik pemegang sekrup (7) keluar dari perkakas (gbr. F1).<br />
Letakkan sekrup pada pemegang sekrup (gbr. F2).<br />
Tekan pemegang sekrup ke arah sekrup memastikan ujung tip dan sekrup<br />
benar-benar terpasang (gbr. F3).<br />
Sekrup dipegang dengan aman ke pemegang sekrup oleh magnet. Magnet tersebut tidak<br />
berfungsi pada sekrup non-besi.<br />
Gerakkan sekrup ke dalam dinding.<br />
Saat memasang sekrup, pemegang sekrup tertarik keluar kembali dengan maksud untuk<br />
membiarkan sekrup digerakkan ke kedalaman yang diinginkan.<br />
Lampu LED<br />
Lampu LED (5) diaktifkan secara otomatis saat alat pemicu ditekan. Lampu LED juga akan<br />
bercahaya saat pemicu ditekan dan penggeser maju/mundur (2) dalam posisi terkunci mati<br />
(posisi tengah).<br />
23
INDONESIA<br />
Petunjuk untuk penggunaan optimal<br />
Memasang sekrup<br />
Selalu gunakan tipe dan ukuran bit obeng yang tepat.<br />
Jika sekrup sulit dikencangkan, coba memberikan sedikit cairan pencuci atau sabun<br />
sebagai lubrikan.<br />
Gunakan kunci spindle untuk melonggarkan sekrup yang kencang atau untuk<br />
mengencangkan sekrup.<br />
Selalu pegang perkakas dan bit obeng dalam satu garis lurus dengan sekrup.<br />
Saat memasang sekrup pada kayu, direkomendasikan untuk mengebor lubang pemandu<br />
dulu dengan kedalaman sama dengan panjang sekrupnya. Sebuah lubang pemandu<br />
akan memandu sekrup tersebut dan mencegah menimbulkan serpihan atau distorsi kayu<br />
tersebut. Untuk ukuran optimum dari lubang pemandu, lihat pada tabel di bawah ini.<br />
Saat memasang sekrup di kayu keras, bor juga lubang bebas dengan kedalaman yang<br />
sama dengan setengah dari panjang sekrup. Untuk ukuran optimum dari lubang bebas,<br />
lihat pada tabel di bawah ini.<br />
Ukuran sekrup<br />
ø Lubang pemandu<br />
(kayu lunak)<br />
ø lubang pemandu<br />
(kayu keras)<br />
Lubang bebas<br />
No. 6 (3.5 mm) 2,0 mm 2,5 mm 3,6 mm<br />
No. 8 (4 mm) 2,5 mm 3,0 mm 4,5 mm<br />
No. 10 (5 mm) 3,0 mm 3,5 mm 5,0 mm<br />
Mengebor<br />
Selalu gunakan sedikit tekanan dalam arah garis lurus dengan bit bor.<br />
Sebelum ujung bor menembus lembar pekerjaan, kurangi tekanan pada perkakas<br />
tersebut.<br />
Gunakan blok kayu untuk menahan bagian belakang bidang kerja yang mungkin saja<br />
terpotong-potong.<br />
Buat lekukan menggunakan punch tengah di bagian tengah lubang yang akan dibor<br />
sebelum memperbaiki akurasi.<br />
Mengebor menggunakan bit bor countersink (pembesar bagian atas lubang)<br />
(gbr. G1-G3)<br />
Bit bor countesink (12) digunakan untuk mengeluarkan bahan untuk mendudukkan kepala<br />
sekrup rata dengan permukaan.<br />
Peringatan! Selalu cocokkan diameter bit drill ke diameter sekrup.<br />
24
INDONESIA<br />
Letakkan bit bor ke dalam perkakas.<br />
Gerakkan bor ke dalam bahan (gbr. G1).<br />
Gerakkan pemotong pada bit bor sejauh mungkin ke dalam bahan sesuai kebutuhan.<br />
Potong bahan secukupnya untuk membenamkan kepala sekrup ke dalam bahan tersebut<br />
(gbr. G2).<br />
Gerakkan sekrup ke dalam bahan dengan bit obeng (gbr. G3).<br />
Perawatan<br />
Perkakas listrik Black & Decker telah dirancang untuk penggunaan jangka panjang dengan<br />
pemeliharaan minimal. Pengoperasian yang memuaskan secara terus-menerus bergantung<br />
pada cara pemeliharaan yang layak dan pembersihan perkakas secara teratur.<br />
Perkakas ini tidak dapat diservis oleh pengguna. Bawa perkakas itu ke agen perbaikan<br />
Black & Decker resmi untuk diservis.<br />
Alat pengisi daya Anda tidak membutuhkan perawatan apapun selain dari pembersihan<br />
berkala.<br />
Cabut alat pengisi daya sebelum membersihkannya.<br />
• Bersihkan secara teratur kerangka motor dengan menggunakan kain bersih yang<br />
lembab. Jangan gunakan bahan pembersih abrasif atau berbasis larutan organik<br />
apapun.<br />
Penting<br />
Untuk memastikan KEAMANAN dan KETAHANAN UJI produk, perbaikan, perawatan dan<br />
pengaturan (selain dari yang terdaftar dalam buku panduan ini) sebaiknya dilakukan oleh<br />
pusat servis resmi atau badan yang terkualifikasi lainnya, selalu gunakan suku cadang<br />
pengganti yang identik. Unit di dalamnya mengandung komponen yang tidak dapat diservis<br />
oleh pengguna.<br />
Aksesori<br />
Kinerja dari setiap perkakas daya tergantung pada aksesori yang digunakan. Aksesori<br />
Black & Decker dibuat untuk standar kualitas tinggi dan dirancang untuk meningkatkan<br />
kinerja perkakas daya Anda. Dengan menggunakan aksesori Black & Decker Anda akan<br />
mendapatkan kinerja terbaik dari perkakas Anda.<br />
Black & Decker menawarkan serangkaian pilihan aksesori yang luas yang tersedia di dealer<br />
lokal kami atau di pusat layanan resmi dengan biaya ekstra.<br />
PERHATIAN: Penggunaan aksesori yang tidak direkomendasikan bisa jadi berbahaya.<br />
25
INDONESIA<br />
Melindungi Lingkungan<br />
Pengumpulan terpisah. Produk ini tidak boleh dibuang bersama limbah rumah tangga<br />
biasa.<br />
Jika Anda mendapati pada suatu hari bahwa produk Black & Decker Anda perlu diganti,<br />
atau tidak lagi dapat Anda gunakan, jangan membuangnya dengan sampah rumah tangga<br />
lainnya. Pisahkan pengumpulan produk ini.<br />
Pisahkan pengumpulan produk dan kemasan bekas agar bahan-bahannya dapat<br />
didaur ulang dan digunakan lagi.<br />
Penggunaan kembali bahan yang didaur ulang membantu mencegah pencemaran<br />
lingkungan dan mengurangi kebutuhan bahan baku.<br />
Jika perlu, hubungi kantor kotapraja setempat untuk mendapatkan petunjuk cara<br />
pembuangan yang benar di kota Anda.<br />
Baterai<br />
Baterai Black & Decker dapat diisi ulang beberapa kali. Pada akhir masa pakainya, buang<br />
baterai dengan memperhatikan lingkungan kita:<br />
• Pakai baterai sampai dayanya habis, dan kemudian lepaskan dari perkakasnya.<br />
• Baterai NiCd, NiMH, dan Li-ion dapat didaur ulang. Bawa baterai berkas tersebut ke<br />
pusat daur ulang setempat.<br />
Informasi Layanan<br />
Black & Decker menawarkan jaringan lengkap milik perusahaan dan lokasi servis resmi<br />
di seluruh Asia. Semua Pusat Servis Black & Decker memiliki tenaga kerja terlatih untuk<br />
memberikan servis perkakas listrik yang efi<strong>sie</strong>n dan terpercaya kepada pelanggan.<br />
Bilamana Anda memerlukan saran teknis, perbaikan, atau komponen pengganti asli pabrik,<br />
hubungi lokasi Black & Decker yang terdekat dengan tempat Anda.<br />
26
INDONESIA<br />
Catatan<br />
• Kebijakan Black & Decker adalah salah satu peningkatan yang berkelanjutan pada<br />
produk kami, dan karenanya, kami berhak mengubah spesifikasi produk tanpa<br />
pemberitahuan sebelumnya.<br />
• Perlengkapan dan aksesori standar bisa jadi beragam menurut negara.<br />
• Spesifikasi produk mungkin berbeda menurut negara.<br />
• Rangkaian produk lengkap mungkin tidak tersedia di semua negara. Hubungi Black &<br />
Decker setempat untuk mengetahui rangkaian produk yang tersedia.<br />
Pernyataan kepatuhan EC<br />
AS36LN<br />
Black & Decker menyatakan bahwa produk ini mematuhi:<br />
98/37/EC, EN60745<br />
LpA (tekanan suara) 58,9 dB(A), LWA (kekuatan akustik) 69,9 dB(A),<br />
Nilai Total Getaran (triax vector sum) sesuai dengan EN60745<br />
KpA (ketidakpastian tekanan suara): 3 dB(A),<br />
KWA (ketidakpastian daya akustik): 3 dB(A)<br />
Kevin Hewitt<br />
Direktur Consumer Engineering<br />
Spennymoor, County Durham DL16 6JG,<br />
United Kingdom<br />
1-5-2008<br />
27


