

BlackandDecker Mixeur- Bx225 - Type 1 - Instruction Manual
BlackandDecker Mixeur- Bx225 - Type 1 - Instruction Manual
BlackandDecker Mixeur- Bx225 - Type 1 - Instruction Manual

Create successful ePaper yourself
Turn your PDF publications into a flip-book with our unique Google optimized e-Paper software.
www.blackanddecker.ae<br />
BX275/BX225/BX205
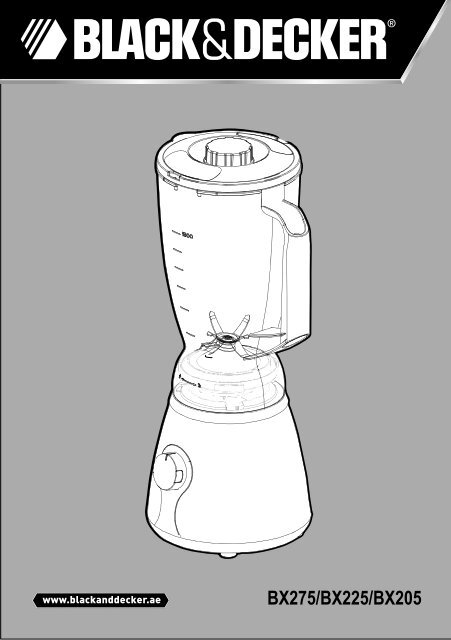
ENGLISH<br />
Parts Identification<br />
A. Filler Cap<br />
B. Lid<br />
C. Blender jug<br />
D. Jug base<br />
K<br />
E. Jug / Mincer seal<br />
E<br />
F. Blade<br />
G. Blade holder<br />
H. Motor coupling<br />
M<br />
L<br />
A<br />
I. Blender body<br />
J. Control knob<br />
B<br />
K Chopper jug (BX275 Only)<br />
L. Chopper blade (BX275 Only)<br />
M. Chopper blade holder<br />
(BX275 Only)<br />
N. Grinder jug<br />
(BX225 & BX275 Only)<br />
O. Grinder Blade<br />
(BX225 & BX275 Only)<br />
P. Grinder blade holder<br />
(BX225 & BX275 Only)<br />
I<br />
N<br />
E<br />
O<br />
P<br />
H<br />
C<br />
D<br />
E<br />
J<br />
F<br />
G<br />
2
ENGLISH<br />
Intended use<br />
Your Black & Decker blender has been designed<br />
for blending, mixing and crushing of solid and<br />
liquid food and beverage ingredients. This<br />
product is intended for indoor household use<br />
only.<br />
Read this entire manual carefully<br />
before using the appliance.<br />
Safety instructions<br />
• Warning! When using mains-powered<br />
appliances, basic safety precautions,<br />
including the following, should always be<br />
followed to reduce the risk of fire, electric<br />
shock and personal injury.<br />
• The intended use is described in this manual.<br />
The use of any accessory or attachment or<br />
the performance of any operation with this<br />
appliance other than those recommended in<br />
this instruction manual may present a risk of<br />
personal injury.<br />
• Retain this manual for future reference.<br />
Using your appliance<br />
• Always take care when using the appliance.<br />
• Never pull the power supply cord to<br />
disconnect the plug from the socket. Keep<br />
the power supply cord away from heat, oil<br />
and sharp edges.<br />
• Do not place the appliance on or near heat<br />
sources or in a heated oven.<br />
• Do not use the appliance outdoors.<br />
• Always protect the motor unit from water or<br />
excessive humidity.<br />
• If the power supply cord is damaged during<br />
use, disconnect the appliance from the power<br />
supply immediately. Do not touch the power<br />
supply cord before disconnecting from the<br />
power supply.<br />
• Disconnect the appliance from the power<br />
supply when not in use, before fitting or<br />
removing parts and before cleaning.<br />
• Never let the appliance operate unattended.<br />
• Never reach into the jar with your fingers or<br />
an object while the appliance is running.<br />
• Only remove the jar after you have switched<br />
the appliance off and any moving parts have<br />
stopped.<br />
• Do not touch the cutting blades.<br />
• Keep any loose clothing or long hair away<br />
from the feeding tube and any moving parts.<br />
• Care shall be taken when handling the sharp<br />
cutting blades, emptying the bowl and during<br />
cleaning.<br />
• Do not immerse the appliance, cord set or<br />
plug in liquids.<br />
Safety of others<br />
• This appliance is not intended for use by<br />
persons (including children) with reduced<br />
physical sensory or mental capabilities, or<br />
lack of experience and knowledge, unless<br />
they have been given supervision or<br />
instruction concerning use of the appliance by<br />
a person responsible for their safety.<br />
• Children should be supervised to ensure that<br />
they do not play with the appliance.<br />
3
ENGLISH<br />
After use<br />
• Remove the plug from the socket before<br />
leaving the appliance unattended and before<br />
changing, cleaning or inspecting any parts of<br />
the appliance.<br />
• When not in use, the appliance should be<br />
stored in a dry place. Children should not<br />
have access to stored appliances.<br />
Inspection and repairs<br />
• Switch off the appliance before cleaning,<br />
changing accessories or approaching parts<br />
which move in use<br />
• Before use, check the appliance for<br />
damaged or defective parts. Check for<br />
breakage of parts, damage to switches and<br />
any other conditions that may affect its<br />
operation.<br />
• Do not use the appliance if any part is<br />
damaged or defective.<br />
• Do not use the appliance if the blade is<br />
damaged.<br />
• Have any damaged or defective parts<br />
repaired or replaced by an authorised repair<br />
agent.<br />
• Before use, check the power supply cord for<br />
signs of damage, ageing and wear.<br />
• Do not use the appliance if the power supply<br />
cord or mains plug is damaged or defective.<br />
• If the power supply cord or mains plug is<br />
damaged or defective it must be repaired by<br />
an authorised repair agent in order to avoid a<br />
hazard. Do not cut the power supply cord<br />
and do not attempt to repair it yourself.<br />
• Never attempt to remove or replace any parts<br />
other than those specified in this manual.<br />
Electrical safety<br />
Before use, check that the mains voltage<br />
corresponds to the voltage on the rating plate.<br />
This appliance is double insulated in<br />
accordance with EN 60335-2-14;<br />
therefore no earth wire is required.<br />
• To avoid the risk of electric shock, do not<br />
immerse the cord, plug or motor unit in water<br />
or other liquid.<br />
• Check that the supply voltage shown on the<br />
rating plate of the appliance matches that of<br />
your electrical system. Any connection error<br />
will invalidate the guarantee.<br />
Mains plug replacement<br />
If a new mains plug needs to be fitted:<br />
• Safely dispose of the old plug<br />
• Connect the brown lead to the live terminal of<br />
the new plug<br />
• Connect the blue lead to the neutral terminal<br />
• If the product is class I (earthed), connect the<br />
green/yellow lead to the earth terminal<br />
Warning! If your product is class II double<br />
insulated (only 2 wires in the cord set), no<br />
connection is to be made to the earth terminal<br />
• Follow the fitting instructions supplied with<br />
good quality plugs<br />
• Any replacement fuse must be of the same<br />
rating as the original fuse supplied with the<br />
product<br />
4
ENGLISH<br />
Assembly<br />
1. Wash all detachable parts (see chapter<br />
‘Maintenance and cleaning’).<br />
2. Fit the jug seal (E) into the required blade<br />
holder (G).<br />
3. Place the blade holder (G) into the required<br />
jug base (D).<br />
4. Secure the blade holder (G) by turning it anti<br />
clockwise.<br />
Use<br />
1. Place the appliance on a flat, stable surface.<br />
2. Put the ingredients into the required jug (C).<br />
3. If using the blender push the lid (B) and filler<br />
cap (A) onto the jug (C).<br />
4. If using the Grinder or chopper seal the jug<br />
by fitting the required blade holder (A)and<br />
secure by turning anti-clockwise.<br />
5. Place the jug (C) onto the blender body (I).<br />
6. Secure the jug (C) by turning it anti<br />
clockwise.<br />
7. Connect it to the electrical supply and select<br />
the required speed using the rotary switch.<br />
The following settings are available:-<br />
P = Pulse Operation<br />
O = Power Off<br />
1 = Low Speed<br />
2 = High Speed<br />
The appliance should be<br />
disconnected from the mains supply<br />
before removing the jug.<br />
Recommendations when<br />
blending<br />
Ingredients<br />
Liquids 20 sec 1 1000ml<br />
Semi Liquids * 10 sec 2 750ml<br />
*Semi Liquids assumes maximum of 250 grams<br />
of fruits, vegetables or ice in 2.5x2.5 cm cubes<br />
along with 500 ml of water or any other liquid of<br />
similar consistency.<br />
Note: The blender should not be run for longer<br />
than 1 minute. After a continuous run of 1<br />
minute, the blender should be allowed to cool<br />
down for at least 2 minutes before further use.<br />
Recommendations when<br />
grinding (BX225 & BX275 Only)<br />
Ingredients<br />
Dry Pepper/<br />
Coffee beans<br />
Max Run Time Speed Max Quantity<br />
(Seconds)<br />
(ml)<br />
Max Run Time Speed Max Quantity<br />
(Seconds)<br />
(ml)<br />
20 sec 2 60g<br />
Dry Pulses 30 sec 1 50g<br />
Dry Herbs 20 sec 1 50g<br />
Note: The dry grinder should not be<br />
continuously run for longer than 40 seconds.<br />
Warning! The grinder should NOT be used for<br />
wet grinding of hard food materials like pulses,<br />
beans, grains etc. This will lead to damage of<br />
blades and reduction of motor life span.<br />
5
ENGLISH<br />
Recommendations when<br />
chopping (BX275 Only)<br />
Ingredients<br />
Max Run Time Speed Max Quantity<br />
(Seconds)<br />
(ml)<br />
Meat 20 sec 1 50g<br />
Cheese * 10 sec 2 50g<br />
* The chopper should only be used for very hard<br />
cheeses such as parmesan.<br />
Note: The chopper should not be continuously<br />
run for longer than 40 seconds.<br />
Useful advice<br />
• Place the appliance on a clean, flat work<br />
surface.<br />
Note: Do not exceed the maximum capacity of<br />
1.5 litres.<br />
• Connect the appliance to a suitable electrical<br />
supply. Rotate the control knob (J) to the<br />
required speed.<br />
• When blending is complete return the control<br />
knob to the off (0) position.<br />
• Once the blade (F) has come to a complete<br />
stop, lift the jug (C) from the blender body (I).<br />
• Remove the lid (B) and pour the ingredients<br />
into a suitable container.<br />
Note: Ingredients can be added by inserting<br />
them through the hole left when the filler cap (A)<br />
is removed.<br />
Warning! Never operate the Blender without<br />
the lid (B) fitted.<br />
Maintenance & cleaning<br />
• Switch the appliance off, remove the plug<br />
from the wall socket and wait until the blade<br />
has stopped rotating.<br />
• The appliance is easier to clean if you do so<br />
immediately after use.<br />
• Do not use abrasive cleaning agents,<br />
scourers, acetone, alcohol etc. to clean the<br />
appliance.<br />
• All detachable parts are dishwasher-safe.<br />
• Place the detachable plastic parts on the top<br />
tray of the dishwasher. Make sure they are<br />
placed well away from the heating element.<br />
• All removable parts can be cleaned with a<br />
cleaning brush in warm water with some<br />
washing-up liquid and rinse them under the<br />
tap.<br />
• Remove the dirty parts from the motor unit.<br />
Clean the motor unit with a damp cloth.<br />
• Never immerse the motor unit in water nor<br />
rinse it under the tap.<br />
Technical data<br />
Voltage<br />
Supply<br />
Power consumption<br />
(Speed I)<br />
Power Consumption<br />
(Speed II)<br />
Weight<br />
BX205 BX225 BX275<br />
220 – 240 Volts<br />
50/60 Hz<br />
200W<br />
300W<br />
1.5 kg<br />
6
ENGLISH<br />
Protecting the environment<br />
Separate collection. This product must not<br />
be disposed of with normal household<br />
waste.<br />
Should you find one day that your Black &<br />
Decker product needs replacement, or if it is of<br />
no further use to you, do not dispose of it with<br />
other household waste. Make this product<br />
available for separate collection.<br />
• Black & Decker provides a facility for<br />
recycling Black & Decker products once they<br />
have reached the end of their working life.<br />
This service is provided free of charge. To<br />
take advantage of this service please return<br />
your product to any authorised repair agent<br />
who will collect them on our behalf.<br />
• You can check the location of your nearest<br />
authorised repair agent by contacting your<br />
local Black & Decker office at the address<br />
indicated in this manual. Alternatively, a list of<br />
authorized Black & Decker repair agents and<br />
full details of our after-sales service and<br />
contact are available on the Internet at:<br />
www.2helpU.com.<br />
Warranty<br />
Black & Decker is confident of the quality of its<br />
products and offers an outstanding warranty.<br />
This warranty statement is in addition to and in<br />
no way prejudices your statutory rights.<br />
The warranty is valid within the territories of the<br />
Member States of the European Union and the<br />
European Free Trade Area.<br />
If a Black & Decker product becomes defective<br />
due to faulty materials, workmanship or lack of<br />
conformity, within 24 months from the date of<br />
purchase, Black & Decker warranty to replace<br />
defective parts, repair products subjected to fair<br />
wear and tear or replace such products to ensure<br />
minimum inconvenience to the customer unless:<br />
The product has been used for trade,<br />
professional or hire purposes;<br />
The product has been subjected to misuse<br />
or neglect;<br />
The product has sustained damage<br />
through foreign objects, substances or<br />
accidents;<br />
Repairs have been attempted by persons<br />
other than authorised repair agents or<br />
Black & Decker service staff.<br />
To claim on the warranty, you will need to submit<br />
proof of purchase to the seller or an authorised<br />
repair agent. You can check the location of your<br />
nearest authorised repair agent by contacting<br />
your local Black & Decker office at the address<br />
indicated in this manual.<br />
Alternatively, a list of authorised Black & Decker<br />
repair agents and full details of our after-sales<br />
service and contacts are available on the Internet<br />
at: www.2helpU.com.<br />
7
FRENCH<br />
Identification des pièces<br />
A. Bouchon de remplissage<br />
B. Couvercle<br />
C. Bol mixeur<br />
K<br />
D. Base du bol<br />
E. Joint du bol<br />
E<br />
F. Lame<br />
L<br />
G. Porte lame<br />
H. Accouplement du moteur M<br />
I. Corps du blender<br />
J. Bouton de réglage<br />
K. Bol du hachoir (BX275 seulement)<br />
L. Lame du hachoir (BX275<br />
seulement)<br />
M. Support de la lame du hachoir<br />
(BX275 seulement)<br />
N. Bol du moulin<br />
(BX225 & BX275 seulement)<br />
O. Lame du moulin<br />
(BX225 & BX275 seulement)<br />
P. Support de la lame du moulin<br />
(BX225 & BX275 seulement)<br />
J<br />
I<br />
N<br />
E<br />
O<br />
P<br />
H<br />
B<br />
C<br />
D<br />
E<br />
A<br />
F<br />
G<br />
8
Utilisation prévue<br />
Votre blender Black & Decker a été conçu pour<br />
mixer, hacher et broyer des aliments solides et<br />
liquides et vos préparations de boissons. Ce<br />
produit est conçu pour un usage domestique<br />
uniquement à l’intérieur.<br />
Lisez ce manuel attentivement avant<br />
d’utiliser l’appareil.<br />
Consignes de sécurité<br />
• Avertissement! Lorsqu’on utilise un appareil<br />
électrique, des précautions de base, y<br />
compris les suivantes, doivent toujours être<br />
suivies afin de réduire les risques d’incendie,<br />
de chocs électriques ou de blessures<br />
corporelles.<br />
• L’utilisation prévue est décrite dans ce<br />
manuel. L’utilisation d’un accessoire ou d’une<br />
pièce, ou l’exécution de toute opération avec<br />
cet appareil autres que celles recommandées<br />
dans ce manuel peut présenter un risque de<br />
blessures corporelles.<br />
• Conservez ce mode d’emploi pour le<br />
consulter ultérieurement.<br />
Utilisation de votre appareil<br />
• Toujours prendre des précautions lors de<br />
l’utilisation de l’appareil.<br />
• Ne jamais tirer sur le cordon d’alimentation<br />
pour débrancher la fiche de la prise. Le<br />
cordon d’alimentation ne doit jamais être à<br />
proximité d’une source de chaleur, de graisse<br />
ou d’angles vifs.<br />
• Ne pas placer l’appareil sur ou à proximité de<br />
sources de chaleur ou dans un four chaud.<br />
• Ne pas utiliser l’appareil à l’extérieur.<br />
• Toujours protéger le bloc moteur à l’abri des<br />
projections d’eau ou d’une humidité<br />
excessive.<br />
FRENCH<br />
• Si le cordon d’alimentation est endommagé<br />
lors de l’utilisation, débranchez l’appareil<br />
immédiatement. Ne touchez pas le cordon<br />
d’alimentation avant d’avoir débranché<br />
l’alimentation électrique.<br />
• Débrancher l’appareil de l’alimentation<br />
électrique lorsqu’il n’est pas utilisé, ou avant<br />
de monter ou de démonter des pièces, ou<br />
avant son nettoyage.<br />
• Ne jamais laisser l’appareil fonctionner sans<br />
surveillance.<br />
• Ne jamais intervenir dans le récipient avec<br />
les doigts ou un objet lorsque l’appareil est<br />
en marche.<br />
• Ne retirer le récipient qu’après avoir éteint<br />
l’appareil et une fois que les pièces en<br />
mouvement sont totalement arrêtées.<br />
• Ne pas toucher les lames de coupe.<br />
• Garder les vêtements amples et les cheveux<br />
longs loin du tube d’alimentation et des<br />
pièces en mouvement.<br />
• Des précautions doivent être prises lors de la<br />
manipulation du côté aiguisé des lames de<br />
coupe, lorsque le récipient est vidé ou<br />
nettoyé.<br />
• Ne pas immerger l’appareil, le cordon<br />
d’alimentation ou la prise dans un liquide.<br />
Sécurité d’autrui<br />
• Cet appareil n’est pas destiné à être utilisé<br />
par des personnes (y compris des enfants)<br />
ayant des capacités physiques, sensorielles<br />
ou mentales réduites, ou ayant un manque<br />
d’expérience et de connaissances, à moins<br />
qu’elles n’aient été formées et encadrées sur<br />
l’utilisation de l’appareil par une personne<br />
responsable de leur sécurité.<br />
• Les enfants doivent être surveillés pour<br />
s’assurer qu’ils ne jouent pas avec l’appareil.<br />
9
FRENCH<br />
Après utilisation<br />
• Retirez la fiche de la prise avant de laisser<br />
l’appareil sans surveillance et avant de<br />
changer, nettoyer ou inspecter un élément de<br />
d’appareil.<br />
• Lorsqu’il n’est pas utilisé, l’appareil doit être<br />
rangé dans un endroit sec. Les enfants ne<br />
doivent pas avoir accès aux appareils<br />
rangés.<br />
Inspection et réparations<br />
• Eteindre l’appareil avant de le nettoyer, de<br />
changer les accessoires ou d’approcher les<br />
pièces en mouvement lors de son<br />
fonctionnement.<br />
• Avant l’utilisation, vérifier que l’appareil n’a<br />
aucune pièce endommagée ou défectueuse.<br />
Vérifier la présence de pièces cassées,<br />
d’interrupteurs endommagés ou toute autre<br />
condition qui pourraient affecter son<br />
fonctionnement.<br />
• Ne pas utiliser l’appareil si une pièce est<br />
endommagée ou défectueuse.<br />
• Ne pas utiliser l’appareil si la lame est<br />
endommagée.<br />
• Faites réparer ou remplacer les pièces<br />
endommagées ou défectueuses par un<br />
réparateur agréé.<br />
• Avant l’utilisation, vérifier l’état du cordon<br />
d’alimentation pour des signes de<br />
dommages, de vieillissement ou d’usure.<br />
• Ne pas utiliser l’appareil si le cordon<br />
d’alimentation ou la fiche secteur est<br />
endommagée ou défectueuse.<br />
• Si le cordon d’alimentation ou la fiche secteur<br />
est endommagée ou défectueuse, il doit être<br />
réparé par un réparateur agréé afin d’éviter<br />
tout danger. Ne pas couper le cordon<br />
d’alimentation et ne pas tenter de le réparer<br />
vous-même.<br />
• Ne jamais essayer de retirer ou de remplacer<br />
une pièce autre que celles spécifiées dans ce<br />
manuel.<br />
Sécurité électrique<br />
Avant son utilisation, vérifiez que la tension<br />
électrique correspond à celle indiquée sur<br />
l’étiquette signalétique.<br />
Cet appareil possède une double<br />
isolation selon la norme EN<br />
60335-2-14; de ce fait un fil de terre<br />
n’est pas nécessaire.<br />
• Pour éviter tout risque de décharge<br />
électrique, n’immergez pas le cordon<br />
d’alimentation, la prise ou le bloc moteur<br />
dans de l’eau ou dans tout autre liquide.<br />
• Vérifiez que la tension d’alimentation<br />
indiquée sur l’étiquette signalétique de<br />
l’appareil correspond bien à celle de votre<br />
installation électrique. Toute erreur de<br />
branchement annule la garantie.<br />
Remplacement de la fiche<br />
électrique<br />
En cas d’installation d’une nouvelle fiche:<br />
• Jetez l’ancienne fiche avec prudence<br />
• Connectez le fil marron sur la borne sous<br />
tension de la nouvelle fiche<br />
• Connectez le fil bleu sur la borne neutre<br />
• Si l’appareil est de classe I (mis à la terre),<br />
connectez le fil vert/jaune sur la borne terre<br />
10
FRENCH<br />
Avertissement! Si votre appareil est de classe II<br />
double isolation (seulement 2 fils dans le<br />
cordon), aucune connexion n’est à faire sur la<br />
borne terre.<br />
• Suivez les instructions de montage fournies<br />
avec les fiches de bonne qualité.<br />
• Tout fusible remplacé doit être du même<br />
calibre que le fusible d’origine fourni avec<br />
l’appareil.<br />
Assemblage<br />
1. Laver toutes les pièces démontables (voir<br />
chapitre ‘Entretien et nettoyage’).<br />
2. Placez le joint du bol (E) sur le porte-lame<br />
souhaité (G).<br />
3. Placez le support de lame (G) sous la base<br />
du bol souhaité (D).<br />
4. Verrouillez le support de lame (G) en<br />
tournant dans le sens inverse des aiguilles<br />
d’une montre.<br />
Utilisation<br />
1. Placez l’appareil sur un plan de travail plat et<br />
stable.<br />
2. Placez les ingrédients dans le bol souhaité<br />
(C).<br />
3. Si vous utilisez le blender, placez le<br />
couvercle (B) et le bouchon de remplissage<br />
(A) sur le bol (C).<br />
4. Si vous utilisez le hachoir ou le moulin,<br />
scellez le bol en plaçant le support de lame<br />
souhaité (A) et verrouillez en tournant dans le<br />
sens inverse des aiguilles d’une montre.<br />
5. Placez le bol (C) sur le corps du blender (I).<br />
6. Verrouillez le bol (C) en tournant dans le<br />
sens inverse des aiguilles d’une montre.<br />
7. Branchez l’appareil sur une prise électrique<br />
et sélectionnez la vitesse souhaitée en<br />
tournant le bouton de réglage.<br />
Les réglages suivants sont disponibles:-<br />
P = Fonction impulsion<br />
O = Position arrêt<br />
1 = Vitesse lente<br />
2 = Vitesse rapide<br />
L’appareil doit être débranché du<br />
réseau électrique avant de retirer le<br />
bol.<br />
Recommandations lors du<br />
mixage<br />
Ingrédients<br />
*Par semi-liquides on suppose une quantité<br />
maximale de 250 gr de fruits, de légumes frais<br />
ou de glaçons de 2,5x2,5 cm avec 500 ml d’eau<br />
ou un autre liquide de consistance semblable.<br />
Remarque: Le blender ne doit pas fonctionner<br />
plus d’1 minute. Après une utilisation continue<br />
d’1 minute, laissez le blender refroidir pendant<br />
au moins 2 minutes avant de le réutiliser.<br />
Recommandations lors du<br />
broyage (BX225 et BX275<br />
seulement)<br />
Ingrédients<br />
Temps d’exécution Vitesse Quantité<br />
max. (secondes)<br />
max. (ml)<br />
Liquides 20 sec 1 1000ml<br />
Semi-liquides * 10 sec 2 750ml<br />
Temps d’exécution Vitesse Quantité<br />
max. (secondes)<br />
max. (ml)<br />
Poivre sec/ 20 sec 2 60g<br />
Grains de café<br />
Légumes secs 30 sec 1 50g<br />
Herbes aromatiques 20 sec 1 50g<br />
sèches<br />
Remarque: Le broyeur ne doit pas fonctionner<br />
en continu plus de 40 secondes.<br />
11
FRENCH<br />
Avertissement! N’utilisez PAS le broyeur pour<br />
un broyage humide d’aliments durs du type<br />
légumes secs, haricots, grains etc. Ceci<br />
endommagerait les lames et réduirait le temps<br />
de vie du moteur.<br />
Recommandations lors du<br />
hachage (BX275 seulement)<br />
Ingrédients<br />
Temps d’exécution Vitesse Quantité<br />
max. (secondes)<br />
max. (ml)<br />
Viande 20 sec 1 50g<br />
Fromage * 10 sec 2 50g<br />
* Utilisez le hachoir uniquement pour des<br />
fromages durs du type parmesan.<br />
Remarque: Le hachoir ne doit pas fonctionner<br />
en continu plus de 40 secondes.<br />
Conseils utiles<br />
• Placez l’appareil sur un plan de travail propre<br />
et plat.<br />
Remarque: Ne pas dépasser la capacité<br />
maximale de 1,5 litre.<br />
• Branchez l’appareil à une alimentation<br />
électrique appropriée. Tournez le bouton de<br />
réglage (J) sur la vitesse souhaitée.<br />
• Quand le mixage est terminé, tournez le<br />
bouton sur la position off (0).<br />
• Une fois que la lame (F) s’est arrêtée de<br />
fonctionner, retirez le bol (C) du corps du<br />
blender (I).<br />
• Enlevez le couvercle (B) et versez la<br />
préparation dans un récipient approprié.<br />
Remarque: Les ingrédients peuvent être ajoutés<br />
en les insérant dans le trou du bouchon de<br />
remplissage (A) quand celui-ci est enlevé.<br />
Avertissement! Ne faites jamais fonctionner le<br />
blender sans avoir mis le couvercle (B).<br />
Entretien et nettoyage<br />
• Mettez l’appareil hors tension, retirez la fiche<br />
de la prise de courant et attendez que la<br />
lame ait cessé de tourner.<br />
• L’appareil est facile à nettoyer si vous le<br />
faites immédiatement après son utilisation.<br />
• Ne pas utiliser de produits abrasifs, de<br />
tampons à récurer, d’acétone, d’alcool etc.<br />
pour nettoyer l’appareil.<br />
• Toutes les pièces démontables passent au<br />
lave-vaisselle.<br />
• Placez les pièces démontables en plastique<br />
sur le panier supérieur du lave-vaisselle.<br />
Assurez-vous qu’elles soient à bonne<br />
distance de l’élément chauffant.<br />
• Toutes les pièces démontables peuvent être<br />
nettoyées avec une brossette de nettoyage à<br />
l’eau tiède et un peu de liquide vaisselle, puis<br />
rincées sous le robinet.<br />
• Retirer les pièces sales du bloc moteur.<br />
Nettoyez le bloc moteur avec un chiffon<br />
humide.<br />
• Ne plongez jamais le bloc moteur dans l’eau<br />
et ne le rincez pas sous le robinet.<br />
Données techniques<br />
Tension<br />
Courant d’alimentation<br />
Puissance nominale<br />
(Vitesse I)<br />
Puissance nominale<br />
(Vitesse II)<br />
Poids<br />
BX205 BX225 BX275<br />
220 – 240 Volts<br />
50/60 Hz<br />
200W<br />
300W<br />
1,5 kg<br />
12
FRENCH<br />
Protection de l'environnement<br />
Collecte séparée. Ce produit ne doit<br />
pas être jeté avec les déchets<br />
domestiques normaux.<br />
Si vous décidez de remplacer ce produit Black &<br />
Decker, ou si vous n'en avez plus l'utilité, ne le<br />
jetez pas avec vos déchets domestiques<br />
Rendez-le disponible pour une collecte séparée.<br />
• Black & Decker fournit un dispositif<br />
permettant de collecter et de recycler les<br />
produits Black & Decker lorsqu'ils ont atteint<br />
la fin de leur cycle de vie. Pour pouvoir<br />
profiter de ce service, veuillez retourner votre<br />
produit à un réparateur agréé qui se chargera<br />
de le collecter pour nous.<br />
• Pour connaître l'adresse du réparateur agréé<br />
le plus proche de chez vous, contactez le<br />
bureau Black & Decker à l'adresse indiquée<br />
dans ce manuel. Vous pourrez aussi trouvez<br />
un liste des réparateurs agréés de Black &<br />
Decker et de plus amples détails sur notre<br />
service après-vente sur le site Internet à<br />
l'adresse suivante : www.2helpU.com<br />
Garantie<br />
Black & Decker est confiant dans la qualité de<br />
ses produits et vous offre une garantie très<br />
étendue.<br />
Ce certificat de garantie est un document<br />
supplémentaire et ne peut en aucun cas se<br />
substituer à vos droits légaux.<br />
La garantie est valable sur tout le territoire des<br />
Etats Membres de l'Union Européenne et de la<br />
Zone de Libre Echange Européenne.<br />
Si un produit Black & Decker s'avère défectueux<br />
en raison de matériaux en mauvaises conditions,<br />
d'une erreur humaine, ou d'un manque de<br />
conformité dans les 24 mois suivant la date<br />
d'achat, Black & Decker garantit le remplacement<br />
des pièces défectueuses, la réparation des<br />
produits usés ou cassés ou remplace ces<br />
produits à la convenance du client, sauf dans les<br />
circonstances suivantes :<br />
Le produit a été utilisé dans un but<br />
commercial, professionnel, ou a été loué.<br />
Le produit a été mal utilisé ou avec<br />
négligence.<br />
Le produit a subi des dommages à cause<br />
d'objets étrangers, de substances ou à<br />
cause d'accidents.<br />
Des réparations ont été tentées par des<br />
techniciens ne faisant pas partie du<br />
service technique de Black & Decker.<br />
Pour avoir recours à la garantie, il est nécessaire<br />
de fournir une preuve d'achat au vendeur ou à un<br />
réparateur agréé. Pour connaître l'adresse du<br />
réparateur agréé le plus proche de chez vous,<br />
contactez le bureau Black & Decker à l'adresse<br />
indiquée dans ce manuel.<br />
Vous pourrez aussi trouver une liste des<br />
réparateurs agréés de Black & Decker et de plus<br />
amples détails sur notre service après-vente sur<br />
le site Internet à l'adresse suivante :<br />
www.2helpU.com<br />
13
ARABIC<br />
¿Éª°†dG<br />
Ékfɪ°V ¢Vô©Jh É¡JÉéàæe IOƒL ‘ ôµjO ófBG ÓHك ãJق<br />
jƒWل LC’Gل.<br />
»àdG Mقbƒك EGلى áaÉ°VE’ÉH ¿ƒµj Gòg ¿Éª°†dG ¿É«H<br />
¿ƒfÉقdG É¡ëæÁ îjل ’h ÉMل …CÉH É¡H GƒMC’Gل. øe<br />
OÉ–’G ‘ AÉ°†YC’G hódGل º«dÉbCG ‘ ¿Éª°†dG …öùj<br />
.á«HhQhC’G IôلهG IQÉéàdG áق£æeh »HhQhC’G<br />
‘ Ö«Y ÖÑ°ùH ôµjO ófBG ÓHك èàæe ‘ Nلل OƒLh ádÉM ‘<br />
óYم hCG áYÉæ°üdG hCG OGƒŸG aGƒàdGق ÓNل ,ÒjÉ©ŸG e 24<br />
ÓHك øª°†J ,AGöûdG ïjQÉJ øe Gkô¡°T GóÑà°SGل ôµjO ófBG<br />
cBÉàdGل IÉYGôe e äÉéàæŸG ìÓ°UEGh áÑ«©ŸG AGõLC’G<br />
ÑdGhلى GóÑà°SGل hCG »©«Ñ£dG ògه bCGل ¿Éª°†d äÉéàæŸG<br />
dل©ª»ل êÉYREG Ée لم:<br />
hCG á«æ¡e hCG ájQÉŒ ¢VGôZCG ‘ èàæŸG Góîà°SGم ºàj<br />
;ÒLCÉJ ¢VGôZCG<br />
Góîà°S’Gم Aƒ°ùd èàæŸG ¢Vô©àj ɪgE’Gل; hCG<br />
áÑjôZ OGƒe hCG AÉ«°TCG áé«àf dلàلف èàæŸG ¢Vô©àj<br />
;çOGƒM hCG<br />
ÒZ ¢UÉî°TCG ᣰSGƒH èàæŸG ìÓ°UEG محádhÉ ºàj<br />
HÉàdG áfÉ«°üdG jôaق hCG øjóªà©ŸG áfÉ«°üdG AÓch<br />
.ôµjO ófBG ÓHك ácöûd<br />
ËóقJ EGلى êÉà– ±ƒ°S ,¿Éª°†dG ÖLƒÃ áÑdÉ£e Ëóقàd<br />
dO»ل FÉÑلd AGöûdG ch»ل hCG æµÁhك .óªà©ŸG áfÉ«°üdG<br />
Yلى ±ô©àdG ch»ل ÜôbCG bƒe ÓNل øe óªà©e áfÉ«°U<br />
¿Gƒæ©dG ‘ ëŸGل« ôµjO ófBG ÓHك Öàµe Yلى É°üJ’Gل<br />
dódG»ل. Gòg ‘ í°VƒŸG<br />
øjóªà©ŸG áfÉ«°üdG AÓcƒH áªFÉb óLƒJ dPك, øe k’óHh<br />
äÉeóÿ áلeɵdG UÉØàdGh°»ل ôµjO ófBG ÓHك ácöûd Ú©HÉàdG<br />
âfÎfE’G Yلى ÉæH á°UÉÿG É°üJ’Gل FÉ°Shhل «ÑdG ó©H Ée<br />
.www.2helpU.com :ÊhεdE’G bƒŸG Yلى<br />
Gòg øe ¢üلîàdG óYم jلõم üØæŸG°ل. ª÷G<br />
.ájOÉ©dG á«dõæŸG áeɪقdG e èàæŸG<br />
áÄ«ÑdG ájɪM<br />
ôµjO ófBG ÓHك èàæe GóÑà°SGل ÉjC’Gم øe ƒjم ‘ õdم GPEG<br />
e ¬æe ¢üلîàJ Óa ,¬eóîà°ùJ ó©J لم GPEG hCG Hك, ¢UÉÿG<br />
èàæŸG Gòg áMÉJEG øe ócCÉJ Hل ,iôNC’G á«dõæŸG áeɪقdG<br />
ªéلd üØæŸG°ل.<br />
ôjhóJ IOÉYE’ aôeق ôµjO ófBG ÓHك ácöT ôaƒJ •<br />
ájÉ¡f EGلى É¡dƒ°Uh Oôéà ôµjO ófBG ÓHك äÉéàæe<br />
óYhم ÉgôªY dل©ªل. É¡à«MÓ°U ËóقJ ºàjh ògه<br />
ògه øe IOÉØà°SÓd .ÉkfÉ› áeóÿG Lôjى ,áeóÿG<br />
±ƒ°S …òdGh óªà©e áfÉ«°U ch»ل …CG EGلى èàæŸG IOÉYEG<br />
.ÉæY áHÉ«f äÉéàæŸG ªL QhóHه ƒàjلى<br />
óªà©e áfÉ«°U ch»ل ÜôbCG bƒe Yلى ±ô©àdG æµÁك •<br />
ÓNل øe É°üJ’Gل Yلى ÓHك Öàµe ëŸGل« ôµjO ófBG<br />
‘ ¿Gƒæ©dG dódG»ل. Gòg ‘ í°VƒŸG dPك, øe k’óHh<br />
Ú©HÉàdG øjóªà©ŸG áfÉ«°üdG AÓcƒH áªFÉb óLƒJ<br />
Ée äÉeóÿ áلeɵdG UÉØàdGh°»ل ôµjO ófBG ÓHك ácöûd<br />
âfÎfE’G Yلى ÉæH á°UÉÿG É°üJ’Gل FÉ°Shhل «ÑdG ó©H<br />
.www.2helpU.com :ÊhεdE’G bƒŸG Yلى<br />
14
ARABIC<br />
• ¿ƒµ«°S SC’G°¡ل øe æJ»ف eÉ«bك ádÉM ‘ RÉ¡÷G<br />
.IöTÉÑe Góîà°S’Gم ó©H dòHك<br />
hCG º«ق©J IQOƒH hCG ᣰTÉc æJ»ف OGƒe óîà°ùJم ’ •<br />
∞«æJ iód OGƒŸG øe ÉgÒZ hCG ∫ƒëc hCG ¿ƒà«°SCG<br />
.RÉ¡÷G<br />
ádÉ°ùZ ‘ dلüØ°ل áلHÉقdG AGõLC’G «ªL ùZ°ل øµÁ •<br />
.øeBG µ°ûHل ÊGhC’G<br />
ìƒلdG Yلى dلüØ°ل áلHÉقdG ᫵«à°SÓÑdG AGõLC’G °V •<br />
øY kGó«©H É¡©°Vh øe ócCÉJh .ÊGhC’G ádÉ°ù¨d …ƒل©dG<br />
.áæNÉ°ùdG äÉfƒµŸG<br />
ÅaGO AÉe ‘ ácôëàŸG AGõLC’G «ªL æJ»ف øµÁ •<br />
.AÉŸG QƒÑæ°U â– É¡Ø£°Th æJ»ف IÉ°Tôa Góîà°SÉHم<br />
• RCGل IóMh øe áî°ùàŸG AGõLC’G محôك qf .¿GQhódG ف<br />
Ñeللá. ¢Tɪb á©£قH ôëŸGك IóMh<br />
â– É¡Ø£°ûJ ’h AÉŸG ‘ ¿GQhódG محôك IóMh ôª¨J ’ •<br />
.AÉŸG QƒÑæ°U<br />
BX205 BX225 BX275<br />
á«æØdG äÉfÉ«ÑdG<br />
âdƒa 240 – 220 ó¡÷G<br />
õJôg 60/50 á«FÉHô¡µdG ájò¨àdG<br />
äGh 200 (I áYöùdG) ábÉ£dG Ó¡à°SGك<br />
äGh 300 (II áYöùdG) ábÉ£dG Ó¡à°SGك<br />
ºéc 1^5 ¿RƒdG<br />
BX275 (jOƒŸGل ôØdGم á«لª©d íFÉ°üf<br />
aق§)<br />
ûàdG°¨»ل Ióe äÉfƒµŸG óلهG áYöùdG übC’G°ى<br />
iƒ°üقdG ᫪µلd (ÊGƒK) (eل)<br />
ºëلdG eل 100 1 á«fÉK 20<br />
eل 750 2 m¿GƒK 10 *Í÷G<br />
Íéc á«°SÉقdG ¿ÉÑLCÓd aق§ áeGôØdG Góîà°SGم »¨Ñæj*<br />
.¿Gõ«eQÉH<br />
øe ÌcC’ UGƒàe°ل µ°ûHل áeGôØdG ûJ°¨»ل »¨Ñæj ’ :áMÓe<br />
.á«fÉK 40<br />
Ió«Øe íFÉ°üf<br />
• °V Yلى RÉ¡÷G fh»ف. mƒà°ùe í£°S<br />
.Îd 1^5 AÉYƒdG á©°ùd übC’G°ى óلهG :áMÓe<br />
.ºFÓe á«FÉHô¡c ájò¨J مخêô EGلى RÉ¡÷G UƒàH°»ل ºb •<br />
.áHƒل£ŸG áYöùdG ójóëàd (J) ºµëàdG ìÉàØe ôjhóàH ºb<br />
• iód ɪàcGل á«لªY EGلى ºµëàdG ìÉàØe QOpCG ,øë£dG<br />
.(0) á«©°VƒdG<br />
(C) AÉYƒdG aQG ,kÉeÉ“ (F) øë£dG IôØ°T bƒJف iód •<br />
.(I) •ÓÿG πµ«g øe<br />
.ºFÓŸG AÉYƒdG ‘ äÉjƒàëŸG Öµ°SGh (B) AÉ£¨dG RCGل •<br />
ÈY É¡àaÉ°VEG ÓNل øe äÉfƒµŸG áaÉ°VEG øµÁ :áMÓe<br />
.(A) ¥ÓZE’G IOGó°S ádGREG iód á«قÑàŸG áëàØdG<br />
.(B) AÉ£¨dG Ö«côJ ¿hóH •ÓÿG π¨°ûJ ’ :ôjò–<br />
æàdGh»ف áfÉ«°üdG<br />
ájò¨àdG òØæe øe ¢ùHÉقdG ´õfGh RÉ¡÷G ÅØWCG •<br />
.¿GQhódG øY äGôØ°ûdG bƒàJف àMى ôàfGh á«FÉHô¡µdG<br />
15
ARABIC<br />
ájò¨àdG Qó°üe øY RÉ¡÷G π°üa »¨Ñæj<br />
.AÉYƒdG ´õf πÑb á«FÉHô¡µdG<br />
á©ØJôe áYQ¢S = 2<br />
§∏ÿG á«∏ª©d íFÉ°üf<br />
≈°übC’G ó◊G áYöùdG 𫨰ûàdG Ióe äÉfƒµŸG<br />
(πe) ᫪µ∏d (ÊGƒK) iƒ°ü≤dG<br />
ΩGôZ 50 1 á«fÉK 20 πFGƒ°ùdG<br />
ΩGôZ 50 2 m¿GƒK 10 *πFGƒ°ùdG √ÉÑ°TCG<br />
hCG ¬cGƒØdG øe ΩGôZ 250 ≈°übCG óM »æ©J πFGƒ°ùdG √ÉÑ°TCG *<br />
ºéMh º°S 2^5×2^5 ¢SÉ«≤H ó«∏L äÉÑ©µe hCG QÉ°†ÿG<br />
.πKɇ ΩGƒ≤H ôNBG πFÉ°S …CG hCG √É«ŸG øe πe 500<br />
.IóMGh á≤«bO øe ÌcC’ •ÓÿG 𫨰ûJ »¨Ñæj ’ :áMÓe<br />
∑ôJ »¨Ñæj ,IóMGh á≤«bO IóŸ π°UGƒàŸG 𫨰ûàdG ó©Hh<br />
πÑb πbC’G ≈∏Y (2) Úà≤«bO IóŸ OÈj ≈àM •ÓÿG<br />
.¬eGóîà°SG á∏°UGƒe<br />
h BX225 πjOƒŸG) øë£dG á«∏ª©d íFÉ°üf<br />
(§≤a BX275<br />
≈°übC’G ó◊G áYöùdG<br />
𫨰ûàdG Ióe äÉfƒµŸG<br />
(πe) ᫪µ∏d (ÊGƒK) iƒ°ü≤dG<br />
ΩGôZ 60 2 á«fÉK 20<br />
/±É÷G πØ∏ØdG<br />
Iƒ¡≤dG ܃ÑM<br />
ΩGôZ 50 1 á«fÉK 30 áaÉ÷G QhòÑdG<br />
ΩGôZ 50 1 á«fÉK 20 áaÉ÷G ÜÉ°ûYC’G<br />
π°UGƒàe πµ°ûH áaÉ÷G áæ룟G 𫨰ûJ »¨Ñæj ’ :áMÓe<br />
.á«fÉK 40 øe ÌcC’<br />
á«FGò¨dG OGƒŸG øë£d áæ룟G ΩGóîà°SG »¨Ñæj ’ !ôjò–<br />
.ÉgÒZh É¡YGƒfCÉH ܃Ñ◊Gh QhòÑdÉc ádƒ∏ÑŸG á«°SÉ≤dG<br />
ôª©dG ¢VÉØîfGh äGôØ°ûdG Qö†J ¤EG ∂dòH ΩÉ«≤dG …ODƒ«°S<br />
.¿GQhódG ∑ôëŸ »∏«¨°ûàdG<br />
•ÓÿG AGõLCG «ªŒ<br />
º°ùb LGQ) π°üØ∏d á∏HÉ≤dG AGõLC’G «ªL π°ùZG .1<br />
.("∞«æàdGh áfÉ«°üdG"<br />
IôØ°T πeÉM ≈∏Y (E) §∏ÿG AÉYh â«ÑãJ á≤∏M Ö qcQ .2<br />
.(G) áHƒ∏£ŸG §∏ÿG<br />
§∏ÿG AÉYh IóYÉb ‘ (G) §∏ÿG IôØ°T πeÉM °V .3<br />
.(D) ܃∏£ŸG<br />
á¡L ¢ùµY √ôjhóàH (G) §∏ÿG IôØ°T πeÉM âqÑK .4<br />
.áYÉ°ùdG ÜQÉ≤Y ¿GQhO<br />
•ÓÿG ΩGóîà°SG<br />
.ô≤à°ùeh mƒà°ùe í£°S ≈∏Y •ÓÿG °V .1<br />
.(C) ܃∏£ŸG §∏ÿG AÉYh ‘ äÉfƒµŸG °V .2<br />
(B) AÉ£¨dG §¨°VG ,§∏ÿG AÉYhh •ÓÿG ΩGóîà°SG iód .3<br />
.(C) §∏ÿG AÉYh ≈∏Y (A) ¥ÓZE’G IOGó°Sh<br />
AÉYh âqÑK ,áeGôØdG hCG áæ룟G ΩGóîà°SG iód .4<br />
áHƒ∏£ŸG IôØ°ûdG πeÉM â«ÑãJ ∫ÓN øe ΩôØdG/øë£dG<br />
¿GQhO ácôM ¢ùµ©H √ôjhóJ ∫ÓN øe ¬æ«eCÉJh (A)<br />
.áYÉ°ùdG ÜQÉ≤Y<br />
.(I) •ÓÿG πµ«g ≈∏Y (C) §∏ÿG AÉYh °V .5<br />
ácôM ¢ùµ©H √ôjhóJ ∫ÓN øe (C) §∏ÿG AÉYh âqpÑnK .6<br />
.áYÉ°ùdG ÜQÉ≤Y ¿GQhO<br />
á«FÉHô¡µdG ájò¨àdG òØæe ¤EG RÉ¡÷G π«°UƒàH ºb .7<br />
.QGhódG ìÉàØŸG ΩGóîà°SÉH áHƒ∏£ŸG áYöùdG QÉ«àNGh<br />
:QGhódG ìÉàت∏d Iôaƒàe á«dÉàdG äGOGO´E’G<br />
¢†ÑædG á«©°VƒH 𫨰ûJ = P<br />
ábÉ£dG £b = 0<br />
á°†Øîæe áYöS = 1<br />
16
ARABIC<br />
IOóëŸG ∂∏J ÒZ AGõLCG ájCG ∫GóÑà°SG hCG ádGREG ∫hÉ– ’ •<br />
‘ Gòg dódG»ل.<br />
á«FÉHô¡µdG áeÓ°ùdG<br />
¢ù«FôdG òNCÉŸG ó¡L ≥aGƒJ øe RÉ¡÷G ΩGóîà°SG πÑb ≥≤–<br />
.∞«æ°üàdG áMƒd ≈∏Y OóëŸG ó¡÷G e<br />
QÉ«©ªلd kÉقah kÉLhOõe k’õY hõ©eل RÉ¡÷G Gòg<br />
¤EG áLÉM ’ ‹ÉàdÉHh ,14-2-60335 EN<br />
.»°VQCG ∂∏°S π«°UƒJ<br />
ÖæŒ Ωõ∏j ,á«FÉHô¡c áeó°üd ¢Vô©àdG ôWÉfl Öæéàd •<br />
AÉŸG ‘ ¿GQhódG ∑ôfi IóMh hCG ¢ùHÉ≤dG hCG ∂∏°ùdG ôªZ<br />
.ôNBG πFÉ°S …CG hCG<br />
í°VƒŸG »FÉHô¡µdG QÉ«àdG ó¡L ≥aGƒJ øe ócCÉàdG »¨Ñæj •<br />
»FÉHô¡µdG ΩÉædG e RÉ¡é∏d ∞«æ°üàdG áMƒd ≈∏Y<br />
.¿Éª°†dG »¨∏j π«°UƒàdG ‘ CÉ£N …CG .∂jód Ωóîà°ùŸG<br />
»°ù«FôdG QÉ«àdG ¢ùHÉb GóÑà°SGل<br />
:IójóL á«°ù«FQ QÉ«J ¢ùHGƒb Ö«côJ ¤EG áLÉ◊G óæY<br />
¿ÉeCÉH ËóقdG ¢ùHÉقdG øe ¢üلîJ •<br />
øe π°UƒŸG ±ô£dÉH »æÑdG π«°UƒàdG ∂∏°S π«°UƒàH ºb •<br />
ójó÷G ¢ùHÉقdG<br />
ójÉëŸG ±ô£dÉH ¥QRC’G π«°UƒàdG ∂∏°S π«°UƒàH ºb •<br />
∂∏°S π«°UƒàH ºb ,(á°VQDƒe) 1 áÄØdG øe èàæŸG ¿Éc GPEG •<br />
»°VQC’G ±ô£dÉH ôØ°UC’G /ö†NC’G π«°UƒàdG<br />
kÉLhOõe k’õY ádhõ©ŸG 2 áÄØdG øe èàæŸG ¿Éc GPEG !ôjò–<br />
…CG AGôLEG ΩóY »¨Ñæj ,(∑Ó°SC’G áYƒª› ‘ §≤a ¿Éµ∏°S)<br />
.»°VQC’G π«°UƒàdG ±ô£H äÓ«°UƒJ<br />
¢ùHGƒ≤H á≤aôŸG Ö«cÎdG äɪ«∏©J ´ÉÑJG ≈∏Y ¢UôMG •<br />
IOƒ÷G á«dÉY QÉ«àdG<br />
¢ùØf øe á∏jóÑdG á«FÉHô¡µdG áeɪ°üdG ¿ƒµJ ¿CG Öéj •<br />
èàæŸG e IôaƒàŸG á«∏°UC’G áeɪ°üdG IOƒL<br />
äɪ«ل©J Góîà°S’Gم ó©H Ée<br />
á«FÉHô¡µdG ájò¨àdG Qó°üe øY RÉ¡÷G ¢ùHÉb üaG°ل •<br />
øe m…CG ¢üëa hCG æJ»ف hCG Ò«¨J Ñbhل ,¬côJ Ñbل<br />
.¬FGõLCG<br />
• »¨Ñæj óYم óæY ±ÉL ¿Éµe ‘ RÉ¡÷G øjõîJ<br />
ßØM ¿Éµe øY kGó«©H ÉØWC’Gل AÉقH »¨Ñæjh .¬eGóîà°SG<br />
.Iõ¡LC’G<br />
ìÓ°UE’Gh ¢üëØdG<br />
hCG ¬JÉ≤ë∏e Ò«¨J hCG ¬Ø«æJ πÑb •ÓÿG ÅØWCG •<br />
.∫ɪ©à°S’G ∫ÓN ácôëàŸG ¬FGõLCG ÜGÎb’G<br />
• –قق óYم øe Ñbل áHƒ£©e hCG IQö†àe AGõLCG OƒLh<br />
‘ Qƒ°ùc OƒLh ΩóY øe ≥≤– .•ÓÿG ΩGóîà°SG<br />
øµÁ iôNCG ä’ÉM ájCG hCG √QGQRCG ‘ QGöVCG hCG ¬FGõLCG<br />
ûJ°¨»ل¬. ‘ ôKDƒJ ¿CG<br />
‘ π£Y hCG ∞∏J OƒLh ádÉM ‘ •ÓÿG Ωóîà°ùJ ’ •<br />
.¬FGõLCG óMCG<br />
IôØ°T ‘ ∞∏J OƒLh ádÉM ‘ •ÓÿG Ωóîà°ùJ ’ •<br />
àdGق£».<br />
áHƒ£©e hCG IQö†àe AGõLCG ájCG ∫GóÑà°SG hCG ìÓ°UEÉH ºb •<br />
.óªà©e áfÉ«°U π«ch ∫ÓN øe<br />
• jلõم S°لك ¢üëa Ñbل á«FÉHô¡µdG ájò¨àdG Góîà°S’Gم<br />
.πcBÉàdG hCG Ωóp≤dG hCG ∞∏àdG äÉeÓY øe √ƒ∏N øe ócCÉà∏d<br />
ájò¨àdG ∂∏°S ∞∏J ádÉM ‘ •ÓÿG ΩGóîà°SG ΩóY Öéj •<br />
.ɪ¡æe …CÉH Ö«Y OƒLh hCG ¢ùHÉ≤dG hCG á«FÉHô¡µdG<br />
òNCÉŸG ¢ùHÉb hCG »FÉHô¡µdG ájò¨àdG ∂∏°S ¿Éc GPEG •<br />
¬MÓ°UEG Ú©àj ,kGQö†àe hCG kÉØdÉJ ¢ù«FôdG »FÉHô¡µdG<br />
ÖæŒ .ôWÉfl ájC’ kÉÑæŒ óªà©e áfÉ«°U π«ch πÑb øe<br />
¬MÓ°UEG ádhÉfih á«FÉHô¡µdG ájò¨àdG ∂∏°S £b<br />
ùØæH°ك.<br />
17
ARABIC<br />
,ΩGóîà°S’G AÉæKCG »FÉHô¡µdG ájò¨àdG ∂∏°S ∞∏J ádÉM ‘ •<br />
.QƒØdG ≈∏Y »FÉHô¡µdG QÉ«àdG Qó°üe øY •ÓÿG π°üaG<br />
øY ¬∏°üa πÑb »FÉHô¡µdG ájò¨àdG ∂∏°S ¢ùŸ ÖæŒ<br />
.á«FÉHô¡µdG ájò¨àdG Qó°üe<br />
ádÉM ‘ á«FÉHô¡µdG ájò¨àdG Qó°üe øY •ÓÿG π°üaG •<br />
πÑbh ¬FGõLCG ádGREG hCG Ö«côJ πÑbh ,¬eGóîà°SG ΩóY<br />
.É¡Ø«æJ<br />
.áÑbGôe ¿hO •ÓÿG π¨°ûJ ’ •<br />
AÉYh πNGO øe iôNCG OGƒÃ hCG ∂©HÉ°UCÉH ÜÎ≤J ’ •<br />
.•ÓÿG πªY AÉæKCG §∏ÿG<br />
«ªL ∞bƒJh •ÓÿG AÉØWEG ó©H §≤a §∏ÿG AÉYh ´õfG •<br />
.ácô◊G øY ¬FGõLCG<br />
.«£≤àdG äGôØ°T ¢ùª∏J ’ •<br />
kGó«©H πjƒW ô©°T hCG IôM á°ûªbCG ájCG AÉ≤HEG ≈∏Y ¢UôMG •<br />
.ácôëàe AGõLCG ájCG hCG ΩÉ©WE’G ܃ÑfCG øY<br />
IOÉ◊G «£≤àdG äGôØ°T e πeÉ©àdG ‘ Qò◊G nñƒJ •<br />
.∞«æàdG ∫ÓNh §∏ÿG AÉYh ≠jôØJ iódh<br />
‘ ¬°ùHÉb hCG á«FÉHô¡µdG ¬cÓ°SCG hCG •ÓÿG ôª¨J ’ •<br />
.πFGƒ°ùdG<br />
øjôNB’G áeÓ°S<br />
øÃ) OGôaC’G πÑb øe ΩGóîà°SÓd ºª°üe ÒZ RÉ¡÷G Gòg •<br />
º¡JGQób ¢VÉØîfG øe ¿ƒfÉ©j øjòdG (∫ÉØWC’G º¡«a<br />
IÈÿG ¤EG ¿hô≤àØj hCG º¡°SGƒM hCG á«∏≤©dG hCG á«fóÑdG<br />
OÉ°TQE’G hCG ±GöTEÓd Gƒ©°†îj ⁄ Ée ,áaô©ŸGh<br />
øY ∫hDƒ°ùe ¢üî°T πÑb øe •ÓÿG ΩGóîà°SG ¢Uƒ°üîH<br />
.º¡àeÓ°S<br />
.•ÓÿÉH º¡ãÑY ΩóY ¿Éª°†d ∫ÉØWC’G áÑbGôe »¨Ñæj •<br />
•ÓÿG ΩGóîà°SG<br />
êõeh §∏ÿ •ÓÿG Gòg ôµjO ófBG ∑ÓH ácöT ⪪°U<br />
Gòg .Ò°ü©dG äÉfƒµeh πFÉ°ùdGh Ö∏°üdG AGò¨dG öüYh<br />
.§≤a ‹õæŸG ΩGóîà°SÓd ºª°üe èàæŸG<br />
πÑb ájÉæ©H ká∏eÉc π«dódG äGOÉ°TQEG CGôbG<br />
.•ÓÿG ΩGóîà°SG<br />
áeÓ°ùdG äGOÉ°TQEG<br />
á«°SÉ°SC’G áeÓ°ùdG äÉWÉ«àMG «ªL PÉîJG »¨Ñæj !ôjò–<br />
,á«FÉHô¡c ájò¨J QOÉ°üà á∏°üàŸG Iõ¡LC’G ΩGóîà°SG iód<br />
´’ófG ô£N øe π«∏≤à∏d ,√ÉfOCG IQƒcòŸG ∂dP ‘ ÉÃ<br />
.á«°üî°T äÉHÉ°UEG hCG á«FÉHô¡c äÉeó°U çhóM hCG ¿GÒædG<br />
¿EG .π«dódG Gòg ‘ πeɵdÉH á∏°üØe •ÓÿG äÉeGóîà°SG •<br />
hCG á£ÑJôŸG ¬JGhOCG hCG •ÓÿG äÉ≤ë∏e øe m…CG ΩGóîà°SG<br />
π«dO ‘ IQƒcòŸG ∂∏àd áØdÉfl á«∏ªY …CG AGôLEG<br />
äÉHÉ°UEG ´ƒbh ô£N ¬æY ºéæj ¿CG øµÁ äGOÉ°TQE’G<br />
.á«°üî°T<br />
.kÓÑ≤à°ùe ¬«dEG ´ƒLô∏d π«dódG Gò¡H ßØàMG •<br />
•ÓÿG ΩGóîà°SG äɪ«∏©J<br />
.•ÓÿG ΩGóîà°SG iód kɪFGO Qò◊G nñƒJ •<br />
π°üØd »FÉHô¡µdG ájò¨àdG ∂∏°S Öë°S kÉ≤∏£e ∫hÉ– ’ •<br />
ájò¨àdG ∂∏°S ßØMG .ájò¨àdG Qó°üe øY ¢ùHÉ≤dG<br />
.IOÉ◊G ±Gƒ◊Gh âjõdGh IQGô◊G øY kGó«©H »FÉHô¡µdG<br />
¿ôa ‘ hCG IQGô◊G QOÉ°üe ¥ƒa •ÓÿG °†J ’ •<br />
.É¡æe Üô≤dÉH hCG øNÉ°S<br />
.∫õæŸG êQÉN •ÓÿG Ωóîà°ùJ ’ •<br />
øY ÉgOÉ©HEÉH ∑ôëŸG IóMh áeÓ°S ≈∏Y kɪFGO ßaÉM •<br />
.IóFGõdG áHƒWôdG hCG AÉŸG<br />
18
ARABIC<br />
AGõLC’G jô©Jف<br />
¥ÓZE’G IOGó°S o .A<br />
AÉ£¨dG .B<br />
K<br />
ÿGل§ AÉYh .C<br />
ÿGل§ AÉYh IóYÉb .D<br />
E<br />
Mلقá .E ÿGل§ AÉYh â«ÑãJ<br />
L<br />
ÿGل§ IôØ°T .F<br />
A<br />
M<br />
eÉMل G. ÿGل§ IôØ°T<br />
¿GQhódG محôك §HGQ .H<br />
B<br />
•ÓÿG πµ«g .I<br />
ºµëàdG ìÉàØe .J<br />
C<br />
N<br />
E<br />
ôØdGم ¿ôL .K<br />
(jOƒŸGل aق§) BX275<br />
ôØdGم IôØ°T .L<br />
(jOƒŸGل aق§) BX275<br />
D<br />
E<br />
F<br />
J<br />
I<br />
H<br />
O<br />
P<br />
eÉMل M. ôØdGم IôØ°T<br />
(jOƒŸGل aق§) BX275<br />
øë£dG AÉYh .N<br />
(jOƒŸGل aق§) BX275 h BX225<br />
øë£dG IôØ°T .O<br />
(jOƒŸGل aق§) BX275 h BX225<br />
øë£dG IôØ°T πeÉM .P<br />
(jOƒŸGل aق§) BX275 h BX225<br />
G<br />
19
N a m e s & A d d r e s s e s f o r B l a c k & D e c k e r S e r v i c e C o n c e s s i o n a r i e s<br />
ALGERIA: SARL Outillage Corporation, After Sale Service Center-08, Rue Mohamed Boudiaf - Cheraga, Algiers, Algeria, Tel:<br />
+213 21 375131, Fax: +213-0-369667. AZERBAIJAN: Kontakt - NN LLC, M.Qashqay 43, Baku, Azerbaijan Az1000. Tel:<br />
+994 12 4082050, Fax: +994 12 4117090. BAHRAIN: Alfouz Services Co. WLL., P.O. Box 26562, Tubli, Manama, Tel: +973-17783562/<br />
17879987, Fax: +973-17783479. Kewalram & Sons Co. WLL P.O. Box 84, Manama, Kingdom of Bahrain, Tel: +973-17213110/ 17210617/<br />
17210619, Fax: +973-17213211/ 17210627. BANGLADESH: Ultra Corporation, 8, Kushol Centre, Uttara, Dhaka 1230. Tel:<br />
+880-2-8922144, Fax: +880-2-8951339. EGYPT: Anasia Egypt for Trading S.A.E, P.O. Box 2443, 9, Mostafa Refaat Street,<br />
Sheraton Heliopolis 11361, Cairo, Tel: +202-22684159, Fax: +202-22684169. ETHIOPIA: Seif Sherif Trade PLC -Arada Sub City,<br />
Kebele 01-02, Global Insurance Bldg., 2nd Flr. Room 43, P.O.Box 2525, Addis Ababa, Ethiopia, Tel: 00-251-11-1563968/ 1563969, Fax:<br />
00-251-11-1558009. INDIA: Gryphon Appliances Ltd., D-6/4, Okhla Industrial Area, Phase-I, New Delhi-110020, Tel: +91-11-46731111,<br />
Fax: +91-11-46731111. JORDAN: Bashiti Hardware, 93 King Abdullah 2nd St., Opp ELBA House, P.O. Box 3005, Tel: +962-6-5349098<br />
ext.11, Fax: +962-6-5330731. KENYA: Leading Concepts, P.O. Box: 40877-00100, Nairobi, Kenya. Tel: +254 20 690 5000, Fax:<br />
+254 20 690 5111. KUWAIT: Al Omar Technical Co., P.O. Box 4062, Safat 13041, Kuwait, Tel: 00965-24848595/ 24840039, Fax:<br />
00965-24845652. The Sultan Centre, P.O. Box 26567-13126 Safat, Kuwait, Tel: 00965-24343155 Etn. 432, Fax: 00965-24319071.<br />
LEBANON: Aces Service Centre, P.O. Box 90-102, Nahr El Mot, Seaside Highway, Pharaon Building, Beirut. Tel: 00961-1-898989, Fax:<br />
00961-1-245880. LIBYA: Homeworld Co., Building No.5, Senidal St., Amr Ibn Elaas Road, Benghazi, Libya. Tel: 00218-61-9094183.<br />
Service Center1 - Benghazi: Tel: +218-061-3383994, Fax: +218-092-7640688, Service Center2 - Tripoli: Tel: +218-021-3606430, Fax:<br />
+218-092-6514813. MALTA: John G Cassar Ltd. 36-Victory Street, Qormi QRM 06, Malta. Tel: +356-21493251, Fax: +356-21483231.<br />
MAURITIUS: J.M. Goupille & Co. Ltd., Rogers Industrial Park 1, Riche Terre, Mauritius, Tel: +230 206 9450/ +230 207 1700, Fax:<br />
+230 206 9474/ +230 248 3188. MOROCCO: UATS 26 Rue Ennarjisse, Hay Erraihan, Beausejour - Hay Hassani-Casablanca, Morocco.<br />
Tel: +212 522945114, Fax: +212 522942442. NEPAL: Universal Electrocom, Tripureshwor, Kathmandu, Nepal. Tel:+977-1-4265191.<br />
NIGERIA: Dana Electronics Ltd. (Lagos) 116/ 120, Apapa Oshodi Express Way, Isolo, Lagos, Nigeria. Tel: +234-17431818/<br />
+234-8037767774/ +234-8057445477. (Abuja) 18, A.E. Ekukinam Street, Off Obsfemi Awolowo Road, Utako, Abuja, Nigeria. Tel:<br />
+234-8032276101/ +234-8037767774. (Kano) 9A - Mai Malari Road, Bompai, Kano, Nigeria. Tel: +234-8053294947/ +234-8037767774.<br />
OMAN: Oman Marketing & Service Co. (Omasco), P.O. Box 2734, Behind Honda Showroom, Wattayah, Oman, Tel: +968-24560232/<br />
24560255, Fax: +968-24560993. Oman Marketing & Service Co. (Omasco), Al Ohi, Sohar, Oman, Tel: +968-26846379, Fax:<br />
+968-26846379. Oman Marketing & Service Co. (Omasco) - Sanaya, Salalah, Oman, Tel: 00968-23212290, Fax: +968-23210936.<br />
PAKISTAN: Ammar Service & Spares - 60-Bank Arcade, Serai Road, Karachi, Pakistan, Tel: 0092-21-32426905, Fax: 0092-21-32427214.<br />
PHILIPPINES: 476 J. P. Rizal St., cor Kakarong St. Brgy Olympia, Makati City, Tel: +632 403-5698. QATAR: Al Muftah Service Centre -<br />
Al Wakrah Road, P.O. Box 875, Doha, Qatar. Tel: 00974-4650880/ 4650110/ 4446868, Fax: 00974-4441415/ 4662599. SAUDI ARABIA:<br />
(Al Khobar) Al-Suwaiket Catering & Trading Co., P.O.Box 4228, King A.Aziz Street, Al Khobar, Tel: +966-3-8591088, Fax:<br />
+966-3-8595648. Fawaz Ebrahim Al Zayani Trading Est. P.O. Box 76026, Al Khobar #31952, Tel: +966-3-8140914, Fax: +966-3-8140824.<br />
(Jeddah) Banaja Trading Co. Ltd, P.O. Box 366, Jeddah-21411, Tel: +966-2-6511111, Fax: +966-2-6503668. (Riyadh) Banaja Trading Co.<br />
Ltd, P.O. Box 566, Riyadh-11421, Tel: 00966-1-4124444, Fax: +966-1-4033378. SOUTH AFRICA: Trevco Power Tool Service 14<br />
Steenbok Street, Koedoespoort, 0186, Pretoria, South Africa, Tel: +27-86-1873826, Fax: +27-86-5001771. SRI LANKA: Delmege<br />
Construction Products (Pvt) Ltd., No 101 Vinayalankara Mawatha, Colombo-10, Sri Lanka, Tel: +94-11-2693361-7, Service hotline:<br />
+94-77-2211111. TUNISIA: Société Tunisienne De Manutention - Rue de la Physique, Nouvelle Zone Industrielle de Ben Arous-2013<br />
Tunisie, Tel: +216-71-386102/ 380620, Fax: +216-71380412 ext 216. UGANDA: Anisuma Investment and Services Ltd., J R complex,<br />
Ware House No.5, Plot No 101, 3rd Street Industrial Area, Jinja Road, Kampala, Tel: +256-414237106. UAE: (Abu Dhabi)<br />
Light House Electrical, P.O. Box 120, Abu Dhabi, Tel: +971-2-6726131, Fax: +971-2-6720667. (Al Ain) Zillion Equipment and Spare Parts<br />
Trading LLC, P.O. Box 19740, Opp. Bin Sadal/Trimix Redymix Sanaiya, Al Ain. Tel: +971-3-7216690, Fax:+971-3-7216103 (Dubai)<br />
Black & Decker (Overseas) GmbH, P.O. Box 5420, Dubai, Tel: +971-4-8127400/ 8127406, Fax: +971-4-2822765. (Musaffah) Light House<br />
Electrical, P.O. Box 120, Abu Dhabi, Tel: +971-2-5548315, Fax: +971-2-5540461. (Sharjah) Mc Coy Middle East LLC, P.O. Box 25793,<br />
Sharjah, Tel: +971-6-5395931, Fax: +971-6-5395932. (Ras Al Khaimah) Mc Coy Middle East LLC, P.O.Box 10584, Ras Al Khaimah, Tel:<br />
+971-7-2277095, Fax: +971-7-2277096. YEMEN: (Aden) Muala St., Tel: +967 2 222670, Fax: +967 2 222670. (Sana'a) Middle East Trad.<br />
Co. Ltd., P.O. Box 12363, Hayel Street, Sana'a. Tel: +967-1-204201, Fax: +967-1-204204. (Taiz) Middle East Trading Co. (METCO),<br />
5th Flr.Hayel Saeed Anam Bldg, Al-Mugamma St. Taiz, Yemen, Tel: +967-4-213455, Fax: +967-4-219869.
Blank Page<br />
Warranty Card Back Side
≈ßr Ë ´Mu«Ê «∞∂Uzl<br />
¢U¸¥a «∞Ad«¡<br />
«∞d±e «∞∂d¥bÍ<br />
«∞FMu«Ê<br />
«ùßr<br />
WARRANTY REGISTRATION CARD<br />
YOUR NAME/<br />
YOUR ADDRESS<br />
POSTCODE<br />
DATE OF PURCHASE<br />
DEALER'S NAME & ADDRESS/<br />
PRODUCT MODEL NO. BX275/BX225/BX205


