

BlackandDecker Debroussaileuse- Gsl200 - Type H1 - Instruction Manual (Anglaise)
BlackandDecker Debroussaileuse- Gsl200 - Type H1 - Instruction Manual (Anglaise)
BlackandDecker Debroussaileuse- Gsl200 - Type H1 - Instruction Manual (Anglaise)

You also want an ePaper? Increase the reach of your titles
YUMPU automatically turns print PDFs into web optimized ePapers that Google loves.
GSL200<br />
GSL300<br />
GSL360<br />
GSL700
A<br />
B<br />
C<br />
D1<br />
1<br />
2<br />
D2<br />
2<br />
E1
1<br />
2<br />
E2<br />
F<br />
G<br />
H<br />
I<br />
J<br />
3
ENGLISH<br />
(Original instructions)<br />
Intended use<br />
Your Black & Decker shear/trimmer has been designed for<br />
trimming grass, hedges, shrubs and brambles. This tool is<br />
intended for consumer use only.<br />
Your Black & Decker charger has been designed for charging<br />
Black & Decker batteries of the type supplied with this tool.<br />
Safety instructions<br />
General power tool safety warnings<br />
@<br />
Warning! Read all safety warnings and all<br />
instructions. Failure to follow the warnings and<br />
instructions listed below may result in electric shock,<br />
fire and/or serious injury.<br />
Save all warnings and instructions for future reference.<br />
The term "power tool" in all of the warnings listed below refers<br />
to your mains operated (corded) power tool or battery<br />
operated (cordless) power tool.<br />
1. Work area safety<br />
a. Keep work area clean and well lit. Cluttered or dark<br />
areas invite accidents.<br />
b. Do not operate power tools in explosive atmospheres,<br />
such as in the presence of flammable liquids, gases<br />
or dust. Power tools create sparks which may ignite the<br />
dust or fumes.<br />
c. Keep children and bystanders away while operating a<br />
power tool. Distractions can cause you to lose control.<br />
2. Electrical safety<br />
a. Power tool plugs must match the outlet. Never modify<br />
the plug in any way. Do not use any adapter plugs<br />
with earthed (grounded) power tools. Unmodified plugs<br />
and matching outlets will reduce risk of electric shock.<br />
b. Avoid body contact with earthed or grounded<br />
surfaces such as pipes, radiators, ranges and<br />
refrigerators. There is an increased risk of electric shock<br />
if your body is earthed or grounded.<br />
c. Do not expose power tools to rain or wet conditions.<br />
Water entering a power tool will increase the risk of<br />
electric shock.<br />
d. Do not abuse the cord. Never use the cord for<br />
carrying, pulling or unplugging the power tool. Keep<br />
cord away from heat, oil, sharp edges or moving<br />
parts. Damaged or entangled cords increase the risk of<br />
electric shock.<br />
e. When operating a power tool outdoors, use an<br />
extension cord suitable for outdoor use. Use of a cord<br />
suitable for outdoor use reduces the risk of electric shock.<br />
f. If operating a power tool in a damp location is<br />
unavoidable, use a residual current device (RCD)<br />
protected supply. Use of an RCD reduces the risk of<br />
electric shock.<br />
3. Personal safety<br />
a. Stay alert, watch what you are doing and use common<br />
sense when operating a power tool. Do not use a<br />
power tool while you are tired or under the influence<br />
of drugs, alcohol or medication. A moment of inattention<br />
while operating power tools may result in serious personal<br />
injury.<br />
b. Use personal protective equipment. Always wear eye<br />
protection. Protective equipment such as dust mask,<br />
non-skid safety shoes, hard hat, or hearing protection<br />
used for appropriate conditions will reduce personal<br />
injuries.<br />
c. Prevent unintentional starting. Ensure the switch is in<br />
the off-position before connecting to power source<br />
and/or battery pack, picking up or carrying the tool.<br />
Carrying power tools with your finger on the switch or<br />
energising power tools that have the switch on invites<br />
accidents.<br />
d. Remove any adjusting key or wrench before turning<br />
the power tool on. A wrench or a key left attached to a<br />
rotating part of the power tool may result in personal injury.<br />
e. Do not overreach. Keep proper footing and balance at<br />
all times. This enables better control of the power tool in<br />
unexpected situations.<br />
f. Dress properly. Do not wear loose clothing or<br />
jewellery. Keep your hair, clothing and gloves away<br />
from moving parts. Loose clothes, jewellery or long hair<br />
can be caught in moving parts.<br />
g. If devices are provided for the connection of dust<br />
extraction and collection facilities, ensure these are<br />
connected and properly used. Use of dust collection can<br />
reduce dust-related hazards.<br />
4. Power tool use and care<br />
a. Do not force the power tool. Use the correct power<br />
tool for your application. The correct power tool will do<br />
the job better and safer at the rate for which it was<br />
designed.<br />
b. Do not use the power tool if the switch does not turn it<br />
on and off. Any power tool that cannot be controlled with<br />
the switch is dangerous and must be repaired.<br />
c. Disconnect the plug from the power source and/or the<br />
battery pack from the power tool before making any<br />
adjustments, changing accessories, or storing power<br />
tools. Such preventive safety measures reduce the risk of<br />
starting the power tool accidentally.<br />
4
(Original instructions)<br />
ENGLISH<br />
d. Store idle power tools out of the reach of children and<br />
do not allow persons unfamiliar with the power tool or<br />
these instructions to operate the power tool. Power<br />
tools are dangerous in the hands of untrained users.<br />
e. Maintain power tools. Check for misalignment or<br />
binding of moving parts, breakage of parts and any<br />
other condition that may affect the power tools<br />
operation. If damaged, have the power tool repaired<br />
before use. Many accidents are caused by poorly<br />
maintained power tools.<br />
f. Keep cutting tools sharp and clean. Properly<br />
maintained cutting tools with sharp cutting edges are less<br />
likely to bind and are easier to control.<br />
g. Use the power tool, accessories and tool bits etc. in<br />
accordance with these instructions, taking into<br />
account the working conditions and the work to be<br />
performed. Use of the power tool for operations different<br />
from those intended could result in a hazardous situation.<br />
5. Battery tool use and care<br />
a. Recharge only with the charger specified by the<br />
manufacturer. A charger that is suitable for one type of<br />
battery pack may create a risk of fire when used with<br />
another battery pack.<br />
b. Use power tools only with specifically designated<br />
battery packs. Use of any other battery packs may create<br />
a risk of injury and fire.<br />
c. When battery pack is not in use, keep it away from<br />
other metal objects, like paper clips, coins, keys,<br />
nails, screws, or other small metal objects, that can<br />
make a connection from one terminal to another.<br />
Shorting the battery terminals together may cause burns<br />
or a fire.<br />
d. Under abusive conditions, liquid may be ejected from<br />
the battery; avoid contact. If contact accidentally<br />
occurs, flush with water. If liquid contacts eyes,<br />
additionally seek medical help. Liquid ejected from the<br />
battery may cause irritation or burns.<br />
6. Service<br />
a. Have your power tool serviced by a qualified repair<br />
person using only identical replacement parts. This will<br />
ensure that the safety of the power tool is maintained.<br />
Additional power tool safety warnings<br />
@<br />
Warning! Additional safety warnings for hedge<br />
trimmers<br />
u Keep all parts of the body away from the cutter blade.<br />
Do not remove cut material or hold material to be cut<br />
when blades are moving. Make sure the switch is off<br />
when clearing jammed material. A moment of inattention<br />
while operating the hedge trimmer may result in serious<br />
personal injury.<br />
u Carry the hedge trimmer by the handle with the cutter<br />
blade stopped. When transporting or storing the<br />
hedge trimmer always fit the cutting device cover.<br />
Proper handling of the hedge trimmer will reduce possible<br />
personal injury from the cutter blades.<br />
u Keep cable away from cutting area. During operation<br />
the cable may be hidden in shrubs and can be accidentally<br />
cut by the blade.<br />
u Hold the power tool by insulated gripping surfaces<br />
only, because the cutter blade may contact hidden<br />
wiring. Cutter blades contacting a "live" wire may make<br />
exposed metal parts of the power tool "live" and could give<br />
the operator an electric shock.<br />
u The intended use is described in this instruction manual.<br />
The use of any accessory or attachment or performance<br />
of any operation with this tool other than those<br />
recommended in this instruction manual may present a<br />
risk of personal injury and/or damage to property.<br />
u If you have not used a hedge trimmer before, preferably<br />
seek practical instruction by an experienced user in<br />
addition to studying this manual.<br />
u Never touch the blades while the tool is running.<br />
u Never attempt to force the blades to come to a standstill.<br />
u Do not put the tool down until the blades have come to a<br />
complete standstill.<br />
u Regularly check the blades for damage and wear. Do not<br />
use the tool when the blades are damaged.<br />
u Take care to avoid hard objects (e.g. metal wire, railings)<br />
when trimming. Should you accidentally hit any such<br />
object, immediately switch the tool off and check for any<br />
damage.<br />
u Should the tool start to vibrate abnormally, immediately<br />
switch it off and check for any damage.<br />
u If the tool stalls, immediately switch it off.<br />
u After use, place the blade sheath supplied over the<br />
blades. Store the tool, making sure that the blade is not<br />
exposed.<br />
u Always ensure that all guards are fitted when using the<br />
tool. Never attempt to use an incomplete tool or a tool with<br />
unauthorised modifications.<br />
u Never allow children to use the tool.<br />
5
ENGLISH<br />
(Original instructions)<br />
u Be aware of falling debris when cutting the higher slides of<br />
a hedge.<br />
Additional power tool safety warnings<br />
@ Warning! Additional safety warnings for shears<br />
u Never allow people unfamiliar with these instructions or<br />
children to use the machine. Local regulations can restrict<br />
the age of the operator.<br />
u Keep in mind that the operator or user is responsible for<br />
accidents or hazards occurring to other people or their<br />
property.<br />
u Never operate the machine while people, especially<br />
children, or pets are nearby.<br />
u Use the machine only in daylight or good artificial light.<br />
u Always ensure that the ventilation openings are kept clear<br />
of debris.<br />
u Use only the manufacturer's recommended replacement<br />
parts and accessories.<br />
u Inspect and maintain the machine regularly. Have the<br />
machine repaired only by an authorized repairer.<br />
Safety of others<br />
u This appliance is not intended for use by persons<br />
(including children) with reduced physical, sensory or<br />
mental capabilities, or lack of experience and knowledge,<br />
unless they have been given supervision or instruction<br />
concerning use of the appliance by a person responsible<br />
for their safety.<br />
u Children should be supervised to ensure that they do not<br />
play with the appliance.<br />
Vibration<br />
The declared vibration emission values stated in the technical<br />
data and the declaration of conformity have been measured in<br />
accordance with a standard test method provided by<br />
EN 60745 and may be used for comparing one tool with<br />
another. The declared vibration emission value may also be<br />
used in a preliminary assessment of exposure.<br />
Warning! The vibration emission value during actual use of<br />
the power tool can differ from the declared value depending<br />
on the ways in which the tool is used. The vibration level may<br />
increase above the level stated.<br />
When assessing vibration exposure to determine safety<br />
measures required by 2002/44/EC to protect persons regularly<br />
using power tools in employment, an estimation of vibration<br />
exposure should consider, the actual conditions of use and the<br />
way the tool is used, including taking account of all parts of<br />
the operating cycle such as the times when the tool is<br />
switched off and when it is running idle in addition to the<br />
trigger time.<br />
Labels on tool<br />
The following pictograms are shown on the tool:<br />
:<br />
O<br />
R<br />
L<br />
Warning! To reduce the risk of injury, the user must<br />
read the instruction manual.<br />
Wear safety glasses or goggles when operating this<br />
tool.<br />
Do not expose the tool to rain or high humidity.<br />
Beware of sharp blades. Blades continue to move<br />
after the motor is switched off.<br />
Beware of flying objects. Keep bystanders away.<br />
Additional safety instructions for batteries and<br />
chargers<br />
Batteries<br />
u Never attempt to open for any reason.<br />
u Do not expose the battery to water.<br />
u Do not store in locations where the temperature may<br />
exceed 40 °C.<br />
u Charge only at ambient temperatures between 10 °C and<br />
40 °C.<br />
u Charge only using the charger provided with the<br />
appliance/tool. Using the wrong charger could result in an<br />
electric shock or overheating of the battery.<br />
u When disposing of batteries, follow the instructions given<br />
in the section "Protecting the environment".<br />
u Do not damage/deform the battery either by puncture or<br />
impact, as this may create a risk of injury and fire.<br />
u Do not charge damaged batteries.<br />
u Under extreme conditions, battery leakage may occur.<br />
When you notice liquid on the batteries carefully wipe the<br />
liquid off using a cloth. Avoid skin contact.<br />
u In case of skin or eye contact, follow the instructions<br />
below.<br />
6
(Original instructions)<br />
ENGLISH<br />
Warning! The battery fluid may cause personal injury or<br />
damage to property. In case of skin contact, immediately rinse<br />
with water. If redness, pain or irritation occurs seek medical<br />
attention. In case of eye contact, rinse immediately with clean<br />
water and seek medical attention.<br />
Chargers<br />
Your charger has been designed for a specific voltage.<br />
Always check that the mains voltage corresponds to the<br />
voltage on the rating plate.<br />
Warning! Never attempt to replace the charger unit with<br />
a regular mains plug.<br />
u Use your Black & Decker charger only to charge the<br />
battery in the tool with which it was supplied. Other<br />
batteries could burst, causing personal injury and damage.<br />
u Never attempt to charge non-rechargeable batteries.<br />
u If the supply cord is damaged, it must be replaced by the<br />
manufacturer or an authorised Black & Decker Service<br />
Centre in order to avoid a hazard.<br />
u Do not expose the charger to water.<br />
u Do not open the charger.<br />
u Do not probe the charger.<br />
u The appliance/tool/battery must be placed in a well<br />
ventilated area when charging.<br />
$ The charger is intended for indoor use only.<br />
x<br />
w<br />
Electrical safety<br />
#<br />
Read the instruction manual before use.<br />
The charger automatically shuts off if the ambient<br />
temperature becomes too high. As soon as the<br />
ambient temperature has cooled down, the charger<br />
will resume operating.<br />
Fail safe isolating transformer. The mains supply is<br />
electrically separated from the transformer output.<br />
Your charger is double insulated; therefore no earth<br />
wire is required. Always check that the mains<br />
voltage corresponds to the voltage on the rating<br />
plate.<br />
u If the supply cord is damaged, it must be replaced by the<br />
manufacturer or an authorised Black & Decker Service<br />
Centre in order to avoid a hazard.<br />
u Warning! Never attempt to replace the charger unit with<br />
a regular mains plug.<br />
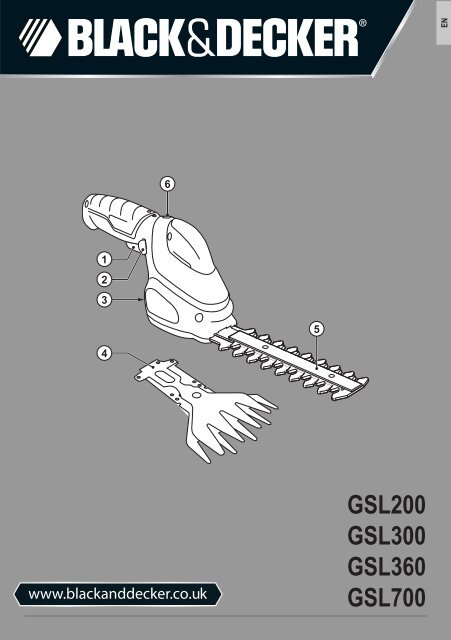
Features<br />
1. On/off switch<br />
2. Lock-off button<br />
3. Blade release button<br />
4. Shear blade (GSL200/GSL360/GSL700)<br />
5. Trim blade (GSL300/GSL360/GSL700)<br />
6. Charging indicator<br />
Assembly<br />
Warning! Avoid accidentally switching the tool on during<br />
assembly.<br />
Fitting the wall mount to the wall (fig. A & B)<br />
The wall mount can be fitted to the wall to provide a<br />
convenient storage and charging point for the tool.<br />
u Drive the screws in the wall through the holes in the<br />
crevices of wall mount.<br />
u Place the tool on the wall mount.<br />
u Plug in the charger making sure the charging indicator (6)<br />
lights up (fig. A).<br />
u If required, use the two pegs (7) below the wall mount to<br />
store the spare blade (fig. B).<br />
Warning! Avoid damaging the power cord when mounting the<br />
wall mount to the wall.<br />
Removing the charger plug from the wall mount<br />
(fig. C)<br />
The tool can be charged without using the wall mount. The<br />
charger plug can be connected to the tool directly.<br />
u Remove the screws from the back of the wall mount.<br />
u Slide the back part (8) from the front part (9) to open the<br />
wall mount.<br />
u Remove the charger plug from the wall mount.<br />
Fitting and removing the blade (fig. D & E)<br />
The shear blade (4) has been designed for trimming grass<br />
and weeds. The trim blade (5) has been designed for trimming<br />
hedges and shrubs.<br />
u Remove the blade cover.<br />
u Push and hold the blade release button (3) in the direction<br />
of the arrow (fig. D1).<br />
u Slide the blade cover (10) backward and lift off (fig. D2).<br />
u Lower the blade onto the pins.<br />
u While holding the blade onto the pins (fig. E1), replace the<br />
blade cover (10) and slide it forward (fig. E2).<br />
Note: No alignment of blade with drive pin is required and<br />
operation of the blade cover release button is not required<br />
when re-fitting the blade cover.<br />
7
ENGLISH<br />
(Original instructions)<br />
Use<br />
Warning! Let the tool work at its own pace. Do not overload.<br />
Charging the battery<br />
The battery needs to be charged before first use and<br />
whenever it fails to produce sufficient power on jobs that were<br />
easily done before. When charging the battery for the first<br />
time, or after prolonged storage, it will only accept an 80%<br />
charge. After several charge and discharge cycles, the battery<br />
will attain full capacity. The battery may become warm while<br />
charging; this is normal and does not indicate a problem.<br />
Warning! Do not charge the battery at ambient temperatures<br />
below 10 °C or above 40 °C. Recommended charging<br />
temperature: approx. 24 °C.<br />
The tool can be left connected to the charger indefinitely.<br />
To maximise the lifetime of the battery, it is recommended to<br />
keep the battery connected to the charger whenever the tool<br />
is not in use. When the battery is full, the power consumption<br />
of the charger is negligible.<br />
Charging with the wall mount (fig. F)<br />
u Place the tool on the wall mount (11).<br />
u Plug in the charger.<br />
Charging with the charger plug (fig. G)<br />
The charger plug is designed with lock outs to prevent the use<br />
of an incorrect charger.<br />
u Insert the charger plug (12) into the charger connector at<br />
the rear of the tool.<br />
u Plug in the charger.<br />
GSL200/GSL300/GSL360 - Charging the battery<br />
u Charge the battery.<br />
When the battery is charging the charging indicator (6) lights<br />
up. The charging indicator will go out when the charging is<br />
complete.<br />
GSL700 - Charging the battery<br />
u Charge the battery.<br />
When the battery is charging the charging indicator (6)<br />
flashes. The charging indicator will stop flashing when the<br />
charging is complete. The charging indicator flashes quickly to<br />
indicate a charging problem. When a charging problem<br />
occurs, connect the tool directly to the charger plug by<br />
removing the wall mount. If the charging problem still occurs,<br />
the charger must be disconnected from the mains supply and<br />
taken to an authorised service centre for repair.<br />
8<br />
Switching on and off (fig. H)<br />
Switching on<br />
u Push and hold the lock button (2) to the right or to the left<br />
and then squeeze the on/off switch (1).<br />
u Release the lock-off button.<br />
Switching off<br />
u Release the on/off switch (1).<br />
Warning! Never attempt to lock the switch in the on position.<br />
Hints for optimum use (fig. I & J)<br />
u Spray the blade with a light coating of light general use oil<br />
before first use and whenever the blades begin to look dry.<br />
Trimming grass<br />
u In order to achieve optimum cutting results, only cut dry<br />
grass.<br />
u Hold the tool as shown in fig. I. Keep your other hand well<br />
away from the blade. Maintain a stable working position so<br />
that you do not slip. Do not overreach.<br />
u When cutting long grass, work in stages from the top.<br />
Take small cuts.<br />
u Keep the tool away from hard objects and delicate plants.<br />
u If the tool starts running slowly, reduce the load.<br />
u To make a closer cut, slightly tilt the tool.<br />
Trimming hedges<br />
u Slightly tilt the tool (up to 15° relative to the line of cut) so<br />
that the blade tips point slightly towards the hedge (fig. J).<br />
This will cause the blades to cut more effectively.<br />
u Start by trimming the top of the hedge. Hold the tool at the<br />
desired angle and move it steadily along the line of cut.<br />
The double-sided blade allows you to cut in either<br />
direction.<br />
u In order to obtain a very straight cut, stretch a piece of<br />
string along the length of the hedge at the desired height.<br />
Use the string as a guideline, cutting just above it.<br />
u In order to obtain flat sides, cut upwards with the growth.<br />
Younger stems move outwards when the blade cuts<br />
downwards, causing shallow patches in the hedge.<br />
u Take care to avoid any foreign objects. Especially avoid<br />
hard objects such as metal wire and railings, as these<br />
could damage the blades.<br />
u Regularly oil the blades.<br />
Guidelines for trimming (UK & Ireland)<br />
u Trim hedges and shrubs with seasonal leaves (new leaves<br />
every year) in June and October.<br />
u Trim evergreens in April and August.<br />
u Trim conifers and other fast growing shrubs every six<br />
weeks from May until October.
(Original instructions)<br />
ENGLISH<br />
Guidelines for trimming (Australia & New Zealand)<br />
u Trim hedges and shrubs with seasonal leaves (new leaves<br />
every year) in December and March.<br />
u Trim evergreens in September and February.<br />
u Trim conifers and other fast growing shrubs every six<br />
weeks from October until March.<br />
Maintenance<br />
Your Black & Decker corded/cordless appliance/tool has been<br />
designed to operate over a long period of time with a minimum<br />
of maintenance. Continuous satisfactory operation depends<br />
upon proper tool care and regular cleaning.<br />
Warning! Before performing any maintenance on corded/<br />
cordless power tools:<br />
u Switch off and unplug the appliance/tool.<br />
u Or switch off and remove the battery from the appliance/<br />
tool if the appliance/tool has a separate battery pack.<br />
u Or run the battery down completely if it is integral and then<br />
switch off.<br />
u Unplug the charger before cleaning it. Your charger does<br />
not require any maintenance apart from regular cleaning.<br />
u Regularly clean the ventilation slots in your appliance/tool/<br />
charger using a soft brush or dry cloth.<br />
u Regularly clean the motor housing using a damp cloth.<br />
Do not use any abrasive or solvent-based cleaner.<br />
u Regularly open the chuck and tap it to remove any dust<br />
from the interior (when fitted).<br />
u After use, carefully clean the blades. After cleaning, apply<br />
a film of light machine oil to prevent the blades from<br />
rusting.<br />
Storage<br />
When the tool will not be used for several months, ideally<br />
leave the battery connected to the charger. Otherwise proceed<br />
as follows:<br />
u Fully charge the battery.<br />
u Store the tool in a secure and dry location. The storage<br />
temperature must always remain in the range of +10 °C to<br />
+40 °C.<br />
u Before using the tool after prolonged storage, fully charge<br />
the battery again.<br />
Protecting the environment<br />
Z<br />
Separate collection. This product must not be<br />
disposed of with normal household waste.<br />
Should you find one day that your Black & Decker product<br />
needs replacement, or if it is of no further use to you, do not<br />
dispose of it with household waste. Make this product<br />
available for separate collection.<br />
z<br />
Separate collection of used products and packaging<br />
allows materials to be recycled and used again.<br />
Re-use of recycled materials helps prevent<br />
environmental pollution and reduces the demand for<br />
raw materials.<br />
Local regulations may provide for separate collection of<br />
electrical products from the household, at municipal waste<br />
sites or by the retailer when you purchase a new product.<br />
Black & Decker provides a facility for the collection and<br />
recycling of Black & Decker products once they have reached<br />
the end of their working life. To take advantage of this service<br />
please return your product to any authorised repair agent who<br />
will collect them on our behalf.<br />
You can check the location of your nearest authorised repair<br />
agent by contacting your local Black & Decker office at the<br />
address indicated in this manual. Alternatively, a list of<br />
authorised Black & Decker repair agents and full details of our<br />
after-sales service and contacts are available on the Internet<br />
at: www.2helpU.com<br />
Batteries<br />
Z<br />
Black & Decker batteries can be recharged many<br />
times. At the end of their useful life, discard batteries<br />
with due care for our environment.<br />
Technical data<br />
GSL200 <strong>H1</strong> GSL300 <strong>H1</strong><br />
Voltage V DC 3.6 3.6<br />
Blade strokes (no load) min -1 850 850<br />
Blade length (shear) cm 10 -<br />
Blade gap (shear) mm 23 -<br />
Blade length (trimmer) cm - 15<br />
Blade gap (trimmer) mm - 8<br />
Blade brake time s < 1 < 1<br />
Weight kg 0.65 0.65<br />
GSL360 <strong>H1</strong> GSL700 <strong>H1</strong><br />
Voltage V DC 3.6 7.0<br />
Blade strokes (no load) min -1 850 850<br />
Blade length (shear) cm 10 10<br />
Blade gap (shear) mm 23 23<br />
Blade length (trimmer) cm 15 15<br />
Blade gap (trimmer) mm 8 8<br />
Blade brake time s < 1 < 1<br />
Weight kg 0.65 0.65<br />
9
ENGLISH<br />
(Original instructions)<br />
Charger 905450XX 905527XX<br />
Input voltage V AC 230 230<br />
Output voltage V DC 9 10<br />
Current mA 100 120<br />
Approx. charging time h 19 23<br />
Weight kg 0.15 0.15<br />
Vibration total values (triax vector sum) according to EN 60745:<br />
Vibration emission value (a h<br />
) 3.1 m/s 2 , uncertainty (K) 1.5 m/s 2<br />
Level of sound pressure according to EN 60745:<br />
Sound pressure (LpA) 66 dB(A), uncertainty (K) 3 dB(A)<br />
Sound power (LWA) 77 dB(A), uncertainty (K) 3 dB(A)<br />
EC declaration of conformity<br />
MACHINERY DIRECTIVE<br />
OUTDOOR NOISE DIRECTIVE<br />
%<br />
GSL200/GSL300/GSL360/GSL700<br />
Black & Decker declares that these products described under<br />
"technical data" are in compliance with:<br />
2006/42/EC, EN 60745-1,<br />
EN 60745-2-15, EN 60335-1<br />
2000/14/EC, Trimmer, Annex V<br />
Level of acoustic power according to (5) 2000/14/EC<br />
(Article 13):<br />
L WA (measured sound power) 77 dB(A)<br />
L WA (guaranteed sound power) 80 dB(A)<br />
These products also comply with Directive<br />
2004/108/EC and 2011/65/EU. For more information, please<br />
contact Stanley Europe at the following address or refer to the<br />
back of the manual.<br />
The undersigned is responsible for compilation of the technical<br />
file and makes this declaration on behalf of Black & Decker.<br />
_<br />
Kevin Hewitt<br />
Vice-President Global Engineering<br />
Black & Decker Europe, 210 Bath Road, Slough,<br />
Berkshire, SL1 3YD<br />
United Kingdom<br />
21/03/2013<br />
Guarantee<br />
Black & Decker is confident of the quality of its products and<br />
offers an outstanding guarantee. This guarantee statement is<br />
in addition to and in no way prejudices your statutory rights.<br />
The guarantee is valid within the territories of the Member<br />
States of the European Union and the European Free Trade<br />
Area.<br />
If a Black & Decker product becomes defective due to faulty<br />
materials, workmanship or lack of conformity, within 24<br />
months from the date of purchase, Black & Decker guarantees<br />
to replace defective parts, repair products subjected to fair<br />
wear and tear or replace such products to ensure minimum<br />
inconvenience to the customer unless:<br />
u The product has been used for trade, professional or hire<br />
purposes;<br />
u The product has been subjected to misuse or neglect;<br />
u The product has sustained damage through foreign<br />
objects, substances or accidents;<br />
u Repairs have been attempted by persons other than<br />
authorised repair agents or Black & Decker service staff.<br />
To claim on the guarantee, you will need to submit proof of<br />
purchase to the seller or an authorised repair agent. You can<br />
check the location of your nearest authorised repair agent by<br />
contacting your local Black & Decker office at the address<br />
indicated in this manual. Alternatively, a list of authorised<br />
Black & Decker repair agents and full details of our after-sales<br />
service and contacts are available on the Internet at:<br />
www.2helpU.com<br />
Please visit our website www.blackanddecker.co.uk to<br />
register your new Black & Decker product and to be kept up to<br />
date on new products and special offers. Further information<br />
on the Black & Decker brand and our range of products is<br />
available at www.blackanddecker.co.uk<br />
10
Australia<br />
Black & Decker (Australia) Pty. Ltd. Tel. 03-8720 5100<br />
20 Fletcher Road, Mooroolbark, Fax 03-9727 5940<br />
Victoria, 3138<br />
New Zealand<br />
Black & Decker Tel. +64 9 259 1133<br />
5 Te Apunga Place Fax +64 9 259 1122<br />
Mt Wellington<br />
Auckland 1060<br />
United Kingdom<br />
Black & Decker Tel. 01753 511234<br />
210 Bath Road Fax 01753 551155<br />
Slough, Berkshire SL1 3YD<br />
ENGLISH<br />
Do not forget to register your product!<br />
www.blackanddecker.co.uk/productregistration<br />
Register your product online at www.blackanddecker.co.uk/productregistration or send your name, surname and product<br />
code to Black & Decker in your country.<br />
90592052 REV-0 03/2012 03/2013


