

Sony DR-350USB - DR-350USB Consignes d’utilisation Espagnol
Sony DR-350USB - DR-350USB Consignes d’utilisation Espagnol
Sony DR-350USB - DR-350USB Consignes d’utilisation Espagnol

You also want an ePaper? Increase the reach of your titles
YUMPU automatically turns print PDFs into web optimized ePapers that Google loves.
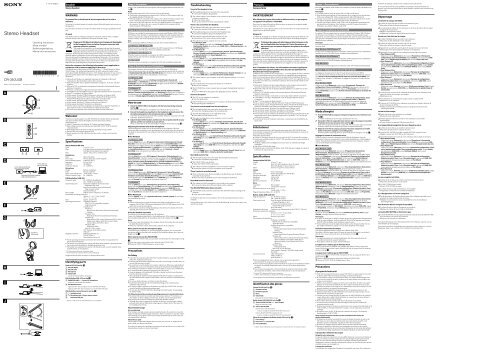
To the dedicated USB jack<br />
Vers la prise USB dédiée<br />
To the USB Jack<br />
Vers la prise USB<br />
Dedicated USB cable (supplied)<br />
Câble USB dédié (fourni)<br />
<br />
VOICE TUBE<br />
<br />
<br />
Tactile dot<br />
Point tactile<br />
<br />
<br />
<br />
English<br />
Stereo headset<br />
WARNING<br />
To prevent fire or shock hazard, do not expose the unit to rain or<br />
moisture.<br />
To prevent fire or shock hazard, do not place objects filled with liquids, such as vases, on<br />
the apparatus.<br />
To avoid electrical shock, do not open the cabinet. Refer servicing to qualified personnel<br />
only.<br />
CE mark<br />
The validity of the CE marking is restricted to only those countries when it is legally<br />
enforced, mainly in the countries EEA (European Economic Area).<br />
Disposal of Old Electrical & Electronic Equipment (Applicable<br />
in the European Union and other European countries with<br />
separate collection systems)<br />
This symbol on the product or on its packaging indicates that this product<br />
shall not be treated as household waste. Instead it shall be handed over to the<br />
applicable collection point for the recycling of electrical and electronic<br />
equipment. By ensuring this product is disposed of correctly, you will help prevent<br />
potential negative consequences for the environment and human health, which could<br />
otherwise be caused by inappropriate waste handling of this product. The recycling of<br />
materials will help to conserve natural resources. For more detailed information about<br />
recycling of this product, please contact your local Civic Office, your household waste<br />
disposal service or the shop where you purchased the product.<br />
Notice for customers: the following information is only applicable to<br />
equipment sold in countries applying EU directives<br />
The manufacturer of this product is <strong>Sony</strong> Corporation, 1-7-1 Konan Minato-ku Tokyo,<br />
108-0075 Japan. The Authorized Representative for EMC and product safety is <strong>Sony</strong><br />
Deutschland GmbH, Hedelfinger Strasse 61, 70327 Stuttgart, Germany. For any service or<br />
guarantee matters please refer to the addresses given in separate service or guarantee<br />
documents.<br />
Microsoft and Windows are registered trademarks or trademarks of Microsoft<br />
Corporation in the United States and/or other countries.<br />
Macintosh and Mac OS are registered trademarks of Apple Inc. in the U.S. and other<br />
countries.<br />
IBM and PC/AT are trademarks and registered trademarks of International Business<br />
Machines Corporation.<br />
Pentium is a trademark or registered trademark of Intel Corporation.<br />
"WALKMAN" and "WALKMAN" logo are registered trademarks of <strong>Sony</strong> Corporation.<br />
Skype is a trademark of Skype Limited.<br />
In this manual, Windows ® 2000 Professional is referred to as Windows 2000.<br />
In this manual, Windows ® XP Home Edition, Windows ® XP Professional and<br />
Windows ® XP Media Center Edition are referred to as Windows XP.<br />
In this manual, Windows Vista ® is referred to as Windows Vista.<br />
In this manual, Windows ® 7 Edition is referred to as Windows 7.<br />
In this manual, Macintosh ® is referred to as Macintosh.<br />
All other names of systems and products are trademarks or registered trademarks of<br />
their respective owners. and ® marks are omitted in this manual.<br />
PC screen terms depicted in this manual may differ from the actual terms.<br />
Welcome!<br />
Thank you for purchasing the <strong>Sony</strong> <strong>DR</strong>-<strong>350USB</strong> Stereo Headset. Before operating the<br />
unit, please read this manual thoroughly and retain it for future reference.<br />
Some features are:<br />
Ideal PC Headset for voice chatting, PC Gaming, and music listening.<br />
Built-in high sensitivity microphone, plus detachable VOICE TUBE for superior<br />
communications.<br />
Smart design and low pressure ear pad for long lasting wearing comfort.<br />
Practical dual use both mini plug and USB.<br />
Handy operation via USB Audio Box functions, such as volume control and mic<br />
muting.<br />
Specifications<br />
Stereo Headset <strong>DR</strong>-350<br />
Cord<br />
1.2 m (47 1 /4 in.)<br />
Plug<br />
Gold plated stereo mini plug (for headphone)<br />
Gold plated mini plug (for microphone)<br />
Mass<br />
Approx. 110 g (3.9 oz.) (without cord)<br />
Headphones<br />
Type<br />
Open air dynamic<br />
Driver unit<br />
30 mm, dome type (CCAW adopted)<br />
Power handling capacity 1,000 mW (IEC* 1 )<br />
Impedance<br />
24 Ω at 1 kHz<br />
Sensitivity<br />
100 dB/mW<br />
Frequency response<br />
14 - 22,000 Hz<br />
Microphone<br />
Design<br />
Built-in microphone<br />
Type<br />
Electret condenser<br />
Open circuit voltage level<br />
-38 dB (0 dB = 1 V/Pa)<br />
Effective frequency rage<br />
20 - 10,000 Hz<br />
USB Audio Box UAB-350<br />
Frequency range<br />
20 - 20,000 Hz (headphone)<br />
200 - 10,000 Hz (microphone)<br />
Input/Output jacks<br />
Output for headphone (mini jack/stereo)<br />
Impedance load: 24 Ω<br />
Input for microphone (mini jack/monaural)<br />
Plug-in-power system<br />
Dedicated USB jack<br />
Power supply<br />
USB bus power compliant (5 V, 100 mA)<br />
Dimensions (excluding projection)<br />
Approx. 31 × 16 × 73 mm (w/h/d)<br />
(1 1 /4 × 21 /32 × 2 7 /8 in.)<br />
Mass<br />
Approx. 25 g (0.9 oz.)<br />
Operating environment<br />
Compliant computer:<br />
IBM PC/AT or compatible computers<br />
Apple Macintosh<br />
Compliant OS:<br />
Windows 7<br />
Starter/Home Basic/Home Premium/Professional/<br />
Ultimate<br />
Windows Vista<br />
Home Basic/Home Premium/Business/Ultimate<br />
Windows XP<br />
Home Edition (SP2 or later)/Professional (SP2 or later)/<br />
Media Center Edition 2004 (SP2 or later)/ Media<br />
Center Edition 2005 (SP2 or later)<br />
Windows 2000<br />
Professional (SP4)<br />
Mac OS X (10.3 or later)<br />
CPU: Pentium II 266 MHz or better<br />
USB port* 2<br />
Supplied accessories Dedicated USB cable (1)<br />
VOICE TUBE (1)<br />
Operating Instructions (1)<br />
For the operating environment mentioned above, the headset is not guaranteed to<br />
operate with all computers.<br />
The headset is not guaranteed to operate with home built computers, operating systems<br />
that are personally up-graded, or multiple operating systems.<br />
The headset is not guaranteed to operate with functions such as system suspend, sleep<br />
and hibernation, on all computers.<br />
* 1 IEC (International Electronic Committee) tested.<br />
* 2 The USB Audio Box supports USB 2.0 (USB 2.0 Full Speed).<br />
Design and specifications are subject to change without notice.<br />
Identifying parts<br />
Headset <strong>DR</strong>-350 (see fig. )<br />
Ear pad (Right)<br />
Ear pad (Left)<br />
Microphone<br />
VOICE TUBE<br />
Attach the VOICE TUBE to the headset.<br />
USB Audio Box UAB-350 (see fig. )<br />
PHONE VOLUME +* / - button (for headphone)<br />
Adjust the volume level of the headset.<br />
MIC MUTING button<br />
(light out) OFF: The microphone is set to MUTING OFF mode.<br />
(light up) MUTING: The microphone is set to MUTING ON mode.<br />
USB Audio Box connection parts (see fig. )<br />
Headphone jack<br />
Microphone jack* (Plug-in-power system)<br />
<br />
Dedicated USB jack<br />
* There is a tactile dot on the USB Audio Box for easy recognition.<br />
Step 1: Connection<br />
Connect your USB Audio Box and computer with the supplied dedicated USB cable (see<br />
fig. ).<br />
Notes<br />
The headset supports the USB 2.0 version (USB 2.0 Full Speed).<br />
The headset is not guaranteed to operate with a USB hub or USB extension cable. Use<br />
the supplied dedicated USB cable only.<br />
When the headset is connected to the computer, the volume level of the computer may<br />
be set to maximum. Turn down the volume of the computer beforehand.<br />
When you use the USB Audio Box, the voice of a digital broadcast is not output from<br />
the computer. To listen to the voice, connect the headset to the computer directly<br />
without using the USB Audio Box.<br />
Step 2: Installing the USB driver<br />
USB drivers are included in operating systems if you are using Windows 2000, Windows<br />
XP, Windows Vista, Windows 7, and Macintosh. USB drivers will be installed when the<br />
system is connected to a computer for the first time. Follow the on-screen instructions to<br />
install. For details, refer to the operating instructions of your computer.<br />
Note<br />
When connecting to different USB ports, you may have to install USB drivers.<br />
For Windows 2000/Windows XP<br />
When the system is connected to a computer, the USB Composite Device, USB Human<br />
Interface Device and USB Audio Device are installed automatically.<br />
For Windows Vista/Windows 7<br />
When the system is connected to a computer, the USB Composite Device, USB Human<br />
Interface Device and UAB-350 are installed automatically.<br />
For Macintosh<br />
When the system is connected to a computer, the UAB-350 is installed automatically.<br />
Step 3: Setting for music CD playback<br />
This setting is necessary when playing back a music CD in the CD-ROM drive.<br />
Follow the instructions below according to your operating system and click the check box<br />
of [Enable digital CD audio for this CD-ROM device]. For Windows Vista, Windows 7<br />
and Macintosh, setting for music CD playback is not necessary.<br />
For Windows 2000<br />
Click the [Start] menu, and select [Settings], [Control Panel], [Sounds and<br />
Multimedia], and [Hardware] tab. Select the CD-ROM drive for playing music, click<br />
[Properties], and then click the [Properties] tab again. Click the check box of [Enable<br />
digital CD audio for this CD-ROM device].<br />
For Windows XP<br />
Click the [start] menu, and select [Control Panel], [Sounds, Speech and Audio<br />
Devices], [Sounds and Audio Devices], and [Hardware] tab. Select the CD-ROM drive<br />
for playing music, click [Properties], and then click the [Properties] tab again. Click the<br />
check box of [Enable digital CD audio for this CD-ROM device].<br />
How to use<br />
1 Attach the VOICE TUBE to the headset, with the <strong>Sony</strong> logo facing outwards<br />
(see fig. ).<br />
The VOICE TUBE helps the microphone more effectively pick up your voice.<br />
2 Connect the headphone plug (black) to the headphone jack and connect the<br />
microphone plug (pink) to the microphone jack (see fig. ).<br />
UAB-350 is for only the headset (<strong>DR</strong>-350). If another headset is connected to the USB<br />
Audio Box, malfunction may occur.<br />
3 Adjust the band of the headset, and then wear the ear pad marked on your<br />
right ear, and the one marked on your left ear.<br />
There is a tactile dot on the unit marked to distinguish the left side (see fig. ).<br />
Adjusting the volume level of the microphone<br />
Check and adjust the volume level of the microphone by the computer. Follow the<br />
instructions below according to your operating system, and check/adjust the volume level.<br />
For details on the operation of your computer, refer to the operating instructions of your<br />
computer.<br />
For Windows<br />
For Windows 2000<br />
Click the [Start] menu, select [Programs], [Accessories], [Entertainment], [Sound<br />
Recorder]. Check the volume level after recording with the [Sound Recorder]. If the<br />
volume level is too high or too low, click the [Start] menu and select [Settings], [Control<br />
Panel], [Sounds and Multimedia], and [Audio] tab. Check that [Preferred device] in<br />
the Sound Recording menu is set to [UAB-350], and click [Volume] in Sound<br />
Recording menu, and adjust the microphone input level.<br />
For Windows XP<br />
Click the [start] menu, select [All Programs], [Accessories], [Entertainment], and<br />
[Sound Recorder]. Check the volume level after recording with the [Sound Recorder].<br />
If the volume level is too high or too low, click the [start] menu and select [Control<br />
Panel], [Sounds, Speech and Audio Devices], [Sounds and Audio Devices], and<br />
[Audio] tab. Check that [Default device] in the Sound recording menu is set to [UAB-<br />
350] and click [Volume] in Sound recording menu, and adjust the microphone input<br />
level.<br />
For Windows Vista<br />
Click the [Start] menu, select [All Programs], [Accessories], [Sound Recorder].<br />
Record with the [Sound Recorder]. Click the [Start] menu and select [Control Panel],<br />
[Hardware and Sound], [Sound], [Recording] tab, and select [UAB-350] for the<br />
recording device and click [Set Default]. Select [UAB-350] again, click [Properties],<br />
select the [Levels] tab, and adjust the microphone input level.<br />
For Windows 7<br />
Click the [Start] menu, select [All Programs], [Accessories], [Sound Recorder].<br />
Record with the [Sound Recorder]. Click the [Start] menu and select [Control Panel],<br />
[Hardware and Sound], [Sound], [Recording] tab, and select [UAB-350] for the<br />
recording device and click [Set Default]. Select [UAB-350] again, click [Properties],<br />
select the [Levels] tab, and adjust the microphone input level.<br />
For Macintosh<br />
Click the [Apple] menu, select [System Preferences], [Sound], [Input] tab, and adjust<br />
the microphone input level.<br />
Notes<br />
The microphone does not support muting on the audio recording device of your<br />
computer. Set MUTING OFF mode by pressing the MIC MUTING button on the USB<br />
Audio Box to mute the microphone.<br />
You may have to perform settings depending on the software. For details, refer to the<br />
operating instructions of your software.<br />
Using the headset separately<br />
You can also use the headset without the USB Audio Box.<br />
Connect the headphone plug (black) to the headphone jack of the computer and connect<br />
the microphone plug (pink) to the microphone jack of the computer (see fig. ).<br />
Notes<br />
When you connect the headset to the computer directly, this headset does not operate<br />
for Apple Macintosh or Mac OS.<br />
When you control the volume of the headset, adjust it on the computer.<br />
When you do not use the microphone plug<br />
When listening to a Walkman, etc., but not using the microphone, you can insert the<br />
microphone plug into the plug holder attached to the headphone plug so that it does not<br />
dangle (see fig. ).<br />
When you do not use the VOICE TUBE<br />
When storing the VOICE TUBE, you can attach it to the headset to avoid losing it (see fig.<br />
).<br />
Insert the convex section of the cord in the hole of the VOICE TUBE.<br />
Rotate the VOICE TUBE 90-degrees to secure in place.<br />
Precautions<br />
On Safety<br />
UAB-350 is for only the headset (<strong>DR</strong>-350). If another headset is connected to the USB<br />
Audio Box, malfunction may occur.<br />
Listening with the headset at high volume may affect your hearing. For traffic safety, do<br />
not use while driving or cycling.<br />
Be careful not to use the headset at too loud a volume level. Otherwise, audio feedback<br />
(howling) may occur as the microphone picks up the sound from the headphone unit.<br />
Do not drop your headset or subject it to external shock, as it may cause a malfunction.<br />
Do not disassemble or attempt to open any parts of the system.<br />
Grasp the plug part of the dedicated USB cable or headset cord when you disconnect<br />
from the connectors or jacks.<br />
After operating the headset with the dedicated USB cable or headset cord, disconnect<br />
the USB cable from the computer if the headset is not to be used for an extended period<br />
of time.<br />
Do not use alcohol, benzene, or thinner to clean the cabinet.<br />
Sound from the headset may be interrupted depending on the communication<br />
conditions of the network.<br />
Do not put weight or pressure on the headset, especially the VOICE TUBE, as it may<br />
cause the headset to deform during long storage.<br />
Do not clean the VOICE TUBE before detaching it from the headset. It may damage<br />
the VOICE TUBE.<br />
The following should be considered regarding placement to avoid malfunctions.<br />
Do not leave the system in a location near heat sources, radios or TV receivers, or a<br />
place subject to direct sunlight, excessive dust, moisture, rain or mechanical shock.<br />
Do not leave the system in a bathroom or other high-humidity location.<br />
Although this system is magnetically shielded, do not leave recorded tapes, watches,<br />
personal credit cards or floppy disks using magnetic coding in front of the system for<br />
an extended period of time.<br />
About headset usage<br />
Act considerately<br />
If the volume is too high, sound may leak outside the headset. Be careful not to raise the<br />
volume so high that it bothers people around you. There is a tendency to raise the volume<br />
when listening in noisy places. However, the volume should be kept at a level where you<br />
can respond when called, etc.<br />
About the ear pads<br />
The ear pads are replaceable. Replace them when they are worn out. To replace the ear<br />
pads, consult your nearest <strong>Sony</strong> dealer.<br />
If you have any questions or problems concerning your system that are not covered in this<br />
manual, please consult your nearest <strong>Sony</strong> dealer.<br />
Troubleshooting<br />
Sound of the headset is low.<br />
The headphone plug is not connected to the jack properly.<br />
Connect the headphone plug properly.<br />
The volume control of your computer or the volume level of the music playback<br />
software is turned down.<br />
Adjust the volume control.<br />
Turn up the volume level of the music playback software.<br />
There is no sound from the headset.<br />
The dedicated USB cable is not connected to your computer.<br />
Connect the dedicated USB cable to your computer.<br />
The headphone plug is not connected to the headphone jack.<br />
Connect the headphone plug to the headphone jack.<br />
The system is connected while music software is in use.<br />
Stop playback of the music software and start again.<br />
The audio device of your computer is not set correctly.<br />
For Windows 2000<br />
Click the [Start] menu, and select [Settings], [Control Panel], [Sounds and<br />
Multimedia], [Audio] tab, and then select [UAB-350] for [Preferred device] in the<br />
Sound Playback menu.<br />
For Windows XP<br />
Click the [start] menu, select [Control Panel], [Sounds, Speech and Audio<br />
Devices], [Sounds and Audio Devices], [Audio] tab, and then select [UAB-350]<br />
for [Default device] in the Sound playback menu.<br />
For Windows Vista<br />
Click the [Start] menu, select [Control Panel], [Hardware and Sound], [Sound],<br />
[Playback] tab, select [UAB-350] for the playback device, and then click [Set<br />
default].<br />
For Windows 7<br />
Click the [Start] menu, select [Control Panel], [Hardware and Sound], [Sound],<br />
[Playback] tab, select [UAB-350] for the playback device, and then click [Set<br />
default].<br />
For Macintosh<br />
Click the [Apple] menu, select [System Preferences], [Sound], [Output] tab, and<br />
then select [UAB-350] for [Select a device for sound output].<br />
The volume control of your computer or the music playback software, etc., is set to<br />
mute.<br />
Unset mute.<br />
Your computer does not recognize the headset as a USB device.<br />
Restart your computer.<br />
The CD-ROM drive of your computer does not support the digital play function of<br />
WDM.<br />
Use a CD-ROM drive that supports the digital play function of WDM.<br />
Sound is disrupted.<br />
The CPU of your computer is overloaded.<br />
Exit other applications.<br />
Other USB devices are connected to your computer and being used simultaneously.<br />
Quit operating other USB devices.<br />
You cannot record sound from the microphone.<br />
The microphone plug is not connected to the microphone jack.<br />
Connect the microphone plug to the microphone jack.<br />
The MIC MUTING button is set to MUTING mode.<br />
Set the MIC MUTING button to OFF.<br />
The audio recording device of your computer is not set correctly.<br />
For Windows 2000<br />
Click the [Start] menu, and select [Settings], [Control Panel], [Sounds and<br />
Multimedia], [Audio] tab, and then select [UAB-350] for [Preferred device] in the<br />
Sound Recording menu.<br />
For Windows XP<br />
Click the [start] menu, select [Control Panel], [Sounds, Speech and Audio<br />
Devices], [Sounds and Audio Devices], [Audio] tab, and then select [UAB-350]<br />
for [Default device] in the Sound recording menu.<br />
For Windows Vista<br />
Click the [Start] menu, select [Control Panel], [Hardware and Sound], [Sound],<br />
[Recording] tab, select [UAB-350] for the recording device, and then click [Set<br />
Default].<br />
For Windows 7<br />
Click the [Start] menu, select [Control Panel], [Hardware and Sound], [Sound],<br />
[Recording] tab, select [UAB-350] for the recording device, and then click [Set<br />
Default].<br />
For Macintosh<br />
Click the [Apple] menu, select [System Preferences], [Sound], [Input] tab, and<br />
then select [UAB-350] for [Select a device for sound input].<br />
Recorded sound is low.<br />
The microphone plug is not connected to the microphone jack properly.<br />
Connect the microphone plug properly.<br />
The VOICE TUBE is not attached.<br />
Attach the VOICE TUBE to the headset.<br />
The volume level of the microphone is set too low on the computer.<br />
Increase the volume level of the microphone on the computer.<br />
There is noise in recorded sound.<br />
There are electrical wires, fluorescent lights or mobile phones near the headset<br />
(especially the microphone).<br />
Move away from any possible sources of electromagnetic interference.<br />
Recorded sound is distorted.<br />
The volume level of the microphone is set too high on the computer.<br />
Decrease the volume level of the microphone on the computer.<br />
The MIC MUTING button does not work.<br />
The MUTING mode cannot be unset by the MIC MUTING button, if setting on the<br />
computer.<br />
Unset mute on the computer.<br />
For details on operation of your computer, refer to the operating instructions of your<br />
computer.<br />
Some problems may not be solved even with Troubleshooting. In such cases, contact your<br />
nearest <strong>Sony</strong> dealer.<br />
Français<br />
Casque stéréo<br />
AVERTISSEMENT<br />
Afin d’éviter les risques d’incendie ou d’électrocution, ne pas exposer<br />
cet appareil à la pluie ou à l’humidité.<br />
Pour éviter les risques d’incendie ou d’électrocution, ne pas poser de récipients remplis<br />
d’eau (p. ex. des vases) sur l’appareil.<br />
Afin d’écarter les risques d’électrocution, ne pas ouvrir le boîtier. Ne confier l’entretien de<br />
l’appareil qu’à un personnel qualifié.<br />
Marque CE<br />
La validité du marquage CE est limitée uniquement aux pays dans lesquels il fait force de<br />
loi, c’est-à-dire principalement dans les pays de I’EEE (Espace Économique Européen).<br />
Traitement des appareils électriques et électroniques en fin<br />
de vie (Applicable dans les pays de l’Union Européenne et<br />
aux autres pays européens disposant de systèmes de collecte<br />
sélective)<br />
Ce symbole, apposé sur le produit ou sur son emballage, indique que ce<br />
produit ne doit pas être traité avec les déchets ménagers. Il doit être remis à<br />
un point de collecte approprié pour le recyclage des équipements électriques et<br />
électroniques. En s’assurant que ce produit est bien mis au rebut de manière appropriée,<br />
vous aiderez à prévenir les conséquences négatives potentielles pour l’environnement et la<br />
santé humaine. Le recyclage des matériaux aidera à préserver les ressources naturelles.<br />
Pour toute information supplémentaire au sujet du recyclage de ce produit, vous pouvez<br />
contacter votre municipalité, votre déchetterie ou le magasin où vous avez acheté le<br />
produit.<br />
Avis à l’intention des clients : les informations suivantes s’appliquent<br />
uniquement aux appareils vendus dans des pays qui appliquent les<br />
directives de l’Union Européenne<br />
Le fabricant de ce produit est <strong>Sony</strong> Corporation, 1-7-1 Konan Minato-ku Tokyo, 108-0075<br />
Japon. Le représentant autorisé pour les questions de compatibilité électromagnétique<br />
(EMC) et la sécurité des produits est <strong>Sony</strong> Deutschland GmbH, Hedelfinger Strasse 61,<br />
70327 Stuttgart, Allemagne. Pour toute question relative au SAV ou à la garantie, merci de<br />
bien vouloir vous référer aux coordonnées contenues dans les documents relatifs au SAV<br />
ou la garantie.<br />
Microsoft et Windows sont des marques déposées ou des marques commerciales de<br />
Microsoft Corporation aux Etats-Unis et / ou dans d’autres pays.<br />
Macintosh et Mac OS sont des marques déposées d’Apple Inc. aux Etats-Unis et dans<br />
d’autres pays.<br />
IBM et PC/AT sont des marques et des marques déposées d’International Business<br />
Machines Corporation.<br />
Pentium est une marque commerciale ou une marque déposée d’Intel Corporation.<br />
« WALKMAN » et le logo « WALKMAN » sont des marques déposées de <strong>Sony</strong><br />
Corporation.<br />
Skype est une marque de Skype Limited.<br />
Dans ce manuel, Windows 2000 fait référence à Windows ® 2000 Professionnel.<br />
Dans le présent manuel, Windows ® XP Home Edition, Windows ® XP Professional et<br />
Windows ® XP Media Center Edition son désignés en tant que Windows XP.<br />
Dans le présent manuel, Windows Vista fait référence à Windows Vista ® .<br />
Dans le présent manuel, Windows 7 fait référence à Windows ® 7 Edition.<br />
Dans le présent manuel, Macintosh fait référence à Macintosh ® .<br />
Tous les autres noms de systèmes et de produits sont des marques commerciales ou des<br />
marques déposées de leurs propriétaires respectifs. Les symboles et ® ne sont pas<br />
utilisés dans ce manuel.<br />
Les termes de l’écran de l’ordinateur repris dans ce manuel peuvent être différents des<br />
termes réels.<br />
Félicitations !<br />
Nous vous remercions d’avoir fait l’acquisition du casque stéréo <strong>DR</strong>-<strong>350USB</strong> de <strong>Sony</strong>.<br />
Avant d’utiliser cet appareil, lisez attentivement le présent mode d’emploi et conservez-le<br />
pour toute référence ultérieure.<br />
Principales caractéristiques :<br />
Casque PC idéal pour discuter de vive voix, jouer sur le PC ou écouter de la musique.<br />
Micro haute sensibilité intégré et VOICE TUBE amovible pour des communications de<br />
qualité supérieure.<br />
Oreillette à faible pression intelligemment conçue pour une <strong>utilisation</strong> prolongée<br />
confortable.<br />
Mini-fiche et USB à double usage.<br />
Utilisation facile, via les fonctions Boîtier Audio USB, telles que le réglage du volume et<br />
la fonction de coupure du son.<br />
Spécifications<br />
Casque stéréo <strong>DR</strong>-350<br />
Cordon<br />
1,2 m (47 1 /4 po.)<br />
Fiche<br />
Mini-fiche stéréo plaquée or (pour le casque)<br />
Mini-fiche plaquée or (pour le micro)<br />
Masse<br />
Environ 110 g (3,9 on.) (sans cordon)<br />
Casque<br />
Type<br />
Ouvert, dynamique<br />
Transducteur<br />
30 mm, type à dôme (CCAW adopté)<br />
Puissance admissible 1 000 mW (IEC* 1 )<br />
Impédance<br />
24 Ω à 1 kHz<br />
Sensibilité<br />
100 dB/mW<br />
Réponse en fréquence<br />
14 - 22 000 Hz<br />
Micro<br />
Conception<br />
Micro intégré<br />
Type<br />
Condensateur à électret<br />
Niveau de tension en circuit ouvert<br />
-38 dB (0 dB = 1 V/Pa)<br />
Plage de fréquences efficace 20 - 10 000 Hz<br />
Boîtier Audio USB UAB-350<br />
Plage de fréquences<br />
20 - 20 000 Hz (casque)<br />
200 - 10 000 Hz (micro)<br />
Prises entrée/sortie<br />
Sortie de casque (miniprise/stéréo)<br />
Charge d’impédance : 24 Ω<br />
Entrée de micro (miniprise/mono)<br />
Système PIP (plug-in-power)<br />
Prise USB dédiée<br />
Alimentation électrique<br />
Conforme pour alimentation par bus USB (5 V, 100 mA)<br />
Dimensions (sauf parties saillantes)<br />
Environ 31 × 16 × 73 mm (l/h/p)<br />
(1 1 /4 × 21 /32 × 2 7 /8 po.)<br />
Masse<br />
Environ 25 g (0,9 on.)<br />
Environnement d’exploitation<br />
Ordinateur compatible :<br />
IBM PC/AT ou ordinateurs compatibles<br />
Apple Macintosh<br />
Systèmes d’exploitation compatibles :<br />
Windows 7<br />
Starter/Home Basic/Home Premium/Professional/<br />
Ultimate<br />
Windows Vista<br />
Home Basic/Home Premium/Business/Ultimate<br />
Windows XP<br />
Home Edition (SP2 ou ultérieur)/Professional (SP2 ou<br />
ultérieur)/Media Center Edition 2004 (SP2 ou<br />
ultérieur)/ Media Center Edition 2005 (SP2 ou<br />
ultérieur)<br />
Windows 2000<br />
Professional (SP4)<br />
Mac OS X (10.3 ou ultérieur)<br />
Unité centrale : Pentium II 266 MHz ou plus rapide<br />
Port USB* 2<br />
Accessoires fournis Câble USB dédié (1)<br />
VOICE TUBE (1)<br />
Mode d’emploi (1)<br />
Pour les configurations citées ci-dessus, nous ne pouvons pas garantir le<br />
fonctionnement du casque avec tous les ordinateurs.<br />
Nous ne pouvons pas garantir le fonctionnement du casque avec les ordinateurs montés<br />
sur mesure, les systèmes d’exploitation mis à niveau ou les systèmes d’exploitation<br />
multiples.<br />
Nous ne pouvons pas garantir le fonctionnement du casque avec des fonctions telles<br />
que suspension de système, veille et mise en hibernation, sur tous les ordinateurs.<br />
* 1 Testé par l’IEC (International Electronic Committee).<br />
* 2 Le Boîtier Audio USB prend en charge USB 2.0 (USB 2.0 Full Speed).<br />
La conception et les spécifications sont sujettes à modification sans préavis.<br />
Identification des pièces<br />
Casque <strong>DR</strong>-350 (voir fig. )<br />
Oreillette (droite)<br />
Oreillette (gauche)<br />
Micro<br />
VOICE TUBE<br />
Raccordez le VOICE TUBE au casque.<br />
Boîtier Audio USB UAB-350 (voir fig. )<br />
Touche PHONE VOLUME +* / - (pour casque)<br />
Réglez le volume du casque.<br />
Touche MIC MUTING<br />
(témoin éteint) OFF (désactivée) :<br />
Le micro est réglé en mode MUTING OFF (son activé).<br />
(témoin allumé) MUTING (coupure du son) :<br />
Le micro est réglé en mode MUTING ON (son désactivé).<br />
Pièces de raccordement du Boîtier Audio USB (voir fig. )<br />
Prise casque <br />
Prise micro * (système PIP)<br />
Prise USB dédiée<br />
* Le Boîtier Audio USB possède un point tactile pour vous permettre de le reconnaître aisément.<br />
Etape 1 : Raccordement<br />
Raccordez votre Boîtier Audio USB et votre ordinateur à l’aide du câble USB dédié fourni<br />
(voir fig. ).<br />
Remarques<br />
Le casque prend en charge la version USB 2.0 (USB 2.0 Full Speed).<br />
Nous ne pouvons pas garantir le fonctionnement de ce casque avec un concentrateur<br />
USB ou une rallonge USB. Utilisez exclusivement le câble USB dédié fourni.<br />
Lorsque vous raccordez le casque à l’ordinateur, il se peut que le volume de ce dernier<br />
soit réglé au maximum. Réduisez d’abord le volume de l’ordinateur.<br />
Lorsque vous utilisez le Boîtier Audio USB, le son des programmes numériques n’est<br />
pas reproduit par l’ordinateur. Pour l’entendre, raccordez le casque directement à<br />
l’ordinateur, sans utiliser le Boîtier Audio USB.<br />
Etape 2 : Installation du pilote USB<br />
Les pilotes USB sont compris dans les systèmes d’exploitation Windows 2000, Windows<br />
XP, Windows Vista, Windows 7 et Macintosh. Les pilotes USB sont installés lorsque<br />
l’appareil est raccordé à l’ordinateur pour la première fois. Suivez les instructions à l’écran<br />
pour procéder à l’installation. Pour de plus amples informations, reportez-vous au mode<br />
d’emploi de votre ordinateur.<br />
Remarque<br />
Lors du raccordement à des ports USB différents, il est possible que vous deviez installer<br />
les pilotes USB.<br />
Pour Windows 2000/Windows XP<br />
Lorsque vous raccordez l’appareil à un ordinateur, USB Composite Device, USB Human<br />
Interface Device et USB Audio Device s’installent automatiquement.<br />
Pour Windows Vista/Windows 7<br />
Lorsque vous raccordez l’appareil à un ordinateur, USB Composite Device, USB Human<br />
Interface Device et UAB-350 s’installent automatiquement.<br />
Pour Macintosh<br />
Lorsque vous raccordez l’appareil à un ordinateur, UAB-350 s’installe automatiquement.<br />
Etape 3 : Réglage de la lecture de CD audio<br />
Ce réglage est nécessaire pour lire des CD audio dans le lecteur de CD-ROM.<br />
Suivez les instructions suivantes en fonction de votre système d’exploitation et cochez la<br />
case [Activer la lecture numérique de CD audio sur ce lecteur de CD-ROM]. Pour<br />
Windows Vista, Windows 7 et Macintosh, le réglage de la lecture de CD audio n’est pas<br />
nécessaire.<br />
Pour Windows 2000<br />
Cliquez sur le menu [Démarrer] et sélectionnez [Paramètres], [Panneau de<br />
configuration], [Sons et multimédia] et [Matériel]. Sélectionnez le lecteur de CD-<br />
ROM destiné à la lecture de musique et cliquez sur [Propriétés], puis à nouveau sur<br />
l’onglet [Propriétés]. Cochez la case [Activer la lecture numérique sur ce lecteur de<br />
CD-ROM].<br />
Pour Windows XP<br />
Cliquez sur le menu [démarrer] et sélectionnez [Panneau de configuration], [Sons,<br />
voix et périphériques audio], [Sons et périphériques audio] et [Matériel].<br />
Sélectionnez le lecteur de CD-ROM destiné à la lecture de musique et cliquez sur<br />
[Propriétés], puis à nouveau sur l’onglet [Propriétés]. Cochez la case [Activer la<br />
lecture numérique de CD audio sur ce lecteur de CD-ROM].<br />
Mode d’emploi<br />
1 Fixez le VOICE TUBE au casque en dirigeant le logo <strong>Sony</strong> vers l’extérieur (voir<br />
fig. ).<br />
Le VOICE TUBE aide le micro à capter parfaitement votre voix.<br />
2 Raccordez la fiche du casque d’écoute (noire) à la prise de casque et raccordez<br />
la fiche du micro (rose) à la prise micro (voir fig. ).<br />
UAB-350 est uniquement destiné au casque (<strong>DR</strong>-350). Si un autre casque est raccordé<br />
au Boîtier Audio USB, cela risque de provoquer un dysfonctionnement.<br />
3 Réglez le serre-tête du casque, puis posez l’écouteur marqué sur l’oreille<br />
droite et l’écouteur marqué sur l’oreille gauche.<br />
L’écouteur gauche, marqué , porte un point tactile pour le distinguer (voir fig. ).<br />
Réglage du niveau de volume du micro<br />
Vérifiez et réglez le niveau du volume du micro à l’aide de l’ordinateur. Suivez les<br />
instructions ci-dessous correspondant à votre système d’exploitation et vérifiez/réglez le<br />
volume. Pour plus d’informations sur le fonctionnement de votre ordinateur, reportezvous<br />
au mode d’emploi qui l’accompagne.<br />
Pour Windows<br />
Pour Windows 2000<br />
Cliquez sur le menu [Démarrer], sélectionnez [Programmes], [Accessoires],<br />
[Divertissement], [Magnétophone]. Après l’enregistrement à l’aide de<br />
[Magnétophone], vérifiez le volume. Si le volume est trop élevé ou trop faible, cliquez<br />
sur le menu [Démarrer] et sélectionnez [Paramètres], [Panneau de configuration],<br />
[Sons et multimédia] et l’onglet [Audio]. Vérifiez que l’option [Périphérique par<br />
défaut] du menu Enregistrement des sons est réglée sur [UAB-350], cliquez sur<br />
[Volume] dans le menu Enregistrement des sons et réglez le niveau d’entrée du micro.<br />
Pour Windows XP<br />
Cliquez sur le menu [démarrer], sélectionnez [Tous les programmes], [Accessoires],<br />
[Divertissement] et [Magnétophone]. Après l’enregistrement à l’aide de<br />
[Magnétophone], vérifiez le volume. Si le volume est trop élevé ou trop faible, cliquez<br />
sur le menu [démarrer] et sélectionnez [Panneau de configuration], [Sons, voix et<br />
périphériques audio], [Sons et périphériques audio] et l’onglet [Audio]. Vérifiez que<br />
l’option [Unité par défaut] du menu Enregistrement audio est réglée sur [UAB-350] et<br />
cliquez sur [Volume] dans le menu Enregistrement audio et réglez le niveau d’entrée<br />
du micro.<br />
Pour Windows Vista<br />
Cliquez sur le menu [Démarrer], sélectionnez [Tous les programmes], [Accessoires],<br />
[Magnétophone]. Enregistrez à l’aide de [Magnétophone]. Cliquez sur le menu<br />
[Démarrer] et sélectionnez [Panneau de configuration], [Matériel et audio], [Son],<br />
l’onglet [Enregistrement] et sélectionnez [UAB-350] comme appareil d’enregistrement et<br />
cliquez sur [Par défaut]. Sélectionnez à nouveau [UAB-350], cliquez sur [Propriétés],<br />
sélectionnez l’onglet [Niveaux] et réglez le niveau d’entrée du micro.<br />
Pour Windows 7<br />
Cliquez sur le menu [Démarrer], sélectionnez [Tous les programmes], [Accessoires],<br />
[Magnétophone]. Enregistrez à l’aide de [Magnétophone]. Cliquez sur le menu<br />
[Démarrer] et sélectionnez [Panneau de configuration], [Matériel et audio], [Son],<br />
l’onglet [Enregistrement], puis sélectionnez [UAB-350] comme appareil<br />
d’enregistrement et cliquez sur [Par défaut]. Sélectionnez à nouveau [UAB-350], cliquez<br />
sur [Propriétés], sélectionnez l’onglet [Niveaux] puis réglez le niveau d’entrée du micro.<br />
Pour Macintosh<br />
Cliquez sur le menu [Pomme], sélectionnez [Préférences Système], [Son], l’onglet<br />
[Entrée], puis réglez le niveau d’entrée du micro.<br />
Remarques<br />
Le micro ne prend pas en charge la coupure du son sur le périphérique d’enregistrement<br />
audio de votre ordinateur. Activez le mode MUTING OFF en appuyant sur la touche<br />
MIC MUTING du Boîtier Audio USB pour couper le micro.<br />
Il est possible que vous deviez régler des paramètres, selon le logiciel utilisé. Pour de<br />
plus amples informations, reportez-vous au mode d’emploi de votre logiciel.<br />
Utilisation autonome du casque<br />
Vous pouvez également utiliser le casque sans le Boîtier Audio USB.<br />
Raccordez la fiche du casque (noire) à la prise de casque de l’ordinateur et raccordez la<br />
fiche du micro (rose) à la prise de micro de l’ordinateur (voir fig. ).<br />
Remarques<br />
Un Apple Macintosh ou le système d’exploitation Mac OS ne permettent pas de<br />
raccorder directement le casque à l’ordinateur.<br />
Pour régler le volume du casque, utilisez l’ordinateur.<br />
Lorsque vous n’utilisez pas la fiche du micro<br />
Lorsque vous écoutez un Walkman, par exemple, sans utiliser le micro, vous pouvez<br />
insérer la fiche du micro dans le porte-fiche fixé à la fiche du casque afin de le maintenir<br />
en place (voir fig. ).<br />
Lorsque vous n’utilisez pas le VOICE TUBE<br />
Lorsque vous rangez le VOICE TUBE, vous pouvez le fixer au casque afin d’éviter de le<br />
perdre (voir fig. ).<br />
Insérez la partie convexe du cordon dans l’orifice du VOICE TUBE.<br />
Tournez le VOICE TUBE de 90 degrés pour le fixer.<br />
Précautions<br />
A propos de la sécurité<br />
UAB-350 est uniquement destiné au casque (<strong>DR</strong>-350). Si un autre casque est raccordé<br />
au Boîtier Audio USB, cela risque de provoquer un dysfonctionnement.<br />
Si vous utilisez le casque à un niveau sonore élevé, vous risquez d’endommager votre<br />
ouïe. Pour des raisons de sécurité, n’utilisez pas le casque lorsque vous conduisez une<br />
voiture ou une bicyclette.<br />
Veillez à ne pas utiliser le casque à un niveau sonore trop élevé. En effet, vous risquez<br />
d’obtenir un retour audio (hurlement) si le micro capte la sonorité élevée du casque.<br />
Ne laissez pas tomber votre casque et ne le soumettez pas à des chocs externes, car cela<br />
pourrait conduire à un mauvais fonctionnement.<br />
Ne démontez pas l’appareil et n’essayez pas d’en ouvrir quelque partie que ce soit.<br />
Saisissez la partie fiche du câble USB dédié ou du cordon du casque lorsque vous les<br />
débranchez des connecteurs ou des prises.<br />
Lorsque vous avez terminé d’utiliser le casque avec le câble USB dédié ou le cordon de<br />
casque, débranchez le câble USB de l’ordinateur si vous prévoyez de ne pas utiliser le<br />
casque pendant une période prolongée.<br />
Pour nettoyer le boîtier, n’utilisez pas d’alcool, de benzine ni de diluant.<br />
Le son parvenant au casque peut être interrompu en fonction des conditions de<br />
communication du réseau.<br />
Ne posez aucun poids et n’exercez aucune pression sur le casque, particulièrement sur le<br />
VOICE TUBE, car il risque de déformer le casque si vous le rangez pour une période<br />
prolongée.<br />
Ne nettoyez pas le VOICE TUBE avant de le détacher du casque. Cela risquerait<br />
d’endommager le VOICE TUBE.<br />
Tenez compte des points suivants lors de l’installation afin d’éviter les<br />
dysfonctionnements.<br />
Ne laissez pas le système à proximité de sources de chaleur, de postes de radio ou de<br />
téléviseurs, ou encore dans un endroit soumis aux rayons directs du soleil, à une<br />
poussière excessive, à l’humidité, à la pluie ou à des chocs mécaniques.<br />
Ne laissez pas l’appareil dans une salle de bain ou un autre endroit très humide.<br />
Bien que cet appareil soit doté d’un écran magnétique, ne laissez pas de cassettes<br />
enregistrées, de montres, de cartes bancaires, de disquettes ou tout autre objet utilisant<br />
un système d’encodage magnétique devant l’appareil pendant une période prolongée.<br />
A propos de l’<strong>utilisation</strong> du casque<br />
Respectez votre entourage<br />
Lorsque le volume est trop élevé, le son est audible même pour ceux qui ne portent pas le<br />
casque. Ne montez pas trop le volume afin de ne pas déranger les gens qui se trouvent<br />
autour de vous. Dans des endroits bruyants, la première réaction est généralement<br />
d’augmenter le volume. Cependant, maintenez le volume à un niveau auquel vous pouvez<br />
entendre lorsque vous êtes appelé, etc.<br />
A propos des oreillettes<br />
Les oreillettes sont remplaçables. Remplacez-les lorsqu’elles sont usées. Pour obtenir des<br />
oreillettes de rechange, consultez votre revendeur <strong>Sony</strong> le plus proche.<br />
Si vous avez des questions ou des problèmes concernant le fonctionnement de cet<br />
appareil, qui ne sont pas abordés dans ce mode d’emploi, consultez votre revendeur <strong>Sony</strong><br />
le plus proche.<br />
Dépannage<br />
Le volume du casque est faible.<br />
La fiche du casque n’est pas raccordée correctement à la prise.<br />
Raccordez la fiche du casque correctement.<br />
La commande du volume de votre ordinateur ou le niveau du volume de la musique<br />
du logiciel de lecture est bas.<br />
Réglez la commande du volume.<br />
Augmentez le volume du logiciel de lecture de musique.<br />
Aucun son n’est émis par le casque.<br />
Le câble USB dédié n’est pas raccordé à votre ordinateur.<br />
Raccordez le câble USB dédié à votre ordinateur.<br />
La fiche du casque n’est pas raccordée à la prise de casque.<br />
Raccordez la fiche du casque à la prise de casque.<br />
L’appareil est raccordé alors que le logiciel de musique est en cours de lecture.<br />
Interrompez la lecture du logiciel de musique et recommencez.<br />
L’appareil de lecture audio de votre ordinateur n’est pas réglé correctement.<br />
Pour Windows 2000<br />
Cliquez sur le menu [Démarrer] et sélectionnez [Paramètres], [Panneau de<br />
configuration], [Sons et multimédia], l’onglet [Audio], puis sélectionnez [UAB-<br />
350] comme [Périphérique par défaut] dans le menu Lecture des sons.<br />
Pour Windows XP<br />
Cliquez sur le menu [démarrer], sélectionnez [Panneau de configuration], [Sons,<br />
voix et périphériques audio], [Sons et périphériques audio], l’onglet [Audio],<br />
puis sélectionnez [UAB-350] comme [Unité par défaut] dans le menu Lecture<br />
audio.<br />
Pour Windows Vista<br />
Cliquez sur le menu [Démarrer], sélectionnez [Panneau de configuration],<br />
[Matériel et audio], [Son], l’onglet [Lecture], sélectionnez [UAB-350] comme<br />
appareil de lecture, puis cliquez sur [Par défaut].<br />
Pour Windows 7<br />
Cliquez sur le menu [Démarrer], sélectionnez [Panneau de configuration],<br />
[Matériel et audio], [Son], l’onglet [Lecture], sélectionnez [UAB-350] comme<br />
appareil de lecture, puis cliquez sur [Par défaut].<br />
Pour Macintosh<br />
Cliquez sur le menu [Pomme], sélectionnez [Préférences Système], [Son], l’onglet<br />
[Sortie], puis sélectionnez [UAB-350] pour [Sélectionnez un périphérique de<br />
sortie audio].<br />
Le son est coupé au niveau de la commande du volume de votre ordinateur ou du<br />
logiciel de lecture de la musique, par exemple.<br />
Rétablissez le son.<br />
Votre ordinateur ne reconnaît pas le casque comme un appareil USB.<br />
Redémarrez votre ordinateur.<br />
Le lecteur de CD-ROM de votre ordinateur ne prend pas en charge la fonction de<br />
lecture numérique de WDM.<br />
Utilisez un lecteur de CD-ROM qui prend en charge la fonction de lecture<br />
numérique de WDM.<br />
Le son est interrompu.<br />
L’unité centrale de votre ordinateur est surchargée.<br />
Quittez les autres applications.<br />
D’autres appareils USB sont raccordés à votre ordinateur et sont utilisés<br />
simultanément.<br />
Cessez d’utiliser les appareils USB autres que celui-ci.<br />
Il est impossible d’enregistrer des sons depuis le micro.<br />
La fiche du micro n’est pas raccordée à la prise de micro.<br />
Raccordez la fiche du micro à la prise de micro.<br />
La touche MIC MUTING est réglée en mode MUTING (coupure de son).<br />
Réglez la touche MIC MUTING sur OFF (désactivé).<br />
L’appareil d’enregistrement audio de votre ordinateur n’est pas réglé correctement.<br />
Pour Windows 2000<br />
Cliquez sur le menu [Démarrer] et sélectionnez [Paramètres], [Panneau de<br />
configuration], [Sons et multimédia], l’onglet [Audio], puis sélectionnez [UAB-<br />
350] comme [Périphérique par défaut] dans le menu Enregistrement des sons.<br />
Pour Windows XP<br />
Cliquez sur le menu [démarrer], sélectionnez [Panneau de configuration], [Sons,<br />
voix et périphériques audio], [Sons et périphériques audio], l’onglet [Audio],<br />
puis sélectionnez [UAB-350] comme [Unité par défaut] dans le menu<br />
Enregistrement audio.<br />
Pour Windows Vista<br />
Cliquez sur le menu [Démarrer], sélectionnez [Panneau de configuration],<br />
[Matériel et audio], [Son], l’onglet [Enregistrement], sélectionnez [UAB-350]<br />
comme appareil d’enregistrement, puis cliquez sur [Par défaut].<br />
Pour Windows 7<br />
Cliquez sur le menu [Démarrer], sélectionnez [Panneau de configuration],<br />
[Matériel et audio], [Son], l’onglet [Enregistrement], sélectionnez [UAB-350]<br />
comme appareil d’enregistrement, puis cliquez sur [Par défaut].<br />
Pour Macintosh<br />
Cliquez sur le menu [Pomme], sélectionnez [Préférences Système], [Son], l’onglet<br />
[Entrée], puis sélectionnez [UAB-350] pour [Sélectionnez un périphérique<br />
d’entrée audio].<br />
Le son enregistré est faible.<br />
La fiche du micro n’est pas raccordée correctement à la prise de micro.<br />
Raccordez la fiche du micro correctement.<br />
Le VOICE TUBE n’est pas installé.<br />
Fixez le VOICE TUBE au casque.<br />
Le volume du micro, réglé sur l’ordinateur, est trop faible.<br />
Augmentez le volume du micro à l’aide de l’ordinateur.<br />
Il y a des parasites sur le son enregistré.<br />
Des fils électriques, des lumières fluorescentes ou des téléphones portables sont à<br />
proximité du casque (en particulier du micro).<br />
Eloignez-vous de toutes les sources susceptibles de créer des interférences<br />
électromagnétiques.<br />
Une distorsion du son enregistré se produit.<br />
Le volume du micro, réglé sur l’ordinateur, est trop élevé.<br />
Réduisez le volume du micro à l’aide de l’ordinateur.<br />
La touche MIC MUTING ne fonctionne pas.<br />
Le mode SILENCIEUX ne peut pas être désactivé à l’aide de la touche MIC MUTING<br />
si son activation a été opérée sur l’ordinateur.<br />
Désactivez le silencieux sur l’ordinateur.<br />
Pour plus d’informations sur le fonctionnement de votre ordinateur, reportez-vous au<br />
mode d’emploi qui l’accompagne.<br />
Vous pouvez rencontrer des problèmes qui ne peuvent pas être résolus avec la section<br />
Dépannage. Dans ce cas, consultez votre revendeur <strong>Sony</strong> le plus proche.<br />
Stereo Headset<br />
<strong>DR</strong>-<strong>350USB</strong><br />
4-178-316-12(1)<br />
Operating Instructions<br />
Mode d’emploi<br />
Bedienungsanleitung<br />
Manual de instrucciones<br />
©2010 <strong>Sony</strong> Corporation Printed in Thailand
an die dedizierte USB-Buchse<br />
A la toma USB exclusiva<br />
an die USB-Buchse<br />
Al puerto USB<br />
Dediziertes USB-Kabel (mitgeliefert)<br />
Cable USB exclusivo (suministrado)<br />
<br />
VOICE TUBE<br />
<br />
<br />
Fühlbarer Punkt<br />
Punto táctil<br />
<br />
<br />
<br />
Deutsch<br />
Stereo-Headset<br />
ACHTUNG<br />
Um Feuergefahr und die Gefahr eines elektrischen Schlags zu<br />
vermeiden, setzen Sie das Gerät weder Regen noch sonstiger<br />
Feuchtigkeit aus.<br />
Um Feuergefahr und die Gefahr eines elektrischen Schlags zu vermeiden, stellen Sie keine<br />
Gefäße mit Flüssigkeiten darin, wie z. B. Vasen, auf das Gerät.<br />
Um einen elektrischen Schlag zu vermeiden, öffnen Sie das Gehäuse nicht. Überlassen Sie<br />
Wartungsarbeiten stets nur qualifiziertem Fachpersonal.<br />
CE-Zeichen<br />
Die Gültigkeit des CE-Zeichens beschränkt sich ausschließlich auf die Länder, in denen es<br />
gesetzlich erforderlich ist, vor allem im EWR (Europäischer Wirtschaftsraum).<br />
Entsorgung von gebrauchten elektrischen und<br />
elektronischen Geräten (anzuwenden in den Ländern der<br />
Europäischen Union und anderen europäischen Ländern mit<br />
einem separaten Sammelsystem für diese Geräte)<br />
Das Symbol auf dem Produkt oder seiner Verpackung weist darauf hin, dass<br />
dieses Produkt nicht als normaler Haushaltsabfall zu behandeln ist, sondern<br />
an einer Annahmestelle für das Recycling von elektrischen und elektronischen Geräten<br />
abgegeben werden muss. Durch Ihren Beitrag zum korrekten Entsorgen dieses Produkts<br />
schützen Sie die Umwelt und die Gesundheit Ihrer Mitmenschen. Umwelt und<br />
Gesundheit werden durch falsches Entsorgen gefährdet. Materialrecycling hilft, den<br />
Verbrauch von Rohstoffen zu verringern. Weitere Informationen zum Recycling dieses<br />
Produkts erhalten Sie bei Ihrer Gemeindeverwaltung, den kommunalen<br />
Entsorgungsbetrieben oder dem Geschäft, in dem Sie das Produkt gekauft haben.<br />
Hinweis für Kunden: Die folgenden Informationen gelten nur für<br />
Geräte, die in Ländern verkauft werden, in denen EU-Richtlinien gelten<br />
Der Hersteller dieses Produktes ist <strong>Sony</strong> Corporation, 1-7-1 Konan Minato-ku Tokio,<br />
108-0075 Japan. Bevollmächtigter für EMV und Produktsicherheit ist <strong>Sony</strong> Deutschland<br />
GmbH, Hedelfinger Strasse 61, 70327 Stuttgart, Deutschland. Für Kundendienst- oder<br />
Garantieangelegenheiten wenden Sie sich bitte an die in Kundendienst- oder<br />
Garantiedokumenten genannten Adressen.<br />
Microsoft und Windows sind eingetragene Warenzeichen oder Warenzeichen der<br />
Microsoft Corporation in den USA und/oder anderen Ländern.<br />
Macintosh und Mac OS sind eingetragene Markenzeichen der Apple, Inc., in den USA<br />
und anderen Ländern.<br />
IBM und PC/AT sind Markenzeichen oder eingetragene Markenzeichen der<br />
International Business Machines Corporation.<br />
Pentium ist ein Warenzeichen oder ein eingetragenes Warenzeichen der Intel<br />
Corporation.<br />
Skype ist ein Markenzeichen von Skype Limited.<br />
In dieser Bedienungsanleitung wird Windows ® 2000 Professional als Windows 2000<br />
bezeichnet.<br />
In dieser Bedienungsanleitung werden Windows ® XP Home Edition, Windows ® XP<br />
Professional und Windows ® XP Media Center Edition als Windows XP bezeichnet.<br />
In dieser Bedienungsanleitung wird Windows Vista ® als Windows Vista bezeichnet.<br />
In dieser Bedienungsanleitung wird Windows ® 7 Edition als Windows 7 bezeichnet.<br />
In dieser Bedienungsanleitung wird Macintosh ® als Macintosh bezeichnet.<br />
Alle anderen erwähnten System- oder Produktnamen sind Warenzeichen oder<br />
eingetragene Warenzeichen der jeweiligen Eigentümer. In dieser Anleitung sind die<br />
Warenzeichen nicht mit den Zeichen und ® markiert.<br />
Die in dieser Anleitung beschriebenen PC-Bildschirme können sich von den<br />
tatsächlichen Bildschirmanzeigen unterscheiden.<br />
Willkommen!<br />
Danke, dass Sie sich für das Stereo-Headset <strong>DR</strong>-<strong>350USB</strong> von <strong>Sony</strong> entschieden haben.<br />
Lesen Sie diese Bedienungsanleitung vor Inbetriebnahme des Geräts bitte genau durch<br />
und bewahren Sie sie zum späteren Nachschlagen sorgfältig auf.<br />
Im Folgenden einige Funktionen und Merkmale dieses Produkts:<br />
Ideales PC-Headset für Sprachchat, PC-Spiele und zum Musikhören.<br />
Integriertes Mikrofon mit hoher Empfindlichkeit und abnehmbare VOICE TUBE für<br />
die optimale Kommunikation.<br />
Intelligentes Design und weiche Ohrpolster für langen Tragekomfort.<br />
Praktischer Doppelnutzen dank Ministecker und USB.<br />
Praktische Bedienung dank USB-Audio-Box-Funktionen wie Lautstärkeeinstellung und<br />
Mikrofonstummschaltung.<br />
Technische Daten<br />
Stereo-Headset <strong>DR</strong>-350<br />
Kabel<br />
1,2 m<br />
Stecker<br />
Vergoldeter Stereoministecker (für Kopfhörer)<br />
Vergoldeter Ministecker (für Mikrofon)<br />
Gewicht<br />
ca. 110 g (ohne Kabel)<br />
Kopfhörer<br />
Typ<br />
Offen, dynamisch<br />
Treibereinheit<br />
30 mm, Kalotte (mit CCAW)<br />
Belastbarkeit 1.000 mW (IEC* 1 )<br />
Impedanz<br />
24 Ω bei 1 kHz<br />
Empfindlichkeit<br />
100 dB/mW<br />
Frequenzgang<br />
14 - 22.000 Hz<br />
Mikrofon<br />
Design<br />
Eingebautes Mikrofon<br />
Typ<br />
Elektret-Kondensatormikrofon<br />
Leerlaufspannungspegel<br />
-38 dB (0 dB = 1 V/Pa)<br />
Effektiver Frequenzbereich 20 - 10.000 Hz<br />
USB-Audio-Box UAB-350<br />
Frequenzbereich<br />
20 - 20.000 Hz (Kopfhörer)<br />
200 - 10.000 Hz (Mikrofon)<br />
Ein-/Ausgangsbuchsen<br />
Ausgang für Kopfhörer (Minibuchse/stereo)<br />
Lastimpedanz: 24 Ω<br />
Eingang für Mikrofon (Minibuchse/monaural)<br />
Plug-in-Power-System<br />
Dedizierte USB-Buchse<br />
Stromversorgung<br />
über USB-Bus möglich (5 V, 100 mA)<br />
Abmessungen (ohne vorstehende Teile)<br />
ca. 31 × 16 × 73 mm (B/H/T)<br />
Gewicht<br />
ca. 25 g<br />
Betriebsumgebung<br />
Kompatible Computer:<br />
IBM PC/AT oder kompatible Computer<br />
Apple Macintosh<br />
Geeignetes Betriebssystem:<br />
Windows 7<br />
Starter/Home Basic/Home Premium/Professional/<br />
Ultimate<br />
Windows Vista<br />
Home Basic/Home Premium/Business/Ultimate<br />
Windows XP<br />
Home Edition (SP2 oder höher)/Professional (SP2 oder<br />
höher)/Media Center Edition 2004 (SP2 oder höher)/<br />
Media Center Edition 2005 (SP2 oder höher)<br />
Windows 2000<br />
Professional (SP4)<br />
Mac OS X (10.3 oder höher)<br />
CPU: Pentium II mit mindestens 266 MHz<br />
USB-Anschluss* 2<br />
Mitgeliefertes Zubehör Dediziertes USB-Kabel (1)<br />
VOICE TUBE (1)<br />
Bedienungsanleitung (1)<br />
Auch bei den oben angegebenen Betriebsumgebungen funktioniert das Headset nicht<br />
unbedingt bei allen Computern.<br />
Das Headset arbeitet möglicherweise nicht mit selbst zusammengestellten Computern,<br />
Betriebssystemen, die Sie selbst aktualisiert haben, oder Rechnern, die unter mehreren<br />
Betriebssystemen laufen.<br />
Das Headset ist bei allen Computern möglicherweise nicht mit Funktionen wie<br />
Standby-Modus, Schlafmodus oder Ruhezustand kompatibel.<br />
* 1 IEC-getestet (IEC = International Electronic Committee).<br />
* 2 Die USB-Audio-Box unterstützt USB 2.0 (USB 2.0 Full Speed).<br />
Änderungen, die dem technischen Fortschritt dienen, bleiben vorbehalten.<br />
Lage und Funktion der Teile und<br />
Bedienelemente<br />
Headset <strong>DR</strong>-350 (siehe Abb. )<br />
Ohrpolster (rechts)<br />
Ohrpolster (links)<br />
Mikrofon<br />
VOICE TUBE<br />
Schließen Sie die VOICE TUBE an das Headset an.<br />
USB-Audio-Box UAB-350 (siehe Abb. )<br />
Taste PHONE VOLUME +*/- (für Kopfhörer)<br />
Stellen Sie hier die Lautstärke des Headsets ein.<br />
Taste MIC MUTING<br />
(leuchtet nicht) OFF: Das Mikrofon ist nicht stummgeschaltet (Modus MUTING OFF).<br />
(leuchtet) MUTING: Das Mikrofon ist stummgeschaltet (Modus MUTING ON).<br />
Anschlüsse der USB-Audio-Box (siehe Abb. )<br />
Kopfhörerbuchse<br />
Mikrofonbuchse* (Plug-in-Power-System)<br />
<br />
Dedizierte USB-Buchse<br />
* Zur leichteren Orientierung befindet sich auf der USB-Audio-Box ein fühlbarer Punkt.<br />
Schritt 1: Anschließen<br />
Verbinden Sie die USB-Audio-Box und den Computer mit dem mitgelieferten dedizierten<br />
USB-Kabel (siehe Abb. ).<br />
Hinweise<br />
Das Headset unterstützt USB 2.0 (USB 2.0 Full Speed).<br />
Das Headset funktioniert mit einem USB-Hub oder einem USB-Verlängerungskabel<br />
unter Umständen nicht. Verwenden Sie daher ausschließlich das mitgelieferte<br />
dedizierte USB-Kabel.<br />
Wenn Sie das Headset an den Computer anschließen, gilt am Computer unter<br />
Umständen die höchste Lautstärkeeinstellung. Drehen Sie die Lautstärke am Computer<br />
daher zuvor herunter.<br />
Wenn Sie die USB-Audio-Box verwenden, lässt sich die Sprache einer digitalen<br />
Sendung nicht über den Computer wiedergeben. Wenn die Sprache wiedergegeben<br />
werden soll, schließen Sie das Headset nicht an die USB-Audio-Box, sondern direkt an<br />
den Computer an.<br />
Schritt 2: Installieren des USB-Treibers<br />
Bei Windows 2000, Windows XP, Windows Vista, Windows 7 und Macintosh enthält das<br />
Betriebssystem bereits die USB-Treiber. Die USB-Treiber werden installiert, wenn das<br />
System zum ersten Mal an den Computer angeschlossen wird. Gehen Sie zum Installieren<br />
nach den Anweisungen auf dem Bildschirm vor. Weitere Erläuterungen finden Sie in der<br />
Bedienungsanleitung zum Computer.<br />
Hinweis<br />
Wenn Sie die Verbindung über einen anderen USB-Anschluss vornehmen, müssen Sie<br />
möglicherweise USB-Treiber installieren.<br />
Windows 2000/Windows XP<br />
Wenn Sie das System an einen Computer anschließen, werden USB Composite Device,<br />
USB Human Interface Device und USB Audio Device automatisch installiert.<br />
Windows Vista/Windows 7<br />
Wenn Sie das System an einen Computer anschließen, werden USB Composite Device,<br />
USB Human Interface Device und UAB-350 automatisch installiert.<br />
Macintosh<br />
Wenn Sie das System an einen Computer anschließen, wird UAB-350 automatisch<br />
installiert.<br />
Schritt 3: Einstellen für die Wiedergabe von Musik-CDs<br />
Diese Einstellungen sind erforderlich, wenn Sie eine Musik-CD im CD-ROM-Laufwerk<br />
wiedergeben wollen.<br />
Gehen Sie nach den folgenden Anweisungen zu Ihrem Betriebssystem vor und klicken Sie<br />
auf das Kontrollkästchen [Digitale CD-Wiedergabe für den CD-Player aktivieren].<br />
Bei Windows Vista, Windows 7 und Macintosh sind Einstellungen für die Wiedergabe<br />
von Musik-CDs nicht erforderlich.<br />
Windows 2000<br />
Klicken Sie auf das Menü [Start] und wählen Sie dann [Einstellungen],<br />
[Systemsteuerung], [Sounds und Multimedia] und die Registerkarte [Hardware].<br />
Wählen Sie das CD-ROM-Laufwerk für die Musikwiedergabe, klicken Sie auf<br />
[Eigenschaften] und dann auf die Registerkarte [Eigenschaften]. Klicken Sie auf das<br />
Kontrollkästchen [Digitale CD-Wiedergabe für den CD-Player aktivieren].<br />
Windows XP<br />
Klicken Sie auf das Menü [Start] und wählen Sie dann [Systemsteuerung], [Sounds,<br />
Sprachein-/ausgabe und Audiogeräte], [Sounds und Audiogeräte] und die<br />
Registerkarte [Hardware]. Wählen Sie das CD-ROM-Laufwerk für die Musikwiedergabe,<br />
klicken Sie auf [Eigenschaften] und dann auf die Registerkarte [Eigenschaften].<br />
Klicken Sie auf das Kontrollkästchen [Digitale CD-Wiedergabe für den CD-Player<br />
aktivieren].<br />
Gebrauch<br />
1 Bringen Sie die VOICE TUBE am Headset an, wobei das <strong>Sony</strong>-Logo nach außen<br />
weist (siehe Abb. ).<br />
Durch die VOICE TUBE kann das Mikrofon effizienter Ihre Stimme einfangen.<br />
2 Schließen Sie den Kopfhörerstecker (schwarz) an die Kopfhörerbuchse und<br />
den Mikrofonstecker (pink) an die Mikrofonbuchse an (siehe Abb. ).<br />
Die UAB-350 eignet sich ausschließlich für das Headset (<strong>DR</strong>-350). Wenn Sie ein<br />
anderes Headset an die USB-Audio-Box anschließen, kann es zu Fehlfunktionen<br />
kommen.<br />
3 Stellen Sie den Kopfbügel des Headsets ein und tragen Sie die Ohrmuschel<br />
mit der Markierung auf dem rechten, die mit der Markierung auf dem<br />
linken Ohr.<br />
An der linken Hörmuschel mit der Markierung befindet sich zur Kennzeichnung<br />
der linken Seite ein fühlbarer Punkt (siehe Abb. ).<br />
Anpassen des Lautstärkepegels des Mikrofons<br />
Überprüfen Sie den Lautstärkepegel des Mikrofons mit dem Computer und passen Sie<br />
ihn an. Gehen Sie zum Überprüfen/Einstellen der Lautstärke nach den folgenden<br />
Anweisungen zu Ihrem Betriebssystem vor.<br />
Einzelheiten zum Betrieb des Computers finden Sie in der Bedienungsanleitung zum<br />
Computer.<br />
Windows<br />
Windows 2000<br />
Klicken Sie auf das Menü [Start] und wählen Sie [Programme], [Zubehör],<br />
[Unterhaltungsmedien] und [Audiorecorder]. Machen Sie mit [Audiorecorder] eine<br />
Aufnahme und überprüfen Sie die Lautstärke. Ist die Aufnahme zu laut oder zu leise,<br />
klicken Sie auf das Menü [Start] und wählen Sie [Einstellungen], [Systemsteuerung],<br />
[Sounds und Multimedia] und die Registerkarte [Audio]. Vergewissern Sie sich, dass<br />
[Bevorzugtes Gerät] unter Audioaufnahme auf [UAB-350] gesetzt ist, klicken Sie<br />
dann auf [Lautstärke] unter Audioaufnahme und stellen Sie den<br />
Mikrofoneingangspegel ein.<br />
Windows XP<br />
Klicken Sie auf das Menü [Start] und wählen Sie [Alle Programme], [Zubehör],<br />
[Unterhaltungsmedien] und [Audiorecorder]. Machen Sie mit [Audiorecorder] eine<br />
Aufnahme und überprüfen Sie die Lautstärke. Ist die Aufnahme zu laut oder zu leise,<br />
klicken Sie auf das Menü [Start] und wählen Sie [Systemsteuerung], [Sounds,<br />
Sprachein-/ausgabe und Audiogeräte], [Sounds und Audiogeräte] und die<br />
Registerkarte [Audio]. Vergewissern Sie sich, dass [Standardgerät] unter<br />
Soundaufnahme auf [UAB- 350] gesetzt ist, klicken Sie dann auf [Lautstärke] unter<br />
Soundaufnahme und stellen Sie den Mikrofoneingangspegel ein.<br />
Windows Vista<br />
Klicken Sie auf das Menü [Start] und wählen Sie [Alle Programme], [Zubehör] und<br />
[Audiorecorder]. Machen Sie mit [Audiorecorder] eine Aufnahme. Klicken Sie auf das<br />
Menü [Start], wählen Sie [Systemsteuerung], [Hardware und Sound], [Sound] und<br />
die Registerkarte [Aufnahme], wählen Sie dann [UAB-350] als Aufnahmegerät und<br />
klicken Sie auf [Als Standard]. Wählen Sie erneut [UAB-350], klicken Sie auf<br />
[Eigenschaften], wählen Sie die Registerkarte [Pegel] und stellen Sie den<br />
Mikrofoneingangspegel ein.<br />
Windows 7<br />
Klicken Sie auf das Menü [Start] und wählen Sie [Alle Programme], [Zubehör] und<br />
[Audiorecorder]. Machen Sie mit [Audiorecorder] eine Aufnahme. Klicken Sie auf das<br />
Menü [Start], wählen Sie [Systemsteuerung], [Hardware und Sound], [Sound] und<br />
die Registerkarte [Aufnahme], wählen Sie dann [UAB-350] als Aufnahmegerät und<br />
klicken Sie auf [Als Standard]. Wählen Sie erneut [UAB-350], klicken Sie auf<br />
[Eigenschaften], wählen Sie die Registerkarte [Pegel] und stellen Sie den<br />
Mikrofoneingangspegel ein.<br />
Macintosh<br />
Klicken Sie auf das Menü [Apple], wählen Sie [Systemeinstellungen], [Ton] und die<br />
Registerkarte [Eingabe] und stellen Sie den Mikrofoneingangspegel ein.<br />
Hinweise<br />
Das Mikrofon unterstützt nicht die Stummschaltung am Audioaufnahmegerät des<br />
Computers. Wenn Sie das Mikrofon stummschalten wollen, stellen Sie den Modus<br />
MUTING OFF mit der Taste MIC MUTING an der USB-Audio-Box entsprechend ein.<br />
Je nach Software müssen Sie möglicherweise Einstellungen vornehmen. Erläuterungen<br />
dazu finden Sie in der Bedienungsanleitung zur Software.<br />
Verwenden des Headsets allein<br />
Sie können das Headset allein, also ohne die USB-Audio-Box verwenden.<br />
Schließen Sie den Kopfhörerstecker (schwarz) an die Kopfhörerbuchse des Computers<br />
und den Mikrofonstecker (pink) an die Mikrofonbuchse des Computers an (siehe Abb.<br />
).<br />
Hinweise<br />
Bei einem direkten Anschluss an den Computer unterstützt dieses Headset Apple<br />
Macintosh und Mac OS nicht.<br />
Stellen Sie die Lautstärke des Headsets bitte am Computer ein.<br />
Wenn Sie den Mikrofonstecker nicht verwenden<br />
Wenn Sie über einen Walkman usw. Musik hören und das Mikrofon nicht benötigen,<br />
können Sie den Mikrofonstecker in die Steckerhalterung am Kopfhörerstecker einsetzen,<br />
so dass der Mikrofonstecker nicht herunterhängt (siehe Abb. ).<br />
Wenn Sie die VOICE TUBE nicht verwenden<br />
Wenn Sie die VOICE TUBE verstauen, können Sie sie am Headset anbringen, um zu<br />
verhindern, dass Sie sie verlieren (siehe Abb. ).<br />
Setzen Sie den erhabenen Abschnitt des Kabels in die Aussparung der VOICE TUBE<br />
ein.<br />
Drehen Sie die VOICE TUBE um 90 Grad, um sie zu sichern.<br />
Sicherheitsmaßnahmen<br />
Sicherheit<br />
Die UAB-350 eignet sich ausschließlich für das Headset (<strong>DR</strong>-350). Wenn Sie ein<br />
anderes Headset an die USB-Audio-Box anschließen, kann es zu Fehlfunktionen<br />
kommen.<br />
Wenn Sie mit dem Headset bei hoher Lautstärke Musik hören, kann es zu<br />
Gehörschäden kommen. Verwenden Sie das Headset aus Gründen der<br />
Verkehrssicherheit nicht beim Fahren von Kraftfahrzeugen oder beim Fahrradfahren.<br />
Verwenden Sie das Headset nicht mit zu hoher Lautstärke. Andernfalls kann es zu einer<br />
akustischen Rückkopplung (Heulton) kommen, wenn das Mikrofon den Ton des<br />
Headsets aufnimmt.<br />
Lassen Sie das Headset nicht fallen und schützen Sie es vor Stößen. Andernfalls kann es<br />
zu Fehlfunktionen kommen.<br />
Versuchen Sie nicht, die Komponenten des Systems zu öffnen oder zu zerlegen.<br />
Wenn Sie das dedizierte USB-Kabel oder das Kabel des Headsets von einem Anschluss<br />
oder einer Buchse trennen, ziehen Sie immer am Stecker, nicht am Kabel selbst.<br />
Wenn Sie das Headset mit dem dedizierten USB-Kabel oder dem Headset-Kabel<br />
verwendet haben und das Headset längere Zeit nicht mehr verwendet werden soll,<br />
trennen Sie das USB-Kabel vom Computer.<br />
Verwenden Sie zum Reinigen des Gehäuses keinen Alkohol, kein Benzin und keinen<br />
Verdünner.<br />
Der Ton vom Headset setzt je nach den Kommunikationsbedingungen im Netzwerk<br />
möglicherweise aus.<br />
Setzen Sie das Headset und vor allem die VOICE TUBE nicht Gewichten oder Druck<br />
aus, da diese sich andernfalls bei längerer Lagerung verformen können.<br />
Reinigen Sie die VOICE TUBE nicht, ohne sie vom Headset abzunehmen. Andernfalls<br />
kann die VOICE TUBE beschädigt werden.<br />
Verwenden Sie das Headset nicht in folgenden Umgebungen, um Fehlfunktionen<br />
zu vermeiden.<br />
Lassen Sie das System nicht in der Nähe von Wärmequellen, Radios oder<br />
Fernsehempfängern oder an Stellen, an denen es direktem Sonnenlicht,<br />
außergewöhnlich viel Staub, Feuchtigkeit, Regen oder mechanischen Erschütterungen<br />
ausgesetzt ist.<br />
Setzen Sie das System keiner hohen Luftfeuchtigkeit aus, wie sie zum Beispiel in einem<br />
Badezimmer gegeben ist.<br />
Dieses System ist magnetisch abgeschirmt. Lassen Sie bespielte Bänder, Uhren,<br />
Kreditkarten oder Disketten mit Magnetcodierung trotzdem nicht längere Zeit vor dem<br />
System liegen.<br />
Hinweise zur Verwendung des Headsets<br />
Nehmen Sie Rücksicht!<br />
Wenn die Lautstärke zu hoch ist, ist der Ton auch in der Umgebung des Headsets zu<br />
hören. Stellen Sie die Lautstärke daher nicht zu hoch ein, damit andere nicht gestört<br />
werden. Wenn die Umgebung laut ist, neigt man dazu, die Lautstärke zu erhöhen.<br />
Dennoch sollten Sie die Lautstärke immer nur so hoch einstellen, dass Sie<br />
Umgebungsgeräusche noch wahrnehmen und beispielsweise hören können, wenn Sie<br />
gerufen werden.<br />
Hinweis zu den Ohrpolstern<br />
Die Ohrpolster sind austauschbar. Ersetzen Sie sie durch neue, wenn sie abgenutzt sind.<br />
Wenden Sie sich dazu an Ihren <strong>Sony</strong>-Händler.<br />
Sollten an Ihrem System Probleme auftreten oder sollten Sie Fragen haben, auf die in<br />
dieser Bedienungsanleitung nicht eingegangen wird, wenden Sie sich bitte an Ihren <strong>Sony</strong>-<br />
Händler.<br />
Störungsbehebung<br />
Die Lautstärke des Headsets ist sehr niedrig.<br />
Der Kopfhörerstecker steckt nicht richtig in der Buchse.<br />
Schließen Sie den Kopfhörerstecker richtig an.<br />
Die Lautstärkeregelung am Computer oder die Lautstärke der<br />
Musikwiedergabesoftware wurde heruntergedreht.<br />
Stellen Sie die Lautstärkeregelung ein.<br />
Erhöhen Sie die Lautstärke der Musikwiedergabesoftware.<br />
Über das Headset wird kein Ton ausgegeben.<br />
Das dedizierte USB-Kabel ist nicht an den Computer angeschlossen.<br />
Schließen Sie das dedizierte USB-Kabel an den Computer an.<br />
Der Kopfhörerstecker steckt nicht richtig in der Kopfhörerbuchse.<br />
Schließen Sie den Kopfhörerstecker an die Kopfhörerbuchse an.<br />
Das System wurde während der Wiedergabe von Musiksoftware angeschlossen.<br />
Stoppen Sie die Wiedergabe der Musiksoftware und starten Sie sie erneut.<br />
Das Audiowiedergabegerät am Computer ist nicht richtig eingestellt.<br />
Windows 2000<br />
Klicken Sie auf das Menü [Start], wählen Sie [Einstellungen], [Systemsteuerung],<br />
[Sounds und Multimedia] und die Registerkarte [Audio] und wählen Sie dann<br />
[UAB-350] als [Bevorzugtes Gerät] unter Audiowiedergabe.<br />
Windows XP<br />
Klicken Sie auf das Menü [Start], wählen Sie [Systemsteuerung], [Sounds,<br />
Sprachein-/ausgabe und Audiogeräte], [Sounds und Audiogeräte] und die<br />
Registerkarte [Audio] und wählen Sie dann [UAB-350] als [Standardgerät] unter<br />
Soundwiedergabe.<br />
Windows Vista<br />
Klicken Sie auf das Menü [Start], wählen Sie [Systemsteuerung], [Hardware und<br />
Sound], [Sound] und die Registerkarte [Wiedergabe], wählen Sie dann [UAB-350]<br />
als Wiedergabegerät und klicken Sie zuletzt auf [Als Standard].<br />
Windows 7<br />
Klicken Sie auf das Menü [Start], wählen Sie [Systemsteuerung], [Hardware und<br />
Sound], [Sound] und die Registerkarte [Wiedergabe], wählen Sie dann [UAB-350]<br />
als Wiedergabegerät und klicken Sie zuletzt auf [Als Standard].<br />
Macintosh<br />
Klicken Sie auf das Menü [Apple], wählen Sie [Systemeinstellungen], [Ton] und<br />
die Registerkarte [Ausgabe] und wählen Sie dann [UAB-350] unter [Wählen Sie<br />
ein Gerät aus für die Tonausgabe].<br />
Für die Lautstärkeregelung am Computer oder die Musikwiedergabesoftware usw. ist<br />
die Stummschaltung aktiviert.<br />
Deaktivieren Sie die Stummschaltung.<br />
Der Computer erkennt das Headset nicht als USB-Gerät.<br />
Starten Sie den Computer neu.<br />
Das CD-ROM-Laufwerk am Computer unterstützt die digitale Wiedergabefunktion<br />
von WDM nicht.<br />
Verwenden Sie ein CD-ROM-Laufwerk, das die digitale Wiedergabefunktion von<br />
WDM unterstützt.<br />
Der Ton setzt aus.<br />
Die CPU des Computers ist überlastet.<br />
Schließen Sie andere Anwendungen.<br />
Andere USB-Geräte sind an den Computer angeschlossen und werden gleichzeitig<br />
benutzt.<br />
Benutzen Sie die anderen USB-Geräte nicht weiter.<br />
Mit dem Mikrofon lässt sich kein Ton aufnehmen.<br />
Der Mikrofonstecker steckt nicht in der Mikrofonbuchse.<br />
Schließen Sie den Mikrofonstecker an die Mikrofonbuchse an.<br />
Die Taste MIC MUTING ist auf den Stummschaltmodus (MUTING) eingestellt.<br />
Stellen Sie die Taste MIC MUTING auf OFF.<br />
Das Audioaufnahmegerät am Computer ist nicht richtig eingestellt.<br />
Windows 2000<br />
Klicken Sie auf das Menü [Start], wählen Sie [Einstellungen], [Systemsteuerung],<br />
[Sounds und Multimedia] und die Registerkarte [Audio] und wählen Sie dann<br />
[UAB-350] als [Bevorzugtes Gerät] unter Audioaufnahme.<br />
Windows XP<br />
Klicken Sie auf das Menü [Start], wählen Sie [Systemsteuerung], [Sounds,<br />
Sprachein-/ausgabe und Audiogeräte], [Sounds und Audiogeräte] und die<br />
Registerkarte [Audio] und wählen Sie dann [UAB-350] als [Standardgerät] unter<br />
Soundaufnahme.<br />
Windows Vista<br />
Klicken Sie auf das Menü [Start], wählen Sie [Systemsteuerung], [Hardware und<br />
Sound], [Sound] und die Registerkarte [Aufnahme], wählen Sie dann [UAB-350]<br />
als Aufnahmegerät und klicken Sie zuletzt auf [Als Standard].<br />
Windows 7<br />
Klicken Sie auf das Menü [Start], wählen Sie [Systemsteuerung], [Hardware und<br />
Sound], [Sound] und die Registerkarte [Aufnahme], wählen Sie dann [UAB-350]<br />
als Aufnahmegerät und klicken Sie zuletzt auf [Als Standard].<br />
Macintosh<br />
Klicken Sie auf das Menü [Apple], wählen Sie [Systemeinstellungen], [Ton] und<br />
die Registerkarte [Eingabe] und wählen Sie dann [UAB-350] unter [Wählen Sie ein<br />
Gerät aus für die Toneingabe].<br />
Der aufgenommene Ton ist zu leise.<br />
Der Mikrofonstecker steckt nicht richtig in der Mikrofonbuchse.<br />
Schließen Sie den Mikrofonstecker richtig an.<br />
Die VOICE TUBE ist nicht angeschlossen.<br />
Schließen Sie die VOICE TUBE an das Headset an.<br />
Die Mikrofonlautstärke ist am Computer zu niedrig eingestellt.<br />
Erhöhen Sie die Mikrofonlautstärke am Computer.<br />
Der aufgenommene Ton ist gestört.<br />
In der Nähe des Headsets (vor allem des Mikrofons) befinden sich elektrische<br />
Leitungen, Leuchtstoffröhren oder Mobiltelefone.<br />
Entfernen Sie sich von allen möglichen Quellen elektromagnetischer Interferenzen.<br />
Der aufgenommene Ton ist verzerrt.<br />
Die Mikrofonlautstärke ist am Computer zu hoch eingestellt.<br />
Verringern Sie die Mikrofonlautstärke am Computer.<br />
Die Taste MIC MUTING funktioniert nicht.<br />
Der Stummschaltmodus (MUTING) kann nicht mit der Taste MIC MUTING<br />
aufgehoben werden, wenn er am Computer aktiviert wurde.<br />
Deaktivieren Sie die Stummschaltung am Computer.<br />
Einzelheiten zum Betrieb des Computers finden Sie in der Bedienungsanleitung zum<br />
Computer.<br />
Manche Probleme lassen sich anhand der Erläuterungen unter „Störungsbehebung“ nicht<br />
beheben. Wenden Sie sich in diesem Fall an den nächsten <strong>Sony</strong>-Händler.<br />
Español<br />
Auriculares stereo<br />
ADVERTENCIA<br />
Para evitar el riesgo de incendios o descargas eléctricas, no exponga la<br />
unidad a la lluvia ni a la humedad.<br />
Para evitar el riesgo de incendios o descargas eléctricas, no coloque sobre el aparato<br />
objetos que contengan líquidos como, por ejemplo, un jarrón.<br />
Para evitar descargas eléctricas, no abra la unidad. En caso de avería, solicite los servicios<br />
de personal cualificado.<br />
Marca CE<br />
La validez de la marca CE se limita únicamente a aquellos países en los que la legislación<br />
la impone, especialmente los países de la EEA (Espacio económico europeo).<br />
Tratamiento de los equipos eléctricos y electrónicos al final<br />
de su vida útil (aplicable en la Unión Europea y en países<br />
europeos con sistemas de recogida selectiva de residuos)<br />
Este símbolo en el equipo o el embalaje indica que el presente producto no<br />
puede ser tratado como residuos domésticos normales, sino que debe<br />
entregarse en el correspondiente punto de recogida de equipos eléctricos y<br />
electrónicos. Al asegurarse de que este producto se desecha correctamente, Ud. ayuda a<br />
prevenir las consecuencias negativas para el medio ambiente y la salud humana que<br />
podrían derivarse de la incorrecta manipulación en el momento de deshacerse de este<br />
producto. El reciclaje de materiales ayuda a conservar los recursos naturales. Para recibir<br />
información detallada sobre el reciclaje de este producto, póngase en contacto con el<br />
ayuntamiento, el punto de recogida más cercano o el establecimiento donde ha adquirido<br />
el producto.<br />
Aviso para los clientes: la información siguiente resulta de aplicación<br />
solo a los equipos comercializados en países afectados por las<br />
directivas de la UE<br />
El fabricante de este producto es <strong>Sony</strong> Corporation, 1-7-1 Konan Minato-ku Tokyo, 108-<br />
0075 Japón. El representante autorizado para EMC y seguridad en el producto es <strong>Sony</strong><br />
Deutschland GmbH, Hedelfinger Strasse 61, 70327 Stuttgart, Alemania. Para cualquier<br />
asunto relacionado con servicio o garantía por favor diríjase a la dirección indicada en los<br />
documentos de servicio o garantía adjuntados con el producto.<br />
Microsoft y Windows son marcas comerciales registradas o marcas comerciales de<br />
Microsoft Corporation en los Estados Unidos y otros países.<br />
Macintosh y Mac OS son marcas comerciales registradas de Apple Inc. en los Estados<br />
Unidos y otros países.<br />
IBM y PC/AT son marcas comerciales y marcas comerciales registradas de<br />
International Business Machines Corporation.<br />
Pentium es una marca comercial o marca comercial registrada de Intel Corporation.<br />
“WALKMAN” y el logotipo de “WALKMAN” son marcas comerciales registradas de<br />
<strong>Sony</strong> Corporation.<br />
Skype es una marca comercial de Skype Limited.<br />
En este manual, el término Windows 2000 se utilize para indicar Windows ® 2000<br />
Professional.<br />
En este manual, el término Windows XP se utiliza para indicar Windows ® XP Home<br />
Edition, Windows ® XP Professional y Windows ® XP Media Center Edition.<br />
En este manual, el término Windows Vista se utiliza para indicar Windows Vista ® .<br />
En este manual, el término Windows 7 se utiliza para indicar Windows ® 7 Edition.<br />
En este manual, el término Macintosh se utiliza para indicar Macintosh ® .<br />
Todos los demás nombres de sistemas y productos son marcas comerciales o marcas<br />
comerciales registradas de sus respectivos propietarios. Las marcas y ® se omiten en<br />
este manual.<br />
Es posible que los términos referentes a pantallas del ordenador que se muestran en este<br />
manual difieran de los términos reales.<br />
¡Bienvenido!<br />
Gracias por la adquisición de los auriculares estéreo <strong>DR</strong>-<strong>350USB</strong> de <strong>Sony</strong>. Antes de<br />
utilizarlos, lea atentamente este manual y consérvelo para consultarlo en el futuro.<br />
Características principales:<br />
Auriculares de ordenador ideales para mantener conversaciones de voz, jugar a juegos<br />
de ordenador y escuchar música.<br />
Micrófono de alta sensibilidad incorporado y, además, VOICE TUBE extraíble para<br />
obtener comunicaciones de calidad superior.<br />
Almohadillas para auriculares de diseño inteligente que ejercen poca presión, para<br />
llevarlos con comodidad durante largos períodos de tiempo.<br />
Práctico doble uso: miniclavija y USB.<br />
Fáciles de utilizar mediante las funciones de la Caja de audio USB como, por ejemplo, el<br />
control de volumen y el silenciamiento de los micrófonos.<br />
Especificaciones<br />
Auriculares estéreo <strong>DR</strong>-350<br />
Cable<br />
1,2 m<br />
Clavija<br />
Miniclavija estéreo dorada (para auriculares)<br />
Miniclavija dorada (para micrófono)<br />
Masa<br />
Aprox. 110 g (sin cable)<br />
Auriculares<br />
Tipo<br />
Abiertos, dinámicos<br />
Unidad auricular<br />
30 mm, tipo cúpula (CCAW adoptado)<br />
Capacidad de potencia 1.000 mW (IEC* 1 )<br />
Impedancia<br />
24 Ω a 1 kHz<br />
Sensibilidad<br />
100 dB/mW<br />
Respuesta en frecuencia<br />
14 - 22.000 Hz<br />
Micrófono<br />
Diseño<br />
Micrófono incorporado<br />
Tipo<br />
Condensador de electreto<br />
Nivel de tensión del circuito abierto<br />
-38 dB (0 dB = 1 V/Pa)<br />
Gama de frecuencias efectivas<br />
20 - 10.000 Hz<br />
Caja de audio USB UAB-350<br />
Gama de frecuencias<br />
20 - 20.000 Hz (auriculares)<br />
200 - 10.000 Hz (micrófono)<br />
Tomas de entrada y salida<br />
Salida de auriculares (minitoma/estéreo)<br />
Impedancia de carga: 24 Ω<br />
Entrada de micrófono (minitoma/monoaural)<br />
Sistema de alimentación por enchufe<br />
Toma USB exclusiva<br />
Fuente de alimentación Compatible con alimentación mediante bus USB (5 V,<br />
100 mA)<br />
Dimensiones (excluyendo partes salientes)<br />
Aprox. 31 × 16 × 73 mm (an/al/prf)<br />
Masa<br />
Aprox. 25 g<br />
Entorno operativo<br />
Ordenadores compatibles:<br />
IBM PC/AT u ordenadores compatibles<br />
Apple Macintosh<br />
Sistemas operativos compatibles:<br />
Windows 7<br />
Starter/Home Basic/Home Premium/Professional/<br />
Ultimate<br />
Windows Vista<br />
Home Basic/Home Premium/Business/Ultimate<br />
Windows XP<br />
Home Edition (SP2 o posterior)/Professional (SP2 o<br />
posterior)/Media Center Edition 2004 (SP2 o<br />
posterior)/ Media Center Edition 2005 (SP2 o<br />
posterior)<br />
Windows 2000<br />
Professional (SP4)<br />
Mac OS X (10.3 o posterior)<br />
CPU: Procesador Pentium II a 266 MHz o superior<br />
Puerto USB* 2<br />
Accesorios suministrados Cable USB exclusivo (1)<br />
VOICE TUBE (1)<br />
Manual de instrucciones (1)<br />
No se garantiza que los auriculares sean compatibles con todos los ordenadores del<br />
entorno operativo mencionado anteriormente.<br />
No se garantiza que los auriculares sean compatibles con ordenadores y sistemas<br />
operativos que el usuario ha actualizado ni con ordenadores con varios sistemas<br />
operativos.<br />
No se garantiza que los auriculares sean compatibles con algunas funciones del<br />
ordenador, como la suspensión, el reposo o la hibernación del sistema.<br />
* 1 Probado por IEC (International Electronic Committee).<br />
* 2 La Caja de audio USB admite USB 2.0 (USB 2.0 Full Speed).<br />
El diseño y las especificaciones están sujetos a cambios sin previo aviso.<br />
Identificación de los componentes<br />
Auriculares <strong>DR</strong>-350 (consulte la figura )<br />
Almohadilla para auricular (derecho)<br />
Almohadilla para auricular (izquierdo)<br />
Micrófono<br />
VOICE TUBE<br />
Coloque el VOICE TUBE en los auriculares.<br />
Caja de audio USB UAB-350 (consulte la figura )<br />
Botón PHONE VOLUME +* / - (auriculares)<br />
Permite ajustar el nivel de volumen de los auriculares.<br />
Botón MIC MUTING<br />
(luz apagada) OFF: el micrófono se ha ajustado en modo MUTING OFF.<br />
(luz encendida) MUTING: el micrófono se ha ajustado en modo MUTING ON.<br />
Componentes de conexión de la Caja de audio USB (consulte la figura )<br />
Toma de auriculares<br />
Toma de micrófono* (sistema de alimentación por enchufe)<br />
<br />
Toma USB exclusiva<br />
* La Caja de audio USB dispone de un punto táctil para facilitar el reconocimiento.<br />
Paso 1: Conexión<br />
Conecte la Caja de audio USB al ordenador mediante el cable USB exclusivo suministrado<br />
(consulte la figura ).<br />
Notas<br />
Los auriculares son compatibles con la versión USB 2.0 (USB 2.0 Full Speed).<br />
No se garantiza que los auriculares funcionen con un concentrador USB o con un cable<br />
prolongador USB. Utilice solamente el cable USB exclusivo suministrado.<br />
Cuando los auriculares están conectados al ordenador, es posible que el nivel de<br />
volumen del ordenador se ajuste al máximo. Baje el volumen del ordenador de<br />
antemano.<br />
Cuando utilice la Caja de audio USB, el ordenador no emitirá las voces de las<br />
transmisiones digitales. Para escuchar dichas voces, conecte los auriculares al<br />
ordenador directamente sin utilizar la Caja de audio USB.<br />
Paso 2: Instalación del controlador USB<br />
Los sistemas operativos Windows 2000, Windows XP, Windows Vista, Windows 7 y<br />
Macintosh incluyen controladores USB. Los controladores USB se instalarán la primera<br />
vez que se conecte el sistema al ordenador. Siga las instrucciones en pantalla para<br />
proceder con la instalación. Para obtener más información, consulte el manual de<br />
instrucciones del ordenador.<br />
Nota<br />
Si realiza la conexión a distintos puertos USB, es posible que deba instalar controladores<br />
USB.<br />
Para Windows 2000/Windows XP<br />
Al conectar el sistema al ordenador, se inicia automáticamente la instalación del USB<br />
Composite Device, el USB Human Interface Device y el USB Audio Device.<br />
Para Windows Vista/Windows 7<br />
Al conectar el sistema al ordenador, se inicia automáticamente la instalación del USB<br />
Composite Device, el USB Human Interface Device y el UAB-350.<br />
Para Macintosh<br />
Al conectar el sistema al ordenador, se inicia automáticamente la instalación del UAB-<br />
350.<br />
Paso 3: Ajuste para reproducir un CD de música<br />
Este ajuste es necesario si reproduce un CD de música en la unidad de CD-ROM.<br />
Lleve a cabo los siguientes pasos correspondientes al sistema operativo de su ordenador y<br />
haga clic en la casilla de verificación [Habilitar audio digital de CD para este<br />
dispositivo de CD-ROM]. Para Windows Vista, Windows 7 y Macintosh, el ajuste para<br />
reproducir un CD de música no es necesario.<br />
Para Windows 2000<br />
Haga clic en el menú [Inicio] y seleccione [Configuración], [Panel de control],<br />
[Sonidos y multimedia], y la ficha [Hardware]. Seleccione la unidad de CD-ROM<br />
donde desea reproducir la música, haga clic en [Propiedades] y, a continuación, haga clic<br />
de nuevo en la ficha [Propiedades]. Haga clic en la casilla de verificación [Habilitar<br />
audio digital de CD para este dispositivo de CD-ROM].<br />
Para Windows XP<br />
Haga clic en el menú [Inicio] y seleccione [Panel de control], [Dispositivos de sonido,<br />
audio y voz], [Dispositivos de sonido y audio], y la ficha [Hardware]. Seleccione la<br />
unidad de CD-ROM donde desea reproducir la música, haga clic en [Propiedades] y, a<br />
continuación, haga clic de nuevo en la ficha [Propiedades] . Haga clic en la casilla de<br />
verificación [Habilitar audio digital de CD para este dispositivo de CD-ROM].<br />
Utilización de la unidad<br />
1 Acople el VOICE TUBE a los auriculares, con el logotipo de <strong>Sony</strong> orientado<br />
hacia fuera (consulte la figura ).<br />
El VOICE TUBE permite que el micrófono capte la voz de manera más efectiva.<br />
2 Conecte la clavija de los auriculares (negra) a la toma de auriculares y conecte<br />
la clavija del micrófono (rosa) a la toma micrófono (consulte la figura ).<br />
UAB-350 está diseñado sólo para auriculares (<strong>DR</strong>-350). Si se conecta otro tipo de<br />
auricular a la Caja de audio USB, es posible que se produzca un fallo de<br />
funcionamiento.<br />
3 Ajuste la diadema de los auriculares y, a continuación, coloque la almohadilla<br />
para auricular marcada con en la oreja derecha y la marcada con en la<br />
oreja izquierda.<br />
Hay un punto táctil en la unidad marcado con una para diferenciar el lado<br />
izquierdo (consulte la figura ).<br />
Ajuste del nivel de volumen del micrófono<br />
Compruebe y ajuste el nivel de volumen del micrófono mediante el ordenador. Lleve a<br />
cabo los siguientes pasos correspondientes al sistema operativo de su ordenador y<br />
compruebe o ajuste el nivel de volumen.<br />
Para obtener más información sobre el funcionamiento del ordenador, consulte el manual<br />
de instrucciones suministrado con este.<br />
Para Windows<br />
Para Windows 2000<br />
Haga clic en el menú [Inicio], seleccione [Programas], [Accesorios],<br />
[Entretenimiento], [Grabadora de sonidos]. Compruebe el nivel de volumen después<br />
de grabar con la [Grabadora de sonidos]. Si el nivel de volumen es demasiado alto o<br />
demasiado bajo, haga clic en el menú [Inicio] y seleccione [Configuración], [Panel de<br />
control], [Sonidos y multimedia] y la ficha [Audio]. Compruebe que [Dispositivo<br />
preferido] del menú Grabación de sonido se ha ajustado en [UAB-350] y, a<br />
continuación, haga clic en [Volumen] del menú Grabación de sonido y ajuste el nivel<br />
de entrada del micrófono.<br />
Para Windows XP<br />
Haga clic en el menú [Inicio], seleccione [Todos los programas], [Accesorios],<br />
[Entretenimiento] y [Grabadora de sonidos]. Compruebe el nivel de volumen después<br />
de grabar con la [Grabadora de sonidos]. Si el nivel de volumen es demasiado alto o<br />
demasiado bajo, haga clic en el menú [Inicio] y seleccione [Panel de control],<br />
[Dispositivos de sonido, audio y voz], [Dispositivos de sonido y audio] y la ficha<br />
[Audio]. Compruebe que [Dispositivo predeterminado] del menú Grabación de<br />
sonido se ha ajustado en [UAB- 350] y, a continuación, haga clic en [Volumen] del<br />
menú Grabación de sonido y ajuste el nivel de entrada del micrófono.<br />
Para Windows Vista<br />
Haga clic en el menú [Inicio], seleccione [Todos los programas], [Accesorios],<br />
[Grabadora de sonidos]. Grabe con la [Grabadora de sonidos]. Haga clic en el menú<br />
[Inicio] y seleccione [Panel de control], [Hardware y sonido], [Sonido], la ficha<br />
[Grabar] y, a continuación, seleccione [UAB-350] en el dispositivo de grabación y haga<br />
clic en [Predeterminar]. Vuelva a seleccionar [UAB-350], haga clic en [Propiedades],<br />
seleccione la ficha [Niveles] y ajuste el nivel de entrada del micrófono.<br />
Para Windows 7<br />
Haga clic en el menú [Inicio], seleccione [Todos los programas], [Accesorios],<br />
[Grabadora de sonidos]. Grabe con la [Grabadora de sonidos]. Haga clic en el menú<br />
[Inicio] y seleccione [Panel de control], [Hardware y sonido], [Sonido], la ficha<br />
[Grabar] y, a continuación, seleccione [UAB-350] en el dispositivo de grabación y haga<br />
clic en [Predeterminar]. Vuelva a seleccionar [UAB-350], haga clic en [Propiedades],<br />
seleccione la ficha [Niveles] y ajuste el nivel de entrada del micrófono.<br />
Para Macintosh<br />
Haga clic en el menú [Apple], seleccione [Preferencias del Sistema], [Sonido] y la<br />
ficha [Entrada] y ajuste el nivel de entrada del micrófono.<br />
Notas<br />
El micrófono no admite la función de silenciamiento para el dispositivo de grabación<br />
de audio del ordenador. Si desea silenciar el micrófono, pulse el botón MIC MUTING<br />
para ajustar la Caja de audio USB en modo MUTING OFF.<br />
Es posible que sea necesario realizar algunos ajustes en función del software. Para<br />
obtener más información, consulte el manual de instrucciones del software.<br />
Utilización independiente de los auriculares<br />
Es posible utilizar los auriculares sin la Caja de audio USB.<br />
Conecte la clavija de los auriculares (negra) a la toma de auriculares del ordenador y la<br />
clavija del micrófono (rosa) a la toma del micrófono (consulte la figura ).<br />
Notas<br />
Cuando conecte los auriculares al ordenador directamente, estos auriculares no<br />
funcionarán con Apple Macintosh ni con Mac OS.<br />
Cuando controle el volumen de los auriculares, ajústelo en el ordenador.<br />
Cuando no utilice la clavija del micrófono<br />
Cuando se escucha música a través de un Walkman o similar, pero no se utiliza el<br />
micrófono, es posible insertar el conector del micrófono en el compartimiento para<br />
conectores colocado en el conector de los auriculares, a fin de que no se balancee<br />
(consulte la figura ).<br />
Cuando no utilice el VOICE TUBE<br />
Cuando guarde el VOICE TUBE, puede acoplarlo a los auriculares para evitar perderlo<br />
(consulte la figura ).<br />
Inserte la sección convexa del cable en el orificio del VOICE TUBE.<br />
Gire el VOICE TUBE 90 grados para fijarlo en su sitio con seguridad.<br />
Precauciones<br />
Seguridad<br />
UAB-350 está diseñado sólo para auriculares (<strong>DR</strong>-350). Si se conecta otro tipo de<br />
auricular a la Caja de audio USB, es posible que se produzca un fallo de<br />
funcionamiento.<br />
Si utiliza los auriculares a un volumen alto, puede dañar sus oídos. Por razones de<br />
seguridad vial, no los utilice mientras conduzca o vaya en bicicleta.<br />
Asegúrese de no utilizar los auriculares a un nivel de volumen demasiado alto. De lo<br />
contrario, es posible que se produzca una reacción acústica (un efecto de zumbido)<br />
debido a que el micrófono recibe el sonido de fuerte volumen de la unidad de<br />
auriculares.<br />
No deje que los auriculares se caigan o reciban golpes, ya que esto podría afectar a su<br />
funcionamiento.<br />
No desmonte ni intente abrir ninguno de los componentes del sistema.<br />
Cuando desconecte la unidad de los conectores o las tomas, hágalo agarrando la clavija<br />
del cable USB exclusivo o del cable de los auriculares.<br />
Cuando termine de utilizar los auriculares con el cable USB exclusivo o el cable de los<br />
auriculares, desconecte dicho cable USB del ordenador si no va a utilizar los auriculares<br />
durante un período de tiempo prolongado.<br />
No utilice alcohol, bencina ni disolventes para limpiar la unidad.<br />
Es posible que el sonido de los auriculares se interrumpa en función de las condiciones<br />
de comunicación de la red.<br />
No coloque ningún peso ni ejerza presión alguna sobre los auriculares, especialmente<br />
sobre el VOICE TUBE, ya que podría provocar que los auriculares se deformaran<br />
durante los largos períodos de almacenamiento.<br />
No limpie el VOICE TUBE antes de extraerlo de los auriculares. Si lo hiciera, podría<br />
dañar el VOICE TUBE.<br />
Tenga en cuenta los siguientes consejos relacionados con la ubicación para evitar<br />
fallos de funcionamiento.<br />
No deje el sistema cerca de fuentes de calor, receptores de radio o televisión, ni en<br />
lugares expuestos a la luz solar directa, polvo excesivo, humedad, lluvia o golpes.<br />
No deje el sistema en el baño u otros lugares con mucha humedad.<br />
Aunque este sistema está magnéticamente protegido, no deje cintas grabadas, relojes,<br />
tarjetas de crédito o disquetes que utilicen codificación magnética delante de la unidad<br />
durante un período prolongado de tiempo.<br />
Acerca del uso de los auriculares<br />
Respeto por los demás<br />
Cuando el volumen es demasiado alto, el sonido se emite fuera de los auriculares. Tenga<br />
cuidado de no subir demasiado el volumen, ya que podría molestar a las personas que se<br />
encuentran a su alrededor. Cuando se utilizan los auriculares en lugares con mucho ruido,<br />
la tendencia es subir el volumen. Sin embargo, el volumen debe mantenerse en un nivel<br />
que le permita oír cuando alguien le llama mientras escucha música con los auriculares.<br />
Acerca de las almohadillas para auriculares<br />
Las almohadillas para auriculares pueden sustituirse. Sustitúyalas cuando estén<br />
deterioradas. Consulte a su distribuidor <strong>Sony</strong> más cercano para conocer el procedimiento<br />
a seguir.<br />
Si tiene preguntas o problemas referentes al sistema y no encuentra la solución en este<br />
manual, póngase en contacto con su distribuidor <strong>Sony</strong> más cercano.<br />
Solución de problemas<br />
El sonido de los auriculares es bajo.<br />
La clavija de los auriculares no se ha conectado correctamente a la toma.<br />
Conéctela correctamente.<br />
El control de volumen del ordenador o el nivel de volumen del software de<br />
reproducción de música se ha ajustado bajo.<br />
Ajuste el control de volumen.<br />
Suba el nivel de volumen del software de reproducción de música.<br />
No se oye ningún sonido a través de los auriculares.<br />
El cable USB exclusivo no está conectado al ordenador.<br />
Conecte el cable USB exclusivo al ordenador.<br />
La clavija de los auriculares no está conectada a la toma de auriculares.<br />
Conéctela a la toma de auriculares.<br />
El sistema se ha conectado mientras se reproducía el software de música.<br />
Detenga la reproducción del software de música y empiece de nuevo.<br />
El dispositivo de reproducción de audio del ordenador no se ha ajustado<br />
correctamente.<br />
Para Windows 2000<br />
Haga clic en el menú [Inicio] y seleccione [Configuración], [Panel de control],<br />
[Sonidos y multimedia], la ficha [Audio] y, a continuación, seleccione [UAB-350]<br />
para [Dispositivo preferido] en el menú Reproducción de sonido.<br />
Para Windows XP<br />
Haga clic en el menú [Inicio], seleccione [Panel de control], [Dispositivos de<br />
sonido, audio y voz], [Dispositivos de sonido y audio], la ficha [Audio] y, a<br />
continuación, seleccione [UAB-350] para [Dispositivo predeterminado] en el<br />
menú Reproducción de sonido.<br />
Para Windows Vista<br />
Haga clic en el menú [Inicio], seleccione [Panel de control], [Hardware y sonido],<br />
[Sonido] y la ficha [Reproducción], seleccione [UAB-350] para el dispositivo de<br />
reproducción y, a continuación, haga clic en [Predeterminar].<br />
Para Windows 7<br />
Haga clic en el menú [Inicio], seleccione [Panel de control], [Hardware y sonido],<br />
[Sonido] y la ficha [Reproducción], seleccione [UAB-350] para el dispositivo de<br />
reproducción y, a continuación, haga clic en [Predeterminar].<br />
Para Macintosh<br />
Haga clic en el menú [Apple], seleccione [Preferencias del Sistema], [Sonido], la<br />
ficha [Salida] y, a continuación, seleccione [UAB-350] para [Seleccione un<br />
dispositivo para la salida de sonido].<br />
El control de volumen del ordenador o el software de reproducción de música, etc., se<br />
ha ajustado en silenciar.<br />
Desactive el ajuste de silenciar.<br />
El ordenador no reconoce los auriculares como dispositivo USB.<br />
Reinicie el ordenador.<br />
La unidad de CD-ROM del ordenador no dispone de la función de reproducción<br />
digital de WDM.<br />
Utilice una unidad de CD-ROM que disponga de esta función de WDM.<br />
El sonido se interrumpe.<br />
La CPU del ordenador está sobrecargada.<br />
Cierre las demás aplicaciones.<br />
Hay otros dispositivos USB conectados al ordenador que se utilizan simultáneamente.<br />
Desactive los otros dispositivos USB.<br />
No es posible grabar el sonido que se emite a través del micrófono.<br />
La clavija del micrófono no está conectada a la toma de micrófono.<br />
Conéctela a la toma de micrófono.<br />
El botón MIC MUTING se ha ajustado en el modo de silencio (MUTING).<br />
Ajuste el botón MIC MUTING en OFF.<br />
El dispositivo de grabación de audio del ordenador no se ha ajustado correctamente.<br />
Para Windows 2000<br />
Haga clic en el menú [Inicio] y seleccione [Configuración], [Panel de control],<br />
[Sonidos y multimedia], la ficha [Audio] y, a continuación, seleccione [UAB-350]<br />
para [Dispositivo preferido] en el menú Grabación de sonido.<br />
Para Windows XP<br />
Haga clic en el menú [Inicio], seleccione [Panel de control], [Dispositivos de<br />
sonido, audio y voz], [Dispositivos de sonido y audio], la ficha [Audio] y, a<br />
continuación, seleccione [UAB-350] para [Dispositivo predeterminado] en el<br />
menú Grabación de sonido.<br />
Para Windows Vista<br />
Haga clic en el menú [Inicio], seleccione [Panel de control], [Hardware y sonido],<br />
[Sonido] y la ficha [Grabar], seleccione [UAB-350] para el dispositivo de<br />
reproducción y, a continuación, haga clic en [Predeterminar].<br />
Para Windows 7<br />
Haga clic en el menú [Inicio], seleccione [Panel de control], [Hardware y sonido],<br />
[Sonido] y la ficha [Grabar], seleccione [UAB-350] para el dispositivo de<br />
reproducción y, a continuación, haga clic en [Predeterminar].<br />
Para Macintosh<br />
Haga clic en el menú [Apple], seleccione [Preferencias del Sistema], [Sonido], la<br />
ficha [Entrada] y, a continuación, seleccione [UAB-350] para [Seleccione un<br />
dispositivo para la entrada de sonido].<br />
El sonido grabado es demasiado bajo.<br />
La clavija del micrófono no se ha conectado correctamente a la toma de micrófono.<br />
Conéctela correctamente.<br />
El VOICE TUBE no está fijado a los auriculares.<br />
Fije el VOICE TUBE a los auriculares.<br />
El nivel de volumen del micrófono se ha ajustado demasiado bajo en el ordenador.<br />
Suba el nivel de volumen del micrófono en el ordenador.<br />
El sonido grabado presenta ruido.<br />
Cerca de los auriculares y, especialmente, cerca del micrófono, hay cables eléctricos,<br />
lámparas fluorescentes o teléfonos móviles.<br />
Aléjese de cualquier posible fuente de interferencias electromagnéticas.<br />
El sonido grabado está distorsionado.<br />
El nivel de volumen del micrófono se ha ajustado demasiado alto en el ordenador.<br />
Baje el nivel de volumen del micrófono en el ordenador.<br />
El botón MIC MUTING no funciona.<br />
No es posible desactivar el ajuste del modo MUTING (silenciamiento) mediante el<br />
botón MIC MUTING si se está ajustando el ordenador.<br />
Desactive el ajuste de silencio del ordenador.<br />
Para obtener más información sobre el funcionamiento del ordenador, consulte el manual<br />
de instrucciones suministrado con este.<br />
El apartado “Solución de problemas” no puede resolver todas las averías. En tal caso,<br />
póngase en contacto con su proveedor <strong>Sony</strong> más cercano.


