

Samsung Objectif NX 50-200 mm III f/4-5,6 OIS Noir (EX-T50200CSB ) - Manuel de l'utilisateur 0.01MB, pdf, Anglais, Français
Samsung Objectif NX 50-200 mm III f/4-5,6 OIS Noir (EX-T50200CSB ) - Manuel de l'utilisateur 0.01MB, pdf, Anglais, Français
Samsung Objectif NX 50-200 mm III f/4-5,6 OIS Noir (EX-T50200CSB ) - Manuel de l'utilisateur 0.01MB, pdf, Anglais, Français

You also want an ePaper? Increase the reach of your titles
YUMPU automatically turns print PDFs into web optimized ePapers that Google loves.
User<br />
Manual<br />
SAMSUNG 18-55<strong>mm</strong> F3.5-5.6 <strong>OIS</strong> <strong>III</strong><br />
SAMSUNG 12-24<strong>mm</strong> F4-5.6 ED<br />
SAMSUNG <strong>50</strong>-<strong>200</strong><strong>mm</strong> F4-5.6 ED <strong>OIS</strong> <strong>III</strong><br />
ENG / SPA / FRE<br />
This User Manual has been specially <strong>de</strong>signed to gui<strong>de</strong> you through the basic functions and features of your <strong>de</strong>vice.<br />
Please read the User Manual carefully to ensure safe and correct use.<br />
A<br />
3<br />
4<br />
5<br />
C<br />
E<br />
1<br />
2<br />
7<br />
6<br />
8<br />
B<br />
D<br />
F<br />
AD68-08097A (1.3)<br />
2<br />
1<br />
English<br />
Before Using This Device<br />
Thank you for purchasing the <strong>Samsung</strong> Lens. The illustrations in this<br />
manual are based on the SAMSUNG 18-55<strong>mm</strong> F3.5-5.6 <strong>OIS</strong> <strong>III</strong>.<br />
The illustrations used in this manual may differ from the actual items.<br />
Some functions <strong>de</strong>scribed in this manual may not be available <strong>de</strong>pending<br />
on the camera mo<strong>de</strong>l. Update the firmware of the camera body and lens.<br />
Visit www.samsung.com to download the firmware.<br />
Unpacking<br />
Lens, Lens cap, Lens mount cover, Hood, Case, User manual<br />
• Optional Item: Filter<br />
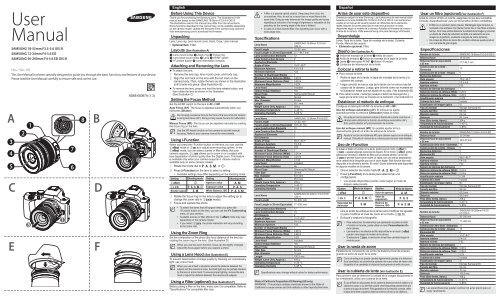
Layouts (See illustration A)<br />
1 Lens mount in<strong>de</strong>x 2 Zoom ring 3 Focus ring<br />
4 Lens hood mount in<strong>de</strong>x 5 Lens 6 AF/MF switch<br />
7 i-Function button 8 Lens information contacts<br />
Attaching and Removing the Lens<br />
► To attach the lens,<br />
1 Remove the lens cap, lens mount cover, and body cap.<br />
2 Align the red mark on the lens with the red mark on the<br />
camera body. Then, rotate the lens as shown in the illustration<br />
until it locks into place. (See illustration B)<br />
► To remove the lens, press and hold the lens release button, and<br />
then rotate the lens as shown in the illustration.<br />
(See illustration C)<br />
Setting the Focus Method<br />
Set the AF/MF switch on the lens to AF or MF.<br />
Auto Focus (AF): The focus is adjusted automatically when you<br />
half-press [Shutter].<br />
Do not apply excessive force to the front of the lens while the camera<br />
is using auto focus (AF). Doing so may cause the lens to malfunction.<br />
Manual Focus (MF): The focus can be adjusted manually by rotating<br />
the focus ring on the lens.<br />
Use the MF Assist function on the camera to aid with manual<br />
focusing. Refer to your camera manual for more <strong>de</strong>tails.<br />
Using i-Function<br />
When you press the i-Function button on the lens, you can use the<br />
E mo<strong>de</strong> or Z or adjust some shooting options. In the<br />
E mo<strong>de</strong>, you can select scenes or filter effects that your<br />
camera supports. Z allows you to zoom in on a subject with<br />
less <strong>de</strong>gradation of photo quality than the Digital zoom. This feature<br />
is available only when your camera supports it. i-Scene mo<strong>de</strong> is<br />
available only on some camera mo<strong>de</strong>ls.<br />
1 Rotate the mo<strong>de</strong> dial to P, A, S, M, or i.<br />
2 Press [i-Function] on the lens to select a setting.<br />
• Available settings may differ <strong>de</strong>pending on the shooting mo<strong>de</strong>.<br />
Setting Shooting mo<strong>de</strong> Setting Shooting mo<strong>de</strong><br />
E i Aperture value A, M<br />
Z P, A, S, M, i Exposure value P, A, S<br />
Shutter speed S, M White Balance, ISO P, A, S, M<br />
3 Rotate the focus ring on the lens to adjust the setting (or to<br />
change the zoom rate in Z mo<strong>de</strong>).<br />
4 Focus and capture the photo.<br />
• To select the items that will appear when you press the<br />
i-Function button on the lens, you can use the iFn Customizing<br />
menu on your camera.<br />
• Available scenes or filter effects in the E mo<strong>de</strong> may vary<br />
<strong>de</strong>pending on the camera mo<strong>de</strong>l.<br />
• If you select Z, the photo resolution will vary according<br />
to the zoom rate.<br />
Using the Zoom Ring<br />
Set the composition of the photo (the focal distance of the lens) by<br />
rotating the zoom ring on the lens. (See illustration D)<br />
When you use the zoom function, focus can be slightly changed.<br />
Adjust the focus again before you capture a photo.<br />
Using a Lens Hood (See illustration E)<br />
To prevent <strong>de</strong>terioration of image quality by blocking out unnecessary<br />
light, use a lens hood.<br />
When you use a flash in situations where the distance between the<br />
subject and the camera is close, the flash light may be partially blocked<br />
by the lens or a lens hood. To ensure proper lighting, remove the lens<br />
hood or adjust the distance between the camera and subjects.<br />
Using a Filter (optional) (See illustration F)<br />
Before putting a filter on the lens, make sure it is compatible. Refer to<br />
"Specifications" for compatible filter size.<br />
• A filter is a precise optical product. Keep away from dust, dirt,<br />
or scratches. Also, do not try to mount two or more filters at the<br />
same time. Doing so may <strong>de</strong>teriorate the image quality and cause<br />
vignetting (a reduction of an image’s brightness or saturation at the<br />
periphery as the viewing angle of the lens is hid<strong>de</strong>n).<br />
• In case of a thick framed filter, the vignetting can occur with a<br />
wi<strong>de</strong>-angle lens.<br />
Specifications<br />
Lens Name<br />
SAMSUNG 18-55<strong>mm</strong> F3.5-5.6<br />
<strong>OIS</strong> <strong>III</strong><br />
Focal Length<br />
18–55 <strong>mm</strong><br />
Focal Length in 35 <strong>mm</strong> Equivalent 27.7–84.7 <strong>mm</strong><br />
Lens Construction-Elements 12<br />
Lens Construction-Groups 9<br />
Aspherical Elements 1<br />
Angle of View 75.9°–28.7°<br />
Maximum Aperture<br />
F3.5–5.6<br />
Minimum Aperture<br />
F22<br />
Number of Diaphragm Bla<strong>de</strong>s 7<br />
Minimum Focus Distance (Wi<strong>de</strong>) 0.28 m<br />
Minimum Focus Distance (Tele) 0.28 m<br />
Maximum Magnification 0.22X<br />
Lens Hood<br />
Inclu<strong>de</strong>d<br />
Optical Image Stabilizer<br />
Yes<br />
Mount Type<br />
<strong>Samsung</strong> <strong>NX</strong> Mount<br />
Filter Size<br />
58 <strong>mm</strong><br />
Max. Diameter<br />
63 <strong>mm</strong><br />
Length<br />
65.1 <strong>mm</strong><br />
Weight (Lens Only, Approx.) 204 g<br />
Operating Temperature 0–40 °C<br />
Operating Humidity 5–85 %<br />
Lens Name<br />
SAMSUNG 12-24<strong>mm</strong> F4-5.6 ED<br />
Focal Length<br />
12–24 <strong>mm</strong><br />
Focal Length in 35 <strong>mm</strong> Equivalent 18.5–37 <strong>mm</strong><br />
Lens Construction-Elements 10<br />
Lens Construction-Groups 8<br />
Aspherical Elements 2<br />
ED Elements 1<br />
Angle of View 99.0°–60.7°<br />
Maximum Aperture<br />
F4–5.6<br />
Minimum Aperture<br />
F22<br />
Number of Diaphragm Bla<strong>de</strong>s 7<br />
Minimum Focus Distance (Wi<strong>de</strong>) 0.24 m<br />
Minimum Focus Distance (Tele) 0.24 m<br />
Maximum Magnification 0.14X<br />
Lens Hood<br />
Inclu<strong>de</strong>d<br />
Optical Image Stabilizer<br />
No<br />
Mount Type<br />
<strong>Samsung</strong> <strong>NX</strong> Mount<br />
Filter Size<br />
58 <strong>mm</strong><br />
Max. Diameter<br />
63.5 <strong>mm</strong><br />
Length<br />
65.5 <strong>mm</strong><br />
Weight (Lens Only, Approx.) 208 g<br />
Operating Temperature 0–40 °C<br />
Operating Humidity 5–85 %<br />
Lens Name<br />
Focal Length<br />
Focal Length in 35 <strong>mm</strong> Equivalent 77–308 <strong>mm</strong><br />
SAMSUNG <strong>50</strong>-<strong>200</strong><strong>mm</strong> F4-5.6 ED<br />
<strong>OIS</strong> <strong>III</strong><br />
<strong>50</strong>–<strong>200</strong> <strong>mm</strong><br />
Lens Construction-Elements 17<br />
Lens Construction-Groups 13<br />
ED Elements 2<br />
Angle of View 31.4°–8.0°<br />
Maximum Aperture<br />
F4–5.6<br />
Minimum Aperture<br />
F22<br />
Number of Diaphragm Bla<strong>de</strong>s 7<br />
Minimum Focus Distance (Wi<strong>de</strong>) 0.98 m<br />
Minimum Focus Distance (Tele) 0.98 m<br />
Maximum Magnification 0.2X<br />
Lens Hood<br />
Inclu<strong>de</strong>d<br />
Optical Image Stabilizer<br />
Yes<br />
Mount Type<br />
<strong>Samsung</strong> <strong>NX</strong> Mount<br />
Filter Size<br />
52 <strong>mm</strong><br />
Max. Diameter<br />
70 <strong>mm</strong><br />
Length<br />
100.5 <strong>mm</strong><br />
Weight (Lens Only, Approx.) 406 g<br />
Operating Temperature 0–40 °C<br />
Operating Humidity 5–85 %<br />
Specifications may change without notice for better performance.<br />
State of California Proposition 65 Warning (US only)<br />
WARNING : This product contains chemicals known to the State of<br />
California to cause cancer and birth <strong>de</strong>fects or other reproductive harm.<br />
Español<br />
Antes <strong>de</strong> usar este dispositivo<br />
Gracias por adquirir la lente <strong>Samsung</strong>. Las ilustraciones <strong>de</strong> este manual están<br />
basadas en la lente SAMSUNG 18-55<strong>mm</strong> F3.5-5.6 <strong>OIS</strong> <strong>III</strong>. Las ilustraciones<br />
usadas en el manual <strong>de</strong>l usuario pue<strong>de</strong>n ser diferentes <strong>de</strong> los elementos<br />
reales. Algunas funciones <strong>de</strong>scritas en este manual podrían no estar<br />
disponibles según el mo<strong>de</strong>lo <strong>de</strong> la cámara. Actualice el firmware <strong>de</strong>l cuerpo y<br />
la lente <strong>de</strong> la cámara. Visite www.samsung.com para <strong>de</strong>scargar el firmware.<br />
Desembalaje<br />
Lente, Tapa <strong>de</strong> la lente, Tapa <strong>de</strong> montaje <strong>de</strong> la lente, Cubierta,<br />
Funda, Manual <strong>de</strong>l usuario<br />
• Elemento opcional: Filtro<br />
Diseño (Ver ilustración A)<br />
1 Índice <strong>de</strong> montaje <strong>de</strong> la lente 2 Anillo <strong>de</strong> zoom<br />
3 Anillo <strong>de</strong> enfoque 4 Índice <strong>de</strong> montaje <strong>de</strong> la tapa <strong>de</strong> la lente<br />
5 Lente 6 Interruptor AF/MF 7 Botón i-Function<br />
8 Contactos <strong>de</strong> información <strong>de</strong> la lente<br />
Colocar y retirar la lente<br />
► Para colocar la lente<br />
1 Retire la tapa <strong>de</strong> la lente, la tapa <strong>de</strong> montaje <strong>de</strong> la lente y la<br />
cubierta <strong>de</strong>l cuerpo.<br />
2 Haga coincidir la marca roja <strong>de</strong> la lente con la marca roja <strong>de</strong>l<br />
cuerpo <strong>de</strong> la cámara. Luego, gire la lente como se muestra en<br />
la ilustración hasta que se ajuste en su sitio. (Ver ilustración B)<br />
► Para retirar la lente, mantenga pulsado el botón <strong>de</strong> <strong>de</strong>senganche, y<br />
luego gire la lente como se muestra en la ilustración. (Ver ilustración C)<br />
Establecer el método <strong>de</strong> enfoque<br />
Configure el interruptor AF/MF <strong>de</strong> la lente en AF o MF.<br />
Uso <strong>de</strong>l enfoque automático (AF): El enfoque se ajusta<br />
automáticamente si presiona [Obturador] hasta la mitad.<br />
No aplique fuerza excesiva sobre el frente <strong>de</strong> la lente mientras la<br />
cámara esté utilizando la función <strong>de</strong> enfoque automático (AF).<br />
Esto podría afectar el funcionamiento <strong>de</strong> la lente.<br />
Uso <strong>de</strong>l enfoque manual (MF): Es posible ajustar el foco<br />
manualmente girando el anillo <strong>de</strong> enfoque <strong>de</strong> la lente.<br />
Ajuste la función <strong>de</strong> Asistencia MF para obtener ayuda con el enfoque<br />
manual. Consulte el manual <strong>de</strong> su cámara para conocer más <strong>de</strong>talles.<br />
Uso <strong>de</strong> i-Function<br />
Al pulsar el botón i-Function en la lente, podrá usar el modo E o<br />
Z, o ajustar algunas opciones <strong>de</strong> disparo. En el modo E, podrá<br />
seleccionar escenas o efectos <strong>de</strong> filtro que la cámara admita. La función<br />
Z le permite hacer zoom sobre un sujeto con una menor <strong>de</strong>gradación<br />
<strong>de</strong> la calidad <strong>de</strong> la fotografía que con el zoom digital. Esta función sólo está<br />
disponible si la cámara la admite. El modo i-Scene solamente está disponible<br />
en algunos mo<strong>de</strong>los <strong>de</strong> la cámara.<br />
1 Gire el selector <strong>de</strong> modos hasta P, A, S, M o i.<br />
2 Pulse [i-Function] en la lente para seleccionar una<br />
configuración.<br />
• Los ajustes disponibles pue<strong>de</strong>n variar según el modo <strong>de</strong><br />
disparo seleccionado.<br />
Ajustes Modo <strong>de</strong> disparo Ajustes Modo <strong>de</strong> disparo<br />
E i Valor <strong>de</strong> apertura A, M<br />
Z P, A, S, M, i<br />
Velocidad <strong>de</strong>l<br />
obturador<br />
S, M<br />
Valor <strong>de</strong><br />
exposición<br />
Balance <strong>de</strong><br />
blancos, ISO<br />
P, A, S<br />
P, A, S, M<br />
3 Gire el anillo <strong>de</strong> enfoque <strong>de</strong> la lente para modificar los ajustes<br />
(o para modificar el nivel <strong>de</strong> zoom en el modo Z).<br />
4 Enfoque y capture la fotografía.<br />
• Para seleccionar los elementos que aparecerán al pulsar el botón<br />
i-Function en la lente, pue<strong>de</strong> utilizar el menú Personalización iFn<br />
<strong>de</strong> la cámara.<br />
• Las escenas o los efectos <strong>de</strong> filtro disponibles en el modo E<br />
pue<strong>de</strong>n variar según el mo<strong>de</strong>lo <strong>de</strong> la cámara.<br />
• Si selecciona Z, la resolución <strong>de</strong> las fotos cambiará según el<br />
nivel <strong>de</strong> zoom.<br />
Usar la rueda <strong>de</strong> zoom<br />
Establezca la composición <strong>de</strong> la foto (la distancia focal <strong>de</strong> la lente)<br />
girando el anillo <strong>de</strong> zoom <strong>de</strong> la lente.<br />
Como el enfoque se pue<strong>de</strong> cambiar ligeramente gracias a la distancia<br />
focal cambiada, se recomienda ajustarlo <strong>de</strong> nuevo antes <strong>de</strong> hacer una<br />
fotografía si ha cambiado la distancia focal girando el anillo <strong>de</strong> zoom.<br />
Usar la cubierta <strong>de</strong> lente (Ver ilustración E)<br />
Para prevenir que se <strong>de</strong>teriore la calidad <strong>de</strong> la imagen bloqueando la<br />
luz innecesaria, utilice una cubierta <strong>de</strong> la lente.<br />
Si usa el flash en situaciones en las cuales la distancia entre el objetivo y la<br />
cámara es corta, la luz <strong>de</strong>l flash podría verse bloqueada parcialmente por<br />
la lente o la tapa <strong>de</strong> la lente. Para garantizar la iluminación correcta, retire<br />
la tapa <strong>de</strong> la lente o ajuste la distancia entre la cámara y los objetivos.<br />
Usar un filtro (opcional) (Ver ilustración F)<br />
Antes <strong>de</strong> colocar el filtro en la lente, asegúrese <strong>de</strong> que sea compatible.<br />
Consulte „Especificaciones” para ver los tamaños <strong>de</strong> filtro compatibles.<br />
• El filtro es un producto óptico preciso. Manténgalo lejos <strong>de</strong>l polvo, la<br />
suciedad o los arañazos. No intente montar dos o más filtros al mismo<br />
tiempo. Si lo hace podría <strong>de</strong>teriorar la calidad <strong>de</strong> la imagen y provocar<br />
un efecto <strong>de</strong> viñeta (la reducción <strong>de</strong>l brillo o la saturación <strong>de</strong> una<br />
imagen en la periferia, ocultando el ángulo <strong>de</strong> visión <strong>de</strong>l lente).<br />
• En el caso <strong>de</strong> filtros <strong>de</strong> marco fino, el efecto viñeta se pue<strong>de</strong> producir<br />
con una lente <strong>de</strong> gran ángulo.<br />
Especificaciones<br />
Nombre <strong>de</strong> la lente<br />
SAMSUNG 18-55<strong>mm</strong> F3.5-5.6 <strong>OIS</strong> <strong>III</strong><br />
Distancia focal<br />
18–55 <strong>mm</strong><br />
Distancia focal en equivalente<br />
a 35 <strong>mm</strong><br />
27,7–84,7 <strong>mm</strong><br />
Construcción <strong>de</strong> la lente -<br />
Elementos<br />
12<br />
Construcción <strong>de</strong> la lente - Grupos 9<br />
Elementos Asféricos 1<br />
Vista angular 75,9°–28,7°<br />
Apertura máxima<br />
F3.5–5.6<br />
Apertura mínima<br />
F22<br />
Número <strong>de</strong> láminas <strong>de</strong>l diafragma 7<br />
Distancia mínima <strong>de</strong> enfoque (Wi<strong>de</strong>) 0,28 m<br />
Distancia mínima <strong>de</strong> enfoque (Tele) 0,28 m<br />
Amplificación máxima 0,22X<br />
Cubierta <strong>de</strong> la lente<br />
Incluida<br />
Estabilizador <strong>de</strong> imagen óptica Sí<br />
Tipo <strong>de</strong> montaje<br />
Montaje <strong>Samsung</strong> <strong>NX</strong><br />
Tamaño <strong>de</strong>l filtro<br />
58 <strong>mm</strong><br />
Diámetro máximo<br />
63 <strong>mm</strong><br />
Distancia<br />
65,1 <strong>mm</strong><br />
Peso (Sólo lentes, Aprox.)<br />
204 g<br />
Temperatura <strong>de</strong> funcionamiento 0–40 °C<br />
Humedad <strong>de</strong> funcionamiento 5–85%<br />
Nombre <strong>de</strong> la lente<br />
SAMSUNG 12-24<strong>mm</strong> F4-5.6 ED<br />
Distancia focal<br />
12–24 <strong>mm</strong><br />
Distancia focal en equivalente<br />
a 35 <strong>mm</strong><br />
18,5–37 <strong>mm</strong><br />
Construcción <strong>de</strong> la lente - Elementos 10<br />
Construcción <strong>de</strong> la lente - Grupos 8<br />
Elementos Asféricos 2<br />
Elementos ED 1<br />
Vista angular 99,0°–60,7°<br />
Apertura máxima<br />
F4–5.6<br />
Apertura mínima<br />
F22<br />
Número <strong>de</strong> láminas <strong>de</strong>l diafragma 7<br />
Distancia mínima <strong>de</strong> enfoque (Wi<strong>de</strong>) 0,24 m<br />
Distancia mínima <strong>de</strong> enfoque (Tele) 0,24 m<br />
Amplificación máxima 0,14X<br />
Cubierta <strong>de</strong> la lente<br />
Incluida<br />
Estabilizador <strong>de</strong> imagen óptica No<br />
Tipo <strong>de</strong> montaje<br />
Montaje <strong>Samsung</strong> <strong>NX</strong><br />
Tamaño <strong>de</strong>l filtro<br />
58 <strong>mm</strong><br />
Diámetro máximo<br />
63,5 <strong>mm</strong><br />
Distancia<br />
65,5 <strong>mm</strong><br />
Peso (Sólo lentes, Aprox.)<br />
208 g<br />
Temperatura <strong>de</strong> funcionamiento 0–40 °C<br />
Humedad <strong>de</strong> funcionamiento 5–85%<br />
Nombre <strong>de</strong> la lente<br />
SAMSUNG <strong>50</strong>-<strong>200</strong><strong>mm</strong> F4-5.6<br />
ED <strong>OIS</strong> <strong>III</strong><br />
Distancia focal<br />
<strong>50</strong>–<strong>200</strong> <strong>mm</strong><br />
Distancia focal en equivalente<br />
a 35 <strong>mm</strong><br />
77–308 <strong>mm</strong><br />
Construcción <strong>de</strong> la lente - Elementos 17<br />
Construcción <strong>de</strong> la lente - Grupos 13<br />
Elementos ED 2<br />
Vista angular 31,4°–8,0°<br />
Apertura máxima<br />
F4–5.6<br />
Apertura mínima<br />
F22<br />
Número <strong>de</strong> láminas <strong>de</strong>l diafragma 7<br />
Distancia mínima <strong>de</strong> enfoque (Wi<strong>de</strong>) 0,98 m<br />
Distancia mínima <strong>de</strong> enfoque (Tele) 0,98 m<br />
Amplificación máxima 0,2X<br />
Cubierta <strong>de</strong> la lente<br />
Incluida<br />
Estabilizador <strong>de</strong> imagen óptica Sí<br />
Tipo <strong>de</strong> montaje<br />
Montaje <strong>Samsung</strong> <strong>NX</strong><br />
Tamaño <strong>de</strong>l filtro<br />
52 <strong>mm</strong><br />
Diámetro máximo<br />
70 <strong>mm</strong><br />
Distancia<br />
100,5 <strong>mm</strong><br />
Peso (Sólo lentes, Aprox.)<br />
406 g<br />
Temperatura <strong>de</strong> funcionamiento 0–40 °C<br />
Humedad <strong>de</strong> funcionamiento 5–85%<br />
Las especificaciones pue<strong>de</strong>n cambiar sin aviso previo para un<br />
mejor rendimiento.
A<br />
English<br />
3<br />
4<br />
5<br />
1<br />
2<br />
7<br />
6<br />
C D<br />
E F<br />
8<br />
B<br />
Español<br />
2<br />
1<br />
Franç<strong>ais</strong><br />
Avant d’utiliser ce produit<br />
Merci d’avoir acheté l’objectif <strong>Samsung</strong>. Les illustrations <strong>de</strong> ce manuel font<br />
référence à l'objectif SAMSUNG 18-55<strong>mm</strong> F3.5-5.6 <strong>OIS</strong> <strong>III</strong>. Les illustrations<br />
utilisées dans le présent gui<strong>de</strong> peuvent différer du produit fourni. Selon le<br />
modèle <strong>de</strong> votre appareil photo, il est possibles que certaines fonctionnalités<br />
décrites dans le présent gui<strong>de</strong> ne soient pas offertes. Mettez à jour le<br />
micrologiciel du boîtier <strong>de</strong> l’appareil photo et <strong>de</strong> l’objectif. Accé<strong>de</strong>z au site<br />
www.samsung.com/fr pour télécharger le micrologiciel.<br />
Contenu du coffret<br />
<strong>Objectif</strong>, couvre-objectif, capuchon <strong>de</strong> la monture <strong>de</strong> l’objectif, pare-soleil,<br />
étui, gui<strong>de</strong> d'utilisation<br />
• Élément optionnel : Filtre<br />
Disposition (Voir illustration A)<br />
1 Repère d'installation <strong>de</strong> l'objectif 2 Bague <strong>de</strong> réglage du zoom<br />
3 Bague <strong>de</strong> mise au point 4 Repère du parasoleil d’objectif 5 <strong>Objectif</strong><br />
6 Co<strong>mm</strong>utateur AF/MF 7 Touche i-Function 8 Contacts d’information <strong>de</strong> l’objectif<br />
Installation et retrait <strong>de</strong> l’objectif<br />
► Pour fixer l’objectif :<br />
1 Retirez le couvre-objectif, le capuchon <strong>de</strong> la monture <strong>de</strong> l’objectif et<br />
le capuchon du boîtier.<br />
2 Alignez le repère rouge <strong>de</strong> l’objectif sur le repère rouge du boîtier.<br />
Tournez ensuite l’objectif co<strong>mm</strong>e indiqué sur l’illustration, jusqu’à ce<br />
qu’il soit en place. (Voir illustration B)<br />
► Pour retirer l’objectif, maintenez enfoncé le bouton d’éjection <strong>de</strong> l’objectif,<br />
puis tournez l’objectif co<strong>mm</strong>e indiqué sur l’illustration. (Voir illustration C)<br />
Réglage <strong>de</strong> la métho<strong>de</strong> <strong>de</strong> mise au point<br />
Positionnez le co<strong>mm</strong>utateur AF/MF <strong>de</strong> l’objectif sur AF ou MF.<br />
Utilisation <strong>de</strong> la Mise au point auto (AF) : La mise au point se fera<br />
automatiquement lorsque vous enfoncez à moitié le [Déclencheur].<br />
Ne forcez pas sur l’objectif lorsque l’appareil photo est en mo<strong>de</strong> Mise au point<br />
automatique (AF). Vous risqueriez <strong>de</strong> provoquer un dysfonctionnement <strong>de</strong> l’objectif.<br />
Utilisation <strong>de</strong> la Mise au point manuelle (MF) : Pour effectuer manuellement<br />
la mise au point, tournez la bague <strong>de</strong> mise au point <strong>de</strong> l’objectif.<br />
Réglez la fonction MF Assist (assistant MF) pour faciliter la mise au point manuelle.<br />
Consultez le gui<strong>de</strong> d'utilisation <strong>de</strong> votre appareil photo pour plus d’informations.<br />
Utilisation <strong>de</strong> i-Function<br />
Lorsque vous appuyez sur le bouton i-Function <strong>de</strong> l’objectif, vous pouvez<br />
utiliser le mo<strong>de</strong> E ou Z, ou bien régler certaines options <strong>de</strong><br />
prise <strong>de</strong> vue. En mo<strong>de</strong> E, vous pouvez sélectionner <strong>de</strong>s scènes ou<br />
<strong>de</strong>s effets <strong>de</strong> filtre pris en charge par votre appareil photo. L’Z vous<br />
permet <strong>de</strong> zoomer sur un sujet avec une dégradation moindre <strong>de</strong> la qualité<br />
photo qu’avec le zoom numérique. Cette fonction est disponible uniquement<br />
si elle est prise en charge par votre appareil photo. Le mo<strong>de</strong> i-Scene est<br />
disponible uniquement sur certains modèles d’appareils photos.<br />
1 Passez au mo<strong>de</strong> P, A, S, M ou i à l'ai<strong>de</strong> <strong>de</strong> la molette <strong>de</strong> sélection.<br />
2 Appuyez sur [i-Function] sur l’objectif pour sélectionner un réglage.<br />
• Les réglages offerts peuvent varier en fonction du mo<strong>de</strong> <strong>de</strong> prise <strong>de</strong> vue sélectionné.<br />
Paramètres Mo<strong>de</strong> <strong>de</strong> prise <strong>de</strong> vue Paramètres Mo<strong>de</strong> <strong>de</strong> prise <strong>de</strong> vue<br />
E i Valeur d'ouverture A, M<br />
Z P, A, S, M, i Valeur d'exposition P, A, S<br />
Vitesse<br />
Balance <strong>de</strong>s<br />
S, M<br />
d'obturation<br />
blancs, ISO<br />
P, A, S, M<br />
3 Tournez la bague <strong>de</strong> mise au point sur l’objectif afin <strong>de</strong> régler les<br />
paramètres (ou modifier le niveau <strong>de</strong> zoom en mo<strong>de</strong> Z).<br />
4 Effectuez la mise au point et prenez la photo.<br />
• Pour sélectionner les options à afficher lorsque vous appuyez sur<br />
le bouton i-Function <strong>de</strong> l’objectif, vous pouvez utiliser le menu iFn<br />
Customizing (personnalisation iFn) <strong>de</strong> l’appareil photo.<br />
• Les scènes ou effets <strong>de</strong> filtre disponibles en mo<strong>de</strong> E<br />
peuvent varier en fonction du modèle <strong>de</strong> l’appareil photo.<br />
• Si vous sélectionnez Z, la résolution <strong>de</strong> la photo changera<br />
en fonction du niveau <strong>de</strong> zoom.<br />
Utilisation <strong>de</strong> la bague <strong>de</strong> réglage du zoom<br />
Pour obtenir la photo la plus claire possible (régler la distance focale <strong>de</strong><br />
l’objectif), tournez la bague <strong>de</strong> zoom <strong>de</strong> l’objectif. (Voir illustration D)<br />
Co<strong>mm</strong>e la mise au point peut être légèrement modifiée en r<strong>ais</strong>on d’une<br />
valeur <strong>de</strong> distance focale changée, il est reco<strong>mm</strong>andé <strong>de</strong> régler à nouveau<br />
la mise au point avant <strong>de</strong> prendre une photo, et ce, si vous avez changé la<br />
distance focale en f<strong>ais</strong>ant tourner bague <strong>de</strong> réglage du zoom.<br />
Utilisation d’un parasoleil (Voir illustration E)<br />
Pour éviter toute dégradation <strong>de</strong> la qualité <strong>de</strong>s images, utilisez un<br />
parasoleil afin <strong>de</strong> réduire la luminosité.<br />
Lorsque vous utilisez un flash dans <strong>de</strong>s situations où la distance<br />
entre le sujet et l’appareil photo est faible, la lumière émise par le<br />
flash peut être partiellement bloquée par l’objectif ou le parasoleil.<br />
Pour assurer un éclairage approprié, retirez le parasoleil ou modifiez<br />
la distance entre l’appareil photo et le sujet.<br />
Utilisation d’un filtre (en option) (Voir illustration F)<br />
Avant <strong>de</strong> placer un filtre sur l’objectif, assurez-vous qu’il est compatible. Voir<br />
les « Fiche technique » pour la taille <strong>de</strong> filtre compatible.<br />
• Un filtre est un produit optique précis. Conservez-le à l’abri <strong>de</strong><br />
la poussière, <strong>de</strong> la saleté ou <strong>de</strong>s rayures. De même, n’essayez<br />
pas <strong>de</strong> monter <strong>de</strong>ux filtres ou plus simultanément. Ceci pourrait<br />
détériorer la qualité <strong>de</strong> l’image et provoquer un phénomène <strong>de</strong><br />
vignettage (réduction <strong>de</strong> la luminosité d’une image ou saturation à<br />
la périphérie, l’angle <strong>de</strong> visualisation <strong>de</strong> l’objectif étant caché).<br />
• En cas <strong>de</strong> filtre à cadre ép<strong>ais</strong>, vous risque d’obtenir un effet <strong>de</strong><br />
vignettage avec un objectif grand angle.<br />
Fiche technique<br />
Nom <strong>de</strong> l’objectif<br />
SAMSUNG 18-55<strong>mm</strong> F3.5-5.6 <strong>OIS</strong> <strong>III</strong><br />
Longueur focale<br />
18 à 55 <strong>mm</strong><br />
Longueur focale (équivalent 35 <strong>mm</strong>)<br />
27,7 à 84,7 <strong>mm</strong><br />
Fabrication <strong>de</strong> l’objectif - éléments 12<br />
Fabrication <strong>de</strong> l’objectif - groupes 9<br />
Éléments asphériques 1<br />
Angle <strong>de</strong> vue 75,9° à 28,7°<br />
Ouverture maximale<br />
f/3.5 à f/5.6<br />
Ouverture minimale f/22<br />
nombre <strong>de</strong> lames <strong>de</strong> diaphragme 7<br />
Distance minimale <strong>de</strong> mise au point<br />
(panoramique)<br />
0,28 m<br />
Distance minimale <strong>de</strong> mise au point (téléobjectif) 0,28 m<br />
Agrandissement maximum 0,22X<br />
Pare-soleil<br />
inclus<br />
Stabilisation optique <strong>de</strong> l’image<br />
oui<br />
Type <strong>de</strong> montage<br />
monture <strong>Samsung</strong> <strong>NX</strong><br />
Taille du filtre<br />
58 <strong>mm</strong><br />
Diamètre maximal<br />
63 <strong>mm</strong><br />
Longueur<br />
65,1 <strong>mm</strong><br />
Poids (lentilles seulement, environ)<br />
204 g<br />
Franç<strong>ais</strong><br />
Température <strong>de</strong> fonctionnement <strong>de</strong> 0 à 40 °C<br />
Humidité <strong>de</strong> fonctionnement <strong>de</strong> 5 à 85%<br />
Nom <strong>de</strong> l’objectif<br />
SAMSUNG 12-24<strong>mm</strong> F4-5.6 ED<br />
Longueur focale<br />
12 à 24 <strong>mm</strong><br />
Longueur focale (équivalent 35 <strong>mm</strong>)<br />
18,5 à 37 <strong>mm</strong><br />
Fabrication <strong>de</strong> l’objectif - éléments 10<br />
Fabrication <strong>de</strong> l’objectif - groupes 8<br />
Éléments asphériques 2<br />
Éléments ED 1<br />
Angle <strong>de</strong> vue 99,0° à 60,7°<br />
Ouverture maximale<br />
f/4 à f/5.6<br />
Ouverture minimale f/22<br />
nombre <strong>de</strong> lames <strong>de</strong> diaphragme 7<br />
Distance minimale <strong>de</strong> mise au point<br />
(panoramique)<br />
0,24 m<br />
Distance minimale <strong>de</strong> mise au point (téléobjectif) 0,24 m<br />
Agrandissement maximum 0,14X<br />
Pare-soleil<br />
inclus<br />
Stabilisation optique <strong>de</strong> l’image<br />
Non<br />
Type <strong>de</strong> montage<br />
monture <strong>Samsung</strong> <strong>NX</strong><br />
Taille du filtre<br />
58 <strong>mm</strong><br />
Diamètre maximal<br />
63,5 <strong>mm</strong><br />
Longueur<br />
65,5 <strong>mm</strong><br />
Poids (lentilles seulement, environ)<br />
208 g<br />
Température <strong>de</strong> fonctionnement <strong>de</strong> 0 à 40 °C<br />
Humidité <strong>de</strong> fonctionnement <strong>de</strong> 5 à 85%<br />
Nom <strong>de</strong> l’objectif<br />
SAMSUNG <strong>50</strong>-<strong>200</strong><strong>mm</strong> F4-5.6 ED<br />
<strong>OIS</strong> <strong>III</strong><br />
Longueur focale<br />
<strong>50</strong> à <strong>200</strong> <strong>mm</strong><br />
Longueur focale (équivalent 35 <strong>mm</strong>)<br />
77 à 308 <strong>mm</strong><br />
Fabrication <strong>de</strong> l’objectif - éléments 17<br />
Fabrication <strong>de</strong> l’objectif - groupes 13<br />
Éléments ED 2<br />
Angle <strong>de</strong> vue 31,4° à 8,0°<br />
Ouverture maximale<br />
f/4 à f/5.6<br />
Ouverture minimale f/22<br />
nombre <strong>de</strong> lames <strong>de</strong> diaphragme 7<br />
Distance minimale <strong>de</strong> mise au point<br />
(panoramique)<br />
0,98 m<br />
Distance minimale <strong>de</strong> mise au point (téléobjectif) 0,98 m<br />
Agrandissement maximum 0,2X<br />
Pare-soleil<br />
inclus<br />
Stabilisation optique <strong>de</strong> l’image<br />
oui<br />
Type <strong>de</strong> montage<br />
monture <strong>Samsung</strong> <strong>NX</strong><br />
Taille du filtre<br />
52 <strong>mm</strong><br />
Diamètre maximal<br />
70 <strong>mm</strong><br />
Longueur<br />
100,5 <strong>mm</strong><br />
Poids (lentilles seulement, environ)<br />
406 g<br />
Température <strong>de</strong> fonctionnement <strong>de</strong> 0 à 40 °C<br />
Humidité <strong>de</strong> fonctionnement <strong>de</strong> 5 à 85%<br />
Ces caractéristiques peuvent changer sans préavis à <strong>de</strong>s fins<br />
d'amélioration du ren<strong>de</strong>ment.<br />
Health and Safety Information<br />
Please read the following safety tips carefully for proper and safe use.<br />
Warning<br />
Caution<br />
• Do not stare at the sun through the lens or camera.<br />
This may cause severe damage to your eyes.<br />
• Keep your lens or camera away from small children and pets.<br />
• Do not store the lens in direct sunlight without the lens cap.<br />
Direct sunlight that passes through the lens may combust<br />
if it comes into contact with fla<strong>mm</strong>able materials.<br />
• Use only sturdy tripods. Lightweight or unstable tripods<br />
may fall over and damage the camera.<br />
Lens Storage and Maintenance<br />
• Store the lens in dry and well ventilated areas.<br />
• Do not store the lens in areas of high temperature or humidity or in a<br />
closet, car, or confined area where chemicals are stored.<br />
• The lens is not waterproof. Be careful not to allow it to get wet when<br />
using it near water.<br />
• Do not use chemicals such as thinner, alcohol, or benzene to remove dust.<br />
• Do not drop the lens or apply excessive shock to it. The lens is a<br />
precise optical product.<br />
• Avoid using the lens anywhere there is a sud<strong>de</strong>n temperature<br />
change. Keep the lens in a plastic bag or a camera case to prevent<br />
con<strong>de</strong>nsation from forming on the insi<strong>de</strong> or outsi<strong>de</strong> of the lens.<br />
• When carrying or not using the lens, place the lens cap and lens<br />
mount cover on the lens to prevent contamination from foreign<br />
particles and protect the lens from scratches.<br />
• Do not keep the camera mounted on a tripod without the lens cap.<br />
The insi<strong>de</strong> of the camera can be damaged by direct sunlight.<br />
• Check the lens once every year or two for best performance.<br />
• Do not apply excessive force to the front of the lens.<br />
• For safe use of the lens, mount or dismount the lens while the camera<br />
is turned off.<br />
• <strong>Samsung</strong> is not responsible for any damage incurred by using other<br />
manufacturers’ lenses.<br />
• Make sure to change lenses only in a clean environment and do not<br />
put your fingers into the lens mount when mounting the lens. Foreign<br />
particles may affect shooting results or cause a malfunction if they<br />
enter the camera body or the lens.<br />
• Do not transport or store the lens with any part of the tube is exten<strong>de</strong>d.<br />
Completely retract the lens tube insi<strong>de</strong> the body by rotating the zoom<br />
ring on the lens.<br />
Correct Disposal of This Product<br />
(Waste Electrical & Electronic Equipment)<br />
(Applicable in countries with separate collection systems)<br />
This marking on the product, accessories or literature indicates that<br />
the product and its electronic accessories (e.g. charger, headset, USB<br />
cable) should not be disposed of with other household waste at the<br />
end of their working life. To prevent possible harm to the environment<br />
or human health from uncontrolled waste disposal, please separate<br />
these items from other types of waste and recycle them responsibly to<br />
promote the sustainable reuse of material resources. Household users<br />
should contact either the retailer where they purchased this product, or<br />
their local government office, for <strong>de</strong>tails of where and how they can take<br />
these items for environmentally safe recycling. Business users should<br />
contact their supplier and check the terms and conditions of the purchase<br />
contract. This product and its electronic accessories should not be mixed<br />
with other co<strong>mm</strong>ercial wastes for disposal.<br />
Información sobre salud y seguridad<br />
Lea las siguientes sugerencias <strong>de</strong> seguridad <strong>de</strong>tenidamente para usar el<br />
dispositivo <strong>de</strong> manera correcta y segura.<br />
Advertencia<br />
Precaución<br />
• No mire el sol a través <strong>de</strong> la lente o <strong>de</strong> la cámara.<br />
Esto pue<strong>de</strong> causar daños graves en sus ojos.<br />
• Mantenga la lente o la cámara lejos <strong>de</strong> los niños<br />
pequeños y las mascotas.<br />
• No almacene la lente en contacto directo con el sol<br />
sin la tapa <strong>de</strong> la lente. La luz directa <strong>de</strong>l sol que pasa<br />
a través <strong>de</strong> la lente pue<strong>de</strong> incendiarse si entra en<br />
contacto con materiales inflamables.<br />
• Utilice sólo trípo<strong>de</strong>s firmes. Los trípo<strong>de</strong>s livianos o<br />
inestables pue<strong>de</strong>n caerse y dañar la cámara.<br />
Almacenamiento y mantenimiento <strong>de</strong> la lente<br />
• Almacene la lente en un área seca y ventilada.<br />
• No guar<strong>de</strong> la lente en sitios con alta temperatura o humedad, o en un armario,<br />
un automóvil o un sitio cerrado en el cual se guar<strong>de</strong>n sustancias químicas.<br />
• La lente no es impermeable. Asegúrese <strong>de</strong> no permitir que se moje<br />
cuando la use cerca <strong>de</strong>l agua.<br />
• No use químicos como diluyentes, alcohol o benceno para quitar el polvo.<br />
• No <strong>de</strong>je caer la lente ni ejerza una fuerza excesiva sobre ella. La lente<br />
es un producto óptico preciso.<br />
• Evite el uso <strong>de</strong> la lente en lugares don<strong>de</strong> pueda haber cambios <strong>de</strong><br />
temperatura repentinos. Mantenga la lente en una bolsa <strong>de</strong> plástico o<br />
en un estuche para cámaras para evitar que se forme con<strong>de</strong>nsación en<br />
el interior o el exterior <strong>de</strong> la lente.<br />
• Cuando no esté utilizando la lente o cuando la lleve <strong>de</strong> un lado a otro,<br />
colóquele la tapa y la tapa <strong>de</strong> montaje a fin <strong>de</strong> evitar la contaminación<br />
con partículas externas e impedir que la lente sufra raspaduras.<br />
• No <strong>de</strong>je la cámara montada en un trípo<strong>de</strong> sin la tapa <strong>de</strong> la lente.<br />
El interior <strong>de</strong> la cámara se pue<strong>de</strong> dañar con la luz directa <strong>de</strong>l sol.<br />
• Revise la lente una o dos veces al año para un mejor rendimiento.<br />
• No ejerza una fuerza excesiva sobre el frente <strong>de</strong> la lente.<br />
• Para usar la lente <strong>de</strong> manera segura, coloque la lente o retírela<br />
cuando la cámara esté apagada.<br />
• <strong>Samsung</strong> no es responsable <strong>de</strong> los daños causados por el uso con<br />
lentes <strong>de</strong> otros fabricantes.<br />
• Asegúrese <strong>de</strong> cambiar las lentes solo en un sitio limpio, y no coloque los<br />
<strong>de</strong>dos <strong>de</strong>ntro <strong>de</strong>l montaje <strong>de</strong> la lente cuando la esté colocando. Las partículas<br />
externas podrían afectar los resultados o provocar el funcionamiento<br />
incorrecto si ingresan en el cuerpo <strong>de</strong> la cámara o en la lente.<br />
• No transporte ni guar<strong>de</strong> la lente con una parte <strong>de</strong>l tubo extendida. Repliegue<br />
el tubo <strong>de</strong> la lente por completo <strong>de</strong>ntro <strong>de</strong>l cuerpo girando el anillo <strong>de</strong> zoom.<br />
Eliminación correcta <strong>de</strong> este producto<br />
(Residuos <strong>de</strong> aparatos eléctricos y electrónicos)<br />
(Se aplica en países con sistemas <strong>de</strong> recolección por separado)<br />
La presencia <strong>de</strong> este símbolo en el producto, accesorios o material<br />
informativo que lo acompañan, indica que al finalizar su vida útil ni el<br />
producto ni sus accesorios electrónicos (como el cargador, cascos, cable<br />
USB) <strong>de</strong>berán eliminarse junto con otros residuos domésticos. Para evitar<br />
los posibles daños al medio ambiente o a la salud humana que representa<br />
la eliminación incontrolada <strong>de</strong> residuos, separe estos productos <strong>de</strong> otros<br />
tipos <strong>de</strong> residuos y recíclelos correctamente. De esta forma se promueve<br />
la reutilización sostenible <strong>de</strong> recursos materiales. Los usuarios particulares<br />
pue<strong>de</strong>n contactar con el establecimiento don<strong>de</strong> adquirieron el producto o<br />
con las autorida<strong>de</strong>s locales pertinentes para informarse sobre cómo y dón<strong>de</strong><br />
pue<strong>de</strong>n llevarlo para que sea sometido a un reciclaje ecológico y seguro.<br />
Los usuarios comerciales pue<strong>de</strong>n contactar con su proveedor y consultar<br />
las condiciones <strong>de</strong>l contrato <strong>de</strong> compra. Este producto y sus accesorios<br />
electrónicos no <strong>de</strong>ben eliminarse junto a otros residuos comerciales.<br />
Renseignements relatifs à la santé et à la sécurité<br />
Veuillez lire attentivement les conseils <strong>de</strong> sécurité suivants pour une<br />
utilisation correcte et sûre.<br />
Mise en<br />
gar<strong>de</strong><br />
Attention<br />
• Lorsque vous utilisez l’objectif ou l’appareil photo, ne<br />
regar<strong>de</strong>z pas directement le soleil. Vous risqueriez <strong>de</strong><br />
causer <strong>de</strong>s do<strong>mm</strong>ages à vos yeux.<br />
• Maintenez votre objectif et votre appareil photo loin <strong>de</strong>s<br />
enfants en bas âge et <strong>de</strong>s animaux domestiques.<br />
• Ne conservez pas l’objectif en plein soleil sans le couvreobjectif.<br />
La lumière directe du soleil passant à travers<br />
l'objectif peut engendrer <strong>de</strong> la combustion si elle entre en<br />
contact direct avec <strong>de</strong>s matériaux infla<strong>mm</strong>ables.<br />
• N'utilisez que <strong>de</strong>s trépieds robustes. Évitez d’utiliser <strong>de</strong>s<br />
trépieds trop légers ou instables, car ils risqueraient <strong>de</strong><br />
tomber et d’endo<strong>mm</strong>ager l’appareil photo.<br />
Conservation et entretien <strong>de</strong> l’objectif<br />
• Rangez l’objectif dans <strong>de</strong>s endroits secs et bien ventilés.<br />
• Ne rangez pas l’objectif dans <strong>de</strong>s endroits où la température ou l’humidité sont<br />
élevées, ou dans un placard, dans un véhicule ou dans toute autre zone restreinte<br />
où <strong>de</strong>s produits chimiques sont également entreposés.<br />
• L’objectif n’est pas étanche. Veillez à ne pas le mouiller lorsque vous l’utilisez près<br />
d’une source d’eau.<br />
• N’utilisez pas <strong>de</strong> produits chimiques tels que du diluant, <strong>de</strong> l’alcool ou du benzène<br />
pour retirer la poussière.<br />
• Ne l<strong>ais</strong>sez pas tomber l’objectif et ne le soumettez pas à <strong>de</strong>s chocs excessifs.<br />
L’objectif est un produit optique précis.<br />
• Évitez d’utiliser l’objectif où il y a <strong>de</strong>s changements <strong>de</strong> température soudains.<br />
Conservez l’objectif dans un sac en plastique ou un étui d’appareil photo pour<br />
éviter la formation <strong>de</strong> con<strong>de</strong>nsation à l’intérieur ou à l'extérieur du produit.<br />
• Lors du transport ou lorsque vous n’utilisez pas l’objectif, placez le couvre-objectif et<br />
le capuchon <strong>de</strong> la monture <strong>de</strong> l’objectif sur l’objectif afin d’éviter toute contamination<br />
due à <strong>de</strong>s particules étrangères et <strong>de</strong> protéger l’objectif contre les rayures.<br />
• Ne l<strong>ais</strong>sez pas l’appareil photo installé sur un trépied sans le couvre-objectif.<br />
La lumière solaire peut endo<strong>mm</strong>ager l’intérieur <strong>de</strong> l’appareil photo.<br />
• Vérifiez l’objectif tous les ans ou tous les <strong>de</strong>ux ans pour obtenir un meilleur ren<strong>de</strong>ment.<br />
• N’appliquez pas <strong>de</strong> force excessive sur l’avant <strong>de</strong> l’objectif.<br />
• Pour une utilisation sûre <strong>de</strong> l’objectif, installez-le ou désinstallez-le lorsque<br />
l’appareil photo est éteint.<br />
• <strong>Samsung</strong> décline toute responsabilité en cas <strong>de</strong> do<strong>mm</strong>ages causés par<br />
l’utilisation d’objectifs fournis par d’autres fabricants.<br />
• Assurez-vous <strong>de</strong> toujours changer l’objectif dans un environnement propre et<br />
ne placez pas vos doigts sur la monture lors <strong>de</strong> l'installation <strong>de</strong> l’objectif. Les<br />
particules étrangères peuvent influer sur les résultats <strong>de</strong>s prises <strong>de</strong> vue ou<br />
entraîner un mauv<strong>ais</strong> fonctionnement <strong>de</strong> l’appareil photo en cas <strong>de</strong> contact avec<br />
le boîtier ou l’objectif.<br />
• Vous ne <strong>de</strong>vez ni transporter, ni stocker l’objectif lorsque le tube d’extension est<br />
sorti. Pour faire entièrement rentrer le tube à l’intérieur du mécanisme, tournez la<br />
bague du zoom <strong>de</strong> l’objectif.<br />
Mise au rebut appropriée du produit<br />
(Déchets d’équipements électriques et électroniques)<br />
(Applicable aux pays qui utilisent <strong>de</strong>s systèmes <strong>de</strong> collecte distincts)<br />
Ce symbole sur le produit, ses accessoires ou sa documentation<br />
indique que ni le produit, ni ses accessoires électroniques<br />
(chargeur, casque audio, câble USB, etc.) ne peuvent être éliminés<br />
en fin <strong>de</strong> vie avec les autres déchets ménagers. Puisque l'élimination non<br />
maîtrisée <strong>de</strong>s déchets peut porter préjudice à l'environnement ou à la santé<br />
humaine, veuillez séparer le produit <strong>de</strong>s autres types <strong>de</strong> déchets et le<br />
recycler <strong>de</strong> façon responsable. Vous favoriserez ainsi la réutilisation durable<br />
<strong>de</strong>s ressources matérielles. Les particuliers <strong>de</strong>vraient co<strong>mm</strong>uniquer avec le<br />
détaillant chez qui ils ont acheté le produit ou se renseigner auprès <strong>de</strong> leur<br />
municipalité pour savoir où et co<strong>mm</strong>ent ils peuvent mettre ce produit au rebut<br />
afin qu'il soit recyclé en respectant l'environnement. Les entreprises sont<br />
<strong>de</strong>vraient co<strong>mm</strong>uniquer avec leurs fournisseurs et consulter les conditions<br />
générales <strong>de</strong> leur contrat d'achat. Ce produit et ses accessoires électroniques<br />
ne doivent pas être éliminés avec les autres déchets co<strong>mm</strong>erciaux.<br />
Veuillez consulter la garantie incluse avec votre produit<br />
ou visiter notre site Web www.samsung.com pour obtenir<br />
du service après-vente ou pour toute question.


