

Samsung Objectif NX zoom 50-200mm (EX-T50200SB ) - Manuel de l'utilisateur 0.01MB, pdf, Anglais, Français
Samsung Objectif NX zoom 50-200mm (EX-T50200SB ) - Manuel de l'utilisateur 0.01MB, pdf, Anglais, Français
Samsung Objectif NX zoom 50-200mm (EX-T50200SB ) - Manuel de l'utilisateur 0.01MB, pdf, Anglais, Français

Create successful ePaper yourself
Turn your PDF publications into a flip-book with our unique Google optimized e-Paper software.
User<br />
Manual<br />
SAMSUNG 18-55mm F3.5-5.6 OIS III<br />
SAMSUNG 12-24mm F4-5.6 ED<br />
SAMSUNG <strong>50</strong>-<strong>200mm</strong> F4-5.6 ED OIS III<br />
ENG / SPA / FRE<br />
This User Manual has been specially <strong>de</strong>signed to gui<strong>de</strong> you through the basic functions and features of your <strong>de</strong>vice.<br />
Please read the User Manual carefully to ensure safe and correct use.<br />
A<br />
3<br />
4<br />
5<br />
C<br />
E<br />
1<br />
2<br />
7<br />
6<br />
8<br />
B<br />
D<br />
F<br />
AD68-08097A (1.3)<br />
2<br />
1<br />
English<br />
Before Using This Device<br />
Thank you for purchasing the <strong>Samsung</strong> Lens. The illustrations in this<br />
manual are based on the SAMSUNG 18-55mm F3.5-5.6 OIS III.<br />
The illustrations used in this manual may differ from the actual items.<br />
Some functions <strong>de</strong>scribed in this manual may not be available <strong>de</strong>pending<br />
on the camera mo<strong>de</strong>l. Update the firmware of the camera body and lens.<br />
Visit www.samsung.com to download the firmware.<br />
Unpacking<br />
Lens, Lens cap, Lens mount cover, Hood, Case, User manual<br />
• Optional Item: Filter<br />
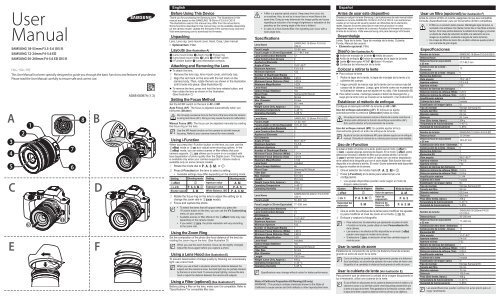
Layouts (See illustration A)<br />
1 Lens mount in<strong>de</strong>x 2 Zoom ring 3 Focus ring<br />
4 Lens hood mount in<strong>de</strong>x 5 Lens 6 AF/MF switch<br />
7 i-Function button 8 Lens information contacts<br />
Attaching and Removing the Lens<br />
► To attach the lens,<br />
1 Remove the lens cap, lens mount cover, and body cap.<br />
2 Align the red mark on the lens with the red mark on the<br />
camera body. Then, rotate the lens as shown in the illustration<br />
until it locks into place. (See illustration B)<br />
► To remove the lens, press and hold the lens release button, and<br />
then rotate the lens as shown in the illustration.<br />
(See illustration C)<br />
Setting the Focus Method<br />
Set the AF/MF switch on the lens to AF or MF.<br />
Auto Focus (AF): The focus is adjusted automatically when you<br />
half-press [Shutter].<br />
Do not apply excessive force to the front of the lens while the camera<br />
is using auto focus (AF). Doing so may cause the lens to malfunction.<br />
Manual Focus (MF): The focus can be adjusted manually by rotating<br />
the focus ring on the lens.<br />
Use the MF Assist function on the camera to aid with manual<br />
focusing. Refer to your camera manual for more <strong>de</strong>tails.<br />
Using i-Function<br />
When you press the i-Function button on the lens, you can use the<br />
E mo<strong>de</strong> or Z or adjust some shooting options. In the<br />
E mo<strong>de</strong>, you can select scenes or filter effects that your<br />
camera supports. Z allows you to <strong>zoom</strong> in on a subject with<br />
less <strong>de</strong>gradation of photo quality than the Digital <strong>zoom</strong>. This feature<br />
is available only when your camera supports it. i-Scene mo<strong>de</strong> is<br />
available only on some camera mo<strong>de</strong>ls.<br />
1 Rotate the mo<strong>de</strong> dial to P, A, S, M, or i.<br />
2 Press [i-Function] on the lens to select a setting.<br />
• Available settings may differ <strong>de</strong>pending on the shooting mo<strong>de</strong>.<br />
Setting Shooting mo<strong>de</strong> Setting Shooting mo<strong>de</strong><br />
E i Aperture value A, M<br />
Z P, A, S, M, i Exposure value P, A, S<br />
Shutter speed S, M White Balance, ISO P, A, S, M<br />
3 Rotate the focus ring on the lens to adjust the setting (or to<br />
change the <strong>zoom</strong> rate in Z mo<strong>de</strong>).<br />
4 Focus and capture the photo.<br />
• To select the items that will appear when you press the<br />
i-Function button on the lens, you can use the iFn Customizing<br />
menu on your camera.<br />
• Available scenes or filter effects in the E mo<strong>de</strong> may vary<br />
<strong>de</strong>pending on the camera mo<strong>de</strong>l.<br />
• If you select Z, the photo resolution will vary according<br />
to the <strong>zoom</strong> rate.<br />
Using the Zoom Ring<br />
Set the composition of the photo (the focal distance of the lens) by<br />
rotating the <strong>zoom</strong> ring on the lens. (See illustration D)<br />
When you use the <strong>zoom</strong> function, focus can be slightly changed.<br />
Adjust the focus again before you capture a photo.<br />
Using a Lens Hood (See illustration E)<br />
To prevent <strong>de</strong>terioration of image quality by blocking out unnecessary<br />
light, use a lens hood.<br />
When you use a flash in situations where the distance between the<br />
subject and the camera is close, the flash light may be partially blocked<br />
by the lens or a lens hood. To ensure proper lighting, remove the lens<br />
hood or adjust the distance between the camera and subjects.<br />
Using a Filter (optional) (See illustration F)<br />
Before putting a filter on the lens, make sure it is compatible. Refer to<br />
"Specifications" for compatible filter size.<br />
• A filter is a precise optical product. Keep away from dust, dirt,<br />
or scratches. Also, do not try to mount two or more filters at the<br />
same time. Doing so may <strong>de</strong>teriorate the image quality and cause<br />
vignetting (a reduction of an image’s brightness or saturation at the<br />
periphery as the viewing angle of the lens is hid<strong>de</strong>n).<br />
• In case of a thick framed filter, the vignetting can occur with a<br />
wi<strong>de</strong>-angle lens.<br />
Specifications<br />
Lens Name<br />
SAMSUNG 18-55mm F3.5-5.6<br />
OIS III<br />
Focal Length<br />
18–55 mm<br />
Focal Length in 35 mm Equivalent 27.7–84.7 mm<br />
Lens Construction-Elements 12<br />
Lens Construction-Groups 9<br />
Aspherical Elements 1<br />
Angle of View 75.9°–28.7°<br />
Maximum Aperture<br />
F3.5–5.6<br />
Minimum Aperture<br />
F22<br />
Number of Diaphragm Bla<strong>de</strong>s 7<br />
Minimum Focus Distance (Wi<strong>de</strong>) 0.28 m<br />
Minimum Focus Distance (Tele) 0.28 m<br />
Maximum Magnification 0.22X<br />
Lens Hood<br />
Inclu<strong>de</strong>d<br />
Optical Image Stabilizer<br />
Yes<br />
Mount Type<br />
<strong>Samsung</strong> <strong>NX</strong> Mount<br />
Filter Size<br />
58 mm<br />
Max. Diameter<br />
63 mm<br />
Length<br />
65.1 mm<br />
Weight (Lens Only, Approx.) 204 g<br />
Operating Temperature 0–40 °C<br />
Operating Humidity 5–85 %<br />
Lens Name<br />
SAMSUNG 12-24mm F4-5.6 ED<br />
Focal Length<br />
12–24 mm<br />
Focal Length in 35 mm Equivalent 18.5–37 mm<br />
Lens Construction-Elements 10<br />
Lens Construction-Groups 8<br />
Aspherical Elements 2<br />
ED Elements 1<br />
Angle of View 99.0°–60.7°<br />
Maximum Aperture<br />
F4–5.6<br />
Minimum Aperture<br />
F22<br />
Number of Diaphragm Bla<strong>de</strong>s 7<br />
Minimum Focus Distance (Wi<strong>de</strong>) 0.24 m<br />
Minimum Focus Distance (Tele) 0.24 m<br />
Maximum Magnification 0.14X<br />
Lens Hood<br />
Inclu<strong>de</strong>d<br />
Optical Image Stabilizer<br />
No<br />
Mount Type<br />
<strong>Samsung</strong> <strong>NX</strong> Mount<br />
Filter Size<br />
58 mm<br />
Max. Diameter<br />
63.5 mm<br />
Length<br />
65.5 mm<br />
Weight (Lens Only, Approx.) 208 g<br />
Operating Temperature 0–40 °C<br />
Operating Humidity 5–85 %<br />
Lens Name<br />
Focal Length<br />
Focal Length in 35 mm Equivalent 77–308 mm<br />
SAMSUNG <strong>50</strong>-<strong>200mm</strong> F4-5.6 ED<br />
OIS III<br />
<strong>50</strong>–200 mm<br />
Lens Construction-Elements 17<br />
Lens Construction-Groups 13<br />
ED Elements 2<br />
Angle of View 31.4°–8.0°<br />
Maximum Aperture<br />
F4–5.6<br />
Minimum Aperture<br />
F22<br />
Number of Diaphragm Bla<strong>de</strong>s 7<br />
Minimum Focus Distance (Wi<strong>de</strong>) 0.98 m<br />
Minimum Focus Distance (Tele) 0.98 m<br />
Maximum Magnification 0.2X<br />
Lens Hood<br />
Inclu<strong>de</strong>d<br />
Optical Image Stabilizer<br />
Yes<br />
Mount Type<br />
<strong>Samsung</strong> <strong>NX</strong> Mount<br />
Filter Size<br />
52 mm<br />
Max. Diameter<br />
70 mm<br />
Length<br />
100.5 mm<br />
Weight (Lens Only, Approx.) 406 g<br />
Operating Temperature 0–40 °C<br />
Operating Humidity 5–85 %<br />
Specifications may change without notice for better performance.<br />
State of California Proposition 65 Warning (US only)<br />
WARNING : This product contains chemicals known to the State of<br />
California to cause cancer and birth <strong>de</strong>fects or other reproductive harm.<br />
Español<br />
Antes <strong>de</strong> usar este dispositivo<br />
Gracias por adquirir la lente <strong>Samsung</strong>. Las ilustraciones <strong>de</strong> este manual están<br />
basadas en la lente SAMSUNG 18-55mm F3.5-5.6 OIS III. Las ilustraciones<br />
usadas en el manual <strong>de</strong>l usuario pue<strong>de</strong>n ser diferentes <strong>de</strong> los elementos<br />
reales. Algunas funciones <strong>de</strong>scritas en este manual podrían no estar<br />
disponibles según el mo<strong>de</strong>lo <strong>de</strong> la cámara. Actualice el firmware <strong>de</strong>l cuerpo y<br />
la lente <strong>de</strong> la cámara. Visite www.samsung.com para <strong>de</strong>scargar el firmware.<br />
Desembalaje<br />
Lente, Tapa <strong>de</strong> la lente, Tapa <strong>de</strong> montaje <strong>de</strong> la lente, Cubierta,<br />
Funda, Manual <strong>de</strong>l usuario<br />
• Elemento opcional: Filtro<br />
Diseño (Ver ilustración A)<br />
1 Índice <strong>de</strong> montaje <strong>de</strong> la lente 2 Anillo <strong>de</strong> <strong>zoom</strong><br />
3 Anillo <strong>de</strong> enfoque 4 Índice <strong>de</strong> montaje <strong>de</strong> la tapa <strong>de</strong> la lente<br />
5 Lente 6 Interruptor AF/MF 7 Botón i-Function<br />
8 Contactos <strong>de</strong> información <strong>de</strong> la lente<br />
Colocar y retirar la lente<br />
► Para colocar la lente<br />
1 Retire la tapa <strong>de</strong> la lente, la tapa <strong>de</strong> montaje <strong>de</strong> la lente y la<br />
cubierta <strong>de</strong>l cuerpo.<br />
2 Haga coincidir la marca roja <strong>de</strong> la lente con la marca roja <strong>de</strong>l<br />
cuerpo <strong>de</strong> la cámara. Luego, gire la lente como se muestra en<br />
la ilustración hasta que se ajuste en su sitio. (Ver ilustración B)<br />
► Para retirar la lente, mantenga pulsado el botón <strong>de</strong> <strong>de</strong>senganche, y<br />
luego gire la lente como se muestra en la ilustración. (Ver ilustración C)<br />
Establecer el método <strong>de</strong> enfoque<br />
Configure el interruptor AF/MF <strong>de</strong> la lente en AF o MF.<br />
Uso <strong>de</strong>l enfoque automático (AF): El enfoque se ajusta<br />
automáticamente si presiona [Obturador] hasta la mitad.<br />
No aplique fuerza excesiva sobre el frente <strong>de</strong> la lente mientras la<br />
cámara esté utilizando la función <strong>de</strong> enfoque automático (AF).<br />
Esto podría afectar el funcionamiento <strong>de</strong> la lente.<br />
Uso <strong>de</strong>l enfoque manual (MF): Es posible ajustar el foco<br />
manualmente girando el anillo <strong>de</strong> enfoque <strong>de</strong> la lente.<br />
Ajuste la función <strong>de</strong> Asistencia MF para obtener ayuda con el enfoque<br />
manual. Consulte el manual <strong>de</strong> su cámara para conocer más <strong>de</strong>talles.<br />
Uso <strong>de</strong> i-Function<br />
Al pulsar el botón i-Function en la lente, podrá usar el modo E o<br />
Z, o ajustar algunas opciones <strong>de</strong> disparo. En el modo E, podrá<br />
seleccionar escenas o efectos <strong>de</strong> filtro que la cámara admita. La función<br />
Z le permite hacer <strong>zoom</strong> sobre un sujeto con una menor <strong>de</strong>gradación<br />
<strong>de</strong> la calidad <strong>de</strong> la fotografía que con el <strong>zoom</strong> digital. Esta función sólo está<br />
disponible si la cámara la admite. El modo i-Scene solamente está disponible<br />
en algunos mo<strong>de</strong>los <strong>de</strong> la cámara.<br />
1 Gire el selector <strong>de</strong> modos hasta P, A, S, M o i.<br />
2 Pulse [i-Function] en la lente para seleccionar una<br />
configuración.<br />
• Los ajustes disponibles pue<strong>de</strong>n variar según el modo <strong>de</strong><br />
disparo seleccionado.<br />
Ajustes Modo <strong>de</strong> disparo Ajustes Modo <strong>de</strong> disparo<br />
E i Valor <strong>de</strong> apertura A, M<br />
Z P, A, S, M, i<br />
Velocidad <strong>de</strong>l<br />
obturador<br />
S, M<br />
Valor <strong>de</strong><br />
exposición<br />
Balance <strong>de</strong><br />
blancos, ISO<br />
P, A, S<br />
P, A, S, M<br />
3 Gire el anillo <strong>de</strong> enfoque <strong>de</strong> la lente para modificar los ajustes<br />
(o para modificar el nivel <strong>de</strong> <strong>zoom</strong> en el modo Z).<br />
4 Enfoque y capture la fotografía.<br />
• Para seleccionar los elementos que aparecerán al pulsar el botón<br />
i-Function en la lente, pue<strong>de</strong> utilizar el menú Personalización iFn<br />
<strong>de</strong> la cámara.<br />
• Las escenas o los efectos <strong>de</strong> filtro disponibles en el modo E<br />
pue<strong>de</strong>n variar según el mo<strong>de</strong>lo <strong>de</strong> la cámara.<br />
• Si selecciona Z, la resolución <strong>de</strong> las fotos cambiará según el<br />
nivel <strong>de</strong> <strong>zoom</strong>.<br />
Usar la rueda <strong>de</strong> <strong>zoom</strong><br />
Establezca la composición <strong>de</strong> la foto (la distancia focal <strong>de</strong> la lente)<br />
girando el anillo <strong>de</strong> <strong>zoom</strong> <strong>de</strong> la lente.<br />
Como el enfoque se pue<strong>de</strong> cambiar ligeramente gracias a la distancia<br />
focal cambiada, se recomienda ajustarlo <strong>de</strong> nuevo antes <strong>de</strong> hacer una<br />
fotografía si ha cambiado la distancia focal girando el anillo <strong>de</strong> <strong>zoom</strong>.<br />
Usar la cubierta <strong>de</strong> lente (Ver ilustración E)<br />
Para prevenir que se <strong>de</strong>teriore la calidad <strong>de</strong> la imagen bloqueando la<br />
luz innecesaria, utilice una cubierta <strong>de</strong> la lente.<br />
Si usa el flash en situaciones en las cuales la distancia entre el objetivo y la<br />
cámara es corta, la luz <strong>de</strong>l flash podría verse bloqueada parcialmente por<br />
la lente o la tapa <strong>de</strong> la lente. Para garantizar la iluminación correcta, retire<br />
la tapa <strong>de</strong> la lente o ajuste la distancia entre la cámara y los objetivos.<br />
Usar un filtro (opcional) (Ver ilustración F)<br />
Antes <strong>de</strong> colocar el filtro en la lente, asegúrese <strong>de</strong> que sea compatible.<br />
Consulte „Especificaciones” para ver los tamaños <strong>de</strong> filtro compatibles.<br />
• El filtro es un producto óptico preciso. Manténgalo lejos <strong>de</strong>l polvo, la<br />
suciedad o los arañazos. No intente montar dos o más filtros al mismo<br />
tiempo. Si lo hace podría <strong>de</strong>teriorar la calidad <strong>de</strong> la imagen y provocar<br />
un efecto <strong>de</strong> viñeta (la reducción <strong>de</strong>l brillo o la saturación <strong>de</strong> una<br />
imagen en la periferia, ocultando el ángulo <strong>de</strong> visión <strong>de</strong>l lente).<br />
• En el caso <strong>de</strong> filtros <strong>de</strong> marco fino, el efecto viñeta se pue<strong>de</strong> producir<br />
con una lente <strong>de</strong> gran ángulo.<br />
Especificaciones<br />
Nombre <strong>de</strong> la lente<br />
SAMSUNG 18-55mm F3.5-5.6 OIS III<br />
Distancia focal<br />
18–55 mm<br />
Distancia focal en equivalente<br />
a 35 mm<br />
27,7–84,7 mm<br />
Construcción <strong>de</strong> la lente -<br />
Elementos<br />
12<br />
Construcción <strong>de</strong> la lente - Grupos 9<br />
Elementos Asféricos 1<br />
Vista angular 75,9°–28,7°<br />
Apertura máxima<br />
F3.5–5.6<br />
Apertura mínima<br />
F22<br />
Número <strong>de</strong> láminas <strong>de</strong>l diafragma 7<br />
Distancia mínima <strong>de</strong> enfoque (Wi<strong>de</strong>) 0,28 m<br />
Distancia mínima <strong>de</strong> enfoque (Tele) 0,28 m<br />
Amplificación máxima 0,22X<br />
Cubierta <strong>de</strong> la lente<br />
Incluida<br />
Estabilizador <strong>de</strong> imagen óptica Sí<br />
Tipo <strong>de</strong> montaje<br />
Montaje <strong>Samsung</strong> <strong>NX</strong><br />
Tamaño <strong>de</strong>l filtro<br />
58 mm<br />
Diámetro máximo<br />
63 mm<br />
Distancia<br />
65,1 mm<br />
Peso (Sólo lentes, Aprox.)<br />
204 g<br />
Temperatura <strong>de</strong> funcionamiento 0–40 °C<br />
Humedad <strong>de</strong> funcionamiento 5–85%<br />
Nombre <strong>de</strong> la lente<br />
SAMSUNG 12-24mm F4-5.6 ED<br />
Distancia focal<br />
12–24 mm<br />
Distancia focal en equivalente<br />
a 35 mm<br />
18,5–37 mm<br />
Construcción <strong>de</strong> la lente - Elementos 10<br />
Construcción <strong>de</strong> la lente - Grupos 8<br />
Elementos Asféricos 2<br />
Elementos ED 1<br />
Vista angular 99,0°–60,7°<br />
Apertura máxima<br />
F4–5.6<br />
Apertura mínima<br />
F22<br />
Número <strong>de</strong> láminas <strong>de</strong>l diafragma 7<br />
Distancia mínima <strong>de</strong> enfoque (Wi<strong>de</strong>) 0,24 m<br />
Distancia mínima <strong>de</strong> enfoque (Tele) 0,24 m<br />
Amplificación máxima 0,14X<br />
Cubierta <strong>de</strong> la lente<br />
Incluida<br />
Estabilizador <strong>de</strong> imagen óptica No<br />
Tipo <strong>de</strong> montaje<br />
Montaje <strong>Samsung</strong> <strong>NX</strong><br />
Tamaño <strong>de</strong>l filtro<br />
58 mm<br />
Diámetro máximo<br />
63,5 mm<br />
Distancia<br />
65,5 mm<br />
Peso (Sólo lentes, Aprox.)<br />
208 g<br />
Temperatura <strong>de</strong> funcionamiento 0–40 °C<br />
Humedad <strong>de</strong> funcionamiento 5–85%<br />
Nombre <strong>de</strong> la lente<br />
SAMSUNG <strong>50</strong>-<strong>200mm</strong> F4-5.6<br />
ED OIS III<br />
Distancia focal<br />
<strong>50</strong>–200 mm<br />
Distancia focal en equivalente<br />
a 35 mm<br />
77–308 mm<br />
Construcción <strong>de</strong> la lente - Elementos 17<br />
Construcción <strong>de</strong> la lente - Grupos 13<br />
Elementos ED 2<br />
Vista angular 31,4°–8,0°<br />
Apertura máxima<br />
F4–5.6<br />
Apertura mínima<br />
F22<br />
Número <strong>de</strong> láminas <strong>de</strong>l diafragma 7<br />
Distancia mínima <strong>de</strong> enfoque (Wi<strong>de</strong>) 0,98 m<br />
Distancia mínima <strong>de</strong> enfoque (Tele) 0,98 m<br />
Amplificación máxima 0,2X<br />
Cubierta <strong>de</strong> la lente<br />
Incluida<br />
Estabilizador <strong>de</strong> imagen óptica Sí<br />
Tipo <strong>de</strong> montaje<br />
Montaje <strong>Samsung</strong> <strong>NX</strong><br />
Tamaño <strong>de</strong>l filtro<br />
52 mm<br />
Diámetro máximo<br />
70 mm<br />
Distancia<br />
100,5 mm<br />
Peso (Sólo lentes, Aprox.)<br />
406 g<br />
Temperatura <strong>de</strong> funcionamiento 0–40 °C<br />
Humedad <strong>de</strong> funcionamiento 5–85%<br />
Las especificaciones pue<strong>de</strong>n cambiar sin aviso previo para un<br />
mejor rendimiento.
A<br />
English<br />
3<br />
4<br />
5<br />
1<br />
2<br />
7<br />
6<br />
C D<br />
E F<br />
8<br />
B<br />
Español<br />
2<br />
1<br />
Franç<strong>ais</strong><br />
Avant d’utiliser ce produit<br />
Merci d’avoir acheté l’objectif <strong>Samsung</strong>. Les illustrations <strong>de</strong> ce manuel font<br />
référence à l'objectif SAMSUNG 18-55mm F3.5-5.6 OIS III. Les illustrations<br />
utilisées dans le présent gui<strong>de</strong> peuvent différer du produit fourni. Selon le<br />
modèle <strong>de</strong> votre appareil photo, il est possibles que certaines fonctionnalités<br />
décrites dans le présent gui<strong>de</strong> ne soient pas offertes. Mettez à jour le<br />
micrologiciel du boîtier <strong>de</strong> l’appareil photo et <strong>de</strong> l’objectif. Accé<strong>de</strong>z au site<br />
www.samsung.com/fr pour télécharger le micrologiciel.<br />
Contenu du coffret<br />
<strong>Objectif</strong>, couvre-objectif, capuchon <strong>de</strong> la monture <strong>de</strong> l’objectif, pare-soleil,<br />
étui, gui<strong>de</strong> d'utilisation<br />
• Élément optionnel : Filtre<br />
Disposition (Voir illustration A)<br />
1 Repère d'installation <strong>de</strong> l'objectif 2 Bague <strong>de</strong> réglage du <strong>zoom</strong><br />
3 Bague <strong>de</strong> mise au point 4 Repère du parasoleil d’objectif 5 <strong>Objectif</strong><br />
6 Commutateur AF/MF 7 Touche i-Function 8 Contacts d’information <strong>de</strong> l’objectif<br />
Installation et retrait <strong>de</strong> l’objectif<br />
► Pour fixer l’objectif :<br />
1 Retirez le couvre-objectif, le capuchon <strong>de</strong> la monture <strong>de</strong> l’objectif et<br />
le capuchon du boîtier.<br />
2 Alignez le repère rouge <strong>de</strong> l’objectif sur le repère rouge du boîtier.<br />
Tournez ensuite l’objectif comme indiqué sur l’illustration, jusqu’à ce<br />
qu’il soit en place. (Voir illustration B)<br />
► Pour retirer l’objectif, maintenez enfoncé le bouton d’éjection <strong>de</strong> l’objectif,<br />
puis tournez l’objectif comme indiqué sur l’illustration. (Voir illustration C)<br />
Réglage <strong>de</strong> la métho<strong>de</strong> <strong>de</strong> mise au point<br />
Positionnez le commutateur AF/MF <strong>de</strong> l’objectif sur AF ou MF.<br />
Utilisation <strong>de</strong> la Mise au point auto (AF) : La mise au point se fera<br />
automatiquement lorsque vous enfoncez à moitié le [Déclencheur].<br />
Ne forcez pas sur l’objectif lorsque l’appareil photo est en mo<strong>de</strong> Mise au point<br />
automatique (AF). Vous risqueriez <strong>de</strong> provoquer un dysfonctionnement <strong>de</strong> l’objectif.<br />
Utilisation <strong>de</strong> la Mise au point manuelle (MF) : Pour effectuer manuellement<br />
la mise au point, tournez la bague <strong>de</strong> mise au point <strong>de</strong> l’objectif.<br />
Réglez la fonction MF Assist (assistant MF) pour faciliter la mise au point manuelle.<br />
Consultez le gui<strong>de</strong> d'utilisation <strong>de</strong> votre appareil photo pour plus d’informations.<br />
Utilisation <strong>de</strong> i-Function<br />
Lorsque vous appuyez sur le bouton i-Function <strong>de</strong> l’objectif, vous pouvez<br />
utiliser le mo<strong>de</strong> E ou Z, ou bien régler certaines options <strong>de</strong><br />
prise <strong>de</strong> vue. En mo<strong>de</strong> E, vous pouvez sélectionner <strong>de</strong>s scènes ou<br />
<strong>de</strong>s effets <strong>de</strong> filtre pris en charge par votre appareil photo. L’Z vous<br />
permet <strong>de</strong> <strong>zoom</strong>er sur un sujet avec une dégradation moindre <strong>de</strong> la qualité<br />
photo qu’avec le <strong>zoom</strong> numérique. Cette fonction est disponible uniquement<br />
si elle est prise en charge par votre appareil photo. Le mo<strong>de</strong> i-Scene est<br />
disponible uniquement sur certains modèles d’appareils photos.<br />
1 Passez au mo<strong>de</strong> P, A, S, M ou i à l'ai<strong>de</strong> <strong>de</strong> la molette <strong>de</strong> sélection.<br />
2 Appuyez sur [i-Function] sur l’objectif pour sélectionner un réglage.<br />
• Les réglages offerts peuvent varier en fonction du mo<strong>de</strong> <strong>de</strong> prise <strong>de</strong> vue sélectionné.<br />
Paramètres Mo<strong>de</strong> <strong>de</strong> prise <strong>de</strong> vue Paramètres Mo<strong>de</strong> <strong>de</strong> prise <strong>de</strong> vue<br />
E i Valeur d'ouverture A, M<br />
Z P, A, S, M, i Valeur d'exposition P, A, S<br />
Vitesse<br />
Balance <strong>de</strong>s<br />
S, M<br />
d'obturation<br />
blancs, ISO<br />
P, A, S, M<br />
3 Tournez la bague <strong>de</strong> mise au point sur l’objectif afin <strong>de</strong> régler les<br />
paramètres (ou modifier le niveau <strong>de</strong> <strong>zoom</strong> en mo<strong>de</strong> Z).<br />
4 Effectuez la mise au point et prenez la photo.<br />
• Pour sélectionner les options à afficher lorsque vous appuyez sur<br />
le bouton i-Function <strong>de</strong> l’objectif, vous pouvez utiliser le menu iFn<br />
Customizing (personnalisation iFn) <strong>de</strong> l’appareil photo.<br />
• Les scènes ou effets <strong>de</strong> filtre disponibles en mo<strong>de</strong> E<br />
peuvent varier en fonction du modèle <strong>de</strong> l’appareil photo.<br />
• Si vous sélectionnez Z, la résolution <strong>de</strong> la photo changera<br />
en fonction du niveau <strong>de</strong> <strong>zoom</strong>.<br />
Utilisation <strong>de</strong> la bague <strong>de</strong> réglage du <strong>zoom</strong><br />
Pour obtenir la photo la plus claire possible (régler la distance focale <strong>de</strong><br />
l’objectif), tournez la bague <strong>de</strong> <strong>zoom</strong> <strong>de</strong> l’objectif. (Voir illustration D)<br />
Comme la mise au point peut être légèrement modifiée en r<strong>ais</strong>on d’une<br />
valeur <strong>de</strong> distance focale changée, il est recommandé <strong>de</strong> régler à nouveau<br />
la mise au point avant <strong>de</strong> prendre une photo, et ce, si vous avez changé la<br />
distance focale en f<strong>ais</strong>ant tourner bague <strong>de</strong> réglage du <strong>zoom</strong>.<br />
Utilisation d’un parasoleil (Voir illustration E)<br />
Pour éviter toute dégradation <strong>de</strong> la qualité <strong>de</strong>s images, utilisez un<br />
parasoleil afin <strong>de</strong> réduire la luminosité.<br />
Lorsque vous utilisez un flash dans <strong>de</strong>s situations où la distance<br />
entre le sujet et l’appareil photo est faible, la lumière émise par le<br />
flash peut être partiellement bloquée par l’objectif ou le parasoleil.<br />
Pour assurer un éclairage approprié, retirez le parasoleil ou modifiez<br />
la distance entre l’appareil photo et le sujet.<br />
Utilisation d’un filtre (en option) (Voir illustration F)<br />
Avant <strong>de</strong> placer un filtre sur l’objectif, assurez-vous qu’il est compatible. Voir<br />
les « Fiche technique » pour la taille <strong>de</strong> filtre compatible.<br />
• Un filtre est un produit optique précis. Conservez-le à l’abri <strong>de</strong><br />
la poussière, <strong>de</strong> la saleté ou <strong>de</strong>s rayures. De même, n’essayez<br />
pas <strong>de</strong> monter <strong>de</strong>ux filtres ou plus simultanément. Ceci pourrait<br />
détériorer la qualité <strong>de</strong> l’image et provoquer un phénomène <strong>de</strong><br />
vignettage (réduction <strong>de</strong> la luminosité d’une image ou saturation à<br />
la périphérie, l’angle <strong>de</strong> visualisation <strong>de</strong> l’objectif étant caché).<br />
• En cas <strong>de</strong> filtre à cadre ép<strong>ais</strong>, vous risque d’obtenir un effet <strong>de</strong><br />
vignettage avec un objectif grand angle.<br />
Fiche technique<br />
Nom <strong>de</strong> l’objectif<br />
SAMSUNG 18-55mm F3.5-5.6 OIS III<br />
Longueur focale<br />
18 à 55 mm<br />
Longueur focale (équivalent 35 mm)<br />
27,7 à 84,7 mm<br />
Fabrication <strong>de</strong> l’objectif - éléments 12<br />
Fabrication <strong>de</strong> l’objectif - groupes 9<br />
Éléments asphériques 1<br />
Angle <strong>de</strong> vue 75,9° à 28,7°<br />
Ouverture maximale<br />
f/3.5 à f/5.6<br />
Ouverture minimale f/22<br />
nombre <strong>de</strong> lames <strong>de</strong> diaphragme 7<br />
Distance minimale <strong>de</strong> mise au point<br />
(panoramique)<br />
0,28 m<br />
Distance minimale <strong>de</strong> mise au point (téléobjectif) 0,28 m<br />
Agrandissement maximum 0,22X<br />
Pare-soleil<br />
inclus<br />
Stabilisation optique <strong>de</strong> l’image<br />
oui<br />
Type <strong>de</strong> montage<br />
monture <strong>Samsung</strong> <strong>NX</strong><br />
Taille du filtre<br />
58 mm<br />
Diamètre maximal<br />
63 mm<br />
Longueur<br />
65,1 mm<br />
Poids (lentilles seulement, environ)<br />
204 g<br />
Franç<strong>ais</strong><br />
Température <strong>de</strong> fonctionnement <strong>de</strong> 0 à 40 °C<br />
Humidité <strong>de</strong> fonctionnement <strong>de</strong> 5 à 85%<br />
Nom <strong>de</strong> l’objectif<br />
SAMSUNG 12-24mm F4-5.6 ED<br />
Longueur focale<br />
12 à 24 mm<br />
Longueur focale (équivalent 35 mm)<br />
18,5 à 37 mm<br />
Fabrication <strong>de</strong> l’objectif - éléments 10<br />
Fabrication <strong>de</strong> l’objectif - groupes 8<br />
Éléments asphériques 2<br />
Éléments ED 1<br />
Angle <strong>de</strong> vue 99,0° à 60,7°<br />
Ouverture maximale<br />
f/4 à f/5.6<br />
Ouverture minimale f/22<br />
nombre <strong>de</strong> lames <strong>de</strong> diaphragme 7<br />
Distance minimale <strong>de</strong> mise au point<br />
(panoramique)<br />
0,24 m<br />
Distance minimale <strong>de</strong> mise au point (téléobjectif) 0,24 m<br />
Agrandissement maximum 0,14X<br />
Pare-soleil<br />
inclus<br />
Stabilisation optique <strong>de</strong> l’image<br />
Non<br />
Type <strong>de</strong> montage<br />
monture <strong>Samsung</strong> <strong>NX</strong><br />
Taille du filtre<br />
58 mm<br />
Diamètre maximal<br />
63,5 mm<br />
Longueur<br />
65,5 mm<br />
Poids (lentilles seulement, environ)<br />
208 g<br />
Température <strong>de</strong> fonctionnement <strong>de</strong> 0 à 40 °C<br />
Humidité <strong>de</strong> fonctionnement <strong>de</strong> 5 à 85%<br />
Nom <strong>de</strong> l’objectif<br />
SAMSUNG <strong>50</strong>-<strong>200mm</strong> F4-5.6 ED<br />
OIS III<br />
Longueur focale<br />
<strong>50</strong> à 200 mm<br />
Longueur focale (équivalent 35 mm)<br />
77 à 308 mm<br />
Fabrication <strong>de</strong> l’objectif - éléments 17<br />
Fabrication <strong>de</strong> l’objectif - groupes 13<br />
Éléments ED 2<br />
Angle <strong>de</strong> vue 31,4° à 8,0°<br />
Ouverture maximale<br />
f/4 à f/5.6<br />
Ouverture minimale f/22<br />
nombre <strong>de</strong> lames <strong>de</strong> diaphragme 7<br />
Distance minimale <strong>de</strong> mise au point<br />
(panoramique)<br />
0,98 m<br />
Distance minimale <strong>de</strong> mise au point (téléobjectif) 0,98 m<br />
Agrandissement maximum 0,2X<br />
Pare-soleil<br />
inclus<br />
Stabilisation optique <strong>de</strong> l’image<br />
oui<br />
Type <strong>de</strong> montage<br />
monture <strong>Samsung</strong> <strong>NX</strong><br />
Taille du filtre<br />
52 mm<br />
Diamètre maximal<br />
70 mm<br />
Longueur<br />
100,5 mm<br />
Poids (lentilles seulement, environ)<br />
406 g<br />
Température <strong>de</strong> fonctionnement <strong>de</strong> 0 à 40 °C<br />
Humidité <strong>de</strong> fonctionnement <strong>de</strong> 5 à 85%<br />
Ces caractéristiques peuvent changer sans préavis à <strong>de</strong>s fins<br />
d'amélioration du ren<strong>de</strong>ment.<br />
Health and Safety Information<br />
Please read the following safety tips carefully for proper and safe use.<br />
Warning<br />
Caution<br />
• Do not stare at the sun through the lens or camera.<br />
This may cause severe damage to your eyes.<br />
• Keep your lens or camera away from small children and pets.<br />
• Do not store the lens in direct sunlight without the lens cap.<br />
Direct sunlight that passes through the lens may combust<br />
if it comes into contact with flammable materials.<br />
• Use only sturdy tripods. Lightweight or unstable tripods<br />
may fall over and damage the camera.<br />
Lens Storage and Maintenance<br />
• Store the lens in dry and well ventilated areas.<br />
• Do not store the lens in areas of high temperature or humidity or in a<br />
closet, car, or confined area where chemicals are stored.<br />
• The lens is not waterproof. Be careful not to allow it to get wet when<br />
using it near water.<br />
• Do not use chemicals such as thinner, alcohol, or benzene to remove dust.<br />
• Do not drop the lens or apply excessive shock to it. The lens is a<br />
precise optical product.<br />
• Avoid using the lens anywhere there is a sud<strong>de</strong>n temperature<br />
change. Keep the lens in a plastic bag or a camera case to prevent<br />
con<strong>de</strong>nsation from forming on the insi<strong>de</strong> or outsi<strong>de</strong> of the lens.<br />
• When carrying or not using the lens, place the lens cap and lens<br />
mount cover on the lens to prevent contamination from foreign<br />
particles and protect the lens from scratches.<br />
• Do not keep the camera mounted on a tripod without the lens cap.<br />
The insi<strong>de</strong> of the camera can be damaged by direct sunlight.<br />
• Check the lens once every year or two for best performance.<br />
• Do not apply excessive force to the front of the lens.<br />
• For safe use of the lens, mount or dismount the lens while the camera<br />
is turned off.<br />
• <strong>Samsung</strong> is not responsible for any damage incurred by using other<br />
manufacturers’ lenses.<br />
• Make sure to change lenses only in a clean environment and do not<br />
put your fingers into the lens mount when mounting the lens. Foreign<br />
particles may affect shooting results or cause a malfunction if they<br />
enter the camera body or the lens.<br />
• Do not transport or store the lens with any part of the tube is exten<strong>de</strong>d.<br />
Completely retract the lens tube insi<strong>de</strong> the body by rotating the <strong>zoom</strong><br />
ring on the lens.<br />
Correct Disposal of This Product<br />
(Waste Electrical & Electronic Equipment)<br />
(Applicable in countries with separate collection systems)<br />
This marking on the product, accessories or literature indicates that<br />
the product and its electronic accessories (e.g. charger, headset, USB<br />
cable) should not be disposed of with other household waste at the<br />
end of their working life. To prevent possible harm to the environment<br />
or human health from uncontrolled waste disposal, please separate<br />
these items from other types of waste and recycle them responsibly to<br />
promote the sustainable reuse of material resources. Household users<br />
should contact either the retailer where they purchased this product, or<br />
their local government office, for <strong>de</strong>tails of where and how they can take<br />
these items for environmentally safe recycling. Business users should<br />
contact their supplier and check the terms and conditions of the purchase<br />
contract. This product and its electronic accessories should not be mixed<br />
with other commercial wastes for disposal.<br />
Información sobre salud y seguridad<br />
Lea las siguientes sugerencias <strong>de</strong> seguridad <strong>de</strong>tenidamente para usar el<br />
dispositivo <strong>de</strong> manera correcta y segura.<br />
Advertencia<br />
Precaución<br />
• No mire el sol a través <strong>de</strong> la lente o <strong>de</strong> la cámara.<br />
Esto pue<strong>de</strong> causar daños graves en sus ojos.<br />
• Mantenga la lente o la cámara lejos <strong>de</strong> los niños<br />
pequeños y las mascotas.<br />
• No almacene la lente en contacto directo con el sol<br />
sin la tapa <strong>de</strong> la lente. La luz directa <strong>de</strong>l sol que pasa<br />
a través <strong>de</strong> la lente pue<strong>de</strong> incendiarse si entra en<br />
contacto con materiales inflamables.<br />
• Utilice sólo trípo<strong>de</strong>s firmes. Los trípo<strong>de</strong>s livianos o<br />
inestables pue<strong>de</strong>n caerse y dañar la cámara.<br />
Almacenamiento y mantenimiento <strong>de</strong> la lente<br />
• Almacene la lente en un área seca y ventilada.<br />
• No guar<strong>de</strong> la lente en sitios con alta temperatura o humedad, o en un armario,<br />
un automóvil o un sitio cerrado en el cual se guar<strong>de</strong>n sustancias químicas.<br />
• La lente no es impermeable. Asegúrese <strong>de</strong> no permitir que se moje<br />
cuando la use cerca <strong>de</strong>l agua.<br />
• No use químicos como diluyentes, alcohol o benceno para quitar el polvo.<br />
• No <strong>de</strong>je caer la lente ni ejerza una fuerza excesiva sobre ella. La lente<br />
es un producto óptico preciso.<br />
• Evite el uso <strong>de</strong> la lente en lugares don<strong>de</strong> pueda haber cambios <strong>de</strong><br />
temperatura repentinos. Mantenga la lente en una bolsa <strong>de</strong> plástico o<br />
en un estuche para cámaras para evitar que se forme con<strong>de</strong>nsación en<br />
el interior o el exterior <strong>de</strong> la lente.<br />
• Cuando no esté utilizando la lente o cuando la lleve <strong>de</strong> un lado a otro,<br />
colóquele la tapa y la tapa <strong>de</strong> montaje a fin <strong>de</strong> evitar la contaminación<br />
con partículas externas e impedir que la lente sufra raspaduras.<br />
• No <strong>de</strong>je la cámara montada en un trípo<strong>de</strong> sin la tapa <strong>de</strong> la lente.<br />
El interior <strong>de</strong> la cámara se pue<strong>de</strong> dañar con la luz directa <strong>de</strong>l sol.<br />
• Revise la lente una o dos veces al año para un mejor rendimiento.<br />
• No ejerza una fuerza excesiva sobre el frente <strong>de</strong> la lente.<br />
• Para usar la lente <strong>de</strong> manera segura, coloque la lente o retírela<br />
cuando la cámara esté apagada.<br />
• <strong>Samsung</strong> no es responsable <strong>de</strong> los daños causados por el uso con<br />
lentes <strong>de</strong> otros fabricantes.<br />
• Asegúrese <strong>de</strong> cambiar las lentes solo en un sitio limpio, y no coloque los<br />
<strong>de</strong>dos <strong>de</strong>ntro <strong>de</strong>l montaje <strong>de</strong> la lente cuando la esté colocando. Las partículas<br />
externas podrían afectar los resultados o provocar el funcionamiento<br />
incorrecto si ingresan en el cuerpo <strong>de</strong> la cámara o en la lente.<br />
• No transporte ni guar<strong>de</strong> la lente con una parte <strong>de</strong>l tubo extendida. Repliegue<br />
el tubo <strong>de</strong> la lente por completo <strong>de</strong>ntro <strong>de</strong>l cuerpo girando el anillo <strong>de</strong> <strong>zoom</strong>.<br />
Eliminación correcta <strong>de</strong> este producto<br />
(Residuos <strong>de</strong> aparatos eléctricos y electrónicos)<br />
(Se aplica en países con sistemas <strong>de</strong> recolección por separado)<br />
La presencia <strong>de</strong> este símbolo en el producto, accesorios o material<br />
informativo que lo acompañan, indica que al finalizar su vida útil ni el<br />
producto ni sus accesorios electrónicos (como el cargador, cascos, cable<br />
USB) <strong>de</strong>berán eliminarse junto con otros residuos domésticos. Para evitar<br />
los posibles daños al medio ambiente o a la salud humana que representa<br />
la eliminación incontrolada <strong>de</strong> residuos, separe estos productos <strong>de</strong> otros<br />
tipos <strong>de</strong> residuos y recíclelos correctamente. De esta forma se promueve<br />
la reutilización sostenible <strong>de</strong> recursos materiales. Los usuarios particulares<br />
pue<strong>de</strong>n contactar con el establecimiento don<strong>de</strong> adquirieron el producto o<br />
con las autorida<strong>de</strong>s locales pertinentes para informarse sobre cómo y dón<strong>de</strong><br />
pue<strong>de</strong>n llevarlo para que sea sometido a un reciclaje ecológico y seguro.<br />
Los usuarios comerciales pue<strong>de</strong>n contactar con su proveedor y consultar<br />
las condiciones <strong>de</strong>l contrato <strong>de</strong> compra. Este producto y sus accesorios<br />
electrónicos no <strong>de</strong>ben eliminarse junto a otros residuos comerciales.<br />
Renseignements relatifs à la santé et à la sécurité<br />
Veuillez lire attentivement les conseils <strong>de</strong> sécurité suivants pour une<br />
utilisation correcte et sûre.<br />
Mise en<br />
gar<strong>de</strong><br />
Attention<br />
• Lorsque vous utilisez l’objectif ou l’appareil photo, ne<br />
regar<strong>de</strong>z pas directement le soleil. Vous risqueriez <strong>de</strong><br />
causer <strong>de</strong>s dommages à vos yeux.<br />
• Maintenez votre objectif et votre appareil photo loin <strong>de</strong>s<br />
enfants en bas âge et <strong>de</strong>s animaux domestiques.<br />
• Ne conservez pas l’objectif en plein soleil sans le couvreobjectif.<br />
La lumière directe du soleil passant à travers<br />
l'objectif peut engendrer <strong>de</strong> la combustion si elle entre en<br />
contact direct avec <strong>de</strong>s matériaux inflammables.<br />
• N'utilisez que <strong>de</strong>s trépieds robustes. Évitez d’utiliser <strong>de</strong>s<br />
trépieds trop légers ou instables, car ils risqueraient <strong>de</strong><br />
tomber et d’endommager l’appareil photo.<br />
Conservation et entretien <strong>de</strong> l’objectif<br />
• Rangez l’objectif dans <strong>de</strong>s endroits secs et bien ventilés.<br />
• Ne rangez pas l’objectif dans <strong>de</strong>s endroits où la température ou l’humidité sont<br />
élevées, ou dans un placard, dans un véhicule ou dans toute autre zone restreinte<br />
où <strong>de</strong>s produits chimiques sont également entreposés.<br />
• L’objectif n’est pas étanche. Veillez à ne pas le mouiller lorsque vous l’utilisez près<br />
d’une source d’eau.<br />
• N’utilisez pas <strong>de</strong> produits chimiques tels que du diluant, <strong>de</strong> l’alcool ou du benzène<br />
pour retirer la poussière.<br />
• Ne l<strong>ais</strong>sez pas tomber l’objectif et ne le soumettez pas à <strong>de</strong>s chocs excessifs.<br />
L’objectif est un produit optique précis.<br />
• Évitez d’utiliser l’objectif où il y a <strong>de</strong>s changements <strong>de</strong> température soudains.<br />
Conservez l’objectif dans un sac en plastique ou un étui d’appareil photo pour<br />
éviter la formation <strong>de</strong> con<strong>de</strong>nsation à l’intérieur ou à l'extérieur du produit.<br />
• Lors du transport ou lorsque vous n’utilisez pas l’objectif, placez le couvre-objectif et<br />
le capuchon <strong>de</strong> la monture <strong>de</strong> l’objectif sur l’objectif afin d’éviter toute contamination<br />
due à <strong>de</strong>s particules étrangères et <strong>de</strong> protéger l’objectif contre les rayures.<br />
• Ne l<strong>ais</strong>sez pas l’appareil photo installé sur un trépied sans le couvre-objectif.<br />
La lumière solaire peut endommager l’intérieur <strong>de</strong> l’appareil photo.<br />
• Vérifiez l’objectif tous les ans ou tous les <strong>de</strong>ux ans pour obtenir un meilleur ren<strong>de</strong>ment.<br />
• N’appliquez pas <strong>de</strong> force excessive sur l’avant <strong>de</strong> l’objectif.<br />
• Pour une utilisation sûre <strong>de</strong> l’objectif, installez-le ou désinstallez-le lorsque<br />
l’appareil photo est éteint.<br />
• <strong>Samsung</strong> décline toute responsabilité en cas <strong>de</strong> dommages causés par<br />
l’utilisation d’objectifs fournis par d’autres fabricants.<br />
• Assurez-vous <strong>de</strong> toujours changer l’objectif dans un environnement propre et<br />
ne placez pas vos doigts sur la monture lors <strong>de</strong> l'installation <strong>de</strong> l’objectif. Les<br />
particules étrangères peuvent influer sur les résultats <strong>de</strong>s prises <strong>de</strong> vue ou<br />
entraîner un mauv<strong>ais</strong> fonctionnement <strong>de</strong> l’appareil photo en cas <strong>de</strong> contact avec<br />
le boîtier ou l’objectif.<br />
• Vous ne <strong>de</strong>vez ni transporter, ni stocker l’objectif lorsque le tube d’extension est<br />
sorti. Pour faire entièrement rentrer le tube à l’intérieur du mécanisme, tournez la<br />
bague du <strong>zoom</strong> <strong>de</strong> l’objectif.<br />
Mise au rebut appropriée du produit<br />
(Déchets d’équipements électriques et électroniques)<br />
(Applicable aux pays qui utilisent <strong>de</strong>s systèmes <strong>de</strong> collecte distincts)<br />
Ce symbole sur le produit, ses accessoires ou sa documentation<br />
indique que ni le produit, ni ses accessoires électroniques<br />
(chargeur, casque audio, câble USB, etc.) ne peuvent être éliminés<br />
en fin <strong>de</strong> vie avec les autres déchets ménagers. Puisque l'élimination non<br />
maîtrisée <strong>de</strong>s déchets peut porter préjudice à l'environnement ou à la santé<br />
humaine, veuillez séparer le produit <strong>de</strong>s autres types <strong>de</strong> déchets et le<br />
recycler <strong>de</strong> façon responsable. Vous favoriserez ainsi la réutilisation durable<br />
<strong>de</strong>s ressources matérielles. Les particuliers <strong>de</strong>vraient communiquer avec le<br />
détaillant chez qui ils ont acheté le produit ou se renseigner auprès <strong>de</strong> leur<br />
municipalité pour savoir où et comment ils peuvent mettre ce produit au rebut<br />
afin qu'il soit recyclé en respectant l'environnement. Les entreprises sont<br />
<strong>de</strong>vraient communiquer avec leurs fournisseurs et consulter les conditions<br />
générales <strong>de</strong> leur contrat d'achat. Ce produit et ses accessoires électroniques<br />
ne doivent pas être éliminés avec les autres déchets commerciaux.<br />
Veuillez consulter la garantie incluse avec votre produit<br />
ou visiter notre site Web www.samsung.com pour obtenir<br />
du service après-vente ou pour toute question.


