istruzioni installazione manutenzione mangani m ... - IMESA SpA
istruzioni installazione manutenzione mangani m ... - IMESA SpA
istruzioni installazione manutenzione mangani m ... - IMESA SpA

You also want an ePaper? Increase the reach of your titles
YUMPU automatically turns print PDFs into web optimized ePapers that Google loves.
E031002B 10/03/06<br />
does not allow to identify the machine, make any<br />
installation operation and service; warranty will<br />
expire automatically.<br />
6. INSTALLATION PREMISES AND<br />
POSITIONING<br />
All the installation must be done by qualified staff.<br />
Place the machine on a flat surface in a stable<br />
and horizontal position, adjusting feet at the<br />
bedplate on the sides. Verify the correct balancing<br />
of the machine. In case of drying flatwork ironer,<br />
remove the roll cover and position the rigging on<br />
the chromed roll between the pressor roll and<br />
steam fan duct. For a correct use, functioning and<br />
service, leave at least 500 mm of free space<br />
around the machine.<br />
For a drying ironer, the supporting surface must<br />
have a minimum capacity of 500 kg/m². For other<br />
machines check their technical cards. The drying<br />
ironer must be placed in a ventilated room (see<br />
the law disposal), with a room temperature<br />
between -10ºC and +40ºC.<br />
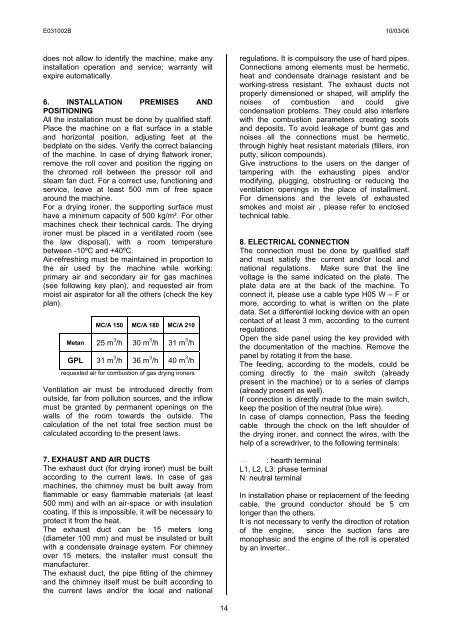
Air-refreshing must be maintained in proportion to<br />
the air used by the machine while working:<br />
primary air and secondary air for gas machines<br />
(see following key plan), and requested air from<br />
moist air aspirator for all the others (check the key<br />
plan).<br />
MC/A 150 MC/A 180 MC/A 210<br />
Metan 25 m 3 /h 30 m 3 /h 31 m 3 /h<br />
GPL 31 m 3 /h 36 m 3 /h 40 m 3 /h<br />
requested air for combustion of gas drying ironers<br />
Ventilation air must be introduced directly from<br />
outside, far from pollution sources, and the inflow<br />
must be granted by permanent openings on the<br />
walls of the room towards the outside. The<br />
calculation of the net total free section must be<br />
calculated according to the present laws.<br />
7. EXHAUST AND AIR DUCTS<br />
The exhaust duct (for drying ironer) must be built<br />
according to the current laws. In case of gas<br />
machines, the chimney must be built away from<br />
flammable or easy flammable materials (at least<br />
500 mm) and with an air-space or with insulation<br />
coating. If this is impossible, it will be necessary to<br />
protect it from the heat.<br />
The exhaust duct can be 15 meters long<br />
(diameter 100 mm) and must be insulated or built<br />
with a condensate drainage system. For chimney<br />
over 15 meters, the installer must consult the<br />
manufacturer.<br />
The exhaust duct, the pipe fitting of the chimney<br />
and the chimney itself must be built according to<br />
the current laws and/or the local and national<br />
14<br />
regulations. It is compulsory the use of hard pipes.<br />
Connections among elements must be hermetic,<br />
heat and condensate drainage resistant and be<br />
working-stress resistant. The exhaust ducts not<br />
properly dimensioned or shaped, will amplify the<br />
noises of combustion and could give<br />
condensation problems. They could also interfere<br />
with the combustion parameters creating soots<br />
and deposits. To avoid leakage of burnt gas and<br />
noises all the connections must be hermetic,<br />
through highly heat resistant materials (fillers, iron<br />
putty, silicon compounds).<br />
Give instructions to the users on the danger of<br />
tampering with the exhausting pipes and/or<br />
modifying, plugging, obstructing or reducing the<br />
ventilation openings in the place of installment.<br />
For dimensions and the levels of exhausted<br />
smokes and moist air , please refer to enclosed<br />
technical table.<br />
8. ELECTRICAL CONNECTION<br />
The connection must be done by qualified staff<br />
and must satisfy the current and/or local and<br />
national regulations. Make sure that the line<br />
voltage is the same indicated on the plate. The<br />
plate data are at the back of the machine. To<br />
connect it, please use a cable type H05 W – F or<br />
more, according to what is written on the plate<br />
data. Set a differential locking device with an open<br />
contact of at least 3 mm, according to the current<br />
regulations.<br />
Open the side panel using the key provided with<br />
the documentation of the machine. Remove the<br />
panel by rotating it from the base.<br />
The feeding, according to the models, could be<br />
coming directly to the main switch (already<br />
present in the machine) or to a series of clamps<br />
(already present as well).<br />
If connection is directly made to the main switch,<br />
keep the position of the neutral (blue wire).<br />
In case of clamps connection, Pass the feeding<br />
cable through the chock on the left shoulder of<br />
the drying ironer, and connect the wires, with the<br />
help of a screwdriver, to the following terminals:<br />
: hearth terminal<br />
L1, L2, L3: phase terminal<br />
N: neutral terminal<br />
In installation phase or replacement of the feeding<br />
cable, the ground conductor should be 5 cm<br />
longer than the others.<br />
It is not necessary to verify the direction of rotation<br />
of the engine, since the suction fans are<br />
monophasic and the engine of the roll is operated<br />
by an inverter..