

Philips 2800 series Téléviseur LED - Guide de mise en route - ENG
Philips 2800 series Téléviseur LED - Guide de mise en route - ENG
Philips 2800 series Téléviseur LED - Guide de mise en route - ENG

Create successful ePaper yourself
Turn your PDF publications into a flip-book with our unique Google optimized e-Paper software.
Quick Start <strong>Gui<strong>de</strong></strong><br />
1<br />
2<br />
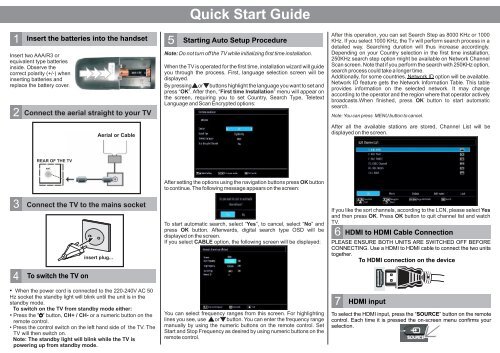
Insert the batteries into the handset<br />
Insert two AAA/R3 or<br />
equival<strong>en</strong>t type batteries<br />
insi<strong>de</strong>. Observe the<br />
correct polarity (+/-) wh<strong>en</strong><br />
inserting batteries and<br />
replace the battery cover.<br />
Connect the aerial straight to your TV<br />
Aerial or Cable<br />
5<br />
Starting Auto Setup Procedure<br />
Note: Do not turn off the TV while initializing first time installation.<br />
Wh<strong>en</strong> the TV is operated for the first time, installation wizard will gui<strong>de</strong><br />
you through the process. First, language selection scre<strong>en</strong> will be<br />
displayed.<br />
By pressing or buttons highlight the language you want to set and<br />
press “ OK”. After th<strong>en</strong>, “ First time Installation” m<strong>en</strong>u will appear on<br />
the scre<strong>en</strong>, requiring you to set Country, Search Type, Teletext<br />
Language and Scan Encrypted options:<br />
After this operation, you can set Search Step as 8000 KHz or 1000<br />
KHz. If you select 1000 KHz, the Tv will perform search process in a<br />
<strong>de</strong>tailed way. Searching duration will thus increase accordingly.<br />
Dep<strong>en</strong>ding on your Country selection in the first time installation,<br />
250KHz search step option might be available on Network Channel<br />
Scan scre<strong>en</strong>. Note that if you perform the search with 250KHz option,<br />
search process could take a longer time.<br />
Additionally, for some countries, Network ID option will be available.<br />
Network ID feature gets the Network Information Table. This table<br />
provi<strong>de</strong>s information on the selected network. It may change<br />
according to the operator and the region where that operator actively<br />
broadcasts. Wh<strong>en</strong> finished, press OK button to start automatic<br />
search.<br />
Note: You can press MENU button to cancel.<br />
After all the available stations are stored, Channel List will be<br />
displayed on the scre<strong>en</strong>.<br />
REAR OF THE TV<br />
3<br />
4<br />
Connect the TV to the mains socket<br />
To switch the TV on<br />
insert plug...<br />
• Wh<strong>en</strong> the power cord is connected to the 220-240V AC 50<br />
Hz socket the standby light will blink until the unit is in the<br />
standby mo<strong>de</strong>.<br />
To switch on the TV from standby mo<strong>de</strong> either:<br />
• Press the " " button, CH+ / CH- or a numeric button on the<br />
remote control.<br />
• Press the control switch on the left hand si<strong>de</strong> of the TV. The<br />
TV will th<strong>en</strong> switch on.<br />
Note: The standby light will blink while the TV is<br />
powering up from standby mo<strong>de</strong>.<br />
After setting the options using the navigation buttons press OK button<br />
to continue. The following message appears on the scre<strong>en</strong>:<br />
To start automatic search, select “ Yes”, to cancel, select “ No” and<br />
press OK button. Afterwards, digital search type OSD will be<br />
displayed on the scre<strong>en</strong>.<br />
If you select CABLE option, the following scre<strong>en</strong> will be displayed:<br />
You can select frequ<strong>en</strong>cy ranges from this scre<strong>en</strong>. For highlighting<br />
lines you see, use or button. You can <strong>en</strong>ter the frequ<strong>en</strong>cy range<br />
manually by using the numeric buttons on the remote control. Set<br />
Start and Stop Frequ<strong>en</strong>cy as <strong>de</strong>sired by using numeric buttons on the<br />
remote control.<br />
If you like the sort channels, according to the LCN, please select Yes<br />
and th<strong>en</strong> press OK. Press OK button to quit channel list and watch<br />
TV.<br />
6 HDMI to HDMI Cable Connection<br />
PLEASE ENSURE BOTH UNITS ARE SWITCHED OFF BEFORE<br />
CONNECTING. Use a HDMI to HDMI cable to connect the two units<br />
together.<br />
To HDMI connection on the <strong>de</strong>vice<br />
7 HDMI input<br />
To select the HDMI input, press the “ SOURCE” button on the remote<br />
control. Each time it is pressed the on-scre<strong>en</strong> m<strong>en</strong>u confirms your<br />
selection.
Programme Recording & Playback<br />
1<br />
Connect a USB memory stick to your TV<br />
IMPORTANT: To record a programme, you should first connect<br />
a USB memory stick to your TV while the TV is switched off. You<br />
should th<strong>en</strong> switch on the TV to <strong>en</strong>able recording feature.<br />
Otherwise, recording feature will not be available.<br />
You should back up your files before making any connections to<br />
the TV set in or<strong>de</strong>r to avoid any possible data loss. Note that<br />
manufacturer will not be responsible for any file damage or data<br />
loss.<br />
2<br />
Instant Recording<br />
Press button to start recording an ev<strong>en</strong>t instantly while watching a<br />
programme. The following OSD appears on the scre<strong>en</strong>:<br />
3<br />
Programme Playback<br />
In the main m<strong>en</strong>u, use Left or Right buttons to select Media<br />
Browser. Highlight Recordings Library item by using Left or<br />
Right button and press OK button to <strong>en</strong>ter. Recordings<br />
Library will th<strong>en</strong> be displayed.<br />
CAUTION !<br />
• Quickly plugging and unplugging USB <strong>de</strong>vices, is a very<br />
hazardous operation. Especially, do not repeatedly quickly plug<br />
and unplug the drive. This may cause physical damage to the<br />
USB player and especially the USB <strong>de</strong>vice itself.<br />
• Do not pull out USB module while playing or recording a file.<br />
For more information on USB memory stick connection,<br />
recording types and programme playback, please refer to<br />
the instruction book.<br />
Record OSD will th<strong>en</strong> be displayed for a short time and the curr<strong>en</strong>t<br />
ev<strong>en</strong>t will be recor<strong>de</strong>d. You can press button on the remote control<br />
again to record the next ev<strong>en</strong>t on the EPG. In this case, OSD will<br />
display the programmed ev<strong>en</strong>ts for recording.<br />
Select a recor<strong>de</strong>d item from the list (if previously recor<strong>de</strong>d) by<br />
using Up or Down button. Press OK button to view Play<br />
Options.<br />
Select an option by using Up or Down and OK buttons.<br />
IMPORTANT:<br />
The TV supports only FAT32 and NTFS disk<br />
formatting. However, NTFS format is not supported for<br />
recording features. For recording, if you connect a USB disk<br />
with NTFS format, the TV will ask you to format the cont<strong>en</strong>t. See<br />
the section, “Format Disk” in the following pages for more<br />
information on disk formatting.<br />
Note that ALL the data stored on the USB disk will be lost and<br />
th<strong>en</strong> the disk format will be converted toFAT32 in such a case.<br />
Press (STOP) button to cancel instant recording. The following<br />
OSD will be displayed. Select Yes by using Left or Right and OK<br />
buttons to cancel instant recording.<br />
Available playback options:<br />
• Play from start: Plays the recording from the beginning.<br />
• Resume: Recomm<strong>en</strong>ces the recordings.<br />
• Play from offset: Specifies a playing point.<br />
Note: Viewing main m<strong>en</strong>u and m<strong>en</strong>u items will not be available<br />
during the playback.<br />
Press (STOP) button to stop a playback and return to return<br />
to Recordings Library.


