

Philips tondeuse pour se couper les cheveux soi-même - Mode d’emploi - ESP
Philips tondeuse pour se couper les cheveux soi-même - Mode d’emploi - ESP
Philips tondeuse pour se couper les cheveux soi-même - Mode d’emploi - ESP

You also want an ePaper? Increase the reach of your titles
YUMPU automatically turns print PDFs into web optimized ePapers that Google loves.
Hairclipper<br />
QC5170<br />
1 2 3 4<br />
E<br />
A<br />
B<br />
CHARGE<br />
F<br />
G<br />
H<br />
1<br />
2<br />
3<br />
3<br />
4<br />
5<br />
5 6<br />
7<br />
90º<br />
45º<br />
18 0 º 90º<br />
0º 45º<br />
8 9 10<br />
C<br />
I<br />
J<br />
K<br />
D<br />
11 12 13<br />
14 15 16<br />
17 18 19<br />
20 21
ENGLISH<br />
Introduction<br />
Dear custo<strong>me</strong>r, you have made the right choice! Your new<br />
<strong>Philips</strong> hair clipper with new ergonomic design and 180°<br />
adjustable cutting ele<strong>me</strong>nt allows you to clip your own<br />
hair easily. You can move the clipper over all areas of your<br />
head as easily as running your fingers through your hair.<br />
To enjoy using the hair clipper, we advi<strong>se</strong> you to read the<br />
following information.<br />
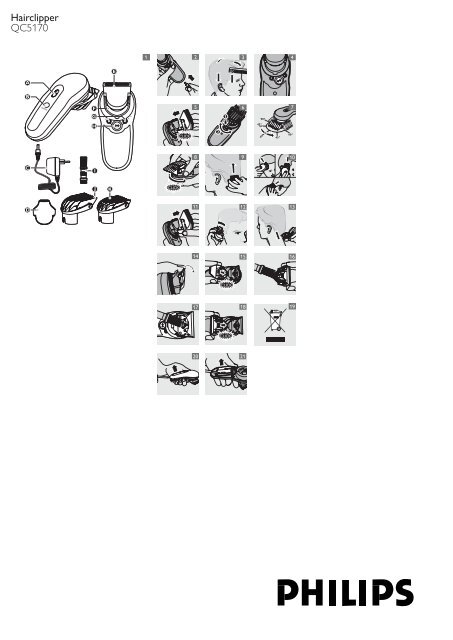
General description (Fig. 1)<br />
A On/off slide<br />
B Charging light<br />
C Adapter (2.5V)<br />
D Precision trim<strong>me</strong>r<br />
E Cutting ele<strong>me</strong>nt<br />
F Swivel head<br />
G Length <strong>se</strong>tting indication window<br />
H Length <strong>se</strong>lector<br />
I Cleaning brush<br />
J Large comb (13-21mm)<br />
K Small comb (3-11mm)<br />
Important<br />
Read the<strong>se</strong> instructions for u<strong>se</strong> carefully before you u<strong>se</strong><br />
the appliance and save them for future reference.<br />
,<br />
,<br />
,<br />
,<br />
,<br />
,<br />
,<br />
,<br />
,<br />
,<br />
,<br />
Check if the voltage indicated on the adapter<br />
corresponds to the local mains voltage before you<br />
connect the appliance.<br />
Only u<strong>se</strong> the adapter supplied to charge the<br />
appliance.<br />
The adapter contains a transfor<strong>me</strong>r. Do not cut<br />
off the adapter to replace it with another plug, as<br />
this cau<strong>se</strong>s a hazardous situation.<br />
Do not u<strong>se</strong> a damaged adapter.<br />
If the adapter is damaged, always have it replaced by<br />
one of the original type in order to avoid hazard.<br />
Do not u<strong>se</strong> the appliance when one of the<br />
attach<strong>me</strong>nts is damaged or broken, as this may<br />
cau<strong>se</strong> injury.<br />
U<strong>se</strong>, charge and store the appliance at a<br />
temperature between 15°C and 35°C.<br />
Keep the appliance and the adapter dry.<br />
Keep the appliance out of the reach of children.<br />
This appliance is only intended for clipping human<br />
scalp hair. Do not u<strong>se</strong> it for another purpo<strong>se</strong>.<br />
If the appliance is subjected to a major change in<br />
temperature, pressure or humidity, let the appliance<br />
acclimati<strong>se</strong> for 30 minutes before you u<strong>se</strong> it.<br />
Electromagnetic fields (EMF)<br />
This <strong>Philips</strong> appliance complies with all standards<br />
regarding electromagnetic fields (EMF). If handled<br />
properly and in accordance with the instructions in this<br />
instruction manual, the appliance is safe to u<strong>se</strong> according<br />
to scientific evidence available today.<br />
Charging<br />
A fully charged appliance has a cord<strong>les</strong>s clipping ti<strong>me</strong> of<br />
up to one hour.<br />
Do not charge the appliance for more than 24 hours.<br />
The ideal charging ti<strong>me</strong> is 8 hours.<br />
1 Charge the appliance for 8 hours before you u<strong>se</strong> it<br />
for the first ti<strong>me</strong>.<br />
Make sure the appliance is switched off when you charge<br />
it.<br />
2 In<strong>se</strong>rt the appliance plug into the appliance and<br />
in<strong>se</strong>rt the adapter into the wall socket. (Fig. 2)<br />
, The charging light goes on to indicate that the<br />
appliance is charging.<br />
Note:The charging light does not indicate when the<br />
appliance is fully charged.<br />
Corded clipping<br />
Only run the appliance from the mains when the<br />
battery is empty.<br />
1 Switch off the hair clipper.<br />
2 Connect the hair clipper to the mains and wait a<br />
few <strong>se</strong>conds before you switch it on.<br />
If the batteries are completely empty, wait a few minutes<br />
before you switch on the appliance.<br />
Using the appliance<br />
Make sure your hair is clean and dry. Do not u<strong>se</strong> the<br />
appliance on freshly washed hair.<br />
1 Comb your hair with a styling comb in the<br />
direction of hair growth. (Fig. 3)<br />
Clipping with comb attach<strong>me</strong>nt<br />
, U<strong>se</strong> the small or large comb attach<strong>me</strong>nt, depending<br />
on the desired hair length. The remaining hair<br />
length after cutting is indicated in mm on the comb<br />
attach<strong>me</strong>nts. The <strong>se</strong>lected hair length <strong>se</strong>tting (1-5) is<br />
shown in the two length <strong>se</strong>tting indication windows<br />
on both sides of the length <strong>se</strong>lector. (Fig. 4)<br />
See the table below for an overview of the length<br />
<strong>se</strong>ttings and the corresponding hair lengths of each comb<br />
attach<strong>me</strong>nt.<br />
Small<br />
comb<br />
Large<br />
comb<br />
<strong>se</strong>tting hair length <strong>se</strong>tting hair length<br />
1 3mm/<br />
0.12in<br />
2 5mm/<br />
0.20in<br />
3 7mm/<br />
0.28in<br />
4 9mm/<br />
0.35in<br />
5 11mm/<br />
0.43in<br />
1 13mm/0.51in<br />
2 15mm/0.59in<br />
3 17mm/0.67in<br />
4 19mm/0.75in<br />
5 21mm/0.83in<br />
1 Slide the comb attach<strong>me</strong>nt into the guiding grooves<br />
of the appliance (‘click’). (Fig. 5)<br />
Make sure that the comb attach<strong>me</strong>nt has been properly<br />
slid into the grooves on both sides.<br />
2 Set the comb attach<strong>me</strong>nt to the desired hair length.<br />
To do this, press the relea<strong>se</strong> button on the length<br />
<strong>se</strong>lector (1) and turn it to the left or right (2). (Fig.<br />
6)<br />
Do not turn the length <strong>se</strong>lector beyond the highest hair<br />
length <strong>se</strong>tting (5).<br />
3 Switch on the appliance.<br />
Using the swivel head<br />
, From its starting position of 0° (pointing forwards),<br />
you can turn the swivel head 45° or 90° to the left<br />
or right. In this way, you can adjust the position of<br />
the cutting ele<strong>me</strong>nt to the part of your head you<br />
are clipping. This makes it much easier to clip your<br />
own hair. (Fig. 7)<br />
1 Set the cutting ele<strong>me</strong>nt to the desired position by<br />
turning the swivel head (‘click’). (Fig. 8)<br />
Always adjust the position of the cutting ele<strong>me</strong>nt with<br />
the swivel head. Do not turn the cutting ele<strong>me</strong>nt or the<br />
comb.<br />
Do not turn the swivel head more than 90° to the left<br />
or right.<br />
, The swivel head allows you to hold and u<strong>se</strong> the<br />
appliance like a brush. (Fig. 9)<br />
Tips<br />
- We advi<strong>se</strong> you to start clipping at the highest <strong>se</strong>tting<br />
of the large comb and to reduce the hair length<br />
<strong>se</strong>tting gradually.<br />
- If a lot of hair has accumulated in the comb<br />
attach<strong>me</strong>nt, remove it from the clipper and blow<br />
and/or shake the hair out of it. When you remove<br />
the comb attach<strong>me</strong>nt, the hair length <strong>se</strong>tting does<br />
not change.<br />
- Write down the hair length <strong>se</strong>ttings you u<strong>se</strong> to<br />
create a certain hairstyle as a reminder for future<br />
clipping <strong>se</strong>ssions.<br />
1 Move the clipper through the hair slowly.<br />
, The hair on different parts of your head grows in<br />
different directions. You may want to try different<br />
clipping directions (upwards, downwards and<br />
across). (Fig. 10)<br />
, To clip in the most effective way, move the<br />
appliance against the direction of hair growth.<br />
2 Turn the swivel head to the position that is most<br />
comfortable for your arm when clipping the<br />
different parts of your head.<br />
3 Make sure that the flat part of the comb<br />
attach<strong>me</strong>nt is fully in contact with the scalp to<br />
obtain an even cutting result.<br />
Clipping without comb attach<strong>me</strong>nt<br />
You can u<strong>se</strong> the clipper without comb attach<strong>me</strong>nt to clip<br />
your hair very clo<strong>se</strong> to the skin (0.8mm) or to contour<br />
the neckline and the area around the ears.<br />
Note:When you u<strong>se</strong> the hair clipper without a comb<br />
attach<strong>me</strong>nt, the clipper cuts the hair very clo<strong>se</strong> to the skin.<br />
1 Remove the comb attach<strong>me</strong>nt by pulling it off the<br />
appliance. (Fig. 11)<br />
Never pull at the flexible top of the comb attach<strong>me</strong>nt.<br />
Always pull at the bottom part.<br />
2 When you contour the hair around the ears, only<br />
cut the hair ends. The hairline should be clo<strong>se</strong> to<br />
the ear. (Fig. 12)<br />
3 To contour the neckline and the sideburns, turn the<br />
clipper and make downward strokes. (Fig. 13)<br />
4 Move slowly and smoothly. Just follow the natural<br />
hairline.<br />
5 Adjust the position of the swivel head to make<br />
contouring easier.<br />
Using the precision trim<strong>me</strong>r<br />
You can u<strong>se</strong> the appliance with the precision trim<strong>me</strong>r to<br />
contour the neckline and the area around the ears more<br />
easily and more preci<strong>se</strong>ly.<br />
1 Make sure the appliance is switched off.<br />
2 Remove the comb attach<strong>me</strong>nt. (Fig. 11)<br />
3 Apply pressure to the centre of the cutting ele<strong>me</strong>nt<br />
to open it. (Fig. 14)<br />
4 Place the lug of the precision trim<strong>me</strong>r into the<br />
slot and push the cutting ele<strong>me</strong>nt back onto the<br />
appliance (‘click’). (Fig. 15)<br />
Cleaning<br />
Do not u<strong>se</strong> abrasives, scourers or liquids such as<br />
alcohol, petrol or acetone to clean the appliance.<br />
Only clean the appliance and the adapter with the brush<br />
supplied.<br />
Be careful that the cutting ele<strong>me</strong>nt does not fall on the<br />
floor.<br />
1 Clean the appliance every ti<strong>me</strong> you have u<strong>se</strong>d it.<br />
2 Make sure the appliance is switched off and<br />
disconnected from the mains before you clean it.<br />
3 Remove the comb attach<strong>me</strong>nt. (Fig. 11)<br />
4 Apply pressure to the centre of the cutting ele<strong>me</strong>nt<br />
to open it. (Fig. 14)<br />
5 Clean the cutting ele<strong>me</strong>nt with the brush supplied.<br />
(Fig. 16)<br />
6 Clean the appliance with the brush supplied. (Fig.<br />
17)<br />
7 Clo<strong>se</strong> the cutting ele<strong>me</strong>nt by pushing it back onto<br />
the appliance (‘click’). (Fig. 18)<br />
The appliance does not need any lubrication.<br />
Replace<strong>me</strong>nt<br />
Only replace a worn or damaged cutting ele<strong>me</strong>nt with an<br />
original <strong>Philips</strong> cutting unit.<br />
,<br />
Environ<strong>me</strong>nt<br />
Do not throw away the appliance with the normal<br />
hou<strong>se</strong>hold waste at the end of its life, but hand it in<br />
at an official collection point for recycling. By doing<br />
this, you help to pre<strong>se</strong>rve the environ<strong>me</strong>nt. (Fig. 19)<br />
4203.000.5531.1 2/7
,<br />
The built-in rechargeable batteries contain<br />
substances that may pollute the environ<strong>me</strong>nt.<br />
Always remove the batteries before you discard<br />
and hand in the appliance at an official collection<br />
point. Dispo<strong>se</strong> of the batteries at an official<br />
collection point for batteries. If you have trouble<br />
removing the batteries, you can also take the<br />
appliance to a <strong>Philips</strong> <strong>se</strong>rvice centre. The staff of<br />
this centre will remove the batteries for you and<br />
will dispo<strong>se</strong> of them in an environ<strong>me</strong>ntally safe way.<br />
Removing the batteries<br />
Only remove the batteries when you discard the<br />
appliance. Make sure the batteries are completely empty<br />
when you remove them.<br />
Do not connect the appliance to the mains again after<br />
the batteries have been removed.<br />
1 Disconnect the appliance from the mains and let<br />
the appliance run until the motor stops.<br />
2 Remove the upper housing part of the appliance.<br />
(Fig. 20)<br />
3 Remove the batteries by prying them out of the<br />
appliance. (Fig. 21)<br />
4 Cut the wires with a pair of hou<strong>se</strong>hold scissors<br />
and dispo<strong>se</strong> of the batteries properly.<br />
Guarantee and <strong>se</strong>rvice<br />
If you need information or if you have a<br />
problem, plea<strong>se</strong> visit the <strong>Philips</strong> website at<br />
www.philips.com or contact the <strong>Philips</strong> Custo<strong>me</strong>r Care<br />
Centre in your country (you find its phone number in<br />
the worldwide guarantee leaflet). If there is no Custo<strong>me</strong>r<br />
Care Centre in your country, turn to your local <strong>Philips</strong><br />
dealer or contact the Service Depart<strong>me</strong>nt of <strong>Philips</strong><br />
Do<strong>me</strong>stic Appliances and Personal Care BV.<br />
4203.000.5531.1 3/7
<strong>ESP</strong>AÑOL<br />
Introducción<br />
Estimado cliente, enhorabuena por su elección. Con<br />
su nuevo cortapelos <strong>Philips</strong> podrá cortar<strong>se</strong> el pelo<br />
usted mismo de forma fácil. Gracias a su nuevo di<strong>se</strong>ño<br />
ergonómico y a su ele<strong>me</strong>nto de corte ajustable 180°,<br />
podrá desplazar el cortapelos por todas las zonas de su<br />
cabeza tan fácil<strong>me</strong>nte como si <strong>se</strong> pasa<strong>se</strong> un cepillo. Para<br />
disfrutar de su cortapelos, le acon<strong>se</strong>jamos que lea la<br />
siguiente información.<br />
Descripción general (fig. 1)<br />
A Botón de encendido/apagado<br />
B Piloto de carga<br />
C Adaptador (2,5 V)<br />
D Recortador de precisión<br />
E Ele<strong>me</strong>nto de corte<br />
F Cabezal giratorio<br />
G Indicador de posición de longitud<br />
H Selector de longitud<br />
I Cepillo de limpieza<br />
J Peine-guía grande (13 - 21 mm)<br />
K Peine-guía pequeño (3 - 11 mm)<br />
Importante<br />
Antes de usar el aparato, lea atenta<strong>me</strong>nte estas<br />
instrucciones de uso y consérvelas por si necesitara<br />
consultarlas en el futuro.<br />
,<br />
,<br />
,<br />
,<br />
,<br />
,<br />
,<br />
,<br />
,<br />
,<br />
,<br />
Antes de enchufar el aparato, compruebe si el<br />
voltaje indicado en el adaptador <strong>se</strong> corresponde<br />
con el voltaje de red local.<br />
Utilice única<strong>me</strong>nte el adaptador suministrado para<br />
cargar el aparato.<br />
El adaptador incorpora un transformador. No corte<br />
el adaptador para sustituirlo por otra clavija, ya que<br />
podría provocar situaciones de peligro.<br />
No utilice un adaptador dañado.<br />
Si el adaptador estuviera dañado, sustitúyalo<br />
siempre por otro del modelo original para evitar<br />
situaciones de peligro.<br />
No utilice el aparato si alguno de los accesorios<br />
está dañado o roto, ya que podría ocasionar<br />
<strong>les</strong>iones.<br />
Utilice y guarde el aparato a una temperatura entre<br />
15°C y 35°C.<br />
Mantenga el aparato y el adaptador siempre <strong>se</strong>cos.<br />
Mantenga el aparato fuera del alcance de los niños.<br />
Este aparato está ideado para cortar única<strong>me</strong>nte el<br />
pelo humano. No lo utilice con otra finalidad.<br />
Si el aparato sufre un cambio brusco de<br />
temperatura, presión o hu<strong>me</strong>dad, deje que <strong>se</strong><br />
aclimate durante 30 minutos antes de utilizarlo.<br />
Campos electromagnéticos (CEM)<br />
Este aparato <strong>Philips</strong> cumple todos los estándares<br />
sobre campos electromagnéticos (CEM). Si <strong>se</strong> utiliza<br />
correcta<strong>me</strong>nte y de acuerdo con las instrucciones de este<br />
manual, el aparato <strong>se</strong> puede usar de forma <strong>se</strong>gura <strong>se</strong>gún<br />
los conocimientos científicos disponib<strong>les</strong> hoy en día.<br />
Carga<br />
Un aparato completa<strong>me</strong>nte cargado proporciona un<br />
tiempo de corte sin cable de hasta una hora.<br />
No cargue el aparato durante más de 24 horas.<br />
El tiempo ideal de carga es de 8 horas.<br />
1 Antes de usar el aparato por vez pri<strong>me</strong>ra, cárguelo<br />
durante al <strong>me</strong>nos 8 horas.<br />
A<strong>se</strong>gúre<strong>se</strong> de que el aparato esté apagado cuando lo<br />
cargue.<br />
2 Introduzca la clavija del aparato en el cortapelos y<br />
enchufe el adaptador a la toma de corriente. (fig. 2)<br />
, El piloto de carga <strong>se</strong> enciende para indicar que el<br />
aparato <strong>se</strong> está cargando.<br />
Nota:El piloto de carga no indica cuándo está el aparato<br />
completa<strong>me</strong>nte cargado.<br />
Corte de pelo con el aparato enchufado a la<br />
red<br />
Utilice el aparato enchufado a la red única<strong>me</strong>nte cuando<br />
la batería esté descargada.<br />
1 Apague el cortapelos.<br />
2 Conecte el cortapelos a la red y espere unos<br />
<strong>se</strong>gundos antes de encenderlo.<br />
Si la batería está completa<strong>me</strong>nte descargada, espere unos<br />
minutos antes de encender el aparato.<br />
Uso del aparato<br />
A<strong>se</strong>gúre<strong>se</strong> de que el cabello esté limpio y <strong>se</strong>co. No utilice<br />
el aparato con el pelo recién lavado.<br />
1 Peine el pelo con un peine de peluquería en la<br />
dirección de crecimiento del pelo. (fig. 3)<br />
Corte de pelo con peine-guía<br />
, U<strong>se</strong> el peine-guía grande o el pequeño en función<br />
de la longitud de pelo que de<strong>se</strong>e obtener. El rango<br />
de longitudes de pelo después del corte está<br />
indicado en milí<strong>me</strong>tros en cada peine-guía. La<br />
posición de longitud de pelo <strong>se</strong>leccionada (1-5)<br />
<strong>se</strong> muestra en los dos indicadores de posición de<br />
longitud situados a ambos lados del <strong>se</strong>lector de<br />
longitud. (fig. 4)<br />
Consulte la siguiente tabla para ver las distintas posiciones<br />
de longitud y la correspondiente longitud de pelo con<br />
cada peine-guía.<br />
Peineguía<br />
pequeño<br />
Posición<br />
longitud de<br />
pelo<br />
1 3 mm/<br />
0,12 pulg.<br />
2 5 mm/<br />
0,2 pulg.<br />
3 7 mm/<br />
0,28 pulg.<br />
4 9 mm/<br />
0,35 pulg.<br />
5 11 mm/<br />
0,43 pulg.<br />
Peineguía<br />
grande<br />
Posición<br />
longitud de<br />
pelo<br />
1 13 mm/<br />
0,51 pulg.<br />
2 15 mm/<br />
0,59 pulg.<br />
3 17 mm/<br />
0,67 pulg.<br />
4 19 mm/<br />
0,75 pulg.<br />
5 21 mm/<br />
0,83 pulg.<br />
1 Deslice el peine-guía por las ranuras de guía del<br />
aparato (“clic”). (fig. 5)<br />
A<strong>se</strong>gúre<strong>se</strong> de que el peine-guía <strong>se</strong> ha deslizado<br />
correcta<strong>me</strong>nte por las ranuras de ambos lados.<br />
2 Ajuste el peine-guía a la longitud de pelo de<strong>se</strong>ada.<br />
Para ello, presione el botón de liberación del<br />
<strong>se</strong>lector de longitud (1) y desplace éste hacia la<br />
izquierda o hacia la derecha (2). (fig. 6)<br />
No desplace el <strong>se</strong>lector de longitud más allá de la<br />
máxima posición de longitud de pelo (5).<br />
3 Encienda el aparato.<br />
Uso del cabezal giratorio<br />
, Desde su posición inicial de 0° (apuntando hacia<br />
delante), puede girar el cabezal 45° ó 90° hacia la<br />
derecha o hacia la izquierda. De esta forma, puede<br />
ajustar la posición del ele<strong>me</strong>nto de corte a la zona<br />
de su cabeza en la que esté cortándo<strong>se</strong> el pelo.<br />
Esto facilita en gran <strong>me</strong>dida cortar<strong>se</strong> el pelo uno<br />
mismo. (fig. 7)<br />
1 Coloque el ele<strong>me</strong>nto de corte en la posición<br />
de<strong>se</strong>ada girando el cabezal giratorio (“clic”). (fig. 8)<br />
Ajuste siempre la posición del ele<strong>me</strong>nto de corte con<br />
el cabezal giratorio. No gire el ele<strong>me</strong>nto de corte o el<br />
peine-guía.<br />
No gire el cabezal giratorio más de 90° hacia la<br />
izquierda o derecha.<br />
,<br />
-<br />
El cabezal giratorio permite sujetar y utilizar el<br />
aparato como un cepillo. (fig. 9)<br />
Con<strong>se</strong>jos<br />
Le acon<strong>se</strong>jamos que empiece a cortar el pelo con<br />
la posición máxima del peine-guía grande, y que<br />
vaya reduciendo la posición de longitud de pelo<br />
gradual<strong>me</strong>nte.<br />
- Si <strong>se</strong> ha acumulado mucho pelo en el peine-guía,<br />
elimínelo soplando o sacudiéndolo. Al retirar el<br />
peine-guía, la posición de longitud de pelo no cambia.<br />
- Anote la posición de longitud de pelo usada para<br />
crear un determinado estilo de corte y así poder<br />
recordarla en futuras ocasiones.<br />
1 Desplace el cortapelos lenta<strong>me</strong>nte por el pelo.<br />
, Puesto que el pelo de las distintas partes de la<br />
cabeza crece en distintas direcciones, puede probar<br />
diferentes direcciones de corte (hacia arriba, hacia<br />
abajo y cruzado). (fig. 10)<br />
, Para cortar de la forma más eficaz, mueva el<br />
aparato en dirección contraria a la de crecimiento<br />
del pelo.<br />
2 Gire el cabezal giratorio a la posición más<br />
cómoda para su brazo cuando corte el pelo de las<br />
distintas partes de su cabeza.<br />
3 A<strong>se</strong>gúre<strong>se</strong> de que la parte plana del peine-guía esté<br />
completa<strong>me</strong>nte en contacto con el cuero cabelludo<br />
para con<strong>se</strong>guir un corte unifor<strong>me</strong>.<br />
Corte de pelo sin peine-guía<br />
Puede usar el cortapelos sin peine-guía para cortar el<br />
pelo al ras (0,8 mm) o para perfilar la línea del cuello y la<br />
zona alrededor de las orejas.<br />
Nota:Cuando utilice el cortapelos sin el peine-guía, <strong>se</strong><br />
cortará el pelo al ras.<br />
1 Tire del peine-guía para sacarlo del aparato. (fig. 11)<br />
No tire nunca de la parte superior flexible del peine.<br />
Tire siempre de su parte inferior.<br />
2 Cuando perfile el pelo alrededor de las orejas,<br />
corte única<strong>me</strong>nte las puntas del pelo. La línea del<br />
pelo debe quedar próxima a la oreja.<br />
(fig. 12)<br />
3 Para perfilar la línea del cuello y las patillas, dé la<br />
vuelta al cortapelos y haga pasadas hacia abajo. (fig.<br />
13)<br />
4 Mueva el cortapelos despacio y suave<strong>me</strong>nte.<br />
Simple<strong>me</strong>nte siga la línea natural del pelo.<br />
5 Ajuste la posición del cabezal giratorio para que el<br />
perfilado le resulte más fácil.<br />
Uso del recortador de precisión<br />
Puede utilizar el cortapelos con el recortador de<br />
precisión para perfilar la línea del cuello y la zona<br />
alrededor de las orejas de forma más fácil y precisa.<br />
1 A<strong>se</strong>gúre<strong>se</strong> de que el aparato está apagado.<br />
2 Quite el peine-guía (fig. 11)<br />
3 Presione en el centro del ele<strong>me</strong>nto de corte para<br />
abrirlo. (fig. 14)<br />
4 Coloque el saliente del recortador de precisión<br />
en la ranura y presione el ele<strong>me</strong>nto de corte para<br />
volver a encajarlo en el aparato (“clic”). (fig. 15)<br />
Limpieza<br />
No u<strong>se</strong> productos abrasivos ni líquidos ta<strong>les</strong> como<br />
alcohol, gasolina o acetona, para limpiar el aparato.<br />
Limpie el aparato y el adaptador única<strong>me</strong>nte con el<br />
cepillo que <strong>se</strong> suministra.<br />
Tenga cuidado de que el ele<strong>me</strong>nto de corte no <strong>se</strong> caiga<br />
al suelo.<br />
1 Limpie siempre el aparato después de usarlo.<br />
2 Antes de empezar a limpiarlo, a<strong>se</strong>gúre<strong>se</strong> de que el<br />
aparato esté apagado y de<strong>se</strong>nchufado de la red.<br />
3 Quite el peine-guía (fig. 11)<br />
4 Presione en el centro del ele<strong>me</strong>nto de corte para<br />
abrirlo. (fig. 14)<br />
5 Limpie el ele<strong>me</strong>nto de corte con el cepillo que <strong>se</strong><br />
suministra. (fig. 16)<br />
6 Limpie el aparato con el cepillo que <strong>se</strong> suministra.<br />
(fig. 17)<br />
7 Cierre el ele<strong>me</strong>nto de corte presionándolo en el<br />
aparato (“clic”). (fig. 18)<br />
El aparato no necesita lubricación.<br />
4203.000.5531.1 4/7
Sustitución<br />
Sustituya un ele<strong>me</strong>nto de corte dañado o<br />
gastado única<strong>me</strong>nte por una unidad de corte <strong>Philips</strong><br />
original.<br />
,<br />
,<br />
Medio ambiente<br />
Al final de su vida útil, no tire el aparato junto con<br />
la basura normal del hogar. Llévelo a un punto de<br />
recogida oficial para su reciclado. De esta manera<br />
ayudará a con<strong>se</strong>rvar el <strong>me</strong>dio ambiente. (fig. 19)<br />
Las baterías recargab<strong>les</strong> incorporadas contienen<br />
sustancias que pueden contaminar el <strong>me</strong>dio<br />
ambiente. Extraiga siempre las baterías antes de<br />
deshacer<strong>se</strong> del aparato o de llevarlo a un punto de<br />
recogida oficial. Deposite las baterías en un lugar<br />
de recogida oficial. Si no puede quitar las baterías,<br />
puede llevar el aparato a un <strong>se</strong>rvicio de asistencia<br />
técnica de <strong>Philips</strong>. El personal del <strong>se</strong>rvicio de<br />
asistencia técnica extraerá las baterías y <strong>se</strong> deshará<br />
de ellas de forma no perjudicial para el <strong>me</strong>dio<br />
ambiente.<br />
Extracción de las baterías<br />
Retire las baterías única<strong>me</strong>nte cuando de<strong>se</strong>che<br />
el aparato. A<strong>se</strong>gúre<strong>se</strong> de que las baterías estén<br />
completa<strong>me</strong>nte descargadas cuando las quite del<br />
aparato.<br />
No conecte el aparato a la red una vez extraídas las<br />
baterías.<br />
1 De<strong>se</strong>nchufe el aparato de la red y deje que<br />
funcione hasta que el motor <strong>se</strong> pare.<br />
2 Quite la parte superior de la carcasa del aparato.<br />
(fig. 20)<br />
3 Saque las baterías del aparato tirando de ellas hacia<br />
fuera. (fig. 21)<br />
4 Corte los cab<strong>les</strong> con unas tijeras y de<strong>se</strong>che las<br />
baterías adecuada<strong>me</strong>nte.<br />
Garantía y <strong>se</strong>rvicio<br />
Si necesita información o tiene algún problema, visite la<br />
página Web de <strong>Philips</strong> en www.philips.com, o pónga<strong>se</strong> en<br />
contacto con el Servicio de Atención al Cliente de <strong>Philips</strong><br />
en su país (hallará el nú<strong>me</strong>ro de teléfono en el folleto de<br />
la garantía mundial).<br />
Si no hay Servicio de Atención al Cliente de<br />
<strong>Philips</strong> en su país, diríja<strong>se</strong> a su distribuidor local <strong>Philips</strong><br />
o pónga<strong>se</strong> en contacto con el Service Depart<strong>me</strong>nt de<br />
<strong>Philips</strong> Do<strong>me</strong>stic Appliances and Personal Care BV.<br />
4203.000.5531.1 5/7
PORTUGUÊS<br />
Introdução<br />
Caro cliente, fez a escolha certa! O <strong>se</strong>u novo aparador de<br />
cabelo <strong>Philips</strong> com novo design ergonómico e acessório<br />
de corte ajustável de 180° permite-lhe aparar facil<strong>me</strong>nte<br />
o cabelo. Pode mover o aparador ao longo da cabeça tão<br />
facil<strong>me</strong>nte como <strong>se</strong> estives<strong>se</strong> a passar os <strong>se</strong>us dedos pelo<br />
cabelo. Para desfrutar da utilização do aparador de cabelo<br />
é acon<strong>se</strong>lhável ler a <strong>se</strong>guinte informação.<br />
Descrição geral (fig. 1)<br />
A Botão ligar/desligar<br />
B Luz de carga<br />
C Adaptador (2,5 V)<br />
D Aparador de precisão<br />
E Acessório de corte<br />
F Cabeça giratória<br />
G Janela indicadora da regulação do compri<strong>me</strong>nto<br />
H Selector de compri<strong>me</strong>nto<br />
I Escova de limpeza<br />
J Pente grande (13-21 mm)<br />
K Pente pequeno (3-11 mm)<br />
Importante<br />
Leia estas instruções com atenção antes de utilizar o<br />
aparelho e guarde-as para uma eventual consulta futura.<br />
,<br />
,<br />
,<br />
,<br />
,<br />
,<br />
,<br />
,<br />
,<br />
,<br />
,<br />
Verifique <strong>se</strong> a voltagem indicada no adaptador<br />
corresponde à voltagem eléctrica local antes de<br />
ligar o aparelho.<br />
Para carregar o aparelho utilize apenas o adaptador<br />
fornecido.<br />
O adaptador contém um transformador. Não<br />
corte o adaptador para o substituir por outro, pois<br />
poderá dar origem a situações de perigo.<br />
Não utilize um adaptador danificado.<br />
Se o adaptador <strong>se</strong> danificar, só deverá <strong>se</strong>r<br />
substituído por uma peça de origem para evitar<br />
situações de perigo.<br />
Não utilize o aparelho <strong>se</strong> algum dos acessórios<br />
estiver danificado ou partido para evitar magoar-<strong>se</strong>.<br />
Utilize e guarde o aparelho a uma temperatura<br />
entre 15°C e 35°C.<br />
Mantenha o aparelho e o adaptador <strong>se</strong>cos.<br />
Mantenha o aparelho fora do alcance das crianças.<br />
Este aparelho destina-<strong>se</strong> unica<strong>me</strong>nte a aparar<br />
cabelo humano. Não o utilize para outras<br />
finalidades.<br />
Se o aparelho estiver sujeito a uma significativa<br />
mudança de temperatura, pressão ou humidade,<br />
deixe o aparelho ambientar-<strong>se</strong> durante 30 minutos<br />
antes de o utilizar.<br />
Campos Electromagnéticos -<br />
EMF (Electro Magnetic Fields)<br />
Este aparelho <strong>Philips</strong> cumpre todas as normas<br />
relacionadas com campos electromagnéticos (EMF).<br />
Se for manu<strong>se</strong>ado correcta<strong>me</strong>nte e de acordo com as<br />
instruções pre<strong>se</strong>ntes no manual de instruções, o aparelho<br />
proporciona uma utilização <strong>se</strong>gura, como demonstrado<br />
pelas provas científicas actual<strong>me</strong>nte disponíveis.<br />
Carga<br />
Com a carga total, o aparelho tem até uma hora de<br />
autonomia de corte <strong>se</strong>m fio.<br />
Não carregue o aparelho por mais de 24 horas.<br />
O tempo de carrega<strong>me</strong>nto ideal é de 8 horas.<br />
1 Carregue o aparelho durante 8 horas antes de o<br />
utilizar pela pri<strong>me</strong>ira vez.<br />
Antes de co<strong>me</strong>çar a carga, certifique-<strong>se</strong> de que o<br />
aparelho está desligado.<br />
2 Introduza a ficha do aparelho no aparelho e<br />
introduza o adaptador na tomada eléctrica. (fig. 2)<br />
, A luz de carga acende-<strong>se</strong> para indicar que o<br />
aparelho está a <strong>se</strong>r carregado.<br />
Nota:A luz de carga não indica quando o aparelho está<br />
completa<strong>me</strong>nte carregado.<br />
Funciona<strong>me</strong>nto com fio<br />
O Aparelho só deve trabalhar directa<strong>me</strong>nte ligado à<br />
corrente eléctrica quando a bateria estiver vazia.<br />
1 Desligue o aparador de cabelo.<br />
2 Ligue o aparador de cabelo à corrente e aguarde<br />
alguns <strong>se</strong>gundos antes de o ligar.<br />
Se as baterias estiverem completa<strong>me</strong>nte vazias, aguarde<br />
alguns minutos antes de ligar o aparelho.<br />
Utilização do aparelho<br />
Certifique-<strong>se</strong> de que o <strong>se</strong>u cabelo está limpo e <strong>se</strong>co. Não<br />
utilize o aparelho em cabelos húmidos.<br />
1 Penteie o <strong>se</strong>u cabelo com um pente no <strong>se</strong>ntido do<br />
cresci<strong>me</strong>nto do cabelo. (fig. 3)<br />
Aparar com o pente acessório<br />
, Utilize o pente acessório pequeno ou o pente<br />
acessório grande, dependendo do compri<strong>me</strong>nto de<br />
cabelo de<strong>se</strong>jado.<br />
O compri<strong>me</strong>nto de cabelo após o corte está<br />
indicado em mm nos pentes acessórios. A regulação<br />
de compri<strong>me</strong>nto de cabelo <strong>se</strong>leccionada (1-5)<br />
é apre<strong>se</strong>ntada nas duas janelas indicadoras do<br />
compri<strong>me</strong>nto em ambos os lados do <strong>se</strong>lector de<br />
compri<strong>me</strong>nto. (fig. 4)<br />
Consulte a tabela a <strong>se</strong>guir para uma descrição geral<br />
das definições de compri<strong>me</strong>nto e os compri<strong>me</strong>ntos de<br />
cabelo correspondentes a cada pente acessório.<br />
Pente<br />
pequeno<br />
regulação<br />
compri<strong>me</strong>nto<br />
do cabelo<br />
1 3 mm/0,12<br />
pol.<br />
2 5 mm/0,20<br />
pol.<br />
3 7 mm/0,28<br />
pol.<br />
4 9 mm/0,35<br />
pol.<br />
5 11 mm/0,43<br />
pol.<br />
Pente<br />
grande<br />
regulação<br />
compri<strong>me</strong>nto<br />
do cabelo<br />
1 13 mm/0,51<br />
pol.<br />
2 15 mm/0,59<br />
pol.<br />
3 17 mm/0,67<br />
pol.<br />
4 19 mm/0,75<br />
pol.<br />
5 21 mm/0,83<br />
pol.<br />
1 Encaixe o pente acessório nas ranhuras do aparelho<br />
(‘clique’). (fig. 5)<br />
Certifique-<strong>se</strong> de que o pente acessório fica devida<strong>me</strong>nte<br />
encaixado nas ranhuras de ambos os lados.<br />
2 Regule o pente acessório para o compri<strong>me</strong>nto de<br />
cabelo pretendido. Para o fazer, prima o botão de<br />
libertação no <strong>se</strong>lector de compri<strong>me</strong>nto (item 1) e<br />
rode-o para a esquerda ou para a direita (item 2).<br />
(fig. 6)<br />
Não rode o <strong>se</strong>lector de compri<strong>me</strong>nto para além da<br />
definição mais alta de compri<strong>me</strong>nto do cabelo (item 5).<br />
3 Ligue o aparelho.<br />
Utilizar a cabeça giratória<br />
, A partir da posição inicial de 0° (voltada para a<br />
frente), pode rodar a cabeça giratória 45° ou 90°<br />
para a esquerda ou para a direita. Desta forma,<br />
pode ajustar a posição do acessório de corte para<br />
a parte da cabeça que está a aparar. Desta forma, é<br />
mais fácil aparar o cabelo. (fig. 7)<br />
1 Regule o acessório de corte para a posição<br />
de<strong>se</strong>jada, rodando a cabeça giratória (‘clique’). (fig.<br />
8)<br />
Ajuste <strong>se</strong>mpre a posição do acessório de corte com<br />
a cabeça giratória. Não rode o acessório de corte ou o<br />
pente.<br />
Não rode a cabeça giratória mais de 90° para a<br />
esquerda ou para a direita.<br />
,<br />
-<br />
A cabeça giratória permite-lhe <strong>se</strong>gurar e utilizar o<br />
aparelho como uma escova. (fig. 9)<br />
Sugestões<br />
É acon<strong>se</strong>lhável que co<strong>me</strong>ce a aparar o cabelo<br />
na definição mais alta do pente grande e que vá<br />
reduzindo gradual<strong>me</strong>nte a definição de compri<strong>me</strong>nto<br />
do cabelo.<br />
- Se estiverem acumulados muitos cabelos no pente<br />
acessório, remova o acessório do aparador e sopre<br />
e/ou abane o acessório para que os cabelos caiam.<br />
Ao remover o pente acessório, a regulação de<br />
compri<strong>me</strong>nto do cabelo não é alterada.<br />
- Anote as regulações que utilizar para criar certos<br />
estilos de corte para <strong>se</strong> recordar em utilizações<br />
futuras.<br />
1 Movi<strong>me</strong>nte o aparador suave<strong>me</strong>nte pelo cabelo.<br />
, O cabelo nas diferentes partes da sua cabeça<br />
cresce em direcções diferentes. Pode experi<strong>me</strong>ntar<br />
diferentes direcções de corte (para cima, para<br />
baixo ou transversal<strong>me</strong>nte). (fig. 10)<br />
, Para aparar da forma mais eficaz, mova o aparelho<br />
na direcção contrária à do cresci<strong>me</strong>nto do cabelo.<br />
2 Rode a cabeça giratória para a posição que<br />
considerar mais confortável para o <strong>se</strong>u braço<br />
enquanto estiver a aparar as diversas partes da sua<br />
cabeça.<br />
3 Certifique-<strong>se</strong> de que a parte plana do pente<br />
acessório fica em contacto com o couro cabeludo<br />
para obter um resultado unifor<strong>me</strong>.<br />
Aparar <strong>se</strong>m o pente acessório<br />
Pode utilizar o aparador <strong>se</strong>m o pente acessório para<br />
fazer um corte bem rente à cabeça (0,8 mm) ou para<br />
contornar a linha do pescoço e a área à volta das orelhas.<br />
Nota:Quando utiliza o aparador de cabelo <strong>se</strong>m um pente<br />
acessório, o aparador faz um corte de cabelo muito rente.<br />
1 Retire o pente acessório puxando-o para fora do<br />
aparelho. (fig. 11)<br />
Nunca puxe pela parte flexível do pente acessório. Puxe<br />
<strong>se</strong>mpre pela parte de baixo.<br />
2 Ao contornar o cabelo à volta das orelhas, corte<br />
apenas as pontas. A linha de cabelo deve ficar junto<br />
à orelha. (fig. 12)<br />
3 Para contornar a linha do pescoço e as patilhas, vire<br />
o aparador e faça passagens de cima para baixo. (fig.<br />
13)<br />
4 Mova devagar e suave<strong>me</strong>nte. Siga apenas a linha<br />
natural do cabelo.<br />
5 Ajuste a posição da cabeça giratória para facilitar os<br />
contornos.<br />
Utilizar o aparador de precisão<br />
Pode utilizar o aparelho com o aparador de precisão para<br />
contornar a linha do pescoço e a área à volta das orelhas<br />
de forma mais fácil e mais precisa.<br />
1 Certifique-<strong>se</strong> de que o aparelho está desligado.<br />
2 Retire o pente acessório. (fig. 11)<br />
3 Pressione o centro do acessório de corte para o<br />
abrir. (fig. 14)<br />
4 Introduza a saliência do aparador de precisão na<br />
ranhura e empurre o acessório de corte para<br />
dentro do aparelho (‘clique’). (fig. 15)<br />
Limpeza<br />
Não utilize produtos de limpeza abrasivos,<br />
de<strong>se</strong>ngordurantes ou líquidos como álcool, petróleo ou<br />
acetona na limpeza do aparelho.<br />
Limpe o aparelho e o adaptador com a escova<br />
fornecida.<br />
Tenha cuidado para não deixar cair o acessório de<br />
corte no chão.<br />
1 Limpe o aparelho após cada utilização.<br />
2 Certifique-<strong>se</strong> de que desligou o aparelho e retirou<br />
a ficha da tomada eléctrica antes de co<strong>me</strong>çar a<br />
limpar.<br />
3 Retire o pente acessório. (fig. 11)<br />
4 Pressione o centro do acessório de corte para o<br />
abrir. (fig. 14)<br />
5 Limpe o acessório de corte com a escova<br />
fornecida. (fig. 16)<br />
6 Limpe o aparelho com a escova fornecida.<br />
(fig. 17)<br />
4203.000.5531.1 6/7
7 Feche o acessório de corte, empurrando-o<br />
de novo na direcção do aparelho (‘clique’). (fig. 18)<br />
O aparelho não precisa de lubrificação.<br />
Substituição<br />
Substitua os acessórios de corte gastos ou danificados<br />
apenas por acessórios de corte originais da <strong>Philips</strong>.<br />
,<br />
,<br />
Ambiente<br />
Não deite fora o aparelho junto com o lixo<br />
doméstico normal no final da sua vida útil;<br />
entregue-o num ponto de recolha oficial para<br />
reciclagem. Ao fazê-lo ajuda a pre<strong>se</strong>rvar o ambiente.<br />
(fig. 19)<br />
As baterias recarregáveis incorporadas contêm<br />
substâncias que podem poluir o ambiente. Retire<br />
<strong>se</strong>mpre as baterias antes de <strong>se</strong> desfazer do<br />
aparelho e entregue o aparelho num ponto de<br />
recolha oficial. Desfaça-<strong>se</strong> das baterias num ponto<br />
de recolha oficial para baterias. Se tiver problemas<br />
na remoção das baterias, pode também levar o<br />
aparelho a um centro de assistência <strong>Philips</strong>, que<br />
poderá remover as baterias por si e eliminá-las de<br />
forma <strong>se</strong>gura para o ambiente.<br />
Retirar as baterias<br />
Remova apenas as baterias quando <strong>se</strong> desfizer do<br />
aparelho. Certifique-<strong>se</strong> de que as baterias estão<br />
completa<strong>me</strong>nte vazias quando as retirar.<br />
Não volte a ligar o aparelho à corrente depois de as<br />
baterias terem sido removidas.<br />
1 Desligue o aparelho da corrente e deixe-o a<br />
trabalhar até o motor parar.<br />
2 Remova a parte superior do corpo do aparelho. (fig.<br />
20)<br />
3 Levante as baterias e tire-as do aparelho.<br />
(fig. 21)<br />
4 Corte os fios com uma tesoura e desfaça-<strong>se</strong> das<br />
baterias de forma adequada.<br />
Garantia e assistência<br />
Se precisar de informações ou <strong>se</strong> tiver algum problema,<br />
visite o site da <strong>Philips</strong> em<br />
www.philips.pt ou contacte o Centro de Atendi<strong>me</strong>nto<br />
ao Cliente <strong>Philips</strong> do <strong>se</strong>u país (encontrará o nú<strong>me</strong>ro<br />
de telefone no folheto da garantia mundial). Se não<br />
existir um Centro de Atendi<strong>me</strong>nto ao Cliente no <strong>se</strong>u<br />
país, dirija-<strong>se</strong> ao distribuidor <strong>Philips</strong> local ou contacte<br />
o Departa<strong>me</strong>nto de Assistência da <strong>Philips</strong> Do<strong>me</strong>stic<br />
Appliances and Personal Care BV.<br />
4203.000.5531.1 7/7


