

Samsung SCC-B5311P (SCC-B5311P ) - Manuel de l'utilisateur 7.03 MB, pdf, Anglais, POLONAIS, RUSSIE
Samsung SCC-B5311P (SCC-B5311P ) - Manuel de l'utilisateur 7.03 MB, pdf, Anglais, POLONAIS, RUSSIE
Samsung SCC-B5311P (SCC-B5311P ) - Manuel de l'utilisateur 7.03 MB, pdf, Anglais, POLONAIS, RUSSIE

Create successful ePaper yourself
Turn your PDF publications into a flip-book with our unique Google optimized e-Paper software.
❚ Installing camera<br />
Before installation<br />
Before installing your camera, you have to read the following cautions:<br />
• You have to check whether the location (ceiling or wall) can bear five times the weight of your camera.<br />
• Don’t let the cable to be caught in improper place or the electric line cover to be damaged. Otherwise it<br />
may cause a breakdown or fire.<br />
• When installing your camera, don’t allow any person to approach the installation site. If you have any<br />
valuable things un<strong>de</strong>r the place, move them away.<br />
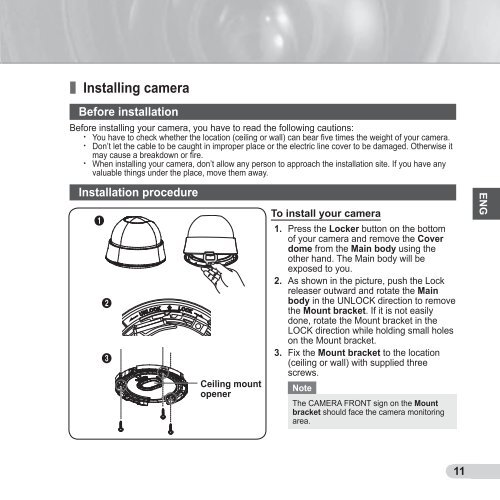
Installation procedure<br />
1<br />
2<br />
3<br />
Ceiling mount<br />
opener<br />
To install your camera<br />
1. Press the Locker button on the bottom<br />
of your camera and remove the Cover<br />
dome from the Main body using the<br />
other hand. The Main body will be<br />
exposed to you.<br />
2. As shown in the picture, push the Lock<br />
releaser outward and rotate the Main<br />
body in the UNLOCK direction to remove<br />
the Mount bracket. If it is not easily<br />
done, rotate the Mount bracket in the<br />
LOCK direction while holding small holes<br />
on the Mount bracket.<br />
3. Fix the Mount bracket to the location<br />
(ceiling or wall) with supplied three<br />
screws.<br />
Note<br />
The CAMERA FRONT sign on the Mount<br />
bracket should face the camera monitoring<br />
area.<br />
ENG<br />
11


