

BlackandDecker Micro-Onde- Mz3000pg - Type 1 - Instruction Manual (Anglaise - Arabe)
BlackandDecker Micro-Onde- Mz3000pg - Type 1 - Instruction Manual (Anglaise - Arabe)
BlackandDecker Micro-Onde- Mz3000pg - Type 1 - Instruction Manual (Anglaise - Arabe)

You also want an ePaper? Increase the reach of your titles
YUMPU automatically turns print PDFs into web optimized ePapers that Google loves.
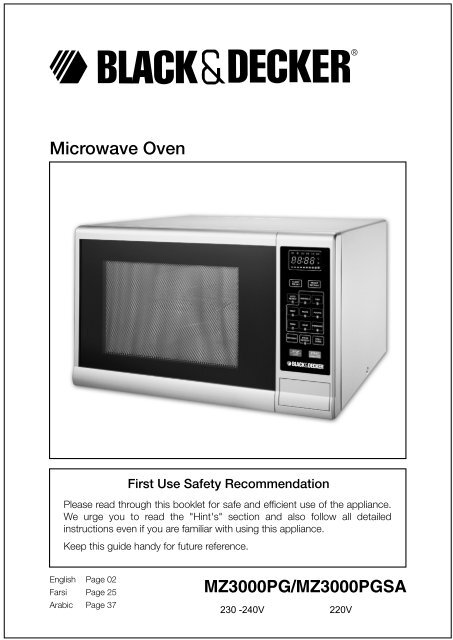
<strong>Micro</strong>wave Oven<br />
First Use Safety Recommendation<br />
Please read through this booklet for safe and efficient use of the appliance.<br />
We urge you to read the "Hint's" section and also follow all detailed<br />
instructions even if you are familiar with using this appliance.<br />
Keep this guide handy for future reference.<br />
English Page 02<br />
Farsi Page 25<br />
Arabic Page 37<br />
MZ3000PG/MZ3000PGSA
MEAT<br />
PI ZA<br />
MICROWAVE<br />
STOP<br />
CLEAR<br />
AUTO<br />
REHEAT<br />
1<br />
4<br />
VEGETABLE<br />
2<br />
PASTA<br />
SOUP<br />
SP ED<br />
DEFROST<br />
WEIGHT<br />
DEFROST<br />
0<br />
FISH<br />
3<br />
POTATO<br />
PO RIDGE<br />
GRI L/<br />
COMBI.<br />
START<br />
EXPRE S C OK<br />
AUTO<br />
REHEAT<br />
1<br />
MEAT<br />
4<br />
PIZZA<br />
MICROWAVE<br />
STOP<br />
CLEAR<br />
VEGETABLE<br />
2<br />
PASTA<br />
SOUP<br />
SPEED<br />
DEFROST<br />
WEIGHT<br />
DEFROST<br />
FISH<br />
3<br />
POTATO<br />
5 6<br />
PORRIDGE<br />
7 8 9<br />
0<br />
GRILL/<br />
COMBI.<br />
START<br />
EXPRESS COOK<br />
English<br />
6<br />
10<br />
Fig A<br />
5<br />
4<br />
3 2 8<br />
1<br />
9<br />
4<br />
5 6<br />
7 8 9<br />
3<br />
7<br />
2<br />
-2-
English<br />
Fig B<br />
Fig C<br />
WEIGHT<br />
DEFROST<br />
3 Mica plate, Do not remove<br />
AUTO<br />
REHEAT<br />
1<br />
VEGETABLE<br />
2<br />
FISH<br />
3<br />
MEAT<br />
4<br />
PASTA POTATO<br />
5 6<br />
PIZZA SOUP PORRIDGE<br />
7 8 9<br />
MICROWAVE<br />
SPEED<br />
DEFROST<br />
0<br />
GRILL/<br />
COMBI.<br />
STOP<br />
CLEAR<br />
START<br />
EXPRESS COOK<br />
4<br />
Intended use<br />
Your Black & Decker microwave oven is<br />
designed to heat appropriate foods &<br />
beverages using electromagnetic radiation.<br />
Always check the suitability of ingredients<br />
before cooking.<br />
Do not use this appliance for any other<br />
purpose. This product is intended for<br />
indoor household use only.<br />
Safety instructions<br />
IMPORTANT SAFETY INSTRUCTIONS<br />
READ CAREFULLY AND KEEP FOR<br />
FUTURE REFERENCE<br />
• While using electrical appliances, in<br />
order to reduce the risk of fire, electric<br />
shock, and / or injury to persons, basic<br />
safety precautions should be followed,<br />
including the following:<br />
Warning: If the door or door seals are<br />
damaged, the oven must not be operated<br />
until it has been repaired by a competent<br />
person<br />
Warning: It is hazardous for anyone other<br />
than a competent person to carry out any<br />
service or repair operation that involves the<br />
removal of a cover which gives protection<br />
against exposure to microwave energy<br />
Warning: Liquids and other foods must not<br />
be heated in sealed containers since they<br />
are liable to explode<br />
Warning: Only allow children to use the<br />
oven without supervision when adequate<br />
instructions have been given so that the<br />
child is able to use the oven in a safe way<br />
and understands the hazards of improper<br />
use<br />
-3-
English<br />
• This microwave oven is a free-standing<br />
unit & must not be built-in or placed in a<br />
cabinet.<br />
• The oven must have sufficient air flow.<br />
To ensure good ventilation, a gap of 10<br />
centimetres is required at the back, 15<br />
centimetres at one side, 30 centimetres<br />
at the other side and 30 centimetres<br />
above.<br />
• Only use utensils that are suitable for<br />
use in microwave ovens<br />
• When heating food in plastic or paper<br />
containers, keep an eye on the oven due<br />
to the possibility of ignition<br />
• If smoke is observed, switch off or<br />
unplug the appliance and keep the door<br />
closed in order to stifle any flames<br />
• <strong>Micro</strong>wave heating of beverages can<br />
result in delayed eruptive boiling<br />
therefore care must be taken when<br />
handling the container<br />
• The contents of feeding bottles and<br />
baby food jars shall be stirred or shaken<br />
and the temperature checked before<br />
consumption, in order to avoid burns<br />
• Eggs in their shell and whole hard-boiled<br />
eggs should not be heated in microwave<br />
ovens since they may explode, even<br />
after microwave heating has ended<br />
• The oven should be cleaned regularly<br />
and any food deposits removed<br />
• Failure to maintain the oven in a clean<br />
condition could lead to deterioration of<br />
the surface that could adversely affect<br />
the life of the appliance and possibly<br />
result in a hazardous situation<br />
• To protect against the risk of electric<br />
shock, DO NOT IMMERSE the<br />
appliance, cord set or plug in water or<br />
other liquids.<br />
• Do not remove the feet from this<br />
product.<br />
• Do not cook food directly on the glass<br />
tray. Always use a bowl or other<br />
container that is suitable for use in a<br />
microwave oven<br />
-4-<br />
Using your appliance<br />
• Do not operate any appliance with a<br />
damaged cord or plug, or after the<br />
appliance malfunctions, or is dropped or<br />
damaged in any manner. Return the<br />
complete appliance to your nearest<br />
authorised service facility for<br />
examination, electrical repair, mechanical<br />
repair or adjustment to avoid any hazard.<br />
• Do not attempt to repair the appliance<br />
yourself; instead, take it to your Black &<br />
Decker-owned or Authorised Service<br />
Centre for repair.<br />
• The use of attachments or accessories<br />
not recommended or sold by this<br />
appliance manufacturer may result in fire,<br />
electric shock or personal injury.<br />
• Do not let the cord hang over the edge of<br />
a table, counter, or touch hot surfaces.<br />
• Avoid touching hot surfaces, use handles<br />
and knobs.<br />
• Do not operate or place any part of this<br />
appliance on or near any hot surfaces<br />
(such as gas or electric burner or in a<br />
heated oven) or any appliance that<br />
generates steam.<br />
• Do not abuse the cord. Never carry the<br />
appliance by the cord or yank it to<br />
disconnect it from the outlet; instead,<br />
grasp the plug and pull to disconnect.<br />
• When using an extension cord with your<br />
appliance, make sure the extension cord<br />
is correctly wired, and rated for its use.<br />
• The microwave oven should be placed on<br />
a flat stable surface which can hold the<br />
weight of the appliance and the heaviest<br />
of food likely to be cooked inside.<br />
• Do not place any item on top of the oven.<br />
• Do not operate the microwave oven<br />
without the glass tray or roller support in<br />
their proper positions.<br />
• Make sure that the power supply cord is<br />
undamaged and does not run under the<br />
microwave oven or over any hot or sharp<br />
surfaces.
English<br />
• Do not operate the appliance when<br />
empty. This could damage the oven.<br />
• Do not use the oven to store any items.<br />
• Food surrounded by a membrane, such<br />
as egg yolks, potatoes, chicken livers,<br />
etc. must be pierced several times with a<br />
fork before cooking.<br />
• Do not use metal pans or dishes with<br />
metal handles.<br />
• Never place any item with a metal trim<br />
inside a microwave.<br />
• Always remove twist-ties from any foods<br />
before operating the microwave.<br />
• Some plastics are not suitable for use in<br />
a microwave. Always check the<br />
suitability of any item before use.<br />
• Do not cook in a container with a<br />
restricted opening as they may explode<br />
if heated in a microwave oven.<br />
• Conventional meat or candy<br />
thermometers must not be used in the<br />
oven. Only thermometers that are<br />
specifically made for microwaves should<br />
be used.<br />
• <strong>Micro</strong>wave utensils should be used only<br />
in accordance with the manufacturer's<br />
instructions.<br />
• Do not attempt to deep-fry foods in this<br />
oven.<br />
• <strong>Micro</strong>wave ovens heat the food in a<br />
container and not the container itself. It<br />
is always necessary to check the<br />
temperature of the food to ensure it is<br />
correctly cooked.<br />
• Do not place the oven where heat,<br />
moisture or high humidity are generated,<br />
or near combustible materials.<br />
Warning: Check the oven for any damage,<br />
such as a misaligned or bent door,<br />
damaged door seals and sealing surface,<br />
broken or loose door hinges & latches and<br />
dents inside the cavity or on the door. If<br />
there is any damage, do not operate the<br />
oven.<br />
-5-<br />
• Do not cover or block any openings on<br />
the appliance.<br />
• Do not use solvents or other corrosive<br />
chemicals or vapours for cleaning this<br />
appliance.<br />
• Never leave metal utensils in the<br />
<strong>Micro</strong>wave.<br />
• During use the appliance becomes hot.<br />
Care should be taken to avoid touching<br />
heating elements inside the oven.<br />
Warning: Accessible parts may become hot<br />
during use. Young children should be kept<br />
away.<br />
• Do not use harsh abrasive cleaners or<br />
sharp metal scrapers to clean the oven<br />
door glass since they can scratch the<br />
surface, which may result in shattering of<br />
the glass.<br />
• The temperature of accessible surfaces<br />
may be high when the appliance is<br />
operating.<br />
• This appliance is not intended to be<br />
operated by means of external timer or<br />
separate remote-control system.<br />
• The door or the outer surface may get hot<br />
when the appliance is operating.<br />
• If smoke is observed, switch off or unplug<br />
the appliance and keep the door closed<br />
in order to stifle any flames.<br />
• Always stir food to distribute the heat<br />
evenly and allow it to stand for a few<br />
minutes before consumption.<br />
• Containers used for cooking can become<br />
hot because of heat transferred from the<br />
heated food. Always use oven gloves<br />
when removing items from the oven.<br />
• If steam accumulates inside or around<br />
the outside of the oven door, wipe with a<br />
soft cloth. This may occur when the<br />
microwave oven is operated under high<br />
humidity conditions and in no way<br />
indicates malfunction of the unit.
English<br />
Safety of others<br />
• This appliance is not intended for use by<br />
persons (including children) with<br />
reduced physical, sensory or mental<br />
capabilities, or lack of experience and<br />
knowledge, unless they have been given<br />
supervision or instruction concerning<br />
use of the appliance by a person<br />
responsible for their safety.<br />
• Children should be supervised to ensure<br />
that they do not play with the appliance.<br />
• Close supervision is necessary when<br />
any appliance is used by or near<br />
children.<br />
• Never leave an appliance unattended<br />
when in use.<br />
After use<br />
• Switch off and remove the plug from the<br />
power outlet when not in use, before<br />
assembling or disassembling parts,<br />
cleaning or carrying out any<br />
maintenance of the appliance. Never<br />
pull the cord while removing it from the<br />
power outlet.<br />
• Keep children and animals away from<br />
the unit and cord set.<br />
Inspection and repairs<br />
If the supply cord is damaged, it must be<br />
replaced by the manufacturer, its service<br />
agent or similarly qualified persons in order<br />
to avoid a hazard.<br />
Electrical safety<br />
This product must be earthed.<br />
Always check that the power supply<br />
corresponds to the voltage on the rating<br />
plate<br />
Power plugs must match the outlet. Never<br />
modify the plug in any way. Do not use any<br />
adaptor plugs with earthed (Class l)<br />
appliances. Unmodified plugs and<br />
matching outlets will reduce the risk of<br />
electric shock.<br />
Never operate an appliance directly below<br />
the socket-outlet it is connected to.<br />
Do not insert any object into the openings<br />
on the outer case.<br />
Extension cables & Class l product<br />
• A 3-core cable must be used as your<br />
appliance is earthed and of Class l<br />
construction.<br />
• Up to 30m (100 ft) can be used without<br />
loss of power.<br />
• If the supply cord is damaged, it must<br />
be replaced by the manufacturer or an<br />
authorised Black & Decker Service<br />
Centre in order to avoid a hazard.<br />
Features (Fig. A)<br />
1 Control panel<br />
2 Turntable shaft<br />
3 Roller support<br />
4 Glass tray<br />
5 Observation window<br />
6 Door<br />
7 Safety interlock system<br />
8 Door release<br />
9 Grill rack<br />
10 Heating element<br />
• Remove all packaging from the<br />
appliance.<br />
• Inspect the oven after unpacking for any<br />
damage such as a misaligned or<br />
damaged door, dents or holes in the<br />
door window and screen, and any dents<br />
in the cavity. If any of these are seen,<br />
DO NOT use the oven.<br />
• Clean the appliance before first use.<br />
Assembly (Fig. B)<br />
Warning! Before assembly, make sure that<br />
the appliance is switched off and<br />
unplugged.<br />
• Place the appliance on a flat, even<br />
surface.<br />
• Open the door (6) & place the stem into<br />
the hole in the cavity base. The door is<br />
opened by pressing the door release.<br />
• Place the roller support (3) into the hole<br />
in the cavity.<br />
-6-
English<br />
• Align the glass tray (4) on top of the<br />
roller support.<br />
• Connect the appliance to a suitable<br />
electrical supply.<br />
Setting the Clock<br />
When the microwave oven is connected to<br />
a suitable electrical supply, the oven will<br />
display "0:00".<br />
To set the correct time, for example: To set<br />
8:00 .<br />
1 Press the "CLOCK/PRE-SET"<br />
button. The hour figures will flash.<br />
2 Press the number buttons "8","0","0" in<br />
order.<br />
3 Press the "CLOCK/PRE-SET"<br />
button to finish setting the clock. The<br />
time will be shown in the LED display.<br />
STOP<br />
Note: If "STOP/CLEAR" CLEAR button is<br />
pressed or if there is no operation within 1<br />
minute, the oven will revert to its previous<br />
state automatically.<br />
Use (Fig. C)<br />
Press the door release (8) to open the oven<br />
door then place the container onto the<br />
glass tray (4).<br />
Close the door & press the <strong>Micro</strong>wave<br />
button repeatedly until the required power<br />
setting is shown in the LED display.<br />
MICROWAVE<br />
Enter the required cooking time using the<br />
numbered buttons on the control panel (1).<br />
Note: The maximum microwave cooking<br />
time is 99 minutes and 99 seconds.<br />
START<br />
Press the "Start / Express Cook" EXPRESS COOK<br />
button to start cooking.<br />
Example: To cook an item at 50% power<br />
for 10 minutes<br />
MICROWAVE<br />
1 Press the <strong>Micro</strong>wave button three<br />
times so that P50 shows in the LED<br />
2 Press the numeric buttons 1, 0, 0, 0 in<br />
sequence<br />
START<br />
3 Press the Start / Express Cook EXPRESS COOK<br />
button to start cooking<br />
Note: During <strong>Micro</strong>wave cooking, the<br />
<strong>Micro</strong>wave<br />
MICROWAVE<br />
button can be pressed to<br />
display the current microwave power in the<br />
LED for 3 seconds. After three seconds,<br />
the display will revert to normal.<br />
Note: During cooking, the "CLOCK/PRE-<br />
SET" button can be pressed to show<br />
the current time in the LED for 2-3<br />
seconds. The display will then revert to<br />
normal.<br />
Once cooking has completed, an audible<br />
signal will be heard. Open the door &<br />
remove the cooked food.<br />
The <strong>Micro</strong>wave power level can be<br />
adjusted to suit the required cooking<br />
Always use oven gloves when removing<br />
method. There are five power settings items from the oven.<br />
available. These are:<br />
If the door of the oven is opened during<br />
Press <strong>Micro</strong>wave once 100%<br />
MICROWAVE<br />
cooking, the microwave oven will automatically<br />
stop working. Cooking will continue<br />
The LED display will show "P100"<br />
after re-closing the door.<br />
Press <strong>Micro</strong>wave twice 80%<br />
MICROWAVE<br />
The LED display will show "P 80" If the remaining cooking time is not<br />
STOP<br />
required, press the "Stop / Clear" CLEAR<br />
Press <strong>Micro</strong>wave three times 50%<br />
MICROWAVE<br />
button to cancel further cooking.<br />
The LED display will show "P 50"<br />
Operating the oven when empty could<br />
Press <strong>Micro</strong>wave four times 30%<br />
MICROWAVE<br />
damage the oven.<br />
The LED display will show "P 30"<br />
To stop the oven during operation, press<br />
Press <strong>Micro</strong>wave five times 10%<br />
MICROWAVE<br />
the Stop / Clear<br />
STOP<br />
button.<br />
CLEAR<br />
The LED display will show "P 10"<br />
-7-
English<br />
100% power. Each additional press will<br />
Delayed Cooking:<br />
This appliance can be programmed to start<br />
cooking at a pre-set time.<br />
To do this, first select the required program.<br />
Press "CLOCK/PRE-SET" button to<br />
display the current clock. The hour figures<br />
will flash.<br />
increase the cooking time by 30 seconds<br />
up to 1 minute 30 seconds. After this, the<br />
cooking time will increase by 1 minute, until<br />
the maximum cooking time of 12 minutes<br />
is reached.<br />
Weight Defrost:<br />
WEIGHT<br />
Press the "DEFROST BY W.T." DEFROST<br />
Enter the required start time using the<br />
numeric buttons.<br />
button. The LED will display "dEF1".<br />
Use the numeric control pad to enter the<br />
START weight (in grams) of the item to be<br />
Press the "START/EXPRESS COOK" EXPRESS COOK<br />
defrosted.<br />
button to confirm the setting. The LED will<br />
show the current time.<br />
START<br />
Press the "START/EXPRESS COOK" EXPRESS COOK<br />
When the set time coincides with the actual<br />
button to start defrosting. The defrost time<br />
time shown on the LED, cooking will<br />
will count down in the LED.<br />
commence.<br />
Note: The time set must be between 0:00<br />
and 23:59.<br />
Example: Defrost 500g of beef:<br />
1 Press the "WEIGHT DEFROST BY W.T."<br />
WEIGHT<br />
DEFROST button. The LED will display<br />
Note: Do not operate the appliance when<br />
empty. This could damage the oven.<br />
"dEF1".<br />
2 Press 5, 0, 0 in sequence<br />
STOP<br />
Note: If the "STOP/CLEAR"<br />
CLEAR button is<br />
START<br />
3 Press the "START/EXPRESS COOK"<br />
pressed while setting the start time, or if<br />
there is no operation within 1 minute, the<br />
appliance will revert to the previous state<br />
automatically.<br />
Note: The clock must be set before using<br />
Delayed Cooking.<br />
Note: Do not use this feature to defrost<br />
frozen items.<br />
Note: After setting the <strong>Micro</strong>wave to cook at<br />
a later time, pressing the "CLOCK/PREbutton<br />
to start defrosting, and the<br />
cooking time will count down.<br />
Note: Weights must be entered in grams<br />
Note: The defrosting weight range is<br />
100g-2000g.<br />
Rapid Defrost:<br />
To defrost food faster, press the "Speed<br />
Defrost button the oven will display<br />
"dEF2".<br />
SET" button will cause the pre-set Use the numeric control pad to enter the<br />
time to flash in the LED for 2-3 seconds. The<br />
<strong>Micro</strong>wave will then revert to the clock<br />
display.<br />
weight (in grams) of the item to be<br />
defrosted.<br />
START<br />
Press the "START/EXPRESS COOK" EXPRESS COOK<br />
Express Cooking:<br />
Press the "START/EXPRESS COOK"<br />
START<br />
EXPRESS COOK<br />
button to start defrosting. The defrost time<br />
will count down in the LED.<br />
button to start cooking for 30 seconds at Note: The defrosting weight range is<br />
100g-1200g.<br />
-8-<br />
EXPRESS COOK
English<br />
This <strong>Micro</strong>wave has 9 programmed cooking modes:<br />
AUTO<br />
REHEAT<br />
1<br />
VEGETABLE<br />
2<br />
FISH<br />
3<br />
MEAT<br />
4<br />
PASTA<br />
5<br />
POTATO<br />
6<br />
PIZZA<br />
7<br />
SOUP<br />
8<br />
PORRIDGE<br />
9<br />
Cooking Mode Weight (g) Button LED Display<br />
Press<br />
150 Once 150<br />
A-1 250 Twice 250<br />
Auto Reheat 350 Thrice 350<br />
400 4 times 400<br />
A-2 150 Once 150<br />
Vegetable 350 Twice 350<br />
500 Thrice 500<br />
150 Once 150<br />
A-3 250 Twice 250<br />
Fish 350 Thrice 350<br />
400 4 times 400<br />
450 5 times 450<br />
150 Once 150<br />
A-4 300 Twice 300<br />
Meat 450 Thrice 450<br />
600 4 times 600<br />
A-5 50 (with water 450) Once 50<br />
Pasta 100 (with water 800) Twice 100<br />
150 (with water 1200) Thrice 150<br />
A-6 (about 200) Once 1<br />
Potato (about 400) Twice 2<br />
(about 600) Thrice 3<br />
A-7 1 (about 80) Once 1<br />
Pizza 2 (about 160) Twice 2<br />
3 (about 250) Thrice 3<br />
A-8 500 Once 500<br />
Soup 750 Twice 750<br />
1000 Thrice 1000<br />
A-9 550 Once 550<br />
Porridge 1100 Twice 1100<br />
To use a programme, first press the button<br />
for the required cooking mode. The same<br />
button must then be pressed a number of<br />
times until the weight of the ingredients is<br />
shown. Consult the table above for the<br />
actual number of times to press each<br />
button.<br />
Press the "START/EXPRESS COOK"<br />
button to start cooking.<br />
START<br />
EXPRESS COOK<br />
-9-
English<br />
Multi-Cook Mode<br />
A maximum of 2 cooking modes can be<br />
programmed into the <strong>Micro</strong>wave.<br />
Press the button for the required cooking<br />
mode.<br />
Enter the required cooking time using the<br />
numeric keypad.<br />
Press the button for the second cooking<br />
mode.<br />
Enter the required cooking time using the<br />
numeric keypad.<br />
Press the "START/EXPRESS COOK "<br />
button to start cooking.<br />
Example: Cook at 100% power for 10<br />
minutes, then at 80% power for 15<br />
minutes.<br />
MICROWAVE<br />
1 Press the "MICROWAVE" button<br />
once to choose 100% microwave power<br />
2 Press the numeric keys 1, 0, 0, 0 in<br />
sequence to set the cooking time<br />
MICROWAVE<br />
3 Press the "MICROWAVE" button<br />
twice to choose 80% microwave power;<br />
4 Press the numeric keys 1, 5, 0, 0 in<br />
sequence to set the cooking time.<br />
5 Press the START/EXPRESS COOK<br />
button to start cooking.<br />
Note: Defrosting must always be carried<br />
out before cooking. If the <strong>Micro</strong>wave is to<br />
be used to defrost ingredients before<br />
cooking, it must be checked to ensure it is<br />
fully defrosted before cooking.<br />
Note: Auto cooking can not work in the<br />
multi-section cooking.<br />
Child Lock<br />
To prevent children operating the <strong>Micro</strong>wave,<br />
press & hold the "Stop / Clear"<br />
START<br />
EXPRESS COOK<br />
START<br />
EXPRESS COOK<br />
STOP<br />
CLEAR<br />
-10-<br />
button for 3 seconds. An audible signal will<br />
be heard and the LED will display.<br />
To turn the child lock off, press the<br />
STOP<br />
"STOP/CLEAR" button for 3<br />
CLEAR<br />
seconds. An audible signal will be heard<br />
denoting that the lock is released, and the<br />
LED will turn back to the usual display.<br />
Cooking with the Grill<br />
GRILL/<br />
Press the "GRILL/COMBI."<br />
COMBI.<br />
button<br />
once to select the grill function, the LED<br />
will display " " and the “ ” icon will<br />
be displayed in the LED<br />
Use the numeric control pad to enter the<br />
weight (in grams) of the item to be cooked.<br />
START<br />
Press the "START/EXPRESS COOK" EXPRESS COOK<br />
button to start cooking. The time will count<br />
down in the LED, and the ":" and " "<br />
icons will flash in the LED.<br />
Note: Half-way through the set cooking<br />
time, the oven will pause and an audible<br />
signal will sound twice. Turn the ingredients<br />
over, then press the "START/EXPRESS<br />
START<br />
COOK" button again to continue<br />
EXPRESS COOK<br />
cooking.<br />
• If no buttons are pressed for 1 minute<br />
after the audible signal, the oven will<br />
re-start automatically.<br />
• The maximum cooking time is 100<br />
minutes and 39 seconds<br />
Grill / Combi Cooking:<br />
Two Grill / Combi programmes are<br />
available:<br />
Combination 1 (55% <strong>Micro</strong>wave and 45%<br />
Grill)<br />
GRILL/<br />
• Press the "Grill/Combi" COMBI. button<br />
twice: The LED display will show " "<br />
and " " icon.
English<br />
Combination 2 (36% <strong>Micro</strong>wave and 64%<br />
Grill)<br />
• Press the "Grill/Combi"<br />
button<br />
three times: The LED display will show<br />
" " and " " icon.<br />
Enter the required cooking time using the<br />
numeric keypad.<br />
• Press " START/EXPRESS COOK "<br />
button to start cooking. The cooking<br />
time counts down, " : " and " " will<br />
flash.<br />
• The maximum cooking time is 100<br />
minutes and 39 seconds.<br />
Note: During Combination Cooking, the<br />
"Grill / Combi"<br />
GRILL/<br />
COMBI.<br />
button can be<br />
pressed to display the Grilling mode in the<br />
LED for 3 seconds. After three seconds,<br />
the display will revert to normal.<br />
Operating times and preparations<br />
Follow directions on food packaging.<br />
Switching on and off<br />
The microwave will start to cook once the<br />
Start / Express Cook<br />
pressed.<br />
button is<br />
To stop the oven during operation, press<br />
STOP<br />
the Stop / Clear button .<br />
CLEAR<br />
START<br />
EXPRESS COOK<br />
GRILL/<br />
COMBI.<br />
START<br />
EXPRESS COOK<br />
Cleaning and maintenance<br />
The oven should be cleaned regularly and<br />
any food deposits removed<br />
Failure to maintain the oven in a clean<br />
condition could lead to deterioration of the<br />
surface that could adversely affect the life<br />
of the appliance and possibly result in a<br />
hazardous situation<br />
Turn the oven off and disconnect from the<br />
power supply before cleaning.<br />
The outside oven surface & control panel<br />
should be cleaned with a damp cloth.<br />
When cleaning surfaces of door, door seal,<br />
cavity of the oven, use only mild,<br />
non-abrasive soaps, or detergents applied<br />
with a sponge or soft cloth.<br />
The glass tray can be washed in warm<br />
sudsy water or in a dishwasher & dried with<br />
a clean cloth.<br />
The roller support and oven cavity should<br />
be cleaned regularly. The cavity should be<br />
cleaned with a damp cloth & a mild<br />
detergent & dried thoroughly. The roller ring<br />
should be washed in warm sudsy water or<br />
in a dish washer.<br />
Note: To prevent damage to the operating<br />
parts inside the oven, water should not be<br />
allowed to enter the ventilation slots.<br />
Do not use detergents, abrasives or<br />
spray-on cleaners on the control Panel.<br />
Do not allow the Control Panel to become<br />
wet.<br />
-11-
English<br />
Detergents or abrasives must never be<br />
used.<br />
Odours can be removed from the oven by<br />
combining a cup of water with the juice<br />
and skin of one lemon in a deep microwave<br />
able bowl. <strong>Micro</strong>wave for 5 minutes, and<br />
dry the cavity thoroughly with a soft cloth.<br />
Radio Interference<br />
A microwave oven may interfere with the<br />
normal operation of radio, TV, or similar<br />
equipment. Should such interference<br />
occur, the following steps should be<br />
followed:<br />
• Clean the door and sealing surface of<br />
the oven.<br />
• Place the radio, TV, etc. as far away<br />
from the microwave oven as possible.<br />
• Ensure the antenna fitted to the radio,<br />
TV, etc is correctly fitted & receiving a<br />
strong signal.<br />
• Plug the microwave oven into a different<br />
socket outlet<br />
Hot surface<br />
Caution: Hot surface<br />
Technical data<br />
MZ3000PG<br />
Rating<br />
<strong>Micro</strong>wave Power Output<br />
Operation Frequency<br />
External Dimensions<br />
Cavity Dimensions<br />
Oven Capacity<br />
Unit weight<br />
: 230 - 240V ~50Hz 1450W<br />
: 900W<br />
: 2,450MHz<br />
: 326mm high x 520mm wide x 394mm deep<br />
: 226mm high x 332mm wide x 371mm deep<br />
: 30 litres<br />
: 16.3kg<br />
MZ3000PGSA<br />
Rating : 220V ~ 60Hz 1450W<br />
<strong>Micro</strong>wave Power Output : 900W<br />
Operation Frequency : 2,450MHz<br />
External Dimensions : 326mm high x 520mm wide x 394mm deep<br />
Cavity Dimensions<br />
: 226mm high x 332mm wide x 371mm deep<br />
Oven Capacity<br />
: 30 litres<br />
Unit weight<br />
: 16.3kg<br />
-12-
<strong>Micro</strong>wave Oven<br />
First Use Safety Recommendation<br />
Please read through this booklet for safe and efficient use of the appliance.<br />
We urge you to read the "Hint's" section and also follow all detailed<br />
instructions even if you are familiar with using this appliance.<br />
Keep this guide handy for future reference.<br />
English Page 02<br />
Arabic Page 27<br />
MZ3000PG - 120V
POPCORN POTATO<br />
CHICKEN<br />
PIECES<br />
WEIGHT<br />
DEFROST<br />
TIME<br />
DEFROST<br />
KITCHEN<br />
TIMER<br />
DI NER<br />
PLATE<br />
POWER<br />
MEMORY AM/PM<br />
STOP<br />
CLEAR<br />
PI ZA<br />
FRESH<br />
VEGETABLE<br />
STEAK<br />
FROZEN<br />
VEGETABLE<br />
GRI L/<br />
COMB.<br />
EXPRE S C OK<br />
0<br />
CLOCK<br />
PRE-SET<br />
START<br />
+30SEC<br />
POPCORN POTATO<br />
CHICKEN<br />
PIECES<br />
WEIGHT<br />
DEFROST<br />
TIME<br />
DEFROST<br />
KITCHEN<br />
TIMER<br />
DINNER<br />
PLATE<br />
POWER<br />
MEMORY AM/PM<br />
STOP<br />
CLEAR<br />
PI ZA<br />
FRESH<br />
VEGETABLE<br />
STEAK<br />
FROZEN<br />
VEGETABLE<br />
GRI L/<br />
COMB.<br />
EXPRESS COOK<br />
CLOCK<br />
PRE-SET<br />
START<br />
+30SEC<br />
English<br />
6<br />
10<br />
Fig A<br />
1 2 3<br />
4 5 6<br />
7 8 9<br />
0<br />
5<br />
4<br />
3 2 8<br />
1<br />
9<br />
4<br />
1 2 3<br />
4 5 6<br />
7 8 9<br />
3<br />
7<br />
2<br />
-2-
English<br />
Fig B<br />
Fig C<br />
POPCORN<br />
POTATO<br />
PIZZA<br />
STEAK<br />
CHICKEN<br />
PIECES<br />
DINNER<br />
PLATE<br />
FRESH FROZEN<br />
VEGETABLE VEGETABLE<br />
3 Mica plate, Do not remove<br />
WEIGHT<br />
DEFROST<br />
POWER<br />
GRILL/<br />
COMB.<br />
TIME<br />
DEFROST<br />
KITCHEN<br />
TIMER<br />
1 2 3<br />
EXPRESS COOK<br />
4 5 6<br />
7 8 9<br />
MEMORY<br />
AM/PM<br />
0<br />
CLOCK<br />
PRE-SET<br />
STOP<br />
START<br />
CLEAR<br />
+30SEC<br />
4<br />
Intended use<br />
Your Black & Decker microwave oven is<br />
designed to heat appropriate foods &<br />
beverages using electromagnetic radiation.<br />
Always check the suitability of ingredients<br />
before cooking.<br />
Do not use this appliance for any other<br />
purpose. This product is intended for<br />
indoor household use only.<br />
Safety instructions<br />
IMPORTANT SAFETY INSTRUCTIONS<br />
READ CAREFULLY AND KEEP FOR<br />
FUTURE REFERENCE<br />
• While using electrical appliances, in<br />
order to reduce the risk of fire, electric<br />
shock, and / or injury to persons, basic<br />
safety precautions should be followed,<br />
including the following:<br />
Warning: If the door or door seals are<br />
damaged, the oven must not be operated<br />
until it has been repaired by a competent<br />
person<br />
Warning: It is hazardous for anyone other<br />
than a competent person to carry out any<br />
service or repair operation that involves the<br />
removal of a cover which gives protection<br />
against exposure to microwave energy<br />
Warning: Liquids and other foods must not<br />
be heated in sealed containers since they<br />
are liable to explode<br />
Warning: Only allow children to use the<br />
oven without supervision when adequate<br />
instructions have been given so that the<br />
child is able to use the oven in a safe way<br />
and understands the hazards of improper<br />
use<br />
-3-
English<br />
• This microwave oven is a free-standing<br />
unit & must not be built-in or placed in a<br />
cabinet.<br />
• The oven must have sufficient air flow.<br />
To ensure good ventilation, a gap of 10<br />
centimetres is required at the back, 15<br />
centimetres at one side, 30 centimetres<br />
at the other side and 30 centimetres<br />
above.<br />
• Only use utensils that are suitable for<br />
use in microwave ovens<br />
• When heating food in plastic or paper<br />
containers, keep an eye on the oven due<br />
to the possibility of ignition<br />
• If smoke is observed, switch off or<br />
unplug the appliance and keep the door<br />
closed in order to stifle any flames<br />
• <strong>Micro</strong>wave heating of beverages can<br />
result in delayed eruptive boiling<br />
therefore care must be taken when<br />
handling the container<br />
• The contents of feeding bottles and<br />
baby food jars shall be stirred or shaken<br />
and the temperature checked before<br />
consumption, in order to avoid burns<br />
• Eggs in their shell and whole hard-boiled<br />
eggs should not be heated in microwave<br />
ovens since they may explode, even<br />
after microwave heating has ended<br />
• The oven should be cleaned regularly<br />
and any food deposits removed<br />
• Failure to maintain the oven in a clean<br />
condition could lead to deterioration of<br />
the surface that could adversely affect<br />
the life of the appliance and possibly<br />
result in a hazardous situation<br />
• To protect against the risk of electric<br />
shock, DO NOT IMMERSE the<br />
appliance, cord set or plug in water or<br />
other liquids.<br />
• Do not remove the feet from this<br />
product.<br />
• Do not cook food directly on the glass<br />
tray. Always use a bowl or other<br />
container that is suitable for use in a<br />
microwave oven<br />
-4-<br />
Using your appliance<br />
• Do not operate any appliance with a<br />
damaged cord or plug, or after the<br />
appliance malfunctions, or is dropped or<br />
damaged in any manner. Return the<br />
complete appliance to your nearest<br />
authorised service facility for<br />
examination, electrical repair, mechanical<br />
repair or adjustment to avoid any hazard.<br />
• Do not attempt to repair the appliance<br />
yourself; instead, take it to your Black &<br />
Decker-owned or Authorised Service<br />
Centre for repair.<br />
• The use of attachments or accessories<br />
not recommended or sold by this<br />
appliance manufacturer may result in fire,<br />
electric shock or personal injury.<br />
• Do not let the cord hang over the edge of<br />
a table, counter, or touch hot surfaces.<br />
• Avoid touching hot surfaces, use handles<br />
and knobs.<br />
• Do not operate or place any part of this<br />
appliance on or near any hot surfaces<br />
(such as gas or electric burner or in a<br />
heated oven) or any appliance that<br />
generates steam.<br />
• Do not abuse the cord. Never carry the<br />
appliance by the cord or yank it to<br />
disconnect it from the outlet; instead,<br />
grasp the plug and pull to disconnect.<br />
• When using an extension cord with your<br />
appliance, make sure the extension cord<br />
is correctly wired, and rated for its use.<br />
• The microwave oven should be placed on<br />
a flat stable surface which can hold the<br />
weight of the appliance and the heaviest<br />
of food likely to be cooked inside.<br />
• Do not place any item on top of the oven.<br />
• Do not operate the microwave oven<br />
without the glass tray or roller support in<br />
their proper positions.<br />
• Make sure that the power supply cord is<br />
undamaged and does not run under the<br />
microwave oven or over any hot or sharp<br />
surfaces.
English<br />
• Do not operate the appliance when<br />
empty. This could damage the oven.<br />
• Do not use the oven to store any items.<br />
• Food surrounded by a membrane, such<br />
as egg yolks, potatoes, chicken livers,<br />
etc. must be pierced several times with a<br />
fork before cooking.<br />
• Do not use metal pans or dishes with<br />
metal handles.<br />
• Never place any item with a metal trim<br />
inside a microwave.<br />
• Always remove twist-ties from any foods<br />
before operating the microwave.<br />
• Some plastics are not suitable for use in<br />
a microwave. Always check the<br />
suitability of any item before use.<br />
• Do not cook in a container with a<br />
restricted opening as they may explode<br />
if heated in a microwave oven.<br />
• Conventional meat or candy<br />
thermometers must not be used in the<br />
oven. Only thermometers that are<br />
specifically made for microwaves should<br />
be used.<br />
• <strong>Micro</strong>wave utensils should be used only<br />
in accordance with the manufacturer's<br />
instructions.<br />
• Do not attempt to deep-fry foods in this<br />
oven.<br />
• <strong>Micro</strong>wave ovens heat the food in a<br />
container and not the container itself. It<br />
is always necessary to check the<br />
temperature of the food to ensure it is<br />
correctly cooked.<br />
• Do not place the oven where heat,<br />
moisture or high humidity are generated,<br />
or near combustible materials.<br />
Warning: Check the oven for any damage,<br />
such as a misaligned or bent door,<br />
damaged door seals and sealing surface,<br />
broken or loose door hinges & latches and<br />
dents inside the cavity or on the door. If<br />
there is any damage, do not operate the<br />
oven.<br />
-5-<br />
• Do not cover or block any openings on<br />
the appliance.<br />
• Do not use solvents or other corrosive<br />
chemicals or vapours for cleaning this<br />
appliance.<br />
• Never leave metal utensils in the<br />
<strong>Micro</strong>wave.<br />
• During use the appliance becomes hot.<br />
Care should be taken to avoid touching<br />
heating elements inside the oven.<br />
Warning: Accessible parts may become hot<br />
during use. Young children should be kept<br />
away.<br />
• Do not use harsh abrasive cleaners or<br />
sharp metal scrapers to clean the oven<br />
door glass since they can scratch the<br />
surface, which may result in shattering of<br />
the glass.<br />
• The temperature of accessible surfaces<br />
may be high when the appliance is<br />
operating.<br />
• This appliance is not intended to be<br />
operated by means of external timer or<br />
separate remote-control system.<br />
• The door or the outer surface may get hot<br />
when the appliance is operating.<br />
• If smoke is observed, switch off or unplug<br />
the appliance and keep the door closed<br />
in order to stifle any flames.<br />
• Always stir food to distribute the heat<br />
evenly and allow it to stand for a few<br />
minutes before consumption.<br />
• Containers used for cooking can become<br />
hot because of heat transferred from the<br />
heated food. Always use oven gloves<br />
when removing items from the oven.<br />
• If steam accumulates inside or around<br />
the outside of the oven door, wipe with a<br />
soft cloth. This may occur when the<br />
microwave oven is operated under high<br />
humidity conditions and in no way<br />
indicates malfunction of the unit.
English<br />
Safety of others<br />
• This appliance is not intended for use by<br />
persons (including children) with<br />
reduced physical, sensory or mental<br />
capabilities, or lack of experience and<br />
knowledge, unless they have been given<br />
supervision or instruction concerning<br />
use of the appliance by a person<br />
responsible for their safety.<br />
• Children should be supervised to ensure<br />
that they do not play with the appliance.<br />
• Close supervision is necessary when<br />
any appliance is used by or near<br />
children.<br />
• Never leave an appliance unattended<br />
when in use.<br />
After use<br />
• Switch off and remove the plug from the<br />
power outlet when not in use, before<br />
assembling or disassembling parts,<br />
cleaning or carrying out any<br />
maintenance of the appliance. Never<br />
pull the cord while removing it from the<br />
power outlet.<br />
• Keep children and animals away from<br />
the unit and cord set.<br />
Inspection and repairs<br />
If the supply cord is damaged, it must be<br />
replaced by the manufacturer, its service<br />
agent or similarly qualified persons in order<br />
to avoid a hazard.<br />
Electrical safety<br />
This product must be earthed.<br />
Always check that the power supply<br />
corresponds to the voltage on the rating<br />
plate<br />
Power plugs must match the outlet. Never<br />
modify the plug in any way. Do not use any<br />
adaptor plugs with earthed (Class l)<br />
appliances. Unmodified plugs and<br />
matching outlets will reduce the risk of<br />
electric shock.<br />
Never operate an appliance directly below<br />
the socket-outlet it is connected to.<br />
Do not insert any object into the openings<br />
on the outer case.<br />
Extension cables & Class l product<br />
• A 3-core cable must be used as your<br />
appliance is earthed and of Class l<br />
construction.<br />
• Up to 30m (100 ft) can be used without<br />
loss of power.<br />
• If the supply cord is damaged, it must<br />
be replaced by the manufacturer or an<br />
authorised Black & Decker Service<br />
Centre in order to avoid a hazard.<br />
Features (Fig. A)<br />
1 Control panel<br />
2 Turntable shaft<br />
3 Roller support<br />
4 Glass tray<br />
5 Observation window<br />
6 Door<br />
7 Safety interlock system<br />
8 Door release<br />
9 Grill rack<br />
10 Heating element<br />
• Remove all packaging from the<br />
appliance.<br />
• Inspect the oven after unpacking for any<br />
damage such as a misaligned or<br />
damaged door, dents or holes in the<br />
door window and screen, and any dents<br />
in the cavity. If any of these are seen,<br />
DO NOT use the oven.<br />
• Clean the appliance before first use.<br />
Assembly (Fig. B)<br />
Warning! Before assembly, make sure that<br />
the appliance is switched off and<br />
unplugged.<br />
• Place the appliance on a flat, even<br />
surface.<br />
• Open the door (6) & place the stem into<br />
the hole in the cavity base. The door is<br />
opened by pressing the door release.<br />
• Place the roller support (3) into the hole<br />
in the cavity.<br />
-6-
English<br />
• Align the glass tray (4) on top of the<br />
roller support.<br />
• Connect the appliance to a suitable<br />
electrical supply.<br />
Setting the Clock<br />
When the microwave oven is connected to<br />
a suitable electrical supply, the oven will<br />
display "0:00".<br />
To set the correct time, for example: To set<br />
8:00 .<br />
CLOCK<br />
PRE-SET<br />
1 Press the "Clock/Pre-set" button.<br />
The hour figures will flash.<br />
2 Press the number buttons "8","0","0" in<br />
order.<br />
AM/PM<br />
3 Press AM/PM as required<br />
CLOCK<br />
4 Press the "Clock/Pre-set"<br />
PRE-SET<br />
button<br />
to finish setting the clock. The time will<br />
be shown in the LED display.<br />
STOP<br />
Note: If "Stop/Clear" CLEAR button is<br />
pressed or if there is no operation within 1<br />
minute, the oven will revert to its previous<br />
state automatically.<br />
This appliance also has a handy "Kitchen<br />
KITCHEN<br />
Timer" TIMER button. This can be operated<br />
as follows:<br />
KITCHEN<br />
1 Press " Kitchen Timer" TIMER button, the<br />
LED display will show 00:00, and the clock<br />
indicator will be lit.<br />
The first "0" will flash, the ":" and the other<br />
"0" will light up.<br />
2 Use the numeric buttons to enter the<br />
required alarm time.<br />
START<br />
3 Press "Start/+30Sec." +30SEC button to<br />
confirm the setting. The clock indicator will<br />
light up.<br />
4 When the set time arrives, the clock<br />
indicator will go out and an audible alarm<br />
will be heard.<br />
Close the door & press the <strong>Micro</strong>wave<br />
button repeatedly until the required power<br />
setting is shown in the LED display.<br />
Level Power Display<br />
1 10% PL1<br />
2 20% PL2<br />
3 30% PL3<br />
4 40% PL4<br />
5 50% PL5<br />
6 60% PL6<br />
7 70% PL7<br />
8 80% PL8<br />
9 90% PL9<br />
10 100% PL10<br />
Remarks: When a power between level<br />
10-8 is chosen, the high level indicator<br />
will light up and it will flash when in<br />
operation.<br />
When a power between level 7-1 is<br />
chosen, the low level indicator will light<br />
up and it will flash when in operation.<br />
POWER<br />
Press the " Power" button until the<br />
LED shows the required power level. " "<br />
and " " or “ " will light up.<br />
Enter the required cooking time using the<br />
numeric buttons.<br />
Note: The maximum cooking time is 99<br />
minutes and 99 seconds.<br />
START<br />
Press the "Start/+30Sec" +30SEC button to<br />
start cooking. The cooking time will be<br />
displayed and will count down during<br />
cooking. ":", " ”, and " ", or " "<br />
will flash in the LED display.<br />
Note: In the process of cooking, if the<br />
STOP<br />
"Stop/Clear"<br />
CLEAR<br />
button is pressed or if<br />
there is no operation within 1 minute, the<br />
oven will go back to the former setting<br />
automatically.<br />
If the clock has been set previously, the Note: During <strong>Micro</strong>wave cooking or grilling,<br />
LED will display the current time.<br />
GRILL/<br />
the "Power" POWER or "Grill / Combi"<br />
COMB.<br />
Use (Fig. C)<br />
button can be pressed to display the<br />
current microwave power in the LED for 3<br />
Press the door release (8) to open the oven seconds. After three seconds, the display<br />
door then place the container onto the<br />
glass tray (4).<br />
-7-<br />
will revert to normal.
English<br />
Note: During cooking, the "Clock/Pre-Set"<br />
CLOCK<br />
PRE-SET button can be pressed to show the<br />
current time in the LED for 2-3 seconds. The<br />
display will then revert to normal.<br />
Once cooking has completed, an audible<br />
signal will be heard. Open the door &<br />
remove the cooked food.<br />
Always use oven gloves when removing<br />
items from the oven.<br />
If the door of the oven is opened during<br />
cooking, the microwave oven will automatcally<br />
stop working. Cooking will continue<br />
after re-closing the door.<br />
If the remaining cooking time is not required,<br />
STOP<br />
press the "Stop / Clear" CLEAR button to<br />
cancel further cooking.<br />
Operating the oven when empty could<br />
damage the oven.<br />
To stop the oven during operation, press the<br />
STOP<br />
Stop / Clear CLEAR button.<br />
<strong>Micro</strong>wave Cook<br />
POWER<br />
1 Keep on pressing “Power” button to<br />
choose microwave power. “ ” and<br />
“ ” or “ ” will be lighted.<br />
2 Press number keys to input the cooking<br />
time; the maximum cooking time is 99<br />
minutes and 99 seconds.<br />
START<br />
3 Press "Start/+30Sec"<br />
+30SEC<br />
to start<br />
cooking, and the remained cooking time<br />
will be displayed. “:” , “ ” , “ ” or “<br />
” indicators will be flashing.<br />
Note: In the process of cooking, if the<br />
STOP<br />
"Stop/Clear" CLEAR button is pressed or if<br />
there is no operation within 1 minute, the<br />
oven will go back to the former setting<br />
automatically.<br />
QuickStart<br />
Use the numeric buttons to enter a cooking<br />
time from 1 to 6 minutes.<br />
Cooking will start automatically at 100%<br />
power.<br />
START<br />
Pressing the "Start/+30Sec" +30SEC button<br />
will increase the cooking time, up to a<br />
maximum of 99 minutes and 99 seconds.<br />
START<br />
If the "Start/+30Sec" +30SEC button is<br />
pressed without entering a cooking time,<br />
the the <strong>Micro</strong>wave will start cooking at<br />
100% power level for 30 seconds. The<br />
cooking time can be increased by pressing<br />
START<br />
the "Start/+30Sec" +30SEC button. Each time<br />
the button is pressed the cooking time will<br />
increase by 30 seconds.<br />
The maximum cooking time is 99 minutes<br />
and 99 seconds.<br />
START<br />
Note: Each time the "Start/+30Sec" +30SEC<br />
button is pressed, the cooking time will<br />
increase by 30 seconds for the microwave<br />
and Auto menu cooking. This function will<br />
not work in the "defrost by weight" mode.<br />
Weight Defrost:<br />
WEIGHT<br />
Press the "Weight Defrost" DEFROST button.<br />
"The LED will display "dEF1, " " and<br />
Use the numeric control pad to enter the<br />
weight (in ounces) of the item to be<br />
defrosted.<br />
START<br />
Press the "Start/+30 Sec" +30SEC button to<br />
start defrosting. The defrost time will count<br />
down in the LED.<br />
Note: Weights must be entered in ounces<br />
Note: The defrosting weight range is 4 -<br />
100 ounces.<br />
Time Defrost:<br />
TIME<br />
Press "Time Defrost"<br />
DEFROST<br />
button. The LED<br />
will display "dEF2", " " and " ".<br />
Use the numeric buttons to enter the<br />
required defrost time. The time range is 0<br />
minutes and 1 seconds to 99 minutes 99<br />
seconds.<br />
The default microwave power is power<br />
level 3. To change the power level, press<br />
POWER<br />
the "Power" button once. The LED<br />
display will show "PL 3". The required<br />
power level can be selected by pressing<br />
the relevant numeric button.<br />
-8-
English<br />
START<br />
Press " Start/+30Sec.<br />
+30SEC<br />
buttonto start<br />
defrosting. The cooking time count down in<br />
the LED display. ":", " “, " ”, indicators<br />
will flash.<br />
Popcorn - standard mode<br />
POPCORN<br />
Press the "Popcorn" button to select<br />
popcorn mode, " ", " " and "Oz" will<br />
light up.<br />
There are three weights programmed into<br />
the Oven. These can be accessed by<br />
POPCORN<br />
repeatedly pressing the "Popcorn"<br />
button. The weights available are:<br />
"1.75 ounces","3.0 ounces" and "3.5<br />
ounces."<br />
START<br />
Press the " Start/+30Sec." button to<br />
+30SEC<br />
start cooking. An audible signal will be<br />
heard. The "Oz" symbol will go out, and<br />
and " " will flash.<br />
When the cooking is completed, another<br />
audible signal will be heard and the LED will<br />
display "0:00".<br />
If the clock is set, the LED will display the<br />
current time.<br />
Popcorn - Time Set mode<br />
POPCORN<br />
The pre-set cooking times for "Popcorn"<br />
button can be changed.<br />
POPCORN<br />
Press the "Popcorn" button to select<br />
popcorn mode, " ", " " and "Oz" will<br />
light up. Depending on the number of times<br />
POPCORN<br />
the "Popcorn" button is pressed, "1.75"<br />
,"3.0", or "3.5" will appear in the LED.<br />
MEMORY<br />
Press the " Memory " button. The LED<br />
will display the cooking time for the selected<br />
weight. The selected cooking time will flash.<br />
Use the numeric buttons to enter the<br />
required cooking time.<br />
MEMORY<br />
Press " Memory " button to save the<br />
setting.<br />
START<br />
Note: If the " Start/+30Sec"<br />
+30SEC<br />
button is<br />
pressed, the oven will to cook with the<br />
amended cooking time. " ", " " will<br />
flash in the display.<br />
To restore the factory set figures, press &<br />
hold the "Popcorn" button until an<br />
POPCORN<br />
audible signal is heard.<br />
Potato<br />
Press the "Potato" button repeatedly<br />
POTATO<br />
until the number of potatoes to be cooked<br />
appears in the display. The " " and " "<br />
symbols will show in the display.<br />
1 potato (approximate 230 gram)<br />
2 potatoes (approximate 460 gram)<br />
3 potatoes (approximate 690 gram)<br />
START<br />
Press the " Start/+30Sec." +30SEC button to<br />
start cooking, The " " and " "<br />
symbols will flash in the display and the<br />
timer will count down.<br />
Times (press “Potato”) Weight Display<br />
1 1set<br />
2 2set<br />
3 3set<br />
Pizza<br />
PIZZA<br />
Press the "Pizza" button repeatedly<br />
until the required number of slices appears<br />
in the display. The " " and " "<br />
symbols will show in the display.<br />
You can reheat 1 - 3 slices of Pizza each<br />
time.<br />
START<br />
Press " Start/+30Sec." +30SEC button to cook,<br />
" " and " " will flash in the display &<br />
the timer will count down.<br />
Times (press “Pizza”) Weight Display<br />
1 3.0 Oz<br />
2 6.0 Oz<br />
3 9.0 Oz<br />
-9-
English<br />
Steak<br />
Press the "Steak" button repeatedly<br />
STEAK<br />
until the required weight appears in the<br />
display. The " ", " ", “ ” and "Oz"<br />
symbols will show in the display.<br />
START<br />
Press the "Start/+30 Sec." +30SEC button to<br />
cook. The " ", " ", " " will flash in<br />
the display & the cooking time will count<br />
down.<br />
Times (press “Steak”) Weight Display<br />
1 4.0 Oz<br />
2 8.0 Oz<br />
3 16.0 Oz<br />
Chicken Pieces<br />
Press the "Chicken Pieces" button<br />
CHICKEN<br />
PIECES<br />
repeatedly until the required weight appears<br />
in the display. The " ", " ", " " and<br />
"Oz" will be shown in the display.<br />
START<br />
Press the "Start/+30 Sec." +30SEC button to<br />
start cooking. The " ", " ", " " will<br />
flash in the display & the cooking time will<br />
count down.<br />
Times Weight Display<br />
(press “Chicken Pieces”)<br />
1 4.0 Oz<br />
2 8.0 Oz<br />
3 12.0 Oz<br />
4 16.0 Oz<br />
Dinner Plate<br />
Press the "Dinner Plate" button<br />
DINNER<br />
PLATE<br />
repeatedly until the required weight appears<br />
in the display. The " ", " ", and "Oz"<br />
will show in the display.<br />
START<br />
+30SEC<br />
Press the "Start/+30 Sec." button to<br />
start cooking. The " ", " " will flash in<br />
the display & the cooking time will count<br />
down.<br />
Times Weight Display<br />
(press “Dinner Plate”)<br />
1 9.0 Oz<br />
2 12.0 Oz<br />
3 18.0 Oz<br />
Fresh Vegetable<br />
Press the "Fresh Vegetable"<br />
FRESH<br />
VEGETABLE<br />
button<br />
repeatedly until the required weight<br />
appears in the display. The " ", " "<br />
and "Oz" will show in the display.<br />
START<br />
Press the "Start/+30 Sec." +30SEC button to<br />
start cooking. The " ", " " will flash in<br />
the display & the cooking time will count<br />
down.<br />
Times Weight Display<br />
(press “Fresh Vegetable”)<br />
1 4.0 Oz<br />
2 8.0 Oz<br />
3 16.0 Oz<br />
Frozen Vegetables<br />
Press the "Frozen Vegetables" button<br />
FROZEN<br />
VEGETABLE<br />
repeatedly until the required weight<br />
appears in the display. The " ", " "<br />
and "Oz" will show in the display.<br />
START<br />
Press the "Start/+30 Sec." +30SEC button to<br />
start cooking. The " ", " " will flash<br />
in the display & the cooking time will count<br />
down.<br />
Times Weight Display<br />
(press “Frozen Vegetable”)<br />
1 4.0 Oz<br />
2 8.0 Oz<br />
3 16.0 Oz<br />
Grill<br />
GRILL/<br />
COMB.<br />
Press the "Grill/Combi." button once<br />
to choose the grill function. The LED will<br />
display "G-1" and " ".<br />
Enter the required cooking time using the<br />
numeric keypad.<br />
The maximum cooking time is 99 minutes<br />
and 99 seconds.<br />
START<br />
Press the "Start/+30 Sec." +30SEC button to<br />
start cooking. The cooking time will count<br />
down. ":" and " " will flash in the display.<br />
Note: After half the grilling time has<br />
elapsed, the oven will pause and an<br />
audible signal will be heard. The ingredients<br />
should now be turned over for even<br />
cooking.<br />
-10-
English<br />
START<br />
Pressing the "Start/+30 Sec." +30SEC button<br />
will continue cooking. If no button is<br />
pressed within 1 minute of the signal, the<br />
oven will continue working and the audible<br />
signal will be heard again.<br />
Combination Cooking (<strong>Micro</strong>wave &<br />
Grill)<br />
GRILL/<br />
Press the "Grill/Combi." COMB. button twice<br />
or three times to select:<br />
Combination 1 (55%microwave+45%grill)<br />
or<br />
Combination 2 (36%microwave+64%grill)<br />
The LED will display "C-1" or "C-2", " "<br />
and " ".<br />
Enter the required cooking time using the<br />
numeric keypad.<br />
The maximum cooking time is 99 minutes<br />
and 99 seconds.<br />
START<br />
Press the "Start/+30 Sec." +30SEC button to<br />
start cooking. The cooking time will count<br />
down and the display will show ":", " "<br />
and " ".<br />
Multi-stage cooking<br />
A maximum of 2 stages can be set for<br />
cooking.<br />
In multi-stage cooking, if one stage is<br />
weight defrosting, this must be carried out<br />
first.<br />
Note: Auto cooking cannot work in the<br />
multi-stage cooking.<br />
Example: if you want to cook with 80%<br />
microwave power for 5 minutes + 60%<br />
microwave power for 10 minutes. The<br />
cooking steps are as follows:<br />
POWER<br />
Press the "Power" button repeatedly<br />
until "PL8" (80% microwave power) is<br />
displayed;<br />
Press the number keys "5","0","0" to set<br />
the cooking time;<br />
POWER<br />
Press the "Power" button repeatedly<br />
until "PL6" (60% microwave power) is<br />
displayed;<br />
Press the number keys "1","0","0","0" to<br />
set the cooking time;<br />
START<br />
Press "Start/ +30 Sec." +30SEC button to<br />
start cooking.<br />
Pre-set Function<br />
This <strong>Micro</strong>wave can be programmed to<br />
begin cooking at a pre-set time.<br />
Select the required cooking mode & enter<br />
the details for the ingredients to be<br />
cooked.<br />
Note: Defrosting is beyond pre-set<br />
cooking.<br />
CLOCK<br />
Press the "Clock/Pre-Set" PRE-SET button to<br />
display the current time. The hour figure<br />
will flash.<br />
The display will show ":" and "0".<br />
Enter the required start time using the<br />
numeric keypad.<br />
Select "AM or PM" by pressing the<br />
AM/PM<br />
AM / PM button repeatedly.<br />
START<br />
Press the "Start/+30 Sec." +30SEC button to<br />
confirm the preset procedure. The display<br />
will show the current time.<br />
When the set time arrives, the <strong>Micro</strong>wave<br />
will operate as programmed.<br />
Note: The clock must be set correctly<br />
before using this function.<br />
Memory Function<br />
This <strong>Micro</strong>wave has 5 programmable<br />
memories.<br />
MEMORY<br />
Press the "Memory" button repeatedly<br />
to select the required programme. The<br />
oven will display "1", to "5" as required.<br />
Enter the one or two stages program<br />
required.<br />
-11-
English<br />
POWER<br />
For example : Press "Power" button<br />
six times, to adjust the initial cooking power.<br />
The oven will display "PL5".<br />
Press the numeric buttons "5","0","0" to<br />
enter a cooking time of 5 minutes.<br />
POWER<br />
Press the "Power" button once to<br />
select full power. The oven will display<br />
"PL10".<br />
Press the numeric buttons "1","0","0","0" to<br />
enter the remaining cooking time.<br />
MEMORY<br />
Press the "Memory" button key to<br />
save the memory program, or press<br />
START<br />
"Start/+30 Sec." +30SEC button to start<br />
cooking and save the program automatically.<br />
The cooking method is now stored & can be<br />
MEMORY<br />
accessed by pressing the "Memory"<br />
button, the number of the required program<br />
START<br />
then "Start/+30Sec."<br />
+30SEC<br />
button to start<br />
cooking.<br />
Child Lock<br />
To prevent children operating the <strong>Micro</strong>wave,<br />
press & hold the "Stop / Clear" CLEAR<br />
STOP<br />
button for 3 seconds. An audible signal will<br />
be heard and the LED will display.<br />
To turn the child lock off, press the<br />
STOP<br />
"Stop/Clear" CLEAR button for 3 seconds. An<br />
audible signal will be heard denoting that<br />
the lock is released, and the LED will turn<br />
back to the usual display.<br />
Operating times and preparations<br />
Follow directions on food packaging.<br />
-12-<br />
Switching on and off<br />
The microwave will start to cook once the<br />
START<br />
Start/+30 Sec +30SEC button is pressed.<br />
To stop the oven during operation, press<br />
the Stop / Clear<br />
STOP<br />
CLEAR button .<br />
Cleaning and maintenance<br />
The oven should be cleaned regularly and<br />
any food deposits removed<br />
Failure to maintain the oven in a clean<br />
condition could lead to deterioration of the<br />
surface that could adversely affect the life<br />
of the appliance and possibly result in a<br />
hazardous situation<br />
Turn the oven off and disconnect from the<br />
power supply before cleaning.<br />
The outside oven surface & control panel<br />
should be cleaned with a damp cloth.<br />
When cleaning surfaces of door, door seal,<br />
cavity of the oven, use only mild,<br />
non-abrasive soaps, or detergents applied<br />
with a sponge or soft cloth.<br />
The glass tray can be washed in warm<br />
sudsy water or in a dishwasher & dried<br />
with a clean cloth.<br />
The roller support and oven cavity should<br />
be cleaned regularly. The cavity should be<br />
cleaned with a damp cloth & a mild<br />
detergent & dried thoroughly. The roller<br />
ring should be washed in warm sudsy<br />
water or in a dish washer.<br />
Note: To prevent damage to the operating<br />
parts inside the oven, water should not be<br />
allowed to enter the ventilation slots.<br />
Do not use detergents, abrasives or<br />
spray-on cleaners on the control Panel.<br />
Do not allow the Control Panel to become<br />
wet.
English<br />
Detergents or abrasives must never be<br />
used.<br />
Odours can be removed from the oven by<br />
combining a cup of water with the juice<br />
and skin of one lemon in a deep microwave<br />
able bowl. <strong>Micro</strong>wave for 5 minutes, and<br />
dry the cavity thoroughly with a soft cloth.<br />
Radio Interference<br />
A microwave oven may interfere with the<br />
normal operation of radio, TV, or similar<br />
equipment. Should such interference<br />
occur, the following steps should be<br />
followed:<br />
Technical data<br />
• Clean the door and sealing surface of<br />
the oven.<br />
• Place the radio, TV, etc. as far away<br />
from the microwave oven as possible.<br />
• Ensure the antenna fitted to the radio,<br />
TV, etc is correctly fitted & receiving a<br />
strong signal.<br />
• Plug the microwave oven into a different<br />
socket outlet<br />
Hot surface<br />
Caution: Hot surface<br />
MZ3000PG-B4<br />
Rating : 120V ~60Hz 1500W<br />
<strong>Micro</strong>wave Power Output : 1000W<br />
Operation Frequency : 2,450Hz<br />
External Dimensions : 520mm high x 430mm wide x 335mm deep<br />
Cavity Dimensions<br />
: 226mm high x 332mm wide x 371mm deep<br />
Oven Capacity<br />
: 28 litres<br />
Unit weight<br />
: 15.3kg<br />
-13-
English<br />
Protecting the environment<br />
Separate collection. This product must not be disposed of with normal household waste.<br />
Should you find one day that your Black & Decker product needs replacement, or if it is of no<br />
further use to you, do not dispose it off with other household waste. Make this product<br />
available for separate collection.<br />
Separate collection of used products and packaging allows materials to be recycled and<br />
used again. Use of recycled materials helps prevent environmental pollution and reduces<br />
the demand for raw materials.<br />
Local regulations may provide for separate collection of electrical products from the household,<br />
at municipal waste sites or by the retailer when you purchase a new product.<br />
Black & Decker provides a facility for the collection and recycling of Black & Decker products<br />
once they have reached the end of their working life. To take advantage of this service please<br />
return your product to any authorised repair agent who will collect them on our behalf. You can<br />
check the location of your nearest authorised repair agent by contacting your local Black &<br />
Decker office at the address indicated in this manual. A list of authorised Black & Decker repair<br />
agents and full details of our after-sales service and contact are available on the Internet at:<br />
www.2helpU.com<br />
BLACK & DECKER HOME APPLIANCE 2 YEAR WARRANTY<br />
Black & Decker provides a 2 Year Warranty for this product from the date of purchase against<br />
defects due to defective materials or workmanship. Motor/element burn-outs due to voltage<br />
fluctuations are not covered under warranty. If the product should become defective within the<br />
warranty period, Black & Decker will repair or (at Black & Decker's discretion) replace it free of<br />
charge.<br />
The warranty provisions do not cover failure due to accident, misuse, abuse, negligence or non<br />
observation of local regulations on the part of the user. Equally, the warranty provisions do not<br />
apply where the appliance has been serviced by a person not authorized by Black & Decker or<br />
serviced with non-approved parts and this has contributed to the fault of the product.<br />
Superseded models without a replacement equivalent will either be repaired or (at Black &<br />
Decker's discretion) replaced with another product of similar retail value.<br />
UPON PURCHASE<br />
Fill in the Warranty Registration Card with the original Authorized Dealer's stamp (indicating<br />
date of purchase) and attach your purchase receipt to it. Retain in case of claims in the future.<br />
MAKING A CLAIM<br />
Take your defective product together with the Warranty Registration Card & purchase receipt to<br />
your local service Centre. You can either do this in person or send it freight prepaid. If mailing<br />
or shipping your appliance, ensure that it is packed carefully in a sturdy carton with enough<br />
packing material to prevent damage. Include a note describing the problem to the service<br />
Centre and be sure to give your return address.<br />
DESIGNED FOR DOMESTIC PURPOSES ONLY.<br />
-14-
-51-<br />
Arabic<br />
±u«œ ¢GKOn ∞LKv¡ «∞Hd«¨U‹ ∞∑HUœÍ ≈ÅU°∑t °QÍ {d¸. «¸≠o ±ö•EW ¢Bn ≠ONU «∞LAJKW ∞LdØe «∞BOU≤W Ë¢QØb ±s Ø∑U°W ´Mu«≤p.<br />
¢LM` {LU≤UÎ ®U±öÎ ±b¢t ßM∑Os ∞Nc« «∞LM∑Z «´∑∂U¸«Î ±s ¢U¸¥a «∞Ad«¡.<br />
´Mb «∞Ad«¡<br />
ÅÔLr ∞öß∑FLUô‹ «∞LMe∞OW ≠Ij.<br />
îc «∞LM∑Z «∞LFDq ±l °DUÆW «∞CLUÊ Ë≈¥BU‰ «∞Ad«¡ °MHºp ≈∞v ±dØe «∞BOU≤W «∞L∫Kw √Ë ¥LJMp ≈¸ßU∞t °U∞∂d¥b «∞Lb≠u´W √§d¢t ßKHUÎ.<br />
Ë≠w •U∞W ≈¸ßU‰ «∞πNU“ °U∞∂d¥b √Ë «∞A∫s, ¢QØb ±s ¢Hd¥m «∞LM∑Z ±s «∞LU¡ ØKOUÎ ËÆr °∑GKOHt §Ob«Î ≠w ÅMbË‚ Ød¢uÊ ±IuÈ ±l ≈{U≠W<br />
{LUÊ ®U±q ∞Lb… ßM∑Os _§Ne… «∞LMe∞OW<br />
´LKOW «∞LDU∞∂W<br />
«±ú °DUÆW ¢ºπOq «∞CLUÊ ±l «∞∑QØb ±s ˧uœ «∞ª∑r «_ÅKw ∞K∑U§d «∞LF∑Lb (Ë¢u{O` ¢U¸¥a «∞Ad«¡) £r «¸≠o ≈¥BU‰ «∞Ad«¡ °U∞∂DUÆW.<br />
«∞d§U¡ «ô•∑HUÿ °NLU ù°d«“≥LU ≠w •U∞W ˧uœ ±DU∞∂U‹ ≠w «∞Lº∑I∂q.<br />
∑ªb«Â ÆDl ¨OU¸ °bËÊ «∞d§uŸ ≈∞v «∞AdØW √Ë «∞∫Bu‰ ´Kv ±u«≠I∑NU, Ë¢º∂∂X ≥cÁ «∞IDl ≠w «∞FDq. Ë≈–« ¢uÆn ≈≤∑Uà √Í ©d«“ ±l ´bÂ<br />
˧uœ «∞∂b¥q «∞LMUßV, ≠SÊ ∞AdØW •o «î∑OU¸ ≈ÅöÕ «∞LM∑Z √Ë «ß∑∂b«∞t °Dd«“ ¬îd °MHf «∞IOLW «∞Ad«zOW.<br />
ô ¥GDw «∞CLUÊ «_´DU‰ «∞MU¢πW ´s «∞∫u«œÀ, ßu¡ «ôß∑FLU‰, «ù≥LU‰, «ôß∑FLU‰ «∞ªU©T, √Ë ´b «¢∂UŸ «∞MEr «∞LFLu‰ °NU ±∫KOUÎ.<br />
Øc∞p, ô ¢MD∂o ®dË◊ «∞CLUÊ ≈–« ¢LX ÅOU≤W √Ë ¢BKO` «∞LM∑Z ∞bÈ ©d· ¨Od ±F∑Lb ±s Æ∂q ®dØW , √ Ë ≠w •U∞W «ß<br />
¥GDw «∞CLUÊ ´Ou» «∞∑BMOl √Ë «∞Lu«œ «∞b«îKW ≠w «∞∑BMOl. Ë≠w •U∞W ≈ÅU°W «∞LM∑Z °QÍ ´Dq √£MU¡ ≠∑d… «∞CLUÊ, ß∑Iu ®dØW<br />
°SÅö•t √Ë (Ë≠IUÎ ∞∑Ib¥d ) «ß∑∂b«∞t ±πU≤UÎ.<br />
≤X : moc.Upleh2.www<br />
ËØOq ¢BKO` ±F∑Lb °U∞Mº∂W ∞p °Ld«§FW ±J∑V °ö„ √≤b œ¥Jd «∞L∫Kw ´Kv «∞FMu«Ê «∞L∂Os ≠w ≥c« «∞J∑OV. ¢∑u≠d ÆUzLW °QßLU¡<br />
ËØö¡ «∞∑BKO` «∞LF∑Lb¥s ±s °ö„ Ë œ¥Jd, ØLU ¢∑u≠d ¢HUÅOq ØU±KW ´s îb±U‹ ±U °Fb «∞∂Ol Ë´MUË¥s «ô¢BU‰ ´Kv ®∂JW «ù≤∑d<br />
¢u≠d °ö„ √≤b œ¥Jd «∞∑ºNOö‹ ôß∑ö Ë≈´Uœ… ¢BMOl ±M∑πU‹ °ö„ √≤b œ¥Jd ´Mb±U ¢Bq ≈∞v ≤NU¥W •OU¢NU «∞FLKOW. ∞ûß∑HUœ…<br />
±s ≥cÁ «∞ªb±W, ¥d§v ≈´Uœ… §NU“„ ≈∞v √Í ËØOq ¢BKO` ±F∑Lb Ë«∞cÍ ßOIu °Uß∑ö±t °U∞MOU°W ´MU. ¥LJMp ±Fd≠W ±uÆl √Æd»<br />
«_≤ELW «∞L∫KOW Æb ¢Mh ´Kv {d˸… «ùß∑ö «∞LMHBq ∞KLM∑πU‹ «∞JNd°UzOW ±s «∞LMU“‰, ≠w ±u«Æl «∞∂Kb¥W ∞KMHU¥U‹ √Ë °u«ßDW<br />
°Uzl «∞∑πezW ´Mb±U ¢A∑dÍ ±M∑πUÎ §b¥b«Î.<br />
•LU¥W «∞∂OµW<br />
«ùß∑ö «∞LMHBq ∞KLM∑πU‹ «∞Lº∑FLKW ˱u«œ «∞∑GKOn ¥ºL` °S´Uœ… ¢BMOl «∞Lu«œ Ë«ß∑FLU∞NU ±s §b¥b. ≈ß∑FLU‰ «∞<br />
Lu«œ «∞LFUœ ¢BMOFNU ¥ºU´b ´Kv ±Ml «∞∑KuÀ «∞∂Oµw Ë¥IKq «∞DKV ´Kv «∞Lu«œ «_Ë∞OW.<br />
≈–« ˧b‹ ≠w ¥u ±s «_¥U √≤p °∫U§W ∞Ad«¡ §NU“ °ö„ √≤b œ¥Jd §b¥b, √Ë ∞r ¢Fb °∫U§W ∞KπNU“ «∞Ib¥r, ô ¢∑ªKh ±Mt ±l «∞<br />
MHU¥U‹ «∞LMe∞OW «_îdÈ. §Ne ≥c« «∞LM∑Z ∞ûß∑öÂ «∞LMHBq.<br />
¥πV ´b «∞∑ªKh ±s ≥c« «∞LM∑Z ±l °IOW «∞MHU¥U‹ «∞LMe∞OW.<br />
BLACK & DECKER<br />
Black & Decker<br />
Black & Decker<br />
Black & Decker<br />
Black & Decker
Arabic<br />
.∞jhhôµ«ªdG ¿ôa ≥∏¨j …òdG í£°ùdGh ÜÉÑdG ∞«æJ •<br />
ó©HCG »a á¡HÉ°ûªdG Iõ¡LCÉdGh ¿ƒjõØ∏àdG hCG ƒjOGôdG °Vh •<br />
.∞jhhôµ«ªdG ¿ôa øY øµªe ¿Éµe<br />
¿ƒjõØ∏àdG hCG ƒjOGôdG »a âÑãªdG »FGƒ¡dG ¿CG øe ócCÉàdG •<br />
.ájƒb IQÉ°TEG πÑ≤à°ùjh í«ë°U ƒëf ≈∏Y âÑãe<br />
.∞∏àîe QÉ«J Qó°üe »a ∞jhhôµ«ªdG ¿ôa ¢ùHÉb â«ÑãJ •<br />
øNÉ°S í£°S<br />
Caution: Hot surface<br />
.É k≤∏£e ᣰTɵdG OGƒªdG hCG äÉØæªdG ΩGóîà°SG ΩóY ø«©àj<br />
°Vh ∫É∏N øe ¿ôØdG πNGO IOƒLƒªdG íFGhôdG øe ¢ü∏îàdG øµªj<br />
¬«dEG É kaÉ°†e AÉe ܃c É¡H ∞jhhôµ«ª∏d áÑ°SÉæe á≤«ªY á«fÉ£∏°S<br />
𫨰ûJ ºK ,∞jhhôµ«ªdG ¿ôa πNGO É¡Jô°ûbh IóMGh áfƒª«d ô«°üY<br />
ΩGóîà°SÉH πeɵdÉH ∞jƒéàdG ∞«ØéJ ºK ,≥FÉbO 5 Ióªd ¿ôØdG<br />
.á∏∏Ñe ¢Tɪb á©£b<br />
ƒjOGôdG äÉLƒe e πNGóàdG<br />
hCG ƒjOGô∏d …OÉ©dG 𫨰ûàdG e ∞jhhôµ«ªdG ¿ôa πªY πNGóàj ób<br />
,πNGóàdG Gòg ´ƒbh ádÉM »ah .á¡HÉ°ûªdG Iõ¡LCÉdG hCG ¿ƒjõØ∏àdG<br />
:á«dÉàdG äGƒ£îdG ´ÉÑJG »¨Ñæj<br />
á«æØdG äÉfÉ«ÑdG<br />
MZ3000PG-B4<br />
äGh 1500 ,õJôg 60 ,âdƒa 120 : ∞«æ°üàdG<br />
äGh 1000 : ∞jhhôµ«ªdG ábÉW êôN<br />
õJôg 2450 : 𫨰ûàdG OOôJ<br />
(≥ª©dG × ¢Vô©dG × ´ÉØJQÉdG) º∏e 335 × º∏e 430 × º∏e 520 : á«LQÉîdG OÉ©HCÉdG<br />
(≥ª©dG × ¢Vô©dG × ´ÉØJQÉdG) º∏e 371 × º∏e 332 × º∏e 226 : ¿ôØdG ∞jƒéJ OÉ©HCG<br />
G kôàd 28 : ¿ôØdG á©°S<br />
ºéc 15^3 : IóMƒdG ¿Rh<br />
-61-
-71-<br />
Arabic<br />
STOP<br />
CLEAR<br />
𫨰ûàdG ±É≤jEGh 𫨰ûàdG<br />
QõdG ≈∏Y §¨°†dG OôéªH »¡£dG »a ∞jhhôµ«ªdG CGóÑj ±ƒ°S<br />
. START "á«fÉK 30+/CGóHG"<br />
"í°ùe/±É≤jEG" QõdG ≈∏Y §¨°VG ,𫨰ûàdG AÉæKCG ¿ôØdG ±É≤jEÉd<br />
áfÉ«°üdGh ∞«æàdG<br />
hCG ΩÉ©W äÉØ∏îe ájCG ádGREGh …QhO πµ°ûH ¿ôØdG ∞«æJ »¨Ñæj<br />
.Ö°SGhQ<br />
ádÉM QƒgóJ ≈dEG áØ«f ádÉM »a ¿ôØdG ≈∏Y ®ÉØëdG ΩóY …ODƒj ób<br />
πµ°ûj ¿CG πªàëjh RÉ¡édG ôªY ≈∏Y kÉÑ∏°S ôKDƒj ób ɪe ;í£°ùdG<br />
πÑb »FÉHô¡µdG QÉ«àdG øY ¬∏°üah ¿ôØdG 𫨰ûJ ±É≤jEG Ωõ∏jh .G kô£N<br />
.¯ǾJ<br />
ΩGóîà°SÉH ºµëàdG áMƒdh »LQÉîdG ¿ôØdG í£°S ∞«æJ »¨Ñæj ɪc<br />
hCG ÜÉÑdG πØb hCG ÜÉÑdG í£°SCG ∞«æJ óæY Ωõ∏jh .á∏∏Ñe ¢Tɪb á©£b<br />
äÉØæªdG hCG ¿ƒHÉ°üdG ΩGóîà°SG ≈∏Y QÉ°üàbÉdG ¿ôØdG ∞jƒéJ<br />
á©£b hCG áéæØ°SEG ΩGóîà°SÉH ∂dPh §≤a ᣰTɵdG ô«Z áØ«ØîdG<br />
±É°†e ÅaGO AɪH á«LÉLõdG á«æ«°üdG π°ùZ øµªjh .áªYÉf ¢Tɪb<br />
.áØ«f ¢Tɪb á©£≤H É¡Ø«ØéJh ¥ÉÑWCÉdG ádÉ°ùZ »a hCG ¿ƒHÉ°U ¬«dEG<br />
å«M ;ÉkjQhO ∞jhhôµ«ªdG ∞jƒéJh IQGhódG áeÉYódG ∞«æJ »¨Ñæjh<br />
¬Ø«ØéJh ∞«ØN ∞æeh á∏∏Ñe ¢Tɪb á©£≤H ∞jƒéàdG ∞«æJ »¨Ñæj<br />
¬«dEG ±É°†ªdG AɪdÉH IQGhódG IôµÑdG á≤∏M π°ùZ »¨Ñæjh .πeɵdÉH<br />
.¥ÉÑWCÉdG ádÉ°ùZ »a hCG ¿ƒHÉ°üdG<br />
»¨Ñæj ,¿ôØdG πNGO 𫨰ûàdG AGõLCG ∞∏J ¿hO ádƒ∏«ë∏d :áMÉ∏e<br />
.ájƒ¡àdG äÉëàa ≈dEG √É«ªdG ∫ƒNóH ìɪ°ùdG ΩóY<br />
¢TôJ »àdG äÉØæªdG hCG ᣰTɵdG OGƒªdG hCG äÉØæªdG Ωóîà°ùJ Éd<br />
.ºµëàdG áMƒd ∞«æàd<br />
+30SEC<br />
.ºµëàdG áMƒd ∫ƒ£j π∏ÑdG ´óJ Éd<br />
,äGôe â°S<br />
POWER<br />
"IôcGòdG" QõdG ≈∏Y §¨°VG :∫ÉãªdG π«Ñ°S ≈∏Y<br />
."PL5" ¿ôØdG ¢Vô©j ±ƒ°S .á«dhCÉdG »¡£dG ábÉW §Ñ°†d<br />
»¡W âbh ∫ÉNOEÉd "0" ,"0" ,"5" ᫪bôdG QGQRCÉdG ≈∏Y §¨°VG<br />
.≥FÉbO 5 √Qób<br />
POWER<br />
ábÉ£dG ójóëàd IóMGh Iôe "IôcGòdG" QõdG ≈∏Y §¨°VG<br />
."PL10" ¿ôØdG ¢Vô©j ±ƒ°S .á∏eɵdG<br />
âbh ∫ÉNOEÉd "0" ,"0" ,"0" ,"1" ᫪bôdG QGQRCÉdG ≈∏Y §¨°VG<br />
.»≤ÑàªdG »¡£dG<br />
MEMORY<br />
hCG ,IôcGòdG èeÉfôH ßØëd "IôcGòdG" QõdG ≈∏Y §¨°VG<br />
START<br />
ßØMh »¡£dG AóÑd "á«fÉK 30+/CGóHG" QõdG ≈∏Y §¨°VG<br />
+30SEC<br />
.Ék«FÉ≤∏J èeÉfôÑdG<br />
§¨°†dG ∫É∏N øe É¡«dEG ∫ƒ°UƒdG øµªjh ¿BÉdG áfõîe »¡£dG á≤jôW<br />
§¨°†dG ºK ,܃∏£ªdG èeÉfôÑdG ºbQh<br />
MEMORY<br />
"IôcGòdG" QõdG ≈∏Y<br />
.»¡£dG AóÑd START "á«fÉK 30+/CGóHG" QõdG ≈∏Y<br />
+30SEC<br />
∫ÉØWCÉdG øe ájɪëdG πØb<br />
QGôªà°SÉdG e §¨°VG ,∞jhhôµ«ªdG ¿ôa 𫨰ûJ øe ∫ÉØWCÉdG æªd<br />
´Éª°S ºàj ±ƒ°S .¿GƒK 3 Ióªd<br />
STOP<br />
CLEAR "í°ùe/±É≤jEG" QõdG ≈∏Y<br />
:LED á°TÉ°T ¢Vô©J ±ƒ°Sh áYƒª°ùe á«Jƒ°U IQÉ°TEG<br />
QõdG ≈∏Y §¨°VG ,∫ÉØWCÉdG øe ájɪëdG πØb Iõ«e 𫨰ûJ ±É≤jEÉd<br />
IQÉ°TEG ´Éª°S ºàj ±ƒ°S .¿GƒK 3 Ióªd<br />
STOP<br />
"í°ùe/±É≤jEG"<br />
CLEAR<br />
.OÉ੪dG ¢Vô©dG ≈dEG LED á°TÉ°T Oƒ©J ±ƒ°Sh áYƒª°ùe á«Jƒ°U<br />
𫨰ûàdG äÉbhCGh äGOGóYEG<br />
.᪩WCÉdG äGƒÑY ≈∏Y áë°VƒªdG äɪ«∏©àdG ÑJG
-81-<br />
Arabic<br />
POWER<br />
"PL6" ¢VôY ≈àM Qôµàe πµ°ûH "ábÉ£dG" QR ≈∏Y §¨°VG<br />
.(%60 ÉgQób ∞jhhôµ«e ábÉW)<br />
âbh §Ñ°†d "0" ,"0" ,"0" ,"1" ᫪bôdG í«JÉتdG ≈∏Y §¨°VG<br />
.»¡£dG<br />
.»¡£dG AóÑd<br />
"á«fÉK 30+/CGóHG" QõdG ≈∏Y §¨°V<br />
≥Ñ°ùªdG §Ñ°†dG áØ«Xh<br />
•ƒÑ°†e âbƒd É k≤ah »¡£dG AóÑd Gòg ∞jhhôµ«ªdG ¿ôa áéeôH øµªj<br />
.É k≤Ñ°ùe<br />
܃∏£ªdG äÉfƒµªdG π«°UÉØJ πNOCGh ܃∏£ªdG »¡£dG °Vh OóM<br />
.É¡«¡W<br />
.É k≤Ñ°ùe •ƒÑ°†ªdG »¡£dG ó©H ¿ƒµJ ó«ªéàdG áHGPEG :áMÉ∏e<br />
âbƒdG ¢Vô©d<br />
CLOCK<br />
PRE-SET<br />
START<br />
+30SEC<br />
"≥Ñ°ùe §Ñ°V/áYÉ°ùdG" QõdG ≈∏Y §¨°VG<br />
.áYÉ°ùdG ΩÉbQCG ¢†eƒJ ±ƒ°S .»dÉëdG<br />
."0"h ":" á°TÉ°ûdG ¢Vô©J ±ƒ°S<br />
.᫪bôdG í«JÉتdG áMƒd ΩGóîà°SÉH ܃∏£ªdG AóÑdG âbh πNOCG<br />
QõdG ≈∏Y §¨°†dG ∫É∏N øe "PM" hCG "AM" OóM<br />
AM/PM<br />
.Qôµàe πµ°ûH "kAÉ°ùe/É kMÉÑ°U"<br />
§Ñ°†dG AGôLEG ó«cCÉàd<br />
START<br />
+30SEC "á«fÉK 30+/CGóHG" QõdG ≈∏Y §¨°VG<br />
.»dÉëdG âbƒdG á°TÉ°ûdG ¢Vô©J ±ƒ°S .≥Ñ°ùªdG<br />
°Vƒ∏d É k≤ah ∞jhhôµ«ªdG πª©j ±ƒ°S ,•ƒÑ°†ªdG âbƒdG ∫ƒ∏M óæY<br />
.èeôѪdG<br />
√òg ΩGóîà°SG πÑb í«ë°U πµ°ûH áYÉ°ùdG §Ñ°V Öéj :áMÉ∏e<br />
.áØ«XƒdG<br />
IôcGòdG áØ«Xh<br />
.áéeôÑ∏d á∏HÉb IôcGP ´GƒfCG á°ùªN ≈∏Y Gòg ∞jhhôµ«ªdG ¿ôa πªà°ûj<br />
èeÉfôÑdG ójóëàd Qôµàe πµ°ûH<br />
MEMORY<br />
"IôcGòdG" QõdG ≈∏Y §¨°VG<br />
.܃∏£ªdG Ö°ùM "5" ≈dEG "1" øe ¿ôØdG ¢Vô©j ±ƒ°S .܃∏£ªdG<br />
.܃∏£ªdG ø«à∏MôªdG èeÉfôH hCG á∏MôªdG èeÉfôH πNOCG<br />
±ÉæÄà°SG ≈dEG<br />
START<br />
+30SEC "á«fÉK 30+/CGóHG" QõdG ≈∏Y §¨°†dG …ODƒj<br />
øe IóMGh á≤«bO ∫É∏N QR …CG ≈∏Y §¨°†dG ΩóY ádÉM »a .»¡£dG<br />
IQÉ°TEG ´Éª°S ºàj ±ƒ°Sh πª©dG ¿ôØdG ∞fCÉà°ùj ±ƒ°S ,IQÉ°TEÉdG ´Éª°S<br />
.iôNCG Iôe áYƒª°ùe<br />
çÉ∏K hCG ø«Jôe<br />
GRILL/<br />
COMB.<br />
:(IGƒ°ûªdGh ∞jhhôµ«ªdG) ÖcôªdG ƒ¡£dG<br />
"Öcôe ƒ¡W/IGƒ°ûªdG" QõdG ≈∏Y §¨°VG<br />
:ójóëàd äGôe<br />
(IGƒ°ûe %45 + ∞jhhôµ«e %55) 1 ƒ¡£dG Öcôe<br />
(IGƒ°ûe %64 + ∞jhhôµ«e %36) 2 ƒ¡£dG Öcôe<br />
h "C-2" hCG "C-1" RƒeôdG " LED á°TÉ°T ¢Vô©J ±ƒ°S<br />
." "h<br />
.᫪bôdG ºµëàdG áMƒd ΩGóîà°SÉH ܃∏£ªdG »¡£dG âbh πNOCG<br />
.á«fÉK 99h á≤«bO 99 ƒg »¡£∏d âbh ≈°übCG<br />
±ƒ°S .»¡£dG AóÑd<br />
START<br />
+30SEC<br />
"á«fÉK 30+/CGóHG" QõdG ≈∏Y §¨°VG<br />
RƒeôdG á°TÉ°ûdG ¢Vô©J ±ƒ°Sh »dRÉæàdG ó©dG »a »¡£dG âbh CGóÑj<br />
." "h " "h ":"<br />
hCG<br />
πMGôªdG Oó©àe ƒ¡£dG<br />
.»¡£∏d ≈°übCG óëc »¡W »à∏Môe áéeôH øµªj<br />
»g πMGôªdG √òg ióMEG âfÉc GPEG ,πMGôªdG Oó©àe »¡£dG »a<br />
á∏MôªdG √òg AGôLEG Öéj ¬fEÉa ,"¿RƒdG Ö°ùM ó«ªéàdG áHGPEG"<br />
.kÉdhCG<br />
Oó©àe »¡£dG »a »FÉ≤∏àdG »¡£dG 𫨰ûJ øµªj Éd :áMÉ∏e<br />
.πMGôªdG<br />
%80 ÉgQób ∞jhhôµ«e ábÉ£H »¡£dG »a áÑZôdG ádÉM »a :∫Éãe<br />
¿EÉa ,≥FÉbO 10 Ióªd %60 ÉgQób ∞jhhôµ«e ábÉW + ≥FÉbO 5 Ióªd<br />
:»dÉàdG ƒëædG ≈∏Y ¿ƒµJ »¡£dG πMGôe<br />
¢VôY ≈àM Qôµàe πµ°ûH POWER "ábÉ£dG" QR ≈∏Y §¨°VG<br />
.(%80 ÉgQób ∞jhhôµ«e ábÉW) "PL8"<br />
âbh §Ñ°†d "0" ,"0" ,"5" ᫪bôdG í«JÉتdG ≈∏Y §¨°VG<br />
.»¡£dG
áLRÉ£dG äGhô°†îdG<br />
Qôµàe πµ°ûH "áLRÉ£dG äGhô°†îdG" QR ≈∏Y §¨°VG<br />
FRESH<br />
VEGETABLE<br />
RƒeôdG ¢VôY ºàj ±ƒ°S .á°TÉ°ûdG ≈∏Y ܃∏£ªdG ¿RƒdG Qƒ¡X ≈àM<br />
.á°TÉ°ûdG ≈∏Y "OZ"h " "h" "<br />
±ƒ°Sh ,»¡£dG AóÑd<br />
START<br />
+30SEC<br />
"á«fÉK 30+/CGóHG" QõdG ≈∏Y §¨°VG<br />
âbh CGóÑj ±ƒ°Sh á°TÉ°ûdG »a " "h " " ¿GõeôdG ¢†eƒj<br />
.»dRÉæàdG ó©dG »a »¡£dG<br />
¢Vô©dG ¿RƒdG ("áLRÉ£dG äGhô°†îdG" QR §¨°V) äGôe<br />
äÉ«bhCG 0^4 1<br />
äÉ«bhCG 0^8 2<br />
á«bhCG 0^16 3<br />
IóªéªdG äGhô°†îdG<br />
≈àM Qôµàe πµ°ûH "IóªéªdG äGhô°†îdG" QR ≈∏Y §¨°VG<br />
FROZEN<br />
VEGETABLE<br />
" RƒeôdG ¢VôY ºàj ±ƒ°S .á°TÉ°ûdG ≈∏Y ܃∏£ªdG ¿RƒdG Qƒ¡X<br />
.á°TÉ°ûdG ≈∏Y "OZ"h " "h"<br />
±ƒ°Sh ,»¡£dG AóÑd<br />
START<br />
+30SEC<br />
"á«fÉK 30+/CGóHG" QõdG ≈∏Y §¨°VG<br />
âbh CGóÑj ±ƒ°Sh á°TÉ°ûdG »a " "h " " ¿GõeôdG ¢†eƒj<br />
.»dRÉæàdG ó©dG »a »¡£dG<br />
¢Vô©dG ¿RƒdG äGôe<br />
("IóªéªdG äGhô°†îdG" QR §¨°V)<br />
äÉ«bhCG 4^0 1<br />
äÉ«bhCG 8^0 2<br />
á«bhCG 16^0 3<br />
IGƒ°ûªdG<br />
GRILL/<br />
QÉ«àNÉd IóMGh Iôe COMB. "Öcôe ƒ¡W/IGƒ°ûªdG" QR ≈∏Y §¨°VG<br />
á°TÉ°T ≈∏Y " "h "G-1" ¢VôY ºàj ±ƒ°S .IGƒ°ûªdG áØ«Xh<br />
.LED<br />
.᫪bôdG í«JÉتdG áMƒd ΩGóîà°SÉH ܃∏£ªdG »¡£dG âbh πNOCG<br />
.á«fÉK 99 á≤«bO 99 ƒg »¡W âbh ≈°übCG<br />
START<br />
±ƒ°S .»¡£dG AóÑd<br />
+30SEC<br />
" á«fÉK 30+/CGóHG" QõdG ≈∏Y §¨°VG<br />
h ":" ¿GõeôdG ¢†eƒj ±ƒ°Sh »dRÉæàdG ó©dG »a »¡£dG âbh CGóÑj<br />
.á°TÉ°ûdG »a<br />
ÉkàbDƒe ¿ôØdG ∞bƒàj ±ƒ°S ,AGƒ°ûdG âbh ∞°üf AÉ°†≤fG ó©H :áMÉ∏e<br />
Ö«∏≤J ∞bƒàdG Gòg ∫É∏N »¨Ñæjh .áYƒª°ùe IQÉ°TEG ´Éª°S ºàj ±ƒ°Sh<br />
.ó«L »¡W ≈∏Y ∫ƒ°üë∏d äÉfƒµªdG<br />
-91-<br />
Arabic<br />
Ωƒë∏dG<br />
Qƒ¡X ≈àM Qôµàe πµ°ûH "Ωƒë∏dG" QR ≈∏Y §¨°VG<br />
STEAK<br />
h " " RƒeôdG ¢VôY ºàj ±ƒ°S .á°TÉ°ûdG ≈∏Y ܃∏£ªdG ¿RƒdG<br />
.á°TÉ°ûdG ≈∏Y "OZ"h " " h" "<br />
,»¡£dG AóÑd START "á«fÉK 30+/CGóHG" QõdG ≈∏Y §¨°VG<br />
á°TÉ°ûdG »a "<br />
+30SEC<br />
"h " "h " " RƒeôdG ¢†eƒJ ±ƒ°Sh<br />
.»dRÉæàdG ó©dG »a »¡£dG âbh CGóÑj ±ƒ°Sh<br />
¢Vô©dG ¿RƒdG ("Ωƒë∏dG" QR §¨°V) äGôe<br />
äÉ«bhCG 0^4 1<br />
äÉ«bhCG 0^8 2<br />
á«bhCG 0^16 3<br />
êÉLódG £b<br />
¿RƒdG Qƒ¡X ≈àM Qôµàe πµ°ûH "êÉLódG £b" QR ≈∏Y §¨°VG<br />
RƒeôdG ¢VôY ºàj<br />
±ƒ°S .á°TÉ°ûdG ≈∏Y ܃∏£ªdG<br />
CHICKEN<br />
PIECES<br />
h " "<br />
.á°TÉ°ûdG ≈∏Y "OZ"h " "h" "<br />
START<br />
,»¡£dG AóÑd<br />
+30SEC<br />
"á«fÉK 30+/CGóHG" QõdG ≈∏Y §¨°VG<br />
±ƒ°Sh á°TÉ°ûdG »a " "h " "h " " RƒeôdG ¢†eƒJ ±ƒ°Sh<br />
.»dRÉæàdG ó©dG »a »¡£dG âbh CGóÑj<br />
¢Vô©dG ¿RƒdG ("êÉLódG £b" QR §¨°V) äGôe<br />
äÉ«bhCG 4^0 1<br />
äÉ«bhCG 8^0 2<br />
á«bhCG 0^12 3<br />
á«bhCG 16^0 4<br />
AGó¨dG ≥ÑW<br />
Qƒ¡X ≈àM Qôµàe πµ°ûH "AGó¨dG ≥ÑW" QR ≈∏Y §¨°VG<br />
DINNER<br />
h "<br />
PLATE<br />
" RƒeôdG ¢VôY ºàj ±ƒ°S .á°TÉ°ûdG ≈∏Y ܃∏£ªdG ¿RƒdG<br />
.á°TÉ°ûdG ≈∏Y "OZ"h" "<br />
,»¡£dG AóÑd<br />
START<br />
"á«fÉK 30+/CGóHG" QõdG ≈∏Y §¨°VG<br />
+30SEC<br />
CGóÑj ±ƒ°Sh á°TÉ°ûdG »a " "h " " ¿GõeôdG ¢†eƒj ±ƒ°Sh<br />
.»dRÉæàdG ó©dG »a »¡£dG âbh<br />
¢Vô©dG ¿RƒdG ("AGó¨dG ≥ÑW" QR §¨°V) äGôe<br />
äÉ«bhCG 0^9 1<br />
á«bhCG 0^12 2<br />
á«bhCG 0^18 3
-02-<br />
Arabic<br />
START<br />
, "á«fÉK 30+/CGóHG" QõdG ≈∏Y §¨°†dG ádÉM »a :áMÉ∏e<br />
+30SEC<br />
¢†eƒj ±ƒ°S .∫ó©ªdG »¡£dG âbh Ö°ùM »¡£dG ¿ôØdG CGóÑj ±ƒ°S<br />
.á°TÉ°ûdG »a " " h" "<br />
QõdG ≈∏Y QGôªà°SÉdG e §¨°VG ,æ°üªdG §Ñ°V ΩÉbQCG IOÉ©à°SÉd<br />
.áYƒª°ùe IQÉ°TEG ´Éª°S ≈àM "QÉ°ûØdG"<br />
POPCORN<br />
¢ùWÉ£ÑdG<br />
OóY Qƒ¡X ≈àM Qôµàe πµ°ûH "¢ùWÉ£ÑdG" QR ≈∏Y §¨°VG<br />
POTATO<br />
¢VôY ºàj ±ƒ°S .á°TÉ°ûdG ≈∏Y É¡«¡W ܃∏£ªdG ¢ùWÉ£ÑdG äÉÑM<br />
.á°TÉ°ûdG ≈∏Y " "h " " øjõeôdG<br />
(ÉkÑjô≤J É keGôL 230) IóMGh ¢ùWÉ£H áÑM<br />
(ÉkÑjô≤J É keGôL 460) ¢ùWÉ£H ÉàÑM<br />
(ÉkÑjô≤J É keGôL 690) ¢ùWÉ£H äÉÑM çÉ∏K<br />
±ƒ°Sh ,»¡£dG AóÑd<br />
START<br />
+30SEC "á«fÉK 30+/CGóHG" QõdG ≈∏Y §¨°VG<br />
»a âbDƒªdG CGóÑj ±ƒ°Sh á°TÉ°ûdG »a " "h " " ¿GõeôdG ¢†eƒj<br />
.»dRÉæàdG ó©dG<br />
¢Vô©dG ¿RƒdG ("¢ùWÉ£ÑdG" QR §¨°V) äGôe<br />
IóMGh áÑM 1<br />
¿ÉàÑM 2<br />
äÉÑM çÉ∏K 3<br />
:Gõà«ÑdG<br />
OóY Qƒ¡X ≈àM Qôµàe πµ°ûH<br />
PIZZA<br />
"Gõà«ÑdG" QR ≈∏Y §¨°VG<br />
øjõeôdG ¢VôY ºàj ±ƒ°S .á°TÉ°ûdG ≈∏Y É¡«¡W ܃∏£ªdG íFGô°ûdG<br />
.á°TÉ°ûdG ≈∏Y" " h" "<br />
.Gõà«H íFGô°T çÉ∏K ≈dEG áëjô°T ø«î°ùJ IOÉYEG Iôe πc »a ∂浪j<br />
START<br />
±ƒ°Sh ,»¡£dG AóÑd<br />
+30SEC<br />
"á«fÉK 30+/CGóHG" QõdG ≈∏Y §¨°VG<br />
»a âbDƒªdG CGóÑj ±ƒ°Sh á°TÉ°ûdG »a " "h " " ¿GõeôdG ¢†eƒj<br />
.»dRÉæàdG ó©dG<br />
¢Vô©dG ¿RƒdG ("Gõà«ÑdG" QR §¨°V) äGôe<br />
äÉ«bhCG 3^0 1<br />
äÉ«bhCG 6^0 2<br />
äÉ«bhCG 9^0 3<br />
START<br />
áHGPEG á«∏ªY AóÑd +30SEC "á«fÉK 30+/CGóHG" QõdG ≈∏Y §¨°VG<br />
á°TÉ°T ≈∏Y ó«ªéàdG áHGPEG âbƒd »dRÉæàdG ó©dG CGóÑj ±ƒ°S .ó«ªéàdG<br />
." "h " " ¿Gô°TDƒªdG ¢†eƒj ±ƒ°S .LED<br />
:»°SÉ«≤dG °VƒdG – QÉ°ûØdG<br />
±ƒ°Sh ,QÉ°ûØdG °Vh ójóëàd "QÉ°ûØdG" QõdG ≈∏Y §¨°VG<br />
POPCORN<br />
."OZ"h " "h " " A»°†j<br />
√òg ≈dEG ∫ƒ°UƒdG øµªjh .¿ôØdG »a áéeôÑe ¿GRhCG áKÉ∏K óLƒJ<br />
QõdG ≈∏Y QôµàªdG §¨°†dG ∫É∏N øe áéeôѪdG ¿GRhCÉdG<br />
POPCORN<br />
:»g áMÉàªdG ¿GRhCÉdG "QÉ°ûØdG"<br />
."äÉ«bhCG 3^5"h "äÉ«bhCG 3"h "á«bhCG 1^75"<br />
START<br />
±ƒ°S .»¡£dG AóÑd "á«fÉK 30+/CGóHG" QõdG ≈∏Y §¨°VG<br />
+30SEC<br />
±ƒ°Sh "OZ" õeôdG »Øàîj ±ƒ°S .áYƒª°ùe IQÉ°TEG ´Éª°S ºàj<br />
." "h " " ¿GõeôdG ¢†eƒj<br />
±ƒ°Sh iôNCG áYƒª°ùe IQÉ°TEG ´Éª°S ºàj ±ƒ°S ,»¡£dG ∫ɪàcG óæY<br />
.LED á°TÉ°T ≈∏Y "0:00" ¢VôY ºàj<br />
âbƒdG LED á°TÉ°T ¢Vô©J ±ƒ°S ,áYÉ°ùdG §Ñ°V ádÉM »a<br />
.»dÉëdG<br />
:âbƒdG §Ñ°V °Vh – QÉ°ûØdG<br />
Qõ∏d áÑ°ùædÉH É k≤Ñ°ùe áWƒÑ°†ªdG »¡£dG äÉbhCG ô««¨J øµªj<br />
. POPCORN "QÉ°ûØdG"<br />
,QÉ°ûØdG °Vh ójóëàd "QÉ°ûØdG" QõdG ≈∏Y §¨°VG<br />
POPCORN<br />
äGôe Oó©d É k≤ahh ."OZ" h " " h " " A»°†j ±ƒ°Sh<br />
hCG "1^75" ¢VôY ºàj ±ƒ°S , POPCORN "QÉ°ûØdG" QõdG §¨°V<br />
.LED á°TÉ°T ≈∏Y "3^5" hCG "3^0"<br />
á°TÉ°T ¢Vô©J ±ƒ°S . MEMORY "IôcGòdG" QõdG ≈∏Y §¨°VG<br />
»¡£dG âbh ¢†eƒj ±ƒ°S .OóëªdG ¿Rƒ∏d »¡£dG âbh LED<br />
.OóëªdG<br />
.܃∏£ªdG »¡£dG âbh ∫ÉNOEÉd ᫪bôdG QGQRCÉdG Ωóîà°SG<br />
.OGóYEÉdG ßØëd<br />
MEMORY<br />
"IôcGòdG" QõdG ≈∏Y §¨°VG
Arabic<br />
IOÉjR ≈dEG<br />
START<br />
+30SEC "á«fÉK 30+/CGóHG" QõdG ≈∏Y §¨°†dG …ODƒj ±ƒ°S<br />
.≈°übCG óëc á«fÉK 39h á≤«bO 100 ≈dEG π°üj ≈àM »¡£dG âbh<br />
START<br />
∫ÉNOEG ¿hO<br />
+30SEC<br />
"á«fÉK 30+/CGóHG" QõdG ≈∏Y §¨°†dG ádÉM »a<br />
ábÉW iƒà°ùªH »¡£dG CGóÑj ±ƒ°S ∞jhhôµ«ªdG ¿ôa ¿EÉa ,»¡W âbh<br />
∫É∏N øe »¡£dG âbh IOÉjR øµªj .á«fÉK 30 Ióªd %100 √Qób<br />
ᣨ°V πc …ODƒJh .<br />
START<br />
+30SEC "á«fÉK 30+/CGóHG" QõdG ≈∏Y §¨°†dG<br />
.á«fÉK 30 QGó≤ªH »¡£dG âbh IOÉjR ≈dEG QõdG ≈∏Y<br />
.á«fÉK 39h á≤«bO 100 ƒg »¡W âbh ≈°übCG<br />
QõdG ≈∏Y §¨°†dG É¡«a ºàj Iôe πc »a :áMÉ∏e<br />
30 QGó≤ªH »¡£dG âbh OGOõj ±ƒ°S ,<br />
START<br />
+30SEC "á«fÉK 30+/CGóHG"<br />
á«FÉ≤∏àdG áªFÉ≤dG »¡Wh ∞jhhôµ«ªdG »¡£d áÑ°ùædÉH á«fÉK<br />
Ö°ùM ó«ªéàdG áHGPEG" °Vh »a áØ«XƒdG √òg πª©J ød ."Auto"<br />
.¿RƒdG<br />
:¿RƒdG Ö°ùM ó«ªéàdG áHGPEG<br />
±ƒ°S . "¿RƒdG Ö°ùM ó«ªéàdG áHGPEG" QõdG ≈∏Y §¨°VG<br />
WEIGHT<br />
DEFROST<br />
.LED á°TÉ°T ≈∏Y " "h " "h "dEF1" ¢VôY ºàj<br />
IóMƒdG (á«bhCÉdÉH) ¿Rh ∫ÉNOEÉd ᫪bôdG ºµëàdG áMƒd Ωóîà°SG<br />
.É¡àHGPEG ܃∏£ªdG<br />
áHGPEG á«∏ªY AóÑd<br />
START<br />
+30SEC "á«fÉK 30+/CGóHG" QõdG ≈∏Y §¨°VG<br />
á°TÉ°T ≈∏Y ó«ªéàdG áHGPEG âbƒd »dRÉæàdG ó©dG CGóÑj ±ƒ°S .ó«ªéàdG<br />
.LED<br />
.á«bhCÉdÉH ¿GRhCÉdG ∫ÉNOEG Öéj :áMÉ∏e<br />
.á«bhCG 100 ≈dEG äÉ«bhCG 4 øe ó«ªéàdG áHGPEG ¿Rh ìhGôàj :áMÉ∏e<br />
:âbƒdG Ö°ùM ó«ªéàdG áHGPEG<br />
±ƒ°S . "âbƒdG Ö°ùM ó«ªéàdG áHGPEG" QõdG ≈∏Y §¨°VG<br />
TIME<br />
DEFROST<br />
.LED á°TÉ°T ≈∏Y " "h " "h "dEF2" ¢VôY ºàj<br />
ó«ªéàdG áHGPEG âbh ∫ÉNOEÉd ᫪bôdG ºµëàdG áMƒd Ωóîà°SG<br />
.á«fÉK 39h á≤«bO 100 ≈dEG IóMGh á«fÉK øe âbƒdG ìhGôàj .܃∏£ªdG<br />
iƒà°ùe ô««¨àd .3 ábÉ£dG iƒà°ùe »g á«°VGôàaÉdG ∞jhhôµ«ªdG ábÉW<br />
øµªj .IóMGh Iôe<br />
POWER<br />
"ábÉ£dG" QR ≈∏Y §¨°VG ,ábÉ£dG<br />
»ªbôdG QõdG ≈∏Y §¨°†dG ≥jôW øY ábÉ£dG iƒà°ùe QÉ«àNG<br />
.Ö°SÉæªdG<br />
-12-<br />
§Ñ°V/áYÉ°ùdG" QõdG ≈∏Y §¨°†dG øµªj ,»¡£dG AÉæKCG :áMÉ∏e<br />
CLOCK<br />
PRE-SET<br />
Ióªd LED á°TÉ°T ≈∏Y »dÉëdG âbƒdG ¢Vô©d "≥Ñ°ùe<br />
.OÉ੪dG °VƒdG ≈dEG á°TÉ°ûdG Oƒ©J ±ƒ°S ,∂dP ó©H .¿GƒK 3-2<br />
íàaG .áYƒª°ùe IQÉ°TEG 䃰U ´Éª°S ºàj ±ƒ°S ,»¡£dG ∫ɪàcG OôéªH<br />
.ΩÉ©£dG êGôNEÉH ºbh ÜÉÑdG<br />
øe ᪩WCÉdG êGôNEG óæY ¿ôØdG äGRÉØb ΩGóîà°SG ≈∏Y É kªFGO ¢UôMG<br />
.¿ôØdG<br />
STOP<br />
CLEAR<br />
¿ôa ∞bƒàj ±ƒ°S ,»¡£dG AÉæKCG É kMƒàØe ¿ôØdG ÜÉH ¿Éc GPEG<br />
≥∏Z IOÉYEG ó©H »¡£dG ±ÉæÄà°SG ºàj ±ƒ°S .Ék«FÉ≤∏J ∞jhhôµ«ªdG<br />
.ÜÉÑdG<br />
QõdG ≈∏Y §¨°VG ,܃∏£e ô«Z »≤ÑàªdG »¡£dG âbh ¿Éc GPEG<br />
.»≤ÑàªdG »¡£dG âbh AɨdEÉd<br />
STOP<br />
"í°ùe/±É≤jEG"<br />
.¬Ø∏J ≈dEG ¬ZGôa AÉæKCG ¿ôØdG 𫨰ûJ …ODƒj ¿CG øµªj<br />
"í°ùe/±É≤jEG" QõdG ≈∏Y §¨°VG ,𫨰ûàdG AÉæKCG ¿ôØdG ±É≤jEÉd<br />
∞jhhôµ«ªdG ƒ¡W<br />
ábÉW QÉ«àNÉd "ábÉ£dG" QR ≈∏Y QGôªà°SÉdG e §¨°VG 1<br />
POWER<br />
." " hCG " "h " " A»°†j ±ƒ°S .∞jhhôµ«ªdG<br />
âbh ≈°übCG ,»¡£dG âbh ∫ÉNOEÉd ΩÉbQCÉdG í«JÉØe ≈∏Y §¨°VG 2<br />
.á«fÉK 99h á≤«bO 99 ƒg »¡W<br />
START<br />
±ƒ°Sh ,»¡£dG AóÑd +30SEC "á«fÉK 30+/CGóHG" QõdG ≈∏Y §¨°VG 3<br />
" " äGô°TDƒªdG ¢†eƒJ ±ƒ°S .»≤ÑàªdG »¡£dG âbh ¢VôY ºàj<br />
." " hCG " "h<br />
QõdG ≈∏Y §¨°†dG ádÉM »a ,»¡£dG AÉæKCG :áMÉ∏e<br />
STOP<br />
∫É∏N á«∏ªY ájCG AGôLEG ΩóY ádÉM »a hCG " í°ùe/±É≤jEG"<br />
CLEAR<br />
.Ék«FÉ≤∏J ≥HÉ°ùdG OGóYEÉdG ≈dEG ¿ôØdG Lôj ±ƒ°S ,á≤«bO<br />
:jô°ùdG ƒ¡£dG<br />
á≤«bO øe ìhGôàj »¡W âbh ∫ÉNOEÉd ᫪bôdG QGQRCÉdG Ωóîà°SG<br />
.≥FÉbO 6 ≈dEG IóMGh<br />
CLEAR<br />
.%100 ÉgQób ábÉ£H Ék«FÉ≤∏J »¡£dG CGóÑj ±ƒ°S
-22-<br />
Arabic<br />
(<strong>Micro</strong>wave) ∞jhhôµ«ªdG QR ≈∏Y §¨°VGh ÜÉÑdG ≥∏ZCG<br />
.LED á°TÉ°T ≈∏Y ܃∏£ªdG ábÉ£dG OGóYEG ô¡j ≈àM Qôµàe πµ°ûH<br />
¢Vô©dG ábÉ£dG iƒà°ùªdG<br />
PL1 %10 1<br />
PL2 %20 2<br />
PL3 %30 3<br />
PL4 %40 4<br />
PL5 %50 5<br />
PL6 %60 6<br />
PL7 %70 7<br />
PL8 %80 8<br />
PL9 %90 9<br />
PL10 %100 10<br />
,8h 10 ø«jƒà°ùªdG ø«H Ée ábÉW iƒà°ùe QÉ«àNG óæY :äÉMÉ∏e<br />
.𫨰ûàdG AÉæKCG ¢†eƒj ±ƒ°Sh »dÉ©dG iƒà°ùªdG ô°TDƒe A»°†j ±ƒ°S<br />
A»°†j ±ƒ°S ,1h 7 Újƒà°ùŸG ÚH Ée ábÉW iƒà°ùe QÉ«àNG óæY<br />
.𫨰ûàdG AÉæKCG ¢†eƒj ±ƒ°Sh ¢†ØîæŸG iƒà°ùŸG ô°TDƒe<br />
iƒà°ùe LED á°TÉ°T ¢Vô©J ≈àM "ábÉ£dG" QR ≈∏Y §¨°VG<br />
POWER<br />
." " hCG " "h " " A»°†j ±ƒ°S .܃∏£ŸG ábÉ£dG<br />
.᫪bôdG QGQRC’G ΩGóîà°SÉH ܃∏£ŸG »¡£dG âbh πNOCG<br />
99h á≤«bO 99 ƒg ∞jhhôµ«ŸG ¿ôa ‘ »¡W âbh ≈°übCG :áMÓe<br />
.á«fÉK<br />
START<br />
ºàj ±ƒ°S .»¡£dG AóÑd +30SEC "á«fÉK 30+/CGóHG" QõdG ≈∏Y §¨°VG<br />
±ƒ°S .»¡£dG AÉæKCG »dRÉæàdG ó©dG »a CGóÑj ±ƒ°Sh »¡£dG âbh ¢VôY<br />
.LED á°TÉ°T »a " " hCG " "h " "h ":" ¢†eƒj<br />
"í°ùe/±É≤jEG" QõdG ≈∏Y §¨°†dG ádÉM »a ,»¡£dG AÉæKCG :áMÉ∏e<br />
STOP<br />
Lôj ±ƒ°S ,á≤«bO ∫É∏N á«∏ªY ájCG AGôLEG ΩóY ádÉM »a hCG CLEAR<br />
.Ék«FÉ≤∏J ≥HÉ°ùdG OGóYEÉdG ≈dEG ¿ôØdG<br />
≈∏Y §¨°†dG øµªj ,IGƒ°ûªdG hCG ∞jhhôµ«ªdÉH »¡£dG AÉæKCG :áMÉ∏e<br />
GRILL/<br />
¢Vô©d COMB. "Öcôe ƒ¡W/IGƒ°ûªdG" QõdG hCG POWER "ábÉ£dG" QR<br />
ó©H .¿GƒK 3 Ióªd LED á°TÉ°T ≈∏Y á«dÉëdG ∞jhhôµ«ªdG ábÉW<br />
.OÉ੪dG °VƒdG ≈dEG á°TÉ°ûdG Oƒ©J ±ƒ°S ,¿GƒK çÉ∏K<br />
k<br />
áeÉYódG ≈∏YCG e (4) á«LÉLõdG á«æ«°üdG IGPÉëªH ºb •<br />
.IQGhódG<br />
.Ö°SÉæe »FÉHô¡c QÉ«J Qó°üªH RÉ¡édG π°Uh •<br />
áYÉ°ùdG §Ñ°V<br />
±ƒ°S ,Ö°SÉæe »FÉHô¡c QÉ«J Qó°üªH ∞jhhôµ«ªdG ¿ôa π«°UƒJ óæY<br />
."0:00" ¿ôØdG ¢Vô©J<br />
.8:00 §Ñ°†d kÉ∏ãe ,í«ë°üdG âbƒdG §Ñ°†d<br />
±ƒ°S . "≥Ñ°ùe §Ñ°V/áYÉ°ùdG" QõdG ≈∏Y §¨°VG 1<br />
CLOCK<br />
PRE-SET<br />
.áYÉ°ùdG ΩÉbQCG ¢†eƒJ<br />
.Ö«JôàdG ≈∏Y "0" ,"0" ,"8" ΩÉbQCÉdG ≈∏Y §¨°VG 2<br />
.܃∏£ªdG Ö°ùM " kAÉ°ùe/É kMÉÑ°U" QõdG ≈∏Y §¨°VG 3<br />
AM/PM<br />
AÉ¡fEÉd "≥Ñ°ùe §Ñ°V/áYÉ°ùdG" QõdG ≈∏Y §¨°VG 4<br />
CLOCK<br />
PRE-SET<br />
.LED á°TÉ°T ≈∏Y âbƒdG ¢VôY ºàj ±ƒ°S .áYÉ°ùdG §Ñ°V<br />
STOP<br />
hCG<br />
CLEAR<br />
"í°ùe/±É≤jEG" QõdG ≈∏Y §¨°†dG ádÉM »a :áMÉ∏e<br />
Ék«FÉ≤∏J ¿ôØdG Oƒ©j ±ƒ°S ,IóMGh á≤«bO ∫É∏N á«∏ªY ájCG ò«ØæJ ΩóY<br />
.á≤HÉ°ùdG ádÉëdG ≈dEG<br />
π¡°S "ïÑ£ªdG âbDƒe" QR ≈∏Y É°†jCG RÉ¡édG Gòg πªà°ûj<br />
KITCHEN<br />
TIMER<br />
:»dÉàdG ƒëædG ≈∏Y QõdG Gòg 𫨰ûJ øµªj .ΩGóîà°SÉdG<br />
¢Vô©J ±ƒ°S , "ïÑ£ªdG âbDƒe" QõdG ≈∏Y §¨°VG 1<br />
KITCHEN<br />
TIMER<br />
.áYÉ°ùdG ô°TDƒe A»°†j ±ƒ°Sh 00:00 ΩÉbQCÉdG LED á°TÉ°T<br />
"0" ΩÉbQCGh ":" õeôdG A»°†j ±ƒ°Sh ,∫hCÉdG "0" ¢†eƒj ±ƒ°S<br />
.iôNCÉdG<br />
.܃∏£ªdG ¬«ÑæàdG âbh ∫ÉNOEÉd ᫪bôdG QGQRCÉdG Ωóîà°SG 2<br />
START<br />
.OGóYEÉdG ó«cCÉàd<br />
+30SEC<br />
"á«fÉK 30+/CGóHG" QõdG ≈∏Y §¨°VG 3<br />
.áYÉ°ùdG ô°TDƒe A»°†j ±ƒ°S<br />
áYÉ°ùdG ô°TDƒe »Øàîj ±ƒ°S ,•ƒÑ°†ªdG âbƒdG ∫ƒ∏M óæY 4<br />
.¬«ÑæJ 䃰U ´Éª°S ºàj ±ƒ°Sh<br />
±ƒ°S LED á°TÉ°T ¿EÉa ,É¡£Ñ°V ≥Ñ°S ób áYÉ°ùdG âfÉc GPEG<br />
.»dÉëdG âbƒdG ¢Vô©J<br />
("ê" πµ°ûdG) ΩGóîà°SÉdG<br />
°V ºK ,(8) ÜÉÑdG ôjôëJ IóMh ΩGóîà°SÉH ¿ôØdG ÜÉH íàaG<br />
.(4) á«LÉLõdG á«æ«°üdG ≈∏Y AÉYƒdG
-32-<br />
Arabic<br />
kGôàe 30 ≈dEG ¬dƒW π°üj »aÉ°VEG π«°UƒJ ∂∏°S ΩGóîà°SG øµªj •<br />
.ábÉ£∏d ¿Gó≤a …CG çhóM ¿hO (Ωób 100)<br />
πÑb øe ¬dGóÑà°SG Ωõ∏j ¬fEÉa ,É kØdÉJ AÉHô¡µdG ∂∏°S ¿Éc GPEG •<br />
ácô°ûd HÉJ óªà©e áfÉ«°U õcôe …CG øe hCG á©æ°üªdG ácô°ûdG<br />
.ôWÉîe ájCG Öæéàd ;ôµjO ófBG ∑É∏H<br />
(CG πµ°ûdG) AGõLCÉdG<br />
ºµëàdG áMƒd 1<br />
IQGhódG á«æ«°üdG OƒªY 2<br />
IQGhódG áeÉYódG 3<br />
á«LÉLõdG á«æ«°üdG 4<br />
áÑbGôªdG IòaÉf 5<br />
ÜÉÑdG 6<br />
áeÉ∏°ù∏d ≥«°û©àdG ΩÉf 7<br />
ÜÉÑdG ôjôëJ IóMh 8<br />
IGƒ°ûªdG πeÉM 9<br />
ø«î°ùàdG IóMh 10<br />
.RÉ¡édG øe ∞«∏¨àdG OGƒe ádGREÉH ºb •<br />
,äÉ«Ø∏J ájCG ≈∏Y ±ô©à∏d ∞«∏¨àdG OGƒe ádGREG ó©H ¿ôØdG ¢üëaG •<br />
OƒLh hCG ¬Ø∏J hCG í«ë°üdG ¬fɵe »a ÜÉÑdG ¿ƒc ΩóY πãe<br />
äÉLÉ©ÑfG ájCG hCG ,á°TÉ°ûdGh ÜÉÑdG IòaÉf »a äÉëàa hCG äÉLÉ©ÑfG<br />
,á≤HÉ°ùdG äÉ«Ø∏àdG øe …CG OƒLh âMÉd GPEG .¿ôØdG ∞jƒéJ »a<br />
.¿ôØdG Ωóîà°ùJ Éd<br />
.Iôe ∫hCÉd ¬eGóîà°SG πÑb RÉ¡édG ∞f •<br />
(Ü πµ°ûdG) Ö«côàdG<br />
∫ƒ°üØeh CÉØ£e RÉ¡édG ¿CG øe ócCÉàdG Öéj ,Ö«côàdG πÑb !ôjòëJ<br />
.»FÉHô¡µdG QÉ«àdG Qó°üe øY<br />
.ƒà°ùe í£°S ≈∏Y RÉ¡édG °V •<br />
»a IOƒLƒªdG áëàØdG »a áÑ°ü≤dG °V ºK ,(6) ÜÉÑdG íàaG •<br />
IóMh ≈∏Y §¨°†dG ∫É∏N øe ÜÉÑdG íàa ºàj .∞jƒéàdG IóYÉb<br />
.ÜÉÑdG ôjôëJ<br />
»a IOƒLƒªdG áëàØdG »a (3) IQGhódG áeÉYódG Ö«côàH ºb •<br />
.∞jƒéàdG<br />
øjôNBÉdG áeÉ∏°S<br />
äGQó≤dG hhP ¢UÉî°TCÉdG ¬eóîà°ù«d ºª°üe ô«Z RÉ¡édG Gòg •<br />
IôÑîdGh áæjóàªdG á«∏≤©dGh á«°ùëdGh á«ægòdGh ájó°ùédG<br />
πX »a ÉdEG (∫ÉØWCÉdG ∂dP »a ɪH) ø«à∏«∏≤dG áaô©ªdGh<br />
ΩGóîà°SÉH á≤∏©àªdG äɪ«∏©àdG º¡FÉ£YEG hCG º¡«∏Y ±Gô°TEÉdG<br />
.º¡àeÉ∏°S øY ∫hDƒ°ùªdG ¢üî°ûdG πÑb øe RÉ¡édG<br />
.RÉ¡édÉH º¡ãÑY ΩóY ¿Éª°†d ∫ÉØWCÉdG ≈∏Y ±Gô°TEÉdG Ωõ∏j •<br />
…CÉd ∫ÉØWCÉdG ΩGóîà°SG ádÉM »a QòëdGh ≥«bódG ±Gô°TEÉdG Ωõ∏j •<br />
.º¡æe Üô≤dÉH RÉ¡édG 𫨰ûJ hCG RÉ¡L<br />
.ΩGóîà°SÉdG AÉæKCG á©HÉàe ¿hO É k≤∏£e RÉ¡édG ∑ôàJ Éd •<br />
ΩGóîà°SÉdG ó©H<br />
AÉHô¡µdG òNCÉe øe ¢ùHÉ≤dG ´õfGh RÉ¡édG 𫨰ûJ ±É≤jEÉH ºb •<br />
hCG ¬FGõLCG øe …CG «ªéJ πÑb hCG RÉ¡édG ΩGóîà°SG ΩóY óæY<br />
∂∏°ùdG ó°T É k≤∏£e ∫hÉëJ Édh .É¡àfÉ«°U hCG É¡Ø«æJ hCG É¡µa<br />
.AÉHô¡µdG òNCÉe øY ¢ùHÉ≤dG π°üa AÉæKCG<br />
.∂∏°ùdGh IóMƒdG øY G kó«©H äÉfGƒ«ëdGh ∫ÉØWCÉdG AÉ≤HEG Ωõ∏j •<br />
ìÉ∏°UEÉdGh ¢üëØdG<br />
ácô°ûdG πÑb øe ¬dGóÑà°SG Öéj ,AÉHô¡µdG ∂∏°S ∞∏J ádÉM »a<br />
áLQO ¢ùØf ≈∏Y ¢üî°T hCG É¡d HÉàdG áfÉ«°üdG π«ch hCG á©æ°üªdG<br />
.ôWÉîªdG Öæéàd π«gCÉàdG<br />
á«FÉHô¡µdG áeÉ∏°ùdG<br />
Gòg ΩGóîà°SG óæY ¢†jQCÉJ ∂∏°S ΩGóîà°SG Ωõ∏j<br />
QÉ«àdG Qó°üe ≥aGƒJ øe ócCÉàdG É kªFGO »¨Ñæjh ,èàæªdG<br />
.∞«æ°üàdG áMƒd »a ø«ÑªdG ó¡édG e »FÉHô¡µdG<br />
πjó©J É kbÉ∏WEG ∫hÉëJ Édh QÉ«àdG òNCÉe e ¢ùHGƒ≤dG ≥aGƒàJ ¿CG Ωõ∏j<br />
»àdG äÉéàæªdG e ÅjÉ¡e ¢ùHGƒb ájCG ΩGóîà°SG ΩóY Ωõ∏jh .¢ùHÉ≤dG<br />
ádó©ªdG ô«Z ¢ùHGƒ≤dG ΩGóîà°SG óëj .("1" áÄØdG) ¢†jQCÉJ É¡H<br />
.á«FÉHô¡c áeó°üd ¢Vô©àdG ô£N øe á≤aGƒàªdG QÉ«àdG òNBÉeh<br />
QÉ«àdG òNCÉe πØ°SCG ¿ƒµj ÉeóæY RÉ¡L …CG 𫨰ûàH É k≤∏£e º≤J Éd<br />
.¬H π°UƒªdG<br />
.RÉ¡é∏d »LQÉîdG AÉ£¨dG äÉëàa »a º°ùL …CG πNóJ Éd<br />
"1" áÄØdG äÉéàæeh »aÉ°VEÉdG π«°UƒàdG ∑É∏°SCG<br />
øe RÉ¡édG Gòg ¿CÉd ;±GôWCÉdG »KÉ∏K πHÉc ΩGóîà°SG ø«©àj •<br />
."1" áÄØdG äÉéàæe øeh ¢†jQCÉJ É¡H »àdG Iõ¡LCÉdG
Arabic<br />
.RÉ¡édG »a äÉëàa ájCG ó°S hCG á«£¨àH º≤J Éd •<br />
å©Ñæj OGƒe hCG ádÉcCG ájhɪ«c OGƒe hCG áÑjòe OGƒe ájCG Ωóîà°ùJ Éd •<br />
.RÉ¡édG Gòg ∞«æàd QÉîH É¡æe<br />
.∞jhhôµ«ªdG πNGO á«fó©ªdG á«YhCÉdG ∑ôJ Ék«FÉ¡f ÖæéJ •<br />
»NƒJ »¨Ñæj ºK øeh ,ÉkæNÉ°S RÉ¡édG íÑ°üj ΩGóîà°SÉdG AÉæKCG •<br />
.¿ôØdG πNGO áæNÉ°ùdG AGõLCÉdG ¢ùªd Öæéàd QòëdG<br />
áæNÉ°S íÑ°üJ ¿CG øµªj ,É¡«dEG ∫ƒ°UƒdG øµªj »àdG AGõLCÉdG :ôjòëJ<br />
.RÉ¡édG øY G kó«©H ∫ÉØWCÉdG AÉ≤HEG »¨Ñæj .ΩGóîà°SÉdG AÉæKCG<br />
§°TɵªdG hCG ¢ùª∏ªdG áæ°ûN hCG ᣰTɵdG äÉØæªdG Ωóîà°ùJ Éd •<br />
¿CG øµªj å«M ;»LÉLõdG ¿ôØdG ÜÉH ∞«æàd IOÉëdG á«fó©ªdG<br />
»a ÖÑ°ùàj ¿CG øµªj √QhóH …òdGh í£°ùdG ¢TóN ≈dEG ∂dP …ODƒj<br />
.êÉLõdG ô°ùc<br />
á©ØJôe É¡«dEG ∫ƒ°UƒdG øµªj »àdG í£°SCÉdG IQGôM áLQO ¿ƒµJ ób •<br />
.RÉ¡édG 𫨰ûJ AÉæKCG<br />
âbDƒªdG πFÉ°Sh ᣰSGƒH 𫨰ûà∏d ºª°üe ô«Z RÉ¡édG Gòg •<br />
.π°üØæªdG ó©oH øY ºµëàdG ΩÉf hCG »LQÉîdG<br />
𫨰ûJ AÉæKCG ÉkæNÉ°S »LQÉîdG í£°ùdG hCG ÜÉÑdG íÑ°üj ¿CG øµªj •<br />
.RÉ¡édG<br />
¬∏°üa hCG RÉ¡édG 𫨰ûJ ±É≤jEG Öéj ,¿ÉNO óYÉ°üJ ßMƒd GPEG •<br />
ájCG OɪNEÉd É k≤∏¨e ÜÉÑdG AÉ≤HEG e »FÉHô¡µdG QÉ«àdG Qó°üe øY<br />
.Ö¡d áæ°ùdCG<br />
…hÉ°ùàdÉH IQGôëdG jRƒàd ΩÉ©£dG Ö«∏≤J ≈∏Y É kªFGO ¢UôMG •<br />
.¬dhÉæJ πÑb ≥FÉbO á©°†Ñd ΩÉ©£dG ∑ôJGh<br />
áé«àf áæNÉ°S »¡£dG »a áeóîà°ùªdG »fGhCÉdG íÑ°üJ ¿CG øµªj •<br />
É kªFGO ¢UôMG Gòd ,É¡«dEG øNÉ°ùdG ΩÉ©£dG øe IQGôëdG ∫É≤àfÉd<br />
.¿ôØdG øe »fGhCÉdG êGôNEG AÉæKCG äGRÉØb AGóJQG ≈∏Y<br />
ÜÉH ∫ƒM hCG ∞jhhôµ«ªdG πNGO QÉîÑdG ªéJ ádÉM »a •<br />
óbh .áªYÉf ¢Tɪb á©£≤H ¬ë°ùeG ,êQÉîdG øe ∞jhhôµ«ªdG<br />
Édh á«dÉY áHƒWQ ±hôX »a ∞jhhôµ«ªdG 𫨰ûJ óæY Gòg çóëj<br />
.RÉ¡édG »a π∏N OƒLh ∫GƒMCÉdG øe ∫ÉM …CÉH »æ©j<br />
-42-<br />
»a ∂dP ÖÑ°ùàj ó≤a ;É kZQÉa ¿ƒµj ÉeóæY RÉ¡édG 𫨰ûàH º≤J Éd •<br />
.¬Ø∏J<br />
.AÉ«°TCG ájCG øjõîàd ¿ôØdG ∫ɪ©à°SG ÖæéJ •<br />
hCG ¢†«ÑdG QÉØ°U πãe ,AÉ°û¨H áWÉëªdG ᪩WCÉ∏d áÑ°ùædÉH •<br />
AÉ°û¨dG Ö≤K Öéj ,∂dP ≈dEG Ée hCG êÉLódG óÑc hCG ¢ùWÉ£ÑdG<br />
.»¡£dG πÑb ácƒ°T ΩGóîà°SÉH äGôe IóY<br />
.á«fó©ªdG …ójCÉdG äGP á«fó©ªdG ¥ÉÑWCÉdG hCG »fGhCÉdG Ωóîà°ùJ Éd •<br />
.∞jhhôµ«ªdG ¿ôa »a á«fó©e ±QÉNR É¡H äGóMh ájCG °†J Éd •<br />
.∞jhhôµ«ªdG ¿ôa 𫨰ûJ πÑb ΩÉ©£dG äÉØd ∂a øe É kªFGO ócCÉJ •<br />
¿ôa »a ΩGóîà°SÉ∏d áëdÉ°U ô«Z ∂«à°SÉ∏ÑdG ´GƒfCG ¢†©H •<br />
IOɪdG áÑ°SÉæe øe ≥≤ëàdG É kªFGO »¨Ñæj ºK øeh ,∞jhhôµ«ªdG<br />
.É¡eGóîà°SG πÑb<br />
ádÉM »a ôéØæj ób ¬fCÉd ;Iô«¨°U áëàa ¬d AÉYh »a »¡£J Éd •<br />
.∞jhhôµ«ªdG ¿ôa »a ¬æ«î°ùJ<br />
»a áeóîà°ùªdG ájó«∏≤àdG IQGôëdG øjRGƒe °Vh ΩóY ø«©àj •<br />
πNGO ôµ°ùdG ∫ƒ∏ëe hCG Ωƒë∏dG IQGôM áLQO ¢SÉ«b<br />
á©æ°üªdG äGôàeƒeôàdG ΩGóîà°SG »¨Ñæj PEG ,∞jhhôµ«ªdG<br />
.§≤a ∞jhhôµ«ªdG ¿ôØd É°ü«°üN<br />
k<br />
äGOÉ°TQEÉd É k≤ah ÉdEG ∞jhhôµ«ªdG »fGhCG ΩGóîà°SG ΩóY »¨Ñæj •<br />
.á©æ°üªdG ácô°ûdG<br />
»a Égôª¨H ᪩WCÉdG »∏b »a ∞jhhôµ«ªdG ΩGóîà°SG ∫hÉëJ Éd •<br />
.øª°ùdG hCG âjõdG<br />
»a OƒLƒªdG ΩÉ©£dG ø«î°ùJ ≈∏Y ∞jhhôµ«ªdG ¿GôaCG πª©J •<br />
áLQO øe ≥≤ëàdG É kªFGO Ωõ∏j ºK øe ,¬°ùØf AÉYƒdG Éd AÉYƒdG<br />
.í«ë°üdG ƒëædG ≈∏Y ¬«¡W ¿Éª°†d ΩÉ©£dG IQGôM<br />
hCG á«dÉY áHƒWQ hCG IQGôM ¬H ódƒàJ ¿Éµe »a ¿ôØdG °†J Éd •<br />
.¥GôàMÉ∏d á∏HÉ≤dG OGƒªdG øe Üô≤dÉH<br />
¿ƒc ΩóY πãe ,äÉ«Ø∏J ájCG ≈∏Y ±ô©à∏d ¿ôØdG ¢üëaG :ôjòëJ<br />
í£°Sh ÜÉÑdG ∫ÉØbCG ∞∏J hCG ¬FÉæëfG hCG í«ë°üdG ¬fɵe »a ÜÉÑdG<br />
äÉLÉ©ÑfG OƒLh hCG ÜÉÑdG è«dGõeh äÉ∏°üØe ¿Gó≤a hCG ô°ùc hCG πØ≤dG<br />
äÉ«Ø∏àdG øe …CG OƒLh âMÉd GPEG .¿ôØdG ∞jƒéJ hCG ÜÉÑdG »a<br />
.¿ôØdG 𫨰ûàH º≤J Éd ,á≤HÉ°ùdG
Arabic<br />
RÉ¡édG ΩGóîà°SG<br />
ó©H hCG ¢ùHÉ≤dG hCG ∂∏°ùdG ∞∏J ádÉM »a RÉ¡L …CG 𫨰ûJ ÖæéJ •<br />
πµ°T …CÉH ¬Ø∏J hCG ¬Wƒ≤°S hCG RÉ¡édG ∞FÉXh »a π∏N …CG Qƒ¡X<br />
õcôe ÜôbCG ≈dEG πeɵdÉH RÉ¡édG IOÉYEG Öéj ɪc ,∫ɵ°TCÉdG øe<br />
hCG á«FÉHô¡µdG äÉMÉ∏°UEÉdG AGôLEGh ¬°üëØd óªà©e áfÉ«°U<br />
.ôWÉîe ájCG Öæéàd ᫵«fɵ«ªdG<br />
õcôe ÜôbCG ≈dEG ¬ª∏°S πH ,∂°ùØæH RÉ¡édG ìÉ∏°UEG ∫hÉëJ Éd •<br />
.É¡æe óªà©e hCG ôµjO ófBG ∑É∏H ácô°ûd HÉJ áfÉ«°U<br />
Éd hCG É¡H ≈°Uƒe ô«Z äÉeõ∏à°ùe hCG äÉ≤ë∏e ΩGóîà°SG …ODƒj ób •<br />
hCG ≥jôM ܃°ûf ≈dEG RÉ¡édG Gò¡d á©æ°ü oªdG ácô°ûdG É¡©«ÑJ<br />
.á«fɪ°ùL áHÉ°UEG hCG á«FÉHô¡c áeó°üd ¢Vô©àdG<br />
hCG πª©dG í£°S hCG Ió°†æªdG ±GƒM ≈∏Y ∂∏°ùdG ≥«∏©J ÖæéJ •<br />
.áæNÉ°ùdG í£°SCÉdG á°ùeÉ∏e<br />
ΩGóîà°SG ≈∏Y ¢UôMGh áæNÉ°ùdG í£°SCÉdG á°ùeÉ∏e ÖæéJ •<br />
.¢†HÉ≤ªdG<br />
…CG Üôb RÉ¡édG Gòg AGõLCG øe …CG ,°Vh hCG ,𫨰ûàH º≤J Éd •<br />
AÉHô¡µdG hCG RɨdÉH πª©j …òdG óbƒªdG πãe) ¬bƒa hCG øNÉ°S í£°S<br />
.QÉîH ¬æe å©Ñæj RÉ¡L …CG hCG (øNÉ°S ¿ôa πNGO hCG<br />
RÉ¡édG πªM É k≤∏£e ∫hÉëJ É∏a ,∂∏°ùdG ∫ɪ©à°SG IAÉ°SEG ÖæéJ •<br />
∂°ùeG πH ,¢ùÑ≤ªdG øe ¬∏°üØd Iƒ≤H √ó°T hCG ∂∏°ùdG ΩGóîà°SÉH<br />
.»FÉHô¡µdG QÉ«àdG π°üØd ¬Ñë°SGh ¢ùHÉ≤dÉH<br />
π«°UƒJ øe ócCÉJ ,RÉ¡édG e »aÉ°VEG π«°UƒJ ∂∏°S ΩGóîà°SG óæY •<br />
.ΩGóîà°SÉdG πªëJ ≈∏Y ¬JQóbh G kó«L ∂∏°ùdG<br />
πªëJ ≈∏Y Qó≤j ƒà°ùe í£°S ≈∏Y ∞jhhôµ«ªdG ¿ôa °Vh »¨Ñæj •<br />
.¬∏NGO É¡©°Vh øµªj ΩÉ©W ᫪c π≤KCG ¿Rhh ¿ôØdG ¿Rh<br />
.¿ôØdG ¥ƒa A»°T …CG °†J Éd •<br />
á«LÉLõdG á«æ«°üdG øµJ ºd GPEG ∞jhhôµ«ªdG ¿ôa 𫨰ûàH º≤J Éd •<br />
.í«ë°üdG °VƒdG »a IQGhódG áeÉYódG hCG<br />
¿ôa πØ°SCG ôªj Éd ¬fCGh »FÉHô¡µdG QÉ«àdG ∂∏°S ∞∏J ΩóY øe ócCÉJ •<br />
.IOÉM hCG áæNÉ°S í£°SCG ájCG ¥ƒa hCG ∞jhhôµ«ªdG<br />
-52-<br />
¬éeO ΩóY ø«©àjh ,á∏≤à°ùe IóMh ƒg Gòg ∞jhhôµ«ªdG ¿ôa •<br />
.áæ«HÉc πNGO ¬©°Vh hCG ôNBG RÉ¡L »a<br />
ájƒ¡J ¿Éª°†d ,Gòd . m±Éc AGƒg QÉ«J ¿ôØdG ≈dEG π°üj ¿CG ø«©àj •<br />
≈∏Y º°S 15h RÉ¡édG ∞∏N º°S 10 √Qób ÆGôa ôaƒJ Ωõ∏j ,Ió«L<br />
≈∏YCG º°S 30h ôNBÉdG ÖfÉédG ≈∏Y º°S 30h ø«ÑfÉédG óMCG<br />
.¿ôØdG<br />
áÑ°SÉæªdG »fGhCÉdG ≈∏Y §≤a ΩGóîà°SÉdG ô°üb »¨Ñæj •<br />
.∞jhhôµ«ªdG ¿GôaCG »a ΩGóîà°SÉ∏d<br />
»¨Ñæj ,á«bQh hCG ᫵«à°SÉ∏H á«YhCG »a ΩÉ©W ø«î°ùJ óæY •<br />
.∫É©à°TG çhóM ∫ɪàMÉd ¿ôØdG áMÉ∏e<br />
¬∏°üa hCG ¿ôØdG 𫨰ûJ ±É≤jEG Öéj ,¿ÉNO óYÉ°üJ ßMƒd GPEG •<br />
OɪNEÉd É k≤∏¨e ¿ôØdG ÜÉH AÉ≤HEG e »FÉHô¡µdG QÉ«àdG Qó°üe øY<br />
.Ö¡d áæ°ùdCG ájCG<br />
ôNCÉJ ≈dEG ∞jhhôµ«ªdG »a äÉHhô°ûªdG ø«î°ùJ …ODƒj ¿CG πªàëj •<br />
óæY QòëdG »NƒJ ø«©àj Gòd ,äÉYÉ≤ØH ÖMÉ°üªdG ¿É«∏¨dG<br />
.äÉHhô°ûªdG á«YhCG e πeÉ©àdG<br />
AGòZ äÉjhÉM hCG äÉYÉ°VôdG äÉjƒàëe êQ hCG ≥ØN Ωõ∏j •<br />
∫ÉØWCÉ∏d É¡FÉ£YEG πÑb É¡JQGôM áLQO øe ≥≤ëàdGh ∫ÉØWCÉdG<br />
.¥hôë∏d ∫ÉØWCÉdG ¢Vô©J Öæéàd<br />
¬«∏Z ºJ …òdG hCG ¬Jô°û≤H ßØàëªdG ¢†«ÑdG ø«î°ùJ ΩóY »¨Ñæj •<br />
ób ¢†«ÑdG Gòg ¿CÉd ∞jhhôµ«ªdG ¿ôa »a ¬Jô°ûb ꃰ†f ≈àM<br />
.∞jhhôµ«ªdG »a ø«î°ùàdG AÉ¡àfG ó©H ≈àM ôéØæj<br />
hCG ΩÉ©W äÉØ∏îe ájCG ádGREGh …QhO πµ°ûH ¿ôØdG ∞«æJ »¨Ñæj •<br />
.Ö°SGhQ<br />
QƒgóJ ≈dEG áØ«f ádÉM »a ¿ôØdG ≈∏Y ®ÉØëdG ΩóY …ODƒj ób •<br />
¿CG πªàëjh RÉ¡édG ôªY ≈∏Y kÉÑ∏°S ôKDƒj ób ɪe ;í£°ùdG ádÉM<br />
.IQƒ£N »a ÖÑ°ùàj<br />
hCG RÉ¡édG ôª¨J Éd ,á«FÉHô¡c áeó°üd ¢Vô©àdG ô£N ÖæéJ ᫨H •<br />
.iôNCG πFGƒ°S ájCG hCG AɪdG »a ¢ùHÉ≤dG hCG ∂∏°ùdG<br />
.èàæªdG Gò¡H á≤ë∏ªdG ºFGƒ≤dG ádGREG ôëj •<br />
á«LÉLõdG á«æ«°üdG ≈∏Y ¬©°VƒH ΩÉ©£dG »¡W ΩóY Öéj •<br />
øe Égô«Z hCG á«fÉ£∏°S ΩGóîà°SG É kªFGO Öéjh ,Iô°TÉÑe<br />
.∞jhhôµ«e ¿ôa »a ΩGóîà°SÉ∏d áÑ°SÉæªdG äÉjhÉëdG
4<br />
3<br />
Arabic<br />
Ü πµ°ûdG<br />
ê πµ°ûdG<br />
POPCORN<br />
POTATO<br />
PIZZA<br />
STEAK<br />
CHICKEN<br />
PIECES<br />
DINNER<br />
PLATE<br />
FRESH FROZEN<br />
VEGETABLE VEGETABLE<br />
ᵫªdG IOÉe øe áë«Ø°U<br />
É¡àdGREG ôëj ,AÉHô¡µ∏d ádRÉ©dG<br />
WEIGHT<br />
DEFROST<br />
TIME<br />
DEFROST<br />
GRILL/<br />
POWER<br />
COMB.<br />
1 2 3<br />
EXPRESS COOK<br />
4 5 6<br />
KITCHEN<br />
TIMER<br />
7 8 9<br />
MEMORY<br />
AM/PM<br />
0<br />
CLOCK<br />
PRE-SET<br />
STOP<br />
START<br />
CLEAR<br />
+30SEC<br />
ΩóY ø«©àj ,ÜÉÑdG ∫ÉØbCG hCG ¿ôØdG ÜÉH ∞∏J ádÉM »a :ôjòëJ<br />
.πgDƒe ¢üî°T ᣰSGƒH ¬MÉ∏°UEG ºàj ≈àM ¿ôØdG ∫ɪ©à°SG<br />
πgDƒªdG »æØdG ô«Z ¢üî°T …CG ΩÉ«b ¿ƒeCɪdG ô«Z øe :ôjòëJ<br />
¢Vô©àdG øe »≤j …òdG AÉ£¨dG ∂a øª°†àJ ìÉ∏°UEG hCG áfÉ«°U ∫ɪYCÉH<br />
.ô°ü≤dG á«gÉæàe äÉLƒªdG ábÉ£d<br />
á≤∏¨e äÉjhÉM »a ᪩WCÉdGh πFGƒ°ùdG ø«î°ùJ ΩóY ø«©àj :ôjòëJ<br />
.QÉéØfÉ∏d á∏HÉb É¡fCÉd<br />
ó©H ÉdEG áHÉbQ ¿hO ¿ôØdG ΩGóîà°SÉH ∫ÉØWCÉ∏d íª°ùoj Éd :ôjòëJ<br />
ΩGóîà°SG ≈∏Y º¡JQób øª°†J »àdG á«aɵdG äGOÉ°TQEÉdÉH ºgójhõJ<br />
ô«Z ΩGóîà°SÉdG ôWÉîªd º¡HÉ©«à°SGh øeBG ƒëf ≈∏Y ¿ôØdG<br />
.í«ë°üdG<br />
ΩGóîà°SÉdG ¢VôZ<br />
äÉdƒcCɪdG ø«î°ùàd ºª°üe ôµjO ófBG ∑É∏H ∞jhhôµ«ªdG ¿ôa<br />
ócCÉJ .á«°ù«WÉæ¨ehô¡µdG á©°TCÉdG ΩGóîà°SÉH áÑ°SÉæªdG äÉHhô°ûªdGh<br />
.»¡£dG πÑb ΩÉ©£dG äÉfƒµe áeAÉ∏e øe É kªFGO<br />
ºª°üe RÉ¡édG .iôNCG ¢VGôZCG ájCG »a RÉ¡édG Gòg Ωóîà°ùJ Éd<br />
.§≤a »dõæªdG ΩGóîà°SÉ∏d<br />
áeÉ∏°ùdG äɪ«∏©J<br />
᪡e áeÉ∏°S äɪ«∏©J<br />
nkÉ∏Ñ≤à°ùe É¡«dEG ´ƒLô∏d É¡H ®ÉØàMÉdGh ø©ªàH É¡JAGôb ≈Lôj<br />
óYGƒb IÉYGôe É kªFGO ø«©àj ,á«FÉHô¡µdG Iõ¡LCÉdG ΩGóîà°SG óæY •<br />
¢Vô©J hCG ≥jôM ܃°ûf äÉdɪàMG øe óë∏d ;á«°SÉ°SCÉdG áeÉ∏°ùdG<br />
Ée ∂dP »a ɪH ,á«°üî°T áHÉ°UEG hCG á«FÉHô¡c áeó°üd ¢UÉî°TCÉdG<br />
-62-<br />
:»∏j
POPCORN POTATO<br />
CHICKEN<br />
PIECES<br />
WEIGHT<br />
DEFROST<br />
TIME<br />
DEFROST<br />
KITCHEN<br />
TIMER<br />
DI NER<br />
PLATE<br />
POWER<br />
MEMORY AM/PM<br />
STOP<br />
CLEAR<br />
PI ZA<br />
FRESH<br />
VEGETABLE<br />
STEAK<br />
FROZEN<br />
VEGETABLE<br />
GRI L/<br />
COMB.<br />
EXPRE S C OK<br />
0<br />
CLOCK<br />
PRE-SET<br />
START<br />
+30SEC<br />
72<br />
POPCORN POTATO<br />
CHICKEN<br />
PIECES<br />
WEIGHT<br />
DEFROST<br />
TIME<br />
DEFROST<br />
KITCHEN<br />
TIMER<br />
DINNER<br />
PLATE<br />
POWER<br />
MEMORY AM/PM<br />
STOP<br />
CLEAR<br />
PI ZA<br />
FRESH<br />
VEGETABLE<br />
STEAK<br />
FROZEN<br />
VEGETABLE<br />
GRI L/<br />
COMB.<br />
EXPRESS COOK<br />
CLOCK<br />
PRE-SET<br />
START<br />
+30SEC<br />
Arabic<br />
1 2 3<br />
4 5 6<br />
7 8 9<br />
0<br />
3<br />
4<br />
9<br />
3<br />
8<br />
1<br />
2<br />
2<br />
4<br />
7<br />
01<br />
5<br />
6<br />
(CG πµ°T) ∫ɵ°TCÉdG<br />
1 2 3<br />
4 5 6<br />
7 8 9
«ùßr<br />
Names & Addresses for Black & Decker Service Concessionaries<br />
Afghanistan: Ishan National Co., Opp. Ministry of Justice, Kabul. Tel.: +93-2-2101727. Algeria: SARL Outillage Corporation, 04<br />
Route De Dely Brahim Cheraga, Alger. Tel.: +213-21-364363/508, Fax: +213-21-369667. Bahrain: Fawaz Al Zayani, P.O.Box 26563,<br />
Adliya, Manama. Tel.: +973-17-715252/712756, Fax: +973-17-713789. Bangladesh: Ultra Corporation, 8, Kushol Centre, Uttara,<br />
Dhaka 1230. Tel.: +880-2-8919272/9756 Ext.28, Fax: +880-2-9887167. Egypt: Anasia Egypt for Trading S. A. E., P.O.Box 2443, 110<br />
Mostafa Refaat Street, Sheraton Heliopolis 11361, Cairo. Tel.: +20-2-2684159, Fax: +20-2-2684169. Ethiopia: Tewfik Sherif & Co.<br />
Ltd., P.O.Box 5583, Debre Zeit Road, Addis Ababa. Tel.: +251-1-651700/601, Fax: +251-1-650570. India: Gryphon Impex Pvt. Ltd.,<br />
D-6/4, Okhla Industrial Area, Phase-I, New Delhi-110020. Tel.: +91-11-26372602-4, Fax: +91-11-26372601. Iran: Tehran - Service<br />
Centre of Iran, No 510, South Karger Ave, Below Pasteur Sq. Tehran. Tel.: +98-21-6490608/0656/6407672. Kish Island: Cayhan<br />
Electric Co., No. 69, Paradise Shopping Centre, Kish Island. Tel.: +98-76444-22894. Jordan: Bashiti Hardware, P.O.Box 1564, TLA<br />
Ali, Amman. Tel.: +962-6-5350009/4770741, Fax: +962-6-5350012/4789783. Kenya: Zylog Enterprises, IPS Building, Kuanda Street,<br />
P.O.Box 40877, Nairobi. Tel.: +254-2-338188/199, Fax: +254-2-330642. Kuwait: Al Omar Technical Co., P.O.Box 4062, 13041 Safat,<br />
Kuwait. Tel.: +965-4848595/0039, Fax: +965-4845652. Lebanon: Est. F.A. Kettaneh SA, P.O.Box 110242, Dora Highway, Kettaneh<br />
Building, Beirut. Tel.: +961-1-255860/6, Fax: +961-1-255891. Libya: El Ghoul Brothers, P.O.Box 348, Islamic Call Bldg., Office<br />
201-202, Benghazi. Tel.: +218-61-9097681/4183, Fax: +218-61-9094123. Madagascar: Group Tana Confort S. A. R. L., B. P. 1770,<br />
Antananarivo. Tel.: +261-20-2264505, Fax: +261-20-2264244. Malta: John G. Cassar Ltd., 36 Victory Str, Qormi QRM 06, Malta.<br />
Tel.: +356-21-493251, Fax: +356-21-483231. Mauritius: Happy World Marketing Ltd., Block 2, Industrial Estate, Coromandel,<br />
P.O.Box 429, Port Louis. Tel.: +230-2076700, Fax: +230-2337330/7400. Nepal: Universal Trading Centre, P.O.Box 1947,<br />
Tripureswor, Kathmandu. Tel.: +977-1-262192/260587/785, Fax: 261154. Nigeria: Amin Bros. Eng. Co. Ltd., 30A (Plot 1291), Akin<br />
Adesola Street, Victoria Island, Lagos. Tel.: +234-1-3201778, Fax: +234-1-2613667. Oman: Oman Mktg. & Service Co., P.O.Box<br />
2734, Ruwi, Muscat. Tel.: +968-560232, Fax: +968-560255. Pakistan: Karachi - Ammar Service & Spares, 60, Bank Arcade, Serai<br />
Road, Karachi. Tel.: +92-21-2426905, Fax: 2427214/5243. Pakistan: Lahore - Electronics Inn, 212-G Raja Centre, Main Market,<br />
Gulberg, Lahore. Tel.: +92-42-5756750. Philippines: Modern House International Enterprises, 213 Rizal Ave. Extension, between 2nd<br />
and 3rd Ave. Kalookan City. Tel.: +632 366-4487, Fax: +632 366-4489. Qatar: Al Muftah Trading & Cont., P.O.Box 875, Doha. Tel.:<br />
+974-4650880/4446868, Fax: +974-4441415. Saudi Arabia: Dammam - Ebrahim Fawaz Al Zayani, P.O.Box 76026, Al Raka,<br />
Dammam. Tel.: +966-3-8140914, Fax: +966-3-8140824. Jeddah: Anasia Trading Co. Ltd. Caravan Shopping Centre, Hail Street. P.<br />
O. Box 50959, Jeddah-21477, Tel. 02 650 0948/02 636 3825, Fax 02 638 0720. Madina: Garziz Trdg. for Bldg. Mat.&Decor.,<br />
P.O.Box 3364, Madina. Tel.: +966-4-8261490/8227636, Fax: +966-4-8265741. Riyadh: Anasia Trading Co Ltd. New Akaria Building,<br />
60th St., 3rd Floor, Building # 4, Office # 3402, Malaz. P. O. Box. 18689, Riyadh-11425, Tel.: 01 478 2549, Fax: 01 478 2761. Yanbu:<br />
Bin Afif, P.O.Box 530 Yanbu, Al Bahr. Tel.: +966-4-3222626/8867, Fax: +966-4-3222210. Sri Lanka: Delmege Gen. Equip. Pvt. Ltd.,<br />
No. 428/1AT. B., Jaya Mawatha (Darley Road), Colombo-10. Tel.: +94-11-2665914, Fax: +94-11-2665915. Sudan: United<br />
Distribution Company, P.O.Box 325, Sayed Abdul Rehman Street, Khartoum. Tel.: +249-11-772612/777296, Fax: +249-11-770919.<br />
Tanzania: General Motors Investment, P. O Box 16541, 14 Vingunguti Nyerere Road, Dar Es Salaam. Tel.: +255-22-2862661/5022,<br />
Fax: +255-22-2862667/5412/3. Tunisia: STE Tunisienne De Quincaillerie Stq., Nvelle Z.I 2013, Ben Arous, Tunis, Tunisia, Tel: +216<br />
71386102, Fax: +216 71380412. UAE: Abu Dhabi - Light House Electric., P.O.Box 120, Abu Dhabi. Tel.: +971-2-6726131, Fax:<br />
+971-2-6720667. Dubai - Black & Decker (O) A.G., P.O.Box 5420, Dubai. Tel.: +971-4-7028234/233, Fax: +971-4-2822765. Ideal<br />
Mach. & Equipt. R. W/shop P.O.Box 37116, Al Quoz, Dubai. Tel.: +971-4-3474160, Fax: +971-4-3474157. Sharjah - McCoy Middle<br />
East LLC, P.O.Box 20228, Sharjah. Tel.: +971-6-5336321, Fax: +971-6-5336320. Uganda: The Building Centre, Kitgum House, 52<br />
Station Road, P.O.Box 7436, Kampala. Tel.: +256-41-234567, Fax: +256-41-236413. Yemen: Aden - Middle East Trad. Co. Ltd.,<br />
Mulla Dakka, Aden. Tel.: +967-2-240950, Fax: +967-2-240952. Sana'a: Middle East Trad. Co. Ltd., P.O.Box 12363, Hayel Street,<br />
Sana'a. Tel.: +967-1-204201, Fax: +967-1-204204. Taiz: Middle East Trad. Co. Ltd., Campa area near Al-Kair mosque, Taiz. Tel.:<br />
+967-4-231610/232033, Fax: +967-4-219869. Zimbabwe: J.D.Distributors, P.O.Box 226, 17 Bessemer Road, Graniteside, Harare.<br />
Tel.: +263-4-753913-7, Fax: 753918. Cyprus: G. Kyprianou Trading Co Ltd., 51 Prodromou AVE. Strovolos, 1681, P.O. Box 23318<br />
Nicosia Cyprus. Tel.: 00357 22 468170/1, Fax: 00357 22 468186, Email gktltd@spidernet.com.cy<br />
WARRANTY REGISTRATION CARD<br />
YOUR NAME/<br />
YOUR ADDRESS<br />
«∞FMu«Ê<br />
≈ßr Ë ´Mu«Ê «∞∂Uzl<br />
«∞Ad«¡ ¢U¸¥a<br />
«∞d±e «∞∂d¥bÍ<br />
POSTCODE<br />
DATE OF PURCHASE<br />
DEALER'S NAME & ADDRESS/<br />
PRODUCT MODEL NO. MZ3000PG - 120V


