

BlackandDecker Mixer- Hm300 - Type 1 - Instruction Manual (Anglaise)
BlackandDecker Mixer- Hm300 - Type 1 - Instruction Manual (Anglaise)
BlackandDecker Mixer- Hm300 - Type 1 - Instruction Manual (Anglaise)

Create successful ePaper yourself
Turn your PDF publications into a flip-book with our unique Google optimized e-Paper software.
www.blackanddecker.co.uk<br />
HM300<br />
HM300BL
1<br />
2<br />
3<br />
4<br />
6 7<br />
5<br />
8<br />
9<br />
12<br />
10<br />
13<br />
11<br />
2
7<br />
12<br />
9 14<br />
13<br />
14 14<br />
13<br />
14<br />
12<br />
1<br />
2<br />
7<br />
7<br />
8<br />
12<br />
12<br />
10<br />
3 4<br />
11<br />
15 16<br />
1<br />
2<br />
5 6<br />
3<br />
3
ENGLISH<br />
(Original instructions)<br />
Intended use<br />
Your BLACK+DECKER TM HM300 Hand <strong>Mixer</strong> and HM300BL<br />
Bowl mixer have been designed for mixing suitable food ingredients.<br />
This appliance is intended to be used in household and<br />
similar applications such as:<br />
u Staff kitchen areas in shops, offices and other working<br />
environments;<br />
u Farm houses;<br />
u By clients in hotels, motels and other residential type<br />
environments;<br />
u Bed and breakfast type environments;<br />
Safety instructions<br />
u Warning! When using mains-powered appliances, basic<br />
safety precautions, including the following, should always<br />
be followed to reduce the risk of fire, electric shock and<br />
personal injury.<br />
u Read all of this manual carefully before using the appliance.<br />
u The intended use is described in this manual. The use of<br />
any accessory or attachment or the performance of any<br />
operation with this appliance other than those recommended<br />
in this instruction manual may present a risk of<br />
personal injury.<br />
u Retain this manual for future reference.<br />
Using your appliance<br />
u Always take care when using the appliance.<br />
u Do not use the appliance outdoors.<br />
u Do not operate the appliance if your hands are wet. Do not<br />
operate the appliance if you are barefoot.<br />
u Guide the power supply cord neatly so it does not hang<br />
over the edge of a work top and cannot be caught accidentally<br />
or tripped over.<br />
u Never pull the power supply cord to disconnect the plug<br />
from the socket. Keep the power supply cord away from<br />
heat, oil and sharp edges.<br />
u If the power supply cord is damaged during use, disconnect<br />
the appliance from the power supply immediately.<br />
Do not touch the power supply cord before disconnecting<br />
from the power supply.<br />
u Disconnect the appliance from the power supply when not<br />
in use and before changing accessories, cleaning, etc.<br />
After use<br />
u Switch off, remove the plug from the socket and let the<br />
appliance cool down before leaving it unattended and<br />
before changing, cleaning or inspecting any parts of the<br />
appliance.<br />
u When not in use, the appliance should be stored in a dry<br />
place. Children should not have access to stored appliances.<br />
Inspection and repairs<br />
u Before use, check the appliance for damaged or defective<br />
parts. Check for breakage of parts, damage to switches<br />
and any other conditions that may affect its operation.<br />
u Do not use the appliance if any part is damaged or defective.<br />
u Have any damaged or defective parts repaired or replaced<br />
by an authorised repair agent.<br />
u Before use, check the power supply cord for signs of damage,<br />
ageing and wear.<br />
u Do not use the appliance if the power supply cord or<br />
mains plug is damaged or defective.<br />
u If the power supply cord or mains plug is damaged or<br />
defective it must be repaired by an authorised repair agent<br />
in order to avoid a hazard. Do not cut the power supply<br />
cord and do not attempt to repair it yourself.<br />
u Never attempt to remove or replace any parts other than<br />
those specified in this manual.<br />
Additional safety instructions for Food <strong>Mixer</strong>s<br />
Warning! Do not place near a hot Gas or electric oven.<br />
u Do not Immerse <strong>Mixer</strong>, Base, Cord or Plug in any liquid.<br />
u The outer surface of this <strong>Mixer</strong> may become hot during<br />
use.<br />
u Allow all moving parts of the appliance to come to a stop<br />
before approaching.<br />
u Always use on a clean work surface and clean the surface<br />
thoroughly after use.<br />
u Allow the appliance to cool before storing.<br />
u Keep hands, long hair and loose clothing away from the<br />
beaters.<br />
Safety of others<br />
u This appliance is not intended for use by persons (including<br />
children) with reduced physical, sensory or mental<br />
capabilities, or lack of experience and knowledgwe, unless<br />
they have been given supervision or instruction concerning<br />
use of the appliance by a person responsible for their<br />
safety.<br />
u Children should be supervised to ensure that they do not<br />
play with the appliance.<br />
4
(Original instructions)<br />
ENGLISH<br />
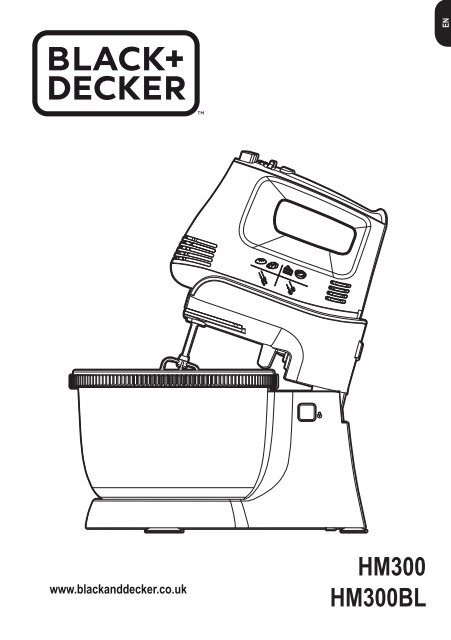
Features<br />
1. Beater eject button<br />
2. Speed selector<br />
3. Turbo Button<br />
4. Beaters<br />
5. Dough Hooks<br />
6. Gears<br />
7. M300 Hand mixer<br />
8. Cradle switch<br />
9. Cradle<br />
10. Base switch<br />
11. Base<br />
12. Bowl<br />
13. Plastic knife<br />
Assembly<br />
@<br />
Warning! Before performing any assembly or<br />
maintenance, switch off and remove from power<br />
supply.<br />
Attaching the beaters to the M350 hand mixer<br />
(Fig. 5)<br />
u Push the required beaters into the appropriate holes in the<br />
appliance ensuring they are fully home.<br />
Note! An icon on the product identifies the hole that takes<br />
the beater / dough hook with the washer (15). Another icon<br />
identifies the hole that accepts the beater / dough hook with a<br />
gear fitted (16).<br />
u On completion of task, the beaters can be removed for<br />
cleaning by pressing the eject button (1)<br />
Attaching the HM300 hand mixer to the HM300BL<br />
bowl mixer (Fig. 1, Fig.2)<br />
u Place the Base (11) on a flat, stable surface.<br />
u Align the sockets on the base of the hand mixer (13) with<br />
the tabs on the Cradle (14) and press down vertically until<br />
the tabs lock into place.<br />
Releasing the M350 hand mixer from the M700 bowl<br />
mixer (Fig. 3)<br />
u Press the Cradle switch (8) to release the tabs and lift the<br />
hand mixer vertically.<br />
Removing the bowl (11) (Fig. 4)<br />
u Press the base switch (10) and tilt the Cradle (9) and<br />
mixer (7) backwards.<br />
u The bowl can now be removed for transferral of contents<br />
using the plastic Knife (13) or cleaning.<br />
Use<br />
Warning! Let the tool work at its own pace. Do not<br />
overload.<br />
u Clean the beaters, dough hooks and bowl before use.<br />
u Ensure that the power cord is unplugged from the power<br />
outlet and the speed selector (2) is set to the "0" position.<br />
u Choose the proper attachments for the task to be performed<br />
and assemble into position. Beaters are for mixing<br />
egg white or other liquid, dough hooks are for kneading<br />
dough.<br />
u Place the food that needs to be mixed into the bowl (11).<br />
u Lower the mixer by pressing the base switch (10).<br />
u Ensure that the speed selector (2) is at the "0" setting and<br />
connect to the power supply.<br />
u Dial the speed selector to your desired setting. The appliance<br />
will start working. There are 5 settings and a turbo<br />
button which will allow the speed to achieve its highest<br />
when depressed.<br />
Warning! Do not place knives, spoons, forks or any other<br />
object into the bowl while operating<br />
Note! The maximum operation time must not exceed 10<br />
minutes. After 10 minutes of use allow the hand/stand mixer to<br />
rest and cool for an appropriate amount of time.<br />
u When Kneading dough, best results can be achieved by<br />
setting the speed selector at a low speed first and then<br />
high speed.<br />
Note! During operation do not touch the bowl.<br />
Warning! Keep hands, long hair and loose clothing away<br />
from the beaters.<br />
u When mixing is completed, turn the speed selector to the<br />
"0" position and unplug the cord from the power outlet.<br />
Cookery tips<br />
u Refrigerated ingredients, such as butter and eggs, them<br />
should be at room temperature before mixing begins. Set<br />
these ingredients out ahead of time.<br />
u To eliminate the possibility of shells eggs in your recipe,<br />
break eggs into separate container first, then add to the<br />
mixture.<br />
u Do not over-beat. Be careful that you only mix/blend mixtures<br />
as recommended in your recipe. Fold dry ingredients<br />
until they are just combined using the low speed setting.<br />
u Climatic conditions. Seasonal temperature changes, temperature<br />
of ingredients and their texture variation all play a<br />
part in the required mixing time and the results achieved.<br />
u Always start mixing at lower speed. Gradually increase to<br />
the recommended speed as stated in the recipe.<br />
5
ENGLISH<br />
(Original instructions)<br />
Cleaning and Maintenance<br />
Warning! Before performing any maintenance:<br />
u Switch off and disconnect from the mains supply.<br />
u Wait for the appliance to completely cool down.<br />
u If necessary scrape excess food particles from the beaters<br />
or dough hooks using a spatula.<br />
Warning! The mixer must not be immersed in water or<br />
other liquid.<br />
u Wipe over the outside surface of the head and Base with a<br />
damp cloth and polish with a soft dry cloth.<br />
u Wipe any excess food particles from the power cord.<br />
u Immerse the mix bowl, beaters and dough hooks in warm<br />
soapy water for complete cleaning. Then rinse under<br />
running water and wipe dry. The beaters and dough hooks<br />
may be placed in a dishwasher.<br />
Mains plug replacement<br />
If a new mains plug needs to be fitted:<br />
u Safely dispose of the old plug.<br />
u Connect the brown lead to the live terminal in the new<br />
plug.<br />
u Connect the blue lead to the neutral terminal.<br />
u If the product is class I (earthed), connect the green/yellow<br />
lead to the earth terminal<br />
Note! If your product is class II double insulated (only 2 wires<br />
in the cord set), no connection is to be made to the earth<br />
terminal.<br />
Follow the fitting instructions supplied with good quality plugs.<br />
Any replacement fuse must be of the same rating as the<br />
original fuse supplied with the product.<br />
Warning! The above section on mains plug replacement is for<br />
authorized service centre persons.<br />
Technical Data<br />
HM300<br />
HM300BL<br />
Input voltage V AC<br />
220-240 220-240<br />
Power Input<br />
Weight<br />
W<br />
kg<br />
Protecting the environment<br />
h<br />
Separate collection. This product must not be<br />
disposed of with normal household waste.<br />
Should you find one day that your Black & Decker product<br />
needs replacement, or if it is of no further use to you, do not<br />
dispose of it with household waste. Make this product available<br />
for separate collection.<br />
z<br />
Separate collection of used products and<br />
packaging allows materials to be recycled and<br />
used again. Re-use of recycled materials helps<br />
prevent environmental pollution and reduces the<br />
demand for raw materials.<br />
Local regulations may provide for separate collection of electrical<br />
products from the household, at municipal waste sites or<br />
by the retailer when you purchase a new product.<br />
Black & Decker provides a facility for the collection and<br />
recycling of Black & Decker products once they have reached<br />
the end of their working life. To take advantage of this service<br />
please return your product to any authorised repair agent who<br />
will collect them on our behalf.<br />
You can check the location of your nearest authorised repair<br />
agent by contacting your local Black & Decker office at<br />
the address indicated in this manual. Alternatively, a list of<br />
authorised Black & Decker repair agents and full details of our<br />
after-sales service and contacts are available on the Internet<br />
at: www.2helpU.com<br />
6
(Original instructions)<br />
ENGLISH<br />
7
Australia Black & Decker (Australia) Pty. Ltd. Tel. 03-8720 5100<br />
20 Fletcher Road, Mooroolbark, Fax 03-9727 5940<br />
Victoria, 3138<br />
New Zealand Black & Decker Tel. +64 9 259 1133<br />
5 Te Apunga Place Fax +64 9 259 1122<br />
Mt Wellington<br />
Aukland 1060<br />
United Kingdom & Black & Decker Tel. 01753 511234<br />
Republic Of Ireland 210 Bath Road Fax 01753 512365<br />
www.blackanddecker.co.uk Slough, Berkshire SL1 3YD<br />
emeaservice@sbdinc.com<br />
XXXXXXXX REV-0 01/2016


