

Makita Tondeuse 36 V Li-Ion 2,2 Ah 43 cm - LM430DWBE - Notice
Makita Tondeuse 36 V Li-Ion 2,2 Ah 43 cm - LM430DWBE - Notice
Makita Tondeuse 36 V Li-Ion 2,2 Ah 43 cm - LM430DWBE - Notice

Create successful ePaper yourself
Turn your PDF publications into a flip-book with our unique Google optimized e-Paper software.
Power switch action (Fig. 8 & 9)<br />
WARNING:<br />
• Before inserting the battery cartridge in the tool,<br />
always check to see that the switch lever actuates<br />
properly and returns to the original position when<br />
released. Operating a tool with a switch that does not<br />
actuate properly can lead to loss of control and serious<br />
personal injury.<br />
NOTE:<br />
• Trying to mow much grass at a time may not allow the<br />
motor to start due to the overload. At this time, change<br />
the mowing height to higher level to restart.<br />
• The mower does not start without pressing the switch<br />
button even if the switch lever is squeezed.<br />
This mower is equipped with the interlock switch and<br />
handle switch. If you notice anything unusual with either<br />
of these switches, stop operation immediately and have<br />
them checked by your nearest <strong>Makita</strong> Authorized Service<br />
Center.<br />
1. Insert the lock key into the interlock switch.<br />
2. Depress the switch button.<br />
3. Pull the switch lever toward you while depressing<br />
the switch button.<br />
4. Release the switch button as soon as the motor<br />
starts running. The mower will continue to run until<br />
you release the switch lever.<br />
5. Release the switch lever to stop the motor.<br />
6. When not in use, remove the lock key. Store the lock<br />
key in a safe place out of reach of children.<br />
Adjusting the mowing height (Fig. 10)<br />
WARNING:<br />
• Never put your hand or leg under the mower unit when<br />
adjusting the mowing height.<br />
• Always make sure that the lever fits in the groove properly<br />
before operation.<br />
The mowing height can be adjusted in the range of<br />
between 20 mm – 75 mm.<br />
1. Remove the lock key.<br />
2. Pull the mowing height adjusting lever toward yourself<br />
and move it to your desired mowing height.<br />
Make sure that the protrusion on the mowing height<br />
adjusting lever fits in the groove in the mower.<br />
NOTE:<br />
• The mowing height figures should be used just as a<br />
guideline, as the state of the lawn or ground may cause<br />
lawn height to be slightly different to the set height figure.<br />
• Try a test mowing of grass in a less conspicuous place<br />
to get your desired height.<br />
Battery protection system<br />
<strong>Li</strong>thium-ion batteries are equipped with a protection system.<br />
This system automatically cuts off power to the tool<br />
to extend battery life.<br />
The tool will automatically stop during operation if the<br />
tool and/or battery are placed under one of the following<br />
conditions:<br />
• Overloaded:<br />
The tool is operated in a manner that causes it to draw<br />
an abnormally high current.<br />
In this situation, release the trigger switch on the tool<br />
and stop the application that caused the tool to become<br />
overloaded. Then pull the trigger switch again to<br />
restart.<br />
If the tool does not start, the battery is overheated. In<br />
this situation, let the battery cool before pulling the trigger<br />
switch again.<br />
• Low battery voltage:<br />
The remaining battery capacity is too low and the tool<br />
will not operate. In this situation, remove and recharge<br />
the battery.<br />
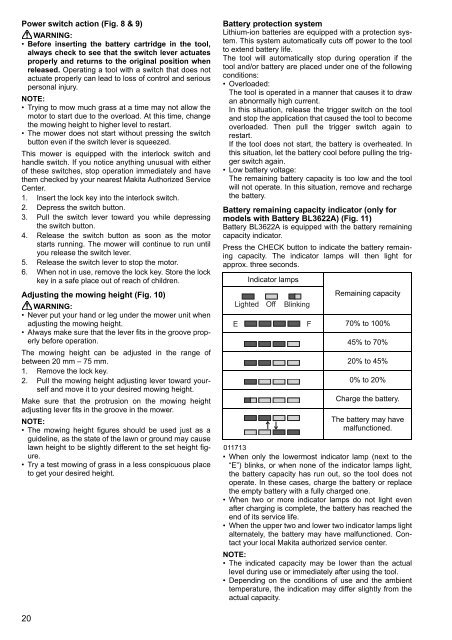
Battery remaining capacity indicator (only for<br />
models with Battery BL<strong>36</strong>22A) (Fig. 11)<br />
Battery BL<strong>36</strong>22A is equipped with the battery remaining<br />
capacity indicator.<br />
Press the CHECK button to indicate the battery remaining<br />
capacity. The indicator lamps will then light for<br />
approx. three seconds.<br />
Indicator lamps<br />
<strong>Li</strong>ghted Off<br />
E<br />
Blinking<br />
F<br />
Remaining capacity<br />
70% to 100%<br />
45% to 70%<br />
20% to 45%<br />
0% to 20%<br />
Charge the battery.<br />
The battery may have<br />
malfunctioned.<br />
011713<br />
• When only the lowermost indicator lamp (next to the<br />
“E”) blinks, or when none of the indicator lamps light,<br />
the battery capacity has run out, so the tool does not<br />
operate. In these cases, charge the battery or replace<br />
the empty battery with a fully charged one.<br />
• When two or more indicator lamps do not light even<br />
after charging is complete, the battery has reached the<br />
end of its service life.<br />
• When the upper two and lower two indicator lamps light<br />
alternately, the battery may have malfunctioned. Contact<br />
your local <strong>Makita</strong> authorized service center.<br />
NOTE:<br />
• The indicated capacity may be lower than the actual<br />
level during use or immediately after using the tool.<br />
• Depending on the conditions of use and the ambient<br />
temperature, the indication may differ slightly from the<br />
actual capacity.<br />
20


