

Philips Sonicare FlexCare+ Brosse à dents électrique - Mode d’emploi - ENG
Philips Sonicare FlexCare+ Brosse à dents électrique - Mode d’emploi - ENG
Philips Sonicare FlexCare+ Brosse à dents électrique - Mode d’emploi - ENG

You also want an ePaper? Increase the reach of your titles
YUMPU automatically turns print PDFs into web optimized ePapers that Google loves.
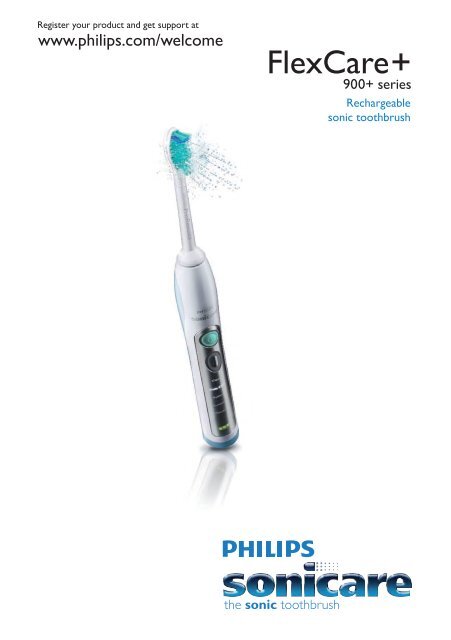
<strong>FlexCare+</strong><br />
900+ series<br />
Rechargeable<br />
sonic toothbrush
2<br />
A<br />
1<br />
B<br />
C<br />
D<br />
E<br />
F<br />
J<br />
G<br />
H<br />
I<br />
L<br />
K<br />
M<br />
N
English 4<br />
Deutsch 15<br />
Français 27<br />
Italiano 39<br />
Nederlands 51<br />
HX6996,HX6995,HX6992,HX6972,HX6962,HX6942
4<br />
English<br />
Introduction<br />
Congratulations on your purchase and welcome to <strong>Philips</strong>! To fully benefit<br />
from the support that <strong>Philips</strong> offers, register your product at www.philips.<br />
com/welcome.<br />
Important<br />
Read this user manual carefully before you use the appliance and save it for<br />
future reference.<br />
Danger<br />
--<br />
Keep the charger and/or sanitiser away from water. Do not place or<br />
store it over or near water contained in a bathtub, washbasin, sink<br />
etc. Do not immerse the charger and/or sanitiser in water or any<br />
other liquid. After cleaning, make sure the charger and/or sanitiser is<br />
completely dry before you connect it to the mains.<br />
Warning<br />
--<br />
The mains cord cannot be replaced. If the mains cord is damaged,<br />
discard the charger and/or sanitiser.<br />
--<br />
Always have the charger and/or sanitiser replaced with one of the<br />
original type in order to avoid a hazard.<br />
--<br />
Do not use the charger and/or sanitiser outdoors or near heated<br />
surfaces.<br />
--<br />
If the appliance is damaged in any way (brush head, toothbrush handle,<br />
charger and/or sanitiser), stop using it. This appliance contains no userserviceable<br />
parts. If the appliance is damaged, contact the Consumer<br />
Care Centre in your country (see chapter ‘Guarantee & service’).<br />
--<br />
This appliance is not intended for use by persons (including children)<br />
with reduced physical, sensory or mental capabilities, or lack of<br />
experience and knowledge, unless they have been given supervision or<br />
instruction concerning use of the appliance by a person responsible for<br />
their safety.<br />
--<br />
Children should be supervised to ensure that they do not play with the<br />
appliance.<br />
--<br />
Discontinue use of the sanitiser if the UV light bulb remains on when<br />
the door is open. UV light can be harmful to the human eye and skin.<br />
Keep the sanitiser out of the reach of children at all times.<br />
Caution<br />
--<br />
Do not clean the brush head, the handle, the charger, the charger cover<br />
and/or the sanitiser in the dishwasher.<br />
--<br />
If you have had oral or gum surgery in the previous 2 months, consult<br />
your dentist before you use the toothbrush.<br />
--<br />
Consult your dentist if excessive bleeding occurs after using this<br />
toothbrush or if bleeding continues to occur after 1 week of use.<br />
--<br />
The <strong>Sonicare</strong> toothbrush complies with the safety standards for<br />
electromagnetic devices. If you have a pacemaker or other implanted<br />
device, contact your physician or the manufacturer of the implanted<br />
device prior to use.<br />
--<br />
If you have medical concerns, consult your doctor before you use the<br />
<strong>Sonicare</strong>.
English 5<br />
--<br />
This appliance has only been designed for cleaning teeth, gums and<br />
tongue. Do not use it for any other purpose. Stop using the appliance<br />
and contact your doctor if you experience any discomfort or pain.<br />
--<br />
Do not use other brush heads than the ones recommended by the<br />
manufacturer.<br />
--<br />
If your toothpaste contains peroxide, baking soda or bicarbonate<br />
(common in whitening toothpastes), thoroughly clean the brush head<br />
with soap and water after each use. This prevents possible cracking of<br />
the plastic.<br />
--<br />
The UV light bulb is hot during and immediately after the sanitising<br />
cycle. Do not touch the UV light bulb when it is hot.<br />
--<br />
Do not operate the sanitiser without the protective screen in place to<br />
avoid contact with a hot bulb.<br />
Electromagnetic fields (EMF)<br />
This <strong>Philips</strong> appliance complies with all standards regarding electromagnetic<br />
fields (EMF). If handled properly and according to the instructions in this<br />
user manual, the appliance is safe to use based on scientific evidence<br />
available today.<br />
General description (Fig. 1)<br />
A Hygienic travel cap<br />
B Brush head<br />
C Interchangeable colour code ring<br />
D Handle with soft grip<br />
E Power on/off button<br />
F <strong>Mode</strong> button<br />
G Brushing modes<br />
H Deluxe recharge gauge<br />
I UV sanitiser base with integrated charger and cord wrap (specific types<br />
only)<br />
J UV sanitiser (specific types only)<br />
K Deluxe charger (specific types only)<br />
L Charger cover with brush head holder<br />
M Travel charger<br />
N Charger base with cord wrap<br />
--<br />
Not shown: UV light bulb<br />
--<br />
Not shown: Sanitiser drip tray<br />
--<br />
Not shown: Protective screen for UV light bulb<br />
Preparing for use<br />
Changing the colour code ring<br />
<strong>Sonicare</strong> brush heads come with interchangeable colour code rings to<br />
identify your brush head.<br />
To change the colour code ring:
6<br />
English<br />
1 Pull the colour code ring from the bottom of the brush head.<br />
2 Install a new ring by slipping one edge of the new ring over the<br />
bottom of the brush head.<br />
Attaching the brush head<br />
1 Align the brush head so the bristles face the front of the handle.<br />
2 Firmly press the brush head down on the metal shaft until it stops.<br />
Note: There is a small gap between the colour code ring and the handle.<br />
Charging your <strong>Sonicare</strong><br />
1 Put the mains plug of the charger or sanitiser in the wall socket.<br />
2 Place the handle on the charger or sanitiser.<br />
,,<br />
The flashing light of the battery gauge indicates that the toothbrush<br />
is charging.<br />
--<br />
1 solid green LED indicates that the toothbrush is 34-66% charged.<br />
--<br />
2 solid green LEDs indicate that the toothbrush is 67-94% charged.<br />
--<br />
3 solid green LEDs indicate that the toothbrush is fully charged.<br />
Note: If the battery charge of your <strong>Sonicare</strong> is low, you hear 3 beeps and 1<br />
LED of the recharge gauge flashes yellow for 30 seconds after completing the<br />
brushing cycle.<br />
Note: To keep the battery fully charged at all times, you may keep your<br />
<strong>Sonicare</strong> on the charger when not in use. Once the <strong>Sonicare</strong> is fully charged,<br />
the charger draws minimal energy from the wall socket.<br />
Note: It takes at least 24 hours to fully charge the battery.
English 7<br />
1<br />
3<br />
2<br />
4<br />
Using the <strong>Sonicare</strong><br />
Brushing instructions<br />
1 Wet the bristles and apply a small amount of toothpaste.<br />
2 Place the toothbrush bristles against the teeth at a slight angle<br />
towards the gumline.<br />
3 Press the power on/off button to switch on the <strong>Sonicare</strong>.<br />
4 Apply light pressure to maximise <strong>Sonicare</strong>’s effectiveness and let the<br />
<strong>Sonicare</strong> toothbrush do the brushing for you. Do not scrub.<br />
5 Gently move the brush head slowly across the teeth in a small back<br />
and forth motion so the longer bristles reach between your teeth.<br />
Continue this motion throughout your brushing cycle.<br />
Note: To make sure you brush evenly throughout the mouth, divide your mouth<br />
into 4 sections using the Quadpacer feature (see chapter ‘Features’).<br />
6 Begin brushing in section 1 (outside top teeth) and brush for 30<br />
seconds before moving to section 2 (inside top teeth). Continue<br />
brushing in section 3 (outside bottom teeth) and brush for 30<br />
seconds before moving to section 4 (inside bottom teeth).<br />
7 After you have completed the brushing cycle, you can<br />
spend additional time brushing the chewing surfaces of your teeth<br />
and areas where staining occurs. You may also brush your tongue,<br />
with the toothbrush switched on or off, as you prefer.<br />
Your <strong>Sonicare</strong> is safe to use on:<br />
--<br />
Braces (brush heads wear out sooner when used on braces)<br />
--<br />
Dental restorations (fillings, crowns, veneers)<br />
Brushing modes<br />
<strong>Sonicare</strong> automatically starts in the default Clean mode.<br />
1 Prior to switching on the <strong>Sonicare</strong>, press the mode button to toggle<br />
between modes.<br />
,,<br />
The selected brushing mode illuminates.<br />
,,<br />
Once a brushing mode has been selected, it remains active until<br />
another brushing mode is selected.<br />
Note: When the toothbrush is switched on, you cannot toggle between modes.<br />
The following brushing modes are available:<br />
Clean<br />
Complete whole mouth cleaning (2 minutes).<br />
Gum Care<br />
Complete whole mouth cleaning (2 minutes) plus gentle cleaning for<br />
problem areas and along the gumline (1 minute).<br />
Refresh<br />
Touch-up for a quick clean (1 minute).
8<br />
English<br />
Sensitive<br />
Gentle cleaning for sensitive gums and teeth (2 minutes).<br />
Massage<br />
Gentle gum stimulation (2 minutes).<br />
Note: When <strong>Sonicare</strong> is used in clinical studies, the default 2-minute Clean<br />
mode must be selected. The handle has to be fully charged. Deactivate the<br />
Easy-start feature. For areas where excess staining occurs, an additional 30<br />
seconds of brushing time can be spent to help remove stains.<br />
Features<br />
Easy-start<br />
This <strong>Sonicare</strong> type comes with the Easy-start feature activated.<br />
The Easy-start feature gently increases power over the first 14 brushings to<br />
help you get used to brushing with the <strong>Sonicare</strong>.<br />
Note: Each of the first 14 brushings must be at least 1 minute in length to<br />
properly move through the Easy-start ramp-up cycle.<br />
Deactivating or activating the Easy-start feature<br />
1 Attach your brush head to the handle.<br />
2 Place the handle on the plugged-in charger.<br />
--<br />
To deactivate Easy-start:<br />
Press and hold the power on/off button for 2 seconds. You hear 1 beep to<br />
indicate that the Easy-start feature has been deactivated.<br />
--<br />
To activate Easy-start:<br />
Press and hold the power on/off button for 2 seconds. You hear 2 beeps to<br />
indicate that the Easy-start feature has been activated.<br />
Note: Using the Easy-start feature beyond the initial ramp-up period is not<br />
recommended and reduces <strong>Sonicare</strong>’s effectiveness in removing plaque.<br />
Smartimer<br />
The Smartimer indicates that your brushing cycle is complete when<br />
it automatically switches off the toothbrush at the end of the brushing<br />
cycle.<br />
Dentists recommend brushing at least 2 minutes twice a day.<br />
Quadpacer<br />
1<br />
3<br />
2<br />
4<br />
--<br />
The Quadpacer is an interval timer that has a short beep and pause to<br />
remind you to brush the 4 sections of your mouth. Depending on the<br />
brushing mode you have selected, the Quadpacer beeps at different<br />
intervals during the brushing cycle. See section ‘Brushing modes’<br />
in chapter ‘Using the <strong>Sonicare</strong>’.<br />
The Quadpacer feature on this type has been activated. To deactivate or<br />
reactivate the Quadpacer feature:<br />
1 Place the handle with a brush head attached on the plugged-in<br />
charger.<br />
2 Press and hold the mode button for 2 seconds.
English 9<br />
,,<br />
You hear 1 beep to indicate the Quadpacer has been deactivated or<br />
you hear 2 beeps to indicate the Quadpacer has been activated.<br />
Cord wrap on deluxe charger (specific types only)<br />
If your type includes the deluxe charger cover and base, the travel charger<br />
is pre-installed inside the cover. If you want to shorten the mains cord, you<br />
can store excess cord in the cord wrap feature built into the charger base.<br />
1 To separate the charger cover from the charger base, press the two<br />
grey snap bars on the charger base and pull the white charger cover<br />
upwards.<br />
2 Wrap excess power cord around the grey charger base as shown in<br />
the picture. Be sure to wrap the cord on the inside of the two snap<br />
levers.<br />
3 When you have stored the excess cord, guide the mains cord<br />
through the small groove in the rear of the grey charger base.<br />
4 To reattach the charger cover, press it down over the charger base<br />
until it snaps into place.<br />
Tip: For extra convenience during travel, you can remove the travel charger and<br />
use it without the charger cover and charger base.<br />
Cord wrap on sanitiser with integrated charger (specific types<br />
only)<br />
--<br />
If your type includes the sanitiser, you can store excess cord in the cord<br />
wrap feature built into the bottom of the sanitiser.
10<br />
English<br />
Sanitising (specific types only)<br />
--<br />
With the UV sanitiser you can clean your brush head after every use.<br />
Discontinue use of the sanitiser if the UV light bulb remains on when<br />
the door is open or if the blue window is broken or missing from<br />
the sanitiser. UV light can be harmful to the human eye and skin. This<br />
appliance should be kept out of reach of children at all times.<br />
Unplug the sanitiser and call Consumer Care if the sanitiser gives off<br />
smoke or a burning smell while it is operating.<br />
1 After brushing, rinse the brush head and shake off excess water.<br />
Do not place the travel cap on the brush head during sanitisation.<br />
2 Place your finger in the door recess on top of the sanitiser and pull<br />
open the door.<br />
3 Place the brush head on one of the 2 pegs in the sanitiser.<br />
--<br />
Make sure the bristles of the brush head directly face the light bulb.<br />
Note: Only clean <strong>Sonicare</strong> ProResults brush heads in the sanitiser.<br />
4 Make sure the sanitiser is plugged into the wall socket.<br />
5 Close the door and press the green power on/off button once to<br />
select the UV clean cycle.<br />
Note: You can only switch on the sanitiser if the door is properly closed.<br />
Note: The sanitiser stops if you open the door during the sanitising cycle.<br />
Note: The sanitiser cycle runs for 10 minutes and then automatically switches<br />
off.<br />
,,<br />
The sanitiser is in operation when the blue light glows through the<br />
window.<br />
,,<br />
When the sanitising cycle is complete, the sanitiser automatically<br />
switches off.<br />
Cleaning<br />
Do not clean the brush head, handle, travel charger, charger cover and<br />
the UV sanitiser in the dishwasher.
English 11<br />
Toothbrush handle<br />
1 Remove the brush head and rinse the metal shaft area with warm<br />
water.<br />
Do not push on the rubber seal on the metal shaft with sharp objects, as<br />
this may cause damage.<br />
2 Use a damp cloth to wipe the entire surface of the handle.<br />
Brush head<br />
1 Rinse the brush head and bristles after each use.<br />
2 Remove the brush head from the handle and rinse the brush head<br />
connection at least once a week with warm water.<br />
Charger<br />
1 Unplug the charger.<br />
2 Use a damp cloth to wipe the surface of the charger.<br />
Sanitiser (specific types only)<br />
Do not clean the sanitiser when the UV light bulb is hot.<br />
For optimal effectiveness, it is recommended to clean the sanitiser weekly.<br />
1 Unplug the sanitiser.<br />
2 Pull the drip tray straight out. Rinse the drip tray and wipe it clean<br />
with a damp cloth.<br />
3 Clean all reflector surfaces with a damp cloth.<br />
4 Remove the protective screen in front of the UV light bulb.<br />
To remove the screen, grasp the edges next to the snaps, gently squeeze<br />
and pull it out.<br />
5 Remove the UV light bulb.<br />
To remove the light bulb, grasp it and pull it out of the metal clasp.<br />
6 Clean the protective screen and the UV light bulb with a damp cloth.<br />
7 Reinsert the UV light bulb.<br />
To reinsert the light bulb, align the bottom of the light bulb with the metal<br />
clasp and push the bulb into the clasp.<br />
8 Reinsert the protective screen.
12<br />
English<br />
To reinsert the screen, align the pegs on the screen with the slots on the<br />
reflective surface near the UV light bulb. Push the screen straight into the<br />
slots on the sanitiser.<br />
Storage<br />
--<br />
If you are not going to use the appliance for an extended period of<br />
time, remove the mains plug from the wall socket. Then clean the<br />
appliance and store it in a cool and dry place away from direct sunlight.<br />
You can use the cord wrap feature to store the mains cord neatly.<br />
Replacement<br />
Brush head<br />
--<br />
Replace <strong>Sonicare</strong> brush heads every 3 months to achieve optimal<br />
results.<br />
--<br />
Use only compatible <strong>Sonicare</strong> replacement brush heads.<br />
UV light bulb<br />
--<br />
You can order replacement UV light bulbs from the Consumer Care<br />
Centre in your country or an authorised <strong>Philips</strong> service centre.<br />
Environment<br />
--<br />
The built-in rechargeable battery contains substances that may pollute<br />
the environment. Always remove the battery before you discard and<br />
hand in the appliance at an official collection point. Dispose of the<br />
battery at an official collection point for batteries. If you have trouble<br />
removing the battery, you can also take the appliance to a <strong>Philips</strong><br />
service centre. The staff of this centre will remove the battery for you<br />
and will dispose of it in an environmentally safe way.<br />
--<br />
Do not throw away the appliance or the UV light bulb (bulb contains<br />
mercury) with the normal household waste at the end of its life, but<br />
hand it in at an official collection point for recycling. By doing this, you<br />
help to preserve the environment.<br />
Removing the rechargeable battery<br />
Please note that this process is not reversible.<br />
To remove the rechargeable battery, you need a flat-head (standard)<br />
screwdriver.<br />
1 To deplete the rechargeable battery of any charge, remove the<br />
handle from the charger, switch on the <strong>Sonicare</strong> and let it run until<br />
it stops. Repeat this step until you can no longer switch on the<br />
<strong>Sonicare</strong>.
English 13<br />
2 Insert a flat-head (standard) screwdriver into the slot located at the<br />
bottom of the handle. Turn the screwdriver anticlockwise to release<br />
the bottom cap.<br />
3 Hold the handle upside down and push down on the shaft to release<br />
the internal components of the handle.<br />
4 Insert the screwdriver under the circuit board, next to the battery<br />
connections, and twist to break the connections. Remove the circuit<br />
board and pry the battery from the plastic carrier.<br />
Guarantee & service<br />
If you need information or if you have a problem, please visit the <strong>Philips</strong><br />
website at www.philips.com or contact the <strong>Philips</strong> Consumer Care Centre<br />
in your country (you find its phone number in the worldwide guarantee<br />
leaflet). If there is no Consumer Care Centre in your country, go to your<br />
local <strong>Philips</strong> dealer.<br />
Guarantee restrictions<br />
The terms of the international guarantee do not cover the following:<br />
--<br />
Brush heads<br />
--<br />
Damage caused by misuse, abuse, neglect or alterations<br />
--<br />
Normal wear and tear, including chips, scratches, abrasions,<br />
discolouration or fading<br />
--<br />
UV light bulb
14<br />
English<br />
Frequently asked questions<br />
This chapter lists the questions most frequently asked about the appliance.<br />
If you cannot find the answer to your question, contact the Consumer<br />
Care Centre in your country.<br />
Question<br />
Why doesn’t the <strong>Sonicare</strong><br />
toothbrush work?<br />
Why do I feel a tickling sensation<br />
when I use the <strong>Sonicare</strong>?<br />
Why is there a brief pause in the<br />
bristle motion while I’m brushing?<br />
The brush head chatters against my<br />
teeth. What can I do about this?<br />
Why does the toothbrush seem<br />
less powerful?<br />
Why doesn’t the mode<br />
button work during brushing?<br />
Why doesn’t the UV sanitiser<br />
light go on?<br />
Do I need a special charger if I<br />
travel with my <strong>Sonicare</strong>?<br />
Answer<br />
You may need to recharge the <strong>Sonicare</strong>. Charge the <strong>Sonicare</strong> for<br />
at least 24 hours.<br />
The socket may not be live. The electricity supply to sockets in<br />
mirror cabinets over washbasins or shaver sockets in bathrooms<br />
may be cut off when the light is switched off..<br />
You may need to reattach or replace the brush head.<br />
You may experience a slight tickling/tingling sensation when you<br />
use <strong>Sonicare</strong> for the first time. As you become accustomed to<br />
brushing with the <strong>Sonicare</strong>, this sensation diminishes.<br />
This is the Quadpacer feature reminding you to move to a new<br />
section of your mouth. This feature enables you to spend equal<br />
time brushing all areas of the mouth (see chapter ‘Using the<br />
<strong>Sonicare</strong>, section ‘Brushing instructions’).<br />
To avoid this, keep the brush head properly oriented, with the<br />
bristles placed on the gumline at a slight angle.<br />
You may need to charge the <strong>Sonicare</strong>.<br />
The Easy-start feature may be on. Deactivate the Easy-start<br />
feature (see chapter ‘Features’).<br />
You may need to replace the brush head.<br />
Brushing modes should be selected prior to switching on the<br />
<strong>Sonicare</strong>.<br />
You may need to plug the sanitiser into a live wall socket.<br />
You may need to shut the sanitiser door.<br />
You may need to replace the UV light bulb (see chapter<br />
‘Replacement’).<br />
The travel charger, the deluxe charger and the sanitiser can be<br />
used at common worldwide voltages between 100-240V AC, at<br />
either 50 or 60Hz. All you need is a simple plug adapter.<br />
Travel tip: The <strong>Sonicare</strong> battery is designed to last up to 3 weeks<br />
between charges.
Deutsch<br />
15<br />
Einführung<br />
Herzlichen Glückwunsch zu Ihrem Kauf und willkommen bei <strong>Philips</strong>! Um<br />
den Support von <strong>Philips</strong> optimal nutzen zu können, registrieren Sie Ihr<br />
Produkt bitte unter www.philips.com/welcome.<br />
Wichtig<br />
Lesen Sie diese Bedienungsanleitung vor dem Gebrauch des Geräts<br />
aufmerksam durch, und bewahren Sie sie für eine spätere Verwendung auf.<br />
Gefahr<br />
--<br />
Halten Sie das Ladegerät und/oder die UV-Reinigungsstation<br />
von Wasser fern. Stellen Sie sie nicht über oder nahe einer mit<br />
Wasser gefüllten Badewanne bzw. einem Waschbecken ab. Tauchen<br />
Sie Ladegerät und/oder Reinigungsstation nicht in Wasser oder<br />
andere Flüssigkeiten. Schließen Sie das Ladegerät und/oder die<br />
Reinigungsstation nach dem Reinigen erst wieder an das Stromnetz an,<br />
wenn sie vollkommen trocken sind.<br />
Warnhinweis<br />
--<br />
Das Netzkabel kann nicht ausgetauscht werden. Wenn das Netzkabel<br />
beschädigt ist, entsorgen Sie das Ladegerät und/oder die UV-<br />
Reinigungsstation.<br />
--<br />
Tauschen Sie das Ladegerät bzw. die UV-Reinigungsstation immer durch<br />
ein Original-Ersatzgerät aus, um Gefährdungen zu vermeiden.<br />
--<br />
Verwenden Sie das Ladegerät und/oder die UV-Reinigungsstation nie<br />
im Freien oder in der Nähe von heißen Oberflächen.<br />
--<br />
Benutzen Sie das Gerät nicht, wenn es beschädigt ist (Bürstenkopf,<br />
Handstück, Ladegerät und/oder UV-Reinigungsstation). Die Geräteteile<br />
lassen sich nicht vom Benutzer warten/reparieren. Ist das Gerät defekt,<br />
wenden Sie sich bitte an ein <strong>Philips</strong> Service-Center in Ihrem Land<br />
(siehe “Garantie und Kundendienst”).<br />
--<br />
Dieses Gerät ist für Benutzer (einschl. Kinder) mit eingeschränkten<br />
physischen, sensorischen oder psychischen Fähigkeiten bzw. ohne<br />
jegliche Erfahrung oder Vorwissen nur dann geeignet, wenn eine<br />
angemessene Aufsicht oder ausführliche Anleitung zur Benutzung des<br />
Geräts durch eine verantwortliche Person sichergestellt ist.<br />
--<br />
Achten Sie darauf, dass Kinder nicht mit dem Gerät spielen.<br />
--<br />
Benutzen Sie die UV-Reinigungsstation nicht, wenn die UV-Lampe<br />
bei offener Klappe noch leuchtet. UV-Licht kann schädlich für<br />
das menschliche Auge und die Haut sein. Halten Sie die UV-<br />
Reinigungsstation immer von Kindern fern.<br />
Achtung<br />
--<br />
Reinigen Sie den Bürstenkopf, das Handstück, das Reise-Ladegerät, die<br />
Hülle für das Ladegerät und/oder die UV-Reinigungsstation nicht in der<br />
Spülmaschine.<br />
--<br />
Wenn in den vergangenen 2 Monaten ein chirurgischer Eingriff an Ihren<br />
Zähnen oder am Zahnfleisch vorgenommen wurde, sollten Sie vor<br />
Benutzung der Zahnbürste Ihren Zahnarzt konsultieren.<br />
--<br />
Konsultieren Sie Ihren Zahnarzt, wenn nach Benutzung dieses Geräts<br />
übermäßiges Zahnfleischbluten auftritt oder Zahnfleischbluten länger<br />
als eine Woche anhält.
16<br />
Deutsch<br />
--<br />
Die <strong>Sonicare</strong> Zahnbürste entspricht den Sicherheitsstandards<br />
für elektromagnetische Geräte. Wenn Sie als Träger eines<br />
Herzschrittmachers oder eines anderen Implantats Fragen zur<br />
Verwendung des Geräts haben, setzen Sie sich bitte mit Ihrem Arzt<br />
oder dem Hersteller des Schrittmachers oder Implantats in Verbindung.<br />
--<br />
Sollten Sie Bedenken wegen Ihrer Gesundheit haben, konsultieren Sie<br />
vor Benutzung der <strong>Sonicare</strong> Ihren Arzt.<br />
--<br />
Dieses Gerät ist ausschließlich zum Reinigen von Zähnen, Zahnfleisch<br />
und Zunge vorgesehen und sollte nicht für andere Zwecke benutzt<br />
werden. Sollten Sie bei Gebrauch des Geräts Unbehagen oder<br />
Schmerzen verspüren, benutzen Sie es nicht weiter, und konsultieren<br />
Sie Ihren Arzt.<br />
--<br />
Benutzen Sie nur die vom Hersteller für diese Zahnbürste<br />
empfohlenen Bürstenköpfe.<br />
--<br />
Bei Verwendung peroxid-, natron- oder bikarbonathaltiger Zahnpasta<br />
(üblich in Weißmacher-Zahnpasta) sollten Sie den Bürstenkopf nach<br />
jedem Gebrauch gründlich mit einem milden Reinigungsmittel und<br />
Wasser reinigen. Dadurch werden Risse im Kunststoff verhindert.<br />
--<br />
Während und direkt nach dem Reinigungsvorgang ist die UV-Lampe<br />
heiß. Berühren Sie die heiße UV-Lampe nicht.<br />
--<br />
Verwenden Sie die UV-Reinigungsstation nicht ohne den aufgesetzten<br />
Schutzschirm, um einen Kontakt mit der heißen Lampe zu vermeiden.<br />
Elektromagnetische Felder<br />
Dieses <strong>Philips</strong> Gerät erfüllt sämtliche Normen bezüglich<br />
elektromagnetischer Felder (EMF). Nach aktuellen wissenschaftlichen<br />
Erkenntnissen ist das Gerät sicher im Gebrauch, sofern es ordnungsgemäß<br />
und entsprechend den Anweisungen in dieser Bedienungsanleitung<br />
gehandhabt wird.<br />
Allgemeine Beschreibung (Abb. 1)<br />
A Hygienische Schutzkappe<br />
B Bürstenkopf<br />
C Auswechselbarer Farbring<br />
D Handstück mit weicher Grifffläche<br />
E Ein-/Ausschalter<br />
F Modus-Taste<br />
G Putzmodi<br />
H Deluxe-Ladestandsanzeige<br />
I Basisstation der UV-Reinigungsstation mit integriertem Ladegerät und<br />
Kabelaufwicklung (nur bestimmte Gerätetypen)<br />
J UV-Reinigungsstation (nur bestimmte Gerätetypen)<br />
K Deluxe -Ladegerät (nur bestimmte Typen)<br />
L Ladegerätabdeckung mit Bürstenkopfhalter<br />
M Reiseladegerät<br />
N Ladestation mit Kabelaufwicklung<br />
--<br />
Nicht abgebildet: UV-Lampe<br />
--<br />
Nicht abgebildet: Abtropfschale der UV-Reinigungsstation<br />
--<br />
Nicht abgebildet: Schutzschirm für UV-Lampe
Deutsch 17<br />
Vorbereitungen<br />
Den Farbring auswechseln<br />
<strong>Sonicare</strong> Bürstenköpfe haben auswechselbare Farbringe, mit denen Sie<br />
Ihren Bürstenkopf eindeutig kennzeichnen können.<br />
So wechseln Sie den Farbring aus:<br />
1 Ziehen Sie den Farbring unten am Bürstenkopf ab.<br />
2 Setzen Sie einen neuen Ring ein, indem Sie eine Seite des neuen<br />
Rings unten auf den Bürstenkopf ziehen.<br />
Den Bürstenkopf befestigen<br />
1 Richten Sie den Bürstenkopf so aus, dass die Borsten zur Vorderseite<br />
des Handstücks zeigen.<br />
2 Drücken Sie den Bürstenkopf auf den Metallschaft, bis er fest sitzt.<br />
Hinweis: Zwischen dem Farbring und dem Handstück bleibt eine kleine Lücke.<br />
Die <strong>Sonicare</strong> Zahnbürste laden<br />
1 Stecken Sie den Netzstecker des Ladegeräts oder der UV-<br />
Reinigungsstation in die Steckdose.<br />
2 Stellen Sie das Handstück auf das Ladegerät oder die UV-<br />
Reinigungsstation.<br />
,,<br />
Die blinkende Akkuladeanzeige zeigt an, dass die Zahnbürste geladen<br />
wird.<br />
--<br />
Eine kontinuierlich grün leuchtende LED zeigt an, dass die Zahnbürste<br />
zu 34-66 % aufgeladen ist.<br />
--<br />
Zwei kontinuierlich grün leuchtende LEDs zeigen an, dass die<br />
Zahnbürste zu 67-94 % aufgeladen ist.<br />
--<br />
Drei kontinuierlich grün leuchtende LEDs zeigen an, dass die<br />
Zahnbürste vollständig aufgeladen ist.<br />
Hinweis: Ist der Ladestand Ihrer <strong>Sonicare</strong> niedrig, ertönen nach dem Putzzyklus<br />
drei Signaltöne und eine LED der Ladestandsanzeige blinkt 30 Sekunden lang
18<br />
Deutsch<br />
1<br />
3<br />
2<br />
4<br />
gelb.<br />
Hinweis: Damit der Akku immer vollständig aufgeladen ist, sollten Sie die<br />
<strong>Sonicare</strong> bei Nichtgebrauch in das Ladegerät stellen. Sobald die <strong>Sonicare</strong><br />
vollständig aufgeladen ist, hat das Ladegerät nur einen minimalen<br />
Stromverbrauch.<br />
Hinweis: Ein vollständiges Aufladen des Akkus dauert mindestens 24 Stunden.<br />
Die <strong>Sonicare</strong> Zahnbürste benutzen<br />
Putzanleitung<br />
1 Befeuchten Sie die Borsten, und tragen Sie etwas Zahnpasta auf.<br />
2 Setzen Sie die Borsten der Zahnbürste in einem leichten Winkel zum<br />
Zahnfleischsaum auf die Zähne.<br />
3 Drücken Sie zum Einschalten der <strong>Sonicare</strong> den Ein-/Ausschalter.<br />
4 Für eine optimale Zahnpflege putzen Sie die Zähne mit nur leichtem<br />
Druck (nicht schrubben) und überlassen der Zahnbürste die<br />
eigentliche Arbeit.<br />
5 Führen Sie den Bürstenkopf langsam in kleinen Vorwärts- und<br />
Rückwärtsbewegungen so über die Zähne, dass die längeren Borsten<br />
in die Zahnzwischenräume gelangen. Verfahren Sie auf diese Weise bis<br />
zum Ende des Putzvorgangs.<br />
Hinweis: Damit alle Zähne gleichmäßig geputzt werden, teilen Sie Ihren Mund<br />
mit der Quadpacer-Funktion in vier Abschnitte auf (siehe “Produktmerkmale”).<br />
6 Beginnen Sie mit Abschnitt 1 (Außenseite Oberkiefer), und putzen<br />
Sie 30 Sekunden lang. Fahren Sie danach mit Abschnitt 2 (Innenseite<br />
Oberkiefer), Abschnitt 3 (Außenseite Unterkiefer) und Abschnitt 4<br />
(Innenseite Unterkiefer) für jeweils 30 Sekunden fort.<br />
7 Nach Ablauf des Putzzyklus können Sie zusätzlich die Kauflächen der<br />
Zähne und Bereiche mit Verfärbungen putzen. Sie können auch die<br />
Zunge ganz nach Belieben mit ein- oder ausgeschalteter Zahnbürste<br />
putzen.<br />
Ihre <strong>Sonicare</strong> ist sicher für den Gebrauch bei:<br />
--<br />
Zahnspangen (die Bürstenköpfe nutzen sich beim Putzen von<br />
Zahnspangen schneller ab)<br />
--<br />
Zahnersatz (Füllungen, Kronen, Verblendschalen)<br />
Putzmodi<br />
Die <strong>Sonicare</strong> beginnt automatisch im standardmäßig eingestellten Clean-<br />
Modus.<br />
1 Drücken Sie vor dem Einschalten der <strong>Sonicare</strong> die Modus-Taste, um<br />
zwischen den Modi zu wechseln.<br />
,,<br />
Der ausgewählte Putzmodus leuchtet auf.<br />
,,<br />
Ein ausgewählter Putzmodus bleibt solange aktiv, bis Sie einen<br />
anderen Putzmodus auswählen.<br />
Hinweis: Bei eingeschalteter Zahnbürste können Sie zwischen den Modi nicht<br />
wechseln.
Deutsch 19<br />
Folgende Putzmodi sind verfügbar:<br />
Clean<br />
Reinigung aller Zähne (2 Minuten).<br />
Gum Care (Zahnfleischpflege)<br />
Reinigung aller Zähne (2 Minuten) plus sanfte Reinigung der Problemzonen<br />
und des Zahnfleisches (1 Minute).<br />
Refresh<br />
Einstellung für eine schnelle Reinigung (1 Minute).<br />
Sensitive<br />
Sanfte Reinigung für empfindliches Zahnfleisch und Zähne (2 Minuten).<br />
Massage<br />
Sanfte Zahnfleischmassage (2 Minuten).<br />
Hinweis: Wird die <strong>Sonicare</strong> in klinischen Studien eingesetzt, muss der<br />
standardmäßig eingestellte 2-minütige Clean-Modus ausgewählt werden. Das<br />
Handstück muss vollständig geladen sein. Deaktivieren Sie die Easy-Start-<br />
Funktion. Bereiche mit starken Verfärbungen können zusätzlich 30 Sekunden<br />
geputzt werden, um die Verfärbungen zu entfernen.<br />
Produktmerkmale<br />
Easy-Start<br />
Bei diesem <strong>Sonicare</strong> Gerätetyp ist die Easy-Start-Funktion aktiviert.<br />
Mit der Easy-Start-Funktion wird die Intensität über die ersten<br />
14 Anwendungen schrittweise erhöht, damit Sie sich leichter an das Putzen<br />
mit der <strong>Sonicare</strong> gewöhnen.<br />
Hinweis: Die ersten 14 Putzzyklen müssen jeweils mindestens eine Minute<br />
dauern, damit der jeweilige Zyklus von der Easy-Start-Funktion ordnungsgemäß<br />
durchlaufen wird.<br />
Die Easy-Start-Funktion deaktivieren bzw. aktivieren<br />
1 Setzen Sie den Bürstenkopf auf das Handstück.<br />
2 Stellen Sie das Handstück in das an das Stromnetz angeschlossene<br />
Ladegerät.<br />
--<br />
So deaktivieren Sie Easy-Start:<br />
Halten Sie den Ein-/Ausschalter 2 Sekunden gedrückt. Sie hören einen<br />
Signalton, sobald die Easy-Start-Funktion deaktiviert ist.<br />
--<br />
So aktivieren Sie Easy-Start:<br />
Halten Sie den Ein-/Ausschalter 2 Sekunden gedrückt. Sie hören zwei<br />
Signaltöne, sobald die Easy-Start-Funktion aktiviert ist.<br />
Hinweis: Die Easy-Start-Funktion sollte nur in der ersten Gewöhnungsphase<br />
genutzt werden, da sie die Effizienz der Plaque-Entfernung mit der <strong>Sonicare</strong><br />
reduziert.<br />
Smartimer<br />
Der Smartimer zeigt das Ende des Putzzyklus an, indem er die Zahnbürste<br />
nach beendetem Putzzyklus automatisch ausschaltet.<br />
Zahnärzte empfehlen, die Zähne zweimal täglich 2 Minuten lang zu putzen.
20<br />
Deutsch<br />
Quadpacer<br />
1<br />
3<br />
2<br />
4<br />
--<br />
Der Quadpacer ist ein Intervalltimer, der Sie anhand des kurzen Signals<br />
und einer Pause an das gleichmäßige Putzen der vier Abschnitte des<br />
Mundes erinnert. Je nach gewähltem Putzmodus ertönt das Signal nach<br />
unterschiedlichen Intervallen des Putzzyklus. Siehe dazu den Abschnitt<br />
“Putzmodi” im Kapitel “Die <strong>Sonicare</strong> Zahnbürste benutzen”.<br />
Die Quadpacer-Funktion wurde bei diesem Gerätetyp aktiviert. So<br />
deaktivieren bzw. reaktivieren Sie die Quadpacer-Funktion:<br />
1 Stellen Sie das Handstück mit einem aufgesetzten Bürstenkopf in das<br />
an das Stromnetz angeschlossene Ladegerät.<br />
2 Halten Sie die Modus-Taste für 2 Sekunden gedrückt.<br />
,,<br />
Ein Signalton gibt an, dass der Quadpacer deaktiviert wurde. Wenn<br />
Sie zwei Signaltöne hören, wurde der Quadpacer aktiviert.<br />
Kabelaufwicklung des Deluxe-Ladegeräts (nur bestimmte<br />
Gerätetypen)<br />
Umfasst Ihr Gerätetyp eine Abdeckung und Basis des Deluxe-Ladegeräts,<br />
ist das Reiseladegerät in der Abdeckung vorinstalliert. Ist Ihnen das Kabel<br />
zu lang, können Sie das überschüssige Kabel in der Kabelaufwicklung der<br />
Ladestation verstauen.<br />
1 Um die Abdeckung von der Basis des Ladegeräts zu trennen, drücken<br />
Sie auf die beiden grauen Entriegelungsleisten an der Basis und<br />
ziehen die weiße Abdeckung des Ladegeräts nach oben.<br />
2 Überschüssiges Kabel können Sie, wie in der Abbildung gezeigt, um<br />
die graue Basis der Ladestation wickeln. Achten Sie darauf, dass sich<br />
das Kabel auf der Innenseite der beiden Klemmen befindet.<br />
3 Wenn Sie das überschüssige Kabel aufgewickelt haben, führen Sie das<br />
Kabel durch die kleine Rille auf der Rückseite der grauen Basis des<br />
Ladegeräts.<br />
4 Setzen Sie die Abdeckung des Ladegeräts mit leichtem Druck auf die<br />
Basis, bis sie einrastet.<br />
Tipp: Besonders praktisch auf Reisen ist das Reiseladegerät, das Sie<br />
herausnehmen und ohne Abdeckung und Basis benutzen können.
Deutsch 21<br />
Kabelaufwicklung des Reinigungsgeräts mit integriertem<br />
Ladegerät (nur bestimmte Gerätetypen)<br />
--<br />
Umfasst Ihr Gerätetyp eine UV-Reinigungsstation, können Sie das<br />
überschüssige Kabel in der Kabelaufwicklung auf der Unterseite der<br />
UV-Reinigungsstation verstauen.<br />
Keimfrei Reinigen (nur bestimmte Gerätetypen)<br />
--<br />
Die UV-Reinigungsstation macht mit jedem Gebrauch eine Vielzahl von<br />
Keimen auf dem Bürstenkopf unschädlich.<br />
Benutzen Sie die UV-Reinigungsstation nicht, wenn bei geöffneter<br />
Klappe die UV-Lampe noch leuchtet oder das blaue Fenster der UV-<br />
Reinigungsstation zerbrochen ist bzw. ganz fehlt. UV-Licht kann schädlich<br />
für das menschliche Auge und die Haut sein. Halten Sie das Gerät immer<br />
von Kindern fern.<br />
Ziehen Sie den Netzstecker der UV-Reinigungsstation, und kontaktieren<br />
Sie ein Service-Center, wenn die UV-Reinigungsstation bei Betrieb raucht<br />
oder Brandgeruch verströmt.<br />
1 Spülen Sie den Bürstenkopf nach Gebrauch aus und schütteln Sie<br />
überschüssiges Wasser ab.<br />
Während der Reinigung darf sich die Schutzkappe nicht auf dem<br />
Bürstenkopf befinden.<br />
2 Fassen Sie mit dem Finger in die Griffmulde oben an der UV-<br />
Reinigungsstation, und öffnen Sie die Klappe.<br />
3 Setzen Sie den Bürstenkopf auf einen der beiden Stifte in der UV-<br />
Reinigungsstation.<br />
--<br />
Vergewissern Sie sich, dass die Borsten des Bürstenkopfes direkt auf die<br />
Lampe gerichtet sind.<br />
Hinweis: Reinigen Sie ausschließlich <strong>Sonicare</strong> ProResults-Bürstenköpfe in der<br />
UV-Reinigungsstation.<br />
4 Achten Sie darauf, dass die UV-Reinigungsstation an der Steckdose<br />
angeschlossen ist.<br />
5 Schließen Sie die Klappe, und drücken Sie den grünen Ein-/<br />
Ausschalter für den Start des UV-Reinigungsvorgangs einmal.<br />
Hinweis: Die UV-Reinigungsstation lässt sich nur bei geschlossener Klappe<br />
einschalten.<br />
Hinweis: Die UV-Reinigungsstation hält den Vorgang an, wenn Sie die Klappe<br />
während der Reinigung öffnen.<br />
Hinweis: Der Reinigungszyklus dauert 10 Minuten, danach schaltet sich das
22<br />
Deutsch<br />
Gerät automatisch aus.<br />
,,<br />
Die UV-Reinigungsstation ist in Betrieb, wenn das blaue Licht durch<br />
das Fenster scheint.<br />
,,<br />
Sobald der Reinigungszyklus abgeschlossen ist, schaltet sich die UV-<br />
Reinigungsstation automatisch ab.<br />
Reinigung<br />
Reinigen Sie den Bürstenkopf, das Handstück, das Reiseladegerät, die<br />
Ladegerätabdeckung und die UV-Reinigungsstation niemals in der<br />
Spülmaschine.<br />
Handstück der Zahnbürste<br />
1 Nehmen Sie den Bürstenkopf ab, und spülen Sie den Metallschaft mit<br />
warmem Wasser ab.<br />
Drücken Sie nicht mit scharfkantigen Gegenständen auf die<br />
Gummidichtung um den Metallschaft, da diese dadurch beschädigt<br />
werden kann.<br />
2 Wischen Sie die Oberfläche des Handstücks mit einem feuchten Tuch<br />
ab.<br />
Bürstenkopf<br />
1 Spülen Sie Bürstenkopf und Borsten nach jedem Gebrauch unter<br />
fließendem Wasser ab.<br />
2 Nehmen Sie einmal pro Woche den Bürstenkopf vom Handstück,<br />
und spülen Sie die Verbindung zwischen Bürstenkopf und Handstück<br />
mit warmem Wasser ab.<br />
Ladegerät<br />
1 Ziehen Sie den Netzstecker des Ladegeräts.<br />
2 Wischen Sie die Oberfläche des Ladegeräts mit einem feuchten Tuch<br />
ab.<br />
UV-Reinigungsstation (nur bestimmte Gerätetypen)<br />
Reinigen Sie die UV-Reinigungsstation nicht, wenn die UV-Lampe noch<br />
heiß ist.<br />
Für eine optimale Wirksamkeit sollte die UV-Reinigungsstation einmal pro<br />
Woche gereinigt werden.<br />
1 Ziehen Sie den Netzstecker der UV-Reinigungsstation.
Deutsch 23<br />
2 Ziehen Sie die Abtropfschale gerade heraus. Spülen Sie die<br />
Abtropfschale ab, und wischen Sie sie mit einem feuchten Tuch nach.<br />
3 Reinigen Sie alle Reflektoroberflächen mit einem feuchten Tuch.<br />
4 Nehmen Sie den Schutzschirm vor der UV-Lampe heraus.<br />
Um den Schutzschirm zu entfernen, greifen Sie die Ecken der<br />
Schnappvorrichtungen, drücken Sie sie behutsam zusammen, und ziehen Sie<br />
den Schutzschirm heraus.<br />
5 Nehmen Sie die UV-Lampe heraus.<br />
Halten Sie die Lampe fest und ziehen Sie sie aus der Metallklammer.<br />
6 Reinigen Sie den Schutzschirm und die UV-Lampe mit einem<br />
feuchten Tuch.<br />
7 Setzen Sie die UV-Lampe wieder ein.<br />
Richten Sie dazu die Unterseite der Lampe mit der Metallklammer aus und<br />
drücken Sie die Lampe in die Klammer.<br />
8 Setzen Sie den Schutzschirm wieder ein.<br />
Um den Schutzschirm wieder einzusetzen, richten Sie die Stifte des<br />
Schirms an den Schlitzen der reflektierenden Oberfläche in der Nähe der<br />
UV-Lampe aus. Drücken Sie den Schutzschirm in die Schlitze der UV-<br />
Reinigungsstation.<br />
Aufbewahrung<br />
--<br />
Wenn Sie das Gerät längere Zeit nicht benutzen, sollten Sie den<br />
Netzstecker ziehen, das Gerät reinigen und an einem kühlen, trockenen<br />
Ort ohne direkte Sonneneinstrahlung aufbewahren. Das Kabel kann in<br />
der Kabelaufwicklung aufbewahrt werden.<br />
Ersatz<br />
Bürstenkopf<br />
--<br />
Um optimale Ergebnisse zu erzielen, tauschen Sie <strong>Sonicare</strong><br />
Bürstenköpfe spätestens nach 3 Monaten aus.<br />
--<br />
Benutzen Sie ausschließlich entsprechende <strong>Sonicare</strong><br />
Ersatzbürstenköpfe.<br />
UV-Lampe<br />
--<br />
Ersatz-UV-Lampen können bei einem Service-Center in Ihrem Land<br />
oder einem autorisierten <strong>Philips</strong> Händler bestellt werden.
24<br />
Deutsch<br />
Umweltschutz<br />
--<br />
Der integrierte Akku enthält Substanzen, die die Umwelt gefährden<br />
können. Entfernen Sie den Akku, bevor Sie das Gerät an einer offiziellen<br />
Recyclingstelle abgeben. Geben Sie den gebrauchten Akku bei einer<br />
Batteriesammelstelle ab. Falls Sie beim Entfernen des Akkus Probleme<br />
haben, können Sie das Gerät auch an ein <strong>Philips</strong> Service-Center geben.<br />
Dort wird der Akku umweltgerecht entsorgt.<br />
--<br />
Werfen Sie weder die UV-Lampe (die Lampe enthält Quecksilber)<br />
noch das Gerät am Ende seiner Lebensdauer in den normalen<br />
Hausmüll, sondern bringen Sie die Teile zum Recycling zu einer<br />
offiziellen Sammelstelle.<br />
Den Akku entfernen<br />
Bitte beachten Sie, dass dieser Vorgang nicht rückgängig gemacht werden<br />
kann.<br />
Zum Entfernen des aufladbaren Akkus benötigen Sie einen<br />
Schlitzschraubendreher (Standardschraubendreher)<br />
1 Um den Akku komplett zu entladen, nehmen Sie das Handstück aus<br />
dem Ladegerät, schalten die <strong>Sonicare</strong> ein und lassen sie laufen, bis sie<br />
zum Stillstand kommt. Wiederholen Sie diesen Vorgang, bis Sie die<br />
<strong>Sonicare</strong> nicht mehr einschalten können.<br />
2 Stecken Sie einen Schlitzschraubendreher (Standardschraubendreher)<br />
in den Schlitz an der Unterseite des Handstücks. Drehen Sie den<br />
Schraubendreher gegen den Uhrzeigersinn, um die Bodenabdeckung<br />
zu lösen.<br />
3 Halten Sie das Handstück kopfüber, und drücken Sie den Schaft nach<br />
unten, um die internen Komponenten des Handstücks zu lösen.
Deutsch 25<br />
4 Stecken Sie den Schraubendreher neben den Akkuverbindungen<br />
unter die Platine, und drehen Sie ihn, bis die Verbindungen<br />
zerbrechen. Nehmen Sie die Platine heraus, und lösen Sie den Akku<br />
aus der Plastikhalterung.<br />
Garantie und Kundendienst<br />
Benötigen Sie weitere Informationen oder treten Probleme auf, besuchen<br />
Sie bitte die <strong>Philips</strong> Website (www.philips.com), oder setzen Sie sich mit<br />
einem <strong>Philips</strong> Service-Center in Ihrem Land in Verbindung (Telefonnummer<br />
siehe Garantieschrift). Sollte es in Ihrem Land kein Service-Center geben,<br />
wenden Sie sich bitte an Ihren <strong>Philips</strong> Händler.<br />
Garantieeinschränkungen<br />
Die folgenden Geräteteile/Schäden unterliegen nicht den Bedingungen der<br />
internationalen Garantie:<br />
--<br />
Bürstenköpfe<br />
--<br />
Schäden durch Missbrauch, falsche Benutzung, Fahrlässigkeit oder<br />
Produktveränderungen.<br />
--<br />
Normale Abnutzungserscheinungen wie abgeschlagene Stellen, Kratzer,<br />
Abschürfungen, Verfärbungen oder Verblassen.<br />
--<br />
UV-Lampe<br />
Häufig gestellte Fragen<br />
Dieses Kapitel enthält die am häufigsten zu diesem Gerät gestellten Fragen.<br />
Sollten Sie hier keine Antwort auf Ihre Frage finden, wenden Sie sich bitte<br />
an das <strong>Philips</strong> Service-Center in Ihrem Land.<br />
Frage<br />
Warum funktioniert die <strong>Sonicare</strong><br />
Zahnbürste nicht?<br />
Warum spüre ich beim<br />
Verwenden der <strong>Sonicare</strong> ein<br />
Kribbeln?<br />
Antwort<br />
Unter Umständen muss die <strong>Sonicare</strong> aufgeladen werden. Laden Sie<br />
die <strong>Sonicare</strong> mindestens 24 Stunden lang auf.<br />
Möglicherweise führt die Steckdose keinen Strom. Steckdosen<br />
in Badezimmerschränken über Waschbecken sowie Rasierer-<br />
Steckdosen werden häufig zusammen mit der Raumbeleuchtung<br />
ausgeschaltet.<br />
Unter Umständen müssen Sie den Bürstenkopf neu anbringen oder<br />
austauschen.<br />
Bei erstmaliger Benutzung der <strong>Sonicare</strong> spüren Sie u. U. ein leichtes<br />
Kitzeln oder Kribbeln. Dieses Gefühl lässt mit zunehmender<br />
Gewöhnung an die <strong>Sonicare</strong> nach.
26<br />
Deutsch<br />
Frage<br />
Beim Reinigen der Zähne<br />
ist eine kurze Pause bei<br />
der Schwingbewegung zu<br />
verzeichnen. Warum ist das so?<br />
Der Bürstenkopf schlägt gegen<br />
meine Zähne. Wie kann ich das<br />
vermeiden?<br />
Woran liegt es, dass die<br />
Putzleistung geringer zu sein<br />
scheint?<br />
Warum funktioniert beim Putzen<br />
die Modus-Taste nicht?<br />
Warum leuchtet die Anzeige an<br />
der UV-Reinigungsstation nicht?<br />
Benötige ich ein spezielles<br />
Ladegerät, wenn ich meine<br />
<strong>Sonicare</strong> mit auf Reisen nehme?<br />
Antwort<br />
Hierfür ist die Quadpacer-Funktion verantwortlich, die Sie<br />
darauf aufmerksam macht, mit dem nächsten Abschnitt im Mund<br />
fortzufahren. Diese Funktion sorgt dafür, dass Sie für das Reinigen<br />
aller Mundpartien gleich viel Zeit aufwenden (weitere Informationen<br />
finden Sie im Kapitel “Die <strong>Sonicare</strong> Zahnbürste benutzen” im<br />
Abschnitt “Putzanleitung”).<br />
Richten Sie den Bürstenkopf so aus, dass die Borsten in einem<br />
leichten Winkel auf dem Zahnfleischsaum aufliegen.<br />
Möglicherweise müssen Sie die <strong>Sonicare</strong> aufladen.<br />
Eventuell ist die Easy-Start-Funktion aktiviert. Deaktivieren Sie die<br />
Easy-Start-Funktion (siehe Abschnitt “Produktmerkmale”).<br />
Der Bürstenkopf muss möglicherweise ausgetauscht werden.<br />
Die Putzmodi müssen vor dem Einschalten der <strong>Sonicare</strong> ausgewählt<br />
werden.<br />
Möglicherweise müssen Sie die Reinigungsstation an eine<br />
stromführende Steckdose anschließen.<br />
Möglicherweise ist die Klappe der Reinigungsstation nicht richtig<br />
geschlossen.<br />
Vielleicht muss die UV-Lampe ausgetauscht werden (siehe “Ersatz”).<br />
Das Reiseladegerät, das Deluxe-Ladegerät und die UV-<br />
Reinigungsstation können weltweit mit allen üblichen<br />
Netzspannungen zwischen 100 und 240 V AC (50 oder 60 Hz)<br />
betrieben werden. Sie benötigen lediglich einen passenden<br />
Netzteiladapter.<br />
Reisetipp: Der Akku Ihrer <strong>Sonicare</strong> ist so konzipiert, dass er zwischen<br />
den Ladevorgängen bis zu 3 Wochen verwendet werden kann.
Français<br />
27<br />
Introduction<br />
Félicitations pour votre achat et bienvenue dans l’univers <strong>Philips</strong> ! Pour<br />
profiter pleinement de l’assistance <strong>Philips</strong>, enregistrez votre produit sur le<br />
site à l’adresse suivante : www.philips.com/welcome.<br />
Important<br />
Lisez attentivement ce mode d’<strong>emploi</strong> avant d’utiliser l’appareil et<br />
conservez-le pour un usage ultérieur.<br />
Danger<br />
--<br />
Évitez tout contact du chargeur et/ou de l’assainisseur avec l’eau. Ne les<br />
placez pas et ne les rangez pas sur ou près d’une baignoire, d’un lavabo<br />
ou d’un évier. Ne les plongez pas dans l’eau ni dans tout autre liquide.<br />
Après le nettoyage, assurez-vous que le chargeur et/ou l’assainisseur<br />
sont parfaitement secs avant de les brancher sur le secteur.<br />
Avertissement<br />
--<br />
Il est impossible de remplacer le cordon d’alimentation. En cas de<br />
dommages, le chargeur et/ou l’assainisseur devra/devront être mis au<br />
rebut.<br />
--<br />
Remplacez systématiquement le chargeur et/ou l’assainisseur par un<br />
chargeur/assainisseur de même type pour éviter tout accident.<br />
--<br />
N’utilisez pas le chargeur et/ou l’assainisseur à l’extérieur ou près de<br />
surfaces chauffantes.<br />
--<br />
Si l’appareil (tête de brosse, manche de la brosse, chargeur et/ou<br />
assainisseur) est endommagé, cessez de l’utiliser. L’appareil ne contient<br />
aucune pièce réparable par l’utilisateur. S’il est endommagé, contactez<br />
le Service Consommateurs de votre pays (voir le chapitre « Garantie<br />
et service »).<br />
--<br />
Cet appareil n’est pas destiné à être utilisé par des personnes<br />
(notamment des enfants) dont les capacités physiques, sensorielles<br />
ou intellectuelles sont réduites, ou par des personnes manquant<br />
d’expérience ou de connaissances, à moins que celles-ci ne soient sous<br />
surveillance ou qu’elles n’aient reçu des instructions quant à l’utilisation<br />
de l’appareil par une personne responsable de leur sécurité.<br />
--<br />
Veillez à ce que les enfants ne puissent pas jouer avec l’appareil.<br />
--<br />
Cessez d’utiliser l’assainisseur si la lampe UV reste allumée alors que<br />
l’appareil est ouvert. Les UV peuvent être dangereux pour les yeux et<br />
la peau. Tenez toujours l’assainisseur hors de portée des enfants.<br />
Attention<br />
--<br />
Ne mettez pas la tête de brosse, le manche, le chargeur de voyage, le<br />
couvercle du chargeur ou l’assainisseur au lave-vaisselle.<br />
--<br />
Si vous avez reçu des soins bucco-dentaires, notamment au niveau des<br />
gencives, au cours des deux derniers mois, consultez votre dentiste<br />
avant d’utiliser cette brosse à <strong>dents</strong>.<br />
--<br />
Consultez votre dentiste si vos gencives saignent de manière excessive<br />
après utilisation de cette brosse à <strong>dents</strong> ou si le saignement persiste<br />
après une semaine d’utilisation.<br />
--<br />
La brosse à <strong>dents</strong> <strong>Sonicare</strong> est conforme aux normes de sécurité<br />
relatives aux appareils électromagnétiques. Si vous portez un<br />
stimulateur cardiaque ou tout autre dispositif implanté, contactez votre
28<br />
Français<br />
médecin traitant ou le fabricant de ce dispositif avant utilisation de la<br />
brosse à <strong>dents</strong> <strong>Sonicare</strong>.<br />
--<br />
Si vous avez des problèmes de santé, consultez votre médecin avant<br />
d’utiliser la brosse à <strong>dents</strong> <strong>Sonicare</strong>.<br />
--<br />
Cet appareil a été conçu exclusivement pour le brossage des <strong>dents</strong>,<br />
des gencives et de la langue. Ne l’utilisez jamais à d’autres fins. Si son<br />
utilisation devait s’avérer inconfortable ou douloureuse, cessez d’utiliser<br />
l’appareil et consultez votre médecin.<br />
--<br />
La brosse à <strong>dents</strong> <strong>Sonicare</strong> est un appareil de soins personnel et n’est<br />
pas destinée à être utilisée sur plusieurs patients dans les cabinets ou<br />
établissements dentaires.<br />
--<br />
Cessez d’utiliser une tête de brosse dont les poils sont écrasés ou<br />
tordus. Remplacez la tête de brosse tous les 3 mois ou plus tôt si vous<br />
constatez des signes d’usure.<br />
--<br />
N’utilisez pas d’autres têtes de brosse que celles recommandées par le<br />
fabricant.<br />
--<br />
Si votre dentifrice contient du peroxyde, du bicarbonate de soude ou<br />
du bicarbonate (couramment utilisés dans les dentifrices blanchissants),<br />
nettoyez bien la tête de brosse avec de l’eau et du savon après chaque<br />
utilisation afin de prévenir toute fissure éventuelle du plastique.<br />
--<br />
Ne touchez pas la lampe UV pendant et juste après le cycle<br />
d’assainissement, lorsqu’elle est chaude.<br />
--<br />
N’utilisez pas l’assainisseur sans l’écran de protection pour éviter tout<br />
contact avec la lampe, car elle peut être chaude.<br />
Champs électromagnétiques (CEM)<br />
Cet appareil <strong>Philips</strong> est conforme à toutes les normes relatives aux champs<br />
électromagnétiques (CEM). Il répond aux règles de sécurité établies sur<br />
la base des connaissances scientifiques actuelles et peut donc être utilisé<br />
en toute sécurité s’il est manipulé correctement et conformément aux<br />
instructions de ce mode d’<strong>emploi</strong>.<br />
Description générale (fig. 1)<br />
A Capuchon de protection hygiénique<br />
B Tête de brosse<br />
C Anneau de couleur interchangeable<br />
D Manche confort<br />
E Bouton marche/arrêt<br />
F Bouton <strong>Mode</strong><br />
G <strong>Mode</strong>s de brossage<br />
H Indicateur de charge Deluxe<br />
I Assainisseur UV avec chargeur intégré et range-cordon (sur certains<br />
modèles uniquement)<br />
J Assainisseur UV (sur certains modèles uniquement)<br />
K Chargeur Deluxe (sur certains modèles uniquement)<br />
L Couvercle du chargeur avec support pour tête de brosse<br />
M Chargeur de voyage<br />
N Socle du chargeur avec range-cordon<br />
--<br />
Non illustré : lampe UV<br />
--<br />
Non illustré : plateau égouttoir de l’assainisseur<br />
--<br />
Non illustré : écran de protection pour lampe UV
Français 29<br />
Avant l’utilisation<br />
Changement de l’anneau de couleur<br />
Les têtes de brosse <strong>Sonicare</strong> sont fournies avec des anneaux de couleur<br />
interchangeables, qui vous permettent de les identifier.<br />
Pour changer l’anneau de couleur :<br />
1 Retirez l’anneau de couleur situé à la base de la tête de brosse.<br />
2 Fixez un autre anneau en faisant glisser le nouvel anneau sur la base<br />
de la tête de brosse.<br />
Fixation de la tête de brosse<br />
1 Orientez la tête de brosse de sorte que les poils soient alignés avec<br />
l’avant du manche.<br />
2 Insérez le manche métallique au maximum dans la tête de brosse.<br />
Remarque : Le léger espace existant entre l’anneau de couleur et le manche<br />
est normal.<br />
Charge de la brosse à <strong>dents</strong> <strong>Sonicare</strong><br />
1 Branchez l’assainisseur ou le chargeur sur la prise secteur.<br />
2 Placez le manche sur le chargeur ou l’assainisseur.<br />
,,<br />
Le voyant clignotant de l’indicateur de charge de la batterie indique<br />
que la brosse à <strong>dents</strong> est en charge.<br />
--<br />
1 voyant vert allumé signifie que la brosse à <strong>dents</strong> est chargée entre 34<br />
et 66 %.<br />
--<br />
2 voyants verts allumés signifient que la brosse à <strong>dents</strong> est chargée<br />
entre 67 et 94 %.<br />
--<br />
3 voyants verts allumés signifient que la brosse à <strong>dents</strong> est<br />
complètement chargée.<br />
Remarque : Lorsque le niveau de charge de la batterie est faible, la brosse à<br />
<strong>dents</strong> <strong>Sonicare</strong> émet 3 signaux sonores et 1 voyant de l’indicateur de charge<br />
clignote en jaune pendant les 30 secondes qui suivent la fin du cycle de<br />
brossage.
30<br />
Français<br />
1<br />
3<br />
2<br />
4<br />
Remarque : Lorsque vous n’utilisez pas la brosse à <strong>dents</strong> <strong>Sonicare</strong>, placez-la<br />
sur le chargeur pour que la batterie soit toujours entièrement chargée. Une<br />
fois la batterie complètement chargée, la consommation d’électricité est<br />
minime.<br />
Remarque : Il faut au moins 24 heures pour charger entièrement la batterie.<br />
Utilisation de la brosse à <strong>dents</strong> <strong>Sonicare</strong><br />
Instructions de brossage<br />
1 Humidifiez les poils de la tête de brosse, puis appliquez une petite<br />
quantité de dentifrice.<br />
2 Mettez les poils de la tête de brosse sur vos <strong>dents</strong>, en les inclinant<br />
légèrement vers la gencive.<br />
3 Allumez la brosse à <strong>dents</strong> <strong>Sonicare</strong> en appuyant sur le bouton<br />
marche/arrêt.<br />
4 Exercez une légère pression pour optimiser l’efficacité de la brosse à<br />
<strong>dents</strong> <strong>Sonicare</strong> et laissez l’appareil brosser vos <strong>dents</strong>. Ne frottez pas.<br />
5 Déplacez lentement la tête de brosse le long de vos <strong>dents</strong> avec un<br />
léger mouvement de va-et-vient, de sorte que les poils les plus longs<br />
atteignent les espaces interdentaires. Continuez ainsi jusqu’à la fin du<br />
cycle de brossage.<br />
Remarque : Pour assurer un brossage uniforme, divisez votre<br />
bouche en 4 sections à l’aide de la fonction Quadpacer (voir le<br />
chapitre « Caractéristiques »).<br />
6 <strong>Brosse</strong>z chaque section pendant 30 secondes : commencez par la<br />
section 1 (<strong>dents</strong> de la mâchoire supérieure, à l’extérieur), suivie de la<br />
section 2 (<strong>dents</strong> de la mâchoire supérieure, à l’intérieur), puis de la<br />
section 3 (<strong>dents</strong> de la mâchoire inférieure, à l’extérieur) et enfin de<br />
la section 4 (<strong>dents</strong> de la mâchoire inférieure, à l’intérieur).<br />
7 Une fois le cycle de brossage terminé, vous pouvez consacrer du<br />
temps supplémentaire au brossage de la surface de mastication des<br />
<strong>dents</strong> et insister sur les zones propices aux taches. Vous pouvez<br />
également brosser votre langue avec la brosse à <strong>dents</strong> en marche ou<br />
arrêtée.<br />
La brosse à <strong>dents</strong> <strong>Sonicare</strong> est compatible avec :<br />
--<br />
- les appareils orthodontiques (les têtes de brosse s’usent toutefois<br />
plus rapidement) ;<br />
--<br />
- les problèmes dentaires (plombages, couronnes, bridges).<br />
<strong>Mode</strong>s de brossage<br />
La brosse à <strong>dents</strong> <strong>Sonicare</strong> est paramétrée pour démarrer<br />
automatiquement en mode Clean.<br />
1 Avant d’allumer la brosse à <strong>dents</strong> <strong>Sonicare</strong>, appuyez sur le bouton<br />
<strong>Mode</strong> pour passer d’un mode à l’autre.<br />
,,<br />
Le mode de brossage sélectionné s’illumine.<br />
,,<br />
Une fois le mode de brossage sélectionné, celui-ci reste actif jusqu’à<br />
ce qu’un autre mode soit sélectionné.
Français 31<br />
Remarque : Lorsque la brosse à <strong>dents</strong> est allumée, vous ne pouvez pas changer<br />
de mode de brossage.<br />
Les modes de brossage disponibles sont :<br />
Clean<br />
Propreté : nettoyage complet de la bouche (2 minutes).<br />
Gum Care<br />
Soin des gencives : nettoyage complet de la bouche (2 minutes) et<br />
nettoyage doux pour les zones sensibles et le long des gencives (1 minute).<br />
Refresh<br />
Rafraîchissement : nettoyage rapide (1 minute).<br />
Sensitive<br />
Sensible : nettoyage doux pour les <strong>dents</strong> et les gencives sensibles<br />
(2 minutes).<br />
Massage<br />
Massage : stimulation en douceur des gencives (2 minutes).<br />
Remarque : Dans le cadre d’études cliniques, il est conseillé de sélectionner le<br />
mode Clean de 2 minutes. Le manche doit être entièrement chargé. Désactivez<br />
la fonction Easy-start (augmentation progressive de l’amplitude de brossage).<br />
Insistez 30 secondes de plus sur les zones les plus tachées.<br />
Caractéristiques<br />
Fonction Easy-start<br />
La fonction Easy-start est activée sur ce modèle <strong>Sonicare</strong>.<br />
Cette fonction, qui augmente progressivement la puissance lors des<br />
14 premiers brossages, vous permet de vous habituer au brossage<br />
<strong>Sonicare</strong>.<br />
Remarque : Au cours des 14 premières utilisations, chaque cycle de brossage<br />
doit durer au moins une minute pour que la fonction Easy-start se déroule<br />
correctement.<br />
Désactivation ou activation de la fonction Easy-start<br />
1 Fixez la tête de brosse au manche.<br />
2 Placez le manche sur le chargeur préalablement branché.<br />
--<br />
Pour désactiver la fonction Easy-start :<br />
Appuyez sur le bouton marche/arrêt et maintenez-le enfoncé pendant<br />
deux secondes. Un signal sonore vous indique que la fonction Easy-start<br />
est désactivée.<br />
--<br />
Pour activer la fonction Easy-start :<br />
Appuyez sur le bouton marche/arrêt et maintenez-le enfoncé pendant<br />
deux secondes. Deux signaux sonores vous indiquent que la fonction Easystart<br />
est activée.<br />
Remarque : Il est recommandé de ne pas dépasser la période initiale<br />
d’utilisation de la fonction Easy-start, sous peine de réduire l’efficacité de la<br />
brosse à <strong>dents</strong> <strong>Sonicare</strong> dans l’élimination de la plaque dentaire.
32<br />
Français<br />
Fonction Smartimer (minuterie 2 minutes)<br />
La fonction Smartimer indique que le cycle de brossage est terminé en<br />
éteignant automatiquement la brosse à <strong>dents</strong> à la fin du cycle de brossage.<br />
Les dentistes recommandent de se brosser les <strong>dents</strong> 2 fois par jour<br />
pendant au moins 2 minutes.<br />
Fonction Quadpacer (minuterie à intervalles de 30 secondes)<br />
1<br />
3<br />
2<br />
4<br />
--<br />
La fonction Quadpacer est un minuteur à intervalles qui émet un bref<br />
signal sonore et suspend le cycle pour vous rappeler de brosser les<br />
quatre sections de votre bouche. Selon le mode de brossage choisi, les<br />
signaux sont émis à différents intervalles au cours du cycle de brossage.<br />
Voir la section « <strong>Mode</strong>s de brossage » du chapitre « Utilisation de la<br />
brosse à <strong>dents</strong> <strong>Sonicare</strong> ».<br />
La fonction Quadpacer est activée sur ce modèle. Pour la désactiver ou la<br />
réactiver :<br />
1 Placez le manche, auquel vous aurez fixé une tête de brosse, sur le<br />
chargeur préalablement branché.<br />
2 Appuyez sur le bouton marche/arrêt et maintenez-le enfoncé<br />
pendant deux secondes.<br />
,,<br />
Un signal sonore indique que la fonction Quadpacer est désactivée<br />
et deux signaux sonores qu’elle a été activée.<br />
Range-cordon sur chargeur Deluxe (sur certains modèles<br />
uniquement)<br />
Si votre modèle inclut le couvercle et le socle du chargeur Deluxe, le<br />
chargeur de voyage est intégré au couvercle. Pour raccourcir le cordon<br />
d’alimentation, enroulez-le autour du range-cordon situé dans le socle du<br />
chargeur.<br />
1 Pour séparer le couvercle du socle, appuyez sur les deux barres<br />
grises situées sur le socle et tirez le couvercle blanc vers le haut.<br />
2 Ajustez la longueur du cordon d’alimentation en l’enroulant autour<br />
du socle gris, comme indiqué sur l’image. Assurez-vous que le cordon<br />
est bien maintenu.
Français 33<br />
3 Insérez ensuite le cordon d’alimentation dans la petite fente située à<br />
l’arrière du socle gris.<br />
4 Pour refermer le couvercle, exercez une pression jusqu’à ce qu’il<br />
s’enclenche.<br />
Conseil : Pour plus de confort lors de vos déplacements, vous pouvez retirer le<br />
chargeur de voyage et l’utiliser sans le couvercle ni le socle.<br />
Range-cordon sur assainisseur avec chargeur intégré (sur<br />
certains modèles uniquement)<br />
--<br />
Si votre modèle inclut l’assainisseur, vous pouvez ajuster la longueur du<br />
cordon en l’enroulant autour du range-cordon intégré dans le socle de<br />
l’assainisseur.<br />
Assainisseur (sur certains modèles uniquement)<br />
--<br />
L’assainisseur UV permet de nettoyer les têtes de brosse après chaque<br />
utilisation.<br />
Cessez d’utiliser l’assainisseur si la lampe UV reste allumée alors que<br />
l’appareil est ouvert ou que la fenêtre bleue est cassée ou manquante.<br />
Les UV peuvent être dangereux pour les yeux et la peau. Tenez toujours<br />
l’assainisseur hors de portée des enfants.<br />
Si de la fumée ou une odeur de brûlé s’échappe de l’assainisseur<br />
en fonctionnement, débranchez l’appareil et contactez le Service<br />
Consommateurs.<br />
1 Après chaque utilisation, rincez la tête de brosse et secouez-la pour<br />
en retirer l’eau.<br />
Ne mettez pas le capuchon de protection sur la tête de brosse lors de<br />
l’assainissement.<br />
2 Insérez un doigt dans le logement du portillon, en haut de<br />
l’assainisseur, puis tirez pour ouvrir.
34<br />
Français<br />
3 Placez la tête de brosse sur l’un des 2 supports de l’assainisseur.<br />
--<br />
Assurez-vous de placer les poils de la tête de brosse directement face<br />
à la lampe.<br />
Remarque : Les têtes de brosse <strong>Sonicare</strong> ProResults ne doivent être nettoyées<br />
que dans l’assainisseur.<br />
4 Assurez-vous que l’assainisseur est branché sur la prise secteur.<br />
5 Fermez l’appareil et appuyez une fois sur le bouton vert marche/<br />
arrêt pour sélectionner le cycle de nettoyage UV.<br />
Remarque : Vous ne pouvez allumer l’assainisseur qu’une fois le portillon<br />
correctement fermé.<br />
Remarque : L’assainisseur cesse de fonctionner si vous ouvrez l’appareil<br />
pendant le cycle d’assainissement.<br />
Remarque : Le cycle de l’assainisseur dure 10 minutes, après quoi l’appareil<br />
s’éteint automatiquement.<br />
,,<br />
L’assainisseur est en cours de fonctionnement lorsque le voyant bleu<br />
au niveau de la fenêtre est allumé.<br />
,,<br />
Une fois le cycle d’assainissement terminé, l’assainisseur s’éteint<br />
automatiquement.<br />
Nettoyage<br />
Ne lavez pas la tête de brosse, le manche, le chargeur de voyage, le<br />
couvercle du chargeur ou l’assainisseur UV au lave-vaisselle.<br />
Manche de la brosse à <strong>dents</strong><br />
1 Retirez la tête de brosse et rincez le manche métallique à l’eau<br />
chaude.<br />
N’appuyez pas sur l’anneau en caoutchouc du manche métallique avec<br />
des objets pointus, sous peine de l’endommager.<br />
2 Essuyez la surface du manche à l’aide d’un chiffon humide.<br />
Tête de brosse<br />
1 Rincez la tête de brosse et les poils après chaque utilisation.<br />
2 Retirez la tête de brosse du manche et rincez la base de la tête de<br />
brosse au moins une fois par semaine à l’eau chaude.
Français 35<br />
Chargeur<br />
1 Débranchez le chargeur.<br />
2 Essuyez la surface du chargeur à l’aide d’un chiffon humide.<br />
Assainisseur (sur certains modèles uniquement)<br />
Ne nettoyez pas l’assainisseur lorsque la lampe UV est chaude.<br />
Pour une efficacité optimale, il est recommandé de nettoyer l’assainisseur<br />
une fois par semaine.<br />
1 Débranchez l’assainisseur.<br />
2 Retirez le plateau égouttoir et rincez-le à l’aide d’un chiffon humide.<br />
3 Nettoyez toutes les surfaces du réflecteur à l’aide d’un chiffon<br />
humide.<br />
4 Retirez l’écran de protection placé devant la lampe UV.<br />
Pour retirer l’écran, saisissez les bords situés près des fermoirs, appuyez<br />
légèrement et tirez.<br />
5 Retirez la lampe UV.<br />
Pour retirer la lampe, saisissez-la et sortez-la de sa fixation métallique.<br />
6 Nettoyez l’écran de protection et la lampe UV à l’aide d’un chiffon<br />
humide.<br />
7 Réinsérez la lampe UV.<br />
Pour réinsérer la lampe, alignez le bas de l’ampoule avec la fixation<br />
métallique et enfoncez l’ampoule dans la fixation.<br />
8 Réinsérez l’écran de protection.<br />
Pour réinsérer l’écran, alignez les taquets de fixation de l’écran avec les<br />
fentes de la surface du réflecteur située près de la lampe UV. Appuyez sur<br />
l’écran de sorte qu’il s’enclenche dans les fentes de l’assainisseur.<br />
Rangement<br />
--<br />
Si vous ne comptez pas utiliser l’appareil pendant une période<br />
prolongée, débranchez le cordon d’alimentation de la prise secteur,<br />
nettoyez l’appareil et rangez-le dans un endroit frais et sec, à l’abri de la<br />
lumière. Utilisez le range-cordon pour ranger correctement le cordon<br />
d’alimentation.<br />
Remplacement<br />
Tête de brosse<br />
--<br />
Pour obtenir des résultats optimaux, remplacez les têtes de<br />
brosse <strong>Sonicare</strong> au moins tous les 3 mois.<br />
--<br />
Utilisez exclusivement des têtes de brosse <strong>Sonicare</strong> ProResults.<br />
Lampe UV<br />
--<br />
Vous pouvez commander des lampes UV de rechange auprès du<br />
Service Consommateurs de votre pays ou d’un Centre Service Agréé<br />
<strong>Philips</strong>.
36<br />
Français<br />
Environnement<br />
--<br />
La batterie rechargeable intégrée contient des substances qui peuvent<br />
nuire à l’environnement. Veillez à toujours retirer la batterie avant de<br />
mettre l’appareil au rebut ou de le déposer à un endroit assigné à cet<br />
effet. Déposez la batterie usagée à un endroit assigné à cet effet. Si<br />
vous n’arrivez pas à retirer la batterie, vous pouvez apporter l’appareil<br />
dans un Centre Service Agréé <strong>Philips</strong> qui prendra toute l’opération en<br />
charge pour préserver l’environnement.<br />
--<br />
Lorsqu’ils ne fonctionneront plus, ne jetez pas l’appareil ni la lampe UV<br />
(celle-ci contient du mercure) avec les ordures ménagères. Déposezles<br />
dans un lieu prévu à cet effet, où ils pourront être recyclés. Vous<br />
contribuerez ainsi à la protection de l’environnement.<br />
Retrait de la batterie rechargeable<br />
Ce processus est irréversible.<br />
Pour retirer la batterie rechargeable, munissez-vous d’un tournevis à tête<br />
plate (standard).<br />
1 Pour décharger la batterie rechargeable, retirez le manche du<br />
chargeur, allumez la brosse à <strong>dents</strong> <strong>Sonicare</strong> et laissez-la fonctionner<br />
jusqu’à ce qu’elle s’éteigne. Répétez cette opération jusqu’à ce que la<br />
brosse à <strong>dents</strong> ne s’allume plus du tout.<br />
2 Insérez un tournevis à tête plate (standard) dans la fente située sur<br />
la partie inférieure du manche. Tournez dans le sens inverse des<br />
aiguilles d’une montre pour desserrer le couvercle inférieur.<br />
3 Tenez le manche à l’envers et tirez sur l’axe pour retirer les<br />
composants internes du manche.<br />
4 Insérez le tournevis sous le circuit imprimé, à proximité des<br />
connexions de la batterie, et tournez pour rompre ces connexions.<br />
Retirez le circuit imprimé et séparez la batterie du boîtier en<br />
plastique.
Français 37<br />
Garantie et service<br />
Si vous souhaitez obtenir des informations supplémentaires ou si vous<br />
rencontrez un problème, rendez-vous sur le site Web de <strong>Philips</strong> à l’adresse<br />
www.philips.com ou contactez le Service Consommateurs <strong>Philips</strong> de<br />
votre pays (vous trouverez le numéro de téléphone correspondant<br />
sur le dépliant de garantie internationale). S’il n’existe pas de Service<br />
Consommateurs <strong>Philips</strong> dans votre pays, renseignez-vous auprès de votre<br />
revendeur <strong>Philips</strong>.<br />
Limites de la garantie<br />
La garantie internationale ne couvre pas les éléments suivants :<br />
--<br />
les têtes de brosse ;<br />
--<br />
les dommages causés par une mauvaise utilisation, une négligence ou<br />
des altérations ;<br />
--<br />
les marques d’usure dues à un usage normal, comme les rayures,<br />
abrasions et décolorations.<br />
--<br />
Lampe UV<br />
Foire aux questions<br />
Ce chapitre reprend les questions les plus fréquemment posées au sujet de<br />
l’appareil. Si vous ne trouvez pas la réponse à votre question ici, contactez<br />
le Service Consommateurs <strong>Philips</strong> de votre pays.<br />
Question<br />
Pourquoi la brosse à <strong>dents</strong><br />
<strong>Sonicare</strong> ne fonctionne-t-elle pas ?<br />
J’ai une sensation de<br />
chatouillement lorsque j’utilise la<br />
brosse à <strong>dents</strong> <strong>Sonicare</strong>. Pourquoi ?<br />
Pourquoi y-a-t-il de petites pauses<br />
dans les mouvements de la brosse<br />
lorsque je me brosse les <strong>dents</strong> ?<br />
La tête de brosse « cliquète » sur<br />
mes <strong>dents</strong>. Que puis-je faire ?<br />
La puissance du brossage semble<br />
diminuer. Pourquoi ?<br />
Réponse<br />
Votre brosse à <strong>dents</strong> <strong>Sonicare</strong> a peut-être besoin d’être rechargée.<br />
Dans ce cas, rechargez-la pendant au moins 24 heures.<br />
La prise de courant n’est peut-être pas alimentée. Dans une salle<br />
de bain, notez que l’alimentation é<strong>lectrique</strong> des prises, notamment<br />
celles situées dans les armoires de toilette au-dessus des lavabos<br />
ou celles destinées aux rasoirs, peut être coupée lorsque la<br />
lumière est éteinte.<br />
Vous devez peut-être refixer ou remplacer la tête de brosse.<br />
Vous pouvez éprouver une légère sensation de chatouillement<br />
lors du premier brossage avec la brosse à <strong>dents</strong> <strong>Sonicare</strong>. Cette<br />
sensation s’atténue après quelques utilisations.<br />
Il s’agit de la fonction Quadpacer qui vous indique que vous devez<br />
brosser une nouvelle section de votre bouche. Cette fonction vous<br />
permet de brosser toutes les zones de votre bouche pendant un<br />
laps de temps équivalent (voir le chapitre « Utilisation de la brosse<br />
à <strong>dents</strong> <strong>Sonicare</strong> », section « Instructions de brossage ».<br />
Ceci peut être évité en orientant correctement la tête de brosse<br />
et en inclinant légèrement les poils vers la gencive.<br />
Il faut peut-être charger la brosse à <strong>dents</strong> <strong>Sonicare</strong>.<br />
La fonction Easy-start a peut-être été activée. Désactivez-la (voir le<br />
chapitre « Caractéristiques »).<br />
Vous devez peut-être remplacer la tête de brosse.
38<br />
Français<br />
Question<br />
Pourquoi le bouton <strong>Mode</strong><br />
ne fonctionne-t-il pas lors du<br />
brossage ?<br />
Pourquoi le voyant de<br />
l’assainisseur UV ne s’allume-t-il<br />
pas ?<br />
Ai-je besoin d’un chargeur spécial<br />
si je voyage avec ma brosse à<br />
<strong>dents</strong> <strong>Sonicare</strong> ?<br />
Réponse<br />
Les modes de brossage doivent être sélectionnés avant d’allumer<br />
la brosse à <strong>dents</strong> <strong>Sonicare</strong>.<br />
Il faut peut-être brancher l’assainisseur sur une prise alimentée.<br />
Il faut peut-être fermer le portillon de l’assainisseur.<br />
Il faut peut-être remplacer la lampe UV (voir le<br />
chapitre « Remplacement »).<br />
Le chargeur de voyage, le chargeur Deluxe et l’assainisseur sont<br />
conçus pour une tension secteur comprise entre 100 et 240 V CA,<br />
à 50 ou 60 Hz. Munissez-vous simplement d’un adaptateur de<br />
courant.<br />
Conseil pour les déplacements : la batterie <strong>Sonicare</strong> est conçue<br />
pour fonctionner pendant 3 semaines maximum entre les charges.
Italiano<br />
39<br />
Introduzione<br />
Congratulazioni per l’acquisto e benvenuti in <strong>Philips</strong>! Per trarre il massimo<br />
vantaggio dall’assistenza <strong>Philips</strong>, registrate il vostro prodotto su www.philips.<br />
com/welcome.<br />
Importante<br />
Prima di utilizzare l’apparecchio, leggete attentamente il presente manuale e<br />
conservatelo per eventuali riferimenti futuri.<br />
Pericolo<br />
--<br />
Tenete il caricabatterie e/o l’igienizzatore lontani dall’acqua. Non<br />
appoggiateli né riponeteli vicino a vasche, lavandini, lavabi ecc. Non<br />
immergete il caricabatterie e/o l’igienizzatore in acqua o in altre<br />
sostanze liquide. Dopo la pulizia, assicuratevi che il caricabatterie e/o<br />
l’igienizzatore siano completamente asciutti prima di collegarli alla presa<br />
di corrente.<br />
Avvertenza<br />
--<br />
Il cavo di alimentazione non può essere sostituito. Nel caso fosse<br />
danneggiato, gettate il caricabatterie e/o l’igienizzatore.<br />
--<br />
Sostituite il caricabatterie e/o l’igienizzatore esclusivamente con un<br />
adattatore e/o un igienizzatore originale al fine di evitare situazioni<br />
pericolose.<br />
--<br />
Non utilizzate il caricabatterie e/o l’igienizzatore in esterno o in<br />
prossimità di superfici calde.<br />
--<br />
In caso di danni (testina, impugnatura, caricabatterie e/o igienizzatore),<br />
non utilizzate in nessun caso l’apparecchio. Le parti di questo<br />
apparecchio non possono essere sostituite o riparate dagli utenti. In<br />
caso di danni all’apparecchio, contattate il Centro Assistenza Clienti del<br />
vostro paese (vedere il capitolo “Garanzia e assistenza”).<br />
--<br />
L’apparecchio non è destinato a persone (inclusi bambini) con capacità<br />
mentali, fisiche o sensoriali ridotte, fatti salvi i casi in cui tali persone<br />
abbiano ricevuto assistenza o formazione per l’uso dell’apparecchio da<br />
una persona responsabile della loro sicurezza.<br />
--<br />
Adottate le dovute precauzioni per evitare che i bambini giochino con<br />
l’apparecchio.<br />
--<br />
Non utilizzate l’igienizzatore se la lampadina a raggi UV rimane accesa<br />
nonostante lo sportello sia aperto. I raggi UV potrebbero essere nocivi<br />
per gli occhi e la pelle. Tenete l’igienizzatore lontano dalla portata dei<br />
bambini.<br />
Attenzione<br />
--<br />
Non pulite la testina, il manico, il caricabatterie, il coperchio del<br />
caricabatterie e/o l’igienizzatore nella lavastoviglie.<br />
--<br />
Se nel corso degli ultimi 2 mesi vi siete sottoposti a interventi su denti<br />
o gengive, chiedete il parere del vostro dentista prima di utilizzare lo<br />
spazzolino.<br />
--<br />
Rivolgetevi al vostro dentista nel caso di eccessivo sanguinamento<br />
dopo l’uso dell’apparecchio o qualora tale sanguinamento continui per<br />
più di una settimana.<br />
--<br />
Lo spazzolino <strong>Sonicare</strong> è conforme alle norme di sicurezza in materia<br />
di dispositivi elettromagnetici. Se siete portatori di pacemaker o di altro
40<br />
Italiano<br />
dispositivo impiantato, consultate il vostro medico o il produttore del<br />
dispositivo di cui siete portatori prima dell’uso.<br />
--<br />
In caso di problemi orali, consultate il medico prima di utilizzare<br />
<strong>Sonicare</strong>.<br />
--<br />
Questo apparecchio è destinato esclusivamente alla pulizia di denti e<br />
gengive. Non utilizzatelo per scopi diversi da quelli previsti. Qualora<br />
avvertiate dolore durante l’utilizzo, contattate il vostro medico.<br />
--<br />
Lo spazzolino <strong>Sonicare</strong> è un apparecchio assolutamente personale e<br />
non deve essere utilizzato da più persone o presso studi dentistici.<br />
--<br />
Non utilizzate l’apparecchio in presenza di setole rovinate o piegate.<br />
Sostituite la testina ogni 3 mesi o prima in presenza di segni di usura.<br />
--<br />
Utilizzate esclusivamente le testine consigliate dal produttore.<br />
--<br />
Se il dentifricio utilizzato contiene perossido, bicarbonato di sodio<br />
o bicarbonato (impiegati di solito per i dentifrici sbiancanti), pulite<br />
accuratamente la testina con acqua e sapone dopo ogni uso, onde<br />
evitare di danneggiare la parte in plastica.<br />
--<br />
La lampadina a raggi UV diventa incandescente durante e subito<br />
dopo il ciclo di igienizzazione. Non toccate la lampadina a raggi UV se<br />
incandescente.<br />
--<br />
Non mettete l’igienizzatore in funzione senza lo schermo protettivo<br />
per evitare il contatto con una lampadina.<br />
Campi elettromagnetici (EMF)<br />
Questo apparecchio <strong>Philips</strong> è conforme a tutti gli standard relativi ai campi<br />
elettromagnetici (EMF). Se utilizzato in modo appropriato seguendo le<br />
istruzioni contenute nel presente manuale utente, l’apparecchio consente<br />
un utilizzo sicuro come confermato dai risultati scientifici attualmente<br />
disponibili.<br />
Descrizione generale (fig. 1)<br />
A Cappuccio igienico da viaggio<br />
B Testina<br />
C Ghiera colorata intercambiabile<br />
D Impugnatura morbida<br />
E Pulsante on/off<br />
F Pulsante modalità<br />
G Modalità di utilizzo<br />
H Indicatore di ricarica deluxe<br />
I Base dell’igienizzatore UV con caricabatterie integrato e avvolgicavo<br />
(solo alcuni modelli)<br />
J Igienizzatore (solo alcuni modelli)<br />
K Caricabatterie deluxe (solo alcuni modelli)<br />
L Coperchio caricabatterie con supporto testina<br />
M Caricabatterie da viaggio<br />
N Base caricabatterie con avvolgicavo<br />
--<br />
Non illustrato: lampadina a raggi UV<br />
--<br />
Non illustrato: vassoio antigoccia igienizzatore<br />
--<br />
Non illustrato: schermo protettivo per lampadina a raggi UV
Italiano 41<br />
Predisposizione dell’apparecchio<br />
Sostituzione della ghiera colorata<br />
Le testine <strong>Sonicare</strong> vengono fornite insieme a ghiere colorate<br />
intercambiabili ideali per personalizzare la testina.<br />
Per sostituire la ghiera colorata:<br />
1 Estraete la ghiera colorata dalla base della testina.<br />
2 Installate una nuova ghiera facendola scorrere da una parte sulla base<br />
della testina.<br />
Inserimento della testina<br />
1 Allineate la testina in modo che le setole siano in corrispondenza del<br />
lato anteriore dell’impugnatura.<br />
2 Premete saldamente la testina sulla parte metallica fino all’arresto.<br />
Nota Tra la ghiera colorata e l’impugnatura è presente un piccolo spazio.<br />
Come ricaricare <strong>Sonicare</strong><br />
1 Inserite la spina di alimentazione del caricabatterie o<br />
dell’igienizzatore nella presa a muro.<br />
2 Posizionate il manico sul caricabatterie o sull’igienizzatore.<br />
,,<br />
Quando lo spazzolino è in carica, la spia della batteria inizia a<br />
lampeggiare.<br />
--<br />
1 spia a LED verde fissa indica che la carica dello spazzolino è pari al<br />
34-66%.<br />
--<br />
2 spie a LED verdi fisse indicano che la carica dello spazzolino è pari al<br />
67-94%.<br />
--<br />
3 spie a LED verdi fisse indicano che lo spazzolino è completamente<br />
carico.<br />
Nota Se la batteria dello spazzolino <strong>Sonicare</strong> è scarica, vengono emessi 3<br />
segnali acustici e 1 LED dell’indicatore di ricarica lampeggia in giallo per 30<br />
dopo aver completato il ciclo di pulizia dei denti.
42<br />
Italiano<br />
1<br />
3<br />
2<br />
4<br />
Nota Per mantenere la batteria sempre carica, potete tenere lo spazzolino<br />
<strong>Sonicare</strong> sul caricabatterie quando non viene utilizzato. Una volta<br />
completamente carico, il caricabatterie assorbe una quantità minima di<br />
corrente dalla presa.<br />
Nota Sono necessarie almeno 24 ore per ricaricare completamente le batterie.<br />
Modalità d’uso dello spazzolino <strong>Sonicare</strong><br />
Istruzioni d’uso<br />
1 Bagnate le setole e applicate una piccola quantità di dentifricio.<br />
2 Appoggiate le setole contro i denti con una leggera angolazione<br />
rispetto alla gengiva.<br />
3 Premete il pulsante on/off per accendere lo spazzolino <strong>Sonicare</strong>.<br />
4 Per ottimizzare l’efficacia, esercitate solo una leggera pressione e<br />
lasciate che lo spazzolino lavori per voi senza dover spazzolare.<br />
5 Muovete delicatamente lo spazzolino avanti e indietro, in modo che<br />
le setole più lunghe raggiungano lo spazio interdentale. Procedete in<br />
questo modo per tutto il ciclo.<br />
Nota Per assicurare una corretta pulizia di tutti i denti, dividete la bocca in 4<br />
sezioni utilizzando la funzione Quadpacer (vedere capitolo “Caratteristiche”).<br />
6 Iniziate a pulire la sezione 1 (parte superiore esterna) per 30<br />
secondi prima di passare alla sezione successiva (parte superiore<br />
interna). Procedete quindi con la sezione 3 (parte inferiore esterna)<br />
e continuate per 30 secondi prima di passare alla sezione 4 (parte<br />
inferiore interna).<br />
7 Al termine del ciclo di pulizia, potete dedicare alcuni secondi alla<br />
superficie orizzontale dei denti e alle zone macchiate. Potete inoltre<br />
spazzolare la lingua con lo spazzolino acceso o spento, a seconda<br />
delle vostre preferenze.<br />
<strong>Sonicare</strong> può essere utilizzato su:<br />
--<br />
Apparecchi dentali (le testine si consumano più rapidamente)<br />
--<br />
Impianti odontoiatrici (otturazioni, corone, coperture)<br />
Modalità di utilizzo<br />
Lo spazzolino <strong>Sonicare</strong> avvia automaticamente la modalità di pulizia<br />
predefinita.<br />
1 Prima di accendere lo spazzolino, premete il pulsante della modalità<br />
per sceglierla.<br />
,,<br />
La modalità di pulizia prescelta si illumina.<br />
,,<br />
Una volta scelta la modalità, quest’ultima rimane attiva fino a quando<br />
non ne viene scelta un’altra.<br />
Nota Quando accendete lo spazzolino, non è possibile passare da una<br />
modalità all’altra.<br />
Sono disponibili le seguenti modalità di pulizia:
Italiano 43<br />
Pulizia<br />
Pulizia completa della bocca (2 minuti).<br />
Cura delle gengive<br />
Pulizia completa della bocca (2 minuti) più pulizia delicata delle zone più<br />
difficili e di quelle intorno alle gengive (1 minuto).<br />
Pulizia veloce<br />
Pulizia dei denti di breve durata (1 minuto).<br />
Denti sensibili<br />
Pulizia delicata per denti e gengive sensibili (2 minuti).<br />
Massaggio<br />
Stimolazione delicata delle gengive (2 minuti).<br />
Nota Quando <strong>Sonicare</strong> viene impiegato per studi clinici, è necessario<br />
selezionare la modalità pulizia predefinita da 2 minuti. Il manico deve essere<br />
completamente carico. Disattivate la funzione Easy-start. In caso di macchie<br />
persistenti, continuate per altri 30 secondi.<br />
Caratteristiche<br />
Easy-start<br />
Questo modello <strong>Sonicare</strong> è dotato della funzione Easy-start attivata.<br />
La funzione Easy-start aumenta leggermente la potenza per i primi 14 cicli<br />
di pulizia per agevolare la familiarizzazione con l’uso di <strong>Sonicare</strong>.<br />
Nota Ciascuna delle prime 14 sessioni deve durare almeno 1 minuto, affinché<br />
l’aumento graduale della potenza della funzione Easy-start possa essere<br />
attivato.<br />
Disattivazione/attivazione della funzione Easy-start<br />
1 Inserite la testina sul manico.<br />
2 Posizionate il manico sul caricabatterie collegato alla presa di<br />
corrente.<br />
--<br />
Per disattivare la funzione Easy-Start:<br />
Tenete premuto il pulsante on/off per 2 secondi. Verrà emesso 1 segnale<br />
acustico per indicare la disattivazione della funzione Easy-start.<br />
--<br />
Per attivare la funzione Easy-Start:<br />
Tenete premuto il pulsante on/off per 2 secondi. Verranno emessi 2 segnali<br />
acustici per indicare l’attivazione della funzione Easy-start.<br />
Nota si sconsiglia di utilizzare la funzione Easy-start dopo il periodo iniziale in<br />
quanto potrebbe ridurre l’efficacia dello spazzolino <strong>Sonicare</strong> nella rimozione<br />
della placca.<br />
Smartimer<br />
La funzione Smartimer spegne automaticamente lo spazzolino per indicare<br />
che il ciclo di pulizia è completo.<br />
I dentisti consigliano la pulizia dei denti almeno due volte al giorno per<br />
almeno 2 minuti.
44<br />
Italiano<br />
Quadpacer<br />
1<br />
3<br />
2<br />
4<br />
--<br />
La funzione Quadpacer è un timer a intervalli che emette un breve<br />
segnale acustico e interrompe il funzionamento per indicare di pulire<br />
le 4 sezioni della bocca. A seconda della modalità o del programma di<br />
pulizia selezionato, la funzione Quadpacer emette un segnale acustico a<br />
intervalli differenti durante il ciclo di pulizia (vedere la sezione “Modalità<br />
di utilizzo” all’interno del capitolo “Modalità d’uso dello spazzolino<br />
<strong>Sonicare</strong>”).<br />
La funzione Quadpacer per questo modello è stata attivata. Per attivare/<br />
disattivare la funzione Quadpacer:<br />
1 Posizionate l’impugnatura con la testina collegata nel caricabatterie<br />
collegato alla presa di corrente.<br />
2 Tenete premuto il pulsante modalità per 2 secondi.<br />
,,<br />
Viene emesso 1 segnale acustico ad indicare che la funzione<br />
Quadpacer è stata disattivata, oppure 2 segnali acustici ad indicare<br />
che è stata attiva.<br />
Avvolgicavo per il caricabatterie deluxe (solo alcuni modelli)<br />
Se il modello acquistato è dotato di coperchio e base del caricabatterie<br />
deluxe, il caricabatterie da viaggio è preinstallato all’interno del coperchio.<br />
Se desiderate accorciare il cavo di alimentazione, potete riporre il cavo in<br />
eccesso nell’avvolgicavo integrato nella base.<br />
1 Per separare il coperchio dalla base del caricabatterie, premete<br />
le due barre a scatto grigie poste sulla base del caricabatterie e<br />
spingete il coperchio bianco verso l’alto.<br />
2 Avvolgete il cavo in eccesso intorno alla base grigia come illustrato<br />
nell’immagine. Assicuratevi che il cavo sia avvolto all’interno delle due<br />
leve a scatto.<br />
3 Dopo aver riposto il cavo in eccesso, fate scorrete il cavo di<br />
alimentazione lungo la piccola scanalatura sul retro della base grigia.<br />
4 Riposizionate il coperchio del caricabatterie, esercitando pressione<br />
sulla base finché non scatta in posizione.<br />
Consiglio Per la massima praticità durante gli spostamenti, potete rimuovere il<br />
caricabatterie da viaggio e utilizzarlo senza il coperchio e la base.
Italiano 45<br />
Avvolgicavo dell’igienizzatore con caricabatterie integrato<br />
(solo alcuni modelli)<br />
--<br />
Se il modello acquistato comprende l’igienizzatore, potete riporre il<br />
cavo in eccesso utilizzando la funzione avvolgicavo integrata nella base<br />
dell’igienizzatore.<br />
Igienizzazione (solo alcuni modelli)<br />
--<br />
Grazie all’igienizzatore UV, potete pulire la testina dopo ogni utilizzo.<br />
Non utilizzate l’igienizzatore se la lampadina a raggi UV rimane accesa<br />
quando lo sportello è aperto o se la finestrella blu è rotta o mancante<br />
all’interno dell’igienizzatore. I raggi UV potrebbero essere nocivi per gli<br />
occhi e la pelle. Tenete l’igienizzatore lontano dalla portata dei bambini.<br />
Scollegate l’igienizzatore e rivolgetevi a centro assistenza clienti<br />
se l’igienizzatore emette fumo o odore di bruciato durante il<br />
funzionamento.<br />
1 Dopo un ciclo di pulizia, sciacquate la testina ed eliminate l’acqua in<br />
eccesso.<br />
Non posizionate il cappuccio da viaggio sulla testina durante<br />
l’igienizzazione.<br />
2 Inserite un dito nell’apertura dello sportello sulla parte superiore<br />
dell’igienizzatore, quindi aprite lo sportello stesso.<br />
3 Posizionate le testine su una dei 2 ganci dell’igienizzatore.<br />
--<br />
Assicuratevi che le setole della testina siano in corrispondenza della<br />
lampadina.<br />
Nota l’igienizzatore può essere utilizzato solo con testine <strong>Sonicare</strong> ProResults.<br />
4 Verificate che l’igienizzatore sia collegato alla presa di corrente.<br />
5 Chiudete lo sportello e premete una volta il pulsante on/off verde<br />
per selezionare il ciclo di pulizia UV.<br />
Nota Potete accendere l’igienizzatore solo quando lo sportello è ben chiuso.<br />
Nota L’igienizzatore si arresta quando viene aperto lo sportello durante il ciclo<br />
di igienizzazione.<br />
Nota il ciclo di igienizzazione dura 10 minuti, trascorsi i quali l’igienizzatore si<br />
spegne automaticamente.<br />
,,<br />
L’igienizzatore è in funzione quando la luce blu è visibile attraverso la<br />
finestrella.
46<br />
Italiano<br />
,,<br />
Una volta concluso il ciclo di igienizzazione, l’igienizzatore si spegne<br />
automaticamente.<br />
Pulizia<br />
Non pulite la testina, l’impugnatura, il caricabatterie da viaggio, il<br />
coperchio del caricabatterie e l’igienizzatore UV in lavastoviglie.<br />
Impugnatura dello spazzolino<br />
1 Rimuovete la testina e sciacquate le parte metallica con acqua calda.<br />
Non utilizzate oggetti appuntiti sulla guarnizione in gomma intorno alla<br />
parte metallica onde evitare danneggiamenti.<br />
2 Passate un panno morbido sull’intera superficie del manico.<br />
Testina<br />
1 Risciacquate la testina e le setole dopo l’uso.<br />
2 Rimuovete la testina dall’impugnatura e sciacquate in acqua calda<br />
l’attacco della testina almeno una volta a settimana.<br />
Caricabatterie<br />
1 Scollegate il caricabatterie dalla presa di corrente.<br />
2 Passate un panno morbido sull’intera superficie del caricabatterie.<br />
Igienizzatore (solo alcuni modelli)<br />
Non pulite l’igienizzatore quando la lampadina UV è incandescente.<br />
Per la massima efficacia, si consiglia di pulire l’igienizzatore ogni settimana.<br />
1 Scollegate l’igienizzatore dalla presa di corrente.<br />
2 Estraete il vassoio antigoccia. Sciacquatelo e pulitelo con un panno<br />
umido.<br />
3 Pulite tutte le superfici del riflettore con un panno morbido.
Italiano 47<br />
4 Rimuovete lo schermo protettivo posto dinanzi alla lampadina UV.<br />
Per rimuovere lo schermo protettivo, afferrate le estremità vicino ai ganci,<br />
premetele delicatamente e tirate.<br />
5 Rimuovete la lampadina UV.<br />
Per rimuovere la lampadina, afferratela e estraetela dal gancio metallico.<br />
6 Pulite lo schermo protettivo e la lampadina UV con un panno<br />
morbido.<br />
7 Reinserite la lampadina UV.<br />
Per reinserire la lampadina, allineate la base della lampadina con il gancio<br />
metallico, quindi esercitare pressione per inserirla nel gancio.<br />
8 Reinserite lo schermo protettivo.<br />
Per reinserire lo schermo protettivo, allineate i fermi su quest’ultimo con le<br />
fessure sulla superficie riflettente in prossimità della lampadina UV. Premete<br />
lo schermo direttamente all’interno delle fessure dell’igienizzatore.<br />
Conservazione<br />
--<br />
Se pensate di non utilizzare l’apparecchio per un lungo periodo,<br />
rimuovete il cavo di alimentazione dalla presa di corrente. Pulite<br />
l’apparecchio e riponetelo in un luogo fresco e asciutto lontano<br />
dai raggi diretti del sole. Potete utilizzare l’avvolgicavo per riporre<br />
facilmente il cavo.<br />
Sostituzione<br />
Testina<br />
--<br />
Per ottenere risultati ottimali, sostituite la testina del <strong>Sonicare</strong> ogni 3<br />
mesi.<br />
--<br />
Utilizzate solo testine <strong>Sonicare</strong> ProResults originali.<br />
Lampadina a raggi UV<br />
--<br />
Potete ordinare le lampadine a raggi UV di ricambio presso il Centro<br />
Assistenza Clienti del vostro paese o presso un centro autorizzato<br />
<strong>Philips</strong>.<br />
Tutela dell’ambiente<br />
--<br />
La batteria ricaricabile integrata contiene sostanze potenzialmente<br />
nocive per l’ambiente. Rimuovete sempre la batteria prima di smaltire<br />
l’apparecchio e consegnarlo a un centro di raccolta ufficiale. Smaltite la<br />
batteria in un apposito centro di raccolta. In caso di difficoltà durante<br />
la rimozione della batteria, consegnate l’apparecchio a un centro di<br />
assistenza <strong>Philips</strong>, che si occuperà della rimozione della batteria e dello<br />
smaltimento dell’apparecchio.
48<br />
Italiano<br />
--<br />
Per contribuire alla tutela dell’ambiente, non smaltite l’apparecchio o<br />
la lampadina a raggi UV (che contiene mercurio) con i normali rifiuti<br />
domestici, ma consegnateli a un centro di raccolta autorizzato per il<br />
riciclaggio. In tal modo, potrete contribuire a mantenere l’ambiente<br />
pulito.<br />
Rimozione della batteria ricaricabile<br />
Ricordate che questo processo non è reversibile.<br />
Per togliere le batterie ricaricabili, utilizzate un normale cacciavite a testa<br />
piatta.<br />
1 Per scaricare completamente la batteria ricaricabile, rimuovete la<br />
base dal caricabatterie, accendete lo spazzolino <strong>Sonicare</strong> e lasciatelo<br />
in funzione fino all’arresto. Ripetete questo passaggio finché lo<br />
spazzolino <strong>Sonicare</strong> non si accende più.<br />
2 Inserite un cacciavite a testa piatta (standard) nella scanalatura sulla<br />
base dell’impugnatura. Ruotate il cacciavite in senso antiorario per<br />
rilasciare il cappuccio inferiore.<br />
3 Tenete l’impugnatura al contrario e premete la parte metallica per<br />
rilasciare i componenti interni.<br />
4 Inserite il cacciavite sotto il circuito stampato, accanto ai<br />
collegamenti della batteria, e ruotate il cacciavite per rompere i<br />
collegamenti. Rimuovete il circuito stampato ed estraete la batteria<br />
dal supporto in plastica.<br />
Garanzia e assistenza<br />
Per informazioni e in caso di problemi, visitate il sito Web <strong>Philips</strong> all’indirizzo<br />
www.philips.com oppure contattate il Centro Assistenza Clienti <strong>Philips</strong> del<br />
vostro paese (per conoscere il numero di telefono, consultate l’opuscolo<br />
della garanzia). Se nel vostro paese non esiste un Centro Assistenza Clienti,<br />
rivolgetevi al vostro rivenditore <strong>Philips</strong>.<br />
Limitazioni della garanzia<br />
I seguenti componenti sono esclusi dalla garanzia internazionale:<br />
--<br />
Testine
Italiano 49<br />
--<br />
I danni dovuti a un uso improprio, abuso, trascuratezza o alterazioni.<br />
--<br />
La normale usura, incluso scheggiature, graffi, abrasioni, scoloritura o<br />
alterazione dei colori.<br />
--<br />
Lampadina a raggi UV<br />
Domande frequenti<br />
Nella presente sezione sono riportate le domande più frequenti relative<br />
all’apparecchio. Se non riuscite a trovare una risposta esaustiva alla vostra<br />
domanda, rivolgetevi al Centro Assistenza Clienti del vostro paese.<br />
Domanda<br />
Perché lo spazzolino <strong>Sonicare</strong><br />
non funziona?<br />
Perché quando uso lo spazzolino<br />
<strong>Sonicare</strong> avverto una sensazione<br />
di solletico?<br />
Perché si verifica una breve<br />
pausa nel movimento delle<br />
setole durante la pulizia?<br />
La testina sbatte contro i<br />
denti. Come posso risolvere il<br />
problema?<br />
Perché lo spazzolino mi sembra<br />
meno potente del solito?<br />
Perché il pulsante modalità non<br />
funziona durante la pulizia?<br />
Perché la spia dell’igienizzatore<br />
UV non si accende?<br />
Risposta<br />
Potrebbe essere necessario ricaricare lo spazzolino <strong>Sonicare</strong>.<br />
Ricaricatelo per almeno 24 ore.<br />
La presa potrebbe non funzionare. Spesso l’erogazione di corrente<br />
dalle prese dei mobiletti a specchio sopra i lavandini, o da quelle per<br />
i rasoi nei bagni viene interrotta quando si spegne la luce.<br />
Provate a inserire nuovamente o a sostituire la testina.<br />
Le prime volte che utilizzate lo spazzolino <strong>Sonicare</strong> potreste<br />
avvertire una leggera sensazione di fastidio/solletico. Man mano<br />
che vi abituate al nuovo spazzolino, questa sensazione tenderà a<br />
diminuire.<br />
Si tratta della funzione Quadpacer che avvisa di passare ad un’altra<br />
sezione della bocca. Questa opzione consente di passare lo stesso<br />
tempo nella pulizia di tutte le zone della bocca (vedere il capitolo<br />
“Modalità d’uso dello spazzolino <strong>Sonicare</strong>”, sezione “Istruzioni<br />
d’uso”).<br />
Per evitare questo problema, tenete la testina nella corretta<br />
inclinazione con le setole posizionate sul bordo gengivale.<br />
Potrebbe essere necessario ricaricare lo spazzolino <strong>Sonicare</strong>.<br />
Potrebbe essere attiva la funzione Easy-start. Disattivarla (vedere<br />
capitolo “Caratteristiche”).<br />
Potrebbe essere necessario sostituire la testina.<br />
Le modalità di pulizia devono essere selezionate prima di accendere<br />
lo spazzolino <strong>Sonicare</strong>.<br />
Collegare l’igienizzatore ad una presa di corrente funzionante.<br />
Potrebbe essere necessario chiudere lo sportello dell’igienizzatore.<br />
È possibile che la lampadina a raggi UV debba essere sostituita<br />
(vedere il capitolo “Sostituzione”).
50<br />
Italiano<br />
Domanda<br />
Devo utilizzare un caricabatterie<br />
speciale per lo spazzolino<br />
<strong>Sonicare</strong> durante gli spostamenti?<br />
Risposta<br />
Il caricabatterie da viaggio, il caricabatterie deluxe e l’igienizzatore<br />
possono essere utilizzati ovunque sia disponibile una tensione<br />
compresa tra 100-240 V CA, a 50 o 60 Hz. È sufficiente utilizzare un<br />
adattatore.<br />
Consiglio durante i viaggi: la batteria dello spazzolino <strong>Sonicare</strong> è stata<br />
progettata per durare fino a 3 settimane tra una carica e l’altra.
Nederlands<br />
51<br />
Inleiding<br />
Gefeliciteerd met uw aankoop en welkom bij <strong>Philips</strong>! Als u volledig wilt<br />
profiteren van de ondersteuning die <strong>Philips</strong> biedt, registreer uw product<br />
dan op www.philips.com/welcome.<br />
Belangrijk<br />
Lees deze gebruiksaanwijzing zorgvuldig door voordat u het apparaat gaat<br />
gebruiken. Bewaar de gebruiksaanwijzing om deze indien nodig te kunnen<br />
raadplegen.<br />
Gevaar<br />
--<br />
Houd de oplader en/of de UV-reiniger uit de buurt van water. Plaats<br />
of bewaar deze niet in de buurt van of boven een bad, wasbak,<br />
gootsteen enz. Dompel de oplader en/of de UV-reiniger nooit in water<br />
of een andere vloeistof. Zorg ervoor dat de oplader en/of de UVreiniger<br />
na het schoonmaken helemaal droog is voordat u deze op het<br />
stopcontact aansluit.<br />
Waarschuwing<br />
--<br />
Het netsnoer kan niet worden vervangen. Dank de oplader en/of de<br />
UV-reiniger af als het netsnoer beschadigd is.<br />
--<br />
Zorg er voor dat u de oplader en/of UV-reiniger vervangt door een<br />
oplader en/of UV-reiniger van het oorspronkelijke type om gevaar te<br />
voorkomen.<br />
--<br />
Gebruik de oplader niet buitenshuis of in de buurt van hete<br />
oppervlakken.<br />
--<br />
Gebruik het apparaat niet langer als het op enige wijze beschadigd<br />
is (opzetborstel, handvat van de tandenborstel, oplader en/of UVreiniger).<br />
Dit apparaat bevat geen onderdelen die door de gebruiker<br />
kunnen worden gerepareerd. Als het apparaat beschadigd is, neem dan<br />
contact op met het Consumer Care Centre in uw land (zie hoofdstuk<br />
‘Garantie & service’).<br />
--<br />
Dit apparaat is niet bedoeld voor gebruik door personen (waaronder<br />
kinderen) met verminderde lichamelijke, zintuiglijke of geestelijke<br />
vermogens, of die gebrek aan ervaring of kennis hebben, tenzij iemand<br />
die verantwoordelijk is voor hun veiligheid toezicht op hen houdt of<br />
hen heeft uitgelegd hoe het apparaat dient te worden gebruikt.<br />
--<br />
Houd toezicht op kinderen om te voorkomen dat ze met het apparaat<br />
gaan spelen.<br />
--<br />
Gebruik de UV-reiniger niet meer als de UV-lamp blijft branden als het<br />
deurtje open staat. UV-licht kan schade aan ogen en huid veroorzaken.<br />
Houd de UV-reiniger altijd buiten het bereik van kinderen.<br />
Let op<br />
--<br />
Maak de opzetborstel, het handvat, de oplader, de opladerkap en/of de<br />
UV-reiniger niet schoon in de vaatwasmachine.<br />
--<br />
Raadpleeg uw tandarts voordat u de tandenborstel gebruikt als u in de<br />
afgelopen 2 maanden een chirurgische behandeling aan uw mond of<br />
uw tandvlees hebt ondergaan.<br />
--<br />
Neem contact op met uw tandarts als er na het gebruik van deze<br />
tandenborstel ernstige tandvleesbloeding optreedt of als het tandvlees<br />
nog steeds gaat bloeden nadat u het apparaat 1 week hebt gebruikt.
52<br />
Nederlands<br />
--<br />
De <strong>Sonicare</strong>-tandenborstel voldoet aan de veiligheidseisen voor<br />
elektromagnetische apparaten. Als u een pacemaker of ander<br />
geïmplanteerd apparaat hebt, neem dan contact op met uw arts of de<br />
fabrikant van het geïmplanteerde apparaat voor u de tandenborstel<br />
gaat gebruiken.<br />
--<br />
Raadpleeg uw arts voordat u de <strong>Sonicare</strong> gebruikt als u medische<br />
klachten hebt.<br />
--<br />
Dit apparaat is alleen bedoeld voor het reinigen van tanden, tandvlees<br />
en de tong. Gebruik het niet voor andere doeleinden. Gebruik het<br />
apparaat niet langer en neem contact op met uw arts als u pijn of<br />
ongemak ondervindt tijdens gebruik van het apparaat.<br />
--<br />
De <strong>Sonicare</strong>-tandenborstel is bedoeld voor thuisgebruik en is niet<br />
bedoeld om door meerdere personen te worden gebruikt in een<br />
tandartsenpraktijk of een instelling.<br />
--<br />
Gebruik de opzetborstel niet langer als de borstelharen verbogen of<br />
geknakt zijn. Vervang de opzetborstel om de 3 maanden of eerder<br />
indien er tekenen van slijtage optreden.<br />
--<br />
Gebruik dit apparaat uitsluitend met de door de fabrikant aanbevolen<br />
opzetborstels.<br />
--<br />
Als uw tandpasta peroxide dan wel zuiveringszout of<br />
natriumbicarbonaat bevat (veelvoorkomend in witmakende<br />
tandpasta’s) moet u de opzetborstel na ieder gebruik grondig<br />
schoonmaken met zeep en water. Hiermee voorkomt u dat er barsten<br />
in het plastic ontstaan.<br />
--<br />
Tijdens de UV-reinigingscyclus en direct erna is de UV-lamp heet. Raak<br />
de UV-lamp niet aan als deze heet is.<br />
--<br />
Gebruik de UV-reiniger niet zonder het afdekscherm. Zo voorkomt u<br />
contact met een hete lamp.<br />
Elektromagnetische velden (EMV)<br />
Dit <strong>Philips</strong>-apparaat voldoet aan alle richtlijnen met betrekking tot<br />
elektromagnetische velden (EMV). Mits het apparaat op de juiste wijze<br />
en volgens de instructies in deze gebruiksaanwijzing wordt gebruikt, is het<br />
veilig te gebruiken volgens het nu beschikbare wetenschappelijke bewijs.<br />
Algemene beschrijving (fig. 1)<br />
A Hygiënisch beschermkapje<br />
B Opzetborstel<br />
C Verwisselbare ring met kleurcode<br />
D Handvat met zacht greepgedeelte<br />
E Aan/uitknop<br />
F Modusknop<br />
G Poetsmodi<br />
H Luxe oplaadmeter<br />
I UV-reinigervoet met ingebouwde oplader en snoerwikkelaar (alleen<br />
bepaalde typen)<br />
J UV-reiniger (alleen bepaalde typen)<br />
K Luxe oplader (alleen bepaalde typen)<br />
L Opladerkap met opzetborstelhouder<br />
M Reisoplader<br />
N Opladervoet met snoerwikkelaar<br />
--<br />
Niet afgebeeld: UV-lamp
Nederlands 53<br />
--<br />
Niet afgebeeld: lekbakje voor UV-reiniger<br />
--<br />
Niet afgebeeld: afdekscherm voor UV-lamp<br />
Klaarmaken voor gebruik<br />
De ring met kleurcode vervangen<br />
<strong>Sonicare</strong>-opzetborstels worden geleverd met verwisselbare ringen met<br />
kleurcodes waarmee u uw eigen opzetborstel herkenbaar kunt maken.<br />
Een ring met kleurcode vervangen:<br />
1 Verwijder de ring met kleurcode van de onderkant van de<br />
opzetborstel.<br />
2 Plaats een nieuwe ring door één kant van de nieuwe ring over de<br />
onderkant van de opzetborstel te schuiven.<br />
De opzetborstel bevestigen<br />
1 Plaats de opzetborstel zo op het handvat dat de borstelharen naar<br />
de voorzijde van het handvat wijzen.<br />
2 Druk de opzetborstel op de metalen aandrijfas tot deze niet verder<br />
kan.<br />
Opmerking: Er zit een kleine opening tussen de ring met kleurcode en het<br />
handvat.<br />
De <strong>Sonicare</strong> opladen<br />
1 Steek de stekker van de oplader of UV-reiniger in het stopcontact.<br />
2 Plaats het handvat op de oplader of de UV-reiniger.<br />
,,<br />
Het knipperende lampje van de oplaadmeter geeft aan dat de<br />
tandenborstel wordt opgeladen.<br />
--<br />
Als 1 lampje groen brandt, is de tandenborstel voor 34-66% opgeladen.<br />
--<br />
Als 2 lampjes groen branden, is de tandenborstel voor 67-94%<br />
opgeladen.<br />
--<br />
Als 3 lampjes groen branden, is de tandenborstel volledig opgeladen.<br />
Opmerking: Als de accu van uw <strong>Sonicare</strong> bijna leeg is, hoort u 3 piepjes en<br />
knippert er na de poetsbeurt 1 lampje van de oplaadmeter geel gedurende 30<br />
seconden.
54<br />
Nederlands<br />
1<br />
3<br />
2<br />
4<br />
Opmerking: Om de accu altijd volledig opgeladen te houden, kunt u uw<br />
<strong>Sonicare</strong> op de oplader plaatsen wanneer u deze niet gebruikt. Als de <strong>Sonicare</strong><br />
volledig is opgeladen, gebruikt de oplader een minimale hoeveelheid netstroom.<br />
Opmerking: Het duurt minimaal 24 uur om de accu volledig op te laden.<br />
De <strong>Sonicare</strong> gebruiken<br />
Poetsinstructies<br />
1 Maak de borstelharen nat en doe er een kleine hoeveelheid<br />
tandpasta op.<br />
2 Plaats de borstelharen van de tandenborstel onder een lichte hoek<br />
richting tandvleesrand tegen de tanden.<br />
3 Druk op de aan/uitknop om de <strong>Sonicare</strong> in te schakelen.<br />
4 U krijgt de beste poetsresultaten met de <strong>Sonicare</strong> als u slechts lichte<br />
druk uitoefent en niet schrobt. Laat de <strong>Sonicare</strong> het werk doen.<br />
5 Beweeg de opzetborstel langzaam kleine stukjes heen en weer over<br />
de tanden zodat de langere haren tussen de tanden komen. Ga de<br />
volledige poetsbeurt zo door.<br />
Opmerking: Om ervoor te zorgen dat u overal even goed poetst, moet u uw<br />
mond in 4 kwadranten verdelen en de Quadpacer gebruiken (zie hoofdstuk<br />
‘Functies’).<br />
6 Begin te poetsen in kwadrant 1 (de buitenkant van de boventanden)<br />
en ga daar 30 seconden mee door voordat u verdergaat met<br />
kwadrant 2 (de binnenkant van de boventanden). Poets vervolgens<br />
kwadrant 3 (de buitenkant van de ondertanden) gedurende 30<br />
seconden voordat u verdergaat met kwadrant 4 (de binnenkant van<br />
de ondertanden).<br />
7 Nadat u de poetsbeurt hebt voltooid, kunt u nog wat extra tijd<br />
besteden aan het poetsen van de kauwvlakken van uw kiezen en<br />
plaatsen waar vlekken voorkomen. U kunt ook uw tong poetsen met<br />
de tandenborstel in- of uitgeschakeld, afhankelijk van uw voorkeur.<br />
De <strong>Sonicare</strong> is veilig te gebruiken op:<br />
--<br />
Beugels (opzetborstels slijten sneller als deze voor een gebit met een<br />
beugel worden gebruikt)<br />
--<br />
Tandheelkundige restauraties (vullingen, kronen, facings)<br />
Poetsmodi<br />
De <strong>Sonicare</strong> start automatisch in de standaard Clean-modus.<br />
1 Druk voordat u de <strong>Sonicare</strong> inschakelt op de modusknop om tussen<br />
de modi te schakelen.<br />
,,<br />
De gekozen poetsmodus licht op.<br />
,,<br />
Wanneer u een poetsmodus hebt gekozen, blijft deze actief totdat u<br />
een andere poetsmodus kiest.<br />
Opmerking: Wanneer de tandenborstel is ingeschakeld, kunt u niet tussen de<br />
modi schakelen.<br />
De volgende poetsmodi zijn beschikbaar:
Nederlands 55<br />
Clean<br />
Volledige mondreiniging (2 minuten).<br />
Gum Care<br />
Volledige mondreiniging (2 minuten) plus zachte reiniging voor<br />
probleemgebieden en langs het tandvlees (1 minuut).<br />
Refresh<br />
Snelle reiniging (1 minuut).<br />
Sensitive<br />
Zachte reiniging van gevoelig tandvlees en gevoelige tanden (2 minuten).<br />
Massage<br />
Zachte tandvleesstimulatie (2 minuten).<br />
Opmerking: Wanneer de <strong>Sonicare</strong> wordt gebruikt voor klinisch onderzoek, moet<br />
de standaard Clean-modus van 2 minuten worden gekozen. Het handvat moet<br />
volledig zijn opgeladen. De Easy-start-functie moet worden uitgeschakeld. Op<br />
plekken waar de tanden veel vlekken vertonen, kunt u 30 seconden extra<br />
poetsen om deze te verwijderen.<br />
Functies<br />
Easy-start<br />
Bij dit <strong>Sonicare</strong>-type is de Easy-start-functie standaard ingeschakeld.<br />
Tijdens de eerste 14 poetsbeurten voert de Easy-start-functie de<br />
poetskracht geleidelijk op om u te laten wennen aan het poetsen met de<br />
<strong>Sonicare</strong>.<br />
Opmerking: De eerste 14 poetsbeurten moeten allemaal minimaal 1 minuut<br />
duren om de Easy-start-functie goed te laten werken.<br />
Easy-start uitschakelen of inschakelen<br />
1 Bevestig de opzetborstel op het handvat.<br />
2 Plaats het handvat op de op netspanning aangesloten oplader.<br />
--<br />
Easy-start uitschakelen:<br />
Houd de aan/uitknop 2 seconden ingedrukt. U hoort 1 piepje dat aangeeft<br />
dat de Easy-start-functie is uitgeschakeld.<br />
--<br />
Easy-start inschakelen:<br />
Houd de aan/uitknop 2 seconden ingedrukt. U hoort 2 piepjes die<br />
aangeven dat de Easy-start-functie is ingeschakeld.<br />
Opmerking: Gebruik van de Easy-start-functie na de eerste gewenningsperiode<br />
wordt afgeraden, omdat de <strong>Sonicare</strong> hierdoor minder effectief plak zal<br />
verwijderen.<br />
Smartimer<br />
De Smartimer geeft aan dat de poetsbeurt is voltooid door de<br />
tandenborstel aan het eind van de poetsbeurt automatisch uit te schakelen.<br />
Tandartsen raden aan om twee keer per dag minimaal 2 minuten te<br />
poetsen.
56<br />
Nederlands<br />
Quadpacer<br />
1<br />
3<br />
2<br />
4<br />
--<br />
De Quadpacer is een timer die een kort piepje laat horen en voor een<br />
korte onderbreking van de poetsbeurt zorgt om u eraan te herinneren<br />
elk van de 4 kwadranten in uw mond te poetsen. Afhankelijk van de<br />
gekozen poetsmodus, laat de Quadpacer tijdens de poetsbeurt na een<br />
bepaald aantal seconden een piepje horen. Zie ‘Poetsmodi’ in hoofdstuk<br />
‘De <strong>Sonicare</strong> gebruiken’.<br />
Op dit type is de Quadpacer ingeschakeld. Om de Quadpacer uit of in te<br />
schakelen:<br />
1 Plaats het handvat met daarop een opzetborstel in de op netspanning<br />
aangesloten oplader.<br />
2 Houd de modusknop 2 seconden ingedrukt.<br />
,,<br />
U hoort 1 piepje dat aangeeft dat de Quadpacer is uitgeschakeld of u<br />
hoort 2 piepjes die aangeven dat de Quadpacer is ingeschakeld.<br />
Snoerwikkelaar van luxe oplader (alleen bepaalde typen)<br />
Als uw type tandenborstel is voorzien van een luxe oplader met kap<br />
en voet, bevindt de reisoplader zich onder de kap. Als u het netsnoer<br />
wilt inkorten, kunt u het overtollige snoer opbergen op de ingebouwde<br />
snoerwikkelaar in de opladervoet.<br />
1 Om de kap van de opladervoet te verwijderen, drukt u op de twee<br />
grijze kliksluitingen op de opladervoet en trekt u de witte kap van de<br />
oplader omhoog.<br />
2 Wikkel het overtollige netsnoer om de grijze opladervoet, zoals<br />
op het plaatje is aangegeven. Zorg dat u het snoer binnen de twee<br />
kliksluitingen wikkelt.<br />
3 Nadat u het overtollige snoer hebt opgeborgen, leidt u het netsnoer<br />
door de kleine inkeping aan de achterkant van de grijze opladervoet.<br />
4 Plaats de kap weer op de opladervoet door hem erop te drukken tot<br />
hij vastklikt.<br />
Tip Voor extra gemak op reis kunt u de reisoplader verwijderen en deze zonder<br />
opladerkap en opladervoet gebruiken.
Nederlands 57<br />
Snoerwikkelaar van UV-reiniger met ingebouwde oplader<br />
(alleen bepaalde typen)<br />
--<br />
Als uw type tandenborstel wordt geleverd met een UV-reiniger, dan<br />
kunt u het overtollige netsnoer om de snoerwikkelaar in het onderste<br />
deel van de UV-reiniger wikkelen.<br />
UV-reinigen (alleen bepaalde typen)<br />
--<br />
Met de UV-reiniger kunt u uw opzetborstel na elke poetsbeurt<br />
reinigen.<br />
Gebruik de UV-reiniger niet meer als de UV-lamp blijft branden wanneer<br />
het deurtje open staat of als het blauwe venster van de UV-reiniger<br />
is beschadigd of ontbreekt. UV-licht kan schade aan ogen en huid<br />
veroorzaken. Houd dit apparaat altijd buiten het bereik van kinderen.<br />
Haal de stekker van de UV-reiniger uit het stopcontact en neem contact<br />
op met Consumer Care als er rook uit de UV-reiniger komt of als de<br />
UV-reiniger een brandlucht verspreidt wanneer deze in werking is.<br />
1 Spoel de opzetborstel na het poetsen schoon en schud het<br />
overtollige water eraf.<br />
Plaats tijdens het UV-reinigen nooit het beschermkapje op de<br />
opzetborstel.<br />
2 Plaats uw vinger in de uitsparing van het deurtje aan de bovenkant<br />
van de UV-reiniger en trek het deurtje open.<br />
3 Plaats de opzetborstel op een van de 2 pinnen in de UV-reiniger.<br />
--<br />
Controleer of de borstelharen van de opzetborstel naar de lamp<br />
wijzen.<br />
Opmerking: Gebruik de UV-reiniger alleen voor het schoonmaken van <strong>Sonicare</strong><br />
ProResults-opzetborstels.<br />
4 Zorg ervoor dat de UV-reiniger is aangesloten op het stopcontact.<br />
5 Sluit het deurtje en druk één keer op de groene aan/uitknop om de<br />
UV-reinigingscyclus te selecteren.<br />
Opmerking: U kunt de UV-reiniger alleen inschakelen als het deurtje volledig is<br />
gesloten.<br />
Opmerking: De UV-reiniger stopt als u het deurtje tijdens de reinigingscyclus<br />
opent.<br />
Opmerking: De UV-reinigingscyclus duurt 10 minuten, waarna de UV-reiniger<br />
automatisch uitschakelt.
58<br />
Nederlands<br />
,,<br />
De UV-reiniger is in werking wanneer het blauwe licht door het<br />
venster schijnt.<br />
,,<br />
Wanneer de reinigingscyclus is voltooid, schakelt de UV-reiniger<br />
automatisch uit.<br />
Schoonmaken<br />
Reinig de opzetborstel, het handvat, de reisoplader, de opladerkap en de<br />
UV-reiniger niet in de vaatwasmachine.<br />
Handvat van tandenborstel<br />
1 Verwijder de opzetborstel en spoel de metalen aandrijfas af met<br />
warm water.<br />
Gebruik geen scherpe voorwerpen om op de rubberen afdichting op de<br />
metalen aandrijfas te duwen, omdat dit schade kan veroorzaken.<br />
2 Maak het gehele oppervlak van het handvat schoon met een vochtige<br />
doek.<br />
Opzetborstel<br />
1 Spoel de borstel en de borstelharen na iedere poetsbeurt onder de<br />
kraan af.<br />
2 Verwijder minimaal één keer per week de opzetborstel van het<br />
handvat en spoel het aansluitpunt van de borstel met warm water<br />
schoon.<br />
Oplader<br />
1 Haal de stekker van de oplader uit het stopcontact.<br />
2 Maak het oppervlak van de oplader schoon met een vochtige doek.<br />
UV-reiniger (alleen bepaalde typen)<br />
Maak de UV-reiniger nooit schoon wanneer de UV-lamp heet is.<br />
Voor een optimale werking van de UV-reiniger raden wij u aan deze<br />
wekelijks schoon te maken.<br />
1 Haal de stekker van de UV-reiniger uit het stopcontact.
Nederlands 59<br />
2 Trek de lekbak recht naar buiten. Spoel de lekbak af en veeg deze<br />
schoon met een vochtige doek.<br />
3 Maak alle reflectorvlakken schoon met een vochtige doek.<br />
4 Verwijder het afdekscherm dat zich voor de UV-lamp bevindt.<br />
U verwijdert het scherm door de randjes naast de vergrendelingen beet te<br />
pakken, zachtjes te knijpen en het scherm dan naar buiten te trekken.<br />
5 Verwijder de UV-lamp.<br />
Verwijder de lamp door deze vast te pakken en uit de metalen klem te<br />
trekken.<br />
6 Maak het afdekscherm en de UV-lamp schoon met een vochtige<br />
doek.<br />
7 Plaats de UV-lamp terug.<br />
Plaats de lamp terug door de onderkant op gelijke hoogte te houden met<br />
de metalen klem en de lamp in de klem te drukken.<br />
8 Plaats het afdekscherm terug.<br />
Om het afdekscherm terug te plaatsen, houdt u de pinnen van het scherm<br />
op gelijke hoogte met de openingen in het reflectievlak naast de UV-lamp.<br />
Duw het scherm recht in de openingen van de UV-reiniger.<br />
Opbergen<br />
--<br />
Gaat u het apparaat langere tijd niet gebruiken, haal dan de stekker<br />
uit het stopcontact. Maak het apparaat vervolgens schoon en bewaar<br />
het op een koele en droge plaats buiten direct zonlicht. U kunt de<br />
snoerwikkelaar gebruiken om het netsnoer netjes op te bergen.<br />
Vervangen<br />
Opzetborstel<br />
--<br />
Vervang de <strong>Sonicare</strong>-opzetborstels om de 3 maanden voor optimale<br />
resultaten.<br />
--<br />
Gebruik hiervoor alleen <strong>Sonicare</strong> ProResults-opzetborstels.<br />
UV-lamp<br />
--<br />
Nieuwe UV-lampen kunt u bestellen bij het Consumer Care Centre in<br />
uw land of bij een geautoriseerd <strong>Philips</strong>-servicecentrum.
60<br />
Nederlands<br />
Milieu<br />
--<br />
De ingebouwde accu bevat stoffen die schadelijk kunnen zijn voor<br />
het milieu. Verwijder altijd de accu voordat u het apparaat afdankt en<br />
inlevert op een door de overheid aangewezen inzamelpunt. Lever de<br />
accu in op een officieel inzamelpunt voor batterijen. Als u problemen<br />
ondervindt bij het verwijderen van de accu, kunt u met het apparaat<br />
ook naar een <strong>Philips</strong>-servicecentrum gaan. Medewerkers van dit<br />
centrum verwijderen dan de accu voor u en zorgen ervoor dat deze<br />
op milieuvriendelijke wijze wordt verwerkt.<br />
--<br />
Gooi het apparaat en de UV-lamp (de lamp bevat kwik) aan het einde<br />
van de levensduur niet weg met het normale huisvuil, maar lever<br />
ze in op een door de overheid aangewezen inzamelpunt om ze te<br />
laten recyclen. Op die manier levert u een bijdrage aan een schonere<br />
leefomgeving.<br />
De accu verwijderen<br />
U kunt de accu niet opnieuw in het apparaat plaatsen nadat u deze hebt<br />
verwijderd.<br />
Om de accu te kunnen verwijderen, hebt u een gewone platte<br />
schroevendraaier nodig.<br />
1 Om de accu volledig te ontladen, neemt u het handvat van de<br />
oplader af, schakelt u de <strong>Sonicare</strong> in en laat u deze werken tot deze<br />
vanzelf stopt. Herhaal deze stap totdat u de <strong>Sonicare</strong> niet meer kunt<br />
inschakelen.<br />
2 Steek een gewone platte schroevendraaier in de sleuf in de<br />
onderkant van het handvat. Draai de schroevendraaier linksom om<br />
het afdekplaatje aan de onderkant te verwijderen.<br />
3 Houd het handvat ondersteboven en duw het omlaag op de<br />
aandrijfas zodat de onderdelen in het handvat naar buiten komen.
Nederlands 61<br />
4 Steek de schroevendraaier onder de printplaat naast de<br />
accuaansluitingen en beweeg de schroevendraaier heen en weer om<br />
de aansluitingen af te breken. Verwijder de printplaat en wrik de accu<br />
los uit de plastic houder.<br />
Garantie & service<br />
Als u informatie nodig hebt of als u een probleem hebt, bezoek dan<br />
de <strong>Philips</strong>-website www.philips.nl, of neem contact op met het <strong>Philips</strong><br />
Consumer Care Centre in uw land (u vindt het telefoonnummer in het<br />
‘worldwide guarantee’-vouwblad). Als er geen Consumer Care Centre in<br />
uw land is, ga dan naar uw <strong>Philips</strong>-dealer.<br />
Garantiebeperkingen<br />
De volgende zaken vallen niet onder de voorwaarden van de internationale<br />
garantie:<br />
--<br />
Opzetborstels<br />
--<br />
Schade als gevolg van verkeerd gebruik, misbruik, verwaarlozing of<br />
wijzigingen<br />
--<br />
Gewone slijtage, inclusief kerfjes, krasjes, schuurplekken, verkleuring of<br />
verbleking<br />
--<br />
UV-lamp<br />
Veelgestelde vragen<br />
In dit hoofdstuk vindt u de meestgestelde vragen over het apparaat. Als u<br />
het antwoord op uw vraag niet kunt vinden, neem dan contact op met het<br />
Consumer Care Centre in uw land.<br />
Vraag<br />
Waarom werkt de <strong>Sonicare</strong>tandenborstel<br />
niet?<br />
Waarom kietelt het wanneer ik<br />
de <strong>Sonicare</strong> gebruik?<br />
Waarom is er een korte<br />
onderbreking in de<br />
borstelbeweging tijdens het<br />
poetsen?<br />
Antwoord<br />
Mogelijk moet de <strong>Sonicare</strong> worden opgeladen. Laad de <strong>Sonicare</strong><br />
minimaal 24 uur op.<br />
Mogelijk staat er geen stroom op het stopcontact. Het is mogelijk<br />
dat de stroomtoevoer naar stopcontacten in spiegelkastjes boven<br />
wastafels of naar stopcontacten voor scheerapparaten in badkamers<br />
wordt afgesloten wanneer het licht in de badkamer wordt uitgedaan.<br />
Mogelijk moet de opzetborstel opnieuw op het apparaat worden<br />
bevestigd of worden vervangen.<br />
De eerste paar keer dat u de <strong>Sonicare</strong> gebruikt, kunt u een licht<br />
kietelend of prikkelend gevoel ervaren. Dit gevoel verdwijnt<br />
wanneer u aan de <strong>Sonicare</strong> gewend bent geraakt.<br />
Dit is de Quadpacer-functie die u eraan herinnert om naar een<br />
volgend kwadrant van uw mond te gaan. Deze functie zorgt<br />
ervoor dat u evenveel poetstijd gebruikt voor elk kwadrant (zie<br />
‘Poetsinstructies’ in hoofdstuk ‘De <strong>Sonicare</strong> gebruiken’).
62<br />
Nederlands<br />
Vraag<br />
De borstel klappert tegen mijn<br />
tanden. Wat moet ik doen?<br />
Waarom lijkt de tandborstel<br />
minder krachtig te poetsen?<br />
Waarom werkt de modusknop<br />
niet tijdens het poetsen?<br />
Waarom gaat de UV-lamp van de<br />
UV-reiniger niet aan?<br />
Heb ik een speciale oplader<br />
nodig als ik mijn <strong>Sonicare</strong> wil<br />
meenemen op reis?<br />
Antwoord<br />
U kunt dit voorkomen door de borstel volgens de instructies<br />
vast te houden, d.w.z. met de borstelharen enigszins schuin op de<br />
tandvleesrand.<br />
Mogelijk moet de <strong>Sonicare</strong> worden opgeladen.<br />
Mogelijk is de Easy-start-functie ingeschakeld. Schakel de Easy-startfunctie<br />
uit (zie hoofdstuk ‘Functies’).<br />
Mogelijk moet de opzetborstel worden vervangen.<br />
De gewenste poetsmodus moet worden gekozen voordat u de<br />
<strong>Sonicare</strong> inschakelt.<br />
U moet de UV-reiniger mogelijk nog aansluiten op het stopcontact.<br />
Het deurtje van de UV-reiniger is mogelijk niet goed gesloten.<br />
Mogelijk moet de UV-lamp worden vervangen (zie hoofdstuk<br />
‘Vervangen’).<br />
De reisoplader, de luxe oplader en de UV-reiniger kunnen<br />
wereldwijd worden gebruikt bij voltages tussen 100V AC en<br />
240V AC en bij 50 of 60Hz. Alles wat u verder nodig hebt, is een<br />
eenvoudige stekkeradapter.<br />
Reistip: de accu van de <strong>Sonicare</strong> is ontworpen om maximaal 3<br />
weken mee te gaan tussen opeenvolgende laadbeurten.
63
www.philips.com/support<br />
©2009 Koninklijke <strong>Philips</strong> Electronics NV (KPENV).<br />
All rights reserved. PHILIPS and the <strong>Philips</strong> shield are<br />
registered trademarks of KPENV. Quadpacer, <strong>Sonicare</strong>,<br />
and the <strong>Sonicare</strong> logo are trademarks of<br />
<strong>Philips</strong> Oral Healthcare, Inc. and/or KPENV.<br />
Printed in the U.S.A.<br />
Printed on 100% recycled paper.<br />
Protected by U.S. and international patents.<br />
Other patents pending. Reg. U.S. Pat. & Tm. Off.<br />
4235.020.3302.1


