

Philips CarStudio Système audio pour voiture - Mode d’emploi - ENG
Philips CarStudio Système audio pour voiture - Mode d’emploi - ENG
Philips CarStudio Système audio pour voiture - Mode d’emploi - ENG

Create successful ePaper yourself
Turn your PDF publications into a flip-book with our unique Google optimized e-Paper software.
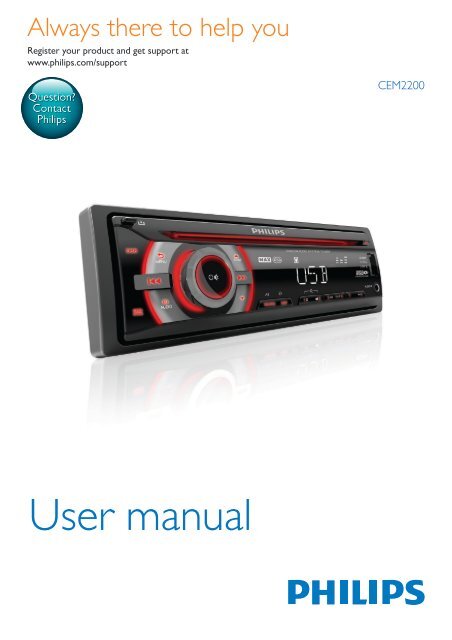
Always there to help you<br />
Register your product and get support at<br />
www.philips.com/support<br />
Question?<br />
Contact<br />
<strong>Philips</strong><br />
CEM2200<br />
User manual
Contents<br />
English<br />
1 Safety 2<br />
2 Your car <strong>audio</strong> system 2<br />
Introduction 2<br />
What's in the box 3<br />
Overview of the system 4<br />
3 Install the car <strong>audio</strong> system 6<br />
Connect wires 7<br />
Mount into the dashboard 8<br />
Attach the front panel 9<br />
4 Get started 10<br />
For the first ti<strong>me</strong> use 10<br />
Set the ti<strong>me</strong> format 10<br />
Set the clock 10<br />
Turn on 10<br />
Switch music listening zone 10<br />
Mute the button beep 10<br />
11 Others 17<br />
Reset 17<br />
Replace fuse 17<br />
12 Product information 18<br />
13 Troubleshooting 19<br />
14 Notice 20<br />
Compliance 20<br />
Care of the environ<strong>me</strong>nt 20<br />
Trademark notice 20<br />
Copyright 20<br />
5 Listen to radio 11<br />
Tune to a radio station 11<br />
Store radio stations in <strong>me</strong>mory 11<br />
Tune to a preset station 11<br />
Play with RDS 11<br />
6 Play from hard <strong>me</strong>dia 13<br />
Play a disc 13<br />
Play from a USB storage device 13<br />
7 Listen to an external player 15<br />
8 Charge your USB device 15<br />
9 Adjust sound 16<br />
10 Adjust system settings 16<br />
EN<br />
1
1 Safety<br />
Read and understand all instructions before<br />
you use your apparatus. If damage is caused by<br />
failure to follow instructions, the warranty does<br />
not apply.<br />
• This apparatus is designed for negative<br />
ground (earth) 12 V DC operation only.<br />
• To ensure safe driving, adjust the volu<strong>me</strong> to<br />
a safe and comfortable level.<br />
• Improper fuses can cause damage or<br />
fire. When you need to change the fuse,<br />
consult a professional.<br />
• Use only the supplied mounting hardware<br />
for a safe and secure installation.<br />
• To avoid short circuit, do not expose the<br />
apparatus to rain or water.<br />
• Never insert objects into the ventilation<br />
slots or other openings on the apparatus.<br />
• Clean the apparatus and fra<strong>me</strong> with a soft,<br />
damp cloth. Never use substances such as<br />
alcohol, chemicals or household cleaners<br />
on the apparatus.<br />
• Never place any objects other than discs<br />
into the apparatus.<br />
• Never use solvents such as benzene,<br />
thinner, cleaners available com<strong>me</strong>rcially, or<br />
anti-static sprays intended for discs.<br />
• Visible and invisible laser radiation when<br />
open. Avoid exposure to beam.<br />
Caution<br />
••<br />
Use of controls or adjust<strong>me</strong>nts or performance of<br />
procedures other than herein may result in hazardous<br />
laser exposure or other unsafe operation.<br />
• The apparatus shall not be exposed to<br />
dripping or splashing.<br />
• Do not place any sources of danger on the<br />
apparatus (e.g. liquid filled objects, lighted<br />
candles).<br />
2 Your car <strong>audio</strong><br />
system<br />
Congratulations on your purchase, and<br />
welco<strong>me</strong> to <strong>Philips</strong>! To fully benefit from the<br />
support that <strong>Philips</strong> offers, register your product<br />
at www.philips.com/welco<strong>me</strong>.<br />
Introduction<br />
With the in-car <strong>audio</strong> system, you can listen to<br />
• FM or AM (MW) radio,<br />
• Audio from a CD or MP3 disc,<br />
• Audio from a USB storage device, and<br />
• Audio from an external player.<br />
Playable <strong>me</strong>dia:<br />
• Disc<br />
• Audio CD, MP3-CD, WMA-CD<br />
• CD-R, CD-RW<br />
• USB storage device<br />
• Compatibility: USB 2.0, USB 1.1<br />
• Class support: MSC (Mass Storage<br />
Class)<br />
• Maximum capacity: 32 GB<br />
• Files<br />
• File system: FAT16, FAT32<br />
• Maximum number of folders: 99<br />
• Maximum number of tracks/files: 999<br />
• Maximum level of directory: 8<br />
• .mp3 files<br />
Sampling frequencies: 32 kHz, 44.1 kHz,<br />
48 kHz<br />
Bitrates: 8-320 kbps and variable<br />
bitrates<br />
• .wma files<br />
Versions: V4, V7, V8, V9 (L1 and L2)<br />
Sampling frequencies: 44.1 kHz, 48 kHz<br />
Bitrates: 64-192 kbps and variable<br />
bitrates<br />
• ID3 tag V2.0 or later<br />
2 EN
• Unsupported files:<br />
AAC, WAV, and PCM files<br />
DRM protected WMA files (.wav, .m4a,<br />
.m4p, .mp4, and .aac)<br />
WMA files in lossless format<br />
English<br />
What's in the box<br />
Check and identify the contents of your<br />
package:<br />
a b c<br />
d e f g<br />
a Main unit (with a sleeve)<br />
b Carrying case (with the front panel<br />
included)<br />
c Trim plate<br />
d Disassembly tool x 2<br />
e Rubber cushion<br />
f Screw x 1<br />
g User manual<br />
EN<br />
3
Overview of the system<br />
a<br />
b<br />
• Press to enable or disable the DBB<br />
(dynamic bass boost) sound effect.<br />
• Unlock the front panel.<br />
c<br />
d<br />
• Press to return to the previous <strong>me</strong>nu.<br />
• Press and hold to access the system<br />
<strong>me</strong>nu.<br />
• Press to turn on the system.<br />
• Press and hold to turn off the system.<br />
4 EN
e<br />
f<br />
g<br />
h<br />
i<br />
j<br />
k<br />
• Press to mute the speakers or release<br />
them from mute status.<br />
• Press to confirm an option.<br />
• Rotate to switch between <strong>me</strong>nu<br />
options.<br />
• Rotate to adjust the volu<strong>me</strong> level.<br />
• For .wma and .mp3 tracks, press to<br />
select the previous folder.<br />
• In radio mode, press to select a tuner<br />
band.<br />
• Press and hold to activate the selection<br />
of listening zones.<br />
• Eject the disc from the disc<br />
compart<strong>me</strong>nt.<br />
• Connect to a USB storage device.<br />
• Connect to the <strong>audio</strong> output socket<br />
(usually the headphone socket) of an<br />
external device.<br />
• Start, pause, or resu<strong>me</strong> the play of<br />
tracks.<br />
• In radio mode, press to select the<br />
preset radio station of No. 6.<br />
• In radio mode, press and hold to store<br />
the current radio station at channel<br />
No. 6.<br />
• In radio mode, press to select the<br />
preset radio station of No. 5.<br />
• In radio mode, press and hold to store<br />
the current radio station at channel<br />
No. 5.<br />
• In radio mode, press to select the<br />
preset radio station of No. 4.<br />
• In radio mode, press and hold to store<br />
the current radio station at channel<br />
No. 4.<br />
l<br />
m<br />
n<br />
• For .wma and .mp3 tracks, press<br />
repeatedly to select a play mode: play<br />
all tracks randomly ([SHU ALL]), play<br />
tracks in the current folder randomly<br />
([SHU FLD]), or play all tracks in the<br />
storage device in sequence ([SHU<br />
OFF]).<br />
• In radio mode, press to select the<br />
preset radio station of No. 3.<br />
• In radio mode, press and hold to store<br />
the current radio station at channel<br />
No. 3.<br />
• For .wma and .mp3 tracks, press<br />
repeatedly to select a repeat mode:<br />
repeat the current track ([REP ONE]),<br />
repeat all tracks in the current folder<br />
([RPT FLD]), or repeat all tracks in the<br />
storage device ([RPT ALL]).<br />
• In radio mode, press to select the<br />
preset radio station of No. 2.<br />
• In radio mode, press and hold to store<br />
the current radio station at channel<br />
No. 2.<br />
• For .wma and .mp3 tracks, press to<br />
access the folder list.<br />
• In radio mode, press to select the<br />
preset radio station of No. 1.<br />
• In radio mode, press and hold to store<br />
the current radio station at channel<br />
No. 1.<br />
• For .wma and .mp3 tracks, press to<br />
access the track list.<br />
o /<br />
• Press repeatedly to display available<br />
information about the current track.<br />
• Press repeatedly to display available<br />
RDS information.<br />
• Press and hold to display the set clock.<br />
p /<br />
• Press repeatedly to select a source.<br />
English<br />
EN<br />
5
q<br />
r<br />
s<br />
• In radio mode, press and hold to<br />
activate the automatic search of radio<br />
stations.<br />
• For .wma and .mp3 tracks, press to<br />
select the next folder.<br />
• In radio mode, press to select a tuner<br />
band.<br />
• Press repeatedly to select a preset<br />
sound equalizer.<br />
• Press and hold to activate the setup of<br />
bass, treble, balance, and fader.<br />
• Press to enable or disable the MAX<br />
Sound feature.<br />
t /<br />
• Tune to a radio station.<br />
• Press to skip to the previous or next<br />
track.<br />
• Press and hold to rewind a track or<br />
search fast forward.<br />
u<br />
• Press to reset the system to factory<br />
default settings.<br />
v Disc slot<br />
3 Install the car<br />
<strong>audio</strong> system<br />
Caution<br />
••<br />
Use the controls only as stated in this user manual.<br />
Always follow the instructions in this chapter in<br />
sequence.<br />
These instructions are for a typical installation.<br />
However, if your car has different require<strong>me</strong>nts,<br />
make the adjust<strong>me</strong>nt accordingly. If you have<br />
any question regarding installation kits, consult<br />
your local retailer.<br />
Note<br />
••<br />
This system is designed for negative ground (earth) 12V<br />
DC operation only.<br />
••<br />
Always install this system in the car dashboard. Other<br />
locations can be dangerous as the rear of the system heats<br />
up during use.<br />
••<br />
To avoid short-circuit: before you connect, make sure that<br />
the ignition is off.<br />
••<br />
Make sure that you connect the yellow and red power<br />
supply leads after all other leads are connected.<br />
••<br />
Make sure that all loose leads are insulated with electrical<br />
tape.<br />
••<br />
Make sure that the leads do not get caught under screws<br />
or iron parts that will move (e.g. seat rail).<br />
••<br />
Make sure that all ground (earth) leads are run to a<br />
common ground (earth) point.<br />
••<br />
Use only the supplied mounting hardware for a safe and<br />
secure installation.<br />
••<br />
Improper fuses can cause damage or fire. When you need<br />
to change the fuse, consult a professional.<br />
••<br />
When you connect other devices to this system, make<br />
sure that the rating of the car circuit is higher than the<br />
total fuse value of all the connected devices.<br />
••<br />
Never connect speaker wires to the <strong>me</strong>tal body or chassis<br />
of the car.<br />
••<br />
Never connect speaker wires with stripes to one another.<br />
6 EN
Connect wires<br />
Note<br />
••<br />
Consult a professional to connect the unit as instructed<br />
below.<br />
2 Connect the antenna and amplifier as<br />
illustrated, if applicable.<br />
English<br />
1 Check the car's wiring carefully and<br />
connect them to the the male connector.<br />
ISO male Connect to<br />
connectors<br />
a Green strip, blackedged<br />
Left speaker (Rear)<br />
green strip<br />
b White strip, blackedged<br />
Left speaker (Front)<br />
white strip<br />
c Gray strip, blackedged<br />
Right speaker (Front)<br />
gray strip<br />
d Purple strip, blackedged<br />
Right speaker (Rear)<br />
purple strip<br />
e Red Ignition key +12V<br />
DC when ON/ACC<br />
f Blue Motor/electric<br />
antenna relay control<br />
lead<br />
g White edged blue Amplifier relay<br />
strip<br />
control lead<br />
h Black Ground<br />
i Yellow To the +12V car<br />
battery which is<br />
energized at all ti<strong>me</strong>s<br />
Connector<br />
Connect to<br />
1 ANTENNA Antenna<br />
2 Socket for ISO male<br />
connectors<br />
As indicated in<br />
Step 1 above<br />
3 REAR LINE OUT R Rear right speaker<br />
(Socket)<br />
4 REAR LINE OUT L Rear left speaker<br />
(Socket)<br />
5 OE REMOTE OE Remote<br />
(Purple)<br />
6 OE REMOTE<br />
(Black strip)<br />
Ground<br />
Tip<br />
• • The pin arrange<strong>me</strong>nt for the ISO connectors depends<br />
on the type of vehicle you drive. Be sure to make<br />
proper connections to prevent damage to the unit.<br />
EN<br />
7
Mount into the dashboard<br />
1 If the car does not have an on-board drive<br />
or navigation computer, disconnect the<br />
negative terminal of the car battery.<br />
• If you disconnect the car battery in<br />
a car that has an on-board drive or<br />
navigation computer, the computer<br />
may lose its <strong>me</strong>mory.<br />
• If the car battery is not disconnected,<br />
to avoid short-circuit, ensure that the<br />
bare wires do not touch each other.<br />
2 Ensure that car dashboard opening is<br />
within these <strong>me</strong>asure<strong>me</strong>nts:<br />
Note<br />
••<br />
If the unit is not fixed by sleeve but by the supplied<br />
screws, skip this step.<br />
183 mm<br />
53.5 mm<br />
5mm<br />
5 Place the supplied rubber cushion over the<br />
end of the mounting bolt.<br />
183 mm<br />
53mm<br />
3 Remove the mounting sleeve with the<br />
supplied disassembly tools.<br />
4 Install the sleeve into the dashboard and<br />
bend the tabs outward to fix the sleeve.<br />
8 EN
6 Slide the unit into the dashboard until you<br />
hear a click sound.<br />
2 Press the left end of the front panel<br />
inwards until it is securely locked with a<br />
"click".<br />
English<br />
Detach the front panel<br />
7 Reconnect the negative terminal of the car<br />
battery.<br />
Attach the front panel<br />
1 Insert the notch on the front panel to the<br />
chassis on the main unit.<br />
Note<br />
••<br />
Before you detach the front panel, make sure that the<br />
system is turned off.<br />
1 Press to release the front panel.<br />
2 Pull the front panel outwards to remove it.<br />
EN<br />
9
4 Get started<br />
For the first ti<strong>me</strong> use<br />
Note<br />
••<br />
Select correct country/region for this unit, otherwise<br />
the unit can not work properly.<br />
1 Press to turn the unit on.<br />
»»<br />
is<br />
displayed.<br />
2 Rotate to select an option:<br />
• (United States)<br />
• (Latin A<strong>me</strong>rica)<br />
• (Western Europe)<br />
• (Russia)<br />
• (Middle East)<br />
• (Pacific)<br />
• (Japan)<br />
• (Australia)<br />
3 Press to confirm.<br />
Set the ti<strong>me</strong> format<br />
1 Press and hold .<br />
2 Press or repeatedly until<br />
is displayed.<br />
3 Rotate to select a setting.<br />
• : 12-hour ti<strong>me</strong> format<br />
• : 24-hour ti<strong>me</strong> format<br />
Set the clock<br />
1 Press and hold .<br />
2 Press or repeatedly until<br />
is displayed.<br />
3 Rotate to set the hour.<br />
4 Press to confirm.<br />
5 Rotate to set the minute.<br />
6 Press to confirm.<br />
Display the clock<br />
In any mode, press and hold until the clock is<br />
displayed.<br />
• Press any key to cancel the clock display.<br />
Turn on<br />
• To turn on the unit, press .<br />
• To turn off the unit, press and hold<br />
until the unit is turned off.<br />
Switch music listening zone<br />
<strong>Philips</strong>’ innovative Zone technology enables<br />
driver or passengers to enjoy music with the<br />
best speakers balance and experience more<br />
vivid spacial effect as the artist is intended to<br />
create. You can switch the music listening zone<br />
from driver to passengers for the best speaker<br />
sound settings in car.<br />
1 Press and hold .<br />
»»<br />
The current setting is displayed.<br />
2 Press / to select a setting.<br />
•<br />
• (Front)<br />
• (Right)<br />
• (Left)<br />
Mute the button beep<br />
Each ti<strong>me</strong> you press a button, the unit beeps.<br />
You can turn this beep sound on or off.<br />
1 Press and hold .<br />
2 Press or repeatedly until<br />
is displayed.<br />
3 Rotate to select a setting:<br />
• turn the beep sound on.<br />
• : turn the beep sound off.<br />
10 EN
5 Listen to radio<br />
Tune to a radio station<br />
1 Press SOURCE repeatedly to select radio<br />
mode.<br />
2 Press / repeatedly to select a band:<br />
], or<br />
3 Press and hold or until the<br />
frequency digit is flashed.<br />
4 Press or to tune to a radio station<br />
manually.<br />
»»<br />
The radio station is broadcast.<br />
• To search for a radio station automatically,<br />
press or .<br />
Select tuner region<br />
You can select suitable country/region of the<br />
radio.<br />
1 Press and hold .<br />
2 Press or repeatedly until ] is<br />
displayed..<br />
3 Rotate to select a region.<br />
• (United States)<br />
• (Latin A<strong>me</strong>rica)<br />
• (Western Europe)<br />
• (Russia)<br />
• (Middle East)<br />
• (Asia Pacific)<br />
• (Japan)<br />
• (Australia)<br />
4 Press to confirm.<br />
3 Rotate to select a setting.<br />
• (local on): only stations<br />
with strong signal can be broadcast.<br />
• (local off): stations<br />
with strong and weak signals can be<br />
broadcast.<br />
Store radio stations in<br />
<strong>me</strong>mory<br />
You can store up to 6 stations in each band.<br />
Store stations automatically<br />
• In Radio mode, press and hold until<br />
is displayed.<br />
»»<br />
The six strongest stations of the<br />
selected band are saved in preset<br />
channel automatically.<br />
Store stations manually<br />
1 Tune to a station that you want to store.<br />
2 Press a nu<strong>me</strong>ric button for 3 seconds.<br />
»»<br />
The station is saved in the selected<br />
channel.<br />
Tune to a preset station<br />
• Press a nu<strong>me</strong>ric key to select a preset<br />
station.<br />
Play with RDS<br />
English<br />
Select tuner sensitivity<br />
To receive more radio stations or only stations<br />
with strong signal, you can adjust the tuner<br />
sensitivity.<br />
1 Press and hold .<br />
2 Press or repeatedly until is<br />
displayed.<br />
The RDS (Radio Data System) function<br />
operates only in areas with FM stations<br />
broadcasting RDS signals. If you tune to an RDS<br />
station, the station na<strong>me</strong> are displayed.<br />
EN<br />
11
Turn on RDS<br />
Note<br />
••<br />
The default setting for RDS is on.<br />
1 Press and hold .<br />
2 Press or repeatedly until is<br />
displayed.<br />
3 Rotate to select .<br />
»»<br />
The RDS function is turned on.<br />
Select program type<br />
Before tuning to RDS stations, you can select<br />
program type and let the unit search only for<br />
programs of the selected category.<br />
1 Press and hold ..<br />
2 Press or repeatedly until is<br />
displayed.<br />
3 Press to confirm.<br />
4 Rotate to select a type, then press<br />
to confirm.<br />
Item Program type Description<br />
1 NEWS News services<br />
2 AFFAIRS Politics and current<br />
affairs<br />
3 INFO Special information<br />
programs<br />
4 SPORT Sports<br />
5 EDUCATE Education and advanced<br />
training<br />
6 DRAMA Radio plays and<br />
literature<br />
7 CULTURE Culture, religion and<br />
society<br />
8 SCIENCE Science<br />
9 VARIED Entertain<strong>me</strong>nt programs<br />
10 POP M Pop music<br />
11 ROCK M Rock music<br />
12 EASY M Light music<br />
13 LIGHT M Light classical music<br />
Item Program type Description<br />
14 CLASSICS Classical music<br />
15 OTHER M Special music programs<br />
16 WEATHER Weather<br />
17 FINANCE Finance<br />
18 CHILDREN Children’s programs<br />
19 SOCIAL Social Affairs<br />
20 RELIGION Religion<br />
21 PHONE IN Phone In<br />
22 TRAVEL Travel<br />
23 LEISURE Leisure<br />
24 JAZZ Jazz Music<br />
25 COUNTRY Country Music<br />
26 NATION M National Music<br />
27 OLDIES Oldies Music<br />
28 FOLK M Folk Music<br />
29 DOCUMENT Docu<strong>me</strong>ntary<br />
30 TEST Alarm Test<br />
31 ALARM Alarm<br />
Select alternate frequencies<br />
If the radio signal is poor, turn on AF (Alternate<br />
Frequency) to search for another station with<br />
stronger signal.<br />
1 Press and hold .<br />
2 Press or repeatedly until is<br />
displayed.<br />
3 Rotate to select a setting.<br />
• : turn AF mode on.<br />
• : turn AF mode off.<br />
Set region for AF tuning<br />
You can define AF tuning region:<br />
Only stations in current region<br />
can be tuned to automatically.<br />
All stations can be tuned to<br />
automatically.<br />
1 Press and hold .<br />
2 Press or repeatedly until is<br />
displayed.<br />
3 Rotate to select a setting.<br />
12 EN
Receive traffic announce<strong>me</strong>nt<br />
If you do not want to miss traffic<br />
announce<strong>me</strong>nt when enjoying music, turn on<br />
the TA (Traffic Announce<strong>me</strong>nt) function.<br />
1 Press and hold .<br />
2 Press or repeatedly until is<br />
displayed.<br />
3 Rotate to select a setting.<br />
• : when there is traffic<br />
announce<strong>me</strong>nt, the unit switches to<br />
the tuner mode (regardless of the<br />
current mode) and begins to broadcast<br />
the traffic conditions. When the traffic<br />
announce<strong>me</strong>nt is over, it returns to the<br />
previous mode.<br />
• : traffic announce<strong>me</strong>nt does<br />
not cut in.<br />
Note<br />
••<br />
If the current received TA signal remains weak for<br />
over 120 seconds, the unit will activate TA Seek mode<br />
automatically. The TA Seek will seek for other station<br />
with good condition of TA signal.<br />
Tip<br />
••<br />
When a traffic announce<strong>me</strong>nt cuts in, user can press<br />
to terminate the traffic announce<strong>me</strong>nt, and the unit will<br />
resu<strong>me</strong> to previous playback mode.<br />
6 Play from hard<br />
<strong>me</strong>dia<br />
You can use this system to listen to <strong>audio</strong>s that<br />
are stored on a compatible disc or USB storage<br />
device.<br />
Play a disc<br />
Note<br />
••<br />
You cannot play a CD encoded with copyright<br />
protection technologies.<br />
••<br />
Ensure that the disc contains playable content.<br />
Insert a CD with the printed side facing up.<br />
»»<br />
Play starts automatically.<br />
• To pause CD play, press .<br />
• To resu<strong>me</strong> CD play, press again.<br />
• To skip to the previous/next track, press<br />
or .<br />
• To search backward/forward rapidly within<br />
the current track, press and hold or<br />
.<br />
• To eject the CD, press on the front panel.<br />
English<br />
Set RDS clock<br />
You can use ti<strong>me</strong> signal that is broadcast<br />
together with the RDS signal to set the clock of<br />
the unit automatically.<br />
1 Press and hold .<br />
2 Press or repeatedly until is<br />
displayed.<br />
3 Rotate to select a setting:<br />
• Turn on the RDS clock. Ti<strong>me</strong><br />
shown on the unit synchronizes with<br />
that on the RDS station.<br />
• Turn off the RDS clock.<br />
Tip<br />
••<br />
The accuracy of the transmitted ti<strong>me</strong> depends on the<br />
RDS station that transmits the ti<strong>me</strong> signal.<br />
Tip<br />
••<br />
If the disc is blocked in the disc compart<strong>me</strong>nt, press and<br />
hold until the disc co<strong>me</strong>s out.<br />
Play from a USB storage device<br />
This system can play .mp3 and .wma files that<br />
are copied onto a compatible storage device.<br />
Note<br />
••<br />
Gibson Innovations does not guarantee compatibility<br />
with all storage devices.<br />
••<br />
NTFS (New Technology File System) file system is not<br />
supported.<br />
EN<br />
13
1 Connect a compatible USB storage device.<br />
2 Press AS/SOURCE repeatedly to switch<br />
the source to [USB].<br />
3 If the play does not start, press .<br />
Control play<br />
Button Function<br />
/ Press repeatedly to select a folder.<br />
Start, pause or resu<strong>me</strong> play.<br />
/ Press to play the previous or next<br />
track.<br />
/ Press and hold to rewind a track<br />
or search forward fast.<br />
Press repeatedly to display<br />
available information about the<br />
current track.<br />
Press repeatedly to select a repeat<br />
mode:<br />
• (repeat one track):<br />
play current track repeatedly.<br />
• ] (repeat a folder): play<br />
all tracks in the current folder<br />
repeatedly.<br />
• (repeat all tracks):<br />
play all tracks repeatedly.<br />
Press repeatedly to select a play<br />
mode:<br />
• start random<br />
play for all tracks in the current<br />
folder.<br />
• start random play<br />
for all tracks.<br />
• cancel shuffle play.<br />
Switch tracks<br />
During play, you can switch tracks or folders<br />
quickly.<br />
Switch tracks directly<br />
1 Press to access the track list.<br />
»»<br />
The file na<strong>me</strong> of current track scrolls.<br />
2 Rotate to toggle through tracks.<br />
3 Press to play the selected track.<br />
Switch folders for a track<br />
1 Press to access the folder list.<br />
»»<br />
The na<strong>me</strong> of current folder scrolls.<br />
2 Rotate to toggle through folders.<br />
3 Press to select the folder.<br />
»»<br />
The system starts playing the first track<br />
under the folder.<br />
14 EN
7 Listen to an<br />
external player<br />
8 Charge your<br />
USB device<br />
English<br />
You can use the system to amplify the <strong>audio</strong><br />
input from an external player, for example, MP3<br />
player.<br />
You can charge your USB device, for example,<br />
smart phone, with this product.<br />
Note<br />
••<br />
The output voltage through the USB socket is 5 V with<br />
output current 1.0 A.<br />
Connect your USB device to this product with<br />
USB cable. Once the USB device is connected<br />
and recognized, it begins to charge automatically.<br />
1 Press repeatedly to switch<br />
the source to<br />
2 Connect an <strong>audio</strong> input cable with a 3.5<br />
mm connector on both ends between<br />
• the socket on the front<br />
panel, and<br />
• the <strong>audio</strong> output socket (usually the<br />
headphone socket) on the external<br />
player.<br />
3 Play <strong>audio</strong> on the external player.<br />
EN<br />
15
9 Adjust sound<br />
The following operations are applicable to all<br />
supported <strong>me</strong>dia.<br />
Button<br />
Function<br />
Rotate to increase or decrease the<br />
volu<strong>me</strong> level.<br />
Press to mute or restore sound.<br />
Press to enable or disable the<br />
feature.<br />
Press to enable or disable the<br />
Dynamic Bass Boost (DBB) effect.<br />
Press to select a preset sound<br />
equalizer.<br />
• (optimal)<br />
• (flat)<br />
• (pop)<br />
• (user)<br />
• (techno)<br />
• (rock)<br />
• (classic)<br />
• (jazz)<br />
1 Press and hold to activate the<br />
setup of customized sound equalizer.<br />
2 Press or repeatedly to select<br />
the item to be adjusted:<br />
• (bass) range: -7 to +7.<br />
• (treble) range: -7<br />
to +7.<br />
• (balance) range: 12L<br />
to 12R. (L = left speaker, R =<br />
right speaker)<br />
• (fader) range: 12R<br />
to 12F. (R = rear speaker, F =<br />
front speaker)<br />
3 Rotate to select a value.<br />
10 Adjust system<br />
settings<br />
1 Press to access system settings.<br />
2 Press or repeatedly until one of the<br />
following settings scrolls.<br />
• , , ,<br />
, or<br />
3 Rotate to change the setting.<br />
[BEEP ON] Enable the beep<br />
sound of buttons.<br />
[BEEP OFF] Disable the beep<br />
sound of buttons.<br />
[DIMMER Increase the<br />
HIGH] brightness level of<br />
the screen.<br />
[DIMMER Decrease the<br />
LOW] brightness level of<br />
the screen.<br />
[DEMO ON] Demonstrate<br />
all features after<br />
the system stays<br />
inactive for 2<br />
minutes.<br />
[DEMO OFF] Disable the demo<br />
mode.<br />
[BKO 10 S] Turn off the screen<br />
automatically 10<br />
seconds after last<br />
operation.<br />
[BKO 20 S] Turn off the screen<br />
automatically 20<br />
seconds after last<br />
operation.<br />
[BKO OFF] Never turn off the<br />
screen.<br />
16 EN
[DANCE<br />
ON]<br />
[DANCE<br />
OFF]<br />
Enable the<br />
spectrum on the<br />
LCD display.<br />
Disable the<br />
spectrum on the<br />
LCD display.<br />
11 Others<br />
Reset<br />
You can reset the unit to its default setting.<br />
1 Detach the front panel.<br />
2 Press the reset button by using a ball-point<br />
pen or a similar tool.<br />
»»<br />
Preset adjust<strong>me</strong>nts such as preset<br />
channels and sound adjust<strong>me</strong>nts are<br />
erased.<br />
English<br />
Replace fuse<br />
If there is no power, check the fuse and replace<br />
if it is damaged.<br />
1 Check the electric connection.<br />
2 Remove the damaged fuse from the rear<br />
panel.<br />
3 Insert a new fuse with the sa<strong>me</strong><br />
specification (15 A).<br />
EN<br />
17
12 Product<br />
information<br />
Note<br />
••<br />
Product information is subject to change without prior<br />
notice.<br />
General<br />
Note<br />
••<br />
If the new fuse gets damaged again, there may be an<br />
internal malfunction. Consult your local retailer.<br />
Power supply 12 V DC (11 V - 16 V),<br />
negative ground<br />
Fuse<br />
15 A<br />
Suitable speaker 4 - 8<br />
impedance<br />
Maximum power 50 W x 4 channels<br />
output<br />
Continuous 22 W x 4 RMS (4 10%<br />
power output T.H.D.)<br />
Pre-Amp output 2.5 V<br />
voltage<br />
Aux-in level 500 mV<br />
Di<strong>me</strong>nsions 181.5 x 52 x 191.4 mm<br />
(W x H x D)<br />
Weight<br />
1.47 kg<br />
Radio<br />
Frequency range<br />
- FM<br />
Frequency range<br />
- AM(MW)<br />
Usable sensitivity<br />
- FM<br />
Usable sensitivity<br />
- AM(MW) (S/N<br />
= 20 dB)<br />
87.5 - 108.0 MHz (100kHz<br />
per step in auto search and<br />
50kHz per step in manual<br />
search)<br />
522 - 1620 KHz (9 kHz)<br />
530 - 1710 kHz (10 kHz)<br />
8 µV<br />
30 µV<br />
18 EN
13 Troubleshooting<br />
Warning<br />
••<br />
Never remove the casing of this product.<br />
To keep the warranty valid, never try to repair<br />
the product yourself.<br />
If you encounter problems when using this<br />
device, check the following points before<br />
requesting service. If the problem remains<br />
unsolved, go to the <strong>Philips</strong> Web page<br />
(www.philips.com/support). When you contact<br />
the Consu<strong>me</strong>r Care, make sure that the<br />
product is nearby and the model number and<br />
serial number are available.<br />
No power or no sound.<br />
••<br />
Car engine is not on. Turn the car engine<br />
on.<br />
••<br />
Cable is not correctly connected. Check<br />
connections.<br />
••<br />
Fuse is burnt. Replace fuse.<br />
••<br />
Volu<strong>me</strong> is too low. Adjust volu<strong>me</strong>.<br />
••<br />
If the above solutions cannot help, press<br />
button.<br />
••<br />
Ensure that the track played is of a<br />
compatible format.<br />
Noise in broadcasts.<br />
••<br />
Signals are too weak. Select other stations<br />
with stronger signals.<br />
••<br />
Check the connection of the car antenna.<br />
••<br />
Change broadcast from Stereo to mono.<br />
Cannot play disc<br />
••<br />
Ensure that the disc label is inserted with<br />
the printed side facing up.<br />
••<br />
Wipe the disc with fibre cleaning cloth<br />
from the centre to the edge in a straight<br />
line.<br />
••<br />
This disc may be defective. Play another<br />
disc.<br />
••<br />
Ensure that the CD is a finalised CD/<br />
CD-R/CD-RW.<br />
••<br />
Ensure that the CD is not encoded with<br />
copyright protection technologies.<br />
The CD skips tracks<br />
••<br />
Ensure that the CD is not damaged or<br />
dirty.<br />
••<br />
Ensure that random mode is deactivated.<br />
Disc cannot be ejected<br />
••<br />
Press and hold .<br />
Preset stations lost.<br />
••<br />
Battery cable is not correctly connected.<br />
Connect the battery cable to the terminal<br />
that is always live.<br />
Display show<br />
••<br />
USB data error. Check the USB device.<br />
English<br />
EN<br />
19
14 Notice<br />
Any changes or modifications made to this<br />
device that are not expressly approved by<br />
Gibson Innovations may void the user’s<br />
authority to operate the equip<strong>me</strong>nt.<br />
Compliance<br />
This apparatus includes this label:<br />
Environ<strong>me</strong>ntal information<br />
All unnecessary packaging has been omitted.<br />
We have tried to make the packaging easy to<br />
separate into three materials: cardboard (box),<br />
polystyrene foam (buffer) and polyethylene<br />
(bags, protective foam sheet.)<br />
Your system consists of materials which can<br />
be recycled and reused if disassembled by<br />
a specialized company. Please observe the<br />
local regulations regarding the disposal of<br />
packaging materials, exhausted batteries and old<br />
equip<strong>me</strong>nt.<br />
Trademark notice<br />
Care of the environ<strong>me</strong>nt<br />
Disposal of your old product<br />
Windows Media and the Windows logo<br />
are trademarks, or registered trademarks of<br />
Microsoft Corporation in the United States<br />
and/or other countries.<br />
Other trademarks and trade na<strong>me</strong>s are those<br />
of their respective owners.<br />
Your product is designed and manufactured<br />
with high quality materials and components,<br />
which can be recycled and reused.<br />
This symbol on a product <strong>me</strong>ans that the<br />
product is covered by European Directive<br />
2012/19/EU. Inform yourself about the local<br />
separate collection system for electrical and<br />
electronic products. Follow local rules and never<br />
dispose of the product with normal household<br />
waste. Correct disposal of old products<br />
helps prevent negative consequences for the<br />
environ<strong>me</strong>nt and human health.<br />
Copyright<br />
2016 © Gibson Innovations Limited. All rights<br />
reserved.<br />
<strong>Philips</strong> and the <strong>Philips</strong> Shield Emblem are<br />
registered trademarks of Koninklijke <strong>Philips</strong> N.V.<br />
and are used under license.<br />
Specifications are subject to change without<br />
notice. Gibson Innovations reserves the right<br />
to change products at any ti<strong>me</strong> without being<br />
obliged to adjust earlier supplies accordingly.<br />
20 EN
2016 © Gibson Innovations Limited. All rights reserved.<br />
<strong>Philips</strong> and the <strong>Philips</strong> Shield Emblem are registered trademarks of Koninklijke <strong>Philips</strong> N.V. and are used<br />
under license<br />
CEM2200_12_UM_V3.0


